jquery中confirm的用法
jquery confirm的用法

jQuery Confirm 是一个基于 jQuery 的插件,它提供了一种简单而有效的方式来创建和显示确认对话框。
下面是 jQuery Confirm 的基本用法:1. 引入 jQuery 和 jQuery Confirm 插件的 JavaScript 文件:html复制代码<script src="jquery.js"></script><script src="jquery.confirm.js"></script>2. 在需要使用确认对话框的地方,调用 confirm() 方法,传入提示消息和确认按钮的文本:javascript复制代码if (!confirm('确定要删除该文件吗?')) {return false;}3. 可以使用一些可选参数来自定义确认对话框的样式和行为:javascript复制代码$.confirm({title: '提示', // 标题message: '确定要删除该文件吗?', // 提示消息buttons: {确定: {text: '确定', // 按钮文本key: 'enter', // 按下回车键触发确认按钮点击事件className: 'btn-primary', // 按钮样式类名callback: function () {// 点击确定按钮后的回调函数// 执行删除文件的操作}},取消: {text: '取消', // 按钮文本key: 'esc', // 按下Esc键触发取消按钮点击事件className: 'btn-default'// 按钮样式类名}}});以上是 jQuery Confirm 的基本用法,可以结合自己的需求进行定制化使用。
js中confirm揭示三个按钮“是”“否”“取消”

js中confirm揭⽰三个按钮“是”“否”“取消”js中confirm提⽰三个按钮“是”“否”“取消” 重载DOM中confirm window.confirm = function(str) { str=str.replace(/\'/g, "'&chr(39)&'").replace(/\r\n|\n|\r/g, "'&VBCrLf&'"); execScript("n = msgbox('"+ str +"', 3, '提⽰')", "vbscript"); return(n); } // 调⽤ function send(){ var v = confirm("提⽰?\u000d 是(Y):是\u000d 否(N):否"); if (v=='6') { alert('是'); } else if(v=='7') { alert('否'); } else { alert('取消'); }}--------------<script language=vbscript>function go()go=msgbox ("haha",3)end function</script><script language=javascript>var a=go()if(a==6){alert("您按的是‘是’")}if(a==7){alert("您按的是‘否’")}if(a==2){alert("您按的是‘取消’")}</script>-------------我们之所以弹出这个对话框,可能就是因为该操作很危险,所以要⽤户确认。
jquery仿alert提示框、confirm确认对话框、prompt带输入的提示框插件[。。。
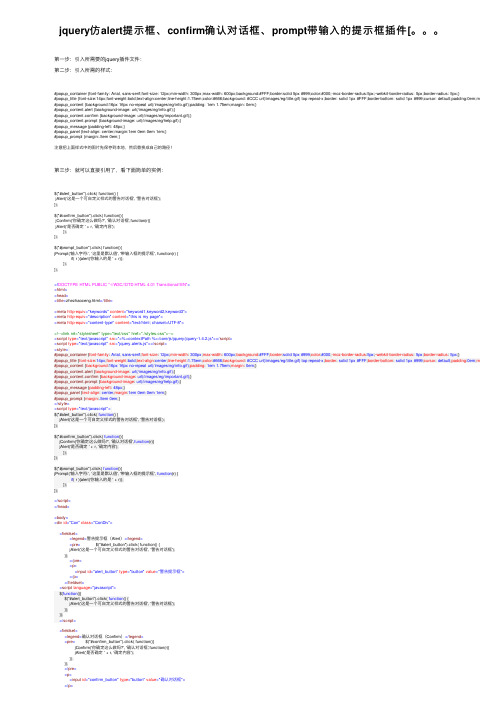
jquery仿alert提⽰框、confirm确认对话框、prompt带输⼊的提⽰框插件[。
第⼀步:引⼊所需要的jquery插件⽂件:第⼆步:引⼊所需的样式:#popup_container {font-family: Arial, sans-serif;font-size: 12px;min-width: 300px;max-width: 600px;background:#FFF;border:solid 5px #999;color:#000;-moz-border-radius:5px;-webkit-border-radius: 5px;border-radius: 5px;}#popup_title {font-size:14px;font-weight:bold;text-align:center;line-height:1.75em;color:#666;background: #CCC url(/images/eg/title.gif) top repeat-x;border: solid 1px #FFF;border-bottom: solid 1px #999;cursor: default;padding:0em;margin:0em aut #popup_content {background:16px 16px no-repeat url(/images/eg/info.gif);padding: 1em 1.75em;margin: 0em;}#popup_content.alert {background-image: url(/images/eg/info.gif);}#popup_content.confirm {background-image: url(/images/eg/important.gif);}#popup_content.prompt {background-image: url(/images/eg/help.gif);}#popup_message {padding-left: 48px;}#popup_panel {text-align: center;margin:1em 0em 0em 1em;}#popup_prompt {margin:.5em 0em;}注意把上⾯样式中的图⽚先保存到本地,然后替换成⾃⼰的路径!第三步:就可以直接引⽤了,看下⾯简单的实例:$("#alert_button").click( function() {jAlert('这是⼀个可⾃定义样式的警告对话框', '警告对话框');});$("#confirm_button").click( function(){jConfirm('你确定这么做吗?', '确认对话框',function(r){jAlert('是否确定 ' + r, '确定内容');});});$("#prompt_button").click( function(){jPrompt('输⼊字符:', '这⾥是默认值', '带输⼊框的提⽰框', function(r) {if( r ){alert('你输⼊的是 ' + r)};});});<!DOCTYPE HTML PUBLIC "-//W3C//DTD HTML 4.01 Transitional//EN"><html><head><title>zhezhaoceng.html</title><meta http-equiv="keywords" content="keyword1,keyword2,keyword3"><meta http-equiv="description" content="this is my page"><meta http-equiv="content-type" content="text/html; charset=UTF-8"><!--<link rel="stylesheet" type="text/css" href="./styles.css">--><script type="text/javascript" src="<%=contextPath %>/core/js/jquery/jquery-1.4.2.js"></script><script type="text/javascript" src="jquery.alerts.js"></script><style>#popup_container {font-family: Arial, sans-serif;font-size: 12px;min-width: 300px;max-width: 600px;background:#FFF;border:solid 5px #999;color:#000;-moz-border-radius:5px;-webkit-border-radius: 5px;border-radius: 5px;}#popup_title {font-size:14px;font-weight:bold;text-align:center;line-height:1.75em;color:#666;background: #CCC url(/images/eg/title.gif) top repeat-x;border: solid 1px #FFF;border-bottom: solid 1px #999;cursor: default;padding:0em;margin#popup_content {background:16px 16px no-repeat url(/images/eg/info.gif);padding: 1em 1.75em;margin: 0em;}#popup_content.alert {background-image: url(/images/eg/info.gif);}#popup_content.confirm {background-image: url(/images/eg/important.gif);}#popup_content.prompt {background-image: url(/images/eg/help.gif);}#popup_message {padding-left: 48px;}#popup_panel {text-align: center;margin:1em 0em 0em 1em;}#popup_prompt {margin:.5em 0em;}</style><script type="text/javascript">$("#alert_button").click( function() {jAlert('这是⼀个可⾃定义样式的警告对话框', '警告对话框');});$("#confirm_button").click( function(){jConfirm('你确定这么做吗?', '确认对话框',function(r){jAlert('是否确定 ' + r, '确定内容');});});$("#prompt_button").click( function(){jPrompt('输⼊字符:', '这⾥是默认值', '带输⼊框的提⽰框', function(r) {if( r ){alert('你输⼊的是 ' + r)};});});</script></head><body><div id="Con" class="ConDiv"><fieldset><legend>警告提⽰框(Alert)</legend><pre> $("#alert_button").click( function() {jAlert('这是⼀个可⾃定义样式的警告对话框', '警告对话框');});</pre><p><input id="alert_button" type="button" value="警告提⽰框"></p></fieldset><script language="javascript">$(function(){$("#alert_button").click( function() {jAlert('这是⼀个可⾃定义样式的警告对话框', '警告对话框');});});</script><fieldset><legend>确认对话框(Confirm)</legend><pre> $("#confirm_button").click( function(){jConfirm('你确定这么做吗?', '确认对话框',function(r){jAlert('是否确定 ' + r, '确定内容');});});</pre><p><input id="confirm_button" type="button" value="确认对话框"></p></fieldset><script language="javascript">$(function(){$("#confirm_button").click( function(){jConfirm('你确定这么做吗?', '确认对话框',function(r){jAlert('是否确定 ' + r, '确定内容');});});});</script><fieldset><legend>带输⼊的提⽰框(Prompt)</legend><pre> jPrompt('输⼊字符:', '这⾥是默认值', '带输⼊框的提⽰框', function(r) {if( r ) alert('你输⼊的是 ' + r);});</pre><p><input id="prompt_button" type="button" value="带输⼊框的提⽰框"></p></fieldset><script language="javascript">$(function(){$("#prompt_button").click( function(){jPrompt('输⼊字符:', '这⾥是默认值', '带输⼊框的提⽰框', function(r) {if( r ){alert('你输⼊的是 ' + r)};});});});</script><fieldset><legend>带HTML输出效果的对话框</legend><pre> jAlert('你可以使⽤HTML标签,⽐如<strong>加粗</strong>, <em>斜体</em>,和<u>下划线</u>!');</pre><p><input id="alert_button_with_html" type="button" value="显⽰带有HTML标签效果的弹出框"></p></fieldset><script language="javascript">$(function(){$("#alert_button_with_html").click( function(){jAlert('你可以使⽤HTML标签,⽐如 <strong>加粗</strong>, <em>斜体</em>,和 <u>下划线</u>!');});});</script></div></body></html>。
react antd 对话框中的confirm用法
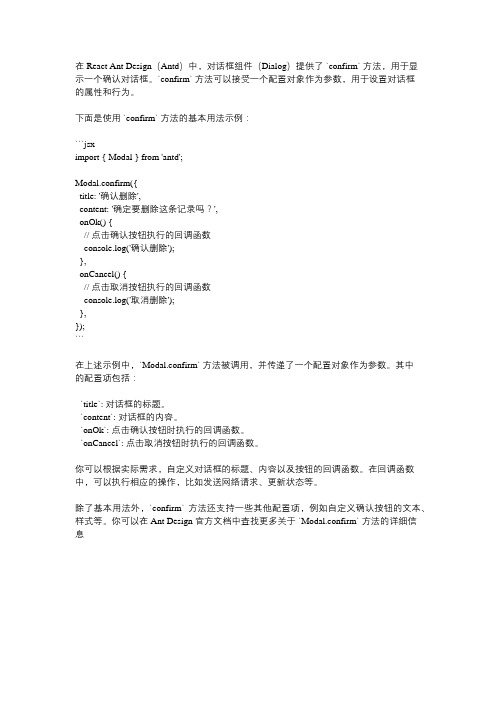
在 React Ant Design(Antd)中,对话框组件(Dialog)提供了 `confirm` 方法,用于显示一个确认对话框。
`confirm` 方法可以接受一个配置对象作为参数,用于设置对话框的属性和行为。
下面是使用 `confirm` 方法的基本用法示例:```jsximport { Modal } from 'antd';Modal.confirm({title: '确认删除',content: '确定要删除这条记录吗?',onOk() {// 点击确认按钮执行的回调函数console.log('确认删除');},onCancel() {// 点击取消按钮执行的回调函数console.log('取消删除');},});```在上述示例中,`Modal.confirm` 方法被调用,并传递了一个配置对象作为参数。
其中的配置项包括:- `title`: 对话框的标题。
- `content`: 对话框的内容。
- `onOk`: 点击确认按钮时执行的回调函数。
- `onCancel`: 点击取消按钮时执行的回调函数。
你可以根据实际需求,自定义对话框的标题、内容以及按钮的回调函数。
在回调函数中,可以执行相应的操作,比如发送网络请求、更新状态等。
除了基本用法外,`confirm` 方法还支持一些其他配置项,例如自定义确认按钮的文本、样式等。
你可以在 Ant Design 官方文档中查找更多关于 `Modal.confirm` 方法的详细信息。
jquery表单验证大全

JQuery笔记(表单验证大全)jquery.validate.js 是 jquery 旗下的一个验证插件,借助 jquery 的优势,我们可以迅速验证一些常见的输入 , 并且可以自己扩充自己的验证方法。
举个例子,有这么一个表单:view plaincopy to clipboardprint?<form id="signupForm" method="get" action=""><fieldset><legend>Validating a complete form</legend><p><label for="firstname">Firstname</label><input id="firstname" name="firstname" class="required"/></p><p><label for="lastname">Lastname</label><input id="lastname" name="lastname" /></p><p><label for="username">Username</label><input id="username" name="username" /></p><p><label for="password">Password</label><input id="password" name="password" type="password" /></p><p><label for="confirm_password">Confirm password</label><input id="confirm_password" name="confirm_password" type="password" /></p><p><label for="email">Email</label><input id="email" name="email" /></p><p><input class="submit" type="submit" value="Submit"/></p></fieldset></form><form id="signupForm" method="get" action=""><fieldset><legend>Validating a complete form</legend><p><label for="firstname">Firstname</label><input id="firstname" name="firstname" class="required"/></p><p><label for="lastname">Lastname</label><input id="lastname" name="lastname" /></p><p><label for="username">Username</label><input id="username" name="username" /></p><p><label for="password">Password</label><input id="password" name="password" type="password" /></p><p><label for="confirm_password">Confirm password</label><input id="confirm_password" name="confirm_password" type="password" /></p><p><label for="email">Email</label><input id="email" name="email" /></p><p><input class="submit" type="submit" value="Submit"/></p></fieldset></form>在这个表单中,有名、姓、用户名、密码、确认密码和 email 。
如何使用Bootstrap的modal组件自定义alert,confirm和modal对话框

如何使⽤Bootstrap的modal组件⾃定义alert,confirm和modal对话框本⽂我将为⼤家介绍Bootstrap中的弹出窗⼝组件Modal,此组件简单易⽤,效果⼤⽓漂亮且很实⽤!由于浏览器提供的alert和confirm框体验不好,⽽且浏览器没有提供⼀个标准的以对话框的形式显⽰⾃定义HTML的弹框函数,所以很多项⽬都会⾃定义对话框组件。
本篇⽂章介绍⾃⼰在项⽬中基于bootstrap的modal组件,⾃定义alert,confirm和modal对话框的经验,相对⽐较简单实⽤,希望能对你有所参考价值。
1. 实例展⽰详细的代码可通过前⾯给出的下载链接下载源码去了解,代码量不⼤,这三个组件加起来只有200多⾏如果你有javascript的组件开发经验,我这个层级的代码相信你⼀下⼦就能看明⽩。
源码中我还给出了⼀个demo,这个demo模拟了⼀个⽐较贴近现实需求的⼀个场景:1)⽤户点击界⾯上的某个按钮,打开之前定义的⼀个modal框:2)⽤户在打开的modal框内填写⼀些表单,点击确定的时候,会触发⼀些校验:没填email时:填写了email之后:这两个提⽰其实是为了演⽰Alert和Confirm的效果硬塞进去的,实际上可能没有这么别扭的功能。
3)在提⽰Password为空的时候,细⼼的⼈会发现那个确定按钮处于⼀个禁⽤的状态,这个考虑是因为确定按钮最终要完成的是⼀些异步任务,在异步任务成功完成之前,我希望modal组件都不要关闭,并且能够控制已点击的按钮不能重复点击;4)我⽤setTimeout模拟了⼀个异步任务,这个异步任务在点击确定按钮之后,3s才会回调,并且:当email输⼊admin@admin的时候,会给出提交成功的提⽰,确定之后就会关闭所有的弹框:当email输⼊其它值得时候,会给出提交失败的提⽰,并且modal框会依然显⽰在那⾥:在组件定义⾥⾯,尤其是注册按钮这⼀块,我加了⼀些AOP编程的处理,同时利⽤了jquery的延迟对象,来实现我需要的异步编程,详情请阅读源码,有问题可以在评论区交流赐教。
jquery-easy-ui解析

$("#myDiv").panel({ title: "js方式的panel", width: 300, height: 500, fit: true, border: true, content: "设置面板内", )}
<div style="width:300px;height:500px" class="easyui-panel" title="第一个面板" iconCls="icon-save" collapsible="true"> </div>
1.3、DATA-OPTIONS属性
我们在写 "iconCls"这种属性的时候编辑器会提示错误,easyui提供 data-options属性给我来写组件的配置如下面代码
我们需要引入3个基本的文件
<script src="../easyui/jquery-1.8.0.min.js"></script> <script src="../easyui/jquery.easyui.min.js"></script> <link href="../easyui/themes/default/easyui.css" rel="stylesheet" />
easyui版helloworld我们在写easyui的js代码的时候也需要dom树生成后也就是说我们需要写function这个方法二内容组件二内容组件2121panelpanel面板面板panel面板是easyui里面非常基础的一个内容组件在我们后期学的tabs选项卡accordion手风琴这两种内容组件都依赖于panel组件
jquery-confirm使用方法

jquery-confirm使⽤⽅法简要教程jquery-confirm是⼀款功能强⼤的对话框和确认框插件。
它提供多种内置的主题效果,可以实现ajax远程加载内容,提供动画效果和丰富的配置参数等。
它的特点还有:可以使⽤键盘控制对话框。
通过ajax加载对话框的内容。
可以在指定时间之后⾃动关闭对话框。
提供丰富的参数和回调函数。
使⽤⽅法基本调⽤$.confirm({confirm: function(){console.log('the user clicked confirm');},cancel: function(){console.log('the user clicked cancel');}});全局默认参数jconfirm.defaults = {title: 'Hello',content: 'Are you sure to continue?',contentLoaded: function(){},icon: '',confirmButton: 'Okay',cancelButton: 'Close',confirmButtonClass: 'btn-default',cancelButtonClass: 'btn-default',theme: 'white',animation: 'zoom',closeAnimation: 'scale',animationSpeed: 500,animationBounce: 1.2,keyboardEnabled: false,rtl: false,confirmKeys: [13], // ENTER keycancelKeys: [27], // ESC keycontainer: 'body',confirm: function () {},cancel: function () {},backgroundDismiss: false,autoClose: false,closeIcon: null,columnClass: 'col-md-4 col-md-offset-4 col-sm-6 col-sm-offset-3 col-xs-10 col-xs-offset-1',onOpen: function(){},onClose: function(){},onAction: function(){}};配置参数jquery-confirm插件的可⽤配置参数有:参数类型默认值描述title String'Hello'对话框的标题content String,Function'Are you sure tocontinue?'对话框的内容,也可以通过⼀个函数返回ajax内容contentLoaded function function(){}如果通过url前缀来调⽤内容,如url:/xyz,该参数将是回调函数icon String''标题前⾯的图标confirmButton String'Okay'确认按钮的⽂本cancelButton String'Close'取消按钮的⽂本confirmButtonClass String'btn-default'确认按钮的的classcancelButtonClass String'btn-default'取消按钮的classtheme String'white'对话框的颜⾊主题,可选值有:'white', 'black', 'material' , 'bootstrap'animation String'zoom'打开对话框时的动画效果。
- 1、下载文档前请自行甄别文档内容的完整性,平台不提供额外的编辑、内容补充、找答案等附加服务。
- 2、"仅部分预览"的文档,不可在线预览部分如存在完整性等问题,可反馈申请退款(可完整预览的文档不适用该条件!)。
- 3、如文档侵犯您的权益,请联系客服反馈,我们会尽快为您处理(人工客服工作时间:9:00-18:30)。
jquery中confirm的用法
jQuery中的confirm()函数可以用来显示一个弹窗,询问用户是否确认执行某个操作。
该函数返回一个布尔值,表示用户是否点击了“确定”按钮。
使用confirm()函数的基本语法如下:
```
if (confirm('确认执行该操作吗?')) {
// 用户点击了“确定”按钮,执行操作
} else {
// 用户点击了“取消”按钮,不执行操作
}
```
在上面的代码中,confirm()函数的参数是一个字符串,表示弹窗中要显示的文本。
如果用户点击了“确定”按钮,则if语句中的代码会被执行;如果用户点击了“取消”按钮,则else语句中的代码会被执行。
当然,confirm()函数还有其他用法,比如可以将其结果赋值给一个变量,或者使用回调函数来处理用户的选择。
具体用法可以参考jQuery文档。
- 1 -。