德生收音机DR910说明书
德生pl00说明书
改变频率
频率变化
------------------------------------------------------------------------------------------------------------------------ ----------- 方法二、用调谐钮搜台 旋转 [TUNING]钮改变频率,找到您想收听的电台。
六、自动搜台存储(ATS) 作用:自动搜索调频、中波的强信号电台,并存储到P0页面,可存储100个电台。
开机,长按 [FM-MW-LW键],直到显示屏上的频率在 变化、地址在闪烁时松手,即启动了自动搜台存储(ATS)功能。
步 骤 1
搜存完电台后,本机自动进入地址状态,并收听自动搜存 的第一个电台。 可旋转 [TUNING]钮,或短按 [UP]键、 [DOWN]键收听已搜存的其它电台。
四. FM/MW波段自动搜索存台(ATS) 开机后,拉出 [拉杆天线],长按 [FM-MW-LW]键启动自动搜索存台(ATS)功能,本机会自动搜索调频和中波波段的电台,并自动存储起来。 完成了ATS操作后,您可以旋转 [TUNING]钮收听已存储好的电台。
五. 存储电台 1.开收音机,选择波段,旋转 [TUNING]钮搜到您喜欢的电台; 2.短按 [MEMORY]键,显示屏右上角显示闪烁的存储地址; 3.再短按 [MEMORY]键确认存储。
步
骤 2 2.按数字键依次输入7、5、6。
搜 寻 电 台
提示:若输入的电台频率不在本波段范围,显示屏显示“ ” (错误)符号。
------------------------------------------------------------------------------------------------------------------------ ---------- 方法四、用自动搜索存台(ATS)功能 长按 [FM-MW-LW]键,直到显示屏上的频率在变化、 地址在闪烁时松手,即启动了自动搜索存台(ATS)功能。 搜存完电台后,本机自动进入地址状态,并收听自动搜存的第一个电台。可旋转 [TUNING]钮,或短按 [UP]键或 [DOWN]键收听已 搜存的其它电台。
得力 得力DL-910K针式打印机程序员手册 说明书
绪 言承蒙惠顾,购得DL-910K打印机。
操作手册详细阐述了本机的性能及操作方法,能指导您正确使用。
当您遇到疑问或机器发生故障时,此手册会带给您很大的帮助。
DL-910K在硬件方面别具特色。
其采用高速打印头设计,打印速度高达175汉字/秒,打印头寿命达4亿次/针,轻松实现各类票据打印。
软件方面,DL-910K兼容所有STAR、EPSON和OKI 打印机,拥有打印针调整和断针自动补偿功能等技术,方便的自动撕纸、参数设置是其特色功能。
DL-910K外观时尚、可靠性高,是税务、企业财务、保险、电信等行业部门票据打印理想选择。
本产品信息如有更改,恕不另行通知。
本资料仅供参考。
除中国现行法律法规规定,得力集团不承担任何由于使用本资料而造成的直接或间接损失的责任。
得力集团保留最终解释权。
目 录第1章安装打印机 ...................................... 1-11.1开箱和检查 ...................................... 1-11.2放置打印机 ...................................... 1-21.3打印机部件 ...................................... 1-31.4载纸板的安装及拆卸 .............................. 1-51.5安装和拆卸色带 .................................. 1-61.6打印机和主机连接 ................................ 1-81.7连接电源 ........................................ 1-91.8安装打印驱动程序 ............................... 1-10第2章纸的安装和使用 .................................. 2-12.1选纸 ............................................ 2-12.2调校打印头间隙 .................................. 2-12.3使用单页纸 ...................................... 2-2第3章控制面板 ....................................... 3-13.1按钮及其指示灯 .................................. 3-13.2开机功能 ........................................ 3-33.3组合功能 ........................................ 3-63.4设置模式下的按键功能 ............................ 3-9第4章参数设置 ....................................... 4-14.1如何进行参数设置 ................................ 4-24.2系统设置 ........................................ 4-34.3纸张设置 ........................................ 4-74.4接口设置 ....................................... 4-124.5仿真设置 ....................................... 4-134.6其他设置 ....................................... 4-144.7纵向校正 ....................................... 4-154.8恢复出厂设置 ................................... 4-18第5章票据通设置和使用 ................................ 5-15.1票据通设置 ...................................... 5-15.2票据通的使用 .................................... 5-3第6章故障和保养 ...................................... 6-16.1故障处理 ........................................ 6-16.2保养与维护 ...................................... 6-5第7章规格 ........................................... 7-17.1打印机规格 ...................................... 7-17.2字符集 .......................................... 7-47.3控制码摘要表 ................................... 7-107.3.1 ESC/P和LQ仿真控制码摘要表 ..................... 7-107.3.2OKI仿真控制码摘要表............................ 7-14附录1:电子电气产品有害物质限制使用的说明 ............. 8-1安全规范企业公开信息:1.售后服务请致电得力全国服务热线:400-185-05552.产品能耗:a. 本产品符合GB21521-2014《打印机、传真机能效限定值及能效等级》一级能效等级最高要求。
Eventide H910 Harmonizer产品介绍说明书
Original Marketing Material circa 1976IntroductionThe H910 Harmonizer was pro audio’s first digital audio effects unit. The ability to manipulate time, pitch and feedback with just a few knobs and switches made it easy to alter audio in ways that otherwise required at least a couple of tape machines and, often, rearranging furniture. Suddenly anyone could be Les Paul (recording engineer not guitar player).The H910’s electronics were primitive and the processing almost entirely analog. The digital bits of the design did “as little as necessary.” Only delay was digital. Everything else - filtering, feedback, mixing, pitch modulation, etc. - was analog. And it sounded it.The H910 was also just a tiny bit unstable. And it showed. In a time long before CDs, MIDI, or any standards for sample rate or bits, Light Emitting Diodes (LEDs) had just become “the latest, greatest thing” and the H910’s iconic, flickering display was the first ‘digital readout’ to appear in many studios. And that flickering readout belied a secret – the H910 was inherently ‘jittery’. The H910’s master clock wasn’t crystal-based but, instead, it was a tuned LC (inductor/capacitor) oscillator. The result is that the system was not locked to a specific frequency and the entire system’s clocking would drift slightly, slowly and unpredictably. In fact, all of the oscillators in the H910 are of the ‘free-running’ sort and this randomness adds to the sound (and the fun).The H910 was groundbreaking when introduced and now the circuitry, the functionality and the ‘sonic behavior’ of the original has been modeled in software and is available in your DAW for the first time. Note that while presets are a good starting point, you’ll get the most out of the H910 if you push buttons and turn knobs - just as you would when searching for a sound using the hardware. That was always, and is now, once again, the fun of it.Genesis of the H910Prior to 1970 there were no digital audio products of any kind, in any studio, anywhere. The first digital audio product to appear was a one-trick-pony, the DDL (Digital Delay Line). First introduced in 1971, DDLs from Eventide and Lexicon were as simple as simple can be - audio goes in now and comes out a bit later. Eventide’s 1745, was a big, costly box full of shift registers with a front panel dominated by big ‘wafer’ switches. Designed in 1972, during the very early days of ICs (Integrated Circuits), the only chips with enough memory (storage) to be dangerous/useful were 1K bit shift registers. RAMs were expensive and teeny. Each 1kbit shift register could delay audio by ~2 mS, so that, by filling a box with ‘only’ 100 of these chips an amazing 200 mS of delay became possible!Studios bought Eventide’s 1745 to use as a pre-delay for a plate reverb or for ADT (automatic double tracking). Eventide’s audio design sounded ‘good enough’ to satisfy even the most critical ears (some early digital audio products sounded awful) thanks, in large part, to Eventide’s custom designed ADC (analog to digital converter). And so, fueled by the sales of a handful of 1745s, Eventide took the next step and developed the successor to the 1745, the 1745M. The 1745M was also a simple DDL but it was modular DDL and used RAM instead of shift registers making fine control of delay possible for the first time. And it had 7 segment numerical LED readouts! The introduction of a “pitch change” module for the 1745M set the stage for the development of the H910. By 1974, most of the pieces needed to design a “Harmonizer” were in place. The Rack Mount H910The H910 was conceived as a box that a vocalist might use to create real-time harmonies and reverb. In fact, the prototype sported a keyboard for selecting musical pitch intervals. (An optional keyboard controller was offered in production.) Much of the H910’s analog circuitry is borrowed from the DDLs. RAM storage was used for delay. By giving the user real time, interactive control of pitch, delay and feedback, the H910 ushered in the digital effects era and became a key instrument allowing engineers and producers to shape sounds in new ways. In a pre-software world, the H910 achieved its groundbreaking effects through the judicious application of analog circuitry, custom converters, and digital logic gates. The H910 Plug-inThis plug-in models the hardware to the best of our ability. It even emulates the randomness of the hardware (not that you can copy ‘random’ with any degree of exactitude). The controls have the same range and characteristics as the front panel controls of the hardware. The pitch change splicing method is the same as the hardware’s – the glitch is back!We’ve done exhaustive listening tests and compared it to the best relics that we could find. This plug-in models the quirkiness of one vintage H910. In fact, we’ve tweaked the plug-in to sound as close to the ‘golden’ relic as possible. (If this plugin sounds different from your H910, you may want to get your hardware adjusted.)H910 ControlsThe H910 user interface consists of two parts. The top half of the interface is the front panel of the original H910 2U rack mount unit. All controls function in the same way as the original. The bottom half of the interface enables features originally available through external connections or options. Front Panel Controls:LINE button: This control switches the Harmonizer in and out of an audio circuit. When the switch is inthe OUT position, the unit is completely bypassed but the algorithm is still running in the background. This allows you to store audio in the feedback patch and modify its contents using the pitch controls, then to hear these differences when you revert to LINE IN.INPUT LEVEL knob and LIMIT indicator: This control varies the level of the audio input to the Harmonizer. Users of the original hardware would always be tweaking this pot! The plug-in models the hardware analog input audio circuitry of the H910 and, let’s just say that, the level of the input audio will change the effect of the other parameters, especially when making use of the feedback control. We recommend that you play with this parameter and listen.Input Level should be adjusted to take advantage of the maximum dynamic range of the digital and analog circuitry by setting the control as far clockwise as possible before excessive distortion becomes apparent on the output signal.The LIMIT indicator is used as an aid in setting the INPUT LEVEL control. It is adjusted to give a brief flash each time the maximum dynamic range is even momentarily exceeded.NOTE:Because the LIMIT indicator is peak responding, and because of the characteristics of the internal signal processing circuitry, it is desirable for the indicator to flash occasionally during normal operation.The amount of flashing is strongly dependent upon the nature of the input signal. As an aid to the operator, a general guide is provided:SIGNAL SOURCE LIMIT INDICATOR DUTY CYCLE Integrated program (radio) once per two secondsIntegrated program (live) once per secondVoice (talking) once per two secondsPiano 2-3 per secondGuitar, acoustic 2 per secondGuitar, fuzz 1 per secondSynthesizer infrequentOrgan infrequentDrums once per beatRemember, the above is a general guideline! The ear is the best measuring instrument around, and the best setting is one at which the output level is maximum and distortion is not yet evident. Additionally right clicking on the INPUT knob will turn it to - dB, muting the input. Right clicking again will toggle the INPUT knob back to its previous value.DELAY ONLY button and LED:This switch determines the mode of operation of the Harmonizer’s main output. When it is depressed, the pitch change function is defeated, and the Harmonizer acts strictly as a digital delay line. In this mode, the LED next to the DELAY ONLY button becomes illuminated and the legends beneath the ADD’L DELAY switch group become relevant.When the DELAY ONLY switch is in the out position, the LED adjacent to the PITCH CONTROL SELECT switch group becomes illuminated, and only the two right hand buttons in the ADD’L DELAY group are active. In this case, the legends above the switches are relevant.ADD'L DELAY switch group:This switch group controls the delay of the main output. In the DELAY ONLY mode, the delay is the sum of the delays of the individual switches depressed, as read out on the bottom of the switch group. Maximum delay is 7.5+15+30+60 milliseconds (112.5 mS), and any intermediate setting can be achieved in 7.5ms steps by combining buttons.In the PITCH CHANGE mode, the additional delay is the sum of the delays of the two right hand switches depressed. Maximum additional delay is 60 mS (30+30). Note that in the PITCH CHANGE mode, pitch change is achieved by a delay that is continuously varying over an approximate 30 mS range, and so a precise delay is not achievable. So even without both ADD'L DELAY buttons pressed there will still be an audible delay when in PITCH CHANGE mode.FEEDBACK knob: The FEEDBACK control is used to add reverb in controlled amounts to the delayed output of the Harmonizer. The control attenuates the signal coming from the main output and reapplies it to the input where it is mixed with the incoming signal. The reverb period is controlled by the DELAY setting and the decay time is varied by adjustment of the FEEDBACK control. Clockwise rotation of the control increases decay time, until the feedback gain exceeds unity, at which time the system will begin to oscillate. The control is also operative in the PITCH CHANGE mode, and may be used to create numerous special effects.PITCH RATIO readout:An LED readout gives the numerical pitch ratio of the Harmonizer. As this is a true digital readout, it is not subject to miscalibration and may be used as a precise reference.For musical applications, our optional keyboard will allow setting to precise intervals automatically. These same intervals can be set using the readout, and referring to the chart showing PITCH RATIO READOUTS FOR VARIOUS MUSICAL RELATIONSHIPS.PITCH RATIO READOUTSFOR VARIOUS MUSICAL RELATIONSHIPSThe figures in this table are accurate to four decimal places.For use with the Model H910 Harmonizer, round off the figure two decimal places.-3/4 -1/2 -1/4 NOTE RELATIONSHIP NOTE +1/4 +1/2 +3/40.9576 0.9715 0.9857 1.0000UNISON 1.0000 1.0145 1.0293 1.04430.9039 0.9170 0.9303 0.9439 -1+1 1.0595 1.0749 1.0905 1.10640.8531 0.8655 0.8781 0.8909 -2+2 1.1225 1.1388 1.1554 1.17220.8052 0.8170 0.8288 0.8409 -3+3 1.1892 1.2065 1.2241 1.24190.7601 0.7711 0.7823 0.7937 -4+4 1.2599 1.2782 1.2968 1.31570.7174 0.7278 0.7384 0.7492 -5+5 1.3348 1.3543 1.3740 1.39390.6771 0.6870 0.6970 0.7071 -6+6 1.4142 1.4348 1.4557 1.47680.6391 0.6484 0.6579 0.6674 -7+7 1.4983 1.5201 1.5422 1.56460.6033 0.6120 0.6209 0.6300 -8+8 1.5874 1.6105 1.6339 1.65770.5694 0.5777 0.5861 0.5946 -9+9 1.6818 17063 1.7311 1.75630.5374 0.5453 0.5532 0.5621 -10+10 1.7818 1.8077 1.8340 1.86070.5073 0.5147 0.5221 0.5297 -11+11 1.8877 1.9152 1.9431 1.97130.5000OCTAVE 2.0000OUTPUT 2 delay buttons: This switch group controls the delay of the second output. It is operative regardless of the setting of the DELAY ONLY switch. Delay 2 is fed from the sum of the input to the H910 and the main feedback path. Delay 2’s input is connected before the input to the pitch shifterso pitch change at Delay 2's output will only be heard when feedback is turned up. The total delay of Delay 2 is the sum of the buttons depressed.MANUAL knob: The MANUAL control is operative in the PITCH CHANGE mode only and when the PITCH CONTROL SELECT is set to MAN mode. It is used to change the pitch ratio between the input and the output. When centered, the ratio is unity. When fully clockwise, the ratio is 2, and the output pitch is increased by one octave. When fully counter-clockwise, the ratio is .5, and the output pitch is decreased by one octave. Intermediate settings produce fractional octave ratios, and the control is “band-spread” around unity to make small ratio adjustments easier.PITCH CONTROL SELECT switch group and LED indicator: When the PITCH CONTROL mode is activated, the LED INDICATOR immediately to the left of the PITCH CONTROL SELECT switch group becomes illuminated, and the four switches assume control of the pitch change function.•Manual: This switch selects the MANUAL control, as described above.•A-F: Depressing the Anti-Feedback switch selects the ANTI-FEEDBACK control, as described below.•KYBD: Allows controlling the H910 Pitch Ratio using by the HK 941 ‘piano style’ keyboard and/or MIDI Note On/Off messages between C3 and C5. The HK 941 Keyboard is available in the bottom half of the H910 plug-in.•ENV: ENVELOPE FOLLOWER controls the pitch ratio. When ENV is active, no input signal will result in a PITCH RATIO of 1.0 and a full scale input signal will set the PITCH RATIO according to the position of the MANUAL control. In other words, the setting of the manual control determines the pitch range.ANTI-FEEDBACK knob: This control is operative in the PITCH CHANGE mode only, when the A-F button in the PITCH CONTROL SELECT group is depressed. Increasing clockwise rotation of the ANTI-FEEDBACK control progressively adds a small up and down frequency shift to the output signal, which serves to decrease the effect of room resonance peaks on the signal which ultimately re-arrives at the microphone. Because the effect becomes more audible as the control is advanced, the optimum setting is a compromise between adequate feedback reduction and audience and/or performer disturbance. At extreme settings this control will create a highly modulated FM like effect which can be used as a special effect.POWER button and LED indicator: The power button functions as a bypass switch. When the POWER button is depressed the H910 plug-in is active. Otherwise the H910 plug-in is inactive and if the DSP can be unloaded it will be. Additional ControlsMIXER SectionMIX slider: This slider controls the relative level of the DRY signal and the WET signal comprised of the mixed MAIN OUTPUT and OUTPUT 2 based on their relative slider positions. Right clicking on the MIX slider will activate a solo mode which will play the WET signal only. Right clicking again will toggle back to the initial MIX position.MAIN slider: This slider controls the contribution of the MAIN output to the WET channel, whether it's set to PITCH CHANGE mode or DELAY ONLY mode. Right clicking on the MAIN slider will enter a solo mode which plays only the MAIN output at full scale. Right clicking again will toggle back to the original MIXER settings.OUT 2 slider: This slider controls the contribution of the delayed OUTPUT 2 signal to the WET channel. Right clicking the OUT 2 slider will enter a solo mode which plays only the OUTPUT 2 signal at full scale. Right clicking again will toggle back to the original MIXER settings.ENVELOPE FOLLOWER SectionATTACK knob: The ATTACK knob sets the ENVELOPE FOLLOWER's attack time from 1 to 100 mS.RELEASE knob: The RELEASE knob sets the ENVELOPE FOLLOWER's release time from 10 mS to 1 S.SENSITIVITY knob: The SENSITIVITY knob sets the gain of the ENVELOPE FOLLOWER allowing you to control the pitch change relative to the dynamics of the input signal. As the SENSITIVITY knob is turned clockwise the ENVELOPE FOLLOWER will have more gain allowing quieter signals to have a greater control over the pitch change.EVENTIDE HK941 Keyboard SectionKEYBOARD: The KEYBOARD is a two octave piano style keyboard. The low C represents a PITCH RATIO of 0.5 representing a PITCH CHANGE of 1 octave down. The middle C represents a PITCH RATIO of 1.0 representing a PITCH CHANGE of unison. The high C represents a PITCH RATIO of 2.0 representing a PITCH CHANGE of 1 octave up. Each other note represents a PITCH CHANGE equal to that number of semitones away from the middle C. Therefore playing a note will allow you to transpose the input audio by the number of semitones selected by the note.GLIDE slider: The GLIDE slider allows you to set the speed at which the PITCH CHANGE amount will change when a new key is depressed. This will allow you to add portamento to your transposition.HOLD button and LED indicator: If the HOLD button is depressed clicking on a key will lock the PITCH CHANGE to that number of semitones until another key is pressed. Otherwise the PITCH CHANGE will reset to unison when you cease pressing the key.Model H910 Harmonizer ® Part #141252 Rev BEventide Inc. One Alsan Way Little Ferry, NJ 07643 USA Eventide and Harmonizer are registered trademarks of Eventide Inc. © 2015 Eventide Inc.。
JBL QUANTUM910 WIRELESS 说明书
910WIRELESSO W N E R’S M A N U A LINTRODUCTION (1)WHAT’S IN THE BOX (2)PRODUCT OVERVIEW (3)Controls on headset (3)Controls on 2.4GHz USB wireless dongle (5)Controls on 3.5 mm audio cable (5)GETTING STARTED (6)Charging your headset (6)Wearing your headset (7)Power on (8)First-time setup (for PC only) (8)USING YOUR HEADSET (10)With 3.5 mm audio connection (10)With 2.4GHz wireless connection (11)With Bluetooth (secondary connection) (13)PRODUCT SPECIFICATIONS (15)TROUBLESHOOTING (17)LICENSE (19)Congratulations on your purchase! This manual includes information on the JBL QUANTUM910 WIRELESS gaming headset. We encourage you to take a few minutes to read this manual, which describes the product and includes step-by-step instructions to help you to set up and get started. Read and understand all the safety instructions before using your product.If you have any questions about this product or its operation, please contact your retailer or customer service, or visit us at 010203040805070601 JBL QUANTUM910 WIRELESS headset02 Calibration microphone03 USB charging cable (USB-A to USB-C)04 3.5 mm audio cable05 2.4GHz USB wireless dongle (USB-C)06 USB-C to USB-A converter07 QSG, warranty card and safety sheet08 Windshield foam for boom microphoneControls on headset01 ANC* / TalkThru** LED• Lights up when the ANC feature is enabled.• Flashes quickly when the TalkThru feature is enabled.02 button• Press briefly to turn ANC on or off.• Hold for 2 seconds to turn TalkThru on or off.03 / dial• Balances the chat volume in relation to the game audio volume.04 Volume +/- dial• Adjusts headset volume.05 Detachable windshield foam06 Mic mute / unmute LED• Lights up when the microphone is muted.07 button• Press to mute or unmute the microphone.• Hold for 5 seconds to turn the RGB light on or off.08 Charging LED• Indicates the charging and battery status.09 3.5 mm audio jack10 USB-C port11 Voice focus boom microphone• Flip up to mute, or flip down to unmute the microphone.12 button• Press to switch between off (default), spatial sound, and spatial sound + head tracking.• Hold for 2 seconds to start re-centering for head tracking.13 / slider• Slide upwards to power on and enter 2.4GHz pairing mode, or slide downwards to power off the headset.• Slide upwards and hold for 2 seconds to enter Bluetooth pairing mode.14 Status LED (Power / 2.4GHz / Bluetooth)15 RGB Lighting Zones16 Flat-fold ear cup* ANC (Active Noise Cancelling): Experience total immersion while gaming by suppressing the outside noise.** TalkThru: In TalkThru mode, you can hold natural conversations without removing your headset.020101 CONNECT button• Hold for 5 seconds to enter 2.4GHz wireless pairing mode.02 LED• Indicates the status of 2.4GHz wireless connection. Controls on 3.5 mm audio cable01 Volume dial•02 slider•Charging your headsetBefore use, fully charge your headset through the supplied USB-A to USB-C charging cable.TIPS:• It takes approximately 3.5 hours to fully charge the headset.• You can also charge your headset through a USB-C to USB-C charging cable (not supplied).Wearing your headset1. Put the side marked L onto your left ear and the side marked R onto your right ear.2. Adjust the earpads and headband for a comfortable fit.3. Adjust the microphone as necessary.Power on• Slide the power switch upwards to power on the headset.The status LED glows solid white upon powering on.• Slide downwards to power off.First-time setup (for PC only)Download from /engine to gain full access to features on your JBL Quantum headset - from headset calibration to adjusting 3D audio to suit your hearing, from creating customized RGB lighting effects to determining how the boom microphone side-tone works.Software requirementsPlatform: Windows 10 (64 bit only) / Windows 11500MB of free hard drive space for installationTIPS:• JBL QuantumSPHERE 360 and DTS Headphone:X V2.0 available on Windows only. Software installation required.• JBL QuantumSPATIAL 360 available on PlayStation (PS4/PS5) and Nintendo Switch.1. Connect the headset to your PC via2.4GHz USB wireless connection (See “With2.4GHz wireless connection”).2. Go to “Sound Settings” -> “Sound Control Panel”.3. Under “Playback” highlight “JBL QUANTUM910 WIRELESS GAME” and select“Set Default” -> “Default Device”.4. Highlight “JBL QUANTUM910 WIRELESS CHAT“ and select “Set Default” ->“Default Communication Device”.5. Under “Recording” highlight “JBL QUANTUM910 WIRELESS CHAT” and select“Set Default” -> “Default Device”.6. n your chat application select “JBL Q UANTUM910 WIRELESS CHAT” as thedefault audio device.7. Follow the onscreen instructions to personalize your sound settings.With 3.5 mm audio connection1. Connect the black connector to your headset.2. Connect the orange connector to the3.5 mm headphone jack on your PC, Mac,mobile or gaming console device.Basic operationNOTE:• The mic mute / unmute LED, button, / dial and RGB Lighting Zones on the headset do not work in 3.5 mm audio connection.With 2.4GH z wireless connection1. Plug the2.4GHz USB wireless dongle into a USB-C port on your PC, Mac, laptop,PS5 console, or Nintendo Switch™ controller.• With the supplied USB-C to USB-A converter, you can connect the dongle to a USB-A port on your PC, Mac, desktop, PS4/PS5 console, or Nintendo Switch™ console.2. Power on the headset. It will pair and connect with the dongle automatically. Basic operationTo pair manually1. On the headset, slide the power switch upwards to power on and enter2.4GHzpairing mode.2. On the 2.4GHz USB wireless dongle, hold CONNECT for 5 seconds until the LEDflashes white quickly.Both LEDs on the headset and dongle turn solid white after successful connection.TIPS:• The headset turns off automatically after 10 minutes of inactivity.• The LED on the dongle enters connecting mode (flashing slowly) after disconnection from the headset.• Compatibility with all USB ports is not guaranteed.With Bluetooth (secondary connection)With this function, you can connect your mobile phone to the headset while playing games, without worrying about missing important calls.1. On the headset, push the / slider upwards and hold for 2 seconds to enterBluetooth pairing mode.The status LED flashes quickly (pairing).2. Enable Bluetooth on your mobile phone and choose “JBL Quantum910” from“Devices”.The status LED flashes slowly (connecting), and then turns solid blue (connected). NOTE:• Next time when you power on the headset, push the / slider upwards to reconnect the headset to your mobile phone.Control calls×1×2When there is an incoming call:• Press once to answer.• Press twice to reject.During a call:• Press once to hang up.TIP:• Use volume controls on your Bluetooth connected device to adjust volume.• Model: QUANTUM910WIRELESS• Driver size: 50 mm Dynamic drivers• Frequency response (Passive): 20 Hz - 40 kHz• Frequency response (Active): 20 Hz - 20 kHz• Microphone frequency response: 100 Hz - 8 kHz• Max input power: 30 mW• Sensitivity: 111 dB SPL / 1 mW• Maximum SPL: 93 dB• Microphone sensitivity: -38 dBV / Pa @1 kHz• Impedance: 32 ohm• 2.4GHz Wireless transmitter power: <13 dBm• 2.4GHz Wireless modulation: GFSK, π/4 DQPSK• 2.4GHz Wireless carrier frequency: 2400 MHz - 2483.5 MHz• Bluetooth transmitted power: <13 dBm• Bluetooth transmitted modulation: GFSK, π/4 DQPSK• Bluetooth frequency: 2400 MHz - 2483.5 MHz• Bluetooth profile version: A2DP v1.3, HFP v1.8• Bluetooth version: BT Core v5.2• Battery type: Li-ion battery (3.7 V / 1300 mAh)• Power supply: 5 V 2 A• Charging time: 3.5 hrs• Music play time with BT+2.4GHz on and ANC+RGB lighting off: 34 hrs • Talk time with BT+2.4GHz on and ANC+RGB lighting off: 38 hrs• Music play time with only 2.4GHz on and ANC+RGB lighting off: 39 hrs • Talk time with only 2.4GHz on and ANC+RGB lighting off: 44 hrs• Music play time with only BT on and ANC+RGB lighting off: 45 hrs• Talk time with only BT on and ANC+RGB lighting off: 47 hrs• Microphone pickup pattern: Unidirectional• Weight: 420 gNOTE:• Technical specifications are subject to change without prior notice.f you have problems using this product, check the following points before you request service.No power• The headset turns off automatically after 10 minutes of inactivity. Power on the headset again.• Recharge the headset (see “Charging your headset”).2.4GH z pairing failed between headset and 2.4GH z USB wireless dongle• Move the headset closer to the dongle. If the issue remains, pair the headset with the dongle again manually (see “To pair manually”).Bluetooth pairing failed• Make sure you have enabled Bluetooth feature on the device to be connected with the headset.• Move the device closer to the headset.• The headset is connected to another device through Bluetooth. Disconnect the other device, then repeat the pairing procedures. (see “With Bluetooth (secondary connection)”).No sound or poor sound• Make sure you have chosen JBL QUANTUM910 WIRELESS GAME as the default device in the game sound settings of your PC, Mac or gaming console device.• Adjust volume on your PC, Mac or gaming console device.• Check game chat balance on PC if you are only playing game or chat audio.• Check that ANC is enabled while TalkThru is disabled.• You may experience obvious sound quality degradation when using the headset near a USB 3.0 enabled device. This is not a malfunction. Use an extension USB dock instead to keep the dongle as far from the USB 3.0 port as possible.In 2.4GHz wireless connection:• Make sure the headset and 2.4GHz wireless dongle are paired and connected successfully.• The USB ports on some gaming console devices may be incompatible with JBL QUANTUM910 WIRELESS. This is not a malfunction.In 3.5 mm audio connection:• Make sure the 3.5 mm audio cable is connected securely.In Bluetooth connection:• The volume control on the headset does not work for the Bluetooth connected device. This is not a malfunction.• Keep away from sources of radio interference such as microwaves or wireless routers.My voice cannot be heard by my teammates• Make sure you have chosen JBL QUANTUM910 WIRELESS CHAT as the default device in the chat sound settings of your PC, Mac or gaming console device.• Make sure the microphone is not muted.I can’t hear myself when I’m talking• Enable sidetone via to hear yourself clearly over game audio. ANC/TalkThru will be disabled when sidetone is enabled.The Bluetooth® word mark and logos are registered trademarks owned by Bluetooth SIG, Inc. and any use of such marks by HARMAN International Industries, Incorporated is under license. Other trademarks and trade names are those of their respective owners.- 19 -HP_JBL_Q910_OM_SOP_V3。
德胜收音机产品展示
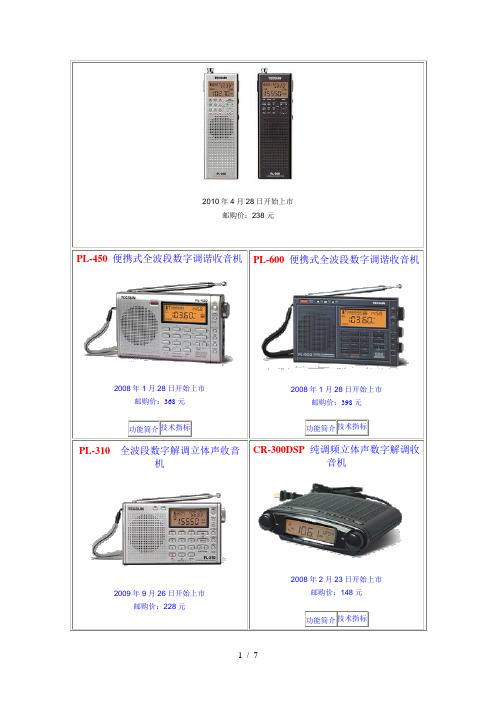
2010年4月28日开始上市邮购价:238元PL-450 便携式全波段数字调谐收音机2008年1月28日开始上市邮购价:368元功能简介技术指标PL-600 便携式全波段数字调谐收音机2008年1月28日开始上市邮购价:398元功能简介技术指标PL-310全波段数字解调立体声收音机2009年9月26日开始上市邮购价:228元CR-300DSP 纯调频立体声数字解调收音机2008年2月23日开始上市邮购价:148元功能简介技术指标功能简介技术指标PL-300wt世界钟全波段数字解调收音机2009年5月28日开始上市邮购价:198元(赠送AN-05外接天线一个)功能简介技术指标PL-380全波段数字解调立体声收音机2009年12月8日开始上市邮购价:238元功能简介技术指标1994 调频/调幅高保真收音机(纪念版)2007年8月18日开始上市邮购价:930元功能简介技术指标S-2000数字调谐全波段无线电接收机2008年8月8日开始上市邮购价:1500元(含邮资20元)功能简介技术指标致用户:了解方法:德生牌收音机产品及附件在全国各大中城市商场均有销售。
如您所在的地区没有德生产品销售,您可以与我公司用户服务部了解邮购。
邮购方法:通过邮局汇款邮购位置:广东省东莞市东城区莞长路189号德生大楼收款人:德生通用电器制造XXX邮政编码:523128说明:本产品橱窗内所标注的邮购价已经包含邮费,您只要按所标金额通过邮局汇款给我们即可,不需要另外再加邮寄费。
各位关心德生公司的朋友和德生电器公司的用户们,如果你们有什么意见和建议,请与我们了解,了解方法如下:Email:tecsun@21cnaaa来信:广东省东莞市东城区莞长路189号德生大楼德生电器公司收邮编:523128咨询热线电话:0769-2316 71180769-2245 5117[文档可能无法思考全面,请浏览后下载,另外祝您生活愉快,工作顺利,万事如意!]。
德生收音机图纸
1.德生R-202T型两波段收音机电路图2. “德生”二次变频收音机R9701电路分析接收机二次变频技木早先主要用于军事通信领域,以后逐渐用于民用通讯设备,如对讲机、移动电话、收信机等。
国内将此技术移植于收音机中的德生公司第一家。
第一代“短波王”R9700的推出,曾畅销大江南北,此后,又先后推出R970l、R9702等功能更优异,使用更方便的机型。
二次变频技术与传统的超外差式收音机的电路结构比较,见图1所示。
可以看出,二次变频的应用,使收音机的接收灵敏度和选择性等指标大大提高。
下面将承前启后的R9701机作一典型介绍:图2是德生R970l AM/FM前级电路图,图3为其功放电路与操作功能显示电路。
K1为电源开关。
图2中的Q6、Q7等元件组成双稳态电子波段切换开关。
由于开机瞬间,C10上的电压不能突变,Q7截止,电源电压E+通过R13、R9使Q6导通,其集电极上的低电平使Q4导通,Icl 14脚输入高电平,于是ICl工作在FM状态。
与此同时,Q6集电极外接的FM LED点亮。
拉杆天线ANT接收到的高频信号经CO、F3、c5耦合至Icl①脚。
Icl是一片低电压AM/FM收音机专用集成电路,内含AM/FM本振,混频及检波电路,内部结构如图4所示,引脚功能及实测数据如表1所示。
Icl①脚输入的FM信号经内部高频放大从15脚输出,再由PVC2、C8、L4选频后与PVC2同步调谐的本振信号(PvC3、L5、C24、ICl③脚内部元件组成)一起送入混频器。
混频后从③脚输出的10.7MHz中频信号再经FM选频并送入ICl⑧脚,经内部中频放大,FM鉴频后通过电子开关选通,从11脚输出鉴频后的音频信号。
TuN LED为电台强场指示灯(见图3)。
按动电子波段开关AM时,即相当于给Q6基极一个人为的低电平.Q6截止,FM LED熄灭。
同时Q4也因高电平而截止,ICl工作在调幅波段。
Q6集电极的高电平又使Q7由截止转为导通,AMLED点亮。
Sony CD FM Cassette Dual Deck MDS-JB900 用户手册说明书
激光唱機 有關 CD 功能的顯示屏信息: – --:(見圖 2) 正在讀取光盤內容 – no/Er:(見圖 3) 無光盤/ CD 操作錯誤
或 CD/ CD-R(W) 光盤空白又或者光盤 未刻錄完成 (見「故障排除」一節) – 播放暫停時: 2 和當前的曲目序號閃動 (見圖 4) – prog:當 CD 編程功能生效時顯示
用。
3 轉動 TUNING 調諧旋鈕選擇電台。
• 請將電量耗盡或長時間不被使用的電池取出 • 接收 FM 波段時,應拉出拉桿天線,並將
以避免電池漏液而損壞遙控器。
它傾斜及轉動以獲得最佳的接收。若信號太
使用交流電源
強,可縮短拉桿天線的長度。
1 檢查位於本機底部銘牌所標示的電源電壓 • 接收 MW (AM) 波段時,由於本機設有內
6 要停止錄音,按 9/ 鍵。
6 要停止磁帶操作,按 9/ 鍵。
除非磁帶錄音機的 ; 暫停鍵已被按下,當 磁帶轉到末端時,磁帶錄音機的按鍵隨即自 動跳回原位,本機關閉。
有用的提示:要從第一首曲目開始對整張 CD 進行同步錄音,必須確定激光唱機已讀 取完 CD 的內容,然後才按 0 鍵開始錄 音。
故障排除
然後關上盒帶艙。
關上盒帶艙。
4 按 0 鍵開始錄音。
3 按 2 鍵開始播放。
➜ CD 曲目播放清單將從其始端自動開始
4 要暫停播放,按 ; 鍵。要恢復播放,再按
播放。您不必另行啟動激光唱機。
一次該鍵。
5 要暫停錄音,按 ; 鍵。要恢復錄音,再按
5 按 5 或 6 鍵可快速進帶或快速倒帶。要
; 鍵。
停止快速轉帶,按 9/ 鍵。
查看曲目播放清單
• 在停止狀態,重複按 PROG 鍵以查看您所 儲存的曲目序號。 ➜ 顯示屏首先顯示該播放清單位置的編 號,然後顯示儲存在該播放清單中的曲
SONY钟控收音机的常用功能键和使用说明

SONY钟控收音机的常用功能键和使用说明大沙头RADIO1.什么是NAP功能,NAP功能就是在按下此键后,机器会以此时间为计时起点,并按照您按下NAP 功能上所显示的数字为时间间隔闹钟。
比如,当前时间为12。
01分,您按下NAP功能键为10,刚等到12。
11分时,机器就会闹铃了。
一般这个NAP功能是可以多种选择的的,如10。
20。
30。
60。
OFF,机器可循环显示。
其实用性,比如你在中午想睡60分钟,就不需要再设开机时间了,只需按下NAP键,选择60分钟,机器就会在60分钟后自动打开将你闹醒。
2.什么是SNOOZESNOOZE功能,SNOOZE功能是一个非常实用的设计,比如你设早上7。
00开机,但是到了7。
00开机后,你还想再睡一小会儿,你就可以按下此键,机器将被关闭,如果是数调收音机,会显示一个数字,机器过了这个时间数后,机器就会打开。
如果是手调式的钟控机,按下此键,机器一样会被关闭,机器过8分钟后就会自动打开,这点设计有点类似于诺基亚手机的闹钟功能。
3.什么是SLEEP OFF功能SLEEP OFF睡眠关机功能,当你按下此键后,机器就会按你所设定的时间自动关机,即使你睡着了,机器也会自动关机。
睡眠定时关机的时间设定方法如下:一般有二种方式,一般的数调型SLEEP键下都预存有10。
20。
30。
60。
120,SLEEP OFF这些常用的睡眠时间,你可以按下SLEEP 键依次选择。
对于一些手调的机型,睡眠关机时间是可以从1分----1小时59分钟任意选择的。
具体操作方法如下:同时按下SLEEP,CLOCK与H,或M三个键设定睡眠关机时间。
4.CLOCK键。
CLOCK键就是时钟键,对于SONY钟控机来说,一般的操作方法是按下此键后,显示时间就会依次显示日历,小时,和分钟。
配合“+,—”键即可设置好主时间。
一般的操作方法有两种,第一种是按下CLOCK键后,利用“+,—”和CLOCK键依次设好小时和分钟,每二种是用CLOCK键与“+,—”同时按下,这时系统时钟会飞速计数,等到计数到你要的时间时松开CLOCK键就,这时就可以获得你想要的系统当前时间了。