codewarrior v10.x快速指南
codewarrior使用指南

Hardware and software integration
•Hardware and software integration
Without simulation, developers risk of getting H/W and S/W problems mixed up (none has been qualified yet), Developers have difficulties to compare a working case (simulation) with a non-working case (hardware target), Easily switch between targets for comparison of results Data Visualization and I/O stimulation (simulation and targets) Flash programming support RTOS awareness (e.g. OSEK) Foreign target capability through API
Hardware specific code
•Hardware specific code generation
Developers have to understand the details of peripheral registers, bit fields, setup and access sequences Trend is for more and complex peripherals, with more registers, increasing the effort of writing accurate code for each peripheral of the derivative. But there is no added value from a project stand point, all applications need some from of code to perform the function
codewarrior快速使用手册
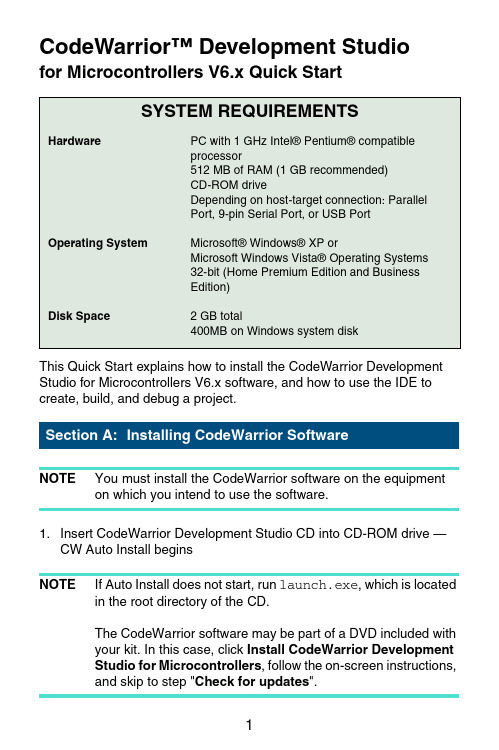
CodeWarrior™ Development Studiofor Microcontrollers V6.x Quick StartSYSTEM REQUIREMENTSHardware PC with 1 GHz Intel® Pentium® compatibleprocessor512 MB of RAM (1 GB recommended)CD-ROM driveDepending on host-target connection: ParallelPort, 9-pin Serial Port, or USB PortOperating System Microsoft® Windows® XP orMicrosoft Windows Vista® Operating Systems32-bit (Home Premium Edition and BusinessEdition)Disk Space 2 GB total400MB on Windows system diskThis Quick Start explains how to install the CodeWarrior Development Studio for Microcontrollers V6.x software, and how to use the IDE to create, build, and debug a project.NOTE You must install the CodeWarrior software on the equipment on which you intend to use the software.1.Insert CodeWarrior Development Studio CD into CD-ROM drive —CW Auto Install beginsNOTE If Auto Install does not start, run launch.exe, which is located in the root directory of the CD.The CodeWarrior software may be part of a DVD included withyour kit. In this case, click Install CodeWarrior DevelopmentStudio for Microcontrollers, follow the on-screen instructions,and skip to step "Check for updates".2.Follow setup program's on-screen instructionsNOTE Special Edition: The Special Edition license is automatically installed with your product and you do not need to register it.This license allows you to develop projects with unlimitedassembly code, up to 32KB of C code for HC(S)08/RS08derivatives and up to 64KB of C code for ColdFire V1derivatives.NOTE Evaluation Edition: The Evaluation license is automatically installed with your product and you do not need to register it.This license allows you to develop projects as ProfessionalEdition within the 30-day evaluation period. After 30 days, thelicense works as Special Edition license (free permanent, butfeature limited) which supports unlimited assembly code, up to32KB of C code for HC(S)08/RS08 derivatives and up to 64KBof C code for ColdFire V1 derivatives.1.Create a projecta.Select Start > Programs > Freescale CodeWarrior >CW forMicrocontrollers V6.x > CodeWarrior IDE — IDE starts and displaysstartup dialog box.Startup Dialog Boxb.Select Create New Project — the Microcontrollers New Project Deviceand Connection dialog box appears.NOTE This section of the quick start demonstrates using the New Project Wizard. We use an MC68HC908GZ60target as anexample.c.Expand HC08 and GZ Family and select MC68HC908GZ60 derivative. NOTE If your MCU is missing from the list, download a service pack for that device at /codewarrior/downloads.Device and Connection Dialog Boxd.Select Full Chip Simulation as your default connection.e.Click Next — the Project Parameters dialog box appears.Project Parameters Dialog Boxf.In Project name text box, the IDE supplies a default project name. Entera project name of your choice.NOTE The IDE automatically creates a folder with the same name in specified location. The IDE automatically adds .mcp extensionwhen it creates project.g.In Location text box enter location to store project, click Set to browse tofolder locationh.Select C as language to be supported by project.NOTE You can click Finish to accept defaults for remaining options.i.Click Next — the Add Additional Files dialog box appears.This dialog box lets you browse folders and add or remove files to or fromthe project.Add Additional Files Dialog Boxj.Click Next — the Processor Expert dialog box appears.This dialog box let you specify whether you want your project configuredto use Device Initialization or Processor Expert.Processor Expert Dialog Boxk.Select the None option button.l.Click Next — the C/C++ Options dialog box appears.This dialog box allows you to specify C/C++ Options.C/C++ Options Dialog Boxm.Select ANSI startup code as code, the New Project Wizard will place in your project as startup code.n.Select Small as memory model to use.o.Select None for floating point format to support.p.Click Finish — the IDE creates your project according to your specifications; Project window appears, docked at left side of mainwindow.Project WindowNOTE To undock project window, double-click the double gray lines.To re-dock window, right click in title tab and select Docked.2.Select connectionFor this example, we specified Full Chip Simulation (FCS).a.To change MCU and connection, select Project >Change MCUConnection.b.Make sure Full Chip Simulation is selected in drop-down list.3.Edit source codea.Double click main.c in Sources folder — the Editor window opensdisplaying contents of file.main.c in Editor Windowb.Make changes to contents of main.c file, if desired.c.From the IDE main menu bar, select File > Save — the IDE saveschanges.4.Add files if appropriatea.In the project window, select a folder.b.From IDE main menu bar, select Project > Add Files.The Select files to add dialog box appears.c.Navigate to the directory that contains file you want to add.d.Select the filename of file you want to add to project.e.Click Open — the Project Messages window appear indicating accesspath has been added to target, if the path is new to the project.f.In the project window, filename of the added file appears under theselected folder.5.Build projecta.From IDE main menu bar, select Project > Make — the IDE builds(assembles, compiles, and links) project; Error & Warnings windowopens showing any error messages and warning messages1.Start debuggera.Click on project window title bar to ensures that window is active projectb.From main menu bar, select Project > Make.c.From main menu bar, select Project > Debug — the True-TimeSimulator & Real-Time Debugger window opens.True-Time Simulator & Real-Time Debugger WindowNOTE The Source and Assembly panes display the main.c program and code.2.Set breakpointa.Point at a C statement in Source window and right-click — the Sourcecontext menu appears.b.Select Set Breakpoint — a permanent breakpoint mark is set.3.Run applicationa.From the True-Time Simulator & Real-Time Debugger window, selectRun — the Run menu appears.b.Select Start/Continue or click on Start/Continue icon — theProgram executes till the first breakpoint; Command pane displaysprogram statusDebugger Simulator Command Pane4.Click the Start/Continu e icon — the simulator resumes programexecution.5.Click the Halt icon — the Simulator stops program execution.6.From the True-Time Simulator & Real-Time Debugger windowtoolbar, select File > Exit to exit the debugger.7.From IDE main Window toolbar, select File > Exit to exit theCodeWarrior IDE.Congratulations!You have successfully created, built, and run an HC08 application with the CodeWarrior for Microcontrollers V6.xsoftware!Freescale™ and the Freescale logo are trademarks of Freescale Semiconductor, Inc. CodeWarrior is a trademark or registered trademark of Freescale Semiconductor, Inc. in the United States and/or other countries. PROCESSOR EXPERT and EMBEDDED BEANS are trademarks of Freescale Semiconductor, Inc. All other product or service names are the property of their respective owners.Copyright © 2009 Freescale Semiconductor, Inc. All rights reserved.Information in this document is provided solely to enable system and software implementers to use Freescale Semiconductor products. There are no express or implied copyright licenses granted hereunder to design or fabricate any integrated circuits or integrated circuits based on the information in this document.Freescale Semiconductor reserves the right to make changes without further notice to any products herein. Freescale Semiconductor makes no warranty, representation or guarantee regarding the suitability of its products for any particular purpose, nor does Freescale Semiconductor assume any liability arising out of the application or use of any product or circuit, and specifically disclaims any and all liability, including without limitation consequential or incidental damages. “Typical” parameters that may be provided in Freescale Semiconductor data sheets and/or specifications can and do vary in different applications and actual performance may vary over time. All operating parameters, including “Typicals”, must be validated for each customer application by customer's technical experts. Freescale Semiconductor does not convey any license under its patent rights nor the rights of others. Freescale Semiconductor products are not designed, intended, or authorized for use as components in systems intended for surgical implant into the body, or other applications intended to support or sustain life, or for any other application in which the failure of the Freescale Semiconductor product could create a situation where personal injury or death may occur. Should Buyer purchase or use Freescale Semiconductor products for any such unintended or unauthorized application, Buyer shall indemnify and hold Freescale Semiconductor and its officers, employees, subsidiaries, affiliates, and distributors harmless against all claims, costs, damages, and expenses, and reasonable attorney fees arising out of, directly or indirectly, any claim of personal injury or death associated with such unintended or unauthorized use, even if such claim alleges that Freescale Semiconductor was negligent regarding the design or manufacture of the part.How to Contact UsCorporate Headquarters Freescale Semiconductor, Inc. 6501 William Cannon Drive West Austin, Texas 78735U.S.A.World Wide Web /codewarrior Technical Support /supportRevised: 24 September 2009。
CODE V 入门用户指南
第一章概述CODE V是设计和分析光学系统的一种工具。
本章的内容主要是向你介绍CODE V,描述可以帮助您学习和使用它的内容,并且简要地描述其用户界面和程序的结构。
目录第一章概述 (1)1.1 何谓CODE V? (2)1.2 手册与用户 (3)1.3 假设和术语 (4)1.4 CODE V的界面 (5)1.5 CODE V的结构 (6)1.6 启动、退出程序和技术支持 (7)1.7 手册中的一些设置 (7)1.1 何谓CODE V?1.1.1 光学设计的得力工具CODE V是解决光学问题一种强大、灵活的软件工具。
虽然CODE V的发展始于30多年前,但是它紧跟光学和计算机的发展步伐,得到不断地改进。
由于CODE V采用了可定制的窗口用户界面,有着丰富的帮助功能和优越的技术支持,所以它是十分容易学习和使用的,本手册将展示的这些特点。
1.1.2 CODE V典型的使用任务CODE V可应用于许多种场合。
下面列举一些典型的使用任务:●对现有光学系统进行评估和调整,以便决定是否适用于新场合或能否降低生产成本。
在重新设计过程中,对使用塑料、非球面、衍射元件或者现在元件进行评估。
●基于具体的产生或应用场合的要求创建新的设计形式。
●对光学系统进行公关分析,以合适制造,绘制生产图纸,甚至导出CAD用的IGES格式文件。
有哪里应用场合?从广义上来说,有三种应用领域:⏹成像系统⏹光电或通讯系统⏹照明和其它系统从历史上来看,CODE V在约80%或更多的应用大概是在成像系统方面。
例如照相镜头、变焦物镜、光盘系统、医用仪器、望远镜、分光镜、复印设备、投影仪、扫描仪、微光刻系统和许多包括军用和民用的航天领域。
虽然用于这些场合已经延续了多年,但是随着技术的发展,例如照相机的数码化、DVD取代CD等等,出现新的工作内容。
在近些年,光子学领域得到快速增长。
同时,由于CODE V有极大的灵活性,照明和其他系统也成为其重要的应用部分。
codewarrior使用指南
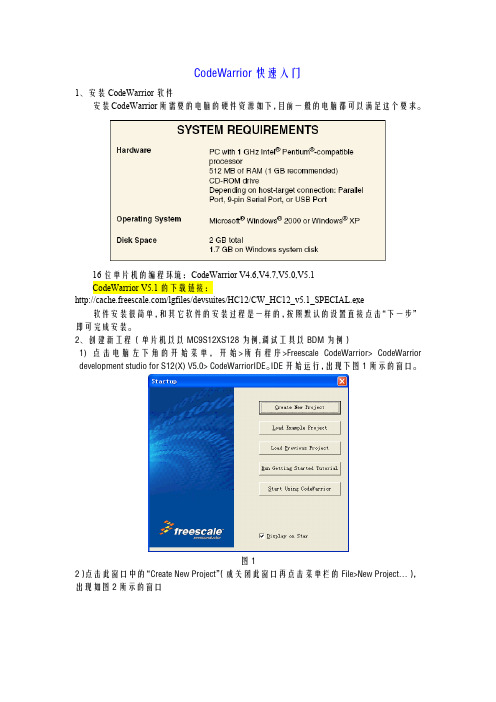
1、安装 CodeWarrior 软件 安装 CodeWarrior 所需要的电脑的硬件资源如下,目前一般的电脑都可以满足这个要求。
16 位单片机的编程环境:CodeWarrior V4.6,V4.7,V5.0,V5.1 CodeWarrior V5.1 的下载链接: /lgfiles/devsuites/HC12/CW_HC12_v5.1_SPECIAL.exe 软件安装很简单,和其它软件的安装过程是一样的,按照默认的设置直接点击“下一步” 即可完成安装。 2、创建新工程(单片机以以 MC9S12XS128 为例,调试工具以 BDM 为例) 1) 点 击电 脑 左下 角 的 开始 菜 单, 开 始 >所 有 程 序>Freescale CodeWarrior> CodeWarrior development studio for S12(X) V5.0> CodeWarriorIDE。IDE 开始运行,出现下图 1 所示的窗口。
图11
图12 接下来给核心板供电,核心板的供电电压是 5V。有的 BDM 有 5V 供电模式,这个时候 直接用 BDM 供电就可以。 2)在新建的工程中键入如下代码 #include <hidef.h> #include "derivative.h" #define LEDCPU PORTK_PK4 #define LEDCPU_dir DDRK_DDRK4 void delay(void) { unsigned int i; for(i=0;i<50000;i++); } void main(void) { LEDCPU_dir=1; EnableInterrupts;
图8
codewarrior快速使用手册
CodeWarrior™ Development Studiofor Microcontrollers V6.x Quick StartSYSTEM REQUIREMENTSHardware PC with 1 GHz Intel® Pentium® compatibleprocessor512 MB of RAM (1 GB recommended)CD-ROM driveDepending on host-target connection: ParallelPort, 9-pin Serial Port, or USB PortOperating System Microsoft® Windows® XP orMicrosoft Windows Vista® Operating Systems32-bit (Home Premium Edition and BusinessEdition)Disk Space 2 GB total400MB on Windows system diskThis Quick Start explains how to install the CodeWarrior Development Studio for Microcontrollers V6.x software, and how to use the IDE to create, build, and debug a project.NOTE You must install the CodeWarrior software on the equipment on which you intend to use the software.1.Insert CodeWarrior Development Studio CD into CD-ROM drive —CW Auto Install beginsNOTE If Auto Install does not start, run launch.exe, which is located in the root directory of the CD.The CodeWarrior software may be part of a DVD included withyour kit. In this case, click Install CodeWarrior DevelopmentStudio for Microcontrollers, follow the on-screen instructions,and skip to step "Check for updates".2.Follow setup program's on-screen instructionsNOTE Special Edition: The Special Edition license is automatically installed with your product and you do not need to register it.This license allows you to develop projects with unlimitedassembly code, up to 32KB of C code for HC(S)08/RS08derivatives and up to 64KB of C code for ColdFire V1derivatives.NOTE Evaluation Edition: The Evaluation license is automatically installed with your product and you do not need to register it.This license allows you to develop projects as ProfessionalEdition within the 30-day evaluation period. After 30 days, thelicense works as Special Edition license (free permanent, butfeature limited) which supports unlimited assembly code, up to32KB of C code for HC(S)08/RS08 derivatives and up to 64KBof C code for ColdFire V1 derivatives.1.Create a projecta.Select Start > Programs > Freescale CodeWarrior >CW forMicrocontrollers V6.x > CodeWarrior IDE — IDE starts and displaysstartup dialog box.Startup Dialog Boxb.Select Create New Project — the Microcontrollers New Project Deviceand Connection dialog box appears.NOTE This section of the quick start demonstrates using the New Project Wizard. We use an MC68HC908GZ60target as anexample.c.Expand HC08 and GZ Family and select MC68HC908GZ60 derivative. NOTE If your MCU is missing from the list, download a service pack for that device at /codewarrior/downloads.Device and Connection Dialog Boxd.Select Full Chip Simulation as your default connection.e.Click Next — the Project Parameters dialog box appears.Project Parameters Dialog Boxf.In Project name text box, the IDE supplies a default project name. Entera project name of your choice.NOTE The IDE automatically creates a folder with the same name in specified location. The IDE automatically adds .mcp extensionwhen it creates project.g.In Location text box enter location to store project, click Set to browse tofolder locationh.Select C as language to be supported by project.NOTE You can click Finish to accept defaults for remaining options.i.Click Next — the Add Additional Files dialog box appears.This dialog box lets you browse folders and add or remove files to or fromthe project.Add Additional Files Dialog Boxj.Click Next — the Processor Expert dialog box appears.This dialog box let you specify whether you want your project configuredto use Device Initialization or Processor Expert.Processor Expert Dialog Boxk.Select the None option button.l.Click Next — the C/C++ Options dialog box appears.This dialog box allows you to specify C/C++ Options.C/C++ Options Dialog Boxm.Select ANSI startup code as code, the New Project Wizard will place in your project as startup code.n.Select Small as memory model to use.o.Select None for floating point format to support.p.Click Finish — the IDE creates your project according to your specifications; Project window appears, docked at left side of mainwindow.Project WindowNOTE To undock project window, double-click the double gray lines.To re-dock window, right click in title tab and select Docked.2.Select connectionFor this example, we specified Full Chip Simulation (FCS).a.To change MCU and connection, select Project >Change MCUConnection.b.Make sure Full Chip Simulation is selected in drop-down list.3.Edit source codea.Double click main.c in Sources folder — the Editor window opensdisplaying contents of file.main.c in Editor Windowb.Make changes to contents of main.c file, if desired.c.From the IDE main menu bar, select File > Save — the IDE saveschanges.4.Add files if appropriatea.In the project window, select a folder.b.From IDE main menu bar, select Project > Add Files.The Select files to add dialog box appears.c.Navigate to the directory that contains file you want to add.d.Select the filename of file you want to add to project.e.Click Open — the Project Messages window appear indicating accesspath has been added to target, if the path is new to the project.f.In the project window, filename of the added file appears under theselected folder.5.Build projecta.From IDE main menu bar, select Project > Make — the IDE builds(assembles, compiles, and links) project; Error & Warnings windowopens showing any error messages and warning messages1.Start debuggera.Click on project window title bar to ensures that window is active projectb.From main menu bar, select Project > Make.c.From main menu bar, select Project > Debug — the True-TimeSimulator & Real-Time Debugger window opens.True-Time Simulator & Real-Time Debugger WindowNOTE The Source and Assembly panes display the main.c program and code.2.Set breakpointa.Point at a C statement in Source window and right-click — the Sourcecontext menu appears.b.Select Set Breakpoint — a permanent breakpoint mark is set.3.Run applicationa.From the True-Time Simulator & Real-Time Debugger window, selectRun — the Run menu appears.b.Select Start/Continue or click on Start/Continue icon — theProgram executes till the first breakpoint; Command pane displaysprogram statusDebugger Simulator Command Pane4.Click the Start/Continu e icon — the simulator resumes programexecution.5.Click the Halt icon — the Simulator stops program execution.6.From the True-Time Simulator & Real-Time Debugger windowtoolbar, select File > Exit to exit the debugger.7.From IDE main Window toolbar, select File > Exit to exit theCodeWarrior IDE.Congratulations!You have successfully created, built, and run an HC08 application with the CodeWarrior for Microcontrollers V6.xsoftware!Freescale™ and the Freescale logo are trademarks of Freescale Semiconductor, Inc. CodeWarrior is a trademark or registered trademark of Freescale Semiconductor, Inc. in the United States and/or other countries. PROCESSOR EXPERT and EMBEDDED BEANS are trademarks of Freescale Semiconductor, Inc. All other product or service names are the property of their respective owners.Copyright © 2009 Freescale Semiconductor, Inc. All rights reserved.Information in this document is provided solely to enable system and software implementers to use Freescale Semiconductor products. There are no express or implied copyright licenses granted hereunder to design or fabricate any integrated circuits or integrated circuits based on the information in this document.Freescale Semiconductor reserves the right to make changes without further notice to any products herein. Freescale Semiconductor makes no warranty, representation or guarantee regarding the suitability of its products for any particular purpose, nor does Freescale Semiconductor assume any liability arising out of the application or use of any product or circuit, and specifically disclaims any and all liability, including without limitation consequential or incidental damages. “Typical” parameters that may be provided in Freescale Semiconductor data sheets and/or specifications can and do vary in different applications and actual performance may vary over time. All operating parameters, including “Typicals”, must be validated for each customer application by customer's technical experts. Freescale Semiconductor does not convey any license under its patent rights nor the rights of others. Freescale Semiconductor products are not designed, intended, or authorized for use as components in systems intended for surgical implant into the body, or other applications intended to support or sustain life, or for any other application in which the failure of the Freescale Semiconductor product could create a situation where personal injury or death may occur. Should Buyer purchase or use Freescale Semiconductor products for any such unintended or unauthorized application, Buyer shall indemnify and hold Freescale Semiconductor and its officers, employees, subsidiaries, affiliates, and distributors harmless against all claims, costs, damages, and expenses, and reasonable attorney fees arising out of, directly or indirectly, any claim of personal injury or death associated with such unintended or unauthorized use, even if such claim alleges that Freescale Semiconductor was negligent regarding the design or manufacture of the part.How to Contact UsCorporate Headquarters Freescale Semiconductor, Inc. 6501 William Cannon Drive West Austin, Texas 78735U.S.A.World Wide Web /codewarrior Technical Support /supportRevised: 24 September 2009。
Kinetis K系列Flexmemory模拟EEPROM_exmaple
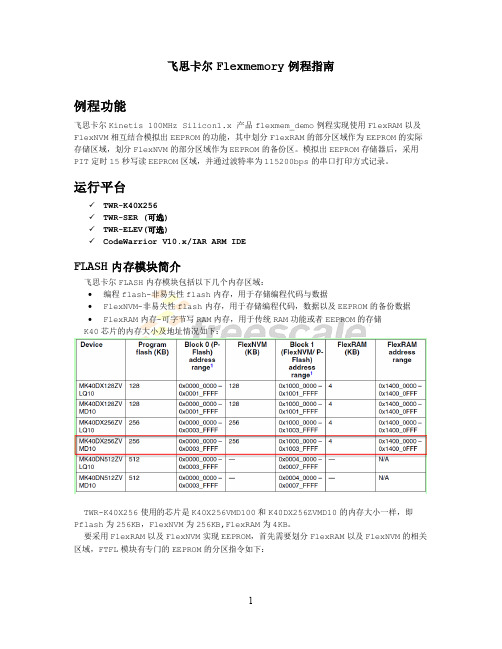
飞思卡尔Flexmemory例程指南例程功能飞思卡尔Kinetis 100MHz Silicon1.x 产品flexmem_demo例程实现使用FlexRAM以及FlexNVM相互结合模拟出EEPROM的功能,其中划分FlexRAM的部分区域作为EEPROM的实际存储区域,划分FlexNVM的部分区域作为EEPROM的备份区。
模拟出EEPROM存储器后,采用PIT定时15秒写读EEPROM区域,并通过波特率为115200bps的串口打印方式记录。
运行平台✓TWR-K40X256✓TWR-SER (可选)✓TWR-ELEV(可选)✓CodeWarrior V10.x/IAR ARM IDEFLASH内存模块简介飞思卡尔FLASH内存模块包括以下几个内存区域:∙编程flash-非易失性flash内存,用于存储编程代码与数据∙FlexNVM-非易失性flash内存,用于存储编程代码,数据以及EEPROM的备份数据∙FlexRAM内存-可字节写RAM内存,用于传统RAM功能或者EEPROM的存储K40芯片的内存大小及地址情况如下:TWR-K40X256使用的芯片是K40X256VMD100和K40DX256ZVMD10的内存大小一样,即Pflash为256KB,FlexNVM为256KB,FlexRAM为4KB。
要采用FlexRAM以及FlexNVM实现EEPROM,首先需要划分FlexRAM以及FlexNVM的相关区域,FTFL模块有专门的EEPROM的分区指令如下:其中,FCCOB4的值有两部分组成,即FCCOB4[EEESPLIT]和FCCOB4[EEESIZE]。
这两部的组合值决定了EEPROM两块内存(Subsystem A, Subsystem B)的比例以及大小,具体查看用户手册的表28-70. Valid EEPROM Data Set Size Codes.这部分内存来自FlexRAM。
【最新资料】CodeWarriorforARMDeveloperSuite的使用方法
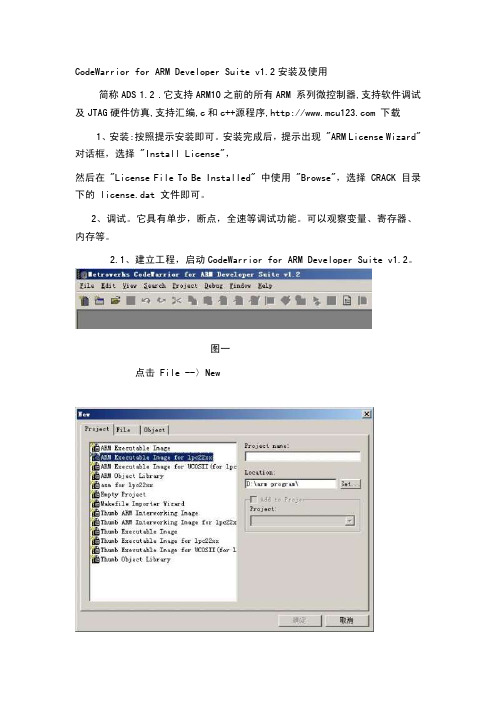
CodeWarrior for ARM Developer Suite v1.2安装及使用简称ADS 1.2 .它支持ARM10之前的所有ARM 系列微控制器,支持软件调试及JTAG硬件仿真,支持汇编,c和c++源程序, 下载1、安装:按照提示安装即可。
安装完成后,提示出现 "ARM License Wizard" 对话框,选择 "Install License",然后在 "License File To Be Installed" 中使用 "Browse",选择 CRACK 目录下的 license.dat 文件即可。
2、调试。
它具有单步,断点,全速等调试功能。
可以观察变量、寄存器、内存等。
2.1、建立工程,启动CodeWarrior for ARM Developer Suite v1.2。
图一点击 File --〉New图二如上图:大家会问。
怎么和我的不一样啊!对了!我的模板是后添加上去的。
我们要用到的工程模板需要添加。
添加方法:下载模板/tools/开发板/EasyARM2100.asp 。
解压,放在安装软件目录下。
如ADS1.2安装在C盘下。
就把工程模板文件(5个)拷贝到C:\ProgramFile\ARM\ADSV1.2\Stationery 下即可。
点击 File --〉 New弹出建立工程对话框,选择ARM Executable Image for IPC22XX。
在Location下选择存放工程的目录。
这个你爱放哪就放哪,就是不能放在有中文的路径下。
一定要记得。
2.2、建立文件。
点击 File --〉 New,弹出建立工程时的对话框(还是图二那个窗口),如果你想直接添加到哪个文件夹下,你就点一下那个文件夹,然后在点击点击 File --〉 New,图三图二File选项卡,同样在右边写入你的文件名。
文件名一定是.S或者.C文件。
CodeWarrior操作步骤

CodeWarrior操作步骤建立Workspace1.打开CodeWarrior2.在目录下建立Workspace(注意工程不要建在桌面,在此为示范请勿效仿)3.建立新项目4.输入项目名称→Next5.选择您使用的芯片型号→Next6.选择编译器类型7.选择编译语言8.选择是否使用PE工具和视图工具9.代码优化选择10.配置完成,点击Finish工程各项配置1. 时钟配置。
用户根据自己需求选择内外时钟及时钟大小2. 功能模块配置。
用户根据自己需求选择功能模块。
eg.IO 配置3.4. 各个功能模块配置好后,进行程序编写5. 主函数在ProcessorExperience.c 中6. 事件和中断等处理函数编写在Events.c 中Main 函数中的for 或while 循环从此出开始写,不然在更新PE 配置是程序被擦除触摸按键编写1.先将触摸按键库的5个文件添加进工程项目Sources中2.将触摸库添加到工程项目中。
右键点击Properties,进行一下设置。
3.更改触摸库TSI_config.c文件设置第一步:根据项目需要增加和减少使用到的TSI 通道。
在TSI_config.c文件中,TSI_TOUCH _DELTA[MAX_TSI_NUM]数组定义了每个按键出发的阈值,分别对应TSI 物理通道的0-15,当某个按键触摸前后的差值大于该Delta 值时,就会触发对应的通道事件。
如果不需要使用某个通道时,可以直接把对应的Delta 值配置为0,那么在代码中该通道就不会被Initial, calibrate 和scan,如果重新启用,只需Delta 值配置为非0 即可。
第二步:配置按键号与物理通道之间的映射关系。
如下二维数组中,左侧TSI_x是实际的TSI 物理通道,右侧KEY_1,2…N 对应着按键号0~N-1,这个按键号和TSI_main函数的返回值touched_key相对应,0xFF 表示未启用。
- 1、下载文档前请自行甄别文档内容的完整性,平台不提供额外的编辑、内容补充、找答案等附加服务。
- 2、"仅部分预览"的文档,不可在线预览部分如存在完整性等问题,可反馈申请退款(可完整预览的文档不适用该条件!)。
- 3、如文档侵犯您的权益,请联系客服反馈,我们会尽快为您处理(人工客服工作时间:9:00-18:30)。
Quick Startfor Microcontrollers V10.1CodeWarrior Development Studiofor Microcontrollers V10.x Quick StartSYSTEM REQUIREMENTSHardware Windows® OS: PC with 1 GHz Intel® Pentium®compatible processorLinux® OS: 1.8 GHz Intel Pentium class processor(or better)2GB of RAMCD-ROM driveDepending on host-target connection: ParallelPort, 9-pin Serial Port, or USB PortOperating System Microsoft® Windows XP 32-bit and 64-bit(Professional Edition),Microsoft Windows Vista® 32-bit and 64-bit (HomePremium Edition and Business Edition), orMicrosoft Windows 7 32-bit and 64-bit (HomePremium Edition and Professional Edition)Red Hat Enterprise Edition 5.2Disk Space 2 GB total400MB on Windows system diskThis Quick Start explains how to install the CodeWarrior Development Studio for Microcontrollers V10.x software on Windows and Linux operating systems, and how to use the CodeWarrior IDE to create, build, and debug a project.NOTE This section describes how to download and installCodeWarrior for Microcontrollers V10.x from the Web or installit from the CD. The Web version has a time-bombed license.NOTE Special Edition: The Special Edition license is automatically installed with your product and you do not need to register it.This license allows you to develop projects with unlimitedassembly code, up to 32KB of C code for HC(S)08/RS08derivatives, up to 64KB of C code for ColdFire V1 derivativesand up to 128 KB of C code for ColdFire V2-V4 derivatives. NOTE Evaluation Edition: The Evaluation Edition license isautomatically installed with your product and you do not needto register it. This license allows you to develop projects asProfessional Edition within the 30-day evaluation period. After30 days, the license works as Special Edition license (freepermanent, but feature limited) which supports unlimitedassembly code, up to 32KB of C code for HC(S)08/RS08derivatives, up to 64KB of C code for ColdFire V1 derivativesand up to 128 KB of C code for ColdFire V2-V4 derivatives. NOTE CodeWarrior Eclipse usage on a Microsoft® Windows Vista® or Microsoft Windows 7 system:Administrator rights are required to install CodeWarriorsoftware on Microsoft Windows Vista and Microsoft Windows 7systems, since the installer copies files into the System andProgram Files folders.The default CodeWarrior installation folder is C:\ProgramFiles\Freescale CodeWarrior\CW MCU v10.1. Toprotect against malware, Windows Vista and Windows 7 do notallow normal processes to change files in the Program Filesfolder; therefore, you must have administrator rights to installand run CodeWarrior software from this location. If you will berunning CodeWarrior software with a non-administratve useraccount, then you need to install CodeWarrior software inanother folder (e.g., C:\Freescale CodeWarrior\CW MCUv10.1).Your project workspace needs to be setup in any folder thatyou can fully access.1.Download CodeWarrior software from the Weba.Go to /cwmcu10 — the CodeWarrior forMicrocontrollers v10.x Product Summary page appears.b.Click the Downloads tab — the page displays separate downloads forthe Windows and Linux operatings systems.c.Click Download next to the required Microcontrollers V10.x download.You will be directed to the Freescale log-in page if you are not logged inalready.d.Enter your user name and password and click Log in.NOTE If you are not a registered user, click Register Now and follow the on-screen instructions.e. A dialog box appears asking you to save the installer file. The extensionof the installer file is .exe for Windows and .tar for Linux.f.Specify the location where you want to save the installer file.2.Install CodeWarrior software downloaded from WebWindows OSa.When the download finishes on the Windows host computer, navigate tothe CodeWarrior installer EXE file you have downloaded, double-click theEXE file — the install wizard appears.b.Follow the wizard instructions to install the CodeWarrior software.When software installation is finished, wizard displays the installationcomplete page.c.Check the Display Start Here page checkbox and click Finish to close thewizard.d.The start here page appears in your default browser. The page gives youinformation about the different documents, such as getting started, userguides, application notes, and cheat sheets available in the product. NOTE CodeWarrior Eclipse usage on a Linux system:The CodeWarrior installer must be run from a root account.CodeWarrior service packs are installed with the EclipseUpdater. The updater must also be run from a root account. Tostart the Eclipse Updater select 'Window > Install newsoftware' in the menu.Eclipse needs read/write access to the installation folder. Makesure the eclipse installation folder has the appropriatepermissions for all users.Make sure your project workspace has read and writepermissions.If the CodeWarrior software does not restart automatically aftera successful CodeWarrior update operation, run ‘./cwide -clean' to launch the CodeWarrior software.Linux OSa.When download finishes on the Linux host computer, navigate to thefolder containing the CodeWarrior installer TAR file you havedownloaded.b.Right-click the TAR file and select Extract Here. The system extracts thecontents of the TAR file. A new folder appears next to the TAR file in thefile browser window; usually, the new folder's name is disk1.c.Open a new terminal window — the shell session starts.d.In the terminal window, log in as root or super user.e.Issue command: xhost +.f.Change working directory to the disk1 directory.g.Issue command: ./setuplinux — the install wizard starts; the welcomepage appears.h.Follow wizard instructions to install the CodeWarrior software.i.When software installation is finished, wizard displays the installationsummary page.NOTE Using P&E hardware via the USB port within the CodeWarrior software requires the Jungo USB drivers. During theCodewarrior software installation on a Linux operating system,it attempts to install the drivers automatically. However, if thedriver installation fails and a warning message is displayed,then please refer to the Readme.pdf found within[CodewarriorInstallDir]\Drivers\pemicro tomanually install the P&E drivers.j.Click Finish.3.Install CodeWarrior Software from CDa.Insert CodeWarrior Development Studio CD into CD-ROM drive — CWAuto Install begins.NOTE If Auto Install does not start, navigate to the CodeWarrior installer EXE file, double-click the EXE file — the install wizardappears.b.Follow the wizard instructions to install the CodeWarrior software.4.Restart your computer — operating system reboots which ensuresthat CodeWarrior IDE finds newly installed drivers.NOTE Before starting the CodeWarrior IDE in Linux, make sure that LD_LIBRARY_PATH is set to empty.1.Start CodeWarrior IDEa.For Windows, select Start > Programs > Freescale CodeWarrior > CWfor MCU v10.1 > CodeWarrior — the Workspace Launcher dialog boxappears.For Linux, open a new terminal window and change the working directory as shown below:CWInstallDir/eclipse/where, CWInstallDir is the directory in which you installed theCodeWarrior software.Issue command: ./cwide — the Workspace Launcher dialog boxappears.Workspace Launcher Dialog BoxNOTE If you want to store your projects in the default location, click OK and proceed to step 2, otherwise follow the steps givenbelow.b.Click Browse — the Select Workspace Directory dialog box appears.Select Workspace Directory Dialog Boxc.Select required folder or click Make New Folder to create a new folder forstoring your projects.d.Click OK — the Select Workspace Directory dialog box closes. NOTE Check the Use this as the default and do not ask again checkbox in the Workspace Launcher dialog box to set thechosen path as the default location for storing all your projects.e.Click OK — the CodeWarrior IDE launches and the Welcome pageappears.NOTE The Welcome page appears only if the CodeWarrior IDE or the selected Workspace is opened first time. Otherwise, theWorkbench window appears. Switch directly to step 2a if theWorkbench window appears.Welcome Pagef.In the Welcome Page, click Go to Workbench — the Workbenchwindow appears.Workbench Window2.Create new projecta.From the IDE menu bar, select File > New > Bareboard Project — theNew Bareboard Project wizard starts; the Create an MCU bareboardProject page appears.b.Enter Project_1 in the New Project Name field.Create an MCU bareboard Project PageNOTE The Location field shows the default project location. If you wish to change this location, clear the Use default locationcheckbox. Click Browse and use the subsequent dialog box tospecify a new location. Click OK. The Create an MCUbareboard Project page now shows new location.c.Click Next — the Devices page appears.d.Expand the tree control and select HCS08 > HCS08G Family >MC9S08GB32.Devices Pagee.Clcik Next — the Connections page appears.Connections Pagef.Select the desired connection.NOTE In the Connections page, you can select multiple connections at once.g.Click Next — the Add Files page appears.Add Files Pageh.Click Next — the Languages page appears.NOTE The page displayed may vary depending on the derivative or board selected. For example, if you select ColdFire V2 >MCF5221X > MCF52210 and click Next, the ColdFire BuildOptions page appears.i.Select the C language.Languages Pagej.Click Next — the C/C++ Options page appears.NOTE If you check only the Relocatable Assembly or Absolute Assembly checkbox and click Next, the Rapid ApplicationDevelopment page appears instead of the C/C++ Optionspage.C/C++ Options Pagek.Click Next — the Rapid Application Development page appears.Rapid Application Development Pagel.Select None from the Rapid Application Development options.m.Click Finish — the IDE creates the project.n.Select Project > Build Project from the IDE menu bar— the IDE builds the project. Expand the project directory in the CodeWarrior Projectsview to view the list of files and folders in the project.CodeWarrior Projects ViewNOTE To set Linker, Complier, and Assembler options for a project, select the project in the CodeWarrior Projects view and selectProject > Properties from the IDE menu bar. In theProperties dialog box that appears, select C/C++ Build >Settings. You can make the required settings in the ToolSettings tab page.1.Debug programa.From the IDE menu bar, select Run > Debug Configurations — theDebug Configurations dialog box appears.b.Expand the CodeWarrior Download tree control in the left pane andselect Project_1 - MC9S08GB32 - PnE Full Chip Simulator.Debug Configurations Dialog Boxc.Click the Debugger tab — the Debugger page opens in the right pane.Debug Configurations Dialog Box — Debugger Paged.Make the appropriate changes in the Debug tab.e.Click Apply to save the changes in the settings, if any.f.Click Debug — the debugger downloads program to simulator and theDebug Perspective appears. The execution halts at the first statement ofmain()and program counter icon on the marker bar points to the next statement to be executed.Debug Perspective2.Set and run to breakpointa.Double-click on the marker bar next to a statement — the breakpointindicator (blue dot) appears next to the statement.b.From the Debug view, click Resume — the debugger executes allstatements up to but not including the breakpoint statement.3.Control programa.From the Debug view, click Step Over — the debugger executesbreakpoint statement and halts at next statement.b.From the Debug view, click Resume — the simulator resumesprogram execution.c.From the Debug view, click Terminate — the debug session ends.4.Select File > Exit from the IDE menu bar to exit the CodeWarrior IDE.Congratulations!You have created, built, and debugged an Microcontrollers project using CodeWarrior for Microcontrollers V10.xsoftware!Freescale, the Freescale logo, CodeWarrior and ColdFire are trademarks of Freescale Semiconductor, Inc., Reg. U.S. Pat. & Tm. Off. Flexis and Processor Expert are trademarks of Freescale Semiconductor, Inc. All other product or service names are the property of their respective owners.© 2010–2011 Freescale Semiconductor, Inc. All rights reserved.Information in this document is provided solely to enable system and software implementers to use Freescale Semiconductor products. There are no express or implied copyright licenses granted hereunder to design or fabricate any integrated circuits or integrated circuits based on the information in this document.Freescale Semiconductor reserves the right to make changes without further notice to any products herein. Freescale Semiconductor makes no warranty, representation or guarantee regarding the suitability of its products for any particular purpose, nor does Freescale Semiconductor assume any liability arising out of the application or use of any product or circuit, and specifically disclaims any and all liability, including without limitation consequential or incidental damages. “Typical” parameters that may be provided in Freescale Semiconductor data sheets and/or specifications can and do vary in different applications and actual performance may vary over time. All operating parameters, including “Typicals”, must be validated for each customer application by customer's technical experts. Freescale Semiconductor does not convey any license under its patent rights nor the rights of others. Freescale Semiconductor products are not designed, intended, or authorized for use as components in systems intended for surgical implant into the body, or other applications intended to support or sustain life, or for any other application in which the failure of the Freescale Semiconductor product could create a situation where personal injury or death may occur. Should Buyer purchase or use Freescale Semiconductor products for any such unintended or unauthorized application, Buyer shall indemnify and hold Freescale Semiconductor and its officers, employees, subsidiaries, affiliates, and distributors harmless against all claims, costs, damages, and expenses, and reasonable attorney fees arising out of, directly or indirectly, any claim of personal injury or death associated with such unintended or unauthorized use, even if such claim alleges that Freescale Semiconductor was negligent regarding the design or manufacture of the part.How to Contact UsCorporate Headquarters Freescale Semiconductor, Inc. 6501 William Cannon Drive West Austin, Texas 78735U.S.A.World Wide Web /codewarrior Technical Support /supportRevised:2 February 2011Freescale, the Freescale logo and CodeWarrior are trademarks of Freescale Semiconductor, Inc., Reg. U.S. Pat. & Tm. Off. All other product or service names are the property of their respective owners.© 2010, 2011 Freescale Semiconductor, Inc.。