同州n9201机顶盒说明书
Philips 55PUS9206 4K UHD LED Android TV 产品说明书
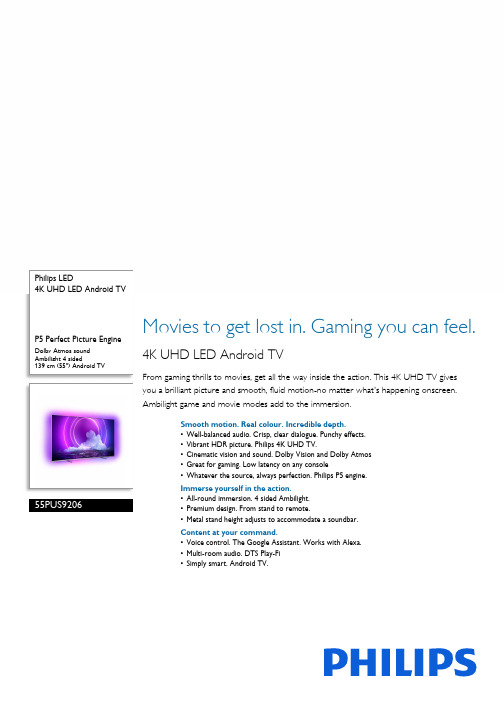
Philips LED4K UHD LED Android TVP5 Perfect Picture Engine Dolby Atmos soundAmbilight 4 sided139 cm (55") Android TV55PUS9206Movies to get lost in. Gaming you can feel. 4K UHD LED Android TVFrom gaming thrills to movies, get all the way inside the action. This 4K UHD TV gives you a brilliant picture and smooth, fluid motion-no matter what's happening onscreen. Ambilight game and movie modes add to the immersion.Smooth motion. Real colour. Incredible depth.•Well-balanced audio. Crisp, clear dialogue. Punchy effects.•Vibrant HDR picture. Philips 4K UHD TV.•Cinematic vision and sound. Dolby Vision and Dolby Atmos•Great for gaming. Low latency on any console•Whatever the source, always perfection. Philips P5 engine.Immerse yourself in the action.•All-round immersion. 4 sided Ambilight.•Premium design. From stand to remote.•Metal stand height adjusts to accommodate a soundbar.Content at your command.•Voice control. The Google Assistant. Works with Alexa.•Multi-room audio. DTS Play-Fi•Simply smart. Android TV.Highlights4 sided AmbilightWith Philips 4 sided Ambilight, every moment feels closer. Intelligent LEDs around the edge of the TV respond to the on-screen action and emit an immersive glow that's simplycaptivating. Experience it once and wonder how you enjoyed TV without it.HDMI 2.1 VRR and low latencyYour Philips TV boasts the latest HDMI 2.1 connectivity and it automatically switches to a low-latency setting when you start playing a game on your console. VRR and Freesync are supported for smooth fast-action gameplay. Ambilight's gaming mode brings the thrill right into the room.Philips P5 Picture EngineThe Philips P5 engine delivers a picture as brilliant as the content you love. Details have noticeably more depth. Colours are vivid, while skin tones look natural. Contrast is socrisp you'll feel every detail. Motion is perfectly smooth.Dolby Vision + Dolby AtmosSupport for Dolby's premium sound and video formats means that the HDR content that you watch will look—and sound—glorious. You'll enjoy a picture that reflects the director's original intentions and experience spacious sound with real clarity and depth.Premium materialsEvery inch of this TV looks and feels premium. The polished metal stand contrasts beautifully with a virtually bezel-free screen. While the soft, textured leather-backed remote with backlit keys is as good to hold as it is to use.Height-adjustable standYou can adjust the height of this TV stand for soundbars. Fit the stand risers to raise the stand to the upper position and your soundbarwon't block the bottom of the screen. No soundbar? No need to attach the risers.Simply smart. Android TVYour Philips Android TV gives you the content you want—when you want it. You can customise the home screen to display your favourite apps, making it simple to startstreaming the movies and shows you love. Or pick up where you left off.DTS Play-Fi compatibleWith DTS Play-Fi on your Philips TV you can connect to compatible speakers in any room. Got wireless speakers in the kitchen? Listen to the film while you make a snack or keep up with the sports commentary while you get everyone drinks.AI voice controlPush a button on the remote to talk to the Google Assistant. Control the TV or Google Assistant-compatible smart home devices with your voice. Or ask Alexa to control the TV viaAlexa-enabled devices.Issue date 2023-07-23 Version: 7.6.1EAN: 87 18863 02884 1© 2023 Koninklijke Philips N.V.All Rights reserved.Specifications are subject to change without notice. Trademarks are the property of Koninklijke Philips N.V. or their respective owners.SpecificationsAmbilight•Ambilight Features: Built-in Ambilight+hue, Ambilight Music, Game Mode, Wall colour adaptive, Lounge mode, AmbiWakeup, AmbiSleep, Philips Wireless Home Speakers •Ambilight Version: 4 sidedPicture/Display•Aspect ratio: 16:9•Diagonal screen size (inch): 55 inch•Diagonal screen size (metric): 139 cm•Display: 4K Ultra HD LED•Panel resolution: 3840 x 2160•Picture engine: P5 Perfect Picture Engine•Picture enhancement: HDR10+, Dolby Vision, Ultra Resolution, Micro Dimming Pro, Perfect Natural Motion, A.I. PQ mode, CalMAN Ready, ISF Colour Management •Diagonal screen size (inch): 55 inchSupported Display Resolution•Computer inputs on HDMI 1/2: HDMI 2.1 supported, HDR supported, HDR10+/HLG•Computer inputs on HDMI 3/4: HDMI 2.0 supported •Video inputs on HDMI 1/2: HDMI 2.1 supported, HDR supported, HDR10+/HLG•Video inputs on HDMI 3/4: HDMI 2.0 supportedTuner/Reception/Transmission•Digital TV: DVB-T/T2/T2-HD/C/S/S2•Video Playback: PAL, SECAM•MPEG Support: MPEG2, MPEG4•TV Programme guide*: 8-day Electronic Programme Guide •Signal strength indication•Teletext: 1000 page Hypertext•HEVC supportAndroid TV•OS: Android TV™ 10 (Q)•Pre-installed apps: Google Play Movies*, Google Play Music*, Google Search, YouTube, Netflix, Amazon instant video, BBC iPlayer, Amazon Prime Video, Disney+, Fitness App, Spotify•Memory size (Flash): 16 GB*Smart TV Features•User Interaction: SimplyShare•Interactive TV: HbbTV•Programme: Pause TV, USB recording*•Ease of Installation: Auto detect Philips devices, Device connection wizard, Network installation wizard, Settings assistant wizard•Ease of Use: One-stop smart menu button, On-screen user manual•Firmware upgradeable: Firmware auto upgrade wizard, Firmware upgradeable via USB, Online firmware upgrade, FW download in background•Screen Format Adjustments: Basic - Fill Screen, Fit to screen, Advance - Shift, Zoom, stretch, Wide screen •Remote Control: with Voice, with Key light, with Muirheadleather•Voice assistant*: Google Assistant built in, RC with Mic.,Works with AlexaMultimedia Applications•Video Playback Formats: Containers: AVI, MKV, H264/MPEG-4 AVC, MPEG-1, MPEG-2, MPEG-4, VP9, HEVC(H.265), AV1•Music Playback Formats: AAC, MP3, WAV, WMA (v2 up tov9.2), WMA-PRO (v9 and v10)•Subtitles Formats Support: .SRT, .SUB, .TXT, .SMI•Picture Playback Formats: JPEG, BMP, GIF, PNG, 360 photo,HEIFProcessing•Processing Power: Quad CoreSound•Audio: 2.1 Channel, Output power: 50 Watt (RMS)•Speaker configuration: 10 W x 2 mid-high speaker, 30 Wsub-woofer•Codec: Dolby Atmos compatible, Dolby Digital MS12 V2.5,DTS-HD(M6)•Sound Enhancement: Dolby Atmos®, A.I. Sound, ClearDialogue, Night mode, A.I. EQ, Dolby Bass Enhancement,Dolby Volume Leveller, DTS Play-Fi, Mimi SoundPersonalisationConnectivity•Number of HDMI connections: 4•HDMI features: 4K, Audio Return Channel•EasyLink (HDMI-CEC): Remote control pass-through,System audio control, System standby, One touch play•Number of USBs: 3•Wireless connection: Wi-Fi 802.11ac, 2 x 2, Dual band,Bluetooth 5.0•Other connections: Satellite Connector, Common InterfacePlus (CI+), Digital audio out (optical), Ethernet-LAN RJ-45,Headphone out, Service connector•HDCP 2.3: Yes on all HDMI•HDMI ARC: Yes for all ports•HDMI eARC: Yes on HDMI2•HDMI VRR: FreeSync Premium, Yes on all HDMI portsEU Energy card•Diagonal screen size (inch): 55•EPREL registration numbers: 685572•Diagonal screen size (metric): 139•Energy class for SDR: G•On mode power demand for SDR: 76 kWh/1000h•Energy class for HDR: G•On mode power demand for HDR: 146 kWh/1000h•Off mode power consumption: n.a.•Networked standby mode: <2.0 W•Panel technology used: LED LCDPower•Mains power: AC 220 - 240 V 50/60 Hz•Ambient temperature: 5°C to 35°C•Standby power consumption: <0.3 W•Power Saving Features: Auto switch-off timer, Picture mute(for radio), Light sensor, Eco modeAccessories•Included accessories: Remote Control, Quick start guide,Legal and safety brochure, Power cord, Tabletop stand•Included batteries: 2 x AAA BatteriesDesign•Colours of TV: Mid silver metal bezel•Stand design: Metal dual tone finish sticksDimensions•Set Width: 1230.8 mm•Set Height: 712.6 mm•Set Depth: 84.5 mm•Product weight: 17.8 kg•Set width (with stand): 1230.8 mm•Set height (with stand): 732.6/ 782.6 mm•Set depth (with stand): 255.0 mm•Product weight (+stand): 18.4 kg•Box width: 1360.0 mm•Box height: 840.0 mm•Box depth: 160.0 mm•Weight incl. Packaging: 22.9 kg•Stand width: 700.0/ 990.8 mm•Stand height: 20.0/ 70.0 mm•Stand depth: 255.0 mm•Wall-mount compatible: 300 x 300 mm*EPG and actual visibility (up to 8 days) is country- and operator-dependent.*Android App offerings vary per country. For more details please visityour local Google Play Store.*The TV supports DVB reception for 'Free to air' broadcast. SpecificDVB operators may not be supported. An up to date list can befound in the FAQ section of the Philips support website. For someoperators Conditional Access and subscription are required.Contact your operator for more information.*Philips TV Remote app and related functionalities vary per TV model,operator and country, as well as smart device model and OS. Formore details please visit: /TVRemoteapp.*USB recording for digital channels only, recordings may be limited bybroadcast copy protection (CI+). Country and channel restrictionsmay apply.*This television contains lead only in certain parts or componentswhere no technology alternatives exist in accordance with existingexemption clauses under the RoHS Directive.*Memory size (Flash): 16 G, the actual available disc space may differ(dependant on e.g. (pre-)installed apps, installed operating system,etc.)*Google Assistant is available on Philips Android TVs running onAndroid O (8) or higher OS version. Google Assistant is available inselected languages and countries.*Amazon Prime is available in selected languages and countries.*Amazon, Alexa and all related logos are trademarks of ,Inc. or its affiliates. Amazon Alexa is available in selected languagesand countries.*Netflix subscription required. Subject to terms on https://*Disney+ subscription required. Subject to terms at https:// (c) 2020 Disney and its related entities.Disney+ is available in selected languages and countries.*Rakuten TV is available in selected languages and countries.。
Novatek机顶盒简易操作说明

目录1.菜单介绍 (1)2.颜色键 (2)3.登录用户 (2)4.连接网络 (3)5.软件升级 (7)6.软件备份 (9)7.打开隐藏菜单 (9)8.选择卫星 (11)9.卫星设置 (12)10.自动搜索节目 (13)11.手动搜索节目 (13)12.自动搜索T/T2节目 (14)13.手动搜索T/T2节目 (14)14.使用OTT/IPTV (15)15.使用GSCAM (15)16.使用NEWCAM/CCCAM (17)17.使用Biss (21)18.使用Powervu (22)B调试日志 (24)20.PVR与Timeshift (25)21.多媒体播放 (25)22.录制TS流 (25)1.菜单介绍主菜单为九宫格模式,简洁易用,同时可以按数字键1~9快速切换。
二级菜单为3*5模式,可以多页,如果有多页,可直接按Page+/-进行翻页,按方向键切换子菜单。
2. 颜色键在主菜单和二级菜单界面下,按颜色键可以快速打开不同的三级子菜单。
● 红色键:快速打开语言设置界面,可以切换菜单语言等● 绿色键:快速打开网络设置界面,可以进行Ethernet/Wi-Fi/3G 等网络设置● 黄色键:快速打开Media Player 界面,可以进行音乐播放,电影播放,图片浏览等 ● 蓝色键:快速进入用户切换界面,可以进行Admin 与Guest 等用户的切换3. 登录用户软件默认为两个登录用户:Admin 和Guest, 其中Admin 可以操作所有菜单并且不需要输入密码(除18+外菜单外),而Guest 用户则有很多菜单是不显示出来,比如Installation 中的菜单等。
默认为Admin用户登录,在Menu的Login菜单中可以进行两个用户的切换。
在播放节目状态下按EXIT键也可以弹出切换窗口。
4.连接网络在主菜单及二级菜单下可以按绿色键进入Network Setting界面,也可以通过主菜单中System Setting中的Network Setting子菜单进入。
TC-9201手机 使用者说明书

TC-P201手機 使用者說明書目錄1基本知識 (6)1.1簡介 (6)1.2安全須知 (7)1.3安全警告和注意事項 (10)通用注意事項 (10)使用手機的注意事項 (11)使用電池的注意事項 (12)使用充電器的注意事項 (13)清潔和維護 (14)一般注意事項 (15)2使用前 (17)2.1各部分的名稱和說明 (17)技術參數 (17)按鍵說明 (18)2.1.3 側鍵功能介紹 (20)2.2電池 (20)電池的拆卸和安裝 (21)電池的充電 (22)2.3連接網路 (24)SIM卡 (24)SIM卡的插入和取出 (25)開關話機 (25)SIM卡的解鎖 (26)話機解鎖 (27)連接到網路 (27)3基本操作 (28)3.1撥打電話 (28)撥打國內電話 (28)撥打固定電話分機 (29)撥打國際電話 (29)撥打列表中電話 (30)3.2緊急呼叫 (31)3.3接聽電話 (31)3.4通話記錄 (31)3.5主選單 (31)4功能選單 (34)4.1功能選單的使用 (34)滾動搜索選擇功能 (34)快捷選擇功能 (34)導航鍵功能 (34)快捷功能 (35)退出主選單 (35)4.2功能選單架構 (35)4.3電話簿 (38)4.4訊息 (40)4.4.1 新訊息 (40)4.4.2 寫訊息 (41)4.4.3 查看已接收訊息和已保存訊息 (42)4.4.4 常用訊息的操作 (44)4.4.5 簡訊設定 (44)4.4.6 多媒體訊息設定 (45)4.5通話記錄 (47)查看通話紀錄 (47)輔助選項 (48)4.6設置 (50)4.6.1 話機設定 (50)4.6.2 通話設定 (51)4.6.3 網路設定 (52)4.6.4 安全設定 (53)4.6.5 恢復出廠設定 (55)4.7多媒體 (55)4.7.1 照相機 (55)4.7.2 音樂播放器 (55)4.7.3 錄音 (56)4.7.4 鈴聲編輯 (57)4.8檔案管理 (57)4.9娛樂和遊戲 (57)4.10情景模式 (59)一般模式 (59)會議模式 (60)戶外模式 (60)室內模式 (60)耳機模式 (60)4.11工具箱 (60)4.11.1 日曆 (60)4.11.2 待辦事項 (61)4.11.3 鬧鈴 (61)4.11.4 世界時間 (61)4.12服務 (62)4.12.1STK (62)4.12.2WAP (62)4.12.3 帳號資料 (64)4.13附加功能 (65)4.13.1 電算機 (65)4.13.2 單位換算 (65)4.13.3 貨幣換算 (66)4.13.4 健康管理 (66)4.14快捷功能 (67)5 外螢幕簡介 (67)5.1待機界面 (67)5.2短訊息提示界面 (67)5.3鬧鐘提示界面 (67)5.4通話界面 (67)6輸入法 (68)6.1概述 (68)6.2鍵盤定義 (68)6.3輸入法說明 (69)6.3.1拼音輸入法 (69)6.3.2筆畫輸入法 (71)6.3.3智能英文輸入法 (73)6.3.4英文和數字輸入 (74)6.3.5注音輸入法 (75)1基本知識1.1簡介感謝您選擇TC-P201系列全中文彩色行動電話。
HD920X 2 手册说明书

HD920XManuale dell'utente2SOMMARIOImportante 3Introduzione 7Descrizione generale 7Prima di utilizzare l'apparecchio per la prima volta 9Preparazione per l'uso 9Utilizzo dell'apparecchio 9Tabella dei cibi 9Frittura ad aria 11Preparazione di patatine fritte fatte in casa 13Pulizia 14Tabella di pulizia 16Conservazione 16Riciclaggio 16Garanzia e assistenza 17Risoluzione dei problemi 173 ITALIANO4ITALIANOdi esperienza o conoscenze adatte a condizioneche tali persone abbiano ricevuto assistenzao formazione per utilizzare l'apparecchio inmaniera sicura e capiscano i potenziali pericoliassociati a tale uso. Evitare che i bambini giochinocon l'apparecchio. Le operazioni di pulizia emanutenzione non devono essere effettuate dabambini di età inferiore agli 8 anni.-Tenere l'apparecchio e il relativo cavo lontanodalla portata di bambini di età inferiore agli 8 anni.-Tenere il cavo di alimentazione lontano dasuperfici incandescenti.-Collegare l'apparecchio esclusivamente a unapresa a muro con messa a terra. Accertarsi sempreche la spina sia correttamente inserita nella presadi corrente.-Questo apparecchio non è stato progettato peressere utilizzato in abbinamento a un timeresterno o a un sistema separato con telecomandoa distanza.-Non collocare l'apparecchio contro una parete o unaltro apparecchio. Lasciare almeno 10 cm di spaziolibero sul retro e i lati e 10 cm di spazio sopral'apparecchio. Non posizionare alcun oggettosopra l'apparecchio.-Non usare l'apparecchio per scopi diversi da quellidescritti nel presente manuale.-Durante la frittura ad aria calda viene emessovapore attraverso le aperture di circolazionedell'aria. Tenere le mani e il viso a distanzadi sicurezza dal vapore e dalle aperture dicircolazione dell'aria. Fare attenzione al vapore eall'aria calda anche quando si rimuove il recipientedall'apparecchio.-Le superfici accessibili potrebbero diventare caldedurante l'uso.5ITALIANO-Il recipiente, il cestello e gli accessori all'internodi Airfryer si surriscaldano durante l'uso. Fare attenzione quando li si maneggia.-Non posizionare l'apparecchio al di sopra o in prossimità di fornelli a gas o ogni tipo di fornello o piastra di cottura elettrici, né all'interno di forni riscaldati.-Non inserire ingredienti dal peso ridotto o carta forno nell'apparecchio.-Non appoggiare l'apparecchio sopra o in prossimità di materiale combustibile, ad esempio tovaglie e tende.-Non lasciare mai incustodito l'apparecchio in funzione.-Scollegare subito l'apparecchio se da quest'ultimo fuoriesce del fumo scuro. Attendere chedall'apparecchio non fuoriesca più fumo prima di rimuovere il recipiente.-Conservazione delle patate: la temperatura deve essere adatta alla varietà di patata conservata e superiore ai 6 °C in modo da minimizzare i rischi di esposizione all'acrilammide negli alimenti preparati.-Non collegare l'apparecchio alla presa di corrente e non toccare il pannello di controllo con le mani bagnate.-Questo apparecchio deve essere utilizzato a una temperatura ambiente compresa tra 5 °C e 40 °C. Attenzione-Questo apparecchio è stato progettato per il normale uso domestico. Non è progettato perl'uso in ambienti quali zone dedicate alla cucina all'interno di negozi, uffici e altri ambienti di lavoro. Non è ideato per essere utilizzato dagli ospitidi alberghi, motel, bed and breakfast e in altri ambienti residenziali.6ITALIANO-Per eventuali controlli o riparazioni, rivolgersisempre a un centro autorizzato Philips. Nontentare di riparare l'apparecchio da soli per noninvalidare la garanzia.-Se l'apparecchio non viene utilizzatocorrettamente, è destinato a usi professionali osemi-professionali, oppure viene utilizzato senzaattenersi alle istruzioni del manuale dell'utente, lagaranzia non è più valida e Philips non rispondeper eventuali danni.-Posizionare e utilizzare sempre l'apparecchio suuna superficie piana, stabile e orizzontale.-Dopo l'utilizzo, scollegare sempre l'apparecchio.-Lasciare raffreddare l'apparecchio per circa 30minuti prima di maneggiarlo o pulirlo.-Assicurarsi che gli ingredienti preparati con questoapparecchio siano di colore giallo-dorato e nonscuri o marroni. Rimuovere i residui bruciati.Non friggere patate fresche a una temperaturasuperiore a 180 °C (per ridurre al minimo laproduzione di acrilammide).-Fare attenzione quando si pulisce la zonasuperiore della camera di cottura: la resistenza e ibordi delle parti metalliche sono caldi.-Assicurarsi sempre che il cibo sia completamentecotto nel sistema Airfryer.-Assicurarsi sempre di avere il controllo del sistemaAirfryer.-Durante la cottura di cibi grassi, il sistema Airfryerpotrebbe emettere fumo.Campi elettromagnetici (EMF)Questo apparecchio Philips è conforme a tutti gli standard e alle normerelativi ai campi elettromagnetici.7 ITALIANO8ITALIANO9 ITALIANO10ITALIANO11 ITALIANO12ITALIANO13 ITALIANO14ITALIANO15 ITALIANO16ITALIANO17 ITALIANO18ITALIANOLe specifiche sono soggette a modifica senza preavviso.© 2021 Koninklijke Philips N.V.Tutti i diritti riservati.。
同洲n9101机顶盒无线功能使用说明书—下载不会怀孕

网络电视说明书 Philips 9206

使用手冊55PUS920665PUS9206Register your product and get support at /TVsupport目錄1 首頁畫面4 1.1 首頁畫面和頻道4 1.2 應用程式和 Philips TV 系列4 1.3 開啟首頁畫面41.4 首頁畫面更新42 安裝6 2.1 閱讀安全指示6 2.2 電視底座和壁面架設6 2.3 擺放位置提示6 2.4 電源線6 2.5 天線電纜62.6 衛星接收碟73 遙控器8 3.1 按鍵瀏覽8 3.2 將遙控器與電視配對10 3.3 語音搜尋10 3.4 IR 感應器11 3.5 電池113.6 清潔114 開啟和關閉12 4.1 開啟或待機124.2 電視上的按鍵125 頻道13 5.1 安裝頻道13 5.2 頻道清單13 5.3 頻道清單排序13 5.4 觀賞頻道14 5.5 設定為喜愛的頻道16 5.6 圖文 / 圖文電視175.7 互動式電視186 安裝頻道20 6.1 安裝衛星20 6.2 安裝天線頻道226.3 複製頻道清單247 連接裝置26 7.1 關於各種連接26 7.2 CAM 搭配智慧卡 - CI+26 7.3 家庭劇院 - HTS27 7.4 智慧型手機和平板電腦28 7.5 藍光光碟播放器28 7.6 藍牙28 7.7 耳機28 7.8 遊戲機28 7.9 USB 外接式硬碟29 7.10 USB 鍵盤30 7.11 USB 隨身碟30 7.12 相機30 7.13 攝影機31 7.14 電腦318 連接您的 Android TV32 8.1 網路和網際網路32 8.2 Google 帳戶338.3 「Philips TV 系列」應用程式349 應用程式35 9.1 關於應用程式35 9.2 Google Play35 9.3 開始或停止應用程式36 9.4 鎖定應用程式36 9.5 管理應用程式379.6 儲存3710 網際網路38 10.1 啟動網際網路3810.2 網際網路選項3811 快速選單3912 輸入源40 12.1 切換至裝置40 12.2 電視輸入源選項40 12.3 裝置名稱及類型4012.4 重新掃描已連接的裝置4013 網路42 13.1 網路4213.2 藍牙4214 設定43 14.1 畫面43 14.2 聲音46 14.3 Ambilight (流光溢彩) 設定48 14.4 環保/節能設定49 14.5 一般設定50 14.6 時鐘、地區及語言設定52 14.7 Android 設定52 14.8 通用存取設定5214.9 鎖定設定5315 影片、相片和音樂54 15.1 來自電腦或 NAS54 15.2 喜愛頻道選單54 15.3 最受歡迎選單與上次播放選單54 15.4 來自 USB 連接裝置54 15.5 播放您的影片/視訊54 15.6 觀看您的相片5515.7 播放您的音樂5616 電視指南58 16.1 必要準備58 16.2 電視指南數據5816.3 使用電視指南5817 錄影與暫停電視播放60 17.1 錄影6017.2 暫停電視 (播放)6118 智慧型手機和平板電腦6318.1 Philips TV Remote App6318.2 Google Cast6319 遊戲64 19.1 必要準備64 19.2 遊戲控制器6419.3 玩遊戲機的遊戲6420 Ambilight (流光溢彩)65 20.1 Ambilight (流光溢彩) 風格65 20.2 關閉 Ambilight (流光溢彩)65 20.3 Ambilight (流光溢彩) 設定65 20.4 Lounge Light 模式65 20.5 日出喚醒鬧鐘66 20.6 Ambisleep6620.7 Ambilight 延伸6621 首選68 21.1 關於首選68 21.2 即時推薦6821.3 隨選視訊6822 Freeview Play70 22.1 關於 Freeview Play7022.2 使用 Freeview Play7023 Netflix7124 Alexa72 24.1 關於 Alexa7224.2 使用 Alexa7225 軟體73 25.1 更新軟體73 25.2 軟體版本73 25.3 自動軟體更新73 25.4 檢視軟體更新紀錄73 25.5 開放原始碼軟體74 25.6 開放原始碼授權7425.7 公告7426 規格75 26.1 環境保護75 26.2 電源75 26.3 作業系統75 26.4 接收75 26.5 顯示器類型75 26.6 顯示器輸入解析度75 26.7 連接76 26.8 聲音7626.9 多媒體7627 協助說明與支援77 27.1 註冊您的電視77 27.2 使用協助說明77 27.3 疑難排解77 27.4 線上協助說明7927.5 支援及維修7928 安全與照護80 28.1 安全性80 28.2 螢幕照護81 28.3 皮革保養與維護8129 使用條款82 29.1 使用條款 - 電視82 29.2 使用條款 - Smart TV8229.3 使用條款 - Philips TV 系列8230 版權83 30.1 HDMI83 30.2 杜比視界及 Dolby Atmos83 30.3 DTS-HD83 30.4 DTS Play-Fi83 30.5 Wi-Fi Alliance83 30.6 Kensington8330.7 其他商標8331 針對第三方所提供服務及/或軟體的免責聲明84索引851首頁畫面1.1首頁畫面和頻道要享受 Android TV的益處,請把電視連接至網際網路。
TOA DT-920 电子调制收音机用户手册说明书
OPERATING INSTRUCTIONS AM/FM SYNTHESIZERDT-920 TUNERPlease follow the instructions in this manual to obtain the optimum results from this unit.We also recommend that you keep this manual handy for future reference.TOA CorporationCONTENTSTO USE YOUR UNIT PROPERLY AND SAFELY ACCESSORIESCONNECTIONSCONTROLSLISTENING TO THE RADIOFREQUENCY UP/DOWN TUNINGDIRECT TUNINGAUTOMATIC OR MANUAL PRESET TUNING LISTENING TO PRESET STATIONS MAINTENANCETROUBLESHOOTING GUIDE SPECIFICATIONS 1 1 2 3 3 3 4 4 5 6 6 6TO USE YOUR UNIT PROPERLY AND SAFELY- Do not damage the power cord.- When not in use, disconnect the power cord from the outlet. Grasp the plug, not the cord, when disconnecting the unit.- If water should enter the unit, electrical shock or a malfunction may result. Use in an area where there is low humidity and little dust.- Do not disassemble or alter the unit in any way.CAUTIONTHIS UNIT SHOULD NOT BE ADJUSTED OR REPAIRED BY ANYONE EXCEPT PROPERLY QUALIFIED SERVICE PERSONNEL.WARNING!TO AVOID THE HAZARDS OF FIRE OR ELECTRICAL SHOCK, DO NOT EXPOSE THIS APPLIANCE TO RAIN OR OTHER MOISTURE.ACCESSORIESAM loop antenna Part No. 614 240 0845FM indoor antennaPart No. 614 023 7481RCA plug audio cablePart No. 645 005 0534 ATTENTIONFor your protection in the event of theft or loss of this product, please fill in the information below for your own personal records.DT-920 Model No.Date of PurchaseWhere Purchased Serial No.(Located on the back of the unit) Purchase PriceWARNING: TO PREVENT FIRE OR SHOCK HAZARD, DO NOT EXPOSETHIS APPLIANCE TO RAIN OR MOISTURE.RISK OF ELECTRIC SHOCKDO NOT OPENThese markings are located on the bottom, side or back of the unit.CAUTION: TO PREVENT THE RISK OF ELECTRIC SHOCK, DO NOT REMOVE COVER (OR BACK). NO USER-SERVICEABLE PARTS INSIDE. REFER SERVICING TO QUALIFIED SERVICE PERSONNEL.This symbol indicates that dangerousvoltage constituting a risk of electric shock is present within this unit.This symbol indicates that there are important operating and maintenance instructions in the literature accompany-ing this unit.CONNECTIONS1. Connect the FM and AM antennas as shown below.FM antennaThe T-shaped indoor FM antenna (300-ohm) is sufficient to receive most local FM broadcasts and should be connected to the rear FM terminals on the DT-920.Infringe areas, or w here reception is distorted or noisy,an FM outdoor antenna (not supplied) should be connected instead of t he indoor a ntenna. The t erminals will accept 300-ohm twin lead cable.AM antennaThe AM loop antenna issufficient to receive most local AM broadcasts.Assemble the loop antenna Unwind the antenna wires (about 3 turns), then connect them to the AM LOOP terminals. Place the loop antenna in a position which yields the best AM reception, or attach it to a wall or other surface as shown.NOTE:To minimize noise...- Keep the speaker wires, power cord and all other cables away from the antennas.- Do not place the antenna close to a TV or speaker.2. Connect one end of a supplied audio cable to the OUTPUT (1 or 2) jack on the TUNER and the other end to the AUX input jack (-20 to 0dBV, 10k ) of the 900series II amplifier.3. After making all the connections, connect t he AC power cord to 120V AC 60Hz outlet.This unit is equipped with a polarized plug. If you have difficulty inserting the plug, turn it over and reinsert it. If the unit will not be used for a long time, disconnect the AC plug from the AC outlet.CAUTION: TO PREVENT ELECTRIC SHOCK, MATCH WIDE BLADE OF PLUG TO WIDE SLOT, FULLY INSERT.ATTENTION:POUR ÉVITER LES CHOCS ÉLECTRIQUES, INTRODUIRELA LAME LA PLUS LARGE DE LA FICHE DANS LA BORNE CORRESPONDANTE DE LA PRISE ET POUSSER JUSQU'AU FOND.CAUTION:Loose or incorrect connections will result in poor sound or improper operation.900 SERIES II AMPLIFIERDT-920CONTROLS1. Power button (POWER)2. Channel/Frequency select button (CH/FREQ)3. Display (MULTI-FUNCTION DISPLAY)4. Band select button (BAND)5. Tuning button (DOWN TUNING UP)6. Preset tuning buttons (PRESET)7. Direct-in button (DIRECT IN)8. Memory button (MEMORY)9. Scan level button (SCAN LEVEL)10. Automatic/Manual tuning select button(AUTO/MANUAL)LISTENING TO THE RADIOPreparation 1. Press the POWER button on the tuner.FREQUENCY UP/DOWN TUNINGAutomatic tuningManual tuning1. Press the BAND button to select AM or FM.2. Press the CH/FREQ button to select the frequency mode. "FREQ" appears.3. Press the AUTO/MANUAL button to select the automatic tuning mode. "AUTO" appears.4. Press the SCAN LEVEL button to select the desired scanning level, "SCAN 1" or "SCAN 2."SCAN 1: To receive stations with weak signals SCAN 2: To receive stations with strong signals 5. Press the TUNING "UP" or "DOWN" button.The unit will scan up or down the band and receive the next station with a signal that is at least as strong as the scanning level selected in step 4.6. Adjust f or t he d esired s ound quality w ith t he a ppropriate controls of the connected amplifier.1. Press the BAND button to select AM or FM.2. Press the CH/FREQ button to select the frequency mode. "FREQ" appears.3. Press the AUTO/MANUAL button to select the manual tuning mode. ("AUTO" disappears and "MONO" appears when FM band is selected.)4. Press and hold the TUNING "UP" or "DOWN" button until the desired station frequency appears on the display.- Press and release the TUNING "UP" or "DOWN"repeatedly change the selected frequency one step at a time.DIRECT TUNING1. Press the BAND button to select AM or FM.2. Press the DIRECT IN button."FM ---. -- MHz" or "AM - - - - kHz" appears and blinks.3. Press the PRESET buttons (1 - 0) to enter the frequency of a broadcast station.Example:FM 98.1 MHz... Press 9, 8 and 1.FM 103.5 MHz... Press 1, 0, 3 and 5.AM 560 kHz... Press 5 and 6.AM 1680 kHz... Press 1, 6 and 8.NOTE:If you try to enter an incorrect station frequency (86.0MHzor 500kHz, for example), the display will continue to blink until the correct number is entered.AUTOMATIC OR MANUAL PRESET TUNINGAutomatic preset tuning (APT)Manual preset tuning1. Press the BAND button to select AM or FM.2. Press the SCAN LEVEL button to select the desired scan level, "SCAN 1" or "SCAN 2."3. Press and hold down the MEMORY button for at least 3seconds, until "APT" and "CH" blink, then release the button.The unit w ill s tart at t he low end of t he s elected band and scan upward (higher frequency numbers). Up to 20stations will be memorized automatically.After the last station is programmed, the lowest preset station number will be selected. "APT" disappears.4. To automatically preset stations on the other band,press the BAND button, then follow steps 1 - 3 above.IMPORTANT NOTE- If APT is activated, all previously programmed stations will be cleared and new stations will be programmed.- FM stations will be automatically programmed into CH01- CH20.AM stations will be automatically programmed into CH21 - CH40.1. Press the BAND button to select AM or FM.2. Tune in a station as described in "FREQUENCY UP/DOWN TUNING" or "DIRECT TUNING."3. Press the MEMORY button. "MEMO" appears and "CH - -" blinks.4. Press two PRESET buttons (1 - 0) while "CH - -" is blinking.When presetting stations, two buttons must be pressed (except when presetting CH40).Example:CH01 ....... Press "0" and "1".CH05 ....... Press "0" and "5".CH12 ....... Press "1" and "2".CH39 ....... Press "3" and "9".CH40 ....... Press "4" only.The selected station is now programmed. The preset channel number and the frequency of the programmed station appear on the display.NOTES:- You cannot enter preset numbers above CH40.- If a new station is programmed into a band and preset number already containing a programmed station, the previously programmed station will be cleared.5. To manually preset stations on the other band, press the BAND button, then follow steps 1 - 4 above.LISTENING TO PRESET STATIONSProgram stations as described in "AUTOMATIC OR MANUAL TUNING."Using the TUNING "UP" or "DOWN" buttonUsing the PRESET button1. Press the CH/FREQ button to select the channel mode.("FREQ" disappears.)2. Press the TUNING "UP" or "DOWN" button until the desired channel number appears on the display.- The preset station for the selected channel number can be heard.1. Press two PRESET buttons (1 - 0) to select the desired channel number.Example:CH01 ... Press "0" and "1".CH05 ... Press "0" and "5".CH12 ... Press "1" and "2".CH39 ... Press "3" and "9".CH40 ... Press "4" only.You cannot enter preset numbers above CH40.- The preset station for the selected channel number can be heard.- If a channel number which has not been preset is entered,"----" appears f or 2 seconds and t he previous station is selected.Changing the reception frequenciesIt is not necessary to perform this procedure in U.S.A and CANADA.1. Select the band to be changed.2. Turn the power off.3. While pressing the BAND button, press the POWER button.AM: 520 - 1710 kHz (10 kHz steps)522 - 1710 kHz (9 kHz steps)FM: 87.9 - 107.9 MHz (200 kHz steps)87.5-108.0 MHz (50 kHz steps)- The preset stations will be retained in the memory even if the unit is turned off.If the memory contents are lost due to a power failure or other condition, preset the stations again.WHAT TO DO IF ...If t he operation of the unit or display is not normal, or you wish to clear the contents of the memory, disconnect the power cord from the AC outlet, then press the RESET button (rear of the unit) for at least 20 seconds.MAINTENANCECleaning the cabinetUse a clean soft cloth moistened with plain lukewarm water and wrung dry. Never use benzol, benzene or other strong chemical cleaners since these could damage the finish of your unit. It is important that no liquid reaches the inside of the unit.WARNING:FOR YOUR PERSONAL SAFETY, BE SURE TO DISCONNECT THE AC POWER CORD BEFORE PROCEEDING WITH ANY MAINTENANCE OR CLEANING.TROUBLESHOOTING GUIDEIf you have followed the instruction and are having difficulty operating the unit, locate the SYMPTOM in the left column below. Check the corresponding POSSIBLE CAUSE and CORRECTIVE ACTION columns to locate and remedy the problem.Servicing:Should this product require service, refer to the TOA Electronics, Inc., TOA Canada Corporation warranty.SPECIFICATIONS DT-920Tuning range AM:FM:520kHz - 1710kHz (10kHz steps)/522kHz - 1710kHz (9kHz steps)87.9MHz - 107.9MHz (200kHz steps)/87.5MHz - 108.0MHz (50kHz steps)FM usable sensitivity AM usable sensitivity Power requirements Power consumption Dimensions (W x H x D)Weight 14.7dBf 700µV/m 120V AC ±10%, 60Hz 6 Watts Approx. 420 x 82 x 270 mm Approx. 2.8 kgIMPORTANT INFORMATIONAll specifications are subject to change without notice.SYMPTOMNo power when the POWER button is set to ON.Poor FM reception.Continuous or intermittent hissing noise during AM reception, especially at night.A humming noise can be heard during AM broadcast reception.The tuner operation or display is not normal.POSSIBLE CAUSENo power plug connection at the AC outlet.No antenna is connected.Shorted or faulty connection(s) between the FM antenna and the tuner.The antenna is not positioned for the best reception.Noise caused by motors, fluorescent lamps,lightning, television. etc.The power cord may be too close to the AM loop antenna or the antenna wire.The memory must be reset.CORRECTIVE ACTIONInsert power plug into the AC outletConnect the supplied FM antenna to the FM antenna terminals on the rear panel of the unit.Refer to the "CONNECTIONS" section.Check the connections to the FM antenna terminals on the rear panel of the unit.Change the position of the antenna. Refer to the "CONNECTIONS" section.Keep the unit away from noise sources.Install an outdoor AM antenna (Noise may bereduced, but not completely eliminated.)Position the power cord away from the antennaline and the AM loop antenna.Adjust the position of the AM loop antenna.Disconnect the power cord, then press theRESET button (rear of the tuner) at least 20seconds. See page 5.FCC INFORMATIONThis device complies with Part 15 of the FCC Rules.Operation is subject to the condition that this device does notcause harmful interference.CAUTION:Changes or modifications not expressly approved by TOA mayvoid the user's authority to operate this equipment.Printed in Hong KongTOA Corporation1AD6P1P0022--A。
百视通贵州IOTV机顶盒安装使用手册V1.0
贵州IOTV智能机顶盒安装使用手册V 1.0拟制:日期:2013-01-06审核:日期:批准:日期:版权所有侵权必究目录1.产品简介 (4)1.1电视新用法 (4)1.2物品清单 (5)1.3机顶盒外观 (5)2.产品安装调试 (7)2.1产品安装 (7)2.1.1连接电视机 (7)2.1.2连接电视机 (8)2.1.3连接电源 (9)2.1.4连接音响设备 (9)2.2激活过程 (10)2.2.1 OTT激活 (10)2.2.2 电视吧激活 (11)2.3互联网设置 (13)2.3.1 使用有线网络 (13)2.3.2 使用无线网络 (14)2.3.3使用PPPOE拨号 (15)2.3.4 网络检测 (16)2.4机顶盒设置 (17)3.操作指南 (18)3.1遥控器使用方法 (18)3.2遥控器电池更换 (19)4.系统升级 (20)4.1系统升级提醒 (20)4.2自动升级操作 (20)4.3升级过程说明 (20)变更历史:1.产品简介BesTV百视通以打造“电视新看法”为己任,通过全新的网络数字互动技术,为观众提供多样化的视听服务。
BesTV始终坚持“用户导向”,激励所有百视通人以高度的媒体责任感、严谨审慎的科学精神,锐意进取、开拓创新、变革管理、优化流程,使IPTV成为个性化、时尚化、互动化的新媒体娱乐平台。
1.1电视新用法国内首款Android 4.0电视机顶盒——BesTV百视通高清智能云电视机顶盒(如图1),带您轻松体验“电视新用法”。
✓内置百视商店,万种Android应用,电视大屏娱乐更舒畅。
✓云端存储海量优质视频,近万小时高清节目、独家最全NBA赛事,方便您随时观看。
✓采用3D高清技术,为您带来最真实的感官享受。
✓机身小巧轻薄,连上WIFI还可以与手机、PAD多屏互动分享,是您可随身携带的高清百宝箱。
图11.2物品清单物品清单请参考图2。
图2 1.3机顶盒外观机顶盒外观请参考图3和图4。
机顶盒的一般操作介绍
普通AV线的连接方法 普通AV线的连接方法 AV
不用机顶盒可否收看数字电视节目? 不用机顶盒可否收看数字电视节目?
• 不用机顶盒可否收看数字电视节目? 不用机顶盒可否收看数字电视节目? • 数字电视接收机(机顶盒)与电视机的连接方法与VCD一样,通过电 视机的AV接口相连接。使用时,通过电视机遥控器上的TV/AV(或视频) 按钮进行转换,切换到TV时收看模拟节目,切换到AV时,收看数字电视 节目。由于从数字电视平台播出的是经过加密的节目,必须通过机顶盒 解密才能收看到节目。因此,即使是高清晰度背投、等离子或液晶电视 机,同样需要通过机顶盒才能收看数字电视。而且现在的机顶盒都是分 地区销售的,并且是以机卡配对的形式。在本地购买的机顶盒同样不能 在外地使用。 • 为什么不把机顶盒功能集成到电视机中? 为什么不把机顶盒功能集成到电视机中? • 目前现在的机顶盒分类没有一个统一的标准,由于机顶盒不仅完成了 数字信号的还原功能,同时还完成了对用户授权的控制功能,而对用户 授权的控制功能跟当地有线电视运营单位密切相关,各地信号的加密方 式是不同的。数字信号的还原虽然可以做到电视机中去,但用户授权的 控制是不行的,否则会引起某个地方生产的电视机在别的地方用不了。 因此,用模拟电视机收看数字电视节目需要一个"定制"的机顶盒。
机顶盒的菜单结构机顶盒的菜单结构-系统选项
常用选项: 常用选项:进入【常用选项】界面,按键可设置菜单的显示参数[时区设置]、 [菜单语言]、[透明度]、[亮度]、[对比度]、[饱和度]、[宽高比]、[电 视制式]、[视频输出]。 注: 视频输出方式有:YCrCb和S-video供选择。 口令更改: 口令更改:进入【口令更改】界面。按键设置菜单或者频道的加密状态;按 数字键输入密码可以设置新密码。 信号检测: 信号检测:进入【信号检测】界面。可检测信号情况。按▲/▼键选择不同 的频率恢复、默认 恢复默认] 恢复默认]:按<确认>键输入密码(出厂默认密码为:0000),进入【恢复 默认】界面,选择“是”,按<确认>键,即可恢复到机顶盒的出厂设置。 系统升级: 系统升级:注:该菜单功能主要给维护人员提供的,请勿操作。
NI9201_9221使用说明和产品规范
注意 确保由专业人员执行连接危险电压的操作 (需遵循当地电气标准)。
注意 请勿将危险电压电路与安全电路放置在同一模 块内。
注意 确保人体与设备及连至该模块的电路有效隔 离。
注意 模块端子接通危险电压 (>42.4 Vpk/60 VDC) 时,应确保人体与设备及连至该模块的电路有效隔 离。此时必须使用 NI 9932 连接器后壳套件,避免人 体与端子意外接触。
© National Instruments Corp.
5
NI 9201/9221 使用说明和产品规范
危险环境下的特殊要求 (欧洲) 设备在 DEMKO 认证 No. 03 ATEX 0324020X 中的评定等级为 EEx nC IIC T4。每个模块均标有 II 3G,并适用于危险环境 Zone 2。环境温度为 –40 °C ≤ Ta ≤ 70 °C 时,如在 Gas Group IIC 危险环境中使用 NI 9201/9221, NI 机箱的防护等级 必须为 Ex nC IIC T4, EEx nC IIC T4, Ex nA IIC T4 或 Ex nL IIC T4 之一。
7
NI 9201/9221 使用说明和产品规范
螺栓端子接口的 NI 9201/9221 带有 10 端子可拆卸式螺栓端 子连接器。 DSUB 接口的 NI 9201/9221 带有 25 引脚的 DSUB 连接器。每个通道均带有一个可连接电压信号的 AI 端子或 引脚。在模块内部,公用端子或引脚 (COM) 连接至隔离参 考地。
电压源
– +
AI COM
NI 9201/9221