JBL PRX800W 有源扬声器用户指南
JBL PRX400 音响系统用户指南说明书

S afetyCAUTION: Before installation, turn-off any part of the audio system to Arrayprevent damage to the speaker or system components.f eatureSHorn Loaded Compression Driver• 1" Titanium diaphragm• Horn loading provides off axis response and midrange vocal clarity• Overload protection circuitry• Field replaceable12" Passive Speaker• High efficiency, low distortion design• High output with minimal power requirementsHigh Output Enclosure• Bass reflex design• Large volume for better low frequency response• Integrated ergonomically designed handles• Interlocking corners allow stacking of multiple cabinets• Dual Input- 5-way binding posts- 1/4” phono jack• Heavy gauge steel mesh grille• Industry standard 1-3/8” pole socketI nStallatIonS pecIfIcatIonSFEA TURE VALUESPEAKER CONFIGURATION ........ 2-Way Passive LoudspeakerDRIVER DIAMETER.............................1" Compression Driver / 12" Woofer POWER HANDLING ........................ 150 Watts RMS / 300 Watts MAX IMPEDANCE ........................................ 4ΩDESIGN .................................................2nd Order Vented (Ported)FREQUENCY RESPONSE .................33Hz - 22kHzSENSITIVITY .......................................... 92dBENCLOSURE MATERIAL................... 18mm (0.71")STAND RECEPTACLE.........................1.375" (35mm)DIMENSIONS....................................... (H) 24.8" x (W) 14.37" x (D) 12.59" 630mm x 365mm x 320mmWEIGHT (ea).........................................41 Lbs. (18.59kg)WARRANTY ..........................................1 YearAmplifier/T unerFor stereo amplifier/tuners, youcan connect a stereo pair of speak-ers to the LEFT and RIGHT out-puts. Connect the amplifier (+) tothe speaker (+) and the amplifier(-) to the speaker (-). For properstereo imaging, connect the LEFToutput to the LEFT speaker andthe RIGHT output to the RIGHTspeaker.Example SpeakerStand SetupRFDJ1 shownwith optionalspeaker stands.Stands notincluded.Rockford Corporation offers a limited warranty on Rockford Fosgate products on the following terms:Length of Warranty• Loudspeakers – 1 Y ear (receipt required).• Any Factory Refurbished Product – 90 days (receipt required)What is CoveredThis warranty applies only to Rockford Fosgate products sold to consumers by Authorized Rock-ford Fosgate Dealers in the United States of America or its possessions. Product purchased by consumers from an Authorized Rockford Fosgate Dealer in another country are covered only by that country’s Distributor and not by Rockford Corporation.Who is CoveredThis warranty covers only the original purchaser of Rockford product purchased from an Autho-rized Rockford Fosgate Dealer in the United States. In order to receive service, the purchaser must provide Rockford with a copy of the receipt stating the customer name, dealer name, product purchased and date of purchase. Products found to be defective during the warranty period will be repaired or replaced (with a product deemed to be equivalent) at Rockford’s discretion.What is Not Covered1. Damage caused by accident, abuse, improper operations, water, theft, shipping2. Any cost or expense related to the removal or reinstallation of product3. Service performed by anyone other than Rockford or an Authorized Rockford Fosgate Service Center4. Any product which has had the serial number defaced, altered, or removed5. Subsequent damage to other components6. Any product purchased outside the U.S.7. Any product not purchased from an Authorized Rockford Fosgate DealerLimit on Implied WarrantiesAny implied warranties including warranties of fitness for use and merchantability are limited in du-ration to the period of the express warranty set forth above. Some states do not allow limitations on the length of an implied warranty, so this limitation may not apply. No person is authorized to assume for Rockford Fosgate any other liability in connection with the sale of the product.How to Obtain ServiceContact the Authorized Rockford Fosgate Dealer you purchased this product from. If you need further assistance, call 1-800-669-9899 for Rockford Customer Service.Y ou must obtain an RA# (Return Authorization number) to return any product to Rockford Fosgate.Y ou are responsible for shipment of product to Rockford.EU WarrantyThis product meets the current EU warranty requirements, see your Authorized dealer for details.l ImIted W arranty S tatementRockford Fosgate600 South Rockford DriveT empe, Arizona 85281 U.S.A.In U.S.A., (480) 967-3565 - Customer Service 1-800-669-9899© 2010 Rockford Corporation. All rights reserved.Rockford Fosgate® and the Rockford Fosgate® “Diamond R” areregistered trademarks of Rockford Corporation.01/2010 E.W .R.1230-56250-02Printed in China。
JBL PRX415M 高功率两路扬声器系统说明书
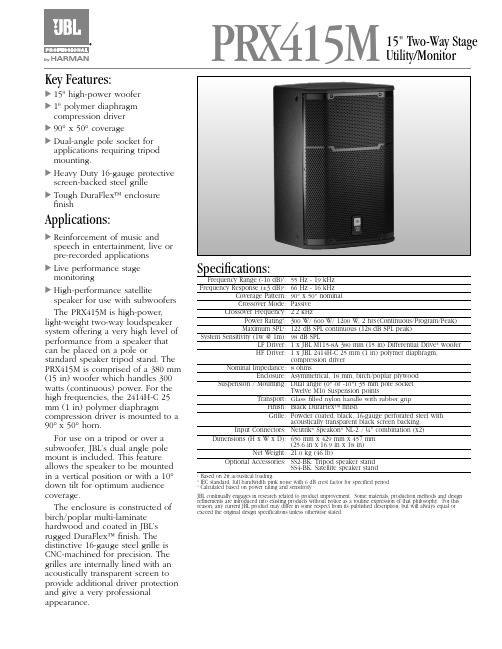
PRX415MKey Features:᭤15" high-power woofer᭤1" polymer diaphragmcompression driver᭤90° x 50° coverage᭤Dual-angle pole socket forapplications requiring tripodmounting.᭤Heavy Duty 16-gauge protectivescreen-backed steel grille᭤Tough DuraFlex™ enclosurefinishApplications:᭤Reinforcement of music andspeech in entertainment, live orpre-recorded applications᭤Live performance stage monitoring᭤High-performance satellite speaker for use with subwoofers The PRX415M is high-power, light-weight two-way loudspeaker system offering a very high level of performance from a speaker that can be placed on a pole or standard speaker tripod stand. The PRX415M is comprised of a 380 mm (15 in) woofer which handles 300 watts (continuous) power. For the high frequencies, the 2414H-C 25 mm (1 in) polymer diaphragm compression driver is mounted to a 90°x 50° horn.For use on a tripod or over a subwoofer, JBL’s dual angle pole mount is included. This feature allows the speaker to be mounted in a vertical position or with a 10°down tilt for optimum audience coverage.The enclosure is constructed of birch/poplar multi-laminate hardwood and coated in JBL’s rugged DuraFlex™ finish. The distinctive 16-gauge steel grille is CNC-machined for precision. The grilles are internally lined with an acoustically transparent screen to provide additional driver protection and give a very professional appearance. Specifications:Frequency Range (-10 dB)1:55 Hz - 19 kHzFrequency Response (±3 dB)1:66 Hz - 16 kHzCoverage Pattern:90° x 50° nominalCrossover Mode:PassiveCrossover Frequency: 2.2 kHzPower Rating2: 300 W/ 600 W/ 1200 W, 2 hrs(Continuous/Program/Peak)Maximum SPL3:122 dB SPL continuous (128 dB SPL peak)System Sensitivity (1w @ 1m):98 dB SPLLF Driver: 1 x JBL M115-8A 380 mm (15 in) Differential Drive®wooferHF Driver: 1 x JBL 2414H-C 25 mm (1 in) polymer diaphragm,compression driverNominal Impedance:8 ohmsEnclosure:Asymmetrical, 18 mm, birch/poplar plywoodSuspension / Mounting:Dual angle (0° or -10°) 35 mm pole socketTwelve M10 Suspension pointsTransport:Glass filled nylon handle with rubber gripFinish:Black DuraFlex™ finishGrille:Powder coated, black, 16-gauge perforated steel withacoustically transparent black screen backing.Input Connectors: Neutrik®Speakon®NL-2 / ¼" combination (x2) Dimensions (H x W x D):650 mm x 429 mm x 457 mm(25.6 in x 16.9 in x 18 in)Net Weight:21.0 kg (46 lb)Optional Accessories: SS2-BK: Tripod speaker standSS4-BK: Satellite speaker standBased on 2acoustical loading.IEC standard, full bandwidth pink noise with 6 dB crest factor for specified periodCalculated based on power rating and sensitivityJBL continually engages in research related to product improvement. Some materials, production methods and designrefinements are introduced into existing products without notice as a routine expression of that philosophy. For this reason, any current JBL product may differ in some respect from its published description, but will always equal orexceed the original design specifications unless otherwise stated.15" Two-Way StageUtility/Monitor᭤PRX415M 15" High-Power, Two-Way Speaker Dimensions in mm (in)Frequency (Hz)S P L (d B )Beamwidth:Frequency Response:Block Diagram:Directivity Index:2010010001000020000Frequency (Hz)01020110100D i r e c t i v i t yI n d e x (D I), d BD i r e c t i v i t y Fa c t o r (Q )SS PRX415CRP 10/12JBL Professional8500 Balboa Boulevard, P.O. Box 2200Northridge, California 91329 U.S.A.© Copyright 2012 JBL Professional。
JBL 扬声器简易安装指南说明书
9. Heat. The product should be situated away from heat sources such as radiators, heat registers, stoves or other products that produce heat. If placed near an amplifier, check with the manufacturer for applicability.
13. Cleaning. Unplug this product from the wall ou cleaners or aerosol cleaners. Use a damp cloth for cleaning.
We’re confident that the JBL loudspeaker you have chosen will provide every note of enjoyment that you expected – and that when you think about purchasing additional audio equipment for your home, car or office, you will once again choose JBL.
Please take a moment to complete the enclosed profile card. It enables us to keep you posted on our latest advancements, and helps us to better understand our customers and build products that meet their needs and expectations.
JBL PRX812 低频响应音箱说明书
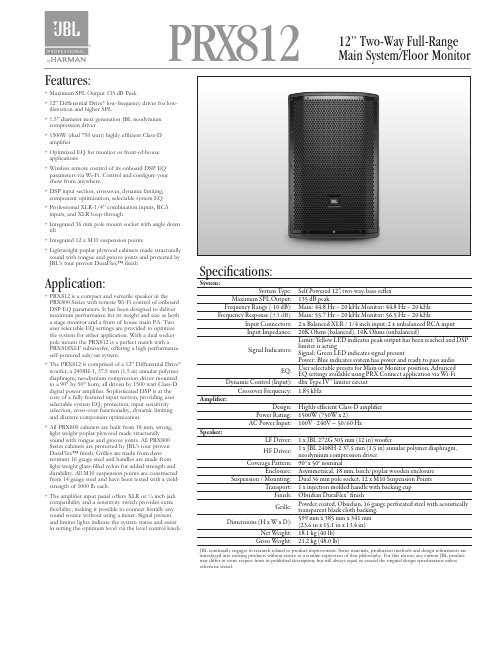
PRX812Features:< M aximum SPL Output 135 dB Peak< 12” Differential Drive ® low-frequency driver for low-distortion and higher SPL<1.5” diameter next generation JBL neodymium compression driver<1500W (dual 750 watt) highly efficient Class-D amplifier<O ptimized EQ for monitor or front-of-house applications<W ireless remote control of its onboard DSP EQ parameters via Wi-Fi. Control and configure your show from anywhere.<D SP input section, crossover, dynamic limiting, component optimization, selectable system EQ <P rofessional XLR-1/4” combination inputs, RCA inputs, and XLR loop-through< I ntegrated 36 mm pole mount socket with angle down tilt<I ntegrated 12 x M10 suspension points < L ightweight poplar plywood cabinets made structurally sound with tongue and groove joints and protected by JBL’s tour proven DuraFlex™ finishApplication:< P RX812 is a compact and versatile speaker in the PRX800 Series with remote Wi-Fi control of onboard DSP EQ parameters. It has been designed to deliver maximum performance for its weight and size as both a stage monitor and a front of house main PA. Two user selectable EQ settings are provided to optimize the system for either application. With a dual socket pole mount the PRX812 is a perfect match with a PRX818XLF subwoofer, offering a high performance self-powered sub/sat system.<T he PRX812 is comprised of a 12” Differential Drive ® woofer, a 2408H-1, 37.5 mm (1.5 in) annular polymer diaphragm, neodymium compression driver mounted to a 90° by 50° horn, all driven by 1500 watt Class-D digital power amplifier. Sophisticated DSP is at the core of a fully featured input section, providing user selectable system EQ, protection, input sensitivity selection, cross-over functionality, dynamic limiting and discrete component optimization.<A ll PRX800 cabinets are built from 18 mm, strong, light-weight poplar plywood made structurally sound with tongue and groove joints. All PRX800 Series cabinets are protected by JBL’s tour proven DuraFlex™ finish. Grilles are made from dent-resistant 16 gauge steel and handles are made from light-weight glass-filled nylon for added strength and durability. All M10 suspension points are constructed from 14 gauge steel and have been tested with a yield-strength of 1000 lb e ach.< T he amplifier input panel offers XLR or ¼ inch jack compatibility and a sensitivity switch provides extra flexibility, making it possible to connect literally any sound source without using a mixer. Signal present and limiter lights indicate the system status and assist in setting the optimum level via the level control knob.12” Two-Way Full-Range Main System/Floor MonitorSpecifications:System:System Type:Self Powered 12”, two-way, bass-reflex Maximum SPL Output:135 dB peakFrequency Range (-10 dB):Main: 44.8 Hz – 20 kHz Monitor: 44.8 Hz – 20 kHz Frequency Response (±3 dB):Main: 55.7 Hz – 20 kHz Monitor: 56.5 Hz – 20 kHzInput Connectors: 2 x Balanced XLR / 1/4 inch input, 2 x unbalanced RCA input Input Impedance:20K Ohms (balanced), 10K Ohms (unbalanced)Signal Indicators:Limit: Y ellow LED indicates peak output has been reached and DSP limiter is actingSignal: Green LED indicates signal presentPower: Blue indicates system has power and ready to pass audio EQ:User selectable presets for Main or Monitor position, Advanced EQ settings available using PRX Connect application via Wi-Fi Dynamic Control (Input):dbx Type IV™ limiter circuit Crossover Frequency:1.85 kHzAmplifier:Design:Highly efficient Class-D amplifier Power Rating:1500W (750W x 2)AC Power Input:100V - 240V ~ 50/60 HzSpeaker:LF Driver:1 x JBL 272G 305 mm (12 in) wooferHF Driver:1 x JBL 2408H-2 37.5 mm (1.5 in) annular polymer diaphragm, neodymium compression driver Coverage Pattern:90° x 50° nominalEnclosure:Asymmetrical, 18 mm, birch/poplar wooden enclosure Suspension / Mounting:Dual 36 mm pole socket, 12 x M10 Suspension Points T ransport:1 x injection molded handle with backing cup Finish:Obsidian DuraFlex™ finishGrille:Powder coated, Obsidian, 16 gauge perforated steel with acoustically transparent black cloth backing.Dimensions (H x W x D):599 mm x 385 mm x 341 mm (23.6 in x 15.1 in x 13.4 in)Net Weight:18.1 kg (40 lb)Gross Weight:21.2 kg (48.0 lb)JBL continually engages in research related to product improvement. Some materials, production methods and design refinements are introduced into existing products without notice as a routine expression of that philosophy. For this reason, any current JBL product may differ in some respect from its published description, but will always equal or exceed the original design specifications unless otherwise stated.N PRX812 12” Two-Way Full-Range Main System/Floor MonitorPN: 5075804 SS PRX812CRP 06/17JBL Professional8500 Balboa Boulevard, P.O. Box 2200Northridge, California 91329 U.S.A.© Copyright 2017 JBL Professional Dimensions in mm (in)Frequency Response (Normal)DimensionsBlock Diagram:Frequency Response (Monitor)Measurement performed in monitor position2010010001000020000Frequency (Hz)758595105115S P L (d B )mm [in]。
JBL Cinema 300 六部分家庭影院扬声器系统用户指南说明书

5D E U T S C HLaUTSPReCHeR aUFSTeLLenLINKER UND RECHTER FRONTLAUTSPRECHERCENTERSURROUND-LAUTSPRECHER UND SUBWOOFERLinker Front-LautsprecherTVCenterRechter Front-LautsprecherSubwooferLinker Surround-LautsprecherRechter Surround-LautsprecherRechter Surround-LautsprecherLinker Surround-Lautsprecher1,5 - 1,8 mLinker Frontlaut-sprecherRechter Frontlaut- sprecherTVCenterTV0 - 0,6 mLinker Front-LautsprecherRechter Front-Lautsprecher6mOnTaGemÖGLiCHKeiTenAUFSTELLUNG MITTELS REGAL-STATIV Satelliten:Center:1.3.2.WiCHTiGeR SiCHeRHeiTSHinWeiS: Wird zusätzliches Befestigungsmaterial nötig, ist der Kunde selbst für dessen Auswahl und korrekte Installation verantwortlich. Der Hersteller verweigert jegliche Verantwortung für den korrekten Zusammenbau und die Befestigung der Lautsprecher.Bitte folgen Sie den Anweisungen in dieser Bedienungsanleitung. Sollten Sie Zweifel hegen, ob Sie die Lautsprecher korrekt und sicher an die Wand befestigen können, wenden Sie sich bitte an Ihren Fachhändler.Satelliten49 mm55 mm195.5 mmCenter1. S uchen Sie nach passenden Aufstellungsorten für Ihre Lautsprecher – konsultieren Sie hierzu das Kapitel Lautsprecher aufstellen auf Seite 5.2. W ählen Sie für Ihre Wände geeignetes Befestigungsmaterial. Die Front- und Surround-Lautsprecher der Cinema 300 Serie wiegen 0,90 kg; der Cinema 300 Center bringt 1,47 kg auf die Waage. Bitte suchen Sie Befestigungsmaterial aus, das dieses Gewicht tragen kann.3. I nstallieren Sie die Wandhalterungen. Stellen Sie bitte sicher, dass die Halterungen sicher an Holzbalken befestigt werden. Für die montage auf Ziegel-, Gipskarton- oder Betonwände benötigen Sie geeignete Dübel.4. Hängen Sie nun die Lautsprecher in die Wandhalterungen ein.WANDMONTAGE7D E U T S C H+–+–+–FRONTLEFT +–+–SURROUNDRIGHT CENTERLaUTSPReCHeR anSCHLieSSenaCHTUnG: Schalten Sie ihren Receiver bzw. Verstärker vollständig aus oder trennen Sie ihn vom Stromnetz BeVOR Sie mit der Verkabelung beginnen.WiCHTiG: a chten Sie bitte darauf, dass die positiven und negativen Leitungen weder sich noch andere Kabel anderer anschlussterminalsberühren (Kurzschluss).2.1.3.Die farblich markierte Ader an die "+"-Klemme anschließenLautsprecher mit dem Receiver verbinden:SPEAKER OUTPUTDie "+"-Klemme am Lautsprecher mit der "+"-Klemme am Verstärker verbinden:Die Lautsprecher mit den entsprechenden Lautsprecherterminals am Verstärker verkabeln:LautsprecherDie farblichmarkierte Ader an die "+"-Klemme anschließenVerstärkerDie farblich markierte Ader an die "+"-KlemmeanschließenLinker Front-LautsprecherCenterKabel mit weißer MarkierungKabel mit grüner MarkierungKabel mit blauer MarkierungKabel mit grauer MarkierungKabel mit roter MarkierungLinker Surround-LautsprecherRechter Front-LautsprecherRechter Surround-LautsprecherReceiver oder Verstärker9D E U T S C HnORmaLBeTRieB DeS SUBWOOFeRSSUBWOOFER EIN- UND AUSSCHALTENStellen Sie den Netzschalter auf der Rückseite des Subwoofers auf …On“.Haben Sie den Power-On-Mode-Schalter auf …Auto" gestellt, •schaltet sich der Subwoofer automatisch vollständig ein sobald am Eingang ein Tonsignal erkannt wird. Empfängt er 20 Minuten lang kein Signal, schaltet er wieder in den Standby-Modus. Ist der Subwoofer aktiviert, leuchtet die Betriebsanzeige grün; leuchtet die LED rot, befindet sich der Subwoofer im Standby-Modus.Steht der Power-Schalter auf …On“ bleibt der Subwoofer•ständig aktiviert. Steht der Power-Schalter auf "On" bleibt der Subwoofer ständig aktiviert, und die LED leuchtet grün.Verwenden Sie den Subwoofer über einen längeren Zeitraum nicht (zum Beispiel während der Sommerferien), sollten Sie den Power-Schalter auf …Off“ stellen und ihn damit vollständig ausschalten.SUBWOOFER-BEDIENELEMENTE: CROSSOVER-REGLER:HINWEIS: Der Crossover-Regler wirkt nur, wenn das Signal über die Line-Level In L/R-Eingänge empfangen wird. Das am Line-Level In LFE-Anschluss anliegende Signal durchläuft weder den Crossover-Regler noch die eingebaute Frequenzweiche.Mit dem Crossover-Regler können Sie die obere Grenzfrequenz des Subwoofers im Bereich zwischen 50 und 200 Hz justieren. Je höher Sie die obere Grenzfrequenz einstellen, desto größer ist der mitden Satelliten-Lautsprechern überlappende Frequenzbereich. Auf diese Weise sorgen Sie selbst in Wohnräumen mit schwierigen akustischen Eigenschaften und unabhängig vom Aufstellungsort des Subwoofers für einen gleichmäßigen Frequenzübergang zwischen den Satelliten-Boxen und dem Bass-Lautsprecher.Achten Sie auf eine gleichmäßige Basswiedergabe in Ihrem Hörraum. Werden bestimmte Basstöne überbetont, sollten Sie eine niedrigere obere Grenzfrequenz ausprobieren. Wirken bestimmte Basstöne schwach, können Sie das Klangbild mit einer höheren oberen Grenzfrequenz verbessern.SUBWOOFER-BEDIENELEMENTE: SUBWOOFER LEVELMit diesem Regler können Sie die Lautstärke des Subwoofers justieren. Drehen Sie den Regler im Uhrzeigersinn, um die Lautstärke zu erhöhen. Drehen Sie ihn gegen den Uhrzeigesinn, um die Lautstärke zu mindern. Haben Sie einmal eine ausgeglichene Lautstärke zwischen Satelliten und Subwoofer gefunden, sollten Sie diese Einstellung nicht mehr verändern.Hinweise zur korrekten einstellung der Subwoofer-Lautstärke:Manchmal ist die ideale Lautstärke für Musik zu laut für die •Wiedergabe von Filmen und umgekehrt. Deswegen sollten Sie für die Einstellung der Subwoofer-Lautstärke bassbetonte Filme und Musikstücke verwenden – wählen Sie einen Durchschnittswert, der zu beiden Inhalten passt.Klingt Ihr Subwoofer ständig zu laut oder zu leise, wählen Sie •bitte einen anderen Aufstellort. Rücken Sie den Subwoofernäher in eine Zimmerecke, wird die Bass-Wiedergabe verstärkt. Vergrößern Sie den Abstand zur nächsten Wand, wird der Bass schwächer.SUBWOOFER-BEDIENELEMENTE: PHASE Dieser Schalter legt fest, ob sich die Bassmembran des Subwoofers und die Membranen der Satelliten-Lautsprecher synchron oder gegenläufig bewegen. Bewegen sich die Membranen nicht synchron, löschen sich einige Bassfrequenzen des Subwoofers oder der Satelliten gegenseitig auf, wodurchBassleistung und Dynamik sinken. Dieser Effekt hängt überwiegendermaßen vom Aufstellungsort der Lautsprecher im Raum ab.In den meisten Fällen können Sie den Phasen-Schalter auf …Normal“ belassen – eine wirklich …richtige“ Einstellung gibt es dennoch nicht. Spielen Subwoofer und Satelliten in Phase, bleibt das Klangbild klar und packend – dynamische Instrumente wie Schlagzeug oder Klavier klingen besonders naturgetreu. Am besten gehen Sie wie folgt vor, um die Phase Ihres Subwoofers korrekt einzustellen: Legen Sie Musik auf, die Sie sehr gut kennen. Stellen Sie den Phasenschalter so ein, dass Schlagzeug und Bass lauter klingen. Korigieren Sie anschließend evtl. die Lautstärke mit dem Subwoofer-Level-Regler mit höchster Dynamik wiedergegeben werden.© 2010 HARMAN International Industries, Incorporated. Alle Rechte vorbehalten.JBL ist eine Marke von HARMAN International Industries, Incorporated, eingetragen in den Vereinigten Staaten und/oder anderen Ländern. PolyPlas ist eine Marke von HARMAN International Industries, Incorporated.Teile-Nr. 950-0296-001, Rev.: AHARMAN Consumer, Inc.8500 Balboa Boulevard, Northridge, CA 91329 USA HARMAN Deutschland GmbH Hünderstraße 1 D-74080 HeilbronnD E U T S C HTeCHniSCHe DaTenCinema 300 SystemFrequenzbereich:Cinema 300 SatellitenBass-Chassis:Chassis mit 75 mm großen PolyPlas™-Membranen, magnetisch abgeschirmtHochtöner:25-mm-Hochtonkalotte aus Titan-Verbundmaterial, magnetisch abgeschirmt Belastbarkeit:100 Watt Nennimpedanz:8 Ohm Wirkungsgrad (2,83 V/1 m):86 dB Übergabefrequenz:3,7 kHz Gehäusetyp:geschlossen Anschlussterminals:Federkontaktklemme Maße (H x B x T):235 x 121 x 86 mm Gewicht:0,90 kgCinema 300 CenterBass-Chassis:Zwei 75-mm-PolyPlas-Membranen, magnetisch abgeschirmtHochtöner:25-mm-Hochtonkalotte aus Titan-Verbundmaterial, magnetisch abgeschirmt Belastbarkeit:100 Watt Nennimpedanz:8 Ohm Wirkungsgrad (2,83 V/1 m):89 dB Übergabefrequenz:3,7 kHz Gehäusetyp:geschlossen Anschlussterminals:Federkontaktklemme Maße (H x B x T):124 x 305 x 86 mm Gewicht:1,47 kgSUB140P SubwooferBass-Chassis:Ein nach unten abstrahlendes Chassis mit 200 mm großer Membran, magnetisch abgeschirmt Gehäusetyp:Nach unten abstrahlendes Gehäuse mit Bassreflexöffnung Verstärkerleistung:150 Watt Frequenzbereich:32 – 200 Hz (–6dB)Bedienelemente:Lautstärkeregler, Phasenschalter, Regler für die obere GrenzfrequenzAnschlüsse:LFE-Eingang, Linker und Rechter Line-Level-Anschluss (Cinch)Betriebsspannung:120 V/60 Hz, 150 W (US); 220 V – 240 V/50 Hz, 150 W (EU)Stromaufnahme:<1 W (8 mA bei 120 V) Standby; 300 W (2,5 A bei 120 V) maximal Maße (H x B x T):483 x 355 x 355 mm Gewicht:10 kgAlle Leistungsmerkmale und Spezifikationen sowie das mechanische Design können sich ohne vorherige Ankündigung ändern.32 Hz – 20 kHz (–6dB)。
JBL PRX800W 有源扬声器用户指南
锐声-技术部
1
PRX800W 系列有源扬声器用户指南
PRX800W 有源扬声器用户指南 版本 1.0 中文 12/2016
广州市锐声灯光音响器材有限公司
原版权所有 JBL,译者:陈运勇,未经原作者同意,文档所有部分不能转载,复制,修改,修正。
更多的信息和改进,请联系 Info@ 广州市锐声灯光音响器材有限公司 广东省广州市番禺区番禺大道番山创业中心 1 区 1 号楼 5 楼 电话:020-84700176 020-84881200 传真:020-84821881
锐声-技术部
注意:这个按键同样是用于还原扬声器出
入点”模式之间切换。扬声器默认设
厂预设的。请查看第 10 页的“还原出厂
置是“正常”模式。切换到“接入点”
设置”
模式可以通过路由器从最开始设置
3. FRONT LED 扬声器前置 LED – 这个按
系统,WIFI 连接 LED 会缓慢地闪烁。
钮可以打开/关闭扬声器前置的 LED 指示 更多 WIFI 使用信息,请查看第 9 页“WIFI 设
式并且没有与 WIFI 建立稳定的连接
- 默认(不亮灯)时为 NORMAL,频响
d. 快速地闪烁 – 扬声器在接入点模
是平直的没更改的。
式同时在与已连接设备通讯
b. Main 和 Monitor(PRX812W 和 PRX815W) 13.WIFI 连接按键 – 这个按键用于连接到
- பைடு நூலகம்择“Main”或“Monitor”取决
9. WIFI 连接按键 – 这个按键用于连接到 WIFI 网络,使用 PRX CONNECT 应用进行控
制和设置。这个按键有两种功能 e. 按住后放开 – 使扬声器尝试连接
JBL 扬声器安装指南说明书

Bass BlockerCoaxial speakerFigure 1Figure 2BASS BLOCKER db351 WIRING CONNECTIONMid-WooferCrossover Figure 3BASIC COMPONENT CONNECTIONINSTALLING db5251& db6501ROUND MODELFigure 6INSTALLING db461, db461p, db571,OVAL MODELS Figure 5INSTALLING db401, db501, db521, db651, db651s, db5251, db6501 ROUND MODELSOVAL MODEL WITH GRILLERemove bottom mount spacerring before installing grille.INSTALLING db401, db521, db5251,ROUND MODELS WITH GRILLE(for db6501/db651driver installation only)INSTALLING db651s, db651& db6501WITH GASKET AND GRILLEFigure 10INSTALLING db6501/db651 WITH GRILLESome applications may require using theadditional spacer/adapter bracket.CROSSOVER MOUNTINGAllow for ventilation clearance.Figure 12TWEETER ATTENUATION SWITCHA3-position switch (-3dB, 0dB, +3dB ) allows you to adjust tweeter level for the tonal balance that's right for your car and system.Figure 13TWEETER ATTENUATION WIRE LOOPCut this wire to reduce tweeter level 3dB.DB6501 & DB5251Figure 14Flush MountTWEETER MOUNTING1. Check for proper clearance: The flush mount kit is 7/8" (22.2mm) deep.2.Mark the center of the spot and cut a 2"(50.8mm) diameter hole using a holesaw, drill bit or razor knife.3. Assemble the cup, clamp and machinescrew loosely as shown.4. Route wires through the round opening in the bottom of the cup.5. Press the assembly into the 2" (50.8mm) diameter hole until the clamp edge is below the mounting surface, then tighten the screw. The legs ofthe clamp can be bent outward by insertinga screwdriver through the holes in the cup while still mounted.6.Connect wires from the tweeter terminals of the Crossover to the tweeter itself using the faston connectors. Connect the red wire from the (+) terminal of the Crossover tweeter output to the red (+) wire from the tweeter.7. Mount the tweeter by snapping it into themounting cup.DB6501 & DB5251Figure 15Surface MountTWEETER MOUNTING1. Using the base of the surface mount cup asa template, mark the screw hole and drill them using a 1/8" (3mm) drill bit. Drill a second hole (for the speaker wire) using a 3/16" (5mm) drill bit.2.Screw surface mount cup to the panel.3. Push the tweeter wires through the open area at the bottom of the cup and through the 3/16" (5mm) hole in the panel.4.Connect wires from the tweeter terminals of the Crossover to the tweeter wires using faston connectors. Be sure to connect the red wire strand from the tweeter to the (+) terminalof the crossover tweeter output.5. Mount the tweeter by snapping it into the mounting cup.db351db401db461db461p db501db521 Type 3 1/2"4"4" x 6"4" x 6"5" 5 1/4"coaxial coaxial coaxial plate coaxial coaxial................................................................................................................................................................................................................ Driver 3 1/2"4"4" x 6"4"5" 5 1/4" complement(8.89cm)(10.2cm)(10cm x 15cm)(10.2cm)(12.7cm)(13.0cm) mid/woofer mid/woofer mid/woofer mid/woofer mid/woofer mid/woofer................................................................................................................................................................................................................ Tweeter 1/2" (12mm)3/4" (19mm)3/4" (19mm)3/4" (19mm)3/4" (19mm) 3/4" (19mm) complement soft dome soft dome soft dome soft dome soft dome soft dome tweeter tweeter tweeter tweeter tweeter tweeter................................................................................................................................................................................................................ Mounting 3 1/8"4"6" x 4"6" x 4"4" 4 11/16" dimensions(79.36mm) (101.6mm)(152.4mm x (152.4mm x (101.6mm) (119mm)101.6mm)101.6mm) ................................................................................................................................................................................................................ Mounting 1 1/2" 1 13/16" 1 15/16" 1 13/16" 1 13/16" 2 5/16" depth (top)(38.1mm)(46.0mm)(49.2mm)(46.04mm)(46.0mm)(58.7mm) ................................................................................................................................................................................................................ Mounting 111/16" 1 15/16"2"2" 1 15/16" 2 7/16" depth (bottom)(42.86mm)(49.21mm)(50.8mm)(50.8mm)(49.21mm)(61.9mm) ................................................................................................................................................................................................................ Peak 105w135w120w150w135w135w Power handling ................................................................................................................................................................................................................ Continuous 35w45w40w50w45w45w Power handling ................................................................................................................................................................................................................ Nominal 4 Ω4Ω4Ω4Ω4Ω4ΩImpedance ................................................................................................................................................................................................................ Frequency90-22kHz85-22kHz75-22kHz71-22kHz65-22kHz60-22kHz response ................................................................................................................................................................................................................ Grille height n/a3/4"n/a n/a n/a1"(6.35mm)(25.4mm) ................................................................................................................................................................................................................ Sensitivity91dB91dB91dB91dB93dB93dB ................................................................................................................................................................................................................db571db651db651s db691db5251db6501db1001 5" x 7" 6 1/2" 6 1/2"6" x 9" 5 1/4" 6 1/2"1"coaxial coaxial slim mount three way component component tweetercoaxial system system ................................................................................................................................................................................................................ 5"x7” 6 1/2" 6 1/2"6" x 9" 5 1/4" 6 1/2"n/a(12.7cm x (16.0cm)(16.0cm)(15cm x 22.9cm)(13.0cm)(16.0cm)mid/woofer 17.8cm)mid/woofer mid/woofer mid/woofer mid/woofer mid/woofermid/woofer ................................................................................................................................................................................................................3/4" (19mm)3/4" (19mm)3/4" (19mm)1" (25.4mm)1" (25.4mm) 1" (25.4mm) 1" (25.4mm) soft dome soft dome soft dome soft dome soft dome soft dome soft dome tweeter tweeter tweeter tweeter tweeter tweeter tweeter3/4" (19mm)soft dome tweeter ................................................................................................................................................................................................................71/8" x 4 15/16"5"5"8 1/2" x 5 3/4" 4 11/16"5" 2 1/16" (181mm x (127mm) (127mm)(215.9mm x (119mm) (127mm)(52.39mm) 125.4mm) 146mm)mounting cup ................................................................................................................................................................................................................23/16"2"2" 3 3/16" 2 5/16"2" 1 3/16" (55.6mm)(50.8mm)(50.8mm)(81.0mm)(58.7mm)(50.8mm)(30.2mm) ................................................................................................................................................................................................................25/8" 2 5/16" 2 5/16" 3 3/4" 2 7/16" 2 5/16" 1 1/32" (66.7mm)(58.74mm)(58.7mm)(95.2mm)(61.9mm)(58.7mm)(26.2mm) ................................................................................................................................................................................................................180w180w165w300w250w300w180w ................................................................................................................................................................................................................60w60w55w100w100w100w60w ................................................................................................................................................................................................................4Ω4Ω4Ω4Ω4Ω4Ω4Ω................................................................................................................................................................................................................52-22kHz35-22kHz50-22kHz35-22kHz53-23kHz35-23kHz4kHz-23kHz ................................................................................................................................................................................................................n/a 1 1/8" 1 1/8" 1 1/4"1" 1 1/8"n/a(28.58mm)(28.58mm)(31.75mm)(25.4mm)(28.58mm) ................................................................................................................................................................................................................93dB92dB92dB93dB93dB92dB92dB ......................................................................................................................................................................................。
YAMAHA PW800W POWER SUPPLY 使用说明书

2-R2 (82.1) 76.2
44.45 31.75
0 5.9 4- ø6.5
R2
t = 1.6
2-R2 R5
36.5 14.5
0 7.5
3.1 0 8 12 134 200
20.5 86.5
PW800W 电源设备专供 Yamaha 专业音响设备使用。PW800W 不可与功率或接口等方面不匹配的设备相连接。请参阅设备附带的使用说明书以确定其是否与 PW800W 兼容。 请使用设备附带的电缆与 PW800W 进行连接。当并联 2 台 PW800W 设备时,请使用PSL120 电源连接电缆(选购件)将第 2 台 PW800W 与主 PW800W 设备相连。
感谢您购买 PW800W 电源设备。 PW800W 电源设备专供 Yamaha 专业音响设备使用。 为了实现 PW800W 的最佳性能及充分利用其特点, 请仔细阅读本说明书并将其妥善保存在便于取阅处以备日后参考。
* 本使用说明书中的插图仅作讲解之用,与实际购买的产品可能会有些出入。 * 本使用说明书中所使用的公司名和产品名均系其各自所有者的商标或注册商标。
1
切勿遮挡 PW800W 前后面板上的散热口。
1 POWER ON/OFF 开关 /POWER 指示灯
POWER ON/OFF 开关 当开关处于 ON 时, PW800W 对连接的设备供电。
PW800W 电源打开步骤
1. 确认 PW800W 电源开关处于 OFF。 2. 使用随设备附赠的电缆将 PW800W 连接至需供电的 设备。 3. 将 PW800W 电源线插入合适的交流电源插座。 4. 将 POWER 开关切换至 ON。
• 只能使用附带的电源线。 • 请勿将电源线放在热源 (如加热器或散热器)附近,不要过分弯折或损
- 1、下载文档前请自行甄别文档内容的完整性,平台不提供额外的编辑、内容补充、找答案等附加服务。
- 2、"仅部分预览"的文档,不可在线预览部分如存在完整性等问题,可反馈申请退款(可完整预览的文档不适用该条件!)。
- 3、如文档侵犯您的权益,请联系客服反馈,我们会尽快为您处理(人工客服工作时间:9:00-18:30)。
7. MIC LED – 这个灯显示的是当前通道
按住两秒以上才能激活。
已选择为话筒输入。
16.MIX OUT 接口 – 卡侬母座输出接口。提
8. MIC 选择按键 – 扬声器默认是线路电
供全频信号可以连接到下一个全频扬声
平,长按 2 秒切换到话筒电平,LED 指示
器。
灯亮。
17.REMOTE EQ LED – 表示扬声器正在通过
9. WIFI 连接按键 – 这个按键用于连接到 WIFI 网络,使用 PRX CONNECT 应用进行控
制和设置。这个按键有两种功能 e. 按住后放开 – 使扬声器尝试连接
到 WIFI 网络 f. 按住保持 2 秒 – 在“正常”和“接
入点”模式之间切换。扬声器默认设 置是“正常”模式。切换到“接入点” 模式可以通过路由器从最开始设置 系统,WIFI 连接 LED 会缓慢地闪烁。 更多 WIFI 使用信息,请查看第 9 页“WIFI 设 置” 10.HI PASS LED – 灯亮表示输出已启用高 通滤波。 11.HI-PASS 按键 – 这个按键决定了 THRU 输出的信号是没改变过的(全频)或者是 加入了滤波器的(高通),默认为全频模式。 如果选择了高通模式,将会添加一个 80Hz 24Db/Octave 的高通滤波器到 THRU 输出 中。激活后搭配全频一起使用会有更平滑 的频率响应。这个案件必须要按住两秒后 才能激活。 12.THRU 接口 – 卡侬母座输出接口。这个 接口提供全频或者高通输出模式。可以连 接输出到全频扬声器也同样可以输出到 另外一个超低频扬声器。 13.REMOTE EQ LED – 表示扬声器正在通过 WIFI 应用设置 14.POWER LED – 这个 LED 表示扬声器电源 已接通,当系统通电并可以传输音频时显 示为蓝色。
锐声-技术部
系统设置 ‐‐‐ 全频扬声器
广州市锐声灯光音响器材有限公司
PRX800W 系列功放面板设备:PRX812W,PRX815W,PRX825W,PRX835W
锐声-技术部
5
PRX800W 系列有源扬声器用户指南
广州市锐声灯光音响器材有限公司
功能
1. 系统 EQ LED – 这个指示灯显示的是 12.WIFI 连接 LED – 这个 LED 有四种状态
7. XLR 输入 – 平衡卡农/大三芯通用输入 插座。
8. WIFI 连接 LED – 这个 LED 有四种状态 a. 关闭 – 扬声器没有连接到 WIFI b. 打开 – 扬声器已经连接到 WIFI c. 缓慢地闪烁 – 扬声器在接入点模 式并且没有与 WIFI 建立稳定的连接 d. 快速地闪烁 – 扬声器在接入点模 式同时在与已连接设备通讯
锐声-技术部
3
PRX800W 系列有源扬声器用户指南
广州市锐声灯光音响器材有限公司
电源供电需求 PRX800W 系列扬声器内含有一个多通道 D 类功率放大器和 DSP 处理电路,所以需要 AC 电源 供电。将扬声器插入电源之前请确认电源能够提供适当的电源电压。为达到最佳的扬声效果, 需求稳定而充足的电源电压。如果电压过低将影响到低音的重放效果,当落差过大扬声器为保 护自身或会自我静音。当电源供电满足时将会恢复工作。同一个插座插入多个扬声器时,同时 长时间的运行可能会影响到系统的电源电压。
工作温度
PRX800W 功率放大器模块并非设计在高温环境下操作。当处于过度高温的环境下将会自我保 护并关闭。当温度下降到可操作环境时,系统将会自动打开。当将扬声器背面直接暴露在太阳 直射的环境下时可能会导致上述情况发生。请确保扩声环境中有冷却系统。
锐声-技术部
4
PRX800W 系列有源扬声器用户指南
注意:这个按键同样是用于还原扬声器出
入点”模式之间切换。扬声器默认设
厂预设的。请查看第 10 页的“还原出厂
置是“正常”模式。切换到“接入点”
设置”
模式可以通过路由器从最开始设置
3. FRONT LED 扬声器前置 LED – 这个按
系统,WIFI 连接 LED 会缓慢地闪烁。
钮可以打开/关闭扬声器前置的 LED 指示 更多 WIFI 使用信息,请查看第 9 页“WIFI 设
为求正确的操作和使用安全,非常重要的是系统安装人员需无时无刻注意到相 关用电安全事项,并且提供正确的电源接地。
开启电源
电源的开关在扬声器背面的输入面板中。请确保当使用扩声系统时扬声器系统是最后一个启动, 最早一个关闭的设备。如果扬声器接入了电源时序器时,请确保扬声器在时序器的最后一个链 路。电源指示 LED 灯在扬声器前面板,可观察扬声器是否正确开关。
9. XLR 输入 – 平衡卡农/大三芯通用输入
WIFI 应用设置
插座。
18.POWER LED – 这个 LED 表示扬声器电源
10.RCA 信号 LED – RCA 输入信号指示灯
已接通,当系统通电并可以传输音频时显
11.RCA 输入 – 莲花非平衡输入插座。
示为蓝色。
锐声-技术部
6
PRX800W 系列有源扬声器用户指南
BOOST (PRX825W & PRX835W) 或 者 是
a. 关闭 – 扬声器没有连接到 WIFI
MONITOR (PRX812W & PRX815W)模式
b. 打开 – 扬声器已经连接到 WIFI
2. 系统 EQ 按键
c. 缓慢地闪烁 – 扬声器在接入点模
a. NORM 和 BOOST(PRX825W 和 PRX835W)
式并且没有与 WIFI 建立稳定的连接
- 默认(不亮灯)时为 NORMAL,频响
d. 快速地闪烁 – 扬声器在接入点模
是平直的没更改的。
式同时在与已连接设备通讯
b. Main 和 Monitor(PRX812W 和 PRX815W) 13.WIFI 连接按键 – 这个按键用于连接到
- 选择“Main”或“Monitor”取决
锐声-技术部
1
PRX800W 系列有源扬声器用户指南
PRX800W 有源扬声器用户指南 版本 1.0 中文 12/2016
广州市锐声灯光音响器材有限公司
原版权所有 JBL,译者:陈运勇,未经原作者同意,文档有部分不能转载,复制,修改,修正。
更多的信息和改进,请联系 Info@ 广州市锐声灯光音响器材有限公司 广东省广州市番禺区番禺大道番山创业中心 1 区 1 号楼 5 楼 电话:020-84700176 020-84881200 传真:020-84821881
输入电平调整。
将输入发送到 MIX OUT 输出。默认(50/50
6. SIGNAL 信号指示灯 – 每个通道都有一
MIX 灯不亮)为根据 CH1 和 CH2 增益旋子
个 LED 指示灯,显示绿色为当前输入信号
的大小来决定 MIX OUT 输出的量。当激活
已连接。
后为 CH1 和 CH2 的各 50%。这个键必须要
保养和清洁 PRX800W 系列扬声器可使用干布清洁。请勿致使设备任何部分潮湿。确保清洁之前从插座断 开电源。
请勿在高湿度的环境下使用 PRX800W 系列有源扬声器。潮湿会腐蚀扬声器纸 盆的和相关电器元件。避免扬声器至于潮湿环境中。避免扬声器暴露于太阳直 射的环境。长期暴露于紫外线下会使得单元变干和漆面破裂。当扬声器放置于 光滑的平面时,可能会因其本身能力而产生移动,应采取措施防止扬声器滑落。
WIFI 网络,使用 PRX CONNECT 应用进行控
于用在主扩声模式还是舞台监听模
制和设置。这个按键有两种功能
式。选择 MAIN 模式时,LED 指示灯关
a. 按住后放开 – 使扬声器尝试连接
闭;选择“Monitor”模式时,LED 灯
到 WIFI 网络
打开。
b. 按住保持 2 秒 – 在“正常”和“接
3. FRONT LED 扬声器前置 LED – 这个按 钮可以打开/关闭扬声器前置的 LED 指示 灯。
4. LIMIT 限幅指示灯- 当 DSP 限幅电平到达 时,LED 指示灯将显示为黄色。
5. GAIN 旋子 – 输入通道 CH1 或者 CH2 的 输入电平调整。
6. SIGNAL 信号指示灯 – 每个通道都有一 个 LED 指示灯,显示绿色为当前输入信号 已连接。
User’s Guide
用户指南
PRX812W PRX815W PRX815XLFW PRX818XLFW PRX825W PRX835W
PRX800W 系列有源扬声器用户指南
广州市锐声灯光音响器材有限公司
目录
重要安全使用说明 ............................................................................................................ 3 系统设置 --- 全频扬声器 .............................................................................................. 5 系统设置 --- 超低频扬声器 .......................................................................................... 7 WIFI 设置 ........................................................................................................................... 9 还原出厂设置 ..................................................................................................................10 疑难解答 ........................................................................................................................... 11