Word分页程序代码
如何在Word中实现文档的分页和分节控制

如何在Word中实现文档的分页和分节控制在Word中,分页和分节是用来控制文档排版和格式的重要功能。
通过适当的分页和分节设置,可以使文档更加整洁美观,并满足不同的排版需求。
下面将介绍如何在Word中实现文档的分页和分节控制。
一、分页控制分页是指在文档中插入一个新的页面,并从该页面开始新的内容。
在Word中,实现文档的分页控制可以通过以下两种方式:1. 使用分页符分页符是Word中常用的分页控制方法。
插入分页符可让当前内容结束,并从新页面开始。
在Word中,可以通过以下步骤插入分页符:a. 首先,将光标定位在需要插入分页符的位置。
b. 然后,点击页面布局(或页面设计)选项卡上的“分页符”按钮,即可插入分页符。
2. 快捷键方式除了使用鼠标操作,Word还提供了一些快捷键来快速插入分页符:a. 在光标所在位置按下“Ctrl+Enter”快捷键,即可插入分页符。
b. 或者,在需要插入分页符的位置直接按下“Ctrl+回车键”,也可以实现相同效果。
二、分节控制分节是指在文档中插入一个或多个特殊的分节符,用于灵活控制每个节的页面格式、页眉页脚、页码以及纸张方向等属性。
下面介绍几种常用的分节控制方法:1. 连续分节连续分节用于在文档中插入一个新节,但新节与前一节的页面格式保持一致。
可以通过以下步骤进行连续分节的设置:a. 首先,将光标定位在需要插入连续分节的位置。
b. 然后,点击页面布局(或页面设计)选项卡上的“分节符”按钮,并选择“连续分节”。
2. 强制分节强制分节用于在文档中插入一个新节,并对新节的页面格式进行修改。
可以通过以下步骤进行强制分节的设置:a. 首先,将光标定位在需要插入强制分节的位置。
b. 然后,点击页面布局(或页面设计)选项卡上的“分节符”按钮,并选择“下一页”。
3. 删除分节符有时候,我们需要删除已插入的分节符。
可以通过以下步骤来删除分节符:a. 首先,将光标定位在分节符所在的位置。
b. 然后,按下“Backspace”键或“Delete”键,即可删除分节符。
使用Word文档的插入分页控制符功能实现文档的分页和分节

使用Word文档的插入分页控制符功能实现文档的分页和分节在日常的文档编辑中,我们经常需要对文档进行分页和分节操作,以便更好地组织和管理文档内容。
而Word文档的插入分页控制符功能能够实现这一目的,本文将详细介绍如何使用该功能进行文档的分页和分节。
一、插入分页控制符实现文档分页分页是指在一个文档内将内容分为不同的页面展示。
在Word文档中,我们可以利用插入分页控制符功能来实现文档的分页。
具体步骤如下:1. 打开Word文档,在需要进行分页的位置单击鼠标光标。
2. 在Word菜单栏的“插入”选项卡中,找到“分页”一栏,点击其中的“分页”按钮。
3. 点击“分页”按钮之后,文档将自动在光标所在位置进行分页,并显示为不同的页面。
通过上述步骤,我们就可以很方便地使用插入分页控制符功能实现文档的分页。
二、插入分节符实现文档分节分节是指将文档内的不同内容进行划分,以便在格式、页眉页脚等方面进行灵活设置。
Word文档中的分节可以通过插入分节符来实现。
下面是具体步骤:1. 打开Word文档,在需要进行分节的位置单击鼠标光标。
2. 在Word菜单栏的“布局”选项卡中,找到“分节符”一栏,点击其中的“下一页”按钮。
3. 点击“下一页”按钮之后,文档将在光标所在位置进行分节,产生新的节,可以实现对该节进行独立的格式设置。
通过以上步骤,我们可以利用插入分节符功能轻松完成文档的分节。
三、插入分页控制符和分节符的应用案例接下来,我们将通过一个实际的应用案例来演示如何使用插入分页控制符和分节符进行文档的分页和分节。
假设我们需要编写一份报告,包含以下内容:封面、目录、正文和参考文献。
我们可以通过插入分页控制符和分节符来实现这些内容的分页和分节。
1. 首先,我们在封面之后插入一个分页符,将封面和目录分隔开来。
2. 在目录之后插入一个分节符,将目录和正文分为两个不同的节,方便对它们进行格式设置。
3. 在正文的结尾处插入一个分节符,将正文和参考文献分隔开来。
Word文档按指定页数分页保存方法

h n s u = Acie c me t a e eu .ieP g agh t Do u n. g S tpLn s a e v P
源
源
Slco .o o et d o o ae [] 将 光 标 移 至 下 一 eet n T N x w G T P g 1 i G
成指定的任务.
sag i j h nba u=A t e ou e t aee pTp ri n c vD cm n. gS t . Mag 源 i P u o n
wod文 档 上 边 距 r
( ) 意指定 分页份数与页数 3任
b= Ip to(将 w r n uB x” od文 档 分 成 份 数 ” 1 读 取 w r 文 o d 源
关 键 词 : B ; od文 档 ; 定 要 求 ;பைடு நூலகம் 页 V A W r 指
O 引
言
数 ” “ 部 分 页 数 ” “ 计 页 数 ” 等 信 息 。 编 写 “u 、每 、累 Sb
将 Wod 档 按 指 定 页 数 分 页保 存 的 时 候 . 以先 r文 可 新 建 一 个 Wod文 档 .然 后 将 需 要 的 源 文 档 内 容 选 定 、 r 复制 、 贴在 新建 文档 中 , 将 新建 文档 按要 求保 存 。 粘 再
收 稿 日期 :01 —0 —0 2 2 3 6
修 稿 日期 : 0 2 4 2 2 1 -0 -0
作 者 简介 : 战 军 (9 0 , , 北 仙 桃 人 , 师 , 士 , 事领 域 为 C I 用及 函数 论 教 学 与 研 究 工 作 毛 17 一) 男 湖 讲 硕 从 A 应
① 现 计 机 21. 代 算 024 0
「word里的各种符号的字母代码」
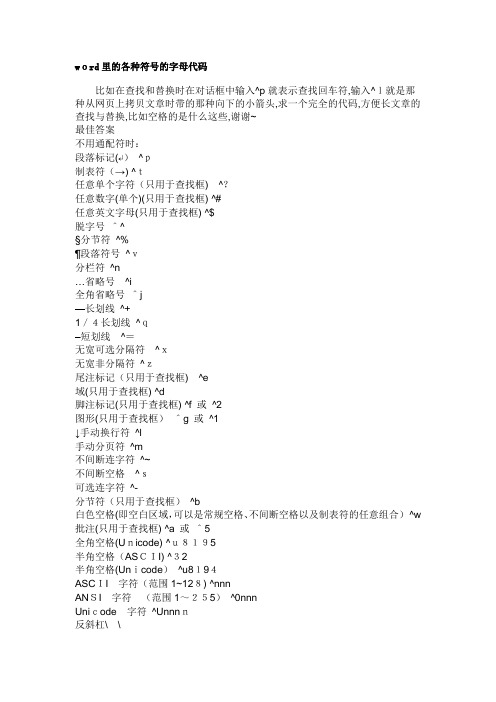
word里的各种符号的字母代码比如在查找和替换时在对话框中输入^p就表示查找回车符,输入^l就是那种从网页上拷贝文章时带的那种向下的小箭头,求一个完全的代码,方便长文章的查找与替换,比如空格的是什么这些,谢谢~最佳答案不用通配符时:段落标记(↵)^p制表符(→) ^t任意单个字符(只用于查找框)^?任意数字(单个)(只用于查找框) ^#任意英文字母(只用于查找框) ^$脱字号^^§分节符^%¶段落符号^v分栏符^n…省略号^i全角省略号^j—长划线^+1/4长划线^q–短划线^=无宽可选分隔符^x无宽非分隔符^z尾注标记(只用于查找框)^e域(只用于查找框) ^d脚注标记(只用于查找框) ^f 或^2图形(只用于查找框)^g 或^1↓手动换行符^l手动分页符^m不间断连字符^~不间断空格^s可选连字符^-分节符(只用于查找框)^b白色空格(即空白区域,可以是常规空格、不间断空格以及制表符的任意组合)^w 批注(只用于查找框) ^a 或^5全角空格(Unicode) ^u8195半角空格(ASCII) ^32半角空格(Unicode)^u8194ASCII字符(范围1~128) ^nnnANSI字符(范围1~255)^0nnnUnicode字符^Unnnn反斜杠\\问号? ?→↓星号* *左括号((右括号))左中括号[ [右中括号] ]感叹号! !电邮符号@@减号--逗号, ,查找框中的内容(仅用于替换框) ^&剪贴板中的内容(仅用于替换框)^c 用通配符时:段落标记^13制表符^t任意单个字符?任意数字(单个) [0-9]任意英文字母[a-zA-Z]脱字号^^§分节符^%¶段落符号^v分栏符^n或^14省略号^i全角省略号^j长划线^+1/4长划线^q短划线^=无宽可选分隔符^x无宽非分隔符^z尾注标记(不支持)域(不支持)脚注标记(不支持)图形^g手动换行符^l 或^11分页符/分节符^m不间断连字符^~不间断空格^s可选连字符^-分节符/分页符^m反斜杠\\\问号?\?星号*\*左括号(\(右括号)\)左中括号[ \[右中括号] \]感叹号!\!电邮符号@\@减号-\-逗号, \,查找的内容^&剪贴板内容^c所有小写英文字母[a-z]所有大写英文字母[A-Z]所有西文字符[^1-^127]ﻫ所有中文汉字和中文标点[!^1-^127]所有中文汉字(CJK统一字符)[一-龥]或[一-﨩]所有中文标点[!一-龥^1-^127]所有非数字字符[!0-9]不用通配符时:段落标记(↵) ^p制表符(→) ^t任意单个字符(只用于查找框)^?任意数字(单个)(只用于查找框) ^#任意英文字母(只用于查找框)^$ 脱字号^^§分节符^%¶段落符号^v分栏符^n…省略号^i全角省略号^j—长划线^+1/4长划线^q–短划线^=无宽可选分隔符^x无宽非分隔符^z尾注标记(只用于查找框)^e域(只用于查找框) ^d脚注标记(只用于查找框)^f 或^2 图形(只用于查找框) ^g 或^1↓手动换行符^l手动分页符^m不间断连字符^~不间断空格^s可选连字符^- 用通配符时:段落标记^13制表符^t任意单个字符?任意数字(单个)[0-9]任意英文字母[a-zA-Z] 脱字号^^§分节符^%¶段落符号^v分栏符^n或^14省略号^i全角省略号^j长划线^+1/4长划线^q短划线^=无宽可选分隔符^x无宽非分隔符^z尾注标记(不支持)域(不支持)脚注标记(不支持)图形^g手动换行符^l或^11 分页符/分节符^m不间断连字符^~不间断空格^s可选连字符^-分节符(只用于查找框)^b白色空格(即空白区域,可以是常规空格、不间断空格以及制表符的任意组合)^w批注(只用于查找框)^a 或^5全角空格(Unicode) ^u8195半角空格(ASCII) ^32半角空格(Unicode) ^u8194ASCII 字符(范围1~128)^nnn ANSI 字符(范围1~255) ^0nnnUnicode 字符^Unnnn反斜杠\ \问号? ?→↓星号**左括号( (右括号))左中括号[ [右中括号]]感叹号! !电邮符号@@减号- -逗号,,查找框中的内容(仅用于替换框)^& 剪贴板中的内容(仅用于替换框)^c分节符/分页符^m反斜杠\\\问号? \?星号*\*左括号(\(右括号) \)左中括号[ \[右中括号]\]感叹号!\!电邮符号@ \@减号- \-逗号, \,查找的内容^&剪贴板内容^c所有小写英文字母[a-z]所有大写英文字母[A-Z]所有西文字符[^1-^127]ﻫ所有中文汉字和中文标点[!^1-^127]所有中文汉字(CJK统一字符) [一-龥]或[一-﨩]所有中文标点[!一-龥^1-^127]所有非数字字符[!0-9]。
如何在Word中插入和编辑分页符和分节符

如何在Word中插入和编辑分页符和分节符在使用Microsoft Word编辑文档时,有时我们需要对文档进行分页或分节。
分页符和分节符是两种常用的功能,它们可以帮助我们更好地控制文档的格式和布局。
下面将介绍如何在Word中插入和编辑分页符和分节符。
一、插入分页符分页符可以将文档分成不同的页面,适用于需要在不同页面中设置不同的页眉页脚、页码等情况。
在Word中插入分页符非常简单。
只需在光标所在位置点击“插入”选项卡上的“分页符”按钮即可。
也可以使用快捷键“Ctrl+Enter”来插入分页符。
插入分页符后,光标会自动跳转到下一页,这样你就可以在新的一页上进行编辑。
如果你想在某个位置插入分页符,只需将光标移动到该位置,然后按下快捷键“Ctrl+Enter”即可。
二、编辑分页符在Word中,我们可以对分页符进行一些编辑操作,以满足不同的需求。
1. 删除分页符:将光标移动到分页符所在的位置,按下“Delete”键即可删除分页符。
删除分页符后,两个页面将合并成一个页面。
2. 移动分页符:将光标移动到分页符所在的位置,点击鼠标右键,在弹出的菜单中选择“剪切”。
然后将光标移动到想要插入分页符的位置,点击鼠标右键,在弹出的菜单中选择“粘贴”。
这样就可以将分页符移动到新的位置。
三、插入分节符分节符可以将文档分成不同的节,每个节可以有不同的页面设置、页眉页脚、页码等。
在Word中插入分节符也很简单。
只需在光标所在位置点击“布局”选项卡上的“分节符”按钮即可。
分节符有两种类型:换页分节符和连续分节符。
换页分节符会在新的一页开始一个新的节,而连续分节符则会在同一页开始一个新的节。
插入分节符后,你可以在不同的节中进行不同的页面设置。
例如,你可以在第一节中设置奇偶页码,而在第二节中不显示页码。
四、编辑分节符在Word中,我们可以对分节符进行一些编辑操作,以满足不同的需求。
1. 删除分节符:将光标移动到分节符所在的位置,按下“Delete”键即可删除分节符。
Word分节、分页、设不同页码的方法
Word分节、分页、设不同页码的方法There is a cover in the document with the main body. There is no page number in the cover. What should I do to set the text?Insert the "sub symbol" at the end of the cover, and cover the cover with the text: the cursor is placed at the point where the segment will be inserted, "insert", "separator", "section type", "next page"";Header page edit: View > header and footer, enter the header content and insert page number, then the cover and text will have header and page number;Third, every day "as described in the previous section" cancel the setting for each section separately: write the cursor to second section (i.e. where the text in the header section), click header and footer Edit Toolbar "with", this is the elimination of the previous section "setting, the header section two can be made set (because the default setting is" with "), otherwise no matter which modify the festival, similarly another festival will change, and do the same with the footer.Cancel the cover header text: the cursor to the first page header, delete the header text, and then there will be the default underscore exists, the same page number can be canceled;Underline the delete header: select the header (note must choose paragraph marks. You can also click the left mouse button) three, the "format", "borders and shading", "border", "no", payattention to right of the dialog solution "application" should be "paragraph", then click "OK" to cancel the underline;Sixth, set the page number in the header or footer: if the insert page number directly, will cover page as page first, order. At this point, select the page number, click the header, footer, edit the toolbar in the page number format, page number, start page number, and enter the corresponding number. (from which page do you want to start?)Set it so that the cover has neither header nor page number. Of course, the first order is not changed, and the latter can be reversed. To draw inferences about, for chapters or more cover documents, reuse these settings so that each chapter header is different, the page number is different.This one will doThe page number starts from any page1, put the cursor in the top position need to start pagination.2, select Insert separator, open the delimiter dialog box, and under the separator type, click the radio button on the next page.3, select the view header and footer, and locate the cursor at the footer.4. Do the following in turn in the header and footer toolbar:The click "with" button, disconnect with a section of the link.Click the insert page button,Word segmentation, pagination, and different page numbers1 - Insert - separator - - - next page2, view - header, footer, pop-up dialog box, there is a link to the previous one option, click, that is to say, let the second section of things different from the previous section!Then insert the cursor at the beginning of the second page, the footer, select the page number format, set the start page number to 1, and then click the insert page number, then insert the page number automatically from the second section!--------------------------------------------------------------------------------以下方法是针对你的原始文档给出的:(Word2003)假如一个论文有《封面》、《目录》、《正文》三个部分在同一字文档中1。
C#操作Word文档(加密、解密、对应书签插入分页符)

C#操作Word⽂档(加密、解密、对应书签插⼊分页符)最近做⼀个项⽬,客户要求对已经⽣成好的RTF⽂件中的内容进⾏分页显⽰,由于之前对这⽅⾯没有什么了解,后来在⽹上也找了相关的资料,并结合⾃⼰在MSDN上⾯的查找,后来总算把问题给解决掉啦。
下⾯对C#操作Word⽂档(加密、解密、插⼊分页符)做⼀个简单的总结,希望对⼀些朋友有所帮忙吧。
^_^写代码之前,需要引⽤对应的DLL⽂件:1、Interop.Microsoft.Office.Interop.Word.dll (⽹上可以下载)2、mscorlib.dll (添加引⽤--->.NET中即可找到)1using Microsoft.Office.Interop.Word;2using MSWord = Microsoft.Office.Interop.Word;3using System.Reflection;45private void button1_Click(object sender, System.EventArgs e)6 {7//Word⽂档保护密码8string Pass = "ITIS@997168";9object PassWord = Pass;10 MSWord.Application wordApp; //Word应⽤程序变量11 MSWord.Document wordDoc; //Word⽂档变量12try13 {14object Nothing = Missing.Value; //初始化15 wordApp = new MSWord.ApplicationClass();1617// 打开已存在的Word18object FileName = @"E:\archive\CMPLatest_2117_230614-1053.Rtf";19object readOnly = false;20object isVisible = true;21object objFalse = false;2223 wordDoc = wordApp.Documents.Open(ref FileName, ref Nothing, ref readOnly, ref Nothing, ref PassWord, ref Nothing, ref Nothing, ref Nothing, ref Nothing, ref Nothing, ref Nothing, ref isVisible, ref Nothing, ref Nothing, 2425//激活Word⽂档26 wordDoc.Activate();27//判断是否有密码28if (wordDoc.HasPassword)29 {30 wordDoc.Password = null;31 }3233//检查是否为Word⽂档设置保护功能,没有设置保护功能,就解除密码保护34if (wordDoc.ProtectionType != WdProtectionType.wdNoProtection)35 {36 wordDoc.Unprotect(ref PassWord);37 }3839//跳转到指定书签40object toMark = MSWord.WdGoToItem.wdGoToBookmark;41//分页符42object oPageBreak = Microsoft.Office.Interop.Word.WdBreakType.wdPageBreak;4344//定义书签名称 PartB45object BookMarkName_b = "bmf_b";46 wordDoc.ActiveWindow.Selection.GoTo(ref toMark, ref Nothing, ref Nothing, ref BookMarkName_b);47//插⼊分页符48 wordDoc.ActiveWindow.Selection.InsertBreak(ref oPageBreak);4950//定义书签名称 PartC151object BookMarkName_c1 = "bmf_c1";52 wordDoc.ActiveWindow.Selection.GoTo(ref toMark, ref Nothing, ref Nothing, ref BookMarkName_c1);53//插⼊分页符54 wordDoc.ActiveWindow.Selection.InsertBreak(ref oPageBreak);5556//定义书签名称 PartC257object BookMarkName_c2 = "bmf_c2";58 wordDoc.ActiveWindow.Selection.GoTo(ref toMark, ref Nothing, ref Nothing, ref BookMarkName_c2);59//插⼊分页符60 wordDoc.ActiveWindow.Selection.InsertBreak(ref oPageBreak);6162//对Word⽂档进⾏加密保护63if(PassWord.ToString() != null)64 {65 wordDoc.Protect(WdProtectionType.wdAllowOnlyReading, ref objFalse, ref PassWord, ref Nothing, ref Nothing);66 }676869//将插⼊分页符后的Word⽂档保存⼀下70 wordDoc.SaveAs(ref FileName, ref Nothing, ref Nothing, ref Nothing, ref objFalse, ref Nothing, ref Nothing, ref Nothing, ref Nothing, ref Nothing, ref Nothing, ref isVisible, ref Nothing, ref Nothing, ref Nothing, ref Nothing); 7172//标记为最终状态,禁⽌弹出对话框73//wordApp.DisplayAlerts = WdAlertLevel.wdAlertsNone;74//标记为最终状态75//wordDoc.Final = true;7677//关闭Word⽂档78 wordDoc.Close(ref Nothing, ref Nothing, ref Nothing);79 wordApp.Quit(ref Nothing, ref Nothing, ref Nothing);80 }81catch(Exception ex)82 {8384 }85 }。
如何插入批量分页符
如何插入批量分页符批量插入分页符的方法在日常文档编辑和排版中,我们常常需要在文档中插入分页符来实现页面的分割和分节,并使得文档结构更加清晰。
对于较长的文档,手动插入分页符可能会耗费大量时间和精力,因此我们需要了解如何批量插入分页符以提高工作效率。
本文将介绍几种常用的批量插入分页符的方法,帮助您更好地处理文档。
一、使用分页符功能实现批量插入微软Office系列软件,如Microsoft Word和Microsoft Excel,提供了内置的分页符功能,可以快速插入分页符。
下面以Microsoft Word为例,具体步骤如下:1. 打开Microsoft Word,进入编辑状态;2. 在需要插入分页符的位置,将光标定位到该处;3. 点击工具栏上的“插入”选项卡,找到“分页符”按钮,点击该按钮;4. 分页符将会插入到光标位置,实现当前页面的分割。
通过重复以上步骤,您可以批量插入多个分页符,从而实现文档的分页和分节。
二、使用快捷键实现批量插入为了进一步提高插入分页符的效率,我们可以利用Microsoft Word 等软件的快捷键功能来实现批量插入分页符。
下面是一些常用的快捷键操作:1. Ctrl + Enter:在当前光标位置插入分页符;2. Ctrl + Shift + Enter:在当前光标位置插入分节符,同时插入分页符。
通过使用上述快捷键,您可以快速插入分页符和分节符,以实现文档的分页和分节要求。
三、利用宏实现批量插入对于大规模文档的处理,我们可以使用宏来实现批量插入分页符的目的。
宏是一种自动化脚本,可以记录您的操作过程,并自动重复执行。
下面是一个简单的宏示例,以实现批量插入分页符:1. 进入Microsoft Word的“开发工具”选项卡,在“宏”功能组中点击“宏”按钮;2. 在弹出的对话框中,输入宏的名称,如“InsertPageBreak”;3. 点击“创建”按钮,进入宏编写界面;4. 在宏编写界面中,输入以下代码:```vbaSub InsertPageBreak()Selection.InsertBreak Type:=wdPageBreakSelection.Find.Execute FindText:="^m", ReplaceWith:="", Replace:=wdReplaceAllEnd Sub```5. 点击“保存”按钮保存宏,并关闭宏编写界面;6. 关闭宏对话框后,您可以使用快捷键Alt + F8来调用宏,然后选择“InsertPageBreak”宏并点击“运行”按钮。
- 1、下载文档前请自行甄别文档内容的完整性,平台不提供额外的编辑、内容补充、找答案等附加服务。
- 2、"仅部分预览"的文档,不可在线预览部分如存在完整性等问题,可反馈申请退款(可完整预览的文档不适用该条件!)。
- 3、如文档侵犯您的权益,请联系客服反馈,我们会尽快为您处理(人工客服工作时间:9:00-18:30)。
1. 打开文档。
2. 快捷键Alt + F11打开VBA编辑器,选择菜单“插入->模块”3. 粘贴代码Option ExplicitSub SplitEveryFivePagesAsDocuments()Dim oSrcDoc As Document, oNewDoc As DocumentDim strSrcName As String, strNewName As StringDim oRange As RangeDim nIndex As Integer, nSubIndex As Integer, nTotalPages As Integer, nBound As IntegerDim fso As ObjectConst nSteps = 110 ' 修改这里控制每隔几页分割一次Set fso = CreateObject("Scripting.FileSystemObject")Set oSrcDoc = ActiveDocumentSet oRange = oSrcDoc.ContentnTotalPages = rmation(wdNumberOfPagesInDocument)oRange.Collapse wdCollapseStartoRange.SelectFor nIndex = 1 To nTotalPages Step nStepsSet oNewDoc = Documents.AddIf nIndex + nSteps > nTotalPages ThennBound = nTotalPagesElsenBound = nIndex + nSteps - 1End IfFor nSubIndex = nIndex To nBoundoSrcDoc.ActivateoSrcDoc.Bookmarks("\page").Range.CopyoSrcDoc.Windows(1).ActivateApplication.Browser.Target = wdBrowsePageApplication.Browser.NextoNewDoc.ActivateoNewDoc.Windows(1).Selection.PasteNext nSubIndexstrSrcName = oSrcDoc.FullNamestrNewName = fso.BuildPath(fso.GetParentFolderName(strSrcName), _fso.GetBaseName(strSrcName) & "_" & (nIndex \ nSteps + 1) & "." & fso.GetExtensionName(strSrcName)) oNewDoc.SaveAs strNewNameoNewDoc.Close FalseNext nIndexSet oNewDoc = NothingSet oRange = NothingSet oSrcDoc = NothingSet fso = NothingMsgBox "结束!"End Sub4. 快捷键F5 运行,直到出现“完成”表示结束。
————————————————打开要处理的WORD文档,然后ALT+F8调出宏处理窗口,新输入宏名称为MyPg。
点击右侧的编辑按钮,输入如下内容,完成后键盘F5即可。
但完成后最后2个文件也会会有问题,手动修改一下就行了。
Sub MyPg()Dim oWord As Word.ApplicationDim oDoc As Word.DocumentDim oNewDoc As Word.DocumentDim oRange As Word.RangeDim lCurrentStart As LongDim lCurrentEnd As LongDim lDocumentEnd As LongDim lOutputCount As LonglOutputCount = 0Set oWord = GetObject(, "Word.Application")Set oDoc = ActiveDocumentoDoc.SelectlCurrentStart = oWord.Selection.StartlCurrentEnd = lCurrentStartlDocumentEnd = oWord.Selection.EndoWord.Selection.Collapse wdCollapseStartDo While (lCurrentEnd < lDocumentEnd)oWord.Browser.T arget = wdBrowsePageoWord.Browser.NextoWord.Browser.NextoWord.Browser.NextoWord.Browser.NextlCurrentEnd = oWord.Selection.EndIf (lCurrentStart = lCurrentEnd) ThenlCurrentEnd = lDocumentEndEnd IfSet oRange = oDoc.Range(lCurrentStart, lCurrentEnd)Set oNewDoc = oWord.Documents.AddoRange.CopyoNewDoc.Range(0, 0).PastelOutputCount = lOutputCount + 1oNewDoc.SaveAs FileName:="d:\" & lOutputCount & ".doc"oNewDoc.CloselCurrentStart = lCurrentEndLoopEnd Sub首先打开要拆分的文档,然后按alt+f11(打开vb)在这里插入,模块,然后复制下列代码:Option ExplicitSub SplitPagesAsDocuments()Dim oSrcDoc As Document, oNewDoc As DocumentDim strSrcName As String, strNewName As StringDim oRange As RangeDim nIndex As IntegerDim fso As ObjectSet fso = CreateObject("Scripting.FileSystemObject")Set oSrcDoc = ActiveDocumentSet oRange = oSrcDoc.ContentoRange.Collapse wdCollapseStartoRange.SelectFor nIndex = 1 To rmation(wdNumberOfPagesInDocument)oSrcDoc.Bookmarks("\page").Range.CopyoSrcDoc.Windows(1).ActivateApplication.Browser.T arget = wdBrowsePageApplication.Browser.NextstrSrcName = oSrcDoc.FullNamestrNewName = fso.BuildPath(fso.GetParentFolderName(strSrcName), _fso.GetBaseName(strSrcName) & "_" & nIndex & "." & fso.GetExtensionName(strSrcName))Set oNewDoc = Documents.AddSelection.PasteoNewDoc.SaveAs strNewNameoNewDoc.Close FalseNextSet oNewDoc = NothingSet oRange = NothingSet oSrcDoc = NothingSet fso = NothingMsgBox "结束!"End Sub注意:不要关闭该vb窗口,直接按f5执行就可以了。
不过那个是按单页拆分的。
如果想按照指定页数拆分,请使用下面的代码,其它步骤和原来那个方案相同。
Option ExplicitSub SplitEveryFivePagesAsDocuments()Dim oSrcDoc As Document, oNewDoc As DocumentDim strSrcName As String, strNewName As StringDim oRange As RangeDim nIndex As Integer, nSubIndex As Integer, nT otalPages As Integer, nBound As Integer Dim fso As ObjectConst nSteps = 200 ' 修改这里控制每隔几页分割一次Set fso = CreateObject("Scripting.FileSystemObject")Set oSrcDoc = ActiveDocumentSet oRange = oSrcDoc.ContentnT otalPages = rmation(wdNumberOfPagesInDocument)oRange.Collapse wdCollapseStartoRange.SelectFor nIndex = 1 To nT otalPages Step nStepsSet oNewDoc = Documents.AddIf nIndex + nSteps > nT otalPages ThennBound = nT otalPagesElsenBound = nIndex + nSteps - 1End IfFor nSubIndex = nIndex To nBoundoSrcDoc.ActivateoSrcDoc.Bookmarks("\page").Range.CopyoSrcDoc.Windows(1).ActivateApplication.Browser.T arget = wdBrowsePageApplication.Browser.NextoNewDoc.ActivateoNewDoc.Windows(1).Selection.PasteNext nSubIndexstrSrcName = oSrcDoc.FullNamestrNewName = fso.BuildPath(fso.GetParentFolderName(strSrcName), _fso.GetBaseName(strSrcName) & "_" & (nIndex \ nSteps + 1) & "." & fso.GetExtensionName(strSrcName))oNewDoc.SaveAs strNewNameoNewDoc.Close FalseNext nIndexSet oNewDoc = NothingSet oRange = NothingSet oSrcDoc = NothingSet fso = NothingMsgBox "结束!"End Sub————————————————版权声明:本文为CSDN博主「dldw777」的原创文章,遵循CC 4.0 BY-SA版权协议,转载请附上原文出处链接及本声明。