索佳Sokkia_SET30R系列(230R_530R_630R)免棱镜全站仪使用说明书
索佳全站仪系列特点介绍

目 录
一、 全站仪 1、索佳全站仪产品系列简介 2、索佳全站仪主要特点介绍 3、索佳特型产品 二、水准仪 1、0.2mm光学水准仪
2、0.3mm电子水准仪(新)
三、索佳全站仪解决方案简介 四、小结
2
索佳产品总览
GNSS参考站 GSR2700 RSX 双频一体化 GSR2700 IS/ISX SET X系列 GIS型GPS:GIR1600
测量机器人NET05/1
SET 20/20K 系列
NET1200
单频Stratus
电子水准仪
SET30RK3全站仪
全站式陀螺仪
激光扫平、铅垂仪 光学水准仪
激光经纬仪
3
1.1 索佳全站仪系列
(0.8mm+1ppm)
(1mm+1ppm)
NET05 SRX、 NET1
(2mm+2ppm)
自动型全站仪
SETX、NET1200
补偿范围
数据存储 通讯端口 显示器
大于±12'
内存 10000 点、 SD 卡、USB 闪存 RS-232C、一级蓝牙(选配) 192 x 80 点阵LCD 图形显示器、屏幕尺寸 71.5 x 31mm
键盘
瞄准器与自动调焦 遥控器 机载软件 测量程序 电源 防尘防水等级 尺寸与重量
带背光27键 (字母数字键) + 测量键
31
1.3 NET05-更好的操作性能:现代化的屏幕触摸操作技术
(8)屏幕可触摸操作,独特凹型按键设计,可背景光照 明数字字母键盘,充分体现人性化设计。
32
1.3 NET05-更好的操作性能:现代化的数据通讯技术
(9)集现代数据通讯技术之大全: RS232、蓝牙、双USB、CF/SD卡
Orbix 3.3 SP 15安装指南说明书

Orbix 3.3.15 Installation GuideMicro FocusThe Lawn22-30 Old Bath RoadNewbury, Berkshire RG14 1QNUK© Copyright 2012-2019 Micro Focus or one of its affiliates.MICRO FOCUS, the Micro Focus logo and Orbix are trademarks or registered trademarks of Micro Focus or one of its affiliates.All other marks are the property of their respective owners.2019-01-31iiContentsInstalling Orbix 3.3 SP15 (1)Introduction (1)Prerequisites to Installing Orbix 3.3 SP 15 (3)Installing Orbix 3.3 SP 15 without the GUI (7)Installing Orbix 3.3 SP 15 with the GUI (8)Verifying your Installation (9)Changing Java version after installation (12)Uninstalling Orbix 3.3 SP 15 (13)Further Information (13)Orbix Installation Guide iiiiv Orbix Installation GuideInstalling Orbix 3.3SP15This document provides instructions for installing Orbix 3.3 SP 15 on allsupported platforms.IntroductionThis document provides instructions for installing Orbix 3.3 SP 15on a wide range of platforms.For a full list of supported platforms, see/prodavail.aspxProduct setsOrbix 3.3 SP 15 consists of three product sets, each enabled by aseparate license code:•Orbix 3.3 SP 15 Java Edition•Orbix 3.3 SP 15 C++ EditionYou can purchase and license any valid combination of these sets.Product componentsOrbix 3.3 SP 15 comprises the following components:•Development Platform for Java•Development Platform for C++•OrbixNamesIn addition OrbixSSL 3.3 SP 15 is separately available. For detailson how to install OrbixSSL, see the OrbixSSL 3.3 SP 15Installation Guide.JRE requirementsThe Orbix 3.3 SP 15 installation was built with InstallAnywhere,which is a Java application. The installer requires a JRE (JavaRuntime Environment). Before launching the installer, you shouldprovide the JRE yourself (see “Installation prerequisites”), or use apre-installed JRE or JDK.Orbix Installation Guide 12 Orbix Installation GuideInstallation stepsTo install Orbix 3.3 SP 15, follow these steps:•Determine your installation type.•Check the prerequisites for installing Orbix 3.3 SP 15.•Install Orbix 3.3 SP 15 on your host machine.•Verify your installation.Before you begin your installationBefore installing Orbix 3.3 SP 15, see the latest version of the Orbix 3.3 SP 15 Release Notes , and check for any updates to this Installation Guide on the following web page:/productdoc.aspxOrbix 3.3 SP 15 license codesYou must have a valid license code to install Orbix 3.3 SP 15 Java Edition or Orbix 3.3 15 C++ Edition. All other components of Orbix 3.3 SP 15 are activated by these license codes. The code is a long numeric string taking the general form:00000000-11111111-22222222-33333333-44444444Your license code should be included in a loose sheet in your Orbix3.3 SP 15 pack. Otherwise, because Orbix 3.3 SP 15 is a service pack release of Orbix 3.3, the license codes provided for Orbix 3.3 are valid for Orbix 3.3 SP 15. If you do not have any license codes, please contact Support before proceeding further.Note:Due to legal restrictions in some countries, OrbixSSL is supplied in a separate installer. OrbixSSL 3.3 SP 15 can beenabled with Orbix 3.3 SP 15 Java Edition or Orbix 3.3 SP 15 C++ Edition license codes.Note:When installing Orbix 3.3 SP 15 using PCAnywhere (a remote client), use a display resolution of type VGA (640 x 480).Orbix Installation Guide 3Determine your installation typeOrbix 3.3 SP 15 comprises two product sets:•Orbix 3.3 SP 15 Java Edition •Orbix 3.3 SP 15 C++ EditionYou can purchase the Java Edition and the C++ Edition separately or together:Prerequisites to Installing Orbix 3.3 SP 15Existing Orbix installationsIf you install Orbix 3.3 SP 15 in the same location as an existing Orbix installation, the existing installation is overwritten. If you have an older version of Orbix on your system and you do notwant it overwritten, you should install Orbix 3.3 SP 15 in a newlocation on your file system.Installation prerequisitesThe prerequisites for installing Orbix 3.3 SP 15 are as follows: ComponentJava Edition C++ EditionDevelopment Platform for JavaEnabled -Development Platform for C++-Enabled OrbixNames Enabled Enabled PrerequisiteNotesPrivileges GeneralTo install in a non-default location, you musthave permission to create files and directoriesin that location.WindowsTo install in the default location, Windows users must have administrator privileges.UNIXTo install into the default location, UNIX usersmust have root privileges.UNIX DISPLAY The installer was built using InstallAnywhere, which is a GUI application. To install Orbix 3.3 SP 15 without the GUI, see “Installing Orbix 3.3 SP 15 without the GUI”.For a GUI application to run on UNIX, you must install on a UNIX host with X and a windowing environment configured. Ensure your display environment variable is set to the workstation you are logged into. For example, set the following environment variable, substituting the full Domain Name System (DNS) name of your workstation for : export DISPLAY=:0.0 Contact your system administrator if you require assistance.JRE The installer was built using InstallAnywhere,which is a Java application, and requires a JRE.You must provide the location of the JRE for theinstallation to run.You need access on all platforms to an existingJRE (or JDK). Alternatively, you should obtainand install the JRE yourself on your systembefore running the installer. When installing aJRE, install all required patches on all platforms.Domain name The installer requires your domain name forOrbix 3.3 SP 15 configuration to resolveInternet or UNIX computer names. Contact your network administrator to obtain thedomain name for your TCP/IP internet prior toinstalling Orbix 3.3 SP 15.Prerequisite Notes4 Orbix Installation GuideOrbix Installation Guide 5Obtaining the installersEnsure that you have the correct installers for your platform. The table below shows the installer file names for each platform.Operating systems and compilers Please refer to the Product Availability page .for the latest information on platforms supported by Orbix 3.3 SP 15.PlatformOrbix installer AIXmicrofocus_orbix_3_3_15_aix.bin Solaris (Sparc)microfocus_orbix_3_3_15_solaris.bin Solaris (x86)microfocus_orbix_3_3_15_solaris_x86.bin Solaris (x64)microfocus_orbix_3_3_15_solaris_x64.bin HP-UX ia64 11v31(classic 32-bit)microfocus_orbix_3_3_15_hpux_ia_classic.bin HP-UX ia64 11v31(classic 64-bit)microfocus_orbix_3_3_15_hpux_ia_64_classic.bin HP-UX ia64 11v31 (standard 32-bit)microfocus_orbix_3_3_15_hpux_ia_standard.bin HP-UX ia64 11v31(standard 64-bit)microfocus_orbix_3_3_15_hpux_ia_64_standard.bin Linux (x86)microfocus_orbix_3_3_15_linux.bin Linux (x64)microfocus_orbix_3_3_15_linux_x64.bin Windows VisualStudio 2010 (32-bit)microfocus_orbix_3_3_15_win_32_vs2010.exe Windows Visual Studio 2010 (64-bit)microfocus_orbix_3_3_15_win_64_vs2010.exe Windows VisualStudio 2012 (32-bit)microfocus_orbix_3_3_15_win_32_vs2012.exe Windows VisualStudio 2012 (64-bit)microfocus_orbix_3_3_15_win_64_vs2012.exe Windows Visual Studio 2013 (32-bit)microfocus_orbix_3_3_15_win_32_vs2013.exe Windows VisualStudio 2013 (64-bit)microfocus_orbix_3_3_15_win_64_vs2013.exe Windows VisualStudio 2015 (32-bit)microfocus_orbix_3_3_15_win_32_vs2015.exe Windows Visual Studio 2015 (64-bit)microfocus_orbix_3_3_15_win_64_vs2015.exe6 Orbix Installation Guide Disk space requirementsThe following table lists the approximate amount of disk space taken up by the Orbix 3.3 files. The install program also requires approximately 50 MB of temporary work space.Default locationThe default location of your Orbix 3.3 installation is as follows:Component Solaris HP-UX Development Environment for Java & C++135 MB 140 MB Documentation 75 MB 75 MB Note:On Windows, please check that you have enough disk space before starting the installation.Platform Default LocationUNIX main installation /opt/microfocus/orbix33Windows C:\Program Files\microfocus\Orbix3.3 SP15 for WindowsWindows (installing32-bit kit on a 64-bit Windows)C:\Program Files (x86)\Micro Focus\Orbix 3.3 SP15 for Windows Note:Orbix 3.3 SP 15 installs in a fixed location relative to the path you specify.Note:When installing Orbix 3.3 SP 15 on Windows in a folder protected by UAC, please ensure that the appropriate access permissions are granted on the Orbix installation folder.Installing Orbix 3.3 SP 15 without the GUIInstalling Orbix 3.3 SP 15 in silent install mode allows you to runthe installer without using the GUI. The silent mode installer looksto a template file that provides the required information.Installing in silent mode1.To install in silent mode, use the following command:./<installer > -f /path /to /template.fileFor example, to run the Solaris (Sparc) installer silently, issuethe following command:./microfocus_orbix_3_3_15_solaris.bin -f /path /to /template.filetemplate.file should contain the following information:2.The LICENCE_KEY_1 and LICENCE_KEY_2 lines signify the C++and Java licence keys respectively. If you want to install just one license set (that is, C++ or Java, but not both), then youcan modify the silent installer file as follows:♦To license only the C++ runtime:♦To license only the Java runtime:##Specimen properties for Solaris 2.9 silent install with licence codes##-------------------------------------------------------------------------##C++, Java, and OTS##-------------------------------------------------------------------------##Specify the directory where you want Orbix 3.3 SP 15 installedUSER_INSTALL_DIR=/path/to/install/dir##Specify the location of your Java Developemnt KitJAVA_LOCATION=/path/to/jdk/dirJAVA_VERSION=1.6INSTALLER_UI=SILENT##Specify the components of Orbix you want to installPRODUCTS="Orbix 3.3 - Java Edition and C++ Edition"##Specify your licence keys: c++ and javaLICENCE_KEY_1=<Licence Key1>LICENCE_KEY_2=<Licence Key2>##Specify the domain for the installation DOMAIN=PRODUCTS="Orbix 3.3 - C++ Edition"LICENCE_KEY_1=<c++-licence-key>PRODUCTS="Orbix 3.3 - Java Edition"LICENCE_KEY_1=<java-licence-key>Installing Orbix 3.3 SP 15 with the GUI This section describes how to install Orbix 3.3. SP 15 using the GUI installer, which is based on InstallAnywhere.Installation steps To install Orbix 3.3. SP 15 using the GUI, perform the following steps:1.In the Select Product screen, select the Orbix 3.3 SP 15 product set that you have purchased (for example, Orbix 3.3 Java Edition). Click Next to continue.2.In the License Information screen, enter the license code(s) that you have purchased in the appropriate text field(s). Click Next to continue. The license keys requested here depend on the product set you selected in the previous screen.3.In the License Agreement screen, click Yes to agree to the terms of the License Agreement, and click Next to continue.4.In the Choose Orbix Installation Folder screen, enter the file location that you wish to install Orbix 3.3 SP 15 into (for example, C:\orbix3). Click Next to continue.5.In the Domain Information screen, enter your domain name, and click Next to continue.6.In the JDK Configuration screen, enter the location of your Java Development Kit. This is not required for Orbix 3.3 SP 15 C++ Edition. Click Install to continue. 7. A progress bar is displayed while the files are installed.8.After the installation is complete, the Orbix welcome page launches automatically.9.In the Reboot Computer screen, choose whether to restart your computer now or later.10.The Install Complete screen is displayed to confirm that the installation is finished. Click Done to finish the installation.Note:You must have permission to create files and directories in this location.Verifying your InstallationConfiguration checksWhen the installation is complete, follow these steps to ensure correct operation:1.Check the contents of the Orbix configuration files, to ensure that the specified directory paths and domain name matchthose for your site.2.Read the Orbix 3.3 SP 15 Release Notes .3.Before attempting to run the Orbix daemon or the Orbix Javaactivator from a terminal or command shell, run the suppliedscripts that set the following environment variables:IT_CONFIG_PATHORBIX_ROOTJAVAHOMEPATH .To run these scripts, type the following commands in a terminal:PlatformLocation UNIX $ORBIX_ROOT/config/iona.cfg$ORBIX_ROOT/config/common.cfg$ORBIX_ROOT/config/orbix3.cfg$ORBIX_ROOT/config/orbixweb3.cfg$ORBIX_ROOT/config/orbixnames3.cfg Windows %ORBIX_ROOT%\config\iona.cfg%ORBIX_ROOT%\config\common.cfg%ORBIX_ROOT%\orbix3.cfg%ORBIX_ROOT%\orbixweb3.cfg%ORBIX_ROOT%\orbixnames3.cfgPlatformCommand UNIX$ORBIX_ROOT/setenvs.sh (or setenvs.csh )UNIX (to source a64-bit environment in amixed-mode installer)$ORBIX_ROOT/setenvs64.sh (or setenvs64.csh )Windows %ORBIX_ROOT%\setenvs.batTesting your Orbix 3.3 SP 15 Java Edition installationTo ensure that your installation is fully operational, you should change directory to the demos directory of your Orbix 3.3 SP 15 installation, for example:Read the index.html file for instructions to run the demonstration program.Testing your Orbix 3.3 SP 15 C++ Edition installationTo ensure that your installation is fully operational, you should change directory to the demos directory of your Orbix 3.3 SP 15 installation, for example:Read the index.html file for instructions to run the demonstration program.Reinstalling the license codeIf the licensed applications fail to run (for example, orbixd , idl , idlj ), you may have made an error in entering your license authorization code.You can reinstall the license by changing to the bin directory of your Orbix 3.3 SP 15 installation, and typing the following line, using your authorization code as shown in the following example:PlatformLocation Make command UNIX$ORBIX_ROOT/demos/common/jumpstart/basic/java make Windows %ORBIX_ROOT%\demos\common\jumpstart\basic\java nmake Platform Location Make command UNIX$ORBIX_ROOT/demos/common/jumpstart/basic/cxx make Windows %ORBIX_ROOT%\demos\common\jumpstart\basic\cxx nmakeNote:If you are building the demos on a Linux system with the -std=c++11 flag, you should set the environment variableORBIXCPP_STD=-std=c++11 before you start building.PlatformCommand UNIXinstall_license orbixd licence_code Windows license.exe orbixd LicenceCodeYou should replace orbixd with the filename of the application that fails to run, and replace licence_code with your licenceauthorization code.The following Orbix 3.3 SP 15 application files are enabled by the corresponding Orbix 3.3 SP 15 product license authorizationcodes:Structure of installed directoriesA complete installation of Orbix 3.3 SP 15 has the followingdirectory structure in the installation location:ApplicationJava Edition code C++ Edition code orbixd - Orbix C++ Daemon Code enablesCode enables idl - Orbix C++ IDL compiler-Code enables idlj - Orbix Java IDLcompiler Code enables -DirectoryDescription \binBinary images for all components \configRepositories and configuration files for all components \contribUtilities contributed by Orbix engineers and partners \demosDemonstrations for all components \docsLinks to the latest information on Orbix 3.3 SP 15\idlIDL files \includeHeader files \libDevelopment libraries \OrbixSSL OrbixSSL files, utilities and examples(OrbixSSL installation required)\tools GUI Tools\UninstallOrbixFiles for uninstalling Orbix 3.3 SP 15Changing Java version after installationAfter you have installed Orbix 3.3.15, it is possible to alter theversion of Java that is used. This may be useful in circumstanceswhere there is a demand to move to another version of Java forimproved security features.1.Ensure that all Orbix servers and the Orbix daemon arestopped.2.Open the common.cfg configuration file located at:<orbix-installation>/config/common.cfg3.Change the line:IT_JAVA_INTERPRETER = "c:\java\java8\bin\java.exe";toIT_JAVA_INTERPRETER ="c:\java\updated_java8\bin\java.exe";4.Open up the environment script (this may be setenvs.bat fileon Windows or a setenvs(64).sh/.csh file on Unix systems)located at the root of the installation tree.Change the value that the JAVA_HOME environment variable isset to.5.If the JDK being updated is Java 11, then switch to theChanging to Java 11 section before step 6.6.This completes migrating to the new version of Java. Re-runthe updated environment scripts.7.Restart the Orbix daemon.Changing to Java 11Changing to Java 11 will require some more changes. These extrachanges are in the same environment script in which you alreadyupdated the JAVA_HOME environment variable.Change the following environment variables:• Change IT_JAVA_MODERN to "true".• Change JAVA_P_FLAG to "/a".Note:Any Java servers that were registered in the IMR(implementation repository) may need to be recreated.Uninstalling Orbix 3.3 SP 15Uninstalling OrbixTo uninstall Orbix 3.3 SP 15, run the UninstallOrbix file in the UninstallOrbix directory of your Orbix 3.3 SP 15 installation. For examples:Further InformationTechnical supportIf you require further technical assistance with using this product, please see the following web page:/Platform Uninstall script UNIX$ORBIX_ROOT/UninstallOrbix/UninstallOrbix Windows %ORBIX_ROOT%\UninstallOrbix\UninstallOrbix Note:The uninstaller removes the complete installation of Orbix3.3 SP 15, but does not remove any files added or generated after installation (for example, log files, executables generated in demo runs, implementation repositories, and so on). If OrbixSSL has been installed, it should be uninstalled first.。
派克液压密封件说明书

派克汉尼汾公司版权所有未经许可不能摘录,翻印。
保留修改权利2021年6月警告销售条件本样本中产品和/或系统或相关产品出现故障,选型不当或使用不当,均可能导致人身伤亡和财产损失。
本文档以及由派克·汉尼汾公司及其子公司和授权经销商提供的其他资料,为具有技术知识的用户提供进一步研究所需的产品和/或系统选项。
重要的是,用户必须对您的应用进行全面的分析,并对当前产品样本中与产品或系统相关的资料进行评估。
由于工作条件以及产品或系统的多样性,用户必须自行分析和测试,并独自承担一切后果,包括:产品和系统的最终选型以及确保满足应用的所有性能、安全和警告等方面的要求。
派克·汉尼汾及其子公司可能会随时对本样本中的产品,包括但不限于:产品的特性、产品的规格、产品的结构、产品的有效性以及产品的价格作出变更而不另行通知.本样本中的所有产品均由派克·汉尼汾公司及其子公司和援权经销商销售。
与派克签订的任何销售合同均按照派克标准条件和销售条件中规定的条款执行(提供复印件备索)。
本公司的密封件,只能在本公司的文件资料述及的应用参数范围与接触介质、压力、温度和存放时间相一致的情况下才能使用。
在规定的应用参数范围外使用以及错误选用不同的材料都可能导致密封件寿命的缩短以及设备的损坏,甚至更严重的后果(如生命安全,环境污染等)。
样本中所列出的工作压力、温度范围、运动速度是极限值,它们之间相互关联、相互影响;在极端的工况下,建议不要同时把各个参数都同时用到极限值。
对于特殊的要求(压力、温度、速度、介质等),请联系派克汉尼汾公司以咨询合适的密封结构、材料、配置、安装建议等。
由于诸多工作参数会影响到流体传动系统及密封元件,这些设备的制造商必须在实际工作条件下测试、验证并批准密封系统的功能与可靠性。
此外,对于不断出现的新的介质(液压油、润滑脂、清洗剂等),用户特别注意它们与目前所用的密封件弹性体材料的兼容性。
我们建议用户在大批量应用之前,在厂内或现场先做密封材料的兼容性能测试,作为密封产品与系统供应商,我们建议用户遵循我们的这些建议。
电子称用户说明书
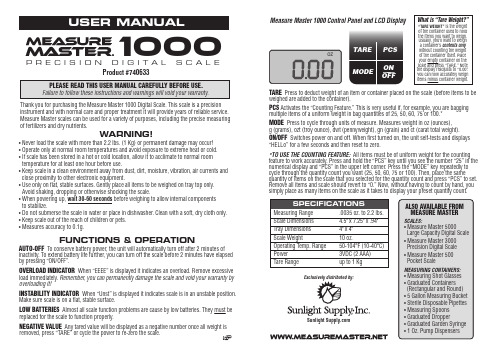
• Never load the scale with more than 2.2 lbs. (1 Kg) or permanent damage may occur!• Operate only at normal room temperatures and avoid exposure to extreme heat or cold.• If scale has been stored in a hot or cold location, allow it to acclimate to normal room temperature for at least one hour before use.• Keep scale in a clean environment away from dust, dirt, moisture, vibration, air currents and close proximity to other electronic equipment.• Use only on flat, stable surfaces. Gently place all items to be weighed on tray top only. Avoid shaking, dropping or otherwise shocking the scale.• When powering up, wait 30-60 seconds before weighing to allow internal components to stabilize.• Do not submerse the scale in water or place in dishwasher. Clean with a soft, dry cloth only.• Keep scale out of the reach of children or pets.• Measures accuracy to 0.1g.TARE Press to deduct weight of an item or container placed on the scale (before items to beweighed are added to the container).PCS Activates the “Counting Feature.” This is very useful if, for example, you are bagging multiple items of a uniform weight in bag quantities of 25, 50, 60, 75 or 100.*MODE Press to cycle through units of measure. Measures weight in oz (ounces),g (grams), ozt (troy ounce), dwt (pennyweight), gn (grain) and ct (carat total weight).ON/OFF Switches power on and off. When first turned on, the unit self-tests and displays “HELLo” for a few seconds and then reset to zero.*TO USE THE COUNTING FEATURE: All items must be of uniform weight for the counting feature to work accurately. Press and hold the “PCS” key until you see the number “25” in the numerical display and “PCS” in the upper left corner. Press the “MODE” key repeatedly to cycle through the quantity count you want (25, 50, 60, 75 or 100). Then, place the samequantity of items on the scale that you selected for the quantity count and press “PCS” to set. Remove all items and scale should revert to “0.” Now, without having to count by hand, you simply place as many items on the scale as it takes to display your preset quantity count.AUTO-OFF To conserve battery power, the unit will automatically turn off after 2 minutes ofinactivity. To extend battery life further, you can turn off the scale before 2 minutes have elapsed by pressing “ON/OFF”.OVERLOAD INDICATOR When “EEEE” is displayed it indicates an overload. Remove excessiveload immediately. Remember, you can permanently damage the scale and void your warranty by overloading it!INSTABILITY INDICATOR When “Unst” is displayed it indicates scale is in an unstable position.Make sure scale is on a flat, stable surface.LOW BATTERIES Almost all scale function problems are cause by low batteries. They must be replaced for the scale to function properly.NEGATIVE VALUE Any tared value will be displayed as a negative number once all weight isremoved, press “TARE” or cycle the power to re-zero the scale.1000P R E C I S I O N D I G I T A L S C A L EWhat is “Tare Weight?”“TARE WEIGHT” is the weight of the container used to hold the items you want to ually, you’ll want to weigh a container’s contents only without counting the weight of the container itself. Place your empty container on the scale and press “TARE.” Note the display readjusts to “0.00”.You can now accurately weigh items minus container weight.FUNCTIONS & OPERATIONWARNING!Thank you for purchasing the Measure Master 1000 Digital Scale. This scale is a precision instrument and with normal care and proper treatment it will provide years of reliable service. Measure Master scales can be used for a variety of purposes, including the precise measuring of fertilizers and dry nutrients.Measure Master 1000 Control Panel and LCD DisplayProduct #740633Sunlight 。
Sokkia_SET22D
全站仪专家网 收集整理
全站仪专家网 收集整理
全站仪专家网 收集整理
全站仪专家网 收集整理
全站仪专家网 收集整理
全站仪专家网 收集整理
全站仪专家网 收集整理
全站仪专家网 收集整理
全站仪专家网 收集整理
全站仪专家网 收集整理
全站仪专家网 收集整理
全站仪专家网 收集整理
全站仪专家网 收集整理
全站仪专家网 收集整理
全站仪专家网 收集整理
全站仪专家网 收集整理
全站仪专家网 收集整理
全站仪专家网 收集整理
全站仪专家网 收集整理
全站仪专家网 收集整理
全站仪专家网 收集整理
全站仪专家网 收集整理
全站仪专家网 收集整理
全站仪专家网 收集整理
全站仪专家网 收集整理
全站仪专家网 收集整理
全站仪专家网 收集整理
全站仪专家网 收集整理
全站仪专家网 收集整理
全站仪专家网 收集整理
全站仪专家网 收集整理
全站仪专家网 收集整理
全站仪专家网 收集整理
全站仪专家网 收集整理
全站仪专家网 收集整理
全站仪专家网 收集整理
全站仪专家网 收集整理
全站仪专家网 收集整理
全站仪专家网 收集整理
全站仪专家网 收集整理
全站仪专家网 收集整理
全站仪专家网 收集整理
全站仪专家网 收集整理
全站仪专家网 收集整理
全站仪专家网 收集整理
全站仪专家网 收集整理
全站仪专家网 收集整理
全站仪专家网 收集整理
全站仪专家网 收集整理
Palo Alto Networks PAN-OS 产品系列说明书
Software that runs all Palo Alto Networks® next-generation firewalls and provides complete visibility and control of applications in use across all users, in all locations, all of the time.
Need to Know
How Can Customers Upgrade?
PAN-OS 10.0 Upgrade Guide
Marketing campaign
Security Simplified
Resources
hi! PAN-OS 10.0
PAN-OS 10.0 Webinar Replay
Access to Previous Release Innovations PAN-OS 9.1 PAN-OS 9.0
PAN-OS 10.0 Highlights
TLS 1.3 Decryption
Natively Integrated IoT Security
Automates Device Quarantine
© 2020 Palo Alto Networks, Inc. Palo Alto Networks is a registered trademark of Palo Alto Networks. A list of our trademarks can be found at /company/trademarks.html. All other marks mentioned herein may be trademarks of their respective companies.
全站仪_2008索佳新品新技术

NET05:索佳高精度全站仪
15
sokkia
4、索佳高端全站仪“十大”特点
“十大”特点之三:独特的自动化性能
智能目标识别、照准与跟踪(棱镜与非棱镜的识别)
16
sokkia
4、索佳高端全站仪“十大”特点
“十大”特点之三:独特的自动化性能
智能目标识别、照准与跟踪(棱镜与棱镜的识别)
4、索佳高端全站仪“十大”特点
“十大”特点:
1. 2. 3. 4. 5. 6. 拥有专利的测角、测距核心技术 世界最高的测量精度 独特的自动化性能 独一无二的反射片照明灯装置 便于用户开发的WinCE操系统 高清晰彩色显示触摸屏、图标可激 活操作风格、背景光照明的数字字 母键盘 7. 长效锂电池供电解决方案 8. 类型齐全的数据传输端口 9. IP6X高等级防护性能 10. 独特的野外信息速递系统
精度[″] 12
sokkia
4、索佳高端全站仪“十大”特点
“十大”特点之二:提供最高的测量精度 型号
NET05
NET1
测角精度
0.5
1.0
棱镜
0.8 mm+1ppm
1.5 mm+1ppm 2.0 mm+2ppm
1.5mm+2ppm(SRX1)
测距精度 反射片
0.5 mm+1ppm
1.0 mm+1ppm
以往的EDM
11
RED-tech-EDM
sokkia
4、索佳高端全站仪“十大”特点
“十大”特点之一:拥有专利的测角、测距核心技术
IACS
20 18 16 14
--自主角度校准系统:应用效果
索佳SETX全站仪介绍

sokkia sokkia 曹新华索佳武汉技术中心cxh0509@5隆重推出z索佳新一代全站仪、经典之作SET X 2007年下半年隆重推出。
z国际著名专业杂志《GIMInternational》撰文推介。
5名称含义SET:S okkia E lectronic T otalstation索佳电子全站仪X:RED-tech E X, E x treme,E x cellent RED-tech EX技术,极至的,卓越的5产品定位手控型顶端全站仪5技术特色高精度测距技术RED-tech(RE volutionary D igital processing tech nology)相位测距、多频率信号同步发射与接收、先进的光学系统、测距信号数字处理。
免棱镜0.3 ~ 500 m,±(3 + 2ppm×D)mm反射片 1.3 ~500 m, ±(3 + 2ppm×D)mm单棱镜 1.3 ~5000 m, ±(1.5 + 2ppm×D)mm (SET1X)±(2 + 2ppm×D)mm5技术特色高精度测角技术IACS(I ndependent A ngle C alibration System)索佳独创的角度自校准系统(专利技术)结合基于随机双向编码技术的绝对编码度盘,极大提高和确保仪器的测角精度。
测角精度:±1”/ 2”/ 3”/ 5”5的主要特点Windows CE 操作系统z高可靠性z高扩展性z自开发软件z丰富的图形界面5的主要特点z高分辨彩色触摸显示屏z背光式操作键盘z透明凹面按键5的主要特点良好的用户操作界面z全中文菜单z直观图形显示z点击屏幕或按键均可操作5的主要特点功能丰富、使用方便的测量软件5的主要特点直观方便的状态条状态信息显示点击改变相关设置按住进入相关设置菜单5的主要特点菜单和界面自定义z页面标签z页面内容z功能菜单z字体大小和颜色z 10000点数据内存z CF卡口(SD卡)z USB口z RS232串口z独有的1级蓝牙,可实现300m距离无线通讯5的主要特点大容量内存、丰富的数据接口5的主要特点z新型双速微动z测量便捷键测量员眼睛无需离开目镜便可方便快捷地按键实施测量5的主要特点标配红绿光导向器100m1.3m –150m3.5m3.5m3.5m3.5m仪器内置红绿光导向器,可极大提高放样等测量的工作效率。
- 1、下载文档前请自行甄别文档内容的完整性,平台不提供额外的编辑、内容补充、找答案等附加服务。
- 2、"仅部分预览"的文档,不可在线预览部分如存在完整性等问题,可反馈申请退款(可完整预览的文档不适用该条件!)。
- 3、如文档侵犯您的权益,请联系客服反馈,我们会尽快为您处理(人工客服工作时间:9:00-18:30)。
测量仪器SET230RSET230R3SET530RSET530R3SET630R无协作目标电子全站仪V2.0-0412-500使用说明书承蒙购买索佳本系列电子全站仪, 对此甚感荣幸。
仪器使用前请详细阅读本使用说明书,并参阅“28.1标准配置”以确认所有附件是否齐全。
为便于阅读, 说明书中部分插图和显示内容做了简化处理。
为改进产品的性能和精度, 仪器的技术指标和外观 随时可能变化,恕不另行通知, 敬请谅解。
仪器软件会 定期更新,恕不另行通知。
具体事宜,可与各地经销商 或索佳测绘仪器贸易(上海)有限公司联系。
此说明书的编写,由于时间仓促,必有疏漏之处。
如发现疑问, 请与索佳测绘仪器贸易(上海)有限公司 联系。
Class 3Class Ⅲ激光产品Class 2Class Ⅱ激光产品iii10. 角度测量.........................................................................................27 10.1 两点间角度测量.....................................................................27 10.2 已知方向的设置.....................................................................28 10.3 水平角重复测量.....................................................................28 10.4 角度测量数据输出.................................................................30 11. 距离测量.........................................................................................31 11.1 返回信号强弱检测步骤.........................................................32 11.2 距离和角度测量 ...................................................................33 11.3 调阅测量数据.........................................................................34 11.4 距离测量数据输出.................................................................35 11.5 悬高测量..................................................................................36 12. 坐标测量.........................................................................................38 12.1 输入测站数据.........................................................................38 12.2 设置后视坐标方位角.............................................................40 12.3 三维坐标测量.........................................................................41 13. 后方交会测量 (42)1. 安全操作注意事项 ...........................................................................1 2. 注意事项 ............................................................................................5 3. 激光安全信息......................................................................................7 4. 仪器功能简介 ....................................................................................9 4.1 仪器部件名称.............................................................................9 4.2 模式图 ......................................................................................12 5. 基本操作 ..........................................................................................13 5.1 键基本操作 ................................................................................13 5.2 显示功能 ....................................................................................17 6. 电池的使用 ......................................................................................19 6.1 电池充电 ..................................................................................19 6.2 电池的装卸................................................................................20 7. 架设仪器............................................................................................21 7.1 对中............................................................................................21 7.2 整平............................................................................................22 8. 调焦与照准.......................................................................................25 9. 开机 .. (26)iii13.1 坐标后方交会测量.................................................................42 13.2 高程后方交会测量.................................................................45 14. 放样测量.........................................................................................48 14.1 角度和距离放样测量.............................................................48 14.2 坐标放样测量.........................................................................50 14.3 悬高放样测量.........................................................................52 15. 直线放样.........................................................................................53 15.1 定义基线 ................................................................................53 15.2 直线放样点 ...........................................................................55 15.3 直线放样线..............................................................................56 16. 点投影..............................................................................................58 16.1 定义基线..................................................................................58 16.2 点投影......................................................................................59 17. 偏心测量.........................................................................................60 17.1 单距偏心测量.........................................................................60 17.2 角度偏心测量.........................................................................62 17.3 双距偏心测量.........................................................................63 18. 对边测量.........................................................................................65 18.1 多点间距离测量.....................................................................65 18.2 改变起始点..............................................................................66 19. 面积计算.........................................................................................67 20. 存储数据.........................................................................................70 20.1 存储测站数据.........................................................................70 20.2 存储距离测量数据.................................................................71 20.3 存储角度测量数据.................................................................72 20.4 存储坐标测量数据.................................................................73 20.5 存储距离和坐标数据.............................................................74 20.6 存储注记数据.........................................................................74 20.7 调阅工作文件数据.................................................................75 21. 工作文件的选取与删除................................................................76 21.1 选取工作文件.........................................................................76 21.2 删除工作文件.........................................................................78 22. 已知数据的输入与删除................................................................79 22.1 已知坐标的输入与删除.........................................................79 22.2 调阅已知坐标.........................................................................82 22.3 属性码的输入与删除.............................................................82 22.4 调阅属性码..............................................................................83 23. 输出工作文件数据. (84)24仪器参数设置 (85)24.1 改变仪器参数 (85)24.2 键功能定义 (89)24.3 更改密码 (93)24.4 初始化 (94)25 双向数据通讯 (95)25.1 与计算机连接 (95)25.2 双向通讯指令及其数据格式 (96)26. 错误信息············································································10827. 检验与校正 (110)27.1 照准部水准器检校 (110)27.2 圆水准器检校 (111)27.3 倾斜传感器零点误差检校 (111)27.4 视准差检测 (114)27.5 分划板检校 (115)27.6 光学对中器检校 (116)27.7 距离加常数检测 (119)27.8 导向光 (120)28. 标准配置和选购附件 (122)28.1 标准配置 (122)28.2 选购附件 (124)28.3 棱镜系统 (126)28.4 电源系统 (128)29. 技术指标 (130)29.1 技术指标 (130)29.2 说明 (132)30. 规范 (133)31. 附加说明 (135)31.1 双盘照准设置垂直度盘指标位 (135)31.2 高精度测距气象改正 (136)31.3 电池使用说明 (137)31.4 保修条例 (139)iv1为确保安全操作,避免造成人员伤害或财产损失,本说明书使用“警告”和“注意”来提示应遵循的条款。