TeamViewer使用手册
teamviewer ipad用法

TeamViewer是一个功能强大的远程控制和桌面共享工具,它可以帮助用户在任何地方使用任何设备进行远程控制,并且可以在不同设备之间进行文件传输和桌面共享。
而iPad作为一款流行的移动设备,它的灵活性和便携性使其成为了很多人的首选,那么TeamViewer如何在iPad上使用呢?接下来我们将会介绍iPad上TeamViewer的用法。
一、下载和安装要在iPad上使用TeamViewer,请首先下载并安装TeamViewer for Remote Control这款应用。
在App Store中搜索TeamViewer即可找到,并进行安装。
二、添加设备1. 打开TeamViewer应用,在主界面点击右上角的“添加设备”按钮。
2. 输入要连接设备的TeamViewer ID和密码,即可连接远程设备。
三、远程控制1. 在连接远程设备后,可以在iPad上直接操作远程设备,包括鼠标点击、键盘输入等操作。
2. 可以进行文件传输,将iPad上的文件传输到远程设备或者将远程设备的文件传输到iPad上。
四、桌面共享1. 在连接远程设备后,在iPad上可以查看远程设备的桌面,进行实时的桌面共享操作。
2. 可以进行语音通话或视瓶通话,方便进行远程协作和交流。
五、其他功能1. 远程打印:可以通过TeamViewer在iPad上远程连接设备后进行打印操作。
2. 远程会议:可以通过TeamViewer进行远程会议,在不同地点的人员进行视瓶和语音会议。
总结:通过使用TeamViewer在iPad上进行远程连接和控制,可以方便快捷地实现远程办公、远程协作以及远程支持等功能。
TeamViewer的安全加密和稳定性能也保障了远程操作的安全和可靠性。
iPad上的TeamViewer用法是非常实用和便捷的,可以帮助用户更加高效地进行工作和生活。
六、安全性和隐私保护方面在使用iPad上的TeamViewer时,安全性和隐私保护是非常重要的。
TeamViewer远程连接软件的使用
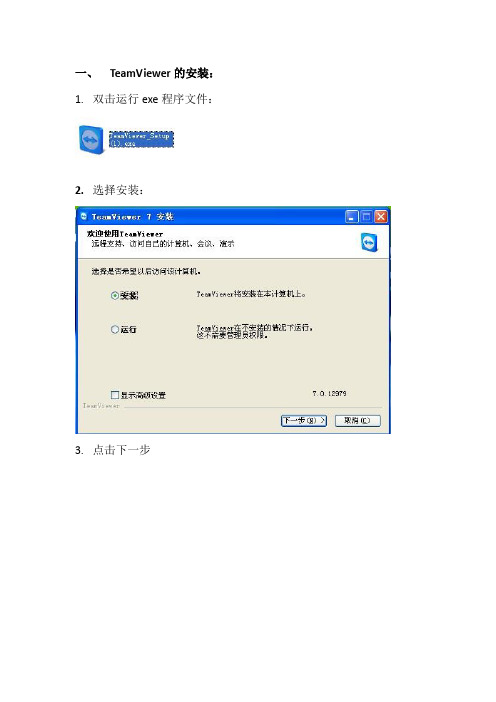
一、T eamViewer的安装:
1.双击运行exe程序文件:
2.选择安装:
3.点击下一步
4.选择个人/非商务用途点击下一步:
5.勾选同意安装条款及仅用做非商业使用选项框点击下一步:
6.选择无(缺省)点击完成:
7.如下安装成功正在激活
8.如下成功激活:
二、T eam Viewer的使用:
1.双击如下图标:
2.出现如下会话框,输入id号如下:
3.查看左下角查看是否连接准备已就绪,如下显示连接已就绪:
4.点击连接到伙伴如下:
5.如下显示正在连接:
6.出现如下会话框时输入密码
7.点击登录如下:
8.出现如下会话框表示连接成功:
9.点击右上角的Ctrl+Alt+Del
10.输入远程计算机用户名及密码如下:
11.如下显示远程连接成功:。
TeamViewer 唤醒网络功能说明书
TeamViewerManual Wake-on-LANRev 11.1-201601Table of contents1 About Wake-on-LAN32 Requirements53 Set up Windows6 3.1 Configure the BIOS6 3.2 Configure the network card7 3.3 Deactivate fast startup84 Set up Mac OS X94.1 Configure the network card95 Configure TeamViewer10 5.1 Assign the computer to your TeamViewer account10 5.2 Wake-on-LAN via a TeamViewer ID in the network11 5.3 Wake-on-LAN via a public address126 Wake up the computer147 Appendix15 7.1 Configure the router151 About Wake-on-LANYou can turn on an offline computer with TeamViewer via Wake-on-LAN.This way, you can control an offline computer remotely by waking it up before you establish aconnection.Wake-on-LAN can be used through two different methods:l Wake up a computer via another computer within the same network (see Section 5.2 ,page 11).l Wake up a computer via its public address (see Section 5.3 , page 12).This manual describes the necessary requirements and steps to use TeamViewer Wake-on-LAN.Unless stated otherwise, the functionalities described always refer to the TeamViewer full version for Microsoft Windows.2 RequirementsIn order to successfully wake up a computer by Wake-on-LAN, its hardware must meet severalrequirements.The following checklist ensures that the computer is suitable for Wake-on-LAN:l The computer is connected to a power source.l The computer's network card supports Wake-on-LAN.l The computer has an Internet connection.l The computer is connected to the Internet via a network cable.l The computer is in one of the following power statesl Sleepl Start > Sleepl Hibernationl Start > Hibernationl Shut down (Soft off)l Start > Shut down (not supported unter Mac OS X)Supported power states.If these requirements have been met, you can move on to configure your computer and thesoftware in the next steps.3 Set up WindowsIn order to wake up the computer, it must be appropriately set up. Several settings must beadjusted on the computer for this purpose and TeamViewer must be correctly configured.3.1 Configure the BIOSTo activate Wake-on-LAN in the BIOS, follow these steps:1. Start the computer.2. Press the F2 key (or the equivalent) to access the BIOS set-up.The BIOS set-up will open.3. Open the Power tab.4. Activate the Wake-on-LAN option.5. Save and exit the BIOS set-up.Activating Wake-on-LAN in the BIOS.: If there is no option to activate Wake-on-LAN in the BIOS, check the manual of the motherboard to make sure that it supports Wake-on-LAN.3.2 Configure the network cardThe computer's network card must be configured in such a way that it is supplied with power atall times. It may be necessary to adjust the properties of the network card for this purpose.To activate Wake-on-LAN for the network card under Windows, follow these steps:1. Start the computer.2. Open the Settings.3. Click Devices.4. Under Related settings, click the Device Manager link.The Device Manager window will open.5. Under Network adapters, choose the Properties option in the context menu (rightclick) of the network card.The Properties of <network card> dialog will open.6. Open the Power Management tab.7. Activate the Allow this device to wake the computer option.8. The network card now supports Wake-on-LAN.Activating Wake-on-LAN for the network card under Windows.3.3 Deactivate fast startupSince Windows 8, the standard shutdown procedure puts the computer into a "hybrid shut-down" state. Because Windows does not support Wake-on-LAN for this state, it is advisable todeactivate the fast startup. Once fast startup has been deactivated, the computer is always putinto hibernation when shutdown.To deactivate the fast startup under Windows, follow these steps:1. Start the computer.2. Open the Control Panel.The Control Panel window will open.3. Click System and Security.4. Under Power Options, click the Change what power buttons do link.5. Click on the Change settings that are currently unavailable link.6. Uncheck the Turn on fast startup (recommended) box.7. Fast startup is now deactivated.Deactivating fast startup under Windows.4 Set up Mac OS XThe computer's network card must be configured in such a way that it is supplied with power atall times. It may be necessary to adjust the properties of the network card for this purpose. 4.1 Configure the network cardTo activate Wake-on-LAN for the network card under Mac OS X, follow these steps:1. Start the Mac.2. Open the System Settings.The System Settings window will open.3. Click Save Energy.4. Click the Power Supply tab.5. Activate the Wake for Wi-Fi network access option.6. The network card now supports Wake-on-LAN.Activating Wake-on-LAN for the network card under Mac OS X.5 Configure TeamViewerIn order to wake up a computer, TeamViewer must be configured once on this device. Duringthis process, you can either configure TeamViewer so that the computer can be wakened viaits public address or via computers within the network.The following checklist ensures that TeamViewer is configured on the computer for Wake-on-LAN:l TeamViewer must be installed.l The computer must be assigned to your TeamViewer account.l TeamViewer Wake-on-LAN must be activated.l For Wake-on-LAN via the network, the TeamViewer ID of a computer via which the com-puter is to be wakened must be entered in the TeamViewer Wake-on-LAN options.l For Wake-on-LAN via a public address, the public address of the computer must beentered in the TeamViewer Wake-on-LAN options.5.1 Assign the computer to your TeamViewer accountIn order to guarantee that the computer cannot be wakened by an unauthorized person, itmust be ensured that the computer really belongs to you. You must therefore assign thecomputer to your TeamViewer account. Only the TeamViewer account linked with thecomputer can wake it up.To assign the computer to your TeamViewer account, follow these steps:1. Start TeamViewer on the computer.2. In the main menu, click Extras | Options.The TeamViewer settings dialog box will open.3. Select the category General.4. Under Account assignment, click the Assign to account… button.The Assign to account dialog box will open.5. Enter the email address of your TeamViewer account in the E-mail text field.6. Enter the password of your TeamViewer account in the Password text field.7. Click the Assign button.8. You have assigned the computer to your TeamViewer account.Assign the computer to your TeamViewer account5.2 Wake-on-LAN via a TeamViewer ID in the networkIf the computer does not have a public address, you can also wake it up using anothercomputer in its network. The other computer must be turned on and TeamViewer must beinstalled and configured for starting with Windows.If this is the case, you can activate Wake-on-LAN via the network in the TeamViewer options.Afterwards, enter the TeamViewer ID of the computer via which you intend to wake up thecomputer. The signal to wake up is then sent from your computer to the computer that is to bewakened via the defined computer.To activate TeamViewer Wake-on-LAN via a TeamViewer ID, follow these steps:1. Start TeamViewer on the computer.2. In the main menu, click Extras | Options.The TeamViewer settings dialog box will open.3. Select the category General.4. Under Network settings | Wake-on-LAN, click the Configure… button.The Wake-on-LAN dialog will open.5. Click the TeamViewer IDs within your network option button.6. In the TeamViewer ID field, enter the TeamViewer ID in your network via which the sig-nal to wake up is to be sent and then click the Add… button.7. Click the OK button.8. The computer can now be wakened via the saved TeamViewer ID.Activate Wake-on-LAN using TeamViewer IDs.5.3 Wake-on-LAN via a public addressIf you want to wake up the computer with the help of its public address, your computer mustbe clearly identifiable on the Internet at all times.This is the case either if you have a fixed, static IP address through your Internet provider oryour computer is reachable, e.g. with the help of a dynamic DNS provider (see http://en.wiki-/wiki/Dynamic_DNS). If these conditions are met, you can activate Wake-on-LAN via apublic address in the TeamViewer options.To activate TeamViewer Wake-on-LAN via a public address, follow these steps:1. Start TeamViewer on the computer.2. In the main menu, click Extras | Options.The TeamViewer settings dialog box will open.3. Select the category General.4. Under Network settings | Wake-on-LAN, click the Configure… button.The Wake-on-LAN dialog will open.5. Click the Public address option button.6. In the Address field, enter the fixed IP address or DNS name of the computer.7. In the Port field, enter the UDP port via which the computer can be reached (seeSection 7.1 , page 15).8. Click the OK button.9. The computer can now be wakened via its public address and TeamViewer.Activating Wake-on-LAN using a public address.6 Wake up the computerIf the computer meets the requirements described in Section 1, page 3 and is set up asdescribed in Section 3, page 6 or Section 4, page 9 and Section 5, page 10, you can wake it up withanother device.To wake up a computer, follow these steps:1. Start a device with an existing Internet connection.2. Open TeamViewer.3. Log in to your Computers & Contacts list with your TeamViewer account. The device to bewakened must be linked to the TeamViewer account (see Section 5 , page 10).4. Select the offline computer that you want to wake up from the Computers & Contacts list.5. In the context menu (right click), click the Wake up button.6. The computer is wakened and appears as online in your Computers & Contacts list.Wake up the computer.7 Appendix7.1 Configure the routerThe router only needs to be configured if you have chosen the Public address option. If youhave chosen the option TeamViewer IDs within your network, you can skip this section.Configuring the router depends on the device used and the firmware installed on it. Not alltypes of devices support the necessary configuration.Support of Wake-on-LAN via a router's public address requires port forwarding to be set up.Depending on the router used, only some of the following alternative configuration possib-ilities may be supported.7.1.1 Set up port forwarding to the broadcast address of the localnetworkIn order to be able to wake up all computers in the local network, set up port forwarding asdescribed in the router manual from an incoming UDP port (e.g. 9) to the broadcast address ofthe local network (this often ends in ".255"). This configuration makes it possible to wake up allcomputers in the router's local network that have been configured according to the directionsmentioned above.Example: If the local network is configured with 192.168.1.0 and the subnet mask255.255.255.0, then port forwarding must be configured from UDP port 9 to 192.168.1.255:9.Sometimes routers do not allow a broadcast address ending in ".255" as the port forwardingdestination. This problem can sometimes be avoided by selecting a smaller subnet mask forthe local network (e.g. 255.255.255.128), thus the broadcast address ends with “.127”.7.1.2 Set up port forwarding to a certain computerIn order to be able to wake up a certain computer in the local network, set up port forwardingas described in the router manual from an incoming UDP port (e.g. 9) to the local IP address ofthe computer to be wakened. It must also be ensured that your router can address the appro-priate computer, even when this computer is turned off. In order to do so, a static ARP entrymust be saved on the router (see instructions for the router) showing the IP address of thecomputer to be wakened on the MAC address of this computer. Some routers generate appro-priate static ARP entries if a fixed IP address is reserved for this computer (no DHCP). In some cases, an appropriate configuration of the static ARP entries cannot be achieved via the router's configuration menu. The ARP entries can then be configured via Telnet or SSH. This is the case for example with the Fritzbox.。
远程办公工具TeamViewer使用指南

远程办公工具TeamViewer使用指南第一章:简介TeamViewer是一款远程办公工具,让用户能够远程控制其他电脑、提供技术支持或者远程会议。
该工具能够跨越不同的操作系统,在全球范围内广泛应用于各种办公场景。
本章将介绍TeamViewer的基本概念、使用方法和优势。
第二章:安装与设置在使用TeamViewer之前,首先需要下载和安装该软件。
本章将介绍如何从官方网站下载TeamViewer,并展示一步一步的安装过程。
同时,还将指导用户完成设置,包括设置个人帐户、安全性选项和许可证模式等。
第三章:远程控制远程控制是TeamViewer的核心功能之一。
通过远程控制,用户可以远程访问并控制其他电脑。
本章将详细介绍如何建立远程连接、远程操作、屏幕共享和配置远程控制选项等。
第四章:文件传输除了远程控制,TeamViewer还支持快速、安全的文件传输。
用户可以直接在远程控制界面中传输文件,从而方便与远程端的合作伙伴共享文件或者传递重要资料。
本章将介绍如何使用TeamViewer传输文件,包括单文件传输和多文件传输。
第五章:远程会议TeamViewer还提供强大的远程会议功能,使用户能够进行远程会议、在线协作和远程演示等操作。
本章将介绍如何创建远程会议、邀请参与者、调整音频和视频选项等。
第六章:安全和隐私在远程办公过程中,安全和隐私是非常重要的考虑因素。
本章将介绍TeamViewer的安全性特性,如双因素身份验证、端到端加密和会话记录等,以帮助用户保护数据和隐私。
第七章:常见问题解答在使用TeamViewer的过程中,可能会遇到一些问题和疑惑。
本章将回答一些常见问题,如遇到网络连接问题时如何处理、如何解决远程控制延迟等。
第八章:TeamViewer的进阶功能除了基本功能外,TeamViewer还具有一些高级功能,如远程打印、VPN连接和跨平台访问等。
本章将介绍这些进阶功能,并教用户如何使用和配置。
第九章:总结与展望在本章,将对整个使用指南进行总结,并展望TeamViewer未来的发展方向。
Teamviewer使用方法
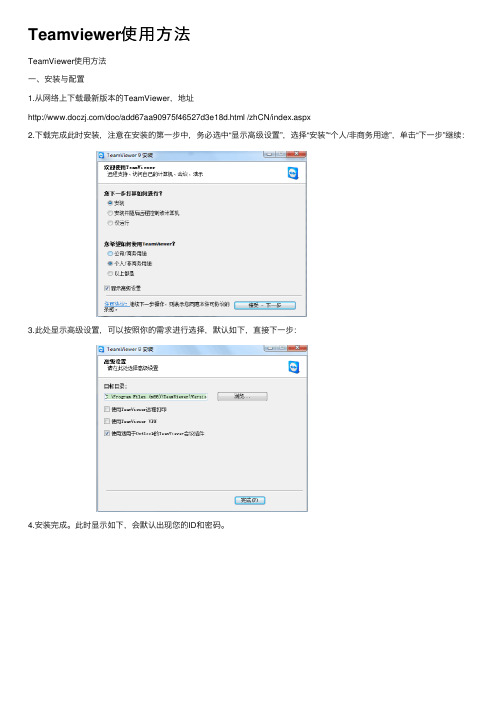
Teamviewer使⽤⽅法TeamViewer使⽤⽅法⼀、安装与配置1.从⽹络上下载最新版本的TeamViewer,地址/doc/add67aa90975f46527d3e18d.html /zhCN/index.aspx2.下载完成此时安装,注意在安装的第⼀步中,务必选中“显⽰⾼级设置”,选择“安装”“个⼈/⾮商务⽤途”,单击“下⼀步”继续:3.此处显⽰⾼级设置,可以按照你的需求进⾏选择,默认如下,直接下⼀步:4.安装完成。
此时显⽰如下,会默认出现您的ID和密码。
⼆、主持会议1.即时会议1.启动TeamViewer,单击会议选项卡。
2.在主持会议区域中,单击召开即时会议按钮。
3.会议随机召开。
a) TeamViewer⾯板将会打开。
4.邀请其他参加者1)在TeamViewer⾯板的参加者控件中,单击“邀请按钮。
2)2此时登录TeamViewer账户,如果没有帐号,⾃⼰注册。
3)从联系⼈列表中选择您想要邀请的联系⼈。
该联系⼈将收到⼀份其必须确认的邀请信息4)单击“通过电⼦邮件或者电话……”,邀请参加者对话框将会打开。
5)a)要使⽤您的默认电⼦邮件程序发送邀请信息,单击以电⼦邮件形式打开按钮。
b)要通过其他通信渠道分发邀请信息,如社交⽹络,聊天窗⼝或者内⽹,单击复制到剪贴板按钮。
2.预约会议在TeamViewer中安排会议1.启动TeamViewer,单击会议选项卡。
2.在主持会议区域中,单击“安排会议”链接。
(如果您已经账户登录,安排会议对话框讲话打开。
如果没有登录,请登录,输⼊您的⽤户名和密码)3.输⼊所需数据,单击“保存”按钮。
i.4.会议对话框将会打开。
5.如果您的计算机上安装了Microsoft Outlook,新建会议请求会在Outlook中打开。
6.现在,您可使⽤Outlook邀请参加者或使⽤Outlook的其他功能。
三、加⼊会议1.通过链接或Web浏览器加⼊会议您收到了带有加⼊会议链接的邀请消息。
TeamViewer 远程访问入门指南说明书
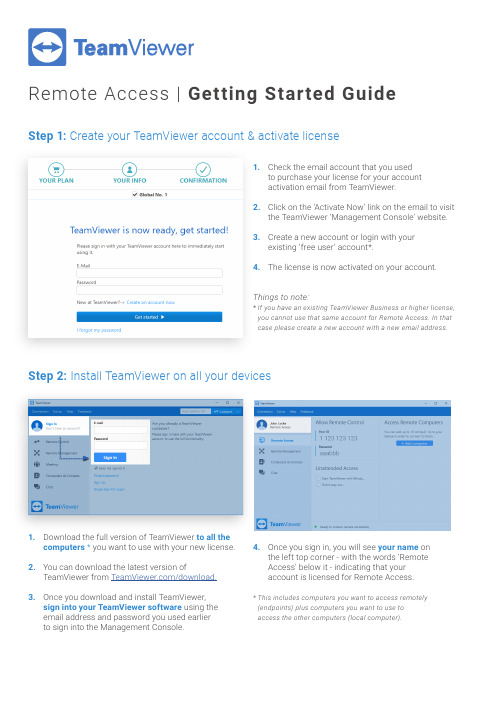
Remote Access |Getting Started Guide Step 1: Create your TeamViewer account & activate licenseStep 2: Install TeamViewer on all your devices1. Check the email account that you used to purchase your license for your account activation email from TeamViewer.2. Click on the ‘Activate Now’ link on the email to visit the TeamViewer ‘Management Console’ website.3. Create a new account or login with your existing ‘free user’ account*.4. The license is now activated on your account.* I f you have an existing TeamViewer Business or higher license,you cannot use that same account for Remote Access. In thatcase please create a new account with a new email address.Things to note:* T his includes computers you want to access remotely (endpoints) plus computers you want to use to access the other computers (local computer).1. Download the full version of TeamViewer to all the computers * you want to use with your new license.2. You can download the latest version of TeamViewer from /download.3. Once you download and install TeamViewer, sign into your TeamViewer software using the email address and password you used earlier to sign into the Management Console.4. Once you sign in, you will see your name on the left top corner - with the words ‘Remote Access’ below it - indicating that your account is licensed for Remote Access.Step 3: Prepare your endpoint computer(s) for Remote Access1. On any endpoint computer, launch TeamViewer, go to Options and go to the “Security” tab.2. Choose a personal password. This password will be used later to connect to the device .Windows:Open TeamViewer optionsMac:3. Close the options and note down the ID under "Your ID" in the “Remote Access” tab.Step 4: Connect to your licensed computer(s) from your local computer1.Now, sign into TeamViewer on your localcomputer and go to the "Remote Access"tab.2.Add your endpoint device by clicking the"Add computer" button and entering theID that you noted into the"TeamViewer ID"field. For"Password", enter the personalpassword you chose earlier, then click OK.3.You're done! You can now connect to your licensedcomputer by selecting it in the list and clicking“Connect”.。
Teamviewer中文使用手册
QuickJoin
或主持人/演示者“邀请参与者”,通过邮件告知对方通过 web 访问的方式: 连接后系统提示等待演示者开始演示过程
主持人/演示者 的界面上可以看到当前已经进入等待状态的人数。
人员到齐后可启动演示。
2.2.2. 会议/演示操作
2.2.2.1. 主持人/演示者操作
演示启动后界面如下: 主界面
选择“远程控制”: 1) 左侧等待会话界面,显示的是你的客户端的 ID 和密码,如你需要其他人连接到
你的机器上进行远程支持,需要提供此处的 ID 和密码给对方; 2) 右侧为创建会话界面,知晓你要连接的终端的 ID 后,可在此输入对方的 ID,根
据需要选择你是要远程控制对方的桌面还是要和对方进行文件传输,然后点击 “连接到伙伴”进行连接。 (VPN 模式需要商业注册版才能支持,可允许双方建立一个 vpn 连接,提供更 好的安全性。)
2. 操作指南
2.1. 远程控制
要进行远程控制,首先两方电脑都必须执行 TeamViewer。 可以选择运行完整版或 QuickSupport。在双方都运行完整版时,双方都可以发起控制请 求以连接对方或被对方连接,运行 QuickSupport 的一方只能等待对方主动连接。 无论运行哪个版本,在运行 TeamViewer 后,TeamViewer 的服务器会自动分配一个 ID 和密码给你,ID 是固定的,但密码是随机的,每次执行都会不同。左边是您的 ID 和密码(若 是对方要主动连你,要将此告诉对方),在右边输入对方的 ID (连续输入不用空格)就可以连 到对方了。 下面就具体使用过程进行说明。
2.1.1.1.2. QuickSupport
运行 QuickSupport 后无具体提示即进入软件界面:
TeamViewer使用手册
给大家分享这个软件,可能不是最新版,但确实非常的好用。
两个文件第一个是ipad上安装,可以用ipad控制连接在网络上的电脑进行远程操作。
第二个是电脑上安装,可以在电脑上控制其它连接在网络上的电脑进行远程操作(公司电脑也可以直接连到家里的电脑!节约ipad流量!)推荐大家建个用户,然后把属于自己的电脑都加入这个用户名下的组,任意电脑都可以互相远程控制,管理起来也非常方便。
TeamViewer Pro开发商:TeamViewer∙$99.99 类别: 效率∙更新: 2011年01月31日∙当前版本: 6.0.9224∙ 6.0.9224(经过 iOS 4.0 测试)∙大小: 11.7 MB∙语言: 英语, 丹麦语, 荷兰语, 芬兰语, 法语, 德语, 意大利语, 日语, 韩语, 挪威语, 波兰语, 葡萄牙语, 俄语, 西班牙语, 瑞典语, 土耳其文∙开发商: TeamViewer GmbH∙© TeamViewer GmbH评级:4岁以上系统要求:与 iPhone、iPod touch、iPad 兼容。
需要 iOS 3.0 或更高版本内容提要TeamViewer可提供对Windows、Mac和Linux系统简单、快速且安全的远程访问。
TeamViewer已在全球各地1亿多台计算机上使用,而且通过TeamViewer App (用于iPhone和iPod Touch),您可以:- 迅速为您的客户和同事提供远程支持- 访问您的办公电脑桌面及其所有的文档和已安装的应用程序- 远程管理无人值守的计算机(例如服务器)功能:------------------------------ 远程访问无人值守的计算机- 使用iPhone多点触摸手势:左击、右击、拖放、滚轮、缩放、更换监视器,可方便地控制远程计算机- 全键盘控制,包括Ctrl、Alt、Windows®等特殊键- 远程重启计算机- 自动调整远程计算机的屏幕分辨率- 通过集成的伙伴名单总览在线的计算机- 绕过防火q1ang和Da1L1服务器轻松访问计算机- 满足最高安全标准:256位AES会话编码、1024位RSA密钥交换许可证:-----------------------------TeamViewer Pro可让您访问任意数量的远程计算机,您无需为此购买任何额外的许可证。
Team Viewer使用
什么是TeamViewer
TeamViewer是一个能在任何防火墙和NAT代理的后台用于远程控制,桌面共享和文件
传输的简单且快速的解决方案。
为了连接到另一台计算机,只需要在两台计算机上同时运行 TeamViewer 即可,而不需要进行安装(也可以选择安装,安装后可以设置开机运行)。
该软件第一次启动在两台计算机上自动生成伙伴 ID。
只需要输入你的伙伴的ID到TeamViewer,然后就会立即建立起连接。
如何安装TeamViewer
把压缩包解压至PC机任一路径。
解压后如下,双击“TeamViewer.exe”文件,启动。
启动后,界面如下:
【温馨提示:本机的ID 一直不变,工具在每次启动后密码会随机显示】如何设置永久密码
所示)
如何实现远程操控
前提前提::
1、 控制机与受控机必须安装该软件
2、 控制机与受控机必须启动该软件
3、 控制机与受控机必须都可以访问INTERNET
操作演示
即可在本机上像操作自己的电脑一样,去操作受控机。
teamviewer使用教程图文
teamviewer使用教程
自己在网上看到的,不是本人原创,过段时间测试一下这个效果。
具体教程如下:1.解压缩下载的文件包,无需安装,双击就可以。
2.首次启动TeamViewer,等待片刻就会生成ID和密码;其中ID号码(机器码)是不变的,而密码是临时性的,该软件启动一次密码就会改变一次(没有修改软件“选项”相关项目时,下同)。
如果你是控制方,就将被控制方的电脑ID数字输入到下图ID文本输入框中,然后单击“连接至伙伴”。
3.输入被控制方电脑上生成的密码后单击“登录”。
4.被控制方电脑桌面显示在你眼前,而且可以控制对方电脑了。
WOO........
5.点选取消窗口中上方控制工具[查看]选项下的[移除壁纸]项,使得主控方恢复显示被控方桌面壁纸。
6.照下图操作,我们来提高主控方显示被控方桌面壁纸的质量。
7.正在进行远程控制的界面。
8.方便快速的文件传送。
9.关于安全的设置。