智能红外遥控器说明书
迷你蓝牙键盘带红外遥控器用户手册 KP-810-18BV 说明书

User ManualMini Bluetooth Keyboard with IR Remote Featuring Integrated Interactive Voice TechnologyModel:KP-810-18BVRev.1.01Basic info:1.1Overview:Bluetooth3.0keyboard remote integrates QWERTY layout,mouse touchpad,voice mode,microphone,headphone and learning infrared remote control.1.2Package:Mini Bluetooth Keyboard with IR RemoteUSB cable for recharging the unit*1User manual*11.3System requirement:--Windows/Google/Mac/Linux--Mac OS,iOS--Android4.0Smart Phone with HDMI/MHL HD out put port2.How to use2.1Function description of keyboard9.Front viewItem Function OperationMouse left Press to operate like left mouse key Mouse rightPress to operate like right mouse key BT Bluetooth reset Press topair keyboard and USB receiverCursorup,down left,right Press the four keys to move cursor up,down,left,and rightPage up Press to scroll page up Page downPress to scroll page downTouch PADMouse touch padSlide your finger on touch pad to movemouse cursorIndicator recharge indicator and go out when fully Recharged.LightupwhenfullyrechargedFlash when signal transited Light up when switch to Caps lock inputSound light2.2Composed keys:All composed keys must work with Fn,for example,if you want to activate “Home”,you have to press key “Fn”and key “9”together.Item Function OperationFn Work with other blue keys Press this key and other bluekey togetherChange operation directions Press“Esc”and“Fn”togetherPress to turn backlit on/off Press“F1”and“Fn”togetherVolume down Press“F2”and“Fn”togetherV olume up Press“F3”and“Fn”togetherMute Press“F4”and“Fn”togetherPrevious Press“F5”and“Fn”togetherStop Press“F6”and“Fn”togetherNext Press“F7”and“Fn”togetherReturn to main page Press“F8”and“Fn”togetherBack to previous page Press“F9”and“Fn”together Prtsc Print screen Press“F10”and“Fn”togetherDel Delete Press“”and“Fn”together Home Home Press“9”and“Fn”together F12F12Press“=”and“Fn”together F11F11Press“-”and“Fn”together End End Press“0”and“Fn”together Ins Insert Press“8”and“Fn”together Ctrl+Alt+Del Ctrl+Alt+Del Press Fn+Enter together2.3How to start:1)Turn unit on by switching power switch to“on“.2)charge your keyboard:when its LED flashes even no any operation on it,that means yourkeyboard is in low power capacity.Please charge it by suppliedcharging cable,connecting micro end of USB cable to yourkeyboard and the other end to usb port of computer,then led willlight be steady on,and go out when it is fully charged.3IR learning:To learn the original code from the other home appliance,take the TV remote as an example:3.1.There are two modes available:“AV”or“TV”.If you want to learn from the TV Remote,please press the TV key and the LED blue light will flash,and if A V,the LED orange light.3.2.Press key“set”for about2seconds until LED lights solid,whichmeans a learning mode.Then tap the key you want to copy andLED will flash one time and then light solid again,which means asearch and pairing state.3.3.Approach two emitting heads of both your TV remote and keyboardabout10mm,then press the original button on TV remote,and theLED of your tv remote blinks and code value of this button is being sent.3.4The LED of the keyboard blinks quickly for3times and lights solid,which means this round of learning process is successfully done.3.5Repeat3.2,3.3to program other infrared learning buttons.Pleas note that LED will go out and quit learning mode if nooperation within10seconds,which means an auto setting save.3.6.Press the“set”key to save and quit the learning mode at any time orat the end of learning process.4.Change operation directions:We may,or exactly,need to use the touchpad horizontally or vertically, you can make it by pressing the key Fn and then click the key“Esc”to change direction of cursor track.5.Voice:The device integrates interactive voice technology to support skype,QQ chatting,MSN real-time talking,Google Talking,wireless music and so on.Just hold the button to speak out.6.Pair Android4.0smart phone/tablet6.1First bluetooth pairing1).Turn on the Bluetooth voice keyboard,Hold BT button till thesecond LED flash.2)Navigate to activate bluetooth mode on your phone or tablet tosearch bluetooth signal around.When the icon“bluetoothiPazzPort”appears,click to connect.Sometimes,you may beasked to input a password(it will show on screen,such as3849).6.2Voice function:1)First voice pairingHold the voice button on the keyboard for about5Seconds,until two LED indicators flash alternately.Find and click the icon “iPazzPortvoice”on Smart phone/tablet to connect.When the fourth LED flashes quickly about3seconds and slows down,this connection is successful.2)Second voice connectionTurn on the keyboard and hold voice button for3seconds till the fourth LED lights.The fourth LED flashes quickly about3seconds and slows down,which means the connecting is successful.3)Turn off the Bluetooth voice function:hold the voice button for 3seconds till the fourth LED lights.6.3Pick up call/cut off call by remote keyboard:Having connected it with this bluetooth keyboard,you can click thesound button on the keyboard to answer the call,and click againto hang up the phone;and hold the sound button for2minutes toreject the phone.7WEEE Directive&Product DisposalAt the end of its serviceable life,this product should not be treated as household or general waste.It should be handed over to the applicable collection point for the recycling of electrical and electronic equipment,or returned to the supplier for disposalNotice to customersThis symbol on the battery indicates that the battery is to be collected separately.The following applies only to users in European countries.This battery should be separately collected at an appropriate collection point.Do not dispose of as household waste.For more information,contact the retailer or local authorities in charge of waste,management.8Caution:Changes or modifications not expressly approved by the party responsible for compliance could void the user's authority to operate the equipment. Compliance statement:Please keep this manual for instant and convenient reference.And please contact us on social platform iPazzPortfans,or at *********************for timely help if you have any question or any problem with our product.。
家用电器智能远程红外遥控器

家用电器智能(远程)红外遥控器原文来自ELECTRONICS, VOL. 14, NO. 2, DECEMBER 2010 Infrared Transceiver for Home Automation摘要:大多数家用电器都具有内置红外接收装置,当试图将家中所有的此类设备整合到一个控制系统中时,我们需要用另一个智能红外遥控器替代原有的遥控器,本文提出了一种USB接口的智能红外遥控器解决方案,该设备分成接收和发射两部分,接收部分记录并处理原遥控器的指令,发射部分代替原来的控制器,向家用电器发出来自计算机或者远程网络的指令,解决了家中无人时对设备简单有效的控制。
关键词:红外通讯,远程控制,智能家居I. 引入智能家居是指将家中所有的或部分的设备用一个独特的系统连接起来,并提供对每个设备进行自动智能控制的家居系统。
实现智能家居的初衷是多方面的,如:家庭财产安全,节能环保,无人时设备控制等等,其原始出发点是处于安全的考虑,因此报警装置,拨打指定电话,模拟家中有人(如:百叶窗定时升起或落下,灯光,音响,视频设备指定时间的开启或关闭)被开发出来。
而如今,又增加了空调的控制,自动浇花功能,宠物喂食功能,车库门的自动控制,入户门的自动开启。
所有这些系统可通过有线或无线的方式解决。
大多数家用电器中均内置红外远程接收器,因此,可通过简易整合实现家用电器的智能控制。
本文提出一种解决方案,用一个USB接口的智能红外遥控器,该设备分成接收和发射两部分,接收部分记录并处理原遥控器的指令,发射部分代替原来的控制器,向家用电器发出来自计算机或者远程网络的指令,解决了家中无人时对设备简单有效的控制。
II.遥控设备的红外通讯红外通讯是一种无线通讯技术,需要通讯双方具有光可视性,即发射器和接收器之间没有障碍物阻隔,具有可视性。
这种通讯技术,常在较短距离范围内适用,特别是在一个房间内比较适合。
家电设备的开发商们开发使用了不同种类的红外通讯和远程控制协议。
小美智能语音红外遥控器使用说明

小美智能语音红外遥控器使用说明小美智能语音红外遥控器使用说明1. 简介•小美智能语音红外遥控器是一款智能设备,通过语音控制来操作各类红外电器设备。
•它可以替代传统遥控器,实现智能家居的一体化控制。
2. 功能特点•支持广泛的红外设备:电视、空调、机顶盒、音响等。
•语音控制:通过语音指令,实现设备的开关、音量调节、频道切换等操作。
•定时设定:可以设置定时开关设备,提高生活的便捷性。
•智能学习:支持学习红外信号,可以学习其他遥控器的功能,方便用户操作。
3. 如何使用?•步骤1:将小美智能语音红外遥控器插入电源,并确保与手机连接。
•步骤2:下载并安装小美智能语音APP,并登录账号。
•步骤3:在APP中添加设备,选择红外设备类型,并按照指引进行操作。
4. 使用技巧•使用语音唤醒功能,可以方便快速地启动小美智能语音红外遥控器。
•语音控制时,语速要适中,清晰地发音,避免产生误识别。
•在使用智能学习功能时,要按照指引正确操作,确保学习到正确的红外信号。
5. 注意事项•请勿将小美智能语音红外遥控器与水或其他液体接触。
•距离红外设备较远时,语音控制可能会受到影响,请尽量靠近设备操作。
•如遇到无法识别的语音指令,可尝试更换控制的方式,例如使用遥控器按键操作。
以上是小美智能语音红外遥控器的相关说明,希望对用户有所帮助。
6. 常见问题解答小美智能语音红外遥控器能控制多少个设备?小美智能语音红外遥控器支持控制多达20个红外设备,包括电视、空调、机顶盒、音响等。
怎样设置定时开关设备?在小美智能语音APP中,选择相应设备,进入控制页面,找到定时设置选项,按照指引进行设置即可。
小美智能语音红外遥控器能学习其他遥控器的功能吗?是的,小美智能语音红外遥控器支持智能学习功能,可以学习其他遥控器的功能,方便用户操作。
唤醒小美智能语音红外遥控器有什么方式?小美智能语音红外遥控器支持语音唤醒功能,您可以在APP中设置唤醒词,并通过语音呼叫唤醒遥控器。
万能红外遥控调光吸顶灯说明手册
承诺
墙壁开关
2
1
●不要私下拆装 吸顶灯,以免 导致安装问题。
■其他
禁止拆解
●我在220 伏的交流电中使用。
过热和过压有发生火灾或触电的危险。
●若出现异常,请确保异常状态,立即关
承诺
闭吸顶灯,并请咨询您的客户服务代表
或经销商。
承诺
●牢固的将吸顶灯安装 在平面上。
●牢固的将电源线安全 且有
效的连接。
●灯罩已经正确和有效的安装,避免带来触 电风险。
型号
包装上的标签、吸顶灯上的铭牌信息
品番
输电入压 周期
额定功率
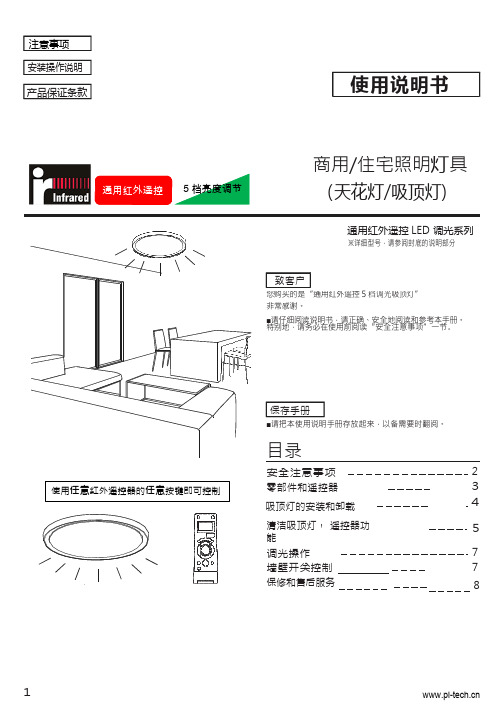
IR 通用红外遥控型调光吸顶灯
220V AC
50/60 Hz
26W
●LED 照明灯具光源寿命 50000 小时。是总点亮时间,即估算为总点亮时间直至到光通量下降至出事照明光通量的 70%时的时间。
输电流入 位置 0.3A 铭牌
红外发射头
此为发射头位置,使用时稍作对准吸顶灯。
任意按键
短按任意一个按键,即实施遥控,5 档亮度递减。
1 4 7 10
BASS
STANDBY/ON
2
3
DISPLAY
5
6
CLOCK /TIMER
8
9
+10
UP
SLEEP TREBLE
SET
DOW N
CANCEL
CD TAPE FM/AM AUX
REV.
●使用遥控器分别控制多个独立的灯。 ※先对准其中一个吸顶灯,使用遥控器调节亮度。再
对准另外的吸顶灯,使用遥控器调节亮度。
6
可能的故障排除
请查看下表
现象 灯不亮
智能型遥控器使用说明书
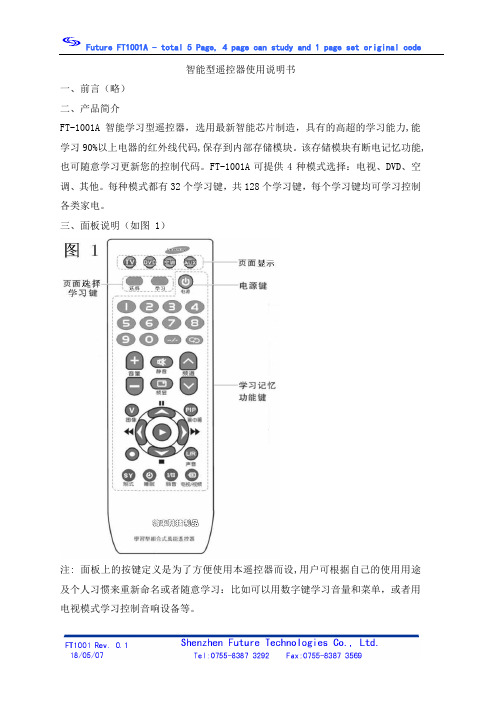
智能型遥控器使用说明书一、前言(略)二、产品简介FT-1001A智能学习型遥控器,选用最新智能芯片制造,具有的高超的学习能力,能学习90%以上电器的红外线代码,保存到内部存储模块。
该存储模块有断电记忆功能,也可随意学习更新您的控制代码。
FT-1001A可提供4种模式选择:电视、DVD、空调、其他。
每种模式都有32个学习键,共128个学习键,每个学习键均可学习控制各类家电。
三、面板说明(如图 1)注: 面板上的按键定义是为了方便使用本遥控器而设,用户可根据自己的使用用途及个人习惯来重新命名或者随意学习:比如可以用数字键学习音量和菜单,或者用电视模式学习控制音响设备等。
四、学习步骤1.学习前(当然,也可以在学习状态中调整),先确定当前所要学的模式(电视、DVD、空调、其它),如不对可按选择键进行调整,如图 2(a)(如您要学空调,当前指示灯指示是电视,则按选择键选到空调,以免覆盖掉电视的功能键)。
2.由通常使用状态(就是睡眠待发射状态)进入学习状态:须长押面板上的学习键约1秒,如图2(b),当前模式的指示灯变亮,表明已进入成功。
3. (见图 3),此时将被学遥控器的发射头正对着学习式遥控器的发射头,确保间距在10cm以内,按键遥控(最好按1秒钟,因为有些按键发连续代码,时间长)。
若指示灯闪烁,则表明学习成功,紧接着按学习遥控器的某个按键保存此代码功能,如图4;如果指示灯仍恒亮不闪,则学习不成功,应重复此步骤,即调整两发射头正对,按原遥控器按键发射代码。
(注: 学习不成功不会覆盖之前的代码) 。
4.重复步骤3,便可以连续学习5.解除学习状态进发射模式有两种方式:在学习状态(指示灯恒亮或闪烁时)按住学习键1秒以上,或10秒钟无任何操作学习注意事项:1.学习时先确定当前模式是否正确,以免学习成功后覆盖以前的控制码。
2.学习时确定两个遥控器发射头正对,两边尽量不晃动(可以将遥控器都放在桌上),且距离在10cm以内,否则,易造成学习不成功。
K1红外线遥控控制器说明书

红外遥控控制器使用说明书
产品特点:
◆可遥控控制光源的效果。
(接收距离10-15米,接收角度80度)
◆智能存储客户最后使用的信息。
◆控制器可控制21种效果变化(16种静态效果,5种动态效果)。
◆使用螺丝柱与DC插座接头,接线较为方便。
产品图片:
按键及功能说明:
2,键分别为亮度调节(此键可9级调光最亮到最暗,任意模式下有效)
3,静态单色键16个,分别对应一个颜色
4,SPEED↑/ SPEED↓分别为速度加减(此键可10级调整, 动态模式下有效)
5,CYCLE键自动循环(七彩跳变,渐变,闪烁, 任意模式下有效)
6,遥控器使用时先抽掉电子处的绝缘片,
接线说明:
产品左边接线头+V、-V分别接DC5V或12V正、负极输入,右边接线头+V接光源正极,R、G、B分别接光源的红、绿、蓝信号线输出端,使用DC头输入时限制在5A
电参数说明:
产品输入电压为DC5V或12V,每路输出最大电流为6A,建议使用电流为4A。
尺寸:
55*42*23mm。
红外遥控器和接收器用户手册说明书
iBIO-Remote MCE遥控器用于Windows Win7™家庭高级版专业版旗舰版ii1欢迎购买我们的产品感谢您选购红外遥控器和接收器,它们专供Win7™家庭高级版,Win7™专业版和Win7™旗舰版所用,通过红外遥控器和接收器您可以访问和管理多媒体电脑以及其他外围设备。
※重要提示:如果您的多媒体电脑已安装接收器,请跳过手册中与接收器相关的部分。
步骤一安装电池遥控器使用两个AAA 或AA 电池(包装附带电池)。
在使用过程中请及时更换电池,以免电池漏液对设备造成损坏。
1.1 将遥控器电池仓盖打开。
1.2 装入电池,注意电池正负极与遥控器正负极相对应。
1.3 盖上遥控器电池仓盖。
步骤二 定位接收器为了获取最佳的性能,请确保遥控器和接收器之间没有障碍物阻挡且距离不超过10米;此外,应该避免强光直接照射在接收器的红外传感器上。
如果您之前有购买过红外接收器,请参阅手册“使用遥控器”章节。
2步骤三 连接接收器开机前,请将接收器连接主板红外接头。
注意:当接收器连接主板红外接头后,请进入BIOS 设置确保板载红外端口功能已激活。
([Advanced]→[SuperIO Configuration]→[OnBoard CIR Port]↓现在您可以通过遥控器来体验多媒体中心的各种功能。
只需将遥控对准接收器,您便可以随意操作享受遥控带给您的舒适感受。
5种按钮:•导航按钮:屏幕上各种菜单之间的移动。
(例如:向上箭头或者输入)•播放按钮:控制多媒体。
(例如:暂停或者停止)•影音和电源按钮:更换频道,调节音量。
(例如:上一频道或者静音)•快捷按钮:方便用户快速访问多媒体中心的主要媒体。
•数字键按钮:输入字母数字字符或电视频道。
3选择遥控器上的导航按钮可以进行媒体中心各菜单之间的移动。
按钮功能图标START 启动媒体中心功能菜单UP 向上移动选项DOWN 向下移动选项LEFT 向左移动选项RIGHT 向右移动选项OK 确认选项BACK 返回上级菜单MORE 提供更多信息45媒体中心的播放按钮功能类似于家庭普通电子设备如CD 、DVD 播放器的播放按钮。
ELCO NOTE_BOX_009红外遥控器使用说明书
S.r.l. File: MN015202 INGL.INFRARED KEYPAD NOTE_BOX_009 USER’S HANDBOOKS.r.l. File: MN015202 INGL.INDEXNORMS AND GENERAL WARNING ________________________________________________________ 3 KEYPAD’S EXTERNAL DESCRIPTION _____________________________________________________ 4 OPERATIVE FUNCTIONS ________________________________________________________________ 6 Address to control boxes _________________________________________________________________ 6 Broadcast and Compound address ________________________________________________________ 8 Main Menu ___________________________________________________________________________ 9 Manual function ______________________________________________________________________ 11 Reception of Inverter parameters from box _______________________________________________ 12 Reading of inverter parameters saved in the keypad _________________________________________ 14 Inverter parameters transmission to the box _______________________________________________ 16 Reading of the box diagnostic ___________________________________________________________ 17 Going to specific parameters ____________________________________________________________ 18“Automatic” function __________________________________________________________________ 19 OPERATIVE VISUALIZATIONS __________________________________________________________ 20 Stand-by function _____________________________________________________________________ 20“About” function ______________________________________________________________________ 21S.r.l. File: MN015202 INGL.NORMS AND GENERAL WARNING•This Manual is an integral and essential part of the product. Please read carefully the instructions contained since they provide important information about safety in installation, use and maintenance.•This equipment shall only be destined to the use it was expressly designed for . Any other use is to be considered incorrect and therefore dangerous.•Divisione ELCO srl shall be responsible of this equipment in its original configuration. Any action that modifies the structure or the operating cycle of this equipment shall be carried out or by the Technical Department of Divisione Elco srl or under their explicit authorisation.•Divisione Elco srl shall not be held responsible for the consequences resulting from the use of non-original spare parts.•Any repair shall be carried out by the authorised department of Divisione Elco srl. The Manufacturer shall not guarantee any repair carried out outside this department.•The contents of this Manual are subject to modifications at any moment as it might be required and without prior notice from the Divisione ELCO srl. If typing errors or any other errors are found, the rectification will be included in the new releases.•Tampering or modifications or repairs by unqualified personnel are not allowed.Divisione ELCO srl does not guarantee against any risks deriving from incorrect use of theirproducts or from the installation, use and maintenance carried out by unqualified personnel.•The infrared Keypad must be closed through its own screws without presenting not protected electrical parts.•Operating conditions: in a closed environment , do not install in an area exposed to corrosive gases or to temperatures out of admitted limits.•The product described is powered with refillable batteries. These last, once used, should not be wasted in the environment beeing very dangerous: you should depose them in the apposite safety boxes. The touch of the same exausted batteries can be dangerous. During the substitution, handle with care. The risk connected is not high if you use every foreseen safety measures.Nota BeneIn optimal conditions (with favourable light, few direct or indirect solar light, few solar /neon light reflextions, with a low incidence corner, with full charge keypad batteries, the distance between keypad and device can go farther than 5mt.S.r.l. File: MN015202 INGL.KEYPAD’S EXTERNAL DESCRIPTION-The keypad’s front part shows 4 leds for the infrared transmission and an infrared reception device (in the central position).Front sight-On the leftside of the keypad you can notice:1. The connector to link keypad to the batteries recharger you can find in the equipment.2. The selector ON / OFF to turn on and turn off the keypad.Vista lato sinistroTo turn the keypad on, move the selector ON / OFF from OFF to ON.To turn the keypad off, move the selector ON / OFF from ON to OFF.S.r.l. File: MN015202 INGL.-From the frontsight you can notice the liquid crystals and the different operative buttons:Front sightS.r.l.File: MN015202 INGL.OPERATIVE FUNCTIONSThe basic operations are:• Parameters setting • Automatic learning of 2 positions movement (running and lifting) • Running direction forward / backward manual orders • Lifting ascent / descent manual orders• Rotating clockwise / anticlockwise manual orders • Setting / Asking about box’ adress • Anomaly restoration •Cycle start• Diagnostic reception• Management of the kind of car• Asking for the actual position of three movements (running, lifting and rotation) • Resetting of the absolute encoder •Operations on displayAddress to control boxesTurning on the display, it lights on displaying for about 2 seconds this following words:The second image shown is the following :The rectangular black cursor flashes.S.r.l.File: MN015202 INGL.The keypad waits for the address of the module or of the trolley to work with.- on the display of the keypad, you’ll read the box’ describing address received from the box through infared.Pressingnew reception.Numerical keysOnce dialed the desired box right address, dialIf dialing you mistake any number, erase it pressing or and dialing again thecorrect code.To avoid conflicts of functioning operations, you must give adrresses with different values to the boxes.S.r.l.File: MN015202 INGL.To have contemporaneous functioning with the infrared keypad, you can follow two different ways:•Select address 0 (zero) on the keypad. This value has the broadcast address function; operations will be performed by every box able to receive infrared signals from keypad. The broadcast address is described below. Select on the keypad the box address to work with.WARNING! Parameters reading or writing during broadcast address operations can cause loss of data or serious functioning anomalies.Parameters reading and writing operations should be done addressing only one box at a time.WARNING! The manual operations are not under adress. This menas that a manual order can have effect on every box in manual operativity able to receive orders through infrared (in action field).To avoid undesired movements, set in manual operativity a box at a time!IMPORTANT!Point the infrared keypad towards the display you should work with!Broadcast and Compound addressDialing as address the number 0 (zero), you turn on the Broadcast version , as every trolley recognizeaddress 0. Using this working version you should pay a particular attention because you could move or set programs ofmore than one box at the same time. You should not habitually use this kind of operativity, but only during particular and rare cases.Once dialed number 0 press EnterS.r.l. File: MN015202 INGL.Main MenuOnce you’ve given an address to the trolley, you have access to the main Menu, where you can choose one of the disposable options.To "move" in the main Menu, use the arrow keys (8 and 2). In the following pictures these keys are focued with a red circle:Keys 2 and 8 are used to move in the Main MenuHaving access to the Main Menu, you can read the first disposable function:- MANUAL:- RECEPTION OF INVERTER BOX PARAMETERS:S.r.l.File: MN015202 INGL.- READING OF INVERTER PARAMETERS OF KEYPAD:- TRANSMISSION OF INVERTER PARAMETERS:- RECEIVE DIAGNOSTIC:- AUTOMATIC FUNCTION:Once you chose the desired function, pressNota. The described menu is circular: if you go on pressing the same sliding direction key, you comeback to the first function.The Parameter menu and that of positions is circular too.S.r.l.File: MN015202 INGL.Manual functionNotaBene. Every manual operation is based on a mantained action! Command is given till the complete release of the key or keys.When you select the manual operativity, the display changes showing a simple list of disposable commands:you let the backward running. Movement stops when you release the key.On the display you’ll read: you let the forward running. Movement stops when you release thekey.On the display you’ll read:S.r.l.File: MN015202 INGL.If the order is received, the box will show on the display the operating reset (flashing tracts), and the average code will be cancelled.On the display of the keypad you’ll read :you let the break release. Brake will be released when you release the key.On the display you’ll read:To go back to main menu from the manual function, press the key:To go back to the input address for the boxes, press the keyReception of Inverter parameters from boxWhen you choose this function, on the display you’ll read:If the reception has no good results, on the display you’ll read:S.r.l. File: MN015202 INGL.If the reception is ok, on the display you’ll read:Each time you read the parameters of a box, the keypad saves a copy in its volatile memory, writing on the last saved data. Every local change is saved in the keypad memory, so that if you change parameters and then you read those saved in a box, you will lose the changes you made.On the display you’ll read the inverter received parameters: for ex.:S.r.l.File: MN015202 INGL.On the display you’ll see a black flashing cursor:Now it’s possible to change the value by typing another one through numerical keys. Once you typedWhen you see the black flashing cursor.To go back to the main menu, press:To go back to the input address for the boxes, press the keyWARNING!The keypad saves inthe local memory the last received parameters. A new reception will be saved on the memorized parameters, replacing them with new ones.Reading of inverter parameters saved in the keypadChoosing this function, on the display of the keypad you’ll read:If the reception has no good results, on the display you’ll read:S.r.l. File: MN015202 INGL.If the reading is ok, on the display you’ll read:Every change on parameters is saved in the keypad memory, so that if you change parameters and then you read those saved in a box, you will lose the changes you made.On the keypad display you can read inverter parameters for ex.:S.r.l.File: MN015202 INGL.. On the display you’ll see a black flashing cursor:Now it’s possible to change a value dialing another one through numerical keys, once dialed,when you see the black flashing cursor.To go back to the main menu, press:To go back to the input address for the boxes, press the keyInverter parameters transmission to the boxBefore selecting this function, point the keypad towards the display of the box and press the keyOn the display you’ll read:If the reception has no good results, on the display you’ll read:S.r.l.File: MN015202 INGL.If the reception is ok, on the display you’ll read:To go back to the main menu, pressA transmission is ok when:1. Box receives correct data from keypad2. Inverter parameter values are in the accepted limits3. Keypad receives from box the confirm of reception and the following memory step that weremade in the right way.Sometimes it happens that the confirm isn’t received; in this case you should repeat the operation.Some parameter are signed with the key symbol. These parameters cannot be changed.Reading of the box diagnosticBefore selecting this function, point the keypad towards the display of the box we’d like to know thepresent average of and press the keyOn the display of the keypad we can read:S.r.l.File: MN015202 INGL.Keypad receives the updated diagnostic from the addressed box. On the display you’ll read the codes of the revealed averages and the correspondent descriptions.more than one average.more than one average.Example of visualization:depending from the disposable visualization on the display of the interfaced box.If there aren’t averages, on the display of the keypad you can read:If the diagnostic reading has no good results, on the display you’ll read:Going to specific parametersThis function is only working insede parameters menu. It let you read the parameter desired numberS.r.l.File: MN015202 INGL.Once you enter the parameter menu, in order to read the parameter desired number, it’s sufficient toNow it’s possible to diale the desired parameter number.“Automatic” functionThis function let you to go off from manual operations on the addressed box without activating themanual mode by pressing the keyS.r.l.File: MN015202 INGL.OPERATIVE VISUALIZATIONSit’s possible to read the working conditions of the box.To go deeper in this argument, take a look into the box user’s manual.Pressing the keyThese functions are better described in the proper box user’s manual.Stand-by functionTo limit the battery consumption, the keypad can operate in low absorption modality. This kind of working condition is automatically started after a prefixed waiting time (about 1 minute) without pressing any key. In this working status it turns off the lcd display back light. To turn on the normal manual operativity, it is sufficient to press one of the operative keys.S.r.l. File: MN015202 INGL.The operative keys are the following:Tasti operativi“About” functionThis function only works when the keypad waits for the box address:S.r.l.File: MN015202 INGL.software version.For example:These infos will remain for about 4 seconds, then the display goes back to the previous visualization:。
MST-G60、G80说明书
——遥控车库门开门机(MST-G60、G80)用户安装使用手册中美合资大连玛斯特门业有限公司前言欢迎您使用本公司生产的MST-G型遥控自动开门机。
请在安装前务必认真阅读并理解本手册的内容,在未完全理解安装方法前,请不要进行开门机的安装,以免对开门机或门造成不必要的损坏。
目录1、安全操作规程 (1)2、性能特点 (2)3、技术参数 (2)4、安装操作 (3)5、功能设定及调试方法………………………………………6、自选功能(配件)连接………………………………………7、用户指南……………………………………………………8、开门机及其门的维护………………………………………安全操作规程1、接通本机电源前,首先检验当地电压应与本机电压相符,超过电压范围要求立即整改,否则会引起开门机破损。
2、安装时,不要穿疏松的衣服,要穿标准的工作服。
3、在位安装完整系统之前,决不允许擅自将开门机电源接通。
4、墙壁开关应安装在可操作范围之内,距离地面高度不小于1.5米,以防儿童接触到;远离门体运动的部件。
5、门的五金件安装一定要牢固,以防运动时松脱,造成门或开门机的损坏。
6、每月均需测试门的平衡系统是否正常,若出现异常,应立即通知专业人员进行调试,以免引起门或开门机的损坏。
7、使用本机前,要确认门的扭簧平衡系统工作正常,门体运行顺畅,无阻滞。
否则,可能会导致开门机或门的损坏。
8、开门机在安装调试完毕后并且无障碍物的情况下才能运行。
门体在运行时,禁止进出车库,禁止儿童在门体附近玩耍。
9、尽可能将开门机安装在距离地面2.5米以上的地方,手动应急手柄要安装在1.5米以上的位置。
10、正确安装完毕并正常运行后,门遇阻力反弹。
11、安装门后,请将本手册放于门附近以便出现故障时参阅维修。
性能特点功能特点——单键遥控,实现开门—停止—关门循环动作。
开、关门自动亮灯,3分钟后自动熄灭;智能实时控制,精确控制行程;直流电机驱动,可柔性启动,运行平稳无噪音;关门遇阻力自动反弹,且反弹力灵敏可靠;具有过载、过热、、低电压检测等保护功能;墙壁开关,红外线感应装置;数码显示——双数码窗口,菜单显示,实时代码反映,自动监控运行。
红外遥控器说明书2003
学习型红外遥控器DQU-HW使用说明书w w w . n j k e j i n . c n南京科进自动化有限公司目 录一 技术指标 (1)二 使用方法 (2)1 硬件连接 (2)2 打开9346 (2)3参数读写及修改 (3)4端子说明 (4)5遥控学习 (6)6遥信遥测量 (9)7遥控发送 (11)8注意事项 (12)学习型红外遥控器DQU-HW模块是我公司研制的新一代智能化控制产品,本产品可以通过学习的方式,掌握遥控器的遥控指令,并模拟发出红外指令,主要应用于各种空调的远程遥控,并且同时监测现场环境的温度和空调运行状态,适用于电力、通信机房等动力环境监控系统的远程空调自动控制。
本设备采用通信接口RS232/RS-485可选,带有地址自动识别功能,便于现场设备的总线组网。
设计人性化,安装简单、方便。
特采用独特的光电隔离技术和看门狗技术,有过流及过压保护,具有很强的抗浪涌电流的冲击和干扰的能力。
一 技术指标1监测量a)模拟量: 4路遥测量(1路内部自带温度采集,3路直流采集)b)开关量: 3路遥信量c)遥控量: 7路遥控量(红外遥控编码学习,发射)2 指标A) 遥测量:测量范围 0 +5V精度0.5% (2.5V直流条件下)B)遥信量:光电隔离抗干扰 1500V输入电流 2~10mA接口电压 5V~12VC)遥控量:红外方式 38KHz调制波长 0.940 um有效距离 5米以内D)通信接口:电气接口(国际标准) RS485或RS232 可选通信方式 串行 半双工速率 300、600、1200、2400、4800、9600、19200bps 数据格式 N.8.1连接方式 全分布式,总线接口1 / 14规约 DQU规约 (参数:11)E)供电电源:电源电压 DC +12 V±10% (直流)F)环境条件:温度条件 0-45℃湿度条件 10-90%图1外观图3 产品外观学习型红外遥控器如图1所示。