哈曼卡顿AVR 151功放中文说明书
功放使用说明书

功放使用说明书-CAL-FENGHAL-(YICAI)-Company One 1QiShengS声功放使用说明书该说明书为东莞市奇声电子实业有限公司版权所有安全须知请阅读本用户指南诣务必认真遵守本用户指南中的说朋。
它有助于您正确安 姿和操作本系统.享用它的先逬功能C 说保存本用户指南 留作以后参考C警吿:为篙低失火或电击风险・请勿使本产恳受雨淋或 受孤 小心:为减少电击的危险.非专婕人员谓勿拆鈍本产品。
请问冷格的缭怨人员咨谊缭煖字宜。
晉告:谓将遥扛^;屯置于儿埜鮫及不對的地方。
如果处理 不当.电迪冋龙导致着火或化学灼衍。
谄勿对电池充电、拆 解、加热到了沁(2倚〉以上或焚化。
谓及时处理废旧 电池亠更楔电池时必幾坯用斤酸的类型和型号S 晋告:如果电池更换不当.可能导致埸炸的危险。
更换电 池时.只駝便用机构认可的(如UL ) CR2032或DL3032 等3伏锂电池。
谓适当处理废I 日电池•遇守任何当地规韋C 请勿将 其焚化C書吿:请勿将任何明火火源〈如点燃的蛾烛)査于本设备 上或靠近本设备。
9S :包含小部件.可能导馥窒息扈险。
不适合3岁以卞的儿生使用。
注意:必须在堂内使用本产品。
在主处、嵌游汽车或船無 •使用本产昂均不符舍本产吊的设计或瀏试初衷。
A 等迫三角形内悩箭头的闪电标忑用来音示用户,系统 /% \ 外壳内存在未终缘的危咎电压.其电压值扫可能构成 厶=电奇危咎。
Z\ 系统上标示的等边三角形内的庙叹号标毛旨在警示用 /!\户,在本用户hi 朿中右僧应的里要操作和维修指示。
小心:为防止电击.请将电源圾插头上的宽插養对准交流 (电源-)插座上的宽插孔。
插头要完全插入插座°小心:使用非本手册指定的其它控靜、调整或操作程序. 可能导致内瑯激光组件发生危险的迫瑟换射酒靈。
除具有 适当资格的照务人员外.任何人员玮得调整或缭烽本光疑 播放机。
注童:如果是通逮电源插头或设备祸会裁述虧设备电瀝. 那么切浙电簿的设备应当可以迅速铁复工作。
哈曼卡顿171s中文说明书
哈曼卡顿171s中文说明书
哈曼卡顿是一款颇具知名度的蓝牙耳机品牌,而哈曼卡顿171s是
其旗舰款式,可以说是哈曼卡顿产品线中最具代表性的一款耳机。
作
为一款颇受欢迎的蓝牙耳机,哈曼卡顿171s的品质堪称一流,其细腻
而丰富的音质表现引起了广泛的关注。
1.外观设计方面
哈曼卡顿171s的设计风格非常简洁明了,耳机主体采用了经典的
圆形造型设计,耳罩与头梁的连接处使用了类似汽车车轮卡盘的设计,整体外观非常大气稳重。
此外,哈曼卡顿171s的外观采用了哑光喷涂
工艺,充满高级感和时尚感。
2.音质表现方面
哈曼卡顿171s采用了自家专有的BALANCED ARMATURE动圈技术,
这种技术可以实现更精确的音频分离和丰富的频响表现。
由于它的单
元并不是传统的铁磁式单元,其灵敏度和谐振频率都比传统单元高,
可以提供更宽广的音频响应区间。
哈曼卡顿171s在低音,中音和高音
表现非常出色,整体的音色非常平衡清晰,让人听了非常舒适。
3.使用体验方面
哈曼卡顿171s配备了蓝牙5.0技术,可以有效避免音频卡顿和延
迟等现象,使用非常流畅。
同时,它还配备了主动降噪和透传模式,
可以根据环境和使用场景进行切换,非常实用。
此外,哈曼卡顿171s
还具有触控操作,只要轻轻触碰耳机壳就可以进行音量控制,切歌和接听电话等操作,非常方便。
总而言之,哈曼卡顿171s是一款非常优秀的蓝牙耳机,无论是外观设计,音质表现还是使用体验方面都得到了极高的评价。
它适用于长时间佩戴,音质表现非常优秀,而且具备实用的主动降噪和透传模式,是一款非常值得入手的蓝牙耳机。
雅马哈 AVR-X4700H 网络AV接收机操作说明书

AVR-X4700H INTEGRATED NETWORK AV RECEIVER 操作说明书附件10安装电池11遥控器的操作范围11特点12高音效12高性能15简易操作19部件名称与功能20前面板20显示屏24后面板26遥控器30连接方法扬声器安装34连接扬声器42连接扬声器之前42扬声器配置和“放大器分配”设置46连接5.1声道扬声器48连接7.1声道扬声器49连接9.1声道扬声器53连接11.1声道扬声器61连接7.1声道扬声器:前置扬声器的双功放连接67连接7.1声道扬声器:第二对前置扬声器68连接多区域扬声器69连接电视机74连接1 : 配备了HDMI端子并兼容ARC(Audio Return Channel)/ eARC(Enhanced Audio Return Channel)的电视机75连接2 : 配备了HDMI端子且不兼容ARC(Audio Return Channel)/ eARC(Enhanced Audio Return Channel)的电视机76连接3 : 未配备HDMI端子的电视机77连接播放设备78连接机顶盒(卫星调谐器/有线电视)79连接DVD播放机或蓝光碟片播放机80连接兼容8K的播放机设备81连接摄像机或游戏机82连接电唱机83将USB存储设备连接至USB端口84连接FM/AM天线85连接至家庭网络(LAN)87有线LAN87无线局域网88连接外部控制设备89 REMOTE CONTROL插孔89 TRIGGER OUT 插口90连接电源线91播放基本操作93开启电源93选择输入源93调节音量94暂时关闭声音(静音)94播放DVD播放机/蓝光碟片播放机94播放USB存储设备95播放储存在USB存储设备上的文件96在蓝牙设备上收听音乐99从蓝牙设备播放音乐100与其他蓝牙设备配对102从蓝牙设备重新连接至本机103在蓝牙耳机上收听音频104在蓝牙耳机上收听音频105重新连接至蓝牙耳机106断开蓝牙耳机106收听FM/AM广播107收听FM/AM广播108通过输入频率来进行调谐(直接调谐)109更改调谐模式(调谐模式)110自动调谐到电台并进行预设(自动预设记忆)110预设当前广播电台(预设记忆)111收听预设电台111指定预设广播电台的名称(预设名称)112跳过预设的广播电台(跳过预设)113取消跳过预设114收听网络电台115收听网络电台116播放存储在计算机或NAS中的文件117播放存储在计算机或NAS中的文件118获取 HEOS App121 HEOS账户122从流媒体音乐服务播放123在多个房间聆听相同的音乐126 AirPlay功能130从iPhone、iPod touch或iPad播放歌曲131从iTunes播放歌曲131在多个同步设备上播放iPhone、iPod touch或 iPad上的曲目 (AirPlay 2)132 QPlay功能133在本机上播放QQ音乐曲目133便捷功能134添加到HEOS最爱收藏135播放HEOS最爱收藏135删除HEOS最爱收藏136调节各声道的音量以与输入源相符(声道电平调节)137调节音调(音调)138音频播放过程中播放所需视频(视频选择)139根据您的观看环境调节图片质量(画面模式)140在所有区域中播放相同的音乐(所有区域立体声)141变更扬声器设置以匹配收听环境(扬声器预设)142选择声音模式143选择声音模式144直通播放145纯直通播放146自动环绕播放146声音模式类型介绍147可为每个输入信号选择的声音模式152 HDMI控制功能158设置步骤158智能菜单功能159睡眠定时器功能161使用睡眠定时器162快速选择附加功能163调用设置164更改设定165面板锁定功能166禁用所有键的按键操作166禁用除VOLUME之外的所有按键操作166取消面板锁定功能167远程锁定功能168禁用遥控器的感应窗功能168启用遥控感应窗功能168网络控制功能169通过网络控制对本机进行控制169在ZONE2(区域2)/ZONE3(区域3)(另一房间)中播放171连接区域171 ZONE2 (区域2) / ZONE3 (区域3)播放177设置菜单图179菜单操作183音频184中置电平调节184低音炮音量调节184低音同步185环绕参数185 Restorer192音频延迟193音量194 Audyssey®195图形 EQ198视频200画质调整200 HDMI设置202输出设置207分量视频输出211屏幕显示211屏幕保护212 4K/8K信号格式213 HDCP设置214 TV格式215输入216输入分配216源重命名219隐藏源219输入源电平220扬声器221 Audyssey®设置221扬声器的设定步骤(Audyssey®设置)223出错信息229检索Audyssey®设置设定231手动设置232放大器分配232扬声器配置240距离245电平246交叉247低音248前置扬声器249双声道回放249扬声器预设252网络253信息253连接253 Wi-Fi设置254设置256网络控制258友好名称258诊断259 AirPlay259 HEOS账户260您尚未登录260您已经登录260常规261语言261 ECO261蓝牙发射器265区域2设置 / 区域3设置266区域重命名268快速选择名称268触发器输出1 / 触发器输出2269前显示屏269固件270信息273使用率数据275保存和读取275设置锁定276重置276通过遥控器操作外部设备277注册预设代码278操作设备281初始化注册的预设代码284指定使用遥控器的操作区域284重设遥控器284提示提示286故障诊断288电源无法开启 / 电源关闭289使用遥控器无法执行操作290本机显示屏不显示内容290不发出声音291所需声音没有发出292声音中断或出现噪音295电视机上不显示视频296菜单屏幕不显示在电视机上298电视机上所显示菜单画面和操作内容的颜色与正常时不同298 AirPlay无法播放299USB存储设备无法播放300无法播放蓝牙设备301网络电台无法播放303计算机或NAS上的音乐文件无法播放304无法播放各种在线服务305 HDMI控制功能无效305无法连接至无线LAN网络306使用HDMI ZONE2时,设备无法正确运行307更新/升级错误消息308恢复出厂设置309恢复网络设置310保修和修理311附录关于HDMI312视频转换功能316播放USB存储设备318播放蓝牙设备319播放保存在计算机或NAS中的文件320播放网络收音机321个人记忆附加功能321最新功能记忆321术语解释322商标信息332规格335索引341感谢您选购本款Denon产品。
哈曼卡顿AVR1700、AVR170、AVR170 230C快速入门指南 - 中文说明书

AVR 1700, AVR 170, AVR 170/230C Audio/video receiverQuick-Start GuideIntroduction, Speaker Placement and ConnectionAVR2IntroductionThank you for choosing a Harman Kardon product!This quick-start guide contains all the information you need to connect and set up your new Harman Kardon audio/video receiver (AVR).To conserve our natural resources, your AVR does not include a printed owner’s manual. An owner’s manual containing complete information about operating all of your new AVR’s features is available at our Web site. Go to and download the AVR 1700, AVR 170, AVR 170/230C Owner’s Manual.Place the Receiver• P lace the AVR on a firm and level surface. Be certain that the surface and any mounting hardware can support the AVR’s weight.• P rovide proper space above and below the AVR for ventilation. Recommended clearance distances are 30cm above the unit, 30cm behind the unit and 30cm on each side of the unit.• I f you install the AVR in a cabinet or other enclosed area, provide cooling air within the cabinet. Under some circumstances, a fan may be required.• D o not obstruct the ventilation slots on the top of the AVR or place objects directly over them.• Do not place the AVR directly on a carpeted surface.• D o not place the AVR in moist or humid locations, in extremely hot or cold locations, in areas near heaters or heat registers, or in direct sunlight.ConnectionsPlace Your SpeakersDetermine the locations for your system’s speakers according to their manufacturer’s directions and the layout of your listening room. Use the illustrations below as a guidefor 5.1-channel systems.Speaker Positioning for 5.1-Channel SystemsFor more detailed speaker placement information, download the complete AVR 1700, AVR 170, AVR 170/230C Owner’s Manualfrom .ConnectorConnectorsConnectorConnect Your SpeakersHow to use the AVR speaker terminals:1. Unscrew Cap2. Insert Bare Wire3. Tighten CapAlways connect the colored (+) terminal on the AVR to the (+) terminal on the speaker(usually red), and the black (–) terminal on the AVR to the (–) terminal on the speaker(usually black).IMPORTANT: Make sure the ( + ) and ( – ) bare wires do not touch each other or the otherterminal. Touching wires can cause a short circuit that can damage your AVR.Connect the speakers as shown in the illustration.Connect Your SubwooferUse a single RCA audio cable to connect the AVR’s Subwoofer Pre-Out connector to yoursubwoofer. Consult your subwoofer’s user manual for specific information about makingconnections to it.PoweredReceiverConnect Your TVHDMI Out ConnectorIf your TV has an HDMI connector and you have HDMI source devices, use an HDMI cable(not supplied) to connect your TV to the AVR’s HDMI Out connector. It will provide thebest possible video quality.IMPORTANT: The AVR’s on-screen display (OSD) only appears through the HDMI Outconnector. If you want to use the AVR’s OSD menus you need to connect its HDMI Outconnector to your TV even if you are not connecting any HDMI video source devices tothe AVR.AVR HDMIOut Connector(not supplied)Composite Video Monitor Out ConnectorIf your TV does not have an HDMI connector, or if your TV does have an HDMI connectorbut you are connecting some source devices with only composite video connectors, usea composite video cable (not supplied) to connect the AVR’s Composite Monitor Outconnector to your TV’s composite video connector.AVRCompositeMonitor Out(not supplied)34se of setup, you should connect each source device to the connector where the ponding default source button is assigned (e.g., connect your Cable/Satellite tuner HDMI 1).all of the connections. (You will make any changes to the connector assignments later in the setup process.)HDMI DevicesIf any of your source devices have HDMI connectors, using them will provide the best possible video and audio performance quality. Since the HDMI cable carries both digital video and digital audio signals, you do not have to make any additional audio connections for source devices you connect via HDMI connectors.Note: If you have a TV or other source device equipped with the HDMI Audio Return Channel Function, its sound will be fed to the AVR via the HDMI Monitor Out connection’s Audio Return Channel, and it will not require additional audio connections to the AVR. Refer to the complete AVR 1700, AVR 170, AVR 170/230C Owner’s Manual , downloadableat .AVR HDMI ConnectorsHDMI-Equipped Source DeviceComposite Video DevicesUse composite video connectors for video source devices that don’t have HDMI connectors. You will also need to make an audio connection from the source device tothe AVR.Composite Video-Equipped Source DeviceAVR Composite Video ConnectorsOptical digital audio devicesIf your non-HDMI source devices have optical digital outputs, connect them to the AVR’s optical digital audio connectors. NOTE: Make only one type of digital connection (HDMI,optical or coaxial) from each source device.AVR Digital Coaxial digital audio devicesIf your non-HDMI source devices have coaxial digital outputs, connect them to the AVR’s coaxial digital audio connectors. NOTE: Make only one type of digital connection (HDMI,optical or coaxial) from each source device.AVR Digital Coaxial-Equipped Source Device5Analog Audio DevicesUse the AVR’s analog audio connectors for source devices that don’t have HDMI or digitalaudio connectors.AVR Analog Audio RecordersConnect an analog audio recorder’s inputs to the AVR’s analog audio Rec Out connectors.You can record any analog audio input signal.AVR Analog Audio Video RecordersConnect an analog video recorder’s video input connector to the AVR’s Composite Monitor Out connector. You can record any composite video signal. To record the audio and video from the source device, connect the AVR’s Analog Rec Out connectors to the analog video recorder’s audio inputs. NOTE: If you have connected the AVR’s Composite Monitor Outvideo connector to your TV you cannot connect a VCR to the AVR for recording.AVR Analog Audio Connect Your Home NetworkUse a Cat. 5 or Cat. 5E cable (not supplied) to connect the AVR’s Network connector to your home network to enjoy Internet radio and content from DLNA ®-compatible devices that areconnected to the network.AVR Network Connect the Radio Antennas• C onnect the supplied FM antenna to the AVR’s FM 75Ω antenna connector. For the best reception, extend the FM antenna as far as possible.• B end and fold the base of the supplied AM antenna as shown and connect the antenna wires to the AVR’s AM and Gnd connectors. Rotate the antenna as necessary to maximizereception quality.NOTE: To connect RS-232, remote IR and trigger equipment, please download the AVR 1700, AVR 170, AVR 170/230C Owner’s Manual from .6Connect to AC PowerConnect the AC power cord to the AVR’s AC Input connector and then to a working, non-switched AC power outlet. IMPORTANT: Before connecting the AC power cord, make surethat the AC voltage listed on the AVR’s back panel matches the AC voltage used in your country.AVR AC Set Up the AVRInstall the Batteries in the Remote ControlRemove the remote control’s battery cover, insert the three supplied AAA batteries as shownin the illustration, and replace the battery cover.NOTE: Remove the protective plastic from the AVR’s front panel so it doesn’t reduce the remote control’s effectiveness.Turn On the AVRConfigure the AVR for Your SpeakersOne of the most important steps in setting up a home theater system is to calibrate the AVR to match your loudspeakers, optimizing sound reproduction. Your AVR features the Harman Kardon EzSet/EQ ™ system, which performs this calibration automatically using the supplied EzSet microphone.You will be using the following remote cotnrol buttons to configure your AVR:1. P lug the supplied EzSet/EQ ™ microphone into the AVR’s Headphone connector.AVRHeadphone 2. P lace the microphone at ear height in your listening position.3. T urn on your TV and select the TV input where you connected the AVR in Connect Your TV , on page 3.4. P ress the remote control’s AVR button, then press the OSD button. The AVR’s on-screen display (OSD) Master Menu will appear on the TV. (Note: If you have only used a composite video connection to your TV, the OSD menus will not appear on your TV. Follow the steps below using the receiver’s front-panel display.)75. U se the remote’s arrow and OK buttons to select “EzSet/EQ.”6. Select “Yes.” The Speaker Configuration menu wlll appear.7. Select “5.1.”8. R emain silent while the test noise plays through your system’s speakers. When the calibration has completed, press the OSD button to exit.Assign the AVR Input Connections1. R eview the input connections you listed on the connection table, on page 4. Note what changes (if any) you have made from the default AVR Input Connector assignments that appear on the list. If you connected your source devices according to the entries in the “Default AVR Input Connector” column of the table on page 4, you can skip this section.2. T urn on your TV and select the TV input where you connected the AVR in Connect Your TV, on page3.3. P ress the remote control’s OSD button. The AVR’s on-screen display (OSD) setup menu will appear on the TV. (Note: If you have used a composite video connection to your TV, the OSD menus will not appear on your TV. Follow the steps below using the AVR’s front-panel display.)4. Use the remote’s arrow and OK buttons to select “Source Setup.” If there is a Source Selector for which you want to assign different video or audio connections. use the left/right arrow buttons to select it, and press the OK button.S o u r c e S e t u pS o u r ce <C a b l e/S a t e l l i t e>T i t l eV i d e o I n H D M I1A u d i o I n H D M I1T o n e O u tB a s s 0T r e b l e 0N i g h t M o d e O f fR e co r d O u t A n a l o g5. S elect “Video In” and use the left/right arrow buttons to select the video input connector you want to assign to the Source Selector button. Press the OK button. (Note: If you select an HDMI connector for the Video connection the Audio connection will automatically change to the same HDMI connector.)S o u r c e S e t u pS o u r ce <C a b l e/S a t e l l i t e>T i t l eV i d e o I n H D M I2A u d i o I n H D M I2T o n e O u tB a s s 0T r e b l e 0N i g h t M o d e O f fR e co r d O u t A n a l o g6. S elect “Audio In” and use the left/right arrow buttons to select the audio input connector you want to assign to the Source button. (Note: If you have assigned an HDMI Video connector for the Source button you cannot assign a different Audio connector.)S o u r c e S e t u pS o u r ce <C a b l e/S a t e l l i t e>T i t l eV i d e o I n C o m p o s i t e1A u d i o I n O p t i ca l1T o n e O u tB a s s 0T r e b l e 0N i g h t M o d e O f fR e co r d O u t A n a l o g7. R epeat steps 4 – 6 for the remaining audio/video connections that you want to re-assign. You are now ready to enjoy your AVR!IMPORTANT: For complete set up information, and for complete information about using all of your audio/video receiver’s features and capabilities, download the AVR 1700, AVR 170, AVR 170/230C Owner’s Manual from .8General SpecificationsPower consumption (AVR 1700):260W(AVR 170):240W(AVR 170/230C): 240WDimensions (W x H x D): 17-5/16" x 6-1/2" x 14-13/16"(440mm x 165mm x 377mm)Weight (unit):12.8 lb (5.8kg)Weight (shipping):18 lb (8.2kg)9HARMAN International Industries, Incorporated8500 Balboa Boulevard, Northridge, CA 91329 USA516.255.4545 (USA only)Made in P.R.C.© 2012 HARMAN International Industries, Incorporated. All rights reserved.Harman Kardon is a trademark of HARMAN International Industries, Incorporated, registered in the United States and/or othercountries. EzSet/EQ is a trademark of HARMAN International Industries, incorporated. DLNA®, the DLNA Logo and DLNA CERTIFIED®are trademarks, service marks, or certification marks of the Digital Living Network Alliance. Dolby, Pro Logic, and the double-Dsymbol are registered trademarks of Dolby Laboratories. DTS, DTS-HD, the Symbol, & DTS or DTS-HD and the Symbol together areregistered trademarks of DTS, Inc. © DTS, Inc. All Rights Reserved. The terms HDMI, the HDMI logo, and High-Definition MultimediaInterface are trademarks or registered trademarks of HDMI Licensing LLC in the United States and other countries. SIRIUS, SIRIUSConnect and all related marks and logos are trademarks of SIRIUS XM Radio inc., and its subsidiaries.Features, specifications and appearance are subject to change without notice.Part no. 950-0459-001, Rev. A 。
哈曼卡顿 Aura Plus 无线音箱使用说明书

Aura PlusWireless Speaker SystemOwner’s ManualAura PlusTable of ContentsNTRODUCT ON 3INCLUDED ITEMS 3CONTROLS AND CONNECTIONS 3HARMAN KARDON AURA PLUS FRONT PANEL CONTROLS 3HARMAN KARDON AURA PLUS REAR PANEL CONTROLS 4 CONNECT ONS 4POWER CONNECTIONS 4SOURCE CONNECTIONS 4IOS WIRELESS WI-FI SHARING 5IOS WI-FI SHARING WITH CABLE 5AD-HOC MODE 6 OPERAT ON 6SWITCHING TO DIFFERENT POWER MODES 6ADJUSTING VOLUME 7PLAYING MUSIC THROUGH WI-FI 7PLAYING MUSIC THROUGH BLUETOOTH 7PLAYING MUSIC THROUGH AIRPLAY® 7 HARMAN KARDON REMOTE 7HARMAN KARDON AURA PLUS LED INDICATION TABLE 8HARMAN KARDON AURA PLUS LED RING PATTERN INDICATION 9TROUBLESHOOT NG 10SPEC F CAT ONS 11USING THIS DEVICE WITH SPOTIFY CONNECT 11IntroductionAura PlusIntroductionThank you for purchasing the Harman Kardon Aura Plus. Harman Kardon Aura Plus is a premium, iconic design, wireless speaker that allows you to stream music from any smart phone, tablet or other wireless devices through Bluetooth®, AUX, Wi-Fi, AirPlay®, Spotify Connect®, and DLNA®.We at Harman Kardon always aim to create new products with high level functionality, beautiful design, and amazing sound quality.Harman Kardon Aura Plus is a 7-speaker, advanced acoustic platform that delivers a truly fantastic sound experience with a balanced soundstage and powerful bass response. The Harman Kardon Remote app simplifies the setup and lets you stream all your audio content. With its simple setup and quality sound, the Harman Kardon Aura Plus is an essential audio component for every house.CONTACT US : For queries and clarifications, please contact your service provider orbrowse for regional contact details.Included ItemsHarman Kardon Aura Plus speaker system consists of the following accessories:•Harman Kardon Aura Plus speaker•One AC power adapter•Regional power cord (varies depending on countries)IMPORTANT: If any included accessory is missing, or if any part of your HKAura Plus system fails to operate properly, contact your dealer immediately.Controls and ConnectionsThis section will help you identify the controls and connections that are provided on the Aura Plus side and rear panels.Harman Kardon Aura Plus Front Panel ControlsThe following control buttons are available on the front panel of the HK Aura Plus:1. Source 2.3. 4.Source: Use the Source button to switch between the sources as required.• Press the source button for 0.5 seconds to change the source from Bluetooth/Optical/Aux-in.• Press the source button for more than 2.5 seconds to disconnect all the Bluetooth connections and switch to Bluetooth source.ON/OFF: This button turns the Harman Kardon Aura Plus ON and OFF. Press and hold this button for more than 2.5 seconds to put the unit into Standby mode. Press the button again to bring it back to Operational mode.NOTE: Harman Kardon Aura Plus gives out a sound prompt when the system wakes up from the Standby mode, and when the power is turned OFF.Wi-Fi: This button helps you connect your Wi-Fi enabled device to the Harman Kardon Aura Plus.Volume control: These touch sensitive buttons control the volume of the unit. Roll your finger on these buttons to increase or decrease the volume.• Roll your finger in the direction of (+) to increase the volume.• Roll your finger in the direction of (-) to decrease the volume.Harman Kardon Aura Plus Rear Panel ControlsThe rear panel of the Harman Kardon Aura Plus allows you to work on the following:Service: The USB port is used for firmware upgrade or Wi-Fi set up only and will not charge attached devices.AUX-IN: The speaker includes a 3.5 mm stereo mini analog auxiliary input. Optical: The speaker supports Digital Optical Input. Connect your optical input cable here.Power: Connect the AC power cord here.ConnectionsThis section helps you understand how to connect your device correctly to a power source, and different input sources.Power ConnectionsConnect the supplied AC power cord to the rear panel of Harman Kardon Aura Plus. Source ConnectionsThe speaker offers the following source connection options:• Wi-Fi (Using AirPlay, DLNA, or Spotify Connect)• Bluetooth• Aux input• Digital Optical InputWi-Fi: You can connect your speaker to your Wi-Fi by three different modes depending on the device you are using.• iOS Wireless Wi-Fi sharing – If you have an iPhone or iPad with Bluetooth• iOS Wi-Fi sharing – If you have an iPhone or iPad and a USB to 30pin or USB to Lightning cable• Ad-hoc mode – If you want to set up the speaker from a computer or other deviceBluetooth: To wirelessly stream audio to the Harman Kardon Aura Plus from a Bluetooth-enabled device:1. Confirm that the Harman Kardon Aura Plus is in the Bluetooth pairing mode(the Bluetooth button LED will be flashing blue). If the LED is not flashingblue, press and hold the source button until its LED begins to flash blue.0.5 secWi-Fi BLUETOOTH OPTICAL AUX IN2.Aura Plus. The unit will appear as HK Aura BT in the list of Bluetoothavailable devices. When the Harman Kardon Aura Plus’s source button LEDilluminates blue constantly, it is paired with the device and you can streamNOTE: Harman Kardon Aura Plus gives out a sound prompt when the Bluetooth is switched on and when you attempt to pair another Bluetooth device.Aux Input: Connect your source device to the Harman Kardon Aura Plus’s Aux In. Press the source button until the LED turns off. This indicates that the source input is set to Aux in.Digital Optical Input: Connect your digital optical input here. Harman Kardon Aura Plus supports PCM raw stream. Press the source button until the LED turns white. This indicates that the source input is set to optical input.Headphone Output: The Harman Kardon Aura Plus also has a 3.5 mm headphone output jack to enable easy connection of headphones for pesonal listening. Connect your headphones and use the capacitance touch control to adjust the volume to the desired level. iOS Wireless Wi-Fi SharingIf you have an Apple device, use the following method to connect your Harman Kardon Aura Plus to the Wi-Fi network:1. Connect your iPhone, iPad or iPod touch to thespeaker’s Bluetooth connection.2. Ensure your iPhone, iPad or iPod Touch is connected to your Wi-Fi network.3. Press the Wi-Fi button on the Harman Kardon Aura Plus for less than a second.A pop-up window will be displayed on your iPad, iPhone or iPod Touch with amessage Share Wi-Fi Settings?4. Press Allow.The iPhone, iPad or iPod Touch will then share Wi-Fi settings with the Harman Kardon Aura Plus and it will be connected to your Wi-Fi network. This takes at least 40 seconds. Once the Harman Kardon Aura Plus is connected to the network, the Wi-Fi LED will light constantly and a sound prompt can be heard.iOS Wi-Fi Sharing with CableIf you have an Apple device without Bluetooth connection, use the following method to connect your Harman Kardon Aura Plus to the Wi-Fi network:1. Connect your iPhone, iPad or iPod touch to the speaker using the USB to 30-pin or USB to Lightning cable provided with your iPhone, iPad or iPod touch.2. Ensure your iPhone, iPad or iPod touch is connected to your Wi-Fi network.3. Press the Wi-Fi button on the Harman Kardon Aura Plus for less than a second.A pop-up window will be displayed on your iPad, iPhone or iPod Touch with amessage Share Wi-Fi Settings?4. Press Allow.The iPhone, iPad or iPod Touch will then share Wi-Fi settings with the Harman Kardon Aura Plus and it will be connected to your Wi-Fi network. This takes at least 40 seconds. Once the Harman Kardon Aura Plus is connected to the network, the Wi-Fi LED will light constant white and a sound prompt will be heard.Aura Plus OperationTo connect using the Harman Kardon remote app:1. Go to the Apple App store or Google Play store and down-load the Harman Kardon Remote app.2. Click + icon on the home screen to add a new device to yournetwork and choose Harman Kardon Aura from the list.3. Follow the setup instructions in the app.Ad-hoc ModeIf you have a Mac or PC computer, or other phone or tablet, use the following method to connect to the system:1. Put the Harman Kardon Aura Plus into Ad-hoc mode by touching theWi-Fi button for more than 5 seconds (ensure there are no USB de-vices plugged into the USB port). The Wi-Fi LED will flash twice.2. Go to the Wi-Fi Settings page on your Mac, PC or Phone andconnect to the network with the name HK_Aura*****.This may take around 40 seconds depending on your device.3. Open your web browser and enter the IP address as192.168.1.1 in the address bar of your browser.4. Select the name of the Wi-Fi network you want5. Enter the password for your network and click Save.6. Ensure that you have entered the password correctly. If you arenot sure, enter the password again without any mistake.The Harman Kardon Aura Plus will then attempt to connect to your Wi-Fi network. This may take up to one minute depending on your Wi-Fi router. If the connection is successful, the Wi-Fi LED will turn green and the connection successful tone can be heard. If the connection is unsuccessful or your password incorrect, the Wi-Fi LED will flash quickly. To try again, start from step 1.NOTE: To restore the factory default settings, long press Source and Power button in Operational mode.OperationSwitching to Different Power ModesThe power button on the side panel of the Harman Kardon Aura Plus allows you to set the wireless speaker to any of the following power modes:• Operational mode• Sleep mode• Standby mode• Off modeTo change the power modes:• Press the power button to enter into Operational mode from Standby mode.• Press the power button again if you want to make the system enter intoStandby mode from Operational mode.Using This Device With Spotify Connect Aura PlusIf the speaker remains inactive for more than 10 minutes, it automatically enters the Sleep mode.• Press the power button to enter into standby mode while the speaker is in sleep mode. The speaker can also enter into standby mode from sleep modeif it remains inactive for more than 30 minutes without Wi-Fi connection.• Press the Volume and the Source buttons to enter into operational mode from sleep mode. The speaker also enters into operational mode from sleepmode if Bluetooth is active.Adjusting VolumeThe volume buttons on the side panel allows you to increase or decrease the volume. These touch-sensitive buttons allow you to control volume with a gentle finger touch on the buttons. Adjust volume using the Volume Up (+) and Volume Down (–) buttons located on the system.• Short press - Increase/decrease volume by 1 step• Press and hold - Increase/ decrease volume continuously (1 step per 0.2 second)Playing Music through Wi-FiTo play music in your Harman Kardon Aura Plus through Wi-Fi:1. Press the Power button.2. Connect to your Wi-Fi network following the above procedures.3. If Harman Kardon Aura Plus is on the Wi-Fi net-work, the Wi-Fi LED becomes constant white.4. Control playback from your Wi-Fi enabled device.Playing Music through BluetoothHarman Kardon Aura Plus supports the audio played from Bluetooth enabled devices.1. Connect the Harman Kardon Aura Plus to the Bluetooth-enabled device.2. Control playback from your Bluetooth-capable device.3. The Harman Kardon Aura Plus will appear as aBluetooth speaker called HK Aura BT.4. Check your phone or tablet manual for more information.Playing Music through AirPlay®AirPlay® allows you to wirelessly stream audio content from your Mac or PC, iPhone, iPad or iPod touch to Harman Kardon Aura Plus.• iPhone, iPod touch, or iPad (running iOS version 4.2 or higher)• MAC or PC running a compatible version of iTunesThe Harman Kardon Aura Plus will appear as a W i-Fi speaker in the AirPlay menu named HK Aura WF.Check your iPod or iPhones manual for more information on how to stream music. Using This Device With Spotify ConnectSpotify lets you listen to millions of songs – the artists you love, the latest hits and discoveries just for you.If you are a Spotify user, you can control this device using your Spotify app.Step 1 Connect your device to the same wifi network as your phone, tablet or PC running the Spotify app.Step 2 Open the Spotify app, and play any song.Step 3 Tap the song image in the bottom left of the screen.Step 4 Tap the Connect iconStep 5 Pick your speaker from the list.For information on how to set up and use Spotify Connect please visit www.spotify. com/connectLicensesThe Spotify Software is subject to third party licenses found here : / connect/third--party- -licenses.Harman Kardon RemoteHarman Kardon Aura Plus can be operated through the Harman Kardon Remote app available in the App Store for Apple products or Google Play for Android products. You can use the Harman Kardon Remote app to stream music to, and control the Harman Kardon Aura Plus through your smart phone or tablet.0.5 secHarman Kardon Aura Plus LED Indication TableHarman Kardon Aura Plus LED Ring Pattern IndicationStatus PatternBooting up from Standby Mode Two Spot ClockwiseBooting Complete Fully OnOperational Mode Fully OnSleep Mode Fully On, but in lower brightness.Off/ Standby Mode OFFVolume Change When volume change is complete, the sameLED ring pattern stays for 5s, and then turns toFully On smoothly.Bass Volume Change (by App)When volume change is complete, the sameLED ring pattern stays for 5s, and then turns toFully On smoothly.Connecting to Wi-Fi Router If successful, the LED ring pattern changes toFully On smoothly.If failed, the LED ring pattern flashes 4 times,then changes to fully On smoothly.Adhoc Connect Mode If any other device is connected, the LED ringpattern changes to fully on smoothly.Wi-Fi Info Sharing The LED pattern is One Spot Clockwise, when waiting for feedback from iOS device. Firmware Upgrading Fully Quick Breathing until upgrading finishedFirmware Upgrading Failed Fully Regular Flash.Aura Plus Troubleshooting TroubleshootingIf your Harman Kardon Aura Plus is not performing the way you think it should, check if the problem is covered in this section before calling your dealer or contacting a Harman Kardon representative.Problems SolutionsThere is no sound coming from the Harman Kardon Aura Plus• No power to unit. Make sure that the wall outlet orpower strip has power.• Make sure that all switches for outlet/power strip areON and that all switches for the unit are ON.Distortion (static, crackling or hissing sounds)• Audio source or source material may be the problem.Test the Harman Kardon Aura Plus with another source.• Volume level may be too high from auxiliary-deviceoutput. Check the volume of the source and turn itdown if necessary.Harman Kardon Aura Plus emits a loud hum or buzzing noise • Input cable is not plugged in properly. Check the inputcable connection.• Cable may have problems. Replace the cable.• It might happen due to ground loop (an unsuitablecon-nection). Turn the Harman Kardon Aura Plus OFFand connect it to another wall outlet.Specifications11Aura Plus SpecificationsPower supply 19VDC, 3APower consumption 57W maximum, <0.5W eco-standby modeTransducers 4.5”(112mm) for Woofer, 1.5”(40mm) for TweeterAmplifier power 1x30W + 2x15WFrequency response 50Hz - 20KHzSignal-to-noise ratio 80dB at 30W(woofer), 80dB @15W(tweeter)Bluetooth transmitter frequency range 2.402 - 2.480GHzBluetooth transmitter power Max 4dBmBluetooth transmitter modulation GFSK, p/4 DQPSK, 8DPSKAirPlay transmitter Frequency range 2412MHz~2472MHz (2.4GHz ISMBand, USA 11 Channels, Europe 13 Channels)AirPlay Transmitter power <20 dBmAirPlay transmitter Modulation 802.11b:DSSS (DBPSK, DQPSK, CCK) ;802.11g:OFDM (BPSK, QPSK, 16QAM, 64QAM);AirPlay network compatibility 802.11b/g© 2016 HARMAN International Industries, Incorporated. All rights reserved.Harman Kardon is a trademark of HARMAN International Industries, Incorporated, registered in the United States and/or other countries. The “beautiful/sound” logo is a trademark of HARMAN International Industries, Incorporated.The Bluetooth® word mark and logos are registered trademarks owned by Bluetooth SIG, Inc. and any use of such marks by HARMAN International Industries, Incorporated is under license. Other trademarks and trade names are those of their respective owners.La marque verbale et le logotype Bluetooth® sont des marques commerciales déposées et la propriété de Bluetooth SIG, Inc. et toute utilisation de ces marques par HARMAN International Industries, Incorporated, est sous licence. Les autres marques et noms commerciaux sont ceux de leurs propriétaires respectifs.The Wi-Fi CERTIFIED Logo is a certification mark of the Wi-Fi Alliance.Wi-Fi est une marque commerciale déposée de la Wi-Fi Alliance.DLNA®, the DLNA Logo and DLNA CERTIFIED® are trademarks, service marks, or certification marks of the Digital Living Network Alliance.DLNA® et le logo DLNA sont des marques commerciales déposées de Digital Living Network Alliance.“Made for iPod,” “Made for iPhone” and “Made for iPad” mean that an electronic accessory has been designed to connect specifically to iPod, iPhone or iPad, respectively, and has been certified by the developer to meet Apple performance standards. Apple is not responsible for the operation of this device or its compliance with safety and regulatory standards. Please note that the use of this accessory with iPod, iPhone, or iPad may affect wireless performance.« Made for iPod », « Made for iPhone » et « Made for iPad » signifie que l’accessoire électronique a été conçu spécialement pour fonctionner avec iPod, iPhone ou iPad, respectivement, et a été certifié par le concepteur pour satisfaire les normes de performance Apple. Apple ne peut être tenu responsable de l’utilisation de cet accessoire et de sa conformité aux normes de sécurité. S’il vous plaît la note que l’usage de cet accessoire avec iPod, iPhone ou iPad peut affecter l’e xécution sans fil.AirPlay, iPad, iPhone, iPod, and iPod touch are trademarks of Apple Inc., registered in the U.S. and other countries.AirPlay, iPad, iPhone, iPod et iPod touch sont des marques commerciales d’Apple Inc., déposées aux États-Unis dans d’autres pays.Made for iPhone 5, iPhone 4S, iPhone 4, iPhone 3GS, iPad (3rd and 4th generation), iPad 2, iPad, iPad mini, and iPod touch (3rd through 5th generation).Fait pour iPhone 5, iPhone 4S, iPhone 4, iPhone 3GS, iPhone 3G, iPad, iPad 2, iPad, iPad mini, iPod touch (3ème et 4ème génération).AirPlay works with iPhone, iPad, and iPod touch with iOS 4.3.3 or later, Mac with OS X Mountain Lion, and Mac and PC with iTunes 10.2.2 or later.AirPlay fonctionne avec iPhone, iPad et iPod touch munis d’iOS 4.3.3 ou postérieur, Mac avec OS X Mountain Lion, et Mac et PC avec iTunes 10.2.2 ou postérieur.This Mark Certifies that this product is compliant with the BLACKFIRE ALLIANCE Standard.Please refer to for more information.BLACKFIRE™ is a Registered Trademark (No. 85,900,599) of BLACKFIRE RESEARCH CORP.All rights reserved.Spotify Connect feature may not be used in countries where Spotify service is not available.TR02424_A。
功放的用法与使用注意事项

功放的用法与使用注意事项功放是音响系统中最基本的设备,它的任务是把来自信号源的微弱电信号进行放大以驱动扬声器发出声音。
功放的使用也需要注意一些事项。
以下是由店铺整理的功放的用法的内容,希望大家喜欢!功放的用法AUdio INPUT是音频信号输入端口,3个都是。
旁边的3个是5、1声道的音源输入端口,平时听、唱歌接AUdio INput这3组中的一组就可以了,5、1声道立体声效果好,看电影合适,但要分几组信号输入。
输出是右边的5组接线端柱(SPEAKERS SYSTEM),从左到右分别是右声道、左声道(左右为主声道)、中置、环绕右、环绕左。
可以接5个音箱,红色为正极,接音箱正极,黑色为负极,接音箱负极。
电脑声卡的输出信号线连接功放的AUdio INput,功放的输出端连接音箱。
无线话筒接入无线咪接收器,输出信号接入功放就行了。
如果有个前级效果器就更方便了,可以把声卡信号和无线咪接收器的信号都输入到前级效果器里,效果器输出再接入功放,这样更好,通过效果器调节音质声音会更好。
功放的作用功放的作用就是把来自音源或前级放大器的弱信号放大,推动音箱放声。
一套良好的音响系统功放的作用功不可没。
功放,是各类音响器材中最大的一个家族,其作用主要是将音源器材输入的较微弱信号进行放大后,产生足够大的电流去推动扬声器进行声音的重放。
由于考虑功率、阻抗、失真、动态以及不同的使用范围和控制调节功能,不同的功放在内部的信号处理、线路设计和生产工艺上也各不相同。
功放的保养方法1、用户应将功放放置在干燥、通风的地方,避免在潮湿、高温、油烟化学制剂有腐蚀性的环境中工作。
2、用户应将功放放置在安全、平稳、不易掉落的台面或机柜中使用,以免碰损或跌落在地上,将机器损坏或引起更大的人为灾害,如火灾、触电等。
3、用户应将功放避开电磁干扰严重的环境,如日光灯镇流器老化等放射的电磁干扰将会引起机器CPU程序错乱,导致机器不能正常工作。
4、PCB布线时注意,电源脚与水溏不能太远,太远可加1000--470U放在它脚边。
Caspian单声道后级中文说明书-欢迎浏览昌业音响网站
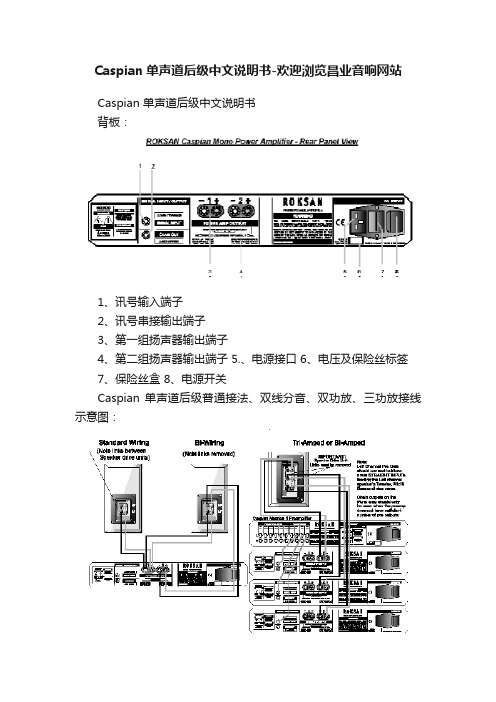
Caspian单声道后级中文说明书-欢迎浏览昌业音响网站
Caspian 单声道后级中文说明书
背板:
1、讯号输入端子
2、讯号串接输出端子
3、第一组扬声器输出端子
4、第二组扬声器输出端子 5.、电源接口 6、电压及保险丝标签
7、保险丝盒 8、电源开关
Caspian 单声道后级普通接法、双线分音、双功放、三功放接线示意图:
功放的电源开关平时应处于接通状态,如果长期不用的话,请关闭电源开关并拨掉电源线。
功放背后的“讯号串接输出端子”作用是:当前级没有足够多的输出端子、但又要同时接多台后级时,可以通过该端子将讯号不经放大直接输给其他后级。
接通电源开关后,功放经过短暂的自检后将进入工作状态,这时前面板的指示灯为红色,功放可以自由识别有无讯号输入,当无讯号输入状态超过2分钟后,功放的显示灯自动转为
待机状态,显示灯变为绿色;但只要一检查到有讯号输入,功放即回复到正常的工作状态,显示灯也将转回红色。
这项功能既使功放能立刻进入状态,又免除了开关机的麻烦。
当功放处于待机状态时,如果侦测到异常情况,例如过流、短路,它就会立即启动自我保护装置,并且显示灯会不断闪烁提醒使用者的注意,你只要关一下机器,就可以使它回复正常的工作状态。
天龙 Denon AVR1912 功放 说明书

请检查并确认本产品附带下列部件。 q 开始使用(本手册).............................................................................................1 w CD-ROM(操作说明书).....................................................................................1 e 维修站列...............................................................................................................1 r 遥控器(RC-1156)..............................................................................................1 t R6/AA电池..........................................................................................................2 y 设置用麦克风(DM-A409)..............................................................................1 u AM环形天线........................................................................................................1 i FM室内天线........................................................................................................1
- 1、下载文档前请自行甄别文档内容的完整性,平台不提供额外的编辑、内容补充、找答案等附加服务。
- 2、"仅部分预览"的文档,不可在线预览部分如存在完整性等问题,可反馈申请退款(可完整预览的文档不适用该条件!)。
- 3、如文档侵犯您的权益,请联系客服反馈,我们会尽快为您处理(人工客服工作时间:9:00-18:30)。
红外传感器:这个传感器可以接收遥控器的红外线 (IR) 命令, 确保此传感 器没有被遮盖。
Set(设置)按钮:按此按钮以选择当前高亮显示的菜单项。
请勿使用延长线
为了避免安全隐患,请您只使用设备中随附的电源线。我们不建议您在使 用本设备时配备延长线。使用任何电子设备时,都不要将电源线放在毛 毯、地毯或重物下面。如果电源线受到了损坏,请您立即联系授权的服务 中心,请他们为您更换为符合工厂规格的电源线。
谨慎处理交流电电源线
从交流电插座上断开电源线时,请务必拔下插头;任何时候都请勿拉拔电 线。较长时间不使用本 AVR 设备时,请从交流电插座上拔出插头。
使用前确认线路电压
AVR 1510 需要使用 120 伏交流电 (AC)。AVR 151 需要使用 220 – 240 伏交流 电。如果所连接线路的电压不符合接收器要求,可能会引发安全和火灾危 险,并可能会损坏设备。如果您不清楚具体型号设备的电压要求,或者不 知道您所在地区的线路电压是多少,请在将设备插入壁装插座之前联系经 销商。
t 在 AVR 上下方保留一定的控件,以便通风。我们建议您将本设备与其 他物品隔开适当的距离摆放,上方、背面和左右两边均保留 30cm 的 间隔。
t 如果将 AVR 摆放在机柜或其他封闭空间内,请在机柜内提供冷却气流。 在某些情况下,可能需要安装风扇。
t 请勿阻挡 AVR 顶部的通风槽,或者放置任何物体。
CATV 系统安装人员须知:本信息旨在提醒 CATV 系统安装人员注意 NEC 第 820-40 条的规定,其中提供了正确接地的指导信息,尤其是指明了接地电 缆必须与大厦接地系统连接,并尽可能接近电VR 摆放在固定和平整的平面上。确保该平面和安装硬件能够承 受 AVR 的重量。
Source Select (源选择)按钮
4
简体中文
AVR
前面板控件
前面板控件(续)
电源指示灯/电源按钮:AVR 具有 3 种不同的电源模式:
t 关闭(电源指示灯琥珀色常亮):关闭模式能最大程度地减少不使用 AVR 时的能源消耗。AVR 在关闭后,会来自联网设备的 DLNA DMR 流作 出反应而自动打开或播放音频。AVR 在关闭后,按电源按钮可将其打 开。要在 AVR 打开时将其关闭,请按住电源按钮不少于 3 秒。前面板 显示屏将显示“Your device is switched off”(您的设备以关闭)两秒, 然后关闭。
注意:除非 USB、iPod、家庭网络、vTuner 或 DLNA DMR 处于活动状 态,AVR 将在没有音频信号或用户控制输入 30 分钟后,自动进入睡眠 模式。在此情况下,AVR 将在 Auto Power Off(自动关闭)系统设置中设 定的小时数后,自动进入睡眠模式。请参阅第 29 页的系统设置。
RDS 按钮(仅限 AVR 151):当收听广播 RDS 信息的 FM 电台时,该按钮可 以激活各种 RDS 功能。
USB 端口:USB 端口可用于播放连接至端口的 Apple iOS® 设备中的音频文 件,还可以用于播放插入此端口的 USB 设备中的 MP3 和 WMA 音频文件。 请将连接器或设备按照正确的方向插入到 USB 端口中。您可以随时插入或 取出连接器或设备 – 没有任何安装或拆除程序。
您也可以使用 USB 端口来执行固件升级。如果日后发布了 AVR 操作系统的 升级,您可以使用此端口将它下载到 AVR。完整说明将在那时提供。
重要提示:请不要将 PC 或其他 USB 主机/控件连接到此端口上,否则可能 会损坏 AVR 和其他设备。
Channel Volume Adjust(声道音量调整)按钮:按此按钮,可以进行一次声 道电平调整。按此按钮后,使用上/下箭头按钮/Tuning(调谐)按钮可以选 择要调整的声道,使用左/右箭头按钮可以调整声道的电平。
11
高级功能
11
音频处理和环绕声
11
系统设置
11
睡眠定时器
12
处理器重置
12
故障排除
12
规格
12
附录
13
13
13
14
15
17
17
17
17
18
18
19
19
19
20
20
20
目录
20 22 23 23 23 24 24 24 24 24 25 25 26 26 26 27 27 29 29 29 30 31 32
Source Select(源选择)按钮:按这些按钮,可以选择当前活动的源。
音量旋钮:旋转这个旋钮,可以增大或减小音量。
5
AVR
后面板连接器
数字音频 连接器
网络 连接器
HDMI 输入 连接器
HDMI 输出 连接器
后面板连接器
广播天线 连接器
模拟音频 连接器
低音扬声器 预先输出 连接器
红外和触发器 连接器
简体中文
AVR
简介、随附配件、重要安全信息和放置 AVR
简介
重要安全信息
感谢您选择 Harman Kardon 产品! 五十多年来,Harman Kardon 一直秉承对音乐和娱乐的热情,采用最尖端的 技术,打造无与伦比的娱乐体验。Sidney Harman 和 Bernard Kardon 发明了一 种接收器,这种单一组件既能简化家庭娱乐系统,又能保证高品质的播放 效果。经过多年的发展,Harman Kardon 的产品如今更加简便易用,同时功 能更加强大,音效也更加出色。 AVR 1510/AVR 151 5.1 声道数字音频/视频接收器 (AVR) 延续了我们的优良传 统,拥有诸多当前最先进的音频和视频处理能力,更有多种聆听和观看选 项可供您选择。 为了更好地使用这款 AVR 设备,请您认真阅读本手册,熟悉它的各种功能 和操作,并在使用过程中随时进行参考。 如果您对于这款产品、安装或操作有任何疑问,请联系 Harman Kardon 零售 商或专门的安装人员,或者访问我们的网站:。
t 打开(电源指示灯白色常亮):当打开 AVR 时,您可以对其全面操作。
耳机插孔:将 1/4" 立体声耳机插入此插口,享受私人视听乐趣。
Tuning Mode(调谐模式)按钮(仅限 AVR 1510):按下此按钮可以在手动 (一次搜索一个频道)和自动(搜索具有可接受信号强度的频道)FM 调 谐模式之间切换。此按钮还可以在 FM 电台打开时,让广播在立体声和单 声道之间切换。
随附配件
以下是 AVR 的随附配件。如果确实这些配件中的任何一项,请联系您的 Harman Kardon 零售商,或通过 联系 Harman Kardon 客 户服务。
t 系统遥控器 t AM 环形天线 t FM 天线 t 两节 AAA 电池 t 交流电电源线(仅限 AVR 151)
注意:您可以使用 System Setup(系统设置)菜单,将 AVR 设置为处于 睡眠模式的时间到达指定时长后,自动进入关闭模式。请参阅第 29 页 的系统设置。
t 睡眠(电源指示灯琥珀色常亮,前面板显示屏显示“Device sleep”(设 备睡眠)):睡眠模式会关闭部分 AVR 回路,但允许 AVR 来自联网设备 的 DMR 流作出反应以自动打开和播放音频。当 AVR 睡眠时,按电源按钮 可将其打开。要在 AVR 打开时让其睡眠,请按住电源按钮不少 3 秒。前 面板显示屏将显示“Your device is going to sleep”(您的设备将进入睡眠模 式),然后在 AVR 处于睡眠模式时显示“Device sleep”(设备睡眠)。
Adjust(频道音量
按钮
调整)按钮
红外 传感器
前面板显 示屏
前面板控件
音量 旋钮
耳机插孔
USB 端口
左/右箭头 按钮
Audio Input(音频输入) 按钮
上/下箭头按钮/ Tuning(调谐)按钮
Surround Modes Select(环绕声模式选择)
按钮
Surround Mode Category(环绕声模式类别)按钮
请勿打开机柜
本产品中不包含用户可以维修的组件。打开机箱可能会有触电危险,如果 您自行对产品进行修理,您将无法获得我们的保修服务。如果水或任何金 属物体(比如曲别针、电线或订书钉)不小心落到了本设备中,请立即断 开本设备与交流电电源的连接,然后咨询授权的服务中心。
CATV(有线电视)或天线接地 (AVR 1510)
扬声器 连接器
模拟视频 连接器
交流电输入 连接器 (AVR 151)
电源线 (AVR 1510)
6
简体中文
Surround Mode Select(环绕声模式选择)按钮:选择需要的环绕声模式 类别后,按这些按钮在类别内选择指定的模式,例如从 Dolby® Pro Logic® II Movie 模式改为 DTS® NEO:6 Cinema 模式。环绕声模式的可用性取决于源输 入信号的本质(例如数字与模拟),以及信号内编码的声道数量。
2
3
为扬声器配置 AVR
3
设置源
3
设置网络
3
操作 AVR
4
HARMAN 遥控应用
6
控制音量
8
设置静音
10
使用耳机
10
选择源
10
选择环绕声模式
10
收听 FM 和 AM 广播
10
播放 USB 设备上的媒体
10
播放 IPOD/IPHONE/IPAD 设备
10
收听 VTUNER(互联网广播)
10
通过家庭网络播放媒体