mantis 操作手册
Mantis-缺陷管理系统使用手册教学教材

Mantis使用手册目录1. 系统简述 (5)2. 登陆方式 (5)3. 系统中的角色 (6)3.1. 管理员 (6)3.1.1. 首页 (6)3.1.2.我的视图 (7)3.1.3.查看问题 (8)3.1.4.报告问题 (12)3.1.5.修改日志 (13)3.1.6.统计报表 (13)3.1.7.管理 (14)3.1.8.个人账号 (23)3.1.9.注销 (25)3.2. 经理 (25)3.2.1.操作区别 (25)3.3. 开发人员 (26)3.3.1.操作区别 (26)3.4. 修改人员 (26)3.4.1.操作区别 (26)3.5. 报告人员 (27)3.5.1.操作区别 (27)3.6. 查看人员 (27)3.6.1.操作区别 (27)4. 分派给我的工作 (27)4.1. 查看问题详细资料 (28)4.2. 关系 (29)4.3. 上传文件 (30)4.4. 正在监视该问题的用户 (30)4.5. 问题注释 (30)4.6. 添加问题注释 (30)4.7. 问题历史 (30)1.系统简述缺陷管理平台Mantis是一个开源的缺陷跟踪系统,以Web操作的形式提供项目管理及缺陷跟踪服务。
Mantis可以帮助所有开发人员完成系统需求缺陷的有效管理,对于bug 问题的状态变化将通过mail的形式由系统自动通知相关人员。
且可以自动生成统计报表和自动导出成doc或excel格式的文件。
Mantis是基于mysql+php的服务具有极高的安全可靠性。
2.登陆方式打开IE 窗口,在地址栏里键入:http://192.168.1.70/mantis/login_page.php,便可显示系统的登录页面(图表1),注册,有两种方式注册新用户:1)由管理员添加新用户(参见管理员操作说明);2)使用Email注册。
进入登录页面后,点击【注册一个新帐号】,输入帐号和E mail地址,提交注册,系统会将初始密码发送到Email中;用户正确的输入自己的帐号(即用户名)及密码后,即可成功登录。
mantis使用文档
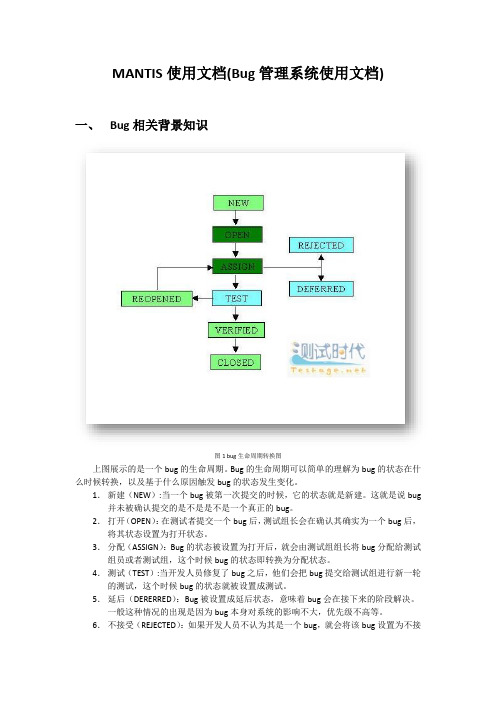
MANTIS使用文档(Bug管理系统使用文档)一、Bug相关背景知识图1 bug生命周期转换图上图展示的是一个bug的生命周期。
Bug的生命周期可以简单的理解为bug的状态在什么时候转换,以及基于什么原因触发bug的状态发生变化。
1.新建(NEW):当一个bug被第一次提交的时候,它的状态就是新建。
这就是说bug 并未被确认提交的是不是是不是一个真正的bug。
2.打开(OPEN):在测试者提交一个bug后,测试组长会在确认其确实为一个bug后,将其状态设置为打开状态。
3.分配(ASSIGN):Bug的状态被设置为打开后,就会由测试组组长将bug分配给测试组员或者测试组,这个时候bug的状态即转换为分配状态。
4.测试(TEST):当开发人员修复了bug之后,他们会把bug提交给测试组进行新一轮的测试,这个时候bug的状态就被设置成测试。
5.延后(DERERRED):Bug被设置成延后状态,意味着bug会在接下来的阶段解决。
一般这种情况的出现是因为bug本身对系统的影响不大,优先级不高等。
6.不接受(REJECTED):如果开发人员不认为其是一个bug,就会将该bug设置为不接受状态。
7.重复(DUPLICATE):如果一个缺陷被重复提交或者两个bug表明的意思是同一个或者指向的问题为同一个,则可以将这个bug的状态设置为重复。
8.已经核实(VERIFIED):Bug被分配给测试人员之后,如果测试人员经过测试发现问题已经修复,不会再重现,则可以将bug设置为已经核实状态。
9.再次打开(REOPENED):如果bug被开发人员修复后,测试中又出现了同样的问题,则将bug的状态设置为重新打开状态,再次交由开发人员修复。
10. 关闭(Closed):如果bug被设置为关闭装填,则表示该bug已由研发人员修复,经过测试人员测试核实,bug已经不存在了。
二、MANTIS功能介绍Mantis是一个基于PHP技术的轻量级的缺陷跟踪系统,其功能与前面提及的JIRA 系统类似,都是以Web操作的形式提供项目管理及缺陷跟踪服务。
维纳斯立体观察系统操作说明和维修手册说明书
E N G I N E E R I N GMantis Stereo Viewing SystemOperating InstructionsAndService ManualUse this manual only after assembling the Mantis Viewing system.After assembling the Mantis Stereo Viewing System you should be familiar with its various components. These instructions will help you become familiar with the operation and use of the Mantis as well as some of the available options. Also included in this manual is a more comprehensive maintenance, troubleshooting and service guide.NOTE: REFER TO THE MANTIS USER GUIDE AS REQUIRED1/Mantis/7/98CONTENTS Page1) System Diagrams (2)M antis Universal Boom Mount (3)M antis FX Bench Mount (4)1) The Basic Systems (5)1) Objective Specifications (7)1) Using the Mantis (9)T urning the Power “ON” (10)F ocusing (10)A djusting the Lighting .................................... (10)C hanging the Magnification (11)A djusting the Eye Spacing (11)5) Options (12)L ens Protective Covers (13)6)Maintenance (14)Lamp Replacement (15)Lens Cleaning (15)Moisture Control (15)Optical Path Alignment (15)Fan (15)7)Troubleshooting (16)Mantis has No Power (17)Optical View ............... (17)8)Service (18)C leaning the Mirrors (19)F an Replacement (20)R epairing Eye Spacing Adjustment (21)M irror Removal (22)9)Warranty (23)10) Information (25)SYSTEM DIAGRAMSSYSTEM DIAGRAMMANTIS UNIVERSAL BOOM MOUNTE N G I N E E R I N GDescription User Guide Des.Part No.1. Yaw Bolt Cover Cover Plate 187-A-00792. Yaw Bolt Assembly Yaw Spigot YB-A-0013. Anti-glare Shield Anti-glare Shield 187-B-00904. Adj. Friction Handle Height Friction Clamp HAN-05675. Table Mount Base Universal Mount 187-C-02586. C Clamp Assembly G ClampHDW-10927. Power Switch SWI-01228. Switch Cover 187-A-01119. Fan Cover Assembly 187-A-021110. Desiccant(10 pack)Desiccant CartridgeM00611. Grommet HDW-103012. Turret Assembly 187-A-020813. Filter Tray - Left 187-C-007614. Filter Tray - Right 187-C-007515. Lamp Diffuser 187-A-011516. Lamp Diffuser(Blue)187-A-0115A 17. Lamp, 12volt, 20wattLAM-13001241314151617101139128756MANTIS FX BENCH STANDVisi nE N G I N E E R I N GDescription User Guide Des.Part No.1. Yaw Bolt Cover Cover Plate 187-A-00792. Yaw Bolt Assembly Yaw Spigot YB-A-0013. Anti-glare Shield Anti-glare Shield187-B-00904. Focusing Thumbwheel 5. Focusing Platform 187-D-292*6. Surface Lighting Switch7. Substage Lighting Switch8. FX Base187-C-03109. Fan Cover Assembly 187-A-021110. Desiccant(10 pack)Desiccant CartridgeM00611. Grommet HDW-103012. Turret Assembly 187-A-020813. Filter Tray - Left 187-C-007614. Filter Tray - Right 187-C-007515. Lamp Diffuser 187-A-011516. Lamp Diffuser(Blue)187-A-0115A 17. Lamp, 12volt, 20wattLAM-1300*Requires Sub-Assembly187-B-3071231011121314151617956784SYSTEM DIAGRAMThe Basic Systems2) The Basic SystemsThe Mantis Stereo Viewing System is a powerful optical inspection system. The patented optical technology provides a bright, crystal clear overhead image in a fatigue free viewing environment. Long working distance offers ample room for rework and part rotation.Mantis systems are available in two versions. One version is the boom mount (refer to page 3 of this manual) which can be mounted on almost any table surface. This is good for general inspection, viewing and rework, especially in a production environment. The other version is the Mantis FX (refer to page 4 of this manual). This version has a portable stand that resembles a traditional microscope stand. This version is better suited to off-line inspection.Each Mantis system can be equipped with any two of the objective lenses listed below. It is common to use a lower magnification lens (such as 2X or 4X) for general inspection and a higher magnification lens (such as 8X or 10X) for closer inspection of possible defects.Mantis - Boom MountDescription Vision Engineering Inc. Part No.1) Mantis viewing head M0012) Mantis Boom Mount M003Mantis FX - Bench StandDescription Vision Engineering Inc. Part No.1) Mantis viewing head M0012) FX Bench Stand M002Objectives - For use with either systemDescription Vision Engineering Inc. Part No.1) 2X Magnification Lens M2222) 4X Magnification Lens M4443) 6X Magnification Lens M0044) 8X Magnification Lens M0085) 10X Magnification Lens M0096) 6X SLWD Magnification Lens M013The 6X SLWD magnification lens has a much longer working distance than the standard 6X magnification lens. It is specifically designed for rework applications.Objective Specifications 3)Objective SpecificationsThe Mantis objectives provide different levels of magnification ranging from 2X to 10X. As magnification changes, working distance (the distance between the objective lens and the subject when properly focused), field of view (the area of subject that is visible in the viewing screen at any one time) and depth of field (the maximum subject height variation that will remain in focus) also change. The chart below shows the characteristics of each lens.Lens Working Distance Field of View Depth of Field2X171 mm ~ 6.7 in.56 mm ~ 2.2 in. 25 mm ~ 1.0 in.4X 86 mm ~ 3.4 in.28 mm ~ 1.1 in. 11 mm ~ 0.4 in.6X 55 mm ~ 2.2 in.20 mm ~ 0.8 in. 5 mm ~ 0.2 in.6X SLWD112 mm ~ 4.4 in.20 mm ~ 0.8 in. 5 mm ~ 0.2 in.8X 41 mm ~ 1.6 in.15 mm ~ 0.6 in. 3 mm ~ 0.1 in.10X 41 mm ~ 1.6 in.12 mm ~ 0.5 in. 2.5 mm ~ 0.1 in.Using the Mantis 4) Using the MantisTurning the Power “ON”Boom Mount (refer to page 3 of this manual)There is one power switch for the Mantis boom mount system. It is located on the front panel of the vertical support column. Flip the switch to energize the Mantis illuminatorFX Bench Stand (refer to page 4 of this manual)There are three power switches for the Mantis FX bench stand system. The first is the main power switch. It is located on the back of the bench stand vertical support. When energized the switch is illuminated. The remaining power switches are on the front of the bench stand vertical support. The upper switch powers the main illuminator incorporated in the Mantis viewing head. The lower switch powers the substage illuminator built into the focusing platform.FocusingAll of the Mantis objective lenses (except 2X) are parfocal. This means that the image stays in focus when switching between objectives without re-focusing. For best results always focus with the highest magnification lens, then switch to the lower magnification.Boom Mount (refer to page 3 of this manual)To focus the boom mount Mantis system move the Mantis viewing head “UP” or “DOWN”. (Before moving the Mantis head always loosen the boom friction clamp lever located on the right side of the boom mount pivot). To facilitate focusing there are 4 plastic lugs located on the underside of the Mantis head. Hold one of the lugs between your thumb and index finger and gently move the head until proper focus is obtained. Tighten the boom friction clamp.FX Bench Stand (refer to page 4 of this manual)To focus the FX bench stand locate the focus adjustment wheel on the front, right hand corner of the bench stand base plate. Turning this wheel will move the focusing platform “UP” or “DOWN”. With a subject on the focusing platform look into the viewing screen and turn the focus adjustment wheel until a clear image is obtained.Adjusting the LightingThe main illuminator built into the Mantis viewing head features an adjustment to optimize lighting for different applications. The illumination adjustment is a horizontal disc on the right side of the Mantis viewing head. Rotate the disc while looking into the viewing screen until optimal lighting is achieved.4) Using the Mantis (con’t)Changing the Magnification (refer to pages 3 or 4 of this manual)Both Mantis systems use a turret assembly to allow the user to select between two different magnification levels. Objective lenses are screwed onto the threaded turret underneath the Mantis viewing head.After two objectives have been selected and screwed into place on the Mantis turret, they can be switched using the objective selection lever. The lever is located on the left side of the Mantis viewing head. The objective selection lever can be moved into two positions. Each position corresponds to a different objective lens being activated. Select the position that provides the magnification required for your application.Adjusting the Eye Spacing (IPD)The Mantis has an adjustment for different eye spacing. The Inter-pupilary Distance (IPD) must be adjusted to obtain a comfortable view. The IPD adjustment is located on the right side of the Mantis viewing head. While looking in the viewing screen rotate the adjustment knob (the left side optical path will move “LEFT” or “RIGHT”) until a comfortable view is achieved.Note: This adjustment is very important to comfortable and effective inspection. It must be re-adjusted for every individual using the Mantis.Options5) OptionsLens Protective coversAll mantis objectives can be fitted with a replaceable, clear plastic protective cap. These inexpensive caps protect the objective lens from damage and are especially useful when using the Mantis for rework operations. Choose from the chart below.Lens Vision Engineering Part No.2X, 4X, 6X, 8X M0106X SLWD M01610X M011Maintenance6)MaintenanceLamp Replacement (refer to pages 3 or 4 of this manual)Replace the lamps using the following procedure.1) Remove the Mantis viewing head by removing the Yaw Spigot nut.2) Turn the Mantis viewing head upside down.3) Remove the lamp cover (filter tray) by sliding it away from the Mantis head. Do not allow thediffuser lens to drop when removing the lamp covers.4) Pull the lamp out by holding it between your thumb and index finger.5) Replace lamp.6) Reassemble by reversing previous steps.Lens CleaningClean the objective lens using a lint free cloth. An anti-static cleaner may be used to reduce static charging.If frequent contamination is experienced it is recommended to use the optional Protective Lens Covers.Moisture Control (refer to pages 3 or 4 of this manual)The Mantis head is equipped with a blue desiccant cartridge for moisture control. This should be checked regularly. When the desiccant turns pink it is ready for replacement.To replace the cartridge remove the rubber plug under the Mantis viewing head, pull out the desiccant cartridge, replace and re-install the rubber plug.Replace with Desiccant 10 pack, Part No. M006.Optical Path AlignmentIt is a good idea to periodically check the Optical Path Alignment of the Mantis stereo view. Look into the viewing screen from a distance of 12”. The view will appear as two illuminated circles. These two circles must be horizontally aligned within 2/3 of their diameter of each other. Improper alignment will cause imaging problems.If the illuminated circles are out of alignment then they can be adjusted. Locate the large Phillips screw head on the back of the Mantis viewing head (this screw head is locked in place with black silicon). While still looking at the viewing screen from a 12” distance, adjust the screw until the two paths are in acceptable alignment.Fan (refer to pages 3 or 4 of this manual)Blow out the fan assembly with CLEAN, DRY AIR (up to 100 PSI) at least once a month to prevent excessive particulate build-up. This will maximize fan life.Troubleshooting7) TroubleshootingMantis has no powerIf the Mantis head has no power and the illuminator will not come “ON” then check the following items:•Is the Mantis power cord plugged in?•Is the wall outlet functioning properly and supplying sufficient voltage?•Is the fuse in the Mantis support column in good working condition?Optical ViewIf over time the optical view of the Mantis has degraded, check for the following:Are the objectives dirty or damaged?•Dirty or damaged lenses will cause an inferior image.Are both lighting lamps functioning properly?•Both lights must be working to supply sufficient light.Is the Eye Spacing control properly adjusted?•The eye spacing adjustment must be set correctly to obtain a comfortable view.Has the lighting adjustment been used to optimize the lighting?•Optimized lighting is important to maintaining a clear image.Have the Mirrors within the Mantis head become dirty?•Mirrors contaminated with particulate will impede image performance.Is the viewing screen dirty?•Clean the viewing screen regularly to prevent dirt build-up from degrading the image.Has the Optical Path alignment been checked?•Proper Optical path alignment will greatly improve viewing ease.Service 8) ServiceShould the Mantis stereo viewing system require service the unit may be returned to Vision Engineering Inc. Some of the simpler repair procedures are discussed here to prevent excessive downtime.Cleaning the mirrorsThe mirrors within the Mantis viewing head can be cleaned. These mirrors are very delicate and can only be blown off with clean, dry air. Never wipe the mirrors with any type of cloth. Required Tools:Small Phillips screwdriverMedium Phillips screwdriver (magnetic preferred)Work in a dust free environment1. Remove the Mantis viewing head from its support by removing the Yaw bolt.2. Rest the viewing head upside down (objective turret facing “UP”)3. Remove the two screws on the rear of the viewing head.4. Remove both filter trays to gain access to the lamps. Do not allow the diffuser lens to dropwhen removing the lamp covers.5. Remove the screw located in each lamp socket.6. The lower viewing head assembly (black lower section) should now be removable7. Turn the lower viewing head assembly over to prevent dust accumulation on the mirror.8. Without Touching the Mirrors, blow off mirrors with CLEAN, DRY AIR while holding unitupright. Ensure that any dust falls out of the viewing head.9. If any contaminant is on the beam splitter, it can be gently wiped with a soft cloth.10. Reassemble by reversing the disassembly instructions.8)Service (con’t)Fan ReplacementRequired Tools:Small Phillips screwdriverMedium Phillips screwdriverWork in a dust free environment1. Remove the objective lenses.2. Remove the Mantis viewing head from its support by removing the Yaw bolt.3. Rest the Mantis viewing head upside down (turret facing “UP”)4. Remove the three screws from the turret.5. Remove the two screws on the infinity lens.6. Remove the two screws holding the fan assembly in place.7. Remove the two screws on the rear of the Mantis viewing head.8. Remove both filter trays providing access to the lamps. Be careful not to allow the diffuserlens to drop when removing the filter tray.9. Remove the single screw in each lamp socket.10. The lower viewing head assembly (black lower section) now lifts off.11. Gently turn over the viewing head assembly to reduce the risk of the mirror collecting dust.12. Disconnect fan wires from P.C. board and remove old fan. Pay close attention to the wireconnection orientation on the P.C. board.13. Install new fan. Feed new fan wires through grommet one at a time. Connect the wires tothe P.C. board being careful to follow the same orientation as the prior fan.14. Reassemble by reversing disassembly steps.8)Service (con’t)Repairing Eye Spacing Control (IPD)Required Tools:Small Phillips screwdriverMedium Phillips screwdriver (magnetic preferred)Work in a dust free environment1. Remove the magnification objectives2. Remove the Mantis viewing head from its support by removing the Yaw bolt.3. Remove the eye spacing adjustment knob.4. Rest the Mantis head upside down (turret facing “UP”).5. Remove the two screws on the rear of the viewing head.6. Remove both filter trays providing access to the lamps. Be careful not to allow the diffuserlens to drop when removing filter tray.7. Remove the single screw from each lamp socket.8. The lower viewing head assembly (lower black section) can now be removed.9. Gently turn over the viewing head assembly to reduce the chance of dust collecting on themirror.10. Without Touching the Mirrors, replace the detached pin through the viewing head and intothe narrow groove on the eye spacing control knob.11. If necessary, blow off the mirrors with CLEAN, DRY AIR while holding the unit upright.Ensure that any dust falls out of the viewing head.12. Reassemble by reversing the disassembly steps.8)Service (con’t)Remove Mirror from Mantis HeadIn the event that a mirror become dislodged within the Mantis viewing head it may be possible to reattach it by following these steps. If a repair cannot be made then follow these steps toremove the loose mirror. Removing the loose mirror will prevent any internal damage during shipping when returning the unit for service. The mirror can now be packed separately and both units sent back to the factory for service.Required Tools:Small Phillips head screwdriverMedium Phillips head screwdriver (magnetic preferred)Work in a dust free environment1. Remove the Mantis viewing head from its support by removing the Yaw bolt.2. Rest the viewing head upside down (turret facing “UP”).3. Remove the two screws on the rear of the viewing head.4. Remove both filter trays providing access to the lamps. Be careful not to let the diffuser lensdrop when removing the filter trays.5. Remove the single screw in each lamp socket.6. The lower viewing head assembly (lower black section) can now be removed.7. Without Touching the Mirror, remove the mirror or reattach if required.8. Reassemble by reversing the disassembly steps.Warranty9) WarrantyThis product is warranted to be free from defects in material and workmanship for a period of one year from the date of invoice to the original purchaser.If, during the warranty period the product is found to be defective, it will be repaired or replaced at facilities of Vision Engineering Inc. or elsewhere, all at the option of Vision Engineering Inc. However, Vision Engineering Inc. reserves the right to refund the purchase price if it is unable to provide replacement, and repair is not commercially practicable or cannot be timely made. Parts not of Vision Engineering Inc. manufacture carry only the warranty of their manufacturer. Expendable components such as lamps and fuses carry no warranty.This warranty does not cover damage caused in transit, damage caused by misuse, neglect, or carelessness, or damage resulting from either improper servicing or modification by other than Vision Engineering Inc. approved service personnel. Further this warranty does not cover any routine maintenance work which is reasonably expected to be performed by the purchaser.No responsibility is assumed for unsatisfactory operating performance due to environmental conditions such as humidity, dust, corrosive chemicals, deposition of oil or other foreign matter, spillage, or other conditions beyond the control of Vision Engineering Inc..Except as stated herein, Vision Engineering Inc. MAKES NO OTHER WARRANTIES, EXPRESS OR IMPLIED BY LAW, WHETHER OR MERCHANTABILITY, FITNESS FOR A PARTICULAR PURPOSE OR OTHERWISE. Further, Vision Engineering Inc. shall not under any circumstances be liable for incidental, consequential or other damages.Information10) InformationVision Engineering Inc. is committed to providing top quality optical inspection systems. We employ a staff of trained Sales and Service engineers and have a network of Authorized distributors to assist you. Please call whenever you have questions.For additional information contact your local Vision Engineering Distributor or call:Corporate Headquarters Western Region Sales Office Vision Engineering Inc.Vision Engineering Inc.570 Danbury Road745 W. Taft AvenueNew Milford, CT 06776Orange, CA 92865Phone: (860) 355-3776Phone: (714) 974-6966。
Mantis使用手册

Mantis使用手册目录修订记录 .......................................................................................................... 错误!未定义书签。
1.系统简述 (3)2.登陆方式 (3)3.系统中的角色 (4)3.1.管理员 (4)3.1.1.首页 (4)3.1.2.我的视图 (5)3.1.3.查看问题 (6)3.1.4.提交问题 (11)3.1.5.变更日志 (12)3.1.6.路线图 (12)3.1.7.统计报表 (12)3.1.8.管理 (13)3.1.9.个人资料 (17)3.1.10.注销 (18)3.2.经理 (19)3.2.1.操作区别 (19)3.3.开发人员 (19)3.3.1.操作区别 (19)3.4.修改人员 (20)3.4.1.操作区别 (20)3.5.报告人员 (20)3.5.1.操作区别 (20)3.6.查看人员 (21)3.6.1.操作区别 (21)4.分派给我的工作 (21)4.1.查看问题详细资料 (21)4.2.关联 (23)4.3.上传文件 (23)4.4.正在监视该问题的用户 (23)4.5.问题注释 (24)4.6.添加问题注释 (24)4.7.问题历史 (24)1.系统简述缺陷管理平台Mantis ['mæntɪs](螳螂),也叫做MantisBT,全称Mantis Bug Tracker,Mantis是一个缺陷跟踪系统,以Web操作的形式提供项目管理及缺陷跟踪服务。
Mantis可以帮助所有开发人员完成系统需求缺陷的有效管理,对于bug问题的状态变化将通过mail的形式由系统自动通知相关人员。
且可以自动生成统计报表和自动导出成doc或excel格式的文件。
Mantis是基于mysql+php的服务,可以通过备份mysql数据库实现资源的备份与还原。
Mantis详细操作手册
Mantis详细操作手册Mantis问题单提交流程一、系统测试-正常提交,没有返回1、测试工程师执行测试用例,发现问题,编写问题单。
◆ 选择“高级报告”;填写“出现频率”,“严重性”,“优先权”,“硬件平台”,“操作系统”,“版本”,“产品版本”;◆ “分派给”选择测试经理。
◆ 填写“摘要”,“说明”,“问题重现步骤说明”,“附加信息”,有附件得要上传附件,例如日志,图片等。
状态设置为“公共”。
点击“提交报告”。
◆ 系统自动将问题单状态设置为“新建”。
分类为“项目名称”,完成度设置为“未处理”。
自动发送邮件通知测试经理。
◆ 提交后,如果测试经理没有返回,不得修改问题单。
2、测试经理审核问题单,确认为合格问题单。
◆ 测试经理登录,打开“我的视图”,点击“指定给我”的问题单。
打开问题,点击“修改问题”。
◆ 审核问题单没有问题后,将问题单“分派给”项目经理,状态设置为“已确认”,点击“更新信息”。
◆ 系统自动发送邮件通知给项目经理。
◆ 提交后,如果项目经理没有返回,不得修改问题单。
3、项目经理审核问题单,确认为有效问题单,提交开发工程师,对问题进行定位修改。
◆ 项目经理登录,打开“我的视图”,点击“指定给我”的问题单。
打开问题,点击“修改问题”。
◆ 审核问题单没有问题后,将问题单“分派给”开发工程师,点击“更新信息”。
◆ 系统自动发送邮件通知开发工程师。
◆ 提交后,如果开发人员没有返回,不得修改问题单。
4、开发工程师对问题进行定位修改以及测试。
◆ 开发工程师登录,打开“我的视图”,点击“指定给我”的问题单。
打开问题,点击“修改问题”。
◆ 在“添加问题注释”中填写对问题的定位,修改以及测试信息,将问题单“分派给”项目经理,状态设置为“已修改”,完成度设置为“已修正”,点击“更新信息”。
◆ 系统自动发送邮件通知项目经理。
◆ 提交后,如果项目经理没有返回,不得修改问题单。
5、项目经理审核问题单,确认问题已经修正,转测试。
Mantis缺陷管理系统使用手册

Mantis缺陷管理平台一、介绍1.Mantis是一个基于PHP技术的轻量级的开源缺陷跟踪系统,以Web操作的形式提供项目管理及缺陷跟踪服务。
2.个人可定制的Email通知功能,每个用户可根据自身的工作特点只订阅相关缺陷状态邮件。
3.支持多项目、多语言。
4.权限设置灵活,不同角色有不同权限,每个项目可设为公开或私有状态,每个缺陷可设为公开或私有状态,每个缺陷可以在不同项目间移动。
5.缺陷报告可以输出到Excel中。
二、登录1.下载Wamp Server,搭建Mysql+PHP+Apache的环境,部署Mantis项目包。
2.项目搭建在本地,访问http://localhost/mantis/my_view_page.php,即进入Mantis缺陷管理平台。
三、权限1.权限说明a)在Mantis 系统中,分别有几种角色:管理员、经理、开发人员、修改人员、报告人员、查看人员。
每个角色所具备的权限不一样,权限的从大到小依次排列是:管理员→经理→开发人员→修改人员→报告人员→复查人员。
2.管理员1)我的视图a)登录之后即跳转到我的视图。
根据未分派的问题、我报告的问题、已解决的问题、最近修改的问题和我监视的问题等5个方面查看处于各个处理阶段的问题。
2)查看问题a)查看问题分两个部分,第一部分是筛选条件,第二部分是问题列表,不同颜色代表问题处于不同的阶段。
b)查看到的问题,可以导出为CSV和EXCEL文件。
3)提交问题a)填写分类、摘要和描述等必填项,选填其他项完成提交报告的动作。
b)可以上传附件,在问题详情页面可下载查看。
4)变更日志a)显示已经修改好了的问题的日志,需要给项目添加版本号,并且在添加或者解决问题时都指定了相应的版本号,才会显示。
5)路线图a)展示出来的就是针对某个里程碑事件,已经有几个问题已经被修复,有多少个问题尚且没有被处理,以一个柱状百分比图例清晰地表明了项目进度。
b)在项目管理界面,设定一个版本。
Mantis-流程操作手册2.0

Mantis使用手册目录1.系统简述 (2)2.登陆方式 (2)3.系统中的角色 (3)3.1.管理员 (4)3.1.1.首页 (4)3.1.2.我的视图 (4)3.1.3.查看问题 (5)3.1.4.报告问题 (9)3.1.5.变更日志 (10)3.1.6.统计报表 (10)3.1.7.管理 (12)3.1.8.个人资料 (20)3.1.9.注销 (23)3.2.经理 (23)3.2.1.操作区别 (23)3.3.开发人员 (23)3.3.1.操作区别 (23)3.4.修改人员 (24)3.4.1.操作区别 (24)3.5.报告人员 (24)3.5.1.操作区别 (24)3.6.查看人员 (25)3.6.1.操作区别 (25)4.分派给我的工作 (25)4.1.查看问题详细资料 (25)4.2.关系 (26)4.3.上传文件 (27)4.4.正在监视该问题的用户 (27)4.5.问题注释 (27)4.6.添加问题注释 (28)4.7.问题历史 (28)1.系统简述Mantis管理平台是一个开源的缺陷跟踪系统,以Web操作的形式提供项目管理及缺陷跟踪服务。
Mantis可以帮助所有开发人员完成系统需求缺陷的有效管理,对于bug问题的状态变化将通过mail的形式由系统自动通知相关人员。
且可以自动生成统计报表和自动导出成doc或excel格式的文件。
2.登陆方式打开浏览器,在地址栏里键入:http://103.24.116.69,便可显示系统的登录页面(图表1),注册,有两种方式注册新用户:1)由管理员添加新用户(参见管理员操作说明);2)使用Email注册。
进入登录页面后,点击【注册一个新帐号】,输入帐号和E mail地址,提交注册,系统会将初始密码发送到Email中;用户正确的输入自己的帐号(即用户名)及密码后,即可成功登录。
图表 2.13.系统中的角色在Mantis 系统中,分别有几种角色:管理员、经理、开发人员、修改人员、报告人员、复查员。
Mantis简要使用说明

Mantis提交问题
在发现一个Bug后,点击“提交问题”进入报告问题 的页面;
•首先 界面右上角选择项目;
Mantis提交问题
填写报告内容
输入详细问题报告后,点击“提交报告”按钮即可。 其中* 字段为必输内容
Mantis提交问题
定制报告内容
根据不同项目,系统对其进行了内容定制。
Mantis提交问题
• 打开系统显示的主界面,也是“我的视图” 菜单显示的界面,界面中工具栏,这就是我 们能够使用的所有功能,主要功能有“我的 视图”、“查看问题”、“报告问题”。 • 界面右上角的“项目”:可以选择所有项目 或者任意项目来界面显示。 • 在工具栏的下方显示登录用户相关的 Bug , 新建的、已解决的、未指定的等;
修改问题状态
问题修改为“发布”状态时,须在“状态改为”界面中输入 ‘处理状况’等信息。
Mantis简要使用说明
Mantis登录
Mantis的登录地址
打开浏览器,在地址栏输入http://10.1.145.240/mantisbt即可 进入Mantis的登录界面。 账户:ItCode,初始密码:123456
Mantis登录
修改密码
Mantis我的视图
Mantis我的视图
Mantis查看问题
Mantis查看问题
• 不论是在“我的视图”,还是在“查看问题” 和“提交问题”界20种筛选条件,可根据各种 条件缩小你要查看问题的范围; • 可以在“搜索”处输入关键字进行查询; 也可以在“问题#”处直接输入bug号直接跳 转到该问题。
问题编辑
提交报告的问题,可以点击界面中部“编辑”功能键,对报 告进行内容修改。
Mantis提交问题
- 1、下载文档前请自行甄别文档内容的完整性,平台不提供额外的编辑、内容补充、找答案等附加服务。
- 2、"仅部分预览"的文档,不可在线预览部分如存在完整性等问题,可反馈申请退款(可完整预览的文档不适用该条件!)。
- 3、如文档侵犯您的权益,请联系客服反馈,我们会尽快为您处理(人工客服工作时间:9:00-18:30)。
Mantis使用教程
1.获取用户名
在网页浏览器地址栏里输入/login_page.php进入Mantis的登录界面,如下图:
Mantis的默认管理员的用户名为administrator 密码为root。
但在这里我们不使用默认用户名,并且一般用户不具备管理员权限的。
1.1 注册用户名
点击Mantis的登录页面“注册一个新帐号”,转到以下界面:
mantis中文社区
在此页面输入自定义的帐号和有效的E-MAIL,点击注册。
如果成功注册将会出现以下页面:
Mantis将会随机生成一个用户密码以E-MAIL的形式发到你刚才填写的E-MAIL 地址,所以填写的E-MAIL地址一定要真实有效,否则你将不能收到你的登录密码。
1.2 修改注册的密码
注册成功后,查看你所填写的E-MAIL邮箱是否已经收到由Mantis发出的用户注册确认信,如下图:
mantis中文社区
点击信入面的超级链接进入Mantis新注册用户的密码修改页面,如下图:
在此页面输你所希望的密码,然后点击页面下方的“更新帐号信息”按钮,完成密码修改。
如果想修改其它个人信息,只需点击[更改个人设置]就可以了。
注意:默认的新注册用户只有[报告人员]的存取权限,其它一些权限的设定需要管理员另行配置。
2.使用Mantis
2.1 登录Mantis
在登录的页面,输入刚刚注册的用户名::james密码:123,进入Mantis的主界面。
在主界面我们可以看到一条工具栏,这就是我们能够使用的所有功能了。
在工具栏的下方我们看到有5大栏,分别是:
1.未指定的:是指问题已经报告,但还没有指定由那个项目组成员进行跟进的问题列
表。
2.已解决的:指问题已经得到解决,问题的状态为[已经解决]。
3.我正在监视的:指你正在监视那些问题,在问题报告中,你被选为监视人。
4.由我报告的:在这里将会显示由你报告的问题列表。
5.最近修改:这一栏显示那些问题报告最近被项目组成员修改了。
2.2问题报告
点击[问题报告]进入以下页面,选择你报告的问题所属的项目,如下图:
mantis中文社区
在上图中有些栏位是打了红星的,表示这些是必填内容。
填好问题报告后,点击[提交报告],就会将此问题提交到系统,系统将会通过E-MAIL通知项目组的相关人员。
在问题报告的右上角有一个[高级报告]的选项,点击后,将会出现以下页面。
点击[高级报告]后,会发现比原来多出来的好几个选项,这些都是有利于模拟问题重现的。
2.3 问题查询
查找问题,只需点击工具栏上[查看问题],出现以下的界面:
mantis中文社区
在工具栏的下方,有一个蓝灰相隔的表格,这些表格的内容正是查找的条件选项,点击其中一选项,就会出现一个下拉框代替任意两个字,让你输入你查找的内容。
输入完
成后,点击筛选按钮就会结果返回到下方的表格,即是:
上图就是是返回的查找结果,点击相应的记录就可以进行修改。
2.4 问题修改
在查找结果的列表上点击编号内容,则会进入问题修改的页面,如下图:
图2.4.1
图2.4.2
图2.4.3
在图2.4.1里一共有6个按钮,具体功能如下:
●修改问题:进入问题明细页面进行修改。
●分派给:是指将这个问题分派给那个人员处理,一般只能选择开发员权限的人
员。
●将状态改为:更改问题的状态,将需要输入更改状态的理由。
●监视问题:点击后,所有和这个问题相关的改动都会通过E-MAIL发到监视用户
的邮箱。
●创建子项问题:建立一个问题的子项,而这个子项报告的问题是依懒于这个问
题而存在的。
●移动问题:将这个问题转移到其它项目中。
图2.4.2与图2.4.3功能界面比较直观,不在这描述了。
3.报表统计
点击工具栏上的[报表统计],以表格的形式对问题进行统计,有“按问题状态”、“按严重性”、“按项目”等,如下图
图3.1
4.Mantis的管理
最重要的一章,在这一章将会介绍Mantis如何管理用户、如何管理项目、如何添加自定义字段等一系列功能。
4.1 用户管理
点击工具栏的管理,进入默认的界面就是[用户管理]。
在这个界面下,我们能看到一些帐户的信息,如:一周内注册的用户、从未登录的用户等等。
界面如下:
图4.1.1
我们在这个界面下可以做的事分别是:
1.删除帐号:对于一些从未使用的帐号进行删除,可以点击图4.1.1[清理帐号]按钮进行
删除,可以在点击帐号列表的帐号,进入帐号明细进行删除。
如下图:
图4.1.1 a
2.权限设置:为帐号选择一个合适的存取权限的角色。
如:报告人员、开发人员、管理
员等。
3.重设密码:点击重设密码,密码将会以E-MAIL的形式发到用户的登记的电子邮箱。
4.添加用户到项目:只有进行这一操作用户才有权限对特定项目进行操作的。
界面如下
图
图4.1.1b
5.缺省帐号设置:在这里设定E-MAIL缺省的提醒情况还有报告时缺省类型(高级报告还是
简单报告),最重要的一点是,“界面语言”一定要设为:“Chinese_simplified”否则用户登录时将会显示一个英文界面。
4.2 项目管理
在这一栏,我们可以添加一个新项目到Mantis,方便我们用Mantis管理多个项目的问题。
1.创建项目,点击[创建新项目],如下图:
图4.2 .1 a
2.按要求输入项目内容,完成后点击[添加项目]。
如下图:
图4.2.2 a
3.项目配置是在创建项目完成后进行的。
在项目管理列表,点击项目名称,进入项目
配置界面,如下图:
图4.2.3 a
图 4.2.3 b
图4.2.3 c
在上图中共分了五大块功能:
A.子项目:在这里新建一个子项目并设定关联。
B.分类:设定该项目的模块分类。
C.版本:设定该项目的版本号。
D.自定义字段:管理另一栏[自定义字段管理]添加了自定义字段,必须在这里设定为该
项目的,否则页面将不会显示。
E.添加用户至项目:设定那些用户有权访问该项目的内容。
4.3 自定义字段管理
通过该功能,我们不单止能使用Mantis预定好的字段,还可以添加自定义的字段,使项目、问题报告更详尽、更适宜。
1.新建:输入自定义字段的名称,然后点击[新建自定义字段]。
如下图:
2.名称添加完成后,系统会提示“操作成功”,点击继续,进入如下界面进行修改。
图4.3.2 a
3.在图
4.3.2a可以设定字段的类型、默认值、预设值、长度、修改权限等。
不过需要
注意一点,如果你要添加的下拉框(即枚举类型)选项内容要以“|”隔开,否则所有选项都会连在一起,并且只有一项选择。
4.4 管理全局配置
[管理全局配置]就是让我们能够在这里设定测试环境,方便我们在问题报告时,以选择择的方式调出,输入的内容很简单,根据提示输入就可以了。
如下图:
4.5 管理配置
[管理配置]分成四大块:权限报表、工作流开始、工作流、邮件提醒。
现在逐一说明。
权限报表
[权限报表]列出Mantis 六大角色所具有的权限,只是一个查询功能。
如下图:
这一功能实现上就是权限的设定。
如下图:
工作流
[工作流]就是指定问题的状态存取权限以及状态的下一状态。
见下图:
E-MAIL提醒
该功能就是指当问题发生何种变化,以E-MAIL通知那些人。
见下图:
5.Mantis的常见问题请登录 mantis中文社区。