流控大师A380单线部署教程
Edge Gateway 3003 安装和操作手册说明书

Edge Gateway 3003安装和操作手册计算机型号: Edge Gateway 3003管制型号: N03G管制类型: N03G001注、小心和警告注: “注”表示帮助您更好地使用该产品的重要信息。
小心: “小心”表示可能会损坏硬件或导致数据丢失,并说明如何避免此类问题。
警告: “警告”表示可能会造成财产损失、人身伤害甚至死亡。
目录1 概览 (5)2 系统视图 (6)顶部视图 (6)底部视图 (6)左侧视图 (7)右侧视图 (9)3 安装 Edge Gateway (10)安全与管制信息 (10)专业安装说明 (10)Instructions d'installation professionnelles (11)联邦通信委员会干扰声明 (11)加拿大工业部声明 (11)设置 Edge Gateway (12)激活移动宽带服务 (17)安装边缘网关 (19)使用标准安装架安装 Edge Gateway (19)使用快速安装架安装 Edge Gateway (26)将电缆控制条连接至标准安装架 (34)使用 DIN 导轨架将 Edge Gateway 安装在 DIN 导轨上。
(36)使用垂直安装架安装 Edge Gateway (39)使用 VESA 安装架安装 Edge Gateway (42)4 设置 ZigBee 加密解密器 (44)5 设置操作系统 (45)Windows 10 IoT Enterprise LTSB 2016 (45)启动并登录—直接系统配置 (45)启动和登录—静态 IP 系统配置 (45)恢复 Windows 10 IoT Enterprise LTSB 2016 (45)Windows 10 IOT Enterprise LTSB 2016 基本功能 (46)Ubuntu Core 16 (47)概览 (47)启动并登录—直接系统配置 (47)启动并登录—静态 IP 系统配置 (47)更新操作系统和应用程序 (48)其他 Ubuntu 命令 (48)网络通信接口 (49)安全性 (51)Watchdog Timer (WDT) (52)恢复 Ubuntu Core 16 (52)3刷新新的 OS 映像 (53)创建恢复 USB 闪存盘 (54)6 访问和更新 BIOS (55)访问 BIOS 设置 (55)在 POST 过程中输入 BIOS 设置 (55)更新 BIOS (55)使用 USB 调用脚本 (55)从 USB 闪存驱动器刷新 BIOS (56)在 Windows 系统上更新 BIOS (56)在 Ubuntu 系统上使用 UEFI 压缩包更新 (56)Dell Command | Configure (DCC) (57)Edge Device Manager (EDM) (57)默认 BIOS 设置 (57)常规(BIOS 级别 1) (57)系统配置(BIOS 级别 1) (59)安全性(BIOS 级别 1) (60)安全引导(BIOS 级别 1) (61)性能(BIOS 级别 1) (61)电源管理(BIOS 级别 1) (61)POST 行为(BIOS 级别 1) (62)虚拟化支持( BIOS 级别1) (62)维护(BIOS 级别 1) (63)系统日志(BIOS 级别 1) (63)7 参考资料 (64)8 附录 (65)天线规格 (65)从 DIN 导轨架卸下 (66)连接到 Edge Gateway (66)Windows 10 IoT Enterprise LTSB 2016 (66)Ubuntu Core 16 (67)4概览Edge Gateway 3000 系列是物联网 (IoT) 设备。
存储巴士A380中文说明书 DATA BUS CHN

2.1 硬盘组装...................................................................................................................................6 2.2 更换硬盘...................................................................................................................................7 2.3 连接至电脑 ...............................................................................................................................7 2.4 关于资料备份 ...........................................................................................................................7
存储巴士
使用手册
Page 2
CN
目录
1 介绍 ..................................................................................................................................................1
深信服上网行为管理-单点登录指南

培训内容
单点登录介绍
单点登录实现方式
单点登录配置举例
培训目标
1. 了解单点登录功能的应用场景和概念 2. 掌握AC/SG设备支持的单点登录方式 1. 了解单点登录功能的几种实现方式
1. 掌握常见网络环境中web单点登录方式的部署和 配置
2. 掌握常见网络环境中数据库单点登录的部署和 配置
数据库单点登录配置举例--同步组织结构
如要同步组织结构,则在“用户自动同步”---新增一个“数据库同步”,填写可 以获取用户的sql语句和组路径分隔符,组路径分隔符是指客户的数据表中如果有 多个组,是以什么符号来分隔组和子组,如上述示例是以短横线分隔的:
点同击步"过测来试之有后效,性看"到,的可组以织列结出构可信以息获如取下的:信息:
的流量是PPPOE封堵,需要开启协议剥离才能识别 3、配置PPPOE单点登录
PPPOE单点登录配置示例
第一步:新建认证策略,认证方式为“不需要认证/单点登录”
PPPOE单点登录配置示例
2. 开启PPPOE协议剥离。
如果网络环境中由其 他协议的数据包封装 PPPOE的数据,则也 要开启其他协议的协 议剥离,如pppoe外层 再由vlan封装,则需
WEB单点登录: 适用场景:适用于内网有一套WEB认证系 统(如办公OA),PC上网前会先通过内网 WEB认证系统认证,客户希望部署AC后, 用户上网通过现有的web系统认证后自动通 过AC认证。
PC
OA
①
实现过程:AC监听PC和WEB认证系统之间 的认证交互过程 ,当PC通过WEB认证系统 认证时,自动通过AC认证上线
PPPOE单点登录配置示例
PPPOE单点登录多用于高校场景, 高校学生上网,多数采用拨号上 网,客户希望学生PPPOE拨号成 功后,即能自动通过AC认证可以 直接上网。需要注意,拨号服务 器需要部署在设备wan口方向, 如图
流控大师使用说明书

1000BASE-T (RJ-45)*4 RS232*1
1000BASE-T (RJ-45)*6 RS232*1
电源
单
单
单
单
尺寸 cm
43.8*22.9*4.3 43.8*22.9*4.3 43.8*22.9*4.3 43.8*22.9*4.3
重量 kg
6
5.5
5.5
5.5
外形
1U 19”机架式 1U 19”机架式 1U 19”机架式 1U 19”机架式
型号
A860
A860-E 860-Q A860-Q2
应用环境 2000 IP
接 标准
口
类
型 扩展
1000BASE-T (000BASE-T (RJ-45)*6 无 单
10000 IP 1000BASE-T (RJ-45)*6 无 单
20000 IP 1000BASE-T (RJ-45)*6 双光口 单
6
录
图27 HTTP 管控规则
图33 域名群组
52
尺寸 cm
42.5*36.9*4.1 42.5*36.9*4.1 42.5*36.9*4.1 42.5*36.9*4.1
重量 kg 外形
8
8
8
8
1U 19”机架式 1U 19”机架式 1U 19”机架式 1U 19”机架式
5
流控大师主要由应用特征库、应用识别系统 、应用管理 系统、应用路由四大部份组成 ,并通过系统管理、策略管理、 系统维护、监控统计四大人机互动管理功能,对流经的所有 应用 数据进行实时监控与管理。其结构图如下:
型号
应 流控 用 模式 环 路由 境 模式
A525
1000 IP 600 IP
云博士流控新向导使用说明+

应VLAN口的名称.
C) 在【ADSL客户端】中添加多条ADSL,注意网络接口选择上面添加的对
D) 在【路由管理】->【路由规则】中添加一条DSCP9的规则.
E) 在【路由管理】->【负载均衡】中添加多条ADSL的负载,其中【网络 接口】选择C 中添加的【ADSL 客户端】名称。
F) 在【路由管理】->【路由管理】中添加路由策略,分别以【负载均衡 名】为网络接口 添加对应的多条策略。
G) 在向导第5步【应用分流】中,设置不同的应用采用多ADSL来负载分 流。
5) 单光纤+单ADSL 做副线:
A) 在向导的【副线设置】中添加光纤副线1 。
8/30/13
All Rights Reserved.
第 7页,共 12页
云博士流控新向导
B) 在向导的【副线设置】中添加ADSL副线2 。
网络接口:指外网接入的所有网口.
分WAN0、WAN1、WAN2 三个外网接口, 一般主线采用WAN0 接口。
运营商:是指提供网络服务的供应商,目前我们国内主要分为【电信】【联通】,南 方大多使用【电信】,北方【联通】用户较多,另外还有个别地区的【移动】、【长宽】、【广 电】等。
线路类型:目前我国线路主要分为【光纤】、【ADSL拨号】两种类型,个别地区采 用的拨号光纤属于【ADSL拨号】类。
第 2页,共 12页
云博士流控新向导
1 配置向导描述
为加强云博士流控设备的人性化体验,使的大多数网管技术人员能够快速上手,我们特别 制作本配置向导,通过本配置向导,我们将能够快速配置云博士流控设备;本向导主要配置如 下内容:
• 局域网参数配置: 设置局域网 LAN 口 IP 地址 ,更新,电影,收银服务器 IP(可多填)
碧海威TMS流控系统用户手册

2.1. 启动设备.........................................................................................ቤተ መጻሕፍቲ ባይዱ.............................7 2.2. 配置管理接口...............................................................................................................8 2.3. 连接数据接口.............................................................................................................10 2.4. 快速上线指南............................................................................................................. 11
碧海威科技有限公司
第 2 页/共 53 页
目录
1. 概述...............................................................................................................................................5
RAK831 Pilot Gateway 设置手册说明书
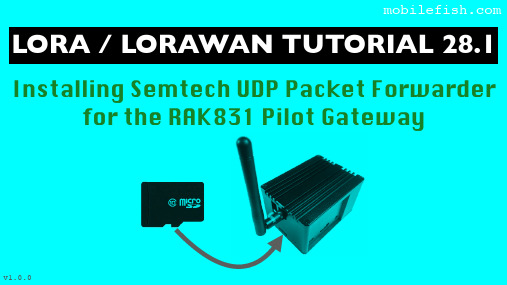
LORA / LORAWAN TUTORIAL 28.1 Installing Semtech UDP Packet Forwarder for the RAK831 Pilot Gatewayv1.0.0INTRO•A micro SD card is shipped with the RAK831 Pilot Gateway with all software pre-installed as mentioned in Tutorial 28.•In this tutorial I will show you how to install all the required software on a micro SD card.•The result is a bootable micro SD card which can be used in the RAK831 Pilot Gateway.Install Raspbian Lite on micro SD cardDOWNLOAD RASPBIAN LITE•Download Raspbian Lite.Lite is a minimal version of the Raspbian image for the Raspberry Pi.The Lite version has only a command line interface (CLI) and no desktop or GUI of any kind.This means fewer modules will load with the kernel thus less of the Raspberry Pi’s resources are used.https:///downloads/raspbian/•After the Raspbian Lite is downloaded,verify the SHA256 checksum.The checksum is a hash number and is used to verify the integrity of the file. macOS:shasum -a 256 <file>Linux:sha256sum <file>Windows 10:certutil -hashfile <file> SHA256WRITE IMAGE TO MICRO SD CARD•Download and install Etcher.Etcher is a tool for Windows,Mac and Linux for flashing images to SD cards and USB drives.https://www.balena.io/etcher/•Flash the Raspbian Lite onto the micro SD card using Etcher.•Note:If the micro SD card is not formatted,Etcher will format it before writing and verifying the image.ADD SSH FILE ON MICRO SD CARD•The micro SD Card has a /boot partition.On macOS,see: /Volumes/boot•Goto the /boot partition and add an empty file with name:ssh When the Raspberry Pi is rebooted it will look for file “ssh”. When found,it will enable SSH.By default SSH is disabled.After the reboot,the ssh file will be deleted.Get the gateway IP address•Insert the micro SD card into the Raspberry Pi.•Connect the LoRa antenna to the gateway.Never power up the gateway without the LoRa antenna, otherwise this can cause damage to your gateway.•It is not required to connect the GPS antenna because GPS is by default disabled as explained in Tutorial 28.•Connect the gateway to a router using an Ethernet cable.•Power up the gateway using the included power adapter.Do not use a power adapter with less than 2A output.•By default the Raspberry Pi has the hostname raspberrypi gateway routerInternetEthernet cable GPS LoRa antennamicro SD Card•There are several methods to get the gateway IP address,I will only demonstrate 3.•Method 1. Router devices list•Open a browser and navigate to your router’s IP address e.g.http://192.168.1.1The IP address is usually printed on a label on your router or check your router’s manual.•T o access your router’s configuration interface you need its username and password.Check your router’s manual.•Locate the gateway (raspberrypi) and write down its IP address.•Method 2. Resolving <hostname>.local with mDNS•On Raspbian,multicast DNS is supported out-of-the-box by the Avahi service.•If your computer supports mDNS,you can reach your gateway (Raspberry Pi) by using its hostname and the .local suffix.Enter command:ping raspberrypi.local•If your computer does not support mDNS,install the Net Analyzer app (iOS and Android) on your mobile.•Select the Ping option and enter:raspberrypi.local•Method 3. Connect monitor and keyboardgatewayrouterInternetEthernet cableGPSLoRa antennamicro SD CardUSB keyboardmonitorHDMI cable•Y ou will see the login prompt.The default username=pi and password=raspberry •Login with above mentioned credentials.•Enter command:hostname -I•The IP address will be shown,for example:192.168.1.71•On Linux and Mac the SSH command can be used to access the Raspberry Pi.•On Windows 10,SSH can be used or instead use Putty,https://.•T o enable SSH functionality on the Windows 10 PowerShell:- Open Settings- View the Apps- Go to the Manage optional features- Click Add a feature- Select OpenSSH Client- Wait, then reboot•Access the Raspberry Pi.ssh pi@<ip_address_gateway>For example:*************.1.71•The default username=pi and password=raspberryCHECK CURRENT RASPBERRY PI CONFIGURATION •Check time zone.date•Check the disk space.The full space of the micro SD card is used.df -h•Check if SPI is enabled.ls /dev/*spi*SPI is not enabled if you see:ls: cannot access '/dev/*spi*': No such file or directory•Check current language settings.localeRAK831 PILOT GATEWAYRaspberry Pi 3RAK831 concentratorConverter BoardSPISPIGPS AntennaPower supplyLoRa Antenna Led’sGPSPower supplyEthernet MCU4x USBPower ConnectorSX1301SX1257SX1257Configure Raspberry Pi•The Raspberry Pi needs to be configured.I will change:•user pi default password•the language•the time zone•and enable SPI•Open the Raspberry Pi Software Configuration T ool: sudo raspi-config•Change user pi password.Select menu: 1 Change User PasswordNote:For security reasons you must change the user pi default password.•Optionally change the language (default is English:en_GB.UTF-8). Select menu:4 Localisation OptionsSelect menu:I1 Change LocaleScroll the list and use the scrollbar to select.Recommended:xx_XX.UTF-8 UTF-8Press Enter key when done with the selection.In the next screen select the default locale for the system environment. Select for example nl_NL.UTF-8 and press the Enter key.•Change the timezone.Select menu:4 Localisation Options Select menu:I2 Change TimezoneFor example:Geographic area:EuropeTime zone: Amsterdam•Enable SPI.Select menu:5 Interfacing OptionsSelect menu:P4 SPI•This will enable SPI (Serial Peripheral Interface) on the Raspberry Pi.An SPI bus is used to send data between microcontroller(s) and peripherals.In this case sending data to and from the Raspberry Pi and RAK831 concentrator via the Converter Board.•Exit the Raspberry Pi configuration tool.MODIFY .BASHRC FILE•If you changed the language using the raspi-config tool,one extra change is needed. Goto pi’s home directory and edit the .bashrc filecd ~nano .bashrcAt the end of the .bashrc file add the following line with YOUR language choice: export LC_ALL=nl_NL.UTF-8Save the fileREBOOT AND LOGIN RASPBERRY PI •Reboot the Raspberry Pi:sudo reboot•Again access the Raspberry Pi:ssh pi@<ip_address_gateway> password=<your_new_password>VERIFY CHANGES•Check time zone:date•Check the disk space:df -h•Check if SPI is enabled:ls /dev/*spi*Y ou will see:/dev/spidev0.0 /dev/spi/dev0.1•Check current language settings.localeInstall softwareINSTALL SOFTWARE•Upgrade the Raspberry Pi packages:sudo apt-get update && sudo apt-get upgrade -y•Install Git.Git is a distributed version control system.sudo apt-get install git•I have forked https:///RAKWireless/RAK831-LoRaGateway-RPi andsimplified the installation procedure.•The repository https:///robertlie/RAK831-LoRaGateway-RPi contains just a few files.The install.sh script:- Creates the gateway EUI.- Allows the user to set the gateway hostname.- Allows the user to select the region the gateway will operate in.Dependant on the selected region the correct global_conf.json is copied from theconfiguration_files folder.- The local_conf.json is copied from the configuration_files folder and the gateway EUI is set in this file.- Allows the user to set the gateway latitude and longitude coordinates and its altitude. - Installs the Semtech LoRa library and the Semtech UDP Packet Forwarder and build both packages.- Makes the packet_forwarder a service,which means when the Raspberry Pi bootsthe packet_forwarder is started.- Disables the onboard Raspberry Pi bluetooth.•Before you start with the installation procedure,you must know which frequency plan to use in your country.See the list of frequency plans by country list:https:///docs/lorawan/frequencies-by-country.html•The frequency plans can be found at:https:///docs/lorawan/frequency-plans.html•If you know the frequency plan,look at the table and find the corresponding Region.Region Frequency PlanAS1AS920-923AS2AS923-925AU AU915-928CN CN470-510EU EU863-870IN IN865-867KR KR920-923RU-US US902-928INSTALL RAK831-LORAGATEWAY-RPI REPOSITORY •Installation procedure:git clone https:///robertlie/RAK831-LoRaGateway-RPi ~/rak831-loragateway•This repository is installed in:/home/pi/rak831-loragatewayEXECUTE INSTALL SCRIPT•Execute the install script:cd ~/rak831-loragatewaysudo ./install.sh•The following is displayed.Press Enter to keep the default value or change it: Host name [ttn-gateway]: <Enter>Region AS1, AS2, AU, CN, EU, IN, KR, RU, US [EU]: EU Latitude [0]: <Enter>Longitude [0]: <Enter>Altitude [0]: <Enter>•I will keep the default hostname,latitude,longitude and altitude.The latitude,longitude and altitude will be set later in TTN console.INSTALL LORA LIBRARY AND PACKET FORWARDER•As mentioned earlier,the install.sh script installs the following git repositories and build these packages.•Semtech LoRa library (V5.0.1)https:///Lora-net/lora_gateway/opt/ttn-gateway/lora_gateway•Semtech UDP Packet Forwarder (V4.0.1)https:///Lora-net/packet_forwarder/opt/ttn-gateway/packet_forwarderCHECK TTN-GATEWAY SERVICE STATUS •Check ttn-gateway service status:systemctl status ttn-gateway -l•Check if there are no errors and GPS is disabled.Also see:/var/log/syslogglobal_conf.json & local_conf.json•The RAK831 Pilot Gateway can be connected to any LoRa network servers.•In this tutorial the RAK831 Pilot Gateway will be connected to The Things Network server.•The Semtech Packet Forwarder is configured via a file called global_conf.json and if provided an additional file called local_conf.json.•The global_conf.json is the main configuration file and contains for example the LoRa network server address,which uplink and downlink ports to use,which frequencies to use and the TX power LookUp T able (LUT).•The local_conf.json file contains more gateway specific parameters.The local_conf.json will override the settings in the global_conf.json.•The ~/rak831-loragateway/install.sh script creates theglobal_conf.json and local_conf.json files in this folder:/opt/ttn-gateway/packet_forwarder/lora_pkt_fwd•Several other global_conf.json file examples can be found in this folder:/opt/ttn-gateway/packet_forwarder/lora_pkt_fwd/cfg but these files are not used.•The https:///robertlie/RAK831-LoRaGateway-RPi/blob/master/configuration_files/README.md file explains where the global configuration files originates from and what modifications were made to these files.•In Tutorial 28 is explained which parameters to set in the local_conf.json file to enable GPS and for beaconing.In the local_conf.json these parameters are commented out. Uncomment these parameters if needed.•In Tutorial 30 you can find an explanation of all the parameters used in theglobal_conf.json and local_conf.json files.•When the global_conf.json or local_conf.json file is changed,always restart the gateway.•Before restarting the gateway,optionally empty the /var/log/syslog: sudo su> /var/log/syslogexit•Restart the ttn-gateway service:sudo service ttn-gateway restart•Check ttn-gateway service status:systemctl status ttn-gateway -l•Check system log for errors:tail -f /var/log/syslogNEXT STEPS….•The gateway is now running without errors.•Next steps:•Register the gateway to The Things Network,watch: https://youtu.be/bea7g5isD0w?t=1779•Optionally enable WiFi,watch:https://youtu.be/bea7g5isD0w?t=1844。
路由版流控大师安装过程详细记录(附大量图片)1
路由版流控大师安装过程详细记录
(附大量图片)
前言:本篇文章写给没安装过流控大师的新手看的,高手飘过。
本次安装选用的是20120628的流控大师路由版,为啥选用这么老的流控大师路由版本,因为这个版本可以开虚拟网卡,其它版本开虚拟网卡没有成功。
开虚拟网卡做什么,可以让你的流控大师变成5W AN口的流控大师路由器。
在小网吧很实用,一般不要买扩W AN口的交换机了。
本次选用的工控机如下
准备的工具:USB启动U盘一个,USB键盘一个,VGA接口的显示器一个
1、观察流控大师的后面,有VGA接口,那是接显示器的,把显示器接在流控大师上。
2、准备好USB接口的键盘,做好启动U盘。
把以上两样物品插在流控大师的USB接口上
3、启动流控大师,不停点击USB键盘上的“DEL”按键。
显示器上出现以下画面。
4、使用光标向右选择到Boot选项
5、用光标移动白亮线到第一启动设备
6、按下回车,出现引导启动设备,用光标移动白亮条在USB上,按“Enter”确定。
USB设备在第一项。
7、按“F10”,再按Enter。
出现。
9、用光标选中运行我的镜像文件,按“Enter”,继续下一步。
03项。
按“Enter”,进行下一步。
- 1、下载文档前请自行甄别文档内容的完整性,平台不提供额外的编辑、内容补充、找答案等附加服务。
- 2、"仅部分预览"的文档,不可在线预览部分如存在完整性等问题,可反馈申请退款(可完整预览的文档不适用该条件!)。
- 3、如文档侵犯您的权益,请联系客服反馈,我们会尽快为您处理(人工客服工作时间:9:00-18:30)。
流控大师A380单线部署教程
1st:启动流控
A380接好电源并开启,EM5口接入交换机(或者直接和进行配置的电脑直连)。
2nd:设置配置流控电脑的IP
配置流控的电脑修改或者增加IP:IP192.168.5.5,子网掩码255.255.255.0。
IP修改完后,记得ping192.168.5.1,确认是连通了的。
[参考:流控大师--设置(A280/A380等官方工控设
备)/thread-1256-1-1.html]
3rd:设置网桥
打开流控的管理界面,https://192.168.5.1,默认的用户名admin密码netzone。
网络配置--数据网口,设置:em0--网桥1、接内网,em1--网桥1、接外网。
[参考:流控大师--设置(A280/A380等官方工控设
备)/thread-1256-1-1.html]
4th:设置路由
路由管理--网卡分配:启用路由/NAT功能,勾选;
分配局域网:em5
分配广域网1:em2
操作并保存;
路由管理--广域网口,em2,设置好运营商给的IP信息
[参考:流控大师--设置(A280/A380等官方工控设
备)/thread-1256-1-1.html]
5th:生成策略
用策略向导,填好设置的网桥接口、终端数目、带宽大小生成策略;
系统维护--配置管理--配置导入,上传并导入刚刚生成的策略。
[参考:流控大师--策略向导[单光纤]/thread-7682-1-1.html] [参考:流控大师--设置--导入策略/thread-1257-1-1.html] 6th:申请试用KEY
在注册帐号,登入申请试用KEY,申请后大约1-3分钟后,会自动生成KEY,获取并下载;
系统维护--升级License,上传导入获得的试用KEY。
[参考:流控大师--申请试用KEY /thread-1169-1-1.html]
7th:接线上架使用
根据上面的设置接线:em0接交换机,em1直连em5,em2接光纤。
Em1直连em5的线为流控自带的黄色线,此线为交叉线。
完成这7步,单线网吧的A380部署就完成了。
Ps:无论单线还是多线,所有流控设备部署完成后都要做端口映射。
映射流控设备地址到外网,假设:流控设备地址为192.168.1.254,操作如下:
路由管理-安全设置-端口映射
点击右侧“新增端口映射”,在右侧新出来的界面填写“对外端口”、“对内ip”、“对内端口”、“备注”。
然后勾选下面的启用此映射规则。
说明:
8443端口为流控大师新界面专用端口,其他常用端口有3389(windows远程桌面专用端口(外网为6001,公司规定。
)),5901(网众无盘专用端口(外网为7001,多个无盘服务器以此类推,公司规定。
)),6880、6881(网众快车更新端口,内外网一致)。
Ps2:流控大师自身ip更改方式
流控大师默认访问ip为192.168.5.1,修改为192.168.1.254步骤如下:
系统维护-网络配置-管理接口,填写ip地址,子网掩码,然后点提交。
提交后请使用新地址https://192.168.1.254配置流控大师。