
PA纯后级广播功放说明书
P A纯后级广播功放说
明书
集团标准化办公室:[VV986T-J682P28-JP266L8-68PNN]
OWNER’S MANUAL
Before operating, please read this manual completely.
PA3002
PA4002
PA5002
Public Address
Amplifiers
FEATURES
Transformer isolated 100V, 70V and 4 Ohms speaker outputs.
5 LED indicator for status display.
XLR socket and mm jack for link convenient.
Output circuit shorting protection & display.
Series amplifiers of high output power available.
AMPLIFIER FRONT VIEW
1. AC power switch (1 is power on and
the “power LED ” is on )
2. POWER LED indicator
3. CLIP LED indicator (Please reduce
4. the gain to prevent severely
clipped
waveforms reaching the loudspeakers)
5. SIGNAL LED indicator
(Output level) 6. PROT LED indicator (DC or
output circuit shorted indicator) 7. TEMP LED indicator (high temperature indicator) 8. Volume (input attenuator) 9. Unit’s fan exhaust window
AMPLIFIER REAR VIEW and CONNECTIONS
1. fan intake window
2. COM. output
3. 4~16 output
4. 70V output
5. 100V output
6.
220V AC fuse
7. XLR input 8. socket input 9. socket link 10. XLR link
11. 220VAC power cord
OPERATING PRECAUTIONS
1 2 3 4 5 6 7 8
Make sure the AC main voltage is correct and is the same as that printed on the rear of the amplifier. Damage caused by connecting the amplifier to improper AC voltage is not covered by the three-year US warranty.
Make sure the power switch is off before making any input or output connections. It is always a good idea to have the gain controls turned down during power-up to prevent speaker damage if there is a high signal level at the inputs.
CONNECTING INPUTS
Input connections are made via either the 3-pin XLR -type connectors (Figure 1) or mm sockets on the rear side of the amplifier.
CONNECTING OUTPUTS
Load can be connected using banana plugs or spade lugs. A black binding post is considered “COM”, while the three red binding posts are considered “hot”, and the voltage is 38V (different from the model ), 70V , and 100V .
Note:
Never connect the “hot ”terminals together.
When connecting load (speakers ), it is better to use one pair of output terminals only.
If the PROT Led goes on steadily while power has been turned on and signal has been fed, there must be a trouble of output shorted. Please turn the unit off and correct the trouble then turn it on again.
Figure 1 3-pin XLR-type
connectors
SPECIFICATIONS
HTTP:/ DSPPA ACOUSTIC TECHNOLOGY CO., LTD.使用说明
欢迎惠顾。
使用前请认真阅读本说明书。
PA3002
PA4002
PA5002
公共广播系列
纯后级广播功放
1 2 3 4 5 6 7 8 性能特点
100V, 70V 定压输出和4 Ohms 定阻输出(平衡,不接地)。
5 单位LED 显示器,作状态显示。
RCA 插口和 XLR 插口供方便地实现环接。
输出短路保护并示警。
成系列大功率纯后级可供选择。
前面板
1. 交流电源开关(按下1为电源接通状态且电源指示灯亮)
2. 电源指示灯
3. 削顶指示灯 (为避免严重削顶 请适当降低增益)
4. 信号指示灯 (输出电平)
5. 保护指示灯 (直流或短路保护 )
6. 温度指示灯(超温指示)
7. 音量控制旋钮
8. 通风散热窗
后面板及连接
1.风扇风口 2.输出公共端 3.4~16 输出 4.70V 输出
5.100V 输出
6.220V 交流保险丝 7. 卡隆输入口 8. 输入插口
Another Amp. PA-series
Pre-amp.
PA2181P
3 4 5 6
7 8 9 10 11
9.环接插口
11.220V交流电源线10.卡隆环接插口
操作注意事项
电源电压应确实与本机相符,由电压不符造成的损坏不在保修之列。
所有输入输出连接好以前,不要通电;通电前最好把音量调至最小以防损坏扬声器。
当通电并输入信号後,如果保护指示灯(PROT)点亮,即说明有输出短路故障.应即切断电源,排除故障後重新加电.
输入之连接
所有输入均应连接於机器後面板之卡隆插口(图1)或 mm 插口。
输出之连接
输出端子在後面板,可用香蕉插或铲形插连接。
黑色乃公共端,红色乃热端。
通常应使用“定压”端子输出,此 时各个扬声器应带线间变压器,扬声器的总功率应与功放的额定输出功率相当。
扬声器在近距离配置时也可用“定阻”(4~16Ω)端子输出,相应地此时扬声器的总阻抗应为4~16Ω。
注意:
宜只选用一对输出端子;
任何时候都不应把两个“热端”连接在一起。
性能规格
图 1 三线卡隆插
性能规格如有改变,恕不另行通知。
5W 单声道高保真 D 类音频功率放大器 PA8157 产品手册说明书

PA8157是一款高保真、高效率、低EMI、免滤波、5W单声道D类音频功率放大器。
PA8157内部集成智能增益控制(AGC)功能,通过检测输出信号的大小智能调整系统的增益,避免了过载对于扬声器的损害,防止了音量过大时破音,提高了听觉体验。
PA8157采用了全差分免滤波PWM调制的系统架构,具有较好的抗干扰能力。
其内部集成的过温保护、欠压保护、过流保护、“咔哒”杂音抑制等功能模块,给PA8157提供了更强壮的鲁棒性,使其拥有了更好的适应能力。
PA8157采用了典型的SOP_8封装。
图1.典型应用图应用蓝牙音箱便携式音响设备玩具特点免滤波D类集成(自动增益控制)AGC功能输出功率5W@2Ω(THD+N=10%,5.3V)工作电压域:2.5V~5.5V低失真THD+N=0.04%@1W,5VPOP声抑制效率最高达88%高PSRR=75dB@217Hz过流、过温、欠压保护全差分/单端输入低噪声70μVrms(GAIN=10V/V)失调电压<20mV静态电流6mA@5V关断电流<0.1μASOP_8封装图2.PA8157封装图管脚定义极限参数注1注1:超出以上所列极限参数,可能造成器件的永久损坏。
以上给出的仅是极限范围,在这样的极限条件下工作,器件的技术指标不予保证。
长期在极限条件下工作,会影响器件可靠性。
R IN=10KΩ,C IN=100nF,T A=25℃,VDD=3.8V,除非有特殊说明图3.谐波失真+噪声 Vs. 输出功率图4.谐波失真+噪声 Vs. 频率图5. 输出功率 Vs. 输入幅度图6. 增益 Vs. 频率图7. 效率 Vs. 输出功率图8. AGC触发时间图9. AGC释放时间图10. PA8157测试原理图PA8157为脉冲输出方式,如图9所示,需要在两个输出各接一个低通滤波器将开关调制频率滤除,然后测量滤波器的差分输出即可得到模拟输出信号,VOP和VON被低通过滤后的差分输出波形和相减后的波形如下图所示。
PA6002广带RF线性功率放大器用户说明书
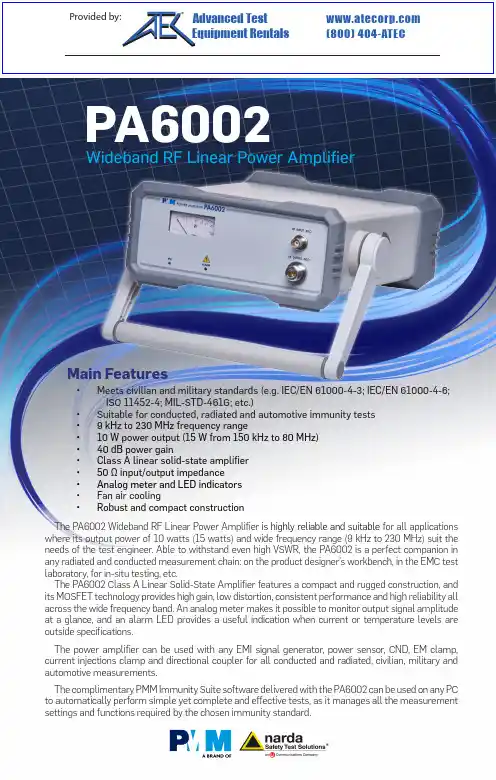
The PA6002 Wideband RF Linear Power Amplifier is highly reliable and suitable for all applications where its output power of 10 watts (15 watts) and wide frequency range (9 kHz to 230 MHz) suit the needs of the test engineer. Able to withstand even high VSWR, the PA6002 is a perfect companion in any radiated and conducted measurement chain: on the product designer’s workbench, in the EMC test laboratory, for in-situ testing, etc.The PA6002 Class A Linear Solid-State Amplifier features a compact and rugged construction, and its MOSFET technology provides high gain, low distortion, consistent performance and high reliability all across the wide frequency band. An analog meter makes it possible to monitor output signal amplitude at a glance, and an alarm LED provides a useful indication when current or temperature levels are outside specifications.The power amplifier can be used with any EMI signal generator, power sensor, CND, EM clamp, current injections clamp and directional coupler for all conducted and radiated, civilian, military and automotive measurements .The complimentary PMM Immunity Suite software delivered with the PA6002 can be used on any PC to automatically perform simple yet complete and effective tests, as it manages all the measurement settings and functions required by the chosen immunity standard .Wideband RF Linear Power AmplifierMain Features•Meets civilian and military standards (e.g. IEC/EN 61000-4-3; IEC/EN 61000-4-6; ISO 11452-4; MIL-STD-461G; etc.)•Suitable for conducted, radiated and automotive immunity tests •9 kHz to 230 MHz frequency range•10 W power output (15 W from 150 kHz to 80 MHz) •40 dB power gain•Class A linear solid-state amplifier •50 Ω input/output impedance • Analog meter and LED indicators • Fan air cooling•Robust and compact constructionOrdering information:PA6002 Wideband RF Linear Power AmplifierIncludes: Power supply cable, BNC-BNC cable, N-m to BNC-f adapter, user’s manual, standard calibration certificateOptional accessories:3010 EMI Signal Generator 9 kHz to 1 GHz3030-01 EMI Signal Generator 9 kHz to 3 GHz, AC supply3030-02 EMI Signal Generator 9 kHz to 3 GHz, AC supply, internal rechargeable battery 6630 USB RF Power Sensor 9 kHz to 3 GHz 6630 FOA Fiber Opic AdapterEP-600 Field probe 100 kHz to 9,25 GHz 0,14 to 140 V/m EP-601 Field probe 10 kHz to 9,25 GHz 0,5 to 500 V/m EP-602 Field probe 5 kHz to 9,25 GHz 1,5 to 1500 V/m EP-603 Field probe 300 kHz to 18 GHz 0,17 to 170 V/m EP-604 Field probe 300 kHz to 26,5 GHz 0,4 to 800 V/m OR03 Optical Programmable Repeater and its probes SB-10 Switching control boxEM Clamps, Current injections clamps, Directional couplers, CDN for mains, Unshielded/ Unbalanced lines CDNs, Shielded lines CDNs, Balanced lines CDNs, 6 dB attenuators, CDN calibration kit and accessories ; for full list and configurations please refer to COND-IS and RAD-IS system documentationGenerators/Receivers/SystemsAntennas/Calibration servicesLISNs/Probes• 1008: Magnetic field generator system • 7010/00: EMI Receiver 150 kHz to 1 GHz • 7010/01: EMI Receiver 9 kHz to 1 GHz • 7010/02: EMI Receiver 9 kHz to 30 MHz • 7010/03: EMI Receiver 9 kHz to 3 GHz • 9010: EMI Receiver 10 Hz to 30 MHz • 9010F: EMI Receiver 10 Hz to 30 MHz• 9010/03P: EMI Receiver 10 Hz to 300 MHz • 9010/30P: EMI Receiver 10 Hz to 3 GHz • 9010/60P: EMI Receiver 10 Hz to 6 GHz • 9030: EMI Receiver 30 MHz to 3 GHz • 9060: EMI Receiver 30 MHz to 6 GHz • 9180: EMI Receiver 6 GHz to 18 GHz • FR4003: Field Receiver 9 KHz to 30 MHz • COND-IS: RF Conducted Immunity System • RAD-IS: RF Radiated Immunity System •AUT-IS: Automotive Immunity System• BC-01: Biconical Antenna 30 to 200 MHz• DR-01: Double-ridged horn Antenna 6 to 18 GHz • LP-02: Log Periodic Antenna 200 MHz to 3 GHz • LP-03: Log Periodic Antenna 800 MHz to 6 GHz • LP-04: Log Periodic Antenna 200 MHz to 6 GHz • TR-01: 60-180 cm wooden extendable tripod• VDH-01: Van der Hoofden Test Head 20 kHz to 10 MHz • Antenna Set AS-02 (BC01+LP02+TR01)• Antenna Set AS-03 (BC01+LP02+LP03+TR01) • Antenna Set AS-04 (BC01+LP04+TR01)• Antenna Set AS-05 (BC01+LP04+DR01+TR01)• RA-01: Rod Antenna 9 kHz to 30 MHz• RA-01-HV: Rod Antenna 150 kHz to 30 MHz • RA-01-MIL: Rod Antenna 9 kHz to 30 MHz • Ansi 63,5 Antenna Factor • SAE ARP 958-D• Free-Space Antenna Factor• CAL-6630: Traceable calibration •LAT-6630: Accredited calibration• L2-16B: single phase AMN, 16 A • L3-32: 4 lines, 3-phase AMN, 32 A • L3-64: 4 lines, 3-phase AMN, 63 A• L3-64/690V: 4 lines, 3-phase AMN, 63 A • L3-100: 4 lines, 3-phase AMN, 100 A• L1-150M: single-path, 50 Ohm AMN, 150 A • L1-150M1: single-path, 50 Ohm AMN, 150 A • L1-500: single phase AMN, 500 A • L3-500: 4 lines, 3-phase AMN, 500 A • L2-D: Delta LISN for telecom, 2 A, 150 Ω• RF-300: Van Veen Loop • SBRF4: RF Switching Box• SHC-1/1000: Voltage probe, 1000 Vac, 35 dB • SHC-2/1000: Voltage probe, 1000 Vac, 30 dBRelated products and servicesP A 6002-F E N -70501 - S p e c i fi c a t i o n s s u b j e c t t o c h a n g e w i t h o u t n o t i c eHeadquarters:Via Benessea, 29/B17035 Cisano sul Neva (SV) - ITALY Phone: +39 0182 58641Fax: +39 0182 586400E-Mail:***********************Internet: www.narda-sts.itSales:Via Leonardo da Vinci, 21/2320090 Segrate (Milano) - ITALY Phone: +39 02 2699871Fax: +39 02 26998700PA6002Wideband RF Linear Power AmplifierSPECIFICATIONSFrequency range Power output CW Power gain Gain flatness Drive levelInput return loss Harmonic distortion RF input RF outputPower indication LED indicators Power supplyOperating temperature Operating humidity Storage temperature Dimensions (W x H x D)Weight9 kHz to 230 MHz10 W; 15 W from 150 kHz to 80 MHz 40 dB+1 dB -1,5 dB0 dBm (1 mW) for 10 W output < 20 dB < -20 dBcZin 50 Ω, BNC female Zin 50 Ω, N female Analog meter, 20 W f.s.Power/current limiter and temperature alarm85 to 264 Vac 47 to 440 Hz / 120 to 370 Vdc 60W 0 °C to +40 °C0 to 90% RH (without condensation)-40 °C to +70 °C 235 x 105 x 300 mm 4,5 kgTypical gain @ nominal power (dB)Power output @ 1 dBc (W)。
音响操作手册

音响扩声系统操作手册一、系统组成:1、PA系统:PA系统负责场厅内观众区域的扩声,由音箱、功放及音箱控制器组成。
PA系统又可细分为主扩声系统和环绕扩声系统。
A、主观众区域扩声系统包括主席台扩声音箱TANNOY V300 4只,TANNOY TA 1400功放2台;超底音音箱TANNOY IQ 18B 2只,TANNOY TA 1000功放2台;音箱控制器TANNOY TDX22台;中置音箱TANNOY V300 2台,TANNOY TA 1400 功放1台;舞台返听音箱TANNOY V12 2台,TANNOY TA1000 1台。
B、环绕扩声包括TANNOY V8 8台,TANNOY TA 1000 2台。
C、前区补声包括TANNOY V12 2台,TANNOY TA 1000 2台。
2、MONITOR监听系统:MONITOR监听系统负责为操作人员、表演人、重要观众(贵宾等)提供清晰准确的扩声。
MONITOR监听系统可分为控制室监听系统、主席台监听系统、场地吊装监听系统及场地内流动监听系统。
控制室监听系统包括TANNOY 5A有源监听音箱2只,AKG K66监听耳机1副。
3、调音台:调音台在扩声系统中占有重要地位。
调音台英语称“MIX”为混合的意思,因此调音台在扩声系统中是将前级音源混合后再分配给不同的扩声系统,混合/分配是其主要的功能。
本套扩声系统中有扩声及流动(监听)两张调音台,扩声调音台用于扩声、控制室监听、场地吊装监听使用;流动(监听)调音台用于场地内流动监听及主席台监听使用。
A、扩声调音台包括ALLEN&HEATH GL2800-40 1台。
4、音源系统:音源系统包括系统前级中的音源播放设备及拾音设备。
A、音源播放设备包括DVD机1台;卡座/CD一体机2台;MD 1台。
B、拾音设备包括AKG WMS400/D880无线手持话筒2套;;AKGWMS400/C407无线话筒/领夹2只;TANNOY鹅颈电容会议话筒8支;TANNOY TDM27对讲话筒2只。
PA中文说明书

ALLEN&HEATH PA系列使用手册PA系列混音器可提供一个标准的PA系统需要的所有音频信号处理工具,并使您的操控能够做到“随心所欲”。
您不仅很快就会熟悉并得心应手的操控他们,而且您还会发现他们所具备的许多创新的性能充分融合了设计师多年的现场调音经验。
如果您再仔细地检查一下他们的质量,您就更会欣赏他们标准化的结构:与我们的旗舰产品ML系列调音台有同样的单独的垂直型电路板,同样的电位器帽,同样的铜质内部耦合界面。
下面的几款PA调音台是带有双功率放大器的型号。
PA12-CP有8路单声道和2路立体声通道输入。
PA20-CP有16路单声道和两路立体声输入。
这两款在侧面均有保护装饰,在前面有便携手提把手。
双功放的配置可以根据现场扩音情况的不同来自由的使用。
例如,您可以用其来做没有返送系统的立体声主扩系统,或是有返送和单声道的系统,再或是与外部功放相连,用这台设备做两个独立的返送系统。
同时也可使用额外的单声道输出用于超低音的信号通道等等。
PA-CP系列的功率放大器是第三代的设计,其在出场之前都是已经做了严格的可靠性和声音质量的测试,其输出功率采用4Ω和8Ωohms可切换式恒定功率设计,功率均为2x500W/8Ω。
精准的均衡调节为音乐的创作和有效的抑制房间声反馈提供很大的方便。
所有输出通道都有四段的参量均衡,每个频段均设置有扫频旋钮,我们是通过理论的分析和实际存在的声染色等问题研究和测试以后,决定设置参量均衡,而不用图示均衡的。
并且我们的“EQ Visualiser”软件将会告诉您参量均衡对频率产生的作用,并可以通过此软件与调音台的MIDI口连接来自定义您所需要的效果。
快速启动1.确保安全:首先要确认设备的工作电压与您当地的供电电压是否一致,检查后面板的ON/OFF是否置于off的状态。
用随机配送的电源线将调音台与电源插座相连接。
在没有检查好所有的连线和控制设置之前不要打开任何开关。
并且要确保在前面和侧面机身的通风口处不要有东西挡住。
ONKYO 9 声道功率放大器 PA-MC5500 说明书
RO T RO T
W DE L FT W DE L FT
UR OUND ACK SU ROU D BAC
GHT
R GH
RO T W DE R GHT
RO T W DE R GHT
P B ONE ET
SP B Z NE LF
ET
LF
SP B ONE R GHT SP B ONE R GHT
SP B Z NE2 R GHT
9 声道功率放大器
PA-MC5500
使用手册
目录
使用之前........................................................ 2 操作 ................................................................. 6 连接 .............................................................. 10 附录 .............................................................. 17
*1
THX 和 Ultra2 为 THX Ltd. 公司的商标。 THX 可能在某些 司法管辖地注册。版权专有。 *2 视 AV 控制器而定。
Cs-3
目录
使用之前
重要的防护措施 ................................................................2 注意事项 ............................................................................3 特点 ....................................................................................4 附件 ....................................................................................5 放大器注意事项 ................................................................6
DSPPA广播系统说明书

【(1)、投标综合说明】DSPPA公共广播系统设备一、公共广播系统概述二、DSPPA 公共广播系统器材性能介绍三、厂区的公共广播/背景音乐示意四、厂区的公共广播/背景音乐示意一、公共广播系统概述DSPPA 广播音响系统涉及面很广,从工厂、学校、宾馆、车站、码头、广场 到会场、影剧院、体育馆、住宅小区等无不与之有密切关系。
在民用建筑工程设计中,广播系统可分为以下几类: 面向公众区(广场、车站、码头、商场、餐厅、走廊、教室等)和停车场等的公共广播系统。
这种系统主要用于语音广播,因此清晰度是首要的。
而且,这种系统往往平时进行背景音乐广播,在出现灾害或紧急情况时,又可转换为紧急广播。
面向宾馆客房的广播音响系统。
这种系统包括客房音响广播和紧急广播,常由设在客房中的床头柜放送,客房广播含有多个可供自Public Address System公 共 广 播 系 统由选择的波段,在紧急广播时,客房广播即自动中断,自动切换为紧急广播。
以礼堂、剧场、体育馆为代表的厅堂扩声系统。
这是专业性较强的扩声系统,它不仅要考虑电声技术问题,还要涉及建筑声学问题。
两者都要统筹兼顾,不可偏废,这类广播系统往往有综合性多用途的要求,不仅可供会场语言扩声使用,还常用于文艺演出等,对于大型现场演出的音响系统,电功率少则几万,多的达数十万瓦,故要用大功率的扬声器和功率放大器,在系统的配置和器材选用方面有一定的要求,同时应注意电力线路的负荷问题。
面向会议室、报告厅等的广播音响系统。
这类系统一般也是设置成公共广播提供的背景音乐和紧急广播两用的系统,但因其特殊性故也常在会议室和报告厅单独设置会议广播系统。
对要求较高或国际会议厅,还需另行设计诸如同声传译系统,会议表决系统以及大屏幕投影电视等的专用视听系统。
从上面介绍可知,对于各种大楼、宾馆及其他民用建筑物的广播音响系统,基本上可以归纳为三种类型:一是公共广播系统(Public Address System简称PA),这种是有线广播系统,它包括背景音乐和紧急广播功能,通常结合在一起,平时播放背景音乐或其他节目,出现火灾等紧急事故时,转换为报警广播。
广播系统-PA
一键 取消 功能
外部 音源 接入
可接入外部 音源设备, 在其它音源 播出时,背 景音乐自动 停止
在车站广播控制终端失效时, 利用广播控制台可以进行广 播操作,实现上述各种广播 功能
后备 模式
紧急 广播 功能
当车站广播控制单元内选区广播模 块发生故障时,按下紧急广播按键, 将车站广播控制台的音频通过应急 通道直接送与功放,此时打开全部 广播区,进行全区广播
控制功能一键取消功能编组功能监听功能背景音乐功能话筒广播功能故障显示功能2020513分区管理功能显示占用功能监听功能显示功能功能图标显示人员操作指示选区选择图标广播区分布电子地图各级广播占用指示选区占用的指示权限内管辖广播选区进行选择监听监听音量可调202051310广播分区占用显示功能广播分区管理监听功能外部音源接入紧急广播功能后备模式一键取消功能led显示灯显广播区选择在车站广播控制终端失效时利用广播控制台可以进行广播操作实现上述各种广播功能当车站广播控制单元内选区广播模块发生故障时按下紧急广播按键将车站广播控制台的音频通过应急通道直接送与功放此时打开全部广播区进行全区广播可接入外部音源设备在其它音源播出时背景音乐自动停止权限内管辖广播选区进行选择监听监听音量可广播区占用指示当车站广播控制台误播一键取消键可立即切断正在进行的广播202051311广播控制台操作功能广播分区管理占用显示显示功能广播选区管理后备模式显示功能广播选区占用背景音乐功能202051312tg200a功放车站控制单元tg200az功放噪声输入单元qh112切换分tg200a功放工控机电源时序控制202051313tg200a前面板图tg200a后面板图202051314tg200a功率放大器的功能
2019/4/8
24
栅格吊顶扬声器
DSPPA广播系统说明书
【(1)、投标综合说明】DSPPA公共广播系统设备一、公共广播系统概述二、DSPPA 公共广播系统器材性能介绍三、厂区的公共广播/背景音乐示意四、厂区的公共广播/背景音乐示意一、公共广播系统概述DSPPA 广播音响系统涉及面很广,从工厂、学校、宾馆、车站、码头、广场 到会场、影剧院、体育馆、住宅小区等无不与之有密切关系。
在民用建筑工程设计中,广播系统可分为以下几类: 面向公众区(广场、车站、码头、商场、餐厅、走廊、教室等)和停车场等的公共广播系统。
这种系统主要用于语音广播,因此清晰度是首要的。
而且,这种系统往往平时进行背景音乐广播,在出现灾害或紧急情况时,又可转换为紧急广播。
面向宾馆客房的广播音响系统。
这种系统包括客房音响广播和紧急广播,常由设在客房中的床头柜放送,客房广播含有多个可供自Public Address System公 共 广 播 系 统由选择的波段,在紧急广播时,客房广播即自动中断,自动切换为紧急广播。
以礼堂、剧场、体育馆为代表的厅堂扩声系统。
这是专业性较强的扩声系统,它不仅要考虑电声技术问题,还要涉及建筑声学问题。
两者都要统筹兼顾,不可偏废,这类广播系统往往有综合性多用途的要求,不仅可供会场语言扩声使用,还常用于文艺演出等,对于大型现场演出的音响系统,电功率少则几万,多的达数十万瓦,故要用大功率的扬声器和功率放大器,在系统的配置和器材选用方面有一定的要求,同时应注意电力线路的负荷问题。
面向会议室、报告厅等的广播音响系统。
这类系统一般也是设置成公共广播提供的背景音乐和紧急广播两用的系统,但因其特殊性故也常在会议室和报告厅单独设置会议广播系统。
对要求较高或国际会议厅,还需另行设计诸如同声传译系统,会议表决系统以及大屏幕投影电视等的专用视听系统。
从上面介绍可知,对于各种大楼、宾馆及其他民用建筑物的广播音响系统,基本上可以归纳为三种类型:一是公共广播系统(Public Address System简称PA),这种是有线广播系统,它包括背景音乐和紧急广播功能,通常结合在一起,平时播放背景音乐或其他节目,出现火灾等紧急事故时,转换为报警广播。
音乐厅 PA2.2 音频放大器说明书
music hall pa2.2INSTRUCTION MANUALmusic hallCONGRATULATIONS ON YOUR PURCHASEYou have selected an exceptional phono preamplifier. Each component used in the construction of the pa2.2 was selected to provide you with superior performance and the highest level of sound reproduction available today. We know of no phono preamplifier that costs as much to produce yet sells for so little. The precise and elegant design of this phono preamplifier makes it easy to install and operate. Please take a few moments to read over the operating instructions to ensure that you get the best performance from your preamplifier and years of trouble-free service.SAFETY GUIDELINESThis product is designed and manufactured to strict quality and safety standards. However, you should be aware of the following installation and operation precautions:1.Take heed of warnings and instructionsRead all the instructions before connecting or operating the preamplifier.Keep this manual so you can refer to these safety instructions.2.Water and MoistureTo reduce the risk of fire or electric shock, do not expose the phono preamplifier to moisture or water. If the phono preamplifier is exposed to moisture, immediately disconnect the power cord from the wall. Take the preamplifier to an authorized music hall service center for inspection. Do not touch the phono preamplifier, power cord, or plug with wet hands.3.Object or liquid entryDo not allow foreign objects or liquids into the unit. If this happens, immediately disconnect the power cord from the wall and take the unit to an authorized music hall service center for inspection.4.HeatKeep the phono preamplifier away from naked flames, radiators, heat registers, stoves, or any other heat-producing appliances (including amplifiers).5.ClimateThe phono preamplifier has been designed for use in moderate climates. Do not attempt to use below 41 degrees Fahrenheit (5 degrees Celsius) or above 95 degrees Fahrenheit (35 degrees Celsius).6.Racks and StandsPlace the phono preamplifier on a fixed, level surface strong enough to supportits weight. Do not place it on a moveable cart that could tip over. We recommend only using stands approved for use with audio equipment.7.CleaningA soft towel can be used.8.Power SourcesConnect the phono preamplifier only to a power supply of the type and voltage described in the operating instructions or specified on the rear panel of the unit.9.Power-cord protectionConnect the phono preamplifier to the power outlet only with the supplied power supply. Do not modify the supplied power supply in any way. Do not attempt to defeat grounding and/or polarization provisions.Do not use extension cords.Do not route the power cord where it will be crushed, pinched, bent at severe angles, exposed to heat, or damaged in any way.10.Non-use periodsIf the preamplifier is to be left unused for a long period of time, the power supply should be unplugged from the wall outlet.11.Damage Requiring ServiceStop using the phono preamplifier immediately and have it inspected by an authorized Music Hall service center whenever:1.The power supply cord or plug has been damaged.2.The phono preamplifier has been exposed to rain.3.The phono preamplifier does not operate properly.4.The phono preamplifier has been dropped or damaged.5.Smoke or any unusual smell is detected from the phono preamplifier. GETTING STARTEDThank you for purchasing the Music Hall pa2.2 usb phono preamplifier. This manual provides valuable information that will help you get optimum performance from your system. Please contact your authorized Music Hall dealer for any additional clarifications you may require. Save the shipping carton and all enclosed packing material for future use. Shipping or moving the pa2.2 in anything other than the original packing material may result in severe damage that is not covered by the warranty. Be sure to keep the original sales receipt; it is your best record of the date of purchase, which you will need in the event warranty service is required.SET-UPThe pa2.2 may be used in either MM (moving magnet) or MC (moving coil) mode according to the construction principle of the phono cartridge to be used. Before setting the mm/mc switch, the unit must be disconnected from the power supplyobtained with the 20dB gain setting.k panelnt panton 7555c FRONT PANEL A REAR PANEL ARTConnecting the TurntableConnect the turntable signal lead to either the mm or mc input on the pa2.2 depending on the type of cartridge your using. Take care to connect the left and right channels correctly. The right channel is marked with red the left channel is market with white. The ground wire of the turntable lead should be connected to the ground screw.Connecting a Line InputYou can connect any standard line output component (cd player, tape deck, tuner, etc.) to the line in input . This will allow you to listen to a standard line signal through the pa2.2 or convert the analog line signal to a digital signal via the usb out for recording on a computer. To listen to the output of the line in the phono/line switch on the front panel must be switched to line.Connection to the AmplifierLocate the line out connectors on back of the pa2.2. You have a choice between variable or fixed output. The variable output will allow you to adjust the volume level of the output with the volume control on the front panel. Please note: the volume control also controls the volume of the headphone output.Connect the line out (fixed or variable) of the pa2.2 to a line input (i.e. AUX, CD, TUNER, etc.) on your amplifier. Take care to connect the left and right channels correctly. Make all connections while the phono box is disconnected from the power supply.*DO NOT CONNECT THE PA2.2 TO A PHONO INPUT.*Mains ConnectionThe pa2.2 is supplied with a high efficiency multi-region regulated power supply. It provides a stable output from any mains voltage from 100 – 240V. Connect the low voltage plug from the power supply to the dc 24V socket on the pa2.2 before connecting to the mains. You may need to snap on a different power plug adaptor for your country. Plug-in and enjoy.Connecting to a ComputerConnect to your Windows PC or Apple Mac computer via the usb out on back of the pa2.2. A usb-B (pa2.2 end) to usb-A (computer end) cable is required for this connection. Connect the pa2.2 to your computer when both products are powered on. Your computer will recognize the pa2.2 and download any necessary drivers.You can select the pa2.2 on a Windows PC under Start > Settings > Sound Apple Mac computer under System Preferences > Sound > InputFor recording to your computer with the pa2.2 we recommend the use of Audacity freeware. The Audacity recorder and audio editor for your computer can be downloaded and set-up at: .Help, FAQ, and Tutorials can also be found on their site.Front Panel Controlson/offUse this switch to power the unit on and off.stereo/monoSwitch between stereo or mono audio output. The sound of mono records is significantly improved by toggling this switch to mono.phase/invertSwitches the output signal between absolute polarity phase (0°) and reversed polarity invert (180°). The majority of recordings are in phase, but some are recorded inverted phase or out-of-phase. The music will sound more full and rich when matched to the correct phase.phono/lineSwitches the audio output between phono and line inputs.headphones¼’ output for headphones.volumeTurn to adjust the headphones and variable output volume level.TECHNICAL SPECIFICATIONS:•MM input impedance: 47 kohms+ 220 pF•MC input impedance: 100 ohms + 1 pF•Analog line-level input impedance: 47 kohms•MM gain at 1khz: 39 dB•MC gain at 1khz: 59 dB (20 dB gain selected) / 65 dB (26 dB gain selected)•MM input sensitivity for 316 mV output: 3.3 mV•MC input sensitivity for 316 mV output: 0.4 mV (20 dB gain selected) / 0.2 mV (26 dB gain selected)•MM signal-to-noise ratio unweighted (with cartridge connected): 70 dB•MC signal-to-noise ratio unweighted (with cartridge connected): 75 dB (20 dB gain) / 70 dB (26 dB gain)•Analog Line-level input Signal-to-noise ratio: 120 dB•MM Input overload level at 20Hz/1kHz/20kHz: 8/71/650 mV•MC Input overload level at 20Hz/1kHz/20kHz (20 dB gain selected): 0.95/48/450 mV •MC Input overload level at 20Hz/1kHz/20kHz (26 dB gain selected): 0.45/24/225 mV •MM Total Harmonic Distortion + Noise (10 mV in): <0.01%•MC Total Harmonic Distortion + Noise (1 mV in and 20 dB gain selected): <0.05% •MC Total Harmonic Distortion + Noise (1 mV in and 26 dB gain selected): <0.05% •Analogue line-level input total harmonic distortion + noise: <0.01%•RIAA curve accuracy: +/- 0.3 dB•MM Crosstalk: 65 dB•MC Crosstalk: 65 dB (20 dB gain) / 60 dB (26 dB gain)•Line-level input crosstalk: 63 dB•Fixed line-level output impedance: 270 ohms•Variable line-level output impedance: 270 ohms•Headphone stage output impedance: 2 ohms•Headphone stage maximum output level: 6.8 V•Headphone stage total harmonic distortion + noise: <0.02%•USB output: maximum 24 bit linear PCM•USB output sampling frequency: maximum 96 kHz•Power Supply Rejection Ratio: 80 dB•Power supply: external 24VDC with multi-region plug adaptors•Power consumption without signal: 2.9 W•Unit dimensions (W x H x D): 6.3 x 2.0 x 6.73 in. (159 x 51 x 171 mm)•Unit weight: 2lbs. (900g)Input Connections: 3 pairs of RCA sockets (left/right) 1 x MM, 1 x MC, 1 x LineOutput Connections: 2 pair of RCA sockets (left/right) 1 x variable, 1x fixed1 x headphone output 32 - 600ΩA/D Converter: Wolfson WM 8786, Tenor TE7022L 24Bit Delta SigmaSampling Rates: 8, 16, 32, 44.1, 48, 96kHzUSB Output: USB 2.0,fully backward-compatible with USB 1.1Operating Systems: Windows: WinXP/Win7/Win8/Win10MAC: Mac OSX10.6.6 ~ OSX10.11music hall reserves the right to make technical modificationsTROUBLESHOOTINGMusic Hall phono preamplifiers are manufactured to the highest standards and undergo strict quality controls before leaving the factory. If, for some reason your phono preamplifier is not working properly, please take a few moments to review this list of potential causes.NO SIGNAL IN ONE OR BOTH CHANNELS:•The phono preamplifier is not connected to the mains power supply.•No mains at the socket.•No connection between the phono preamplifier and amplifier.•Correct input not selected at amplifier.•Poor contact or broken connection between the amplifier or turnable.•Amplifier not switched on.•Amplifier or speakers defective or muted.•Cartridge not wired into the head shell.•Loudspeakers not connected.•The correct input line or phono is not selected for the source that’s playing.•The turntable is not connected to the selected input mm or mc.LOUD HUM ON PHONO INPUT:•No earth connection from cartridge, tonearm, or audio cable to amplifier.•Ground loop.•Phono preamplifier too close to one or both speakers.DISTORTED SOUND FROM ONE OR BOTH CHANNELS:•MM/MC switch on pa2.2 incorrectly set.•Dust on the stylus.•Needle or cantilever damaged..SERVICEShould you encounter a problem that you cannot solve, please contact your Music Hall dealer. Never return a phono preamplifier without authorization and without safely disconnecting it and correctly packing it in the original packaging. Repairs will only be made under warranty if the unit is returned correctly packaged in its original box.WARRANTYThis entitles you to have the Music Hall pa2.2 repaired free of charge, at our discretion, for one year after the date of purchase, at any authorized Music Hall service center, provided the unit was purchased from an authorized dealer. Your original sales receipt is proof of purchase date. Music Hall takes no responsibility for defects arising from accident, misuse, abuse, wear and tear, neglect or unauthorized repair and/or adjustment. Music Hall cannot accept responsibilityfor damage or loss that occurs during transit. The warranty does not cover transportation costs.CLAIMS UNDER WARRANTYThe pa2.2 should be packed in the original packing and returned to the dealer from whom it was purchased, or, upon authorization, to a Music Hall service center. It should be sent by a reputable carrier, carriage prepaid. Do not send the phono preamplifier via USPS (United States Postal Service). Since no responsibility will be accepted for a unit in transit to the dealer, customer, or authorized service agent, customers are advised to insure against loss, damage, or theft.FOR FURTHER INFORMATION CONTACT:Music Hall108 Station RoadGreat Neck, NY 11023Tel: 516-487-3663Fax: 516-773-3891。
Rockford Fosgate PA-1HD和PA-1多用途预放器说明书
PA-1HD and PA-1 PreamplifiersDear Customer:Congratulations on your purchase of America’s finest car audio components. At Rockford Fosgate we are committed to musical reproduction at its best, and we are pleased you chose our product. Through years of engineering expertise, hand craftsmanship and critical testing procedures we have produced a wide range of products that reproduce music with all the clarity and richness you deserve.For maximum performance we recommend you have your new Rockford Fosgate product installed by an Authorized Rockford Fosgate Dealer, as we provide specialized training through Rockford Technical Training Institute (RTTI). The length and nature of your warranty are dramatically affected if you install the product yourself. Please read your warranty and return your receipt and original carton for possible future use.For your musical enjoyment, Rockford Fosgate offers everything from two channel Punch® amplifiers, the more powerful four channel Power amplifiers, to three lines of speakers: Pro Series, The Punch®, and Series One™, In addition, we offer two-, three- and four-way speaker systems, and subwoofer and full range enclosures. For sound reproduc-tion at its best, we offer signal processors: equalizers, pre-amps, and crossovers.To insure overall installation quality, Rockford provides top quality wire, connectors, carpet, grille cloth, “Colours” speaker grilles and amplifier shrouds, high output alterna-tors, and many more accessories through our Perfect Interface division.To add the finishing touch to your new Rockford Fosgate image, order your Rockford P.0.P which includes everything from t-shirts and jackets, to key chains and neon hats.To get a free brochure on Rockford Fosgate products and Rockford P.O.P., please call 602-967-3565 or FAX 602-967-8132.And Remember.. .PRACTICE SAFE SOUND™CONTINUOUS EXPOSURE TO SOUND PRESSURE LEVELS OVER 100dB MAY CAUSE PERMANENT HEARING LOSS. HIGH-POWEREDAUTOSOUND SYSTEMS MAY PRODUCE SOUND PRESSURE LEVELS WELL OVER 130dB. USE COMMON SENSE AND PRACTICE SAFE SOUND.INTRODUCTIONThe Rockford Fosgate PA-l HD / PA-1 is an automotive stereopre-amplifier which will provide state-of-the-art sound in cars,vans, boats, or wherever a 9 to 16 volt battery is available.The Punch® adjustable input circuits are designed to matchalmost any music source, from low preamp levels to speakerlevels, with negligible noise.Three rotary potentiometers control bass, midbass, and trebleequalization circuits specially designed to compensate for theresponse errors present in most mobile installations.Unlike conventional tone controls, the Punch®equalization cor-rects the specific problems of poor low bass response, mid-bassbulge, and high frequency rolloff. The result is full-range soundwithout excessive boost in areas where it is not needed.FEATURES DESCRIPTION (PA-1 HD pictured)1 2 34 56 7 8 9 10 11 12 13 14 15 16 17 18Volume ControlFront to rear fader, along with a non-faded output. Bass equalizer designed to compensate for the special acoustic problems of automobilesL.E.D. lights (differs slightly on PA-l)Midbass equalizer designed to address the mid bass bulge common to most carsTreble control to set the desired level of brilliance Input:-1: Tape-2: CDCD switchable input gainTape switchable gainClipping indicators adjustable gainCD inputsTape InputsNon-faded OutputsRear OutputsFront OutputsPower Connection (White Wire)Ground Connection (Black Wire)Turn-on Connection (Red Wire)Adjustable gains for optimum signal to noise ratio. Full floating supply for superior noise ratio. Handcrafted in U.S.A.117183INPUT LEVEL CONTROLSThe PA-l HD / PA-1 input level controls are accessible with ajeweler’s screwdriver through four holes in the cover (left andright tape [#9] and left and right compact disc [#8]). The controlsare factory preset to a level which matches most 500 millivolt to1 Volt rated preamp-output source units.If you are using the speaker-out leads of the source unit, turn thePA-l HD / PA-l input controls fully counterclockwise to theirminimum gain position.If the volume control of the source is “touchy” and/or noisy-thatis, if just a little volume from the source drives the system intodistortion-reduce the PA-l HD/ PA-l input g ain controls so thatthe distortion is not audible until the source volume is at about3/4 of its rotation.If maximum volume from the source won’t drive the amplifierinto distortion, increase the PA-l HD / PA-l input gain controlsuntil distortion is audible at about 3/4volume. CLIPPING LEVEL INDICATORSThe PA-l HD / PA-l clipping level indicator [#10] controls areaccessible with a jeweler’s screwdriver through a hole in thecover. The controls are factory preset to a level which matchesmost 400 millivolt input amplifiers.The best way to adjust the clipping indicators is to hook anoscilloscope to the output of the amplifier and turn the pot untilthe clipping lights (the two outside red lights) just flash when theamplifier starts to clip. Without an oscilloscope, adjust thecontrols so that the clipping indicators flash before clippingbecomes audible.TURN-ON CONNECTION(RED WIRE)The PA-l HD / PA-l is turned on by applying Positive 12 Voltsto the red wire [#18]. Usually, the red wire is connected to thesource unit’s “Accessory” or “Auto-Antenna” lead, either ofwhich will go positive when the source is turned on.Although the majoriiy of high-quality automotive source unitshave an Accessory or Auto-Antenna output, there are manywhich may require different turn-on methods. If the source hasno Auto-Antenna lead (or if Auto-Antenna goes down duringtape operation):a.)Find the internal switched power voltage inside the sourceunit and solder a lead to it. Run the lead out through theback of the unit (being sure to use a grommet for insulationfrom the case) and connect to the pre-amplifier turn-onwire.b)Or: install a switch in the car with one terminal connectedto +12 volts and the other to the PA-1 HD / PA-1 red lead.c)Or: Connect the PA-1 HD/ PA-l red lead to accessory pointat the vehicle’s fuse block. In this case the pre-amplifier willbe on wheneverthe vehicle is on. This method will allow thesystem to amplify any noise and turn-on and turn-off trans-ients, and may therefore be unsatisfactory.POWER CONNECTION(WHITE WIRE)The White wire [#16] must be connected directly to a positiveterminal of the battery or to the fuse block to provide a powersource with a low voltage drop and low noise. If the power wiremust be extended, use only 18-gauge or larger wire and makea good splice.It is best to use as short a wire run as possible. DO NOT run thepower wire next to the input cabling to the pre-amplifier: it willinduce noise.Avoid running the White power wire near the radio’s antenna orpower leads, or near sensitive equipment or harnesses. TheWhite power wire could induce noise.The White wire is provided with an in-line 3/4 ampere fuse. Donot use a larger fuse or the pre-amplifier will not be adequatelyprotected.GROUND CONNECTION(BLACK WIRE)The ground wire [#17] must be connected directly to the vehiclechassis, near the pre-amplifier. Ground loops are aggravatedby the length of the ground wire or any resistance in the groundpath. For this reason we do not recommend extending theground wire in any installation.The ground point in the car should be a piece of chassis metalthat is welded to the main body of the vehicle. Painted surfacesshould be scraped or sanded clean before the ground lug isbolted down. (Cover the bare-metal area with paint or grease toprevent rust .)6SPECIFICATIONSNOISE:Signal to nose less than -9OdB.DISTORTION:Less than 0.01% THD+N(Total Harmonic Distortion & Noise).PREAMP FREQUENCY RESPONSE:All controls flat: 20Hz to 10,000 Hz ±.5dBEQUALIZER CONTROLS:Bass Equalizer: ±l2dB at 45HzMidbass:±l2dB at 180HzTreble: ±12dB at 20,000HzCURRENT DRAW:250 milli-Amperes.DIMENSIONS: PA-1 HD6.850” x 3.6” x 1”174mm x 91.4mm x 25.4mmDIMENSIONS: PA-16.75” x 3.5” x 1.5”171.4mm x 88.9mm x 38.1mmNOTE: Specifications subject to change without notice.ROCKFORD FOSGATELIMITED ELECTRONICS WARRANTYRockford Fosgate warrants all electronics to the original retail purchaser only, to be free from defects in materials or workmanship for a period of two (2) years parts and one (1) year labor providing the product was purchased from and installed by an authorized Rockford Fosgate dealer. Warranty on products purchased from, but not installed by an authorized dealer is one (1) year parts, no labor. This warranty is not transferable. Electronics found to be defective during the warranty period will be repaired or replaced at Rockford Fosgate’s discretion. Repaired or replaced electronics will cover the balance of the original warranty period only.Defective product must be shipped prepaid, together with proof of purchase and installation with a brief description of the problem, to the Rockford Fosgate Dealer from whom you purchased the product or to the factory in Tempe, Arizona in the original factory canon or equivalent. Any shipping loss or damage will be borne by you. If you return your product to the factory, please call 602-967-3565, ext. 3081 for a return authorization number. If, upon inspection at either the Dealership or the factory, a determination is made that the product has failed due to materials or workmanship we will repair or replace it at no charge, and return it in a reasonable length of time. If a determination is made that the product has been abused or is out of the warranty period, it will be repaired and returned C.O.D. for the repair and freight. Warranty does not cover the cabinet or any appearance item, any cost or expense related to the removal or reinstallation of the product, any accessory used in conjunction with the product, or any damage to the product resulting from alteration, accident, misuse or abuse. This warranty does not apply if the parts or labor, which would otherwise by provided without charge under this warranty, are obtained from any other source than Rockford Fosgate or an Authorized Rockford Fosgate service center. Rockford Fosgate limits obligation under any implied warranties under state laws to a period not to exceed the warranty period. This warranty applies only to products sold in the United States of America, or its posses-sions. For warranty outside the U.S.A., please contact your local agent. This warranty will terminate if the serial number has been removed, tampered with, or defaced. This product has no factory warranty if purchased from any other than an Authorized Rockford Fosgate Dealer.Ship to:Rockford CorporationWarranty Repair Dept.2055 E. 5th St.Tempe, Arizona 85281 U.S.A9Rockford FosgateA Division of Rockford Corporation641 South Rockford Drive Tempe, Arizona 85281 U.S.A.602 - 967 - 3565。