狄卫一体化摄像机DCC-627P
LVC-C371HP

27倍一体化变焦彩色黑白日夜两用摄像机LVC-C371HP产品特征:内置27倍变焦镜头1/4” 470K像素Super HAD CCD清晰度500TV线日夜转换功能(红外滤色片自动切换)DSS数字慢快门屏幕显示夜间模式最低照度0.005Lux移动侦测屏幕菜单显示锐度、镜像规格参数:信号制式PAL总/有效像素470K/440K图像元件1/4"Super HAD CCD镜头27 倍变焦(F1.5(W),F3.6(T) f=3.25-88.0mm)聚集范围WIDE(0.01m),TELE(1.0m) 同步内同步行频15.625KHz场频50Hz信噪比不低于 52dB最低照度彩色:1Lux 黑白:0 Lux(IR ON)/0.005 Lux(IR OFF)清晰度500TV 线视频输出复合视频 1Vp-p(75 Ω ),Y/C 分离控制变焦/聚焦 DC 控制(PTZ)变焦速度慢速/中速/快速变焦/聚焦预置64 个预置点设置/调用(EEPROM 存储)摄像机地址关,0-255 (总线 256)聚焦模式自动/键控自动/手动白平衡自动(ATW)/室内/室外/手动/键控自动曝光模式自动/光圈手动 /AGC 手动 /DSS 手动移动侦测开/关(灵敏度:0-15[16 种模式 ]) 电子快门1/50 to 1/50,000防闪烁模式手动开/关光圈控制自动/手动自动增益控制自动/手动DSS数字慢快开门工作温度/湿度-10°C--50°C/0%RH—80%RH储存温度/湿度-20°C--60°C/0%RH—85%RH电源DC12V功率最大 3.4W尺寸(WXHXD)57X 62X 96mm重量480g。
GV-FER5702 5MP H.265 超低光 Lux WDR Pro IR 鱼眼长肠 IP 摄像

GV-FER5702 5MP H.265 Super Low Lux WDR Pro IR Fisheye Rugged IP CameraIntroductionGV-FER5702 is a 5 MP outdoor fisheye camera allowing you to monitor all angles of a location and can be installed to the ceiling or the wall.The camera supports H.265 video codec to achieve better compression ratio while maintaining high quality image at reduced network bandwidths. The camera adheres to IP66 and IK10 standards and can be powered through PoE. With its WDR Pro, it can process scenes with contrasting intensity of lights and produce clear image. It is also equipped with a built-in micro SD card slot for local storage.Key Features•1/2.8" progressive scan CMOS•Triple streams from H.265, H.264 and MJPEG•Up to 30 fps at 2592 x 1944•Day and Night function (with removable IR-cut filter)•Intelligent IR•Vandal resistance (IK10)•Ingress protection (IP66)•One sensor input and one alarm output•Built-in microphone•Built-in micro SD card slot (SD/SDHC/SDXC/UHS-I, Class 10) for local storage•Two-way audio•DC 12V/ PoE (IEEE 802.af)•No mechanical moving parts•Wide Dynamic Range Pro (WDR Pro)•2D / 3D noise reduction•Smart streaming•Tampering alarm•Virtual PTZ function•Auto Pan function•Privacy mask•Visual automation•Text overlay•12 languages on Web interface•ONVIF Profile S / G / T supportThe following is a comparison of live view between a third-party fisheye camera and a GV-Fisheye Camera with IR LED.Third-Party Fisheye Camera GV-Fisheye Camera with IR LEDPhotosDimensionsCameraImage Sensor 1/2.8” progressive scan CMOS Picture Elements 2592 (H) x 1944 (V)Minimum Illumination Color 0.01 Lux (F2.0, AGC ON) IR On 0 LuxShutter Speed Auto / Manual (1 ~ 1/100000s) White Balance Auto / Manual (2800K ~ 8500K) S/N Ratio 55 dBWDR Pro YesDynamic Range 120 dBOptics LensMegapixel YesDay/Night Yes (with removab le IR‐cut filter) Lens Type FixedFocal Length 1.4 mmMaximum Aperture F/2Mount M12Image Format 1/2.8”Horizontal FOV 180°Operation Focus Fixed Zoom Fixed Iris FixedIR LED Quantity 3 IR LEDsMax. IR Distance 20 m (65 ft)OperationVideo Compression H.265, H.264, MJPEGVideo Streaming Triple streams from H.265, H.264 or MJPEGFrame Rate 30 fps at 2592 x 1944 (50/60 Hz)*The frame rate and the performance may vary depending on the number of connections and data bitrates (different scenes).Image Setting Brightness, Contrast, Saturation, Sharpness, Flicker-less, Image Orientation (Flip, Mirror, 0°, 180°)Audio Compression G.711Audio Support Two‐way Audio (external speaker required) Sensor Input 1 Input, dry contact, NO / NCAlarm Output 1 Relay Output (1A 30V DC / 0.3A 125V AC)Video ResolutionVideo Resolution Main Stream 2592 x 1944 (Default) Sub Stream 640 x 480 (Default) Third Stream (Closed by Default) 640 x 360, 352 x 288NetworkInterface 10/100 EthernetProtocol ARP, DHCP, DDNS, DNS, DynDNS, FTP, HTTP, HTTPS, ICMP, IGMP, IPv4, NTP,RTCP, RTP, RTSP, SMTP, SNMP, TCP, UDP, UPnP, ONVIF (Profile S, G, T) MechanicalConnectors Power DC JackEthernet RJ-45Audio1 In (built‐in or external microphone with power supply)1 Out (Audio Out Wire)Digital I/O I/O wiresLocal StorageMicro SD card slot (SD/SDHC/SDXC/UHS-I, Class 10)*UHS-II card type is not supported.GeneralOperating Temperature Start-up-30⁰C ~ 60⁰C (-22°F ~ 140°F) OperationHumidity 0% ~ 95% (no condensation)Power Source 12V DC / PoE (IEEE 802.3af)Max. Power Consumption 8.5WDimension Ø 125x 44 mm (Ø 4.9” x 1.7”)Weight 360 g (0.79 lb)Ingress Protection IP66Vandal Resistance IK10Regulatory CE, FCC, RoHS compliantWeb InterfaceInstallation Management Web-based configurationMaintenance Firmware upgrade through Web Browser or GV-IP Device Utility Language Czech, English, French, German, Hungarian, Italian, Japanese, Portuguese,Russian, Spanish, Traditional Chinese, Simplified ChineseApplicationsSoftware Supported GV-VMS (V17.4.3 / V18.2.1)*It is required to apply patch files to all the supported software.Smart Device Access GV‐Eye for iOS and AndroidLive Viewing Browser (IE, Edge, Chrome, Firefox, Safari), Mobile AppNote:1.It is required to apply patch files to some of the supported software.2.Do not use clothes or any ordinary material to clean the camera cover since they may result in scratches.3.Mind the following when using an inserted memory card for recording:•Recorded data on the memory card can be damaged or lost if the data are accessed while the camera is under physical shock, power interruption, memory card detachment or when the memory card reaches the end of its lifespan. Noguarantee is provided for such causes.•The stored data can be lost if the memory card is not accessed for a long period of time. Back up your data periodically if you seldom access the memory card.•Memory cards are expendable and their durability varies according to the conditions of the installed site and how they are used. Back up your data regularly and replace the memory card annually.•To avoid power outage, it is highly suggested to apply a battery backup (UPS).•For better performance, it is highly suggested to use micro SD card of MLC NAND flash, Class 10.•Replace the memory card when its read/write speed is lower than 6 MB/s or when the memory card is frequently undetected by the camera.4.To avoid reflected glare by IR LED, keep a minimum distance of 1 M (3.28 ft) between the camera body and nearby walls.5.Specifications are subject to change without notice.Packing List1.GV-FER5702 Fisheye Camera2.Waterproof Rubber Set3.Screw Kit4.Drill Template Paster5.Download GuideAccessoriesModel No. Name DetailsGV-Mount107 (must be used with GV-Mount212P) Pendant Bracket Dimensions: Ø 120 x 334 mm(Ø 4.72” x 13.15”)Weight: 0.74 kg (1.63 lb)GV-Mount211P Wall Mount andJunction Box Dimensions: 233 x 126 x 126 mm (9.2” x 5” x 5”)Weight: 1 kg (2.2 lb)GV-Mount212P Wall Box Mount Dimensions: Ø 126 x 36 mm(Ø5.0” x 1.4”)Weight: 0.22 kg (0.48 lb)GV-PA191 Power over Ethernet(PoE) AdapterGV-PA191 is a Power over Ethernet (PoE)adapter designed to provide power to theIP device through a single Ethernet cable.GV-PoE Switch GV-PoE Switch is designed to provide power along with network connection for IP devices. GV-PoE Switch is available in various models with different numbers and types of ports.Power Adapter Contact our sales representatives for the countries and areas supported.。
ICOM-- 2720说明书

中文说明书ICOM-- 2720说明书部分中文翻译参考声明:本文根据ICOM IC2720英文说明书翻译,仅供业余无线电爱好者进行交流、参考,并非正式说明书。
作者对于文章翻译过程中可能产生的问题及由此导致的任何问题与后果不承担任何责任。
欢迎各位HAM对文章中翻译问题进行指正、探讨。
✧特点V/V U/U 同时收听功能左右段控制完全分离分离控制面板,灵活安装最大50W发射功率(140M段)35W(400M段)分离控制面板MIC接口全新DMS (动态频道搜索)系统✧注意事项RF exposure! 无线电波辐射!本设备产生无线电辐射能量。
操作此设备时必须非常注意。
如果对于辐射或安全级别有任何问题,请参考FCC关于人体受磁场影响的相关测量部分。
禁止接交流电源,可能导致火灾或电击事故。
禁止驾车过程中使用电台,安全驾驶需要绝对的注意力——任何分散注意力的行为将导致交通事故。
禁止将设备接到16V以上直流电源,将导致设备损坏。
禁止(安装时)在保险管及插头间切断电线,接反极性将导致设备损坏。
禁止将设备接触雨雪或其他液体,因其会导致设备损坏。
禁止用湿手接触设备,这可能导致触电或设备损坏。
禁止将设备安装在可能妨碍驾驶或造成人体损伤的位置。
禁止任何物体阻碍设备背部的散热风扇运转。
不要在不需要发射的时候按PTT按钮。
不要让儿童接触无线电设备。
在车上使用设备时,不要在引擎关闭的情况下进行使用,这会使汽车电瓶电力很快耗尽。
小心!长时间使用设备时,设备将发热。
避免在阳光直射或在–10℃以下60℃以上的温度环境下操作设备。
避免使用化学制剂进行清洁,如:汽油、酒精等。
仅使用ICOM提供的原配或另配MIC,使用其他第三方制造的MIC可能因为线序不同而损坏设备。
✧配件1.3米2.直流电源线车载安装支架3.HM-133手眯* HM-118N 或HM-118TN/TAN 手眯包装同样有售4.20A保险管5.固定螺丝、螺母、垫圈6.手眯挂钩7.控制面板支架(MB-84)8.控制面板支架固定螺丝、螺母、垫圈9.连接电缆3.5米+美版机包含氧铁整流环一只✧快速参考安装一体安装需要使用MB-85组合架将控制板与主机固定在一起(20CM连接线与MB85一同供应)。
高清一体化摄像机
高清一体化摄像机高清一体化摄像机推荐导语:随着数码科技的发展,数码已经融入人们之中。
一体化的摄像机其技术从家用摄像机技术发展而来,与传统摄像机相比,一体机体积小巧、美观,在安装方面具有优势,比较方便,其电源、视频、控制信号均有直接插口,不似传统摄像机有麻烦的连线。
那么一体化的摄像机价格是多少呢?接下来就让我们一起来了解下吧。
高清一体化摄像机推荐三星SNO-5080RP参考价格:5800元三星SNO-5080RP 内置1/3英寸CMOS传感器,有效像素达130万,搭配3.6倍变焦镜头,焦距杂2.8-10mm可调,最大化的扩大了监控摄像机的监控视野。
除此之外,该款可实现在无红外灯的情况下最低0.3lux环境的正常成像。
而在31个红外灯的作用下,可以使摄像机保证30米左右的夜视照度。
三星SNO-5080RP是三星旗下一款高清网络摄像机,红外防水,支持各种协议,ONVIF协议,兼容海康,大华等各家知名品牌的NVR。
三星SNO-5080RP 有着十分强劲的昼夜监控能力,无论是监控摄像机自身的视频处理,还是对于周边的.适应能力等,都有着十分不错的效果。
总之,是一款非常实用的视频监控设备。
索尼SSC-ET185P参考价格:3040元索尼SSC-ET185P模拟监控摄像机采用一体机结构设计,支持日夜转换和宽动态功能,内置1/4 英寸Exwave HAD CCD传感器,最低彩色低照度为0.5Lux,黑白照度0.007Lux,信噪比为50dB,更好处理画质效果。
索尼SSC-ET185P模拟监控摄像机强低照度搭配远视眼,在超强能力低照度传感器的作用下也能够实现夜视监控。
这款监控摄像机的另一大优势在于变焦技术,18被光学变焦和12倍数字变焦,数据显示变焦达到了216倍。
该一体机彩色成像,画质较为清晰,高倍变焦可捕捉主目标细节。
松下WV-CP600参考价格:2750元松下WV-CP600就具备以上各种特性,它是一款枪式摄像机,成像色彩为彩色,成像器件采用1/3英寸行间转移CCD,为获取清晰的图像提供了保障,水平清晰度为650TVL,分辨率则达到976*582像素,完美演绎高清画质,让用户可以关注到更多细节,电子快门为1/50秒-1/120,000秒,信噪比为52dB,满足一般用户的使用要求。
家用监控摄像头要如何选

家用监控摄像头要如何选?就在上周,小编的一个朋友家里失窃了。
具体导致失窃的原因目前尚无法考证,但是初步怀疑是家里的男主人在出门的时候没有把大门完全关好。
朋友居住的小区是封闭式管理的小区,有物业公司24小时全程监控。
但即使如此,还是在此次失窃中损失掉了数万元的金饰品。
事后,朋友惋惜的表示钱还能再赚回来。
不过小编倒是清楚,这种说法其实更是一种自我安慰,自己辛辛苦苦赚的钱居然便宜了不劳而获的小偷,也是很心塞。
这件事也让小编警醒,除了公共场所应该安装摄像头之外,咱们日常家居生活里是否也需要这样的利器来保卫我们的人身财产安全呢?对于家用监控摄像,可能很多小伙伴都觉得一头雾水。
反正我锁好了门窗,怎么可能出事呢?对于朋友家的失窃,我们事后讨论了一下,住家被盗,也是一个概率问题。
毕竟我们没法保证这样的事情绝对不会发生在自己的身上,所以防患于未然非常有必要。
为了给不了解家庭监控的选择与安装的小伙伴来一个科普,小编今天就来跟大家聊聊这个严肃的话题。
首先,在选择家用监控摄像头之前,我们要清楚自己选择的目的是什么,然后再根据具体需求进行选择。
对于普通家庭来说,使用监控的目的无非有以下几种:家中无人时监控财产安全,监控掌握家中活动的人的动向,窃取别人的隐私。
关于最后这一条,由于违法法律和道德,且侵犯了他人隐私,因此不在我们今天的讨论范围之内。
监控财产安全,是为了防止在家中无人的情况下发生失窃事件,而这一条,是我们今天要谈论的重点。
监控家中人的动向可以包括监控家中的老人是否安全,家中的保姆是否履行了自己的工作指责等等,这一条的需求可以跟保证财产安全合并阅读。
明确了监控的目的性,我们就可以根据这几个目的来确认购买的摄像头都应该具备哪些基本功能。
第一,选择的监控摄像头要身材小巧家用的监控摄像头通常需要安装在门口或窗台等位置,目的是为了防止坏人入侵,在显眼的地方安装,其设计需要体积小巧一些,容易隐藏,在不易被入侵者发现的同时,也不要打扰到家人的日常生活。
D-Link DCS-4602EV 高清外部防盗PoE球形摄像头快速安装指南说明书

Viewing Your Camera via Web BrowserD-Link DCS-4602EV Quick Installation GuideD-Link DCS-4602EV Quick Installation Guide6ENGLISHConnect the power and Ethernet cables, or just the Ethernet cable if you are using a PoE connection. Reattach the camera cover.To adjust the camera's angle, pull the black inner cover and remove it from the camera. Loosen the adjustment screw on the side of the camera, then retighten it after moving the camera to the desired angle. Y ou can also rotate the camera by grasping the camera and turning it left or right.When you are done adjusting the camera's angle, put the inner cover back into place.Note : The camera has a limited range of motion; if it stops when you are adjusting it, do not attempt to rotate or tilt the camera any further in that direction.D-Link DCS-4602EV Quick Installation Guide 7ENGLISH Using the DCS-37-1 Mount (optional)Use the provided screws to mount the DCS-37-1 to thewall.Place the DCS-37-1 mounting sticker in the desiredlocation, then use a 6 mm drill bit to drill the required holes 25 mm deep and insert the wall anchors into the holes.If you plan to pass cables through the wall, you will alsoneed to drill a hole for the cable channel.Remove the cover from the camera.Pass the camera connectors through the back or bottomcable channel on the DCS-37-1. Use the provided screws to mount the camera to the DCS-37-1 using the set ofmounting holes marked A .Remove the inner cover and adjust the angle and rotation of the camera as desired, then put the inner cover back in place.Attach the camera cover.If you are passing the camera cables through the wall,place the rubber stopper into the bottom cable channel to seal it.D-Link DCS-4602EV Quick Installation GuideAnzeige Ihrer Kamera über einen WebbrowserAffichage de votre caméra via un navigateur WebD-Link DCS-4602EV Quick Installation GuideD-Link DCS-4602EV Quick Installation GuideVisualización de su cámara a través del explorador de webVisualizzazione della telecameratramite il browser WebD-Link DCS-4602EV Quick Installation Guide。
布拉德安全科技BL-C210网络摄像头安装指南说明书

Installation GuideModel No.BL-C210(Wired Type)Model number suffixes (“A”, “CE”, and “E”) are omitted from the following model numbers shown in this document, unless necessary.BL-C210A, BL-C210CE, BL-C210EPlease read the included Important Information before proceeding.Complete Operating Instructions and all other documentation can be found on the included CD-ROM.•This document (Installation Guide) explains how to physically connect the camera to the power supply and network, as well how to mount or place the camera for regular use.•The Setup Guide describes how to set up the camera so that it can be accessed using a PC.•Refer to the Operating Instructions on the CD-ROM for details regarding the camera’s features.•Refer to the Troubleshooting Guide on the CD-ROM if you have any problems configuring or using the camera.Abbreviations•UPnP is the abbreviation for “Universal Plug and Play”.•The Network Camera is referred to as “the camera” in this document.•The Setup CD-ROM is referred to as “the CD-ROM” in this document.Installation Procedure OverviewThe following is an overview of the steps required to install and setup the camera. All steps are explained in this document unless otherwise noted.1.Confirm the following items are included in the camera’s packaging.2.You will need the following additional items to install and configure the camera.– a PC (see the system requirements in the Important Information document)– 2 LAN cables (CAT-5 straight cable)– a routerCamera Diagrams3 for information about the PRIVACY button.*2See 1.1 Understanding the Camera Indicators in the Troubleshooting Guide on the CD-ROM for indicator meaning.*3BL-C210A onlyPreparationConfirm that you have all the items required for installation.Camera DiagramMake sure you know the names of the camera’s physical features.ConnectionsConnecting the camera to your network and to the power outlet.Setup•Refer to the included Setup Guide for information on configuring the camera to be accessed from a PC.•BL-C210A only: Refer to the included Setup Guide for VIERA Connection for information on registering the camera to a Panasonic VIERA TV.MountingMounting or placing the camera.E F PRIVACY button *1Built-in sensor (pyroelectric infrared sensor)Speaker (for built-in alarm)POWER indicator *2AV LINK indicator *3Microphone Lens cover LensI J L Wall mounting holes Tripod mounting holeSerial number and MAC address label DATA/POWER INExternal INPUT interfaceFACTORY DEFAULT RESET button Safety wire hole Cable cover© Panasonic System Networks Co., Ltd. 2009PNQX1993YB KK0809CQ4119Please read this document before using the product, and save this document for future2ConnectionsConnect the camera to your router and to the power outlet as described below.•Before proceeding, confirm that your PC is connected to your router and can access the Internet. Also confirm that your router’s UPnP ™ feature is enabled. (Most routers have UPnP ™ turned off by default.) Refer to the operating instructions included with your router or to the Panasonic Network Camera website (/pcc/ipcam/) for more information.•The external INPUT interface is not capable of connecting directly to devices that require large amounts of current. In some cases, acustom interface circuit (customer-provided) may have to be used. Serious damage to the camera may result if a device that exceeds its electrical capability is connected to the external INPUT interface.•Low voltage/current circuits and high voltage/current circuits are used in the camera circuit. All wiring should be performed by a qualified electrician. Incorrect wiring could damage the camera and cause a fatal electric shock.the external INPUT interface, terminals may become damaged or the interface may be pushed inside the camera body and become unusable.38.When deciding where to mount the camera, you can verify thesensor’s ability to make detections that satisfy your needs by referring to the camera’s indicator. See 7.5 Changing the Indicator Display in the Operating Instructions on the CD-ROM, and configure the camera to light the indicator in orange when the sensor makes a detection. You can then adjust the sensitivity of the sensor (see 2.9 Adjusting Sensor Sensitivity in the Operating Instructions on the CD-ROM) or change the camera’s location if necessary. Note that if you increase the sensitivity of the sensor, the sensor may make inaccurate detections.Note•If you are not satisfied with the sensor’s ability to make detections, we recommend using the camera’s motion detection feature. This feature detects motion by detecting changes in the camera image. For more information, see Section 2 Using Triggers to Buffer and Transfer Images in the Operating Instructions on the CD-ROM.•The built-in sensor and the motion detection feature are notdesigned to be used for security or surveillance. No responsibility will be taken by our company with respect to consequences resulting from the use of these features.PRIVACY ButtonPrivacy mode allows you to protect your privacy by hiding the lens inside the camera, preventing camera images from being seen. You can turn privacy mode on by pressing the PRIVACY button on the front of the camera.When privacy mode is turned on, the PRIVACY button (which also serves as the camera’s indicator) changes from green to red to let you know that privacy mode is activated. To turn privacy mode off and allow the camera to be accessed, simply press the PRIVACY button again. It should turn green within a few seconds.If users are accessing the camera when privacy mode is turned on, the camera image area displayed in their web browsers turns gray or black. No camera pages can be accessed by users while privacy mode is turned on. Once privacy mode is turned off, users can press the refresh button in their web browsers to view images again.The camera’s administrator can also turn privacy mode on and off using a PC or a mobile phone, and the PRIVACY button itself can be disabled so that privacy mode cannot be turned on or off by pressing the PRIVACY button.For more information about privacy mode, see 7.6 Privacy Mode in the Operating Instructions on the CD-ROM.Note•If you plan on using the PRIVACY button to turn privacy mode on and off, make sure you mount the camera where you can reach the button.Other Notes•Camera images can be viewed in relatively dark areas, however, image quality decreases when viewing dark images. We recommend using supplemental lighting for best results.•Prolonged exposure to direct sunlight or halogen light may damage the camera’s image sensor. Mount the camera appropriately.temperature changes such as near an air conditioneras glass in front of the cameraMounting the Camera•The camera illustrations in this document depict the BL-C210A. Caution•Do not drive the screws into a soft material. Drive the screws into a secure area of the wall, such as a wall stud, otherwise the camera may fall and be damaged.•Make sure you attach the safety wire when mounting the camera, to prevent the camera from falling.Note•Use screws that are appropriate for the material of the wall.•The included screws are for use with wooden walls only.•The pull-out strength of the installation area must be at least 294 N(30 kgf) per screw.•The camera is intended for indoor use only and should not bemounted outdoors.•To ensure that camera images are displayed properly, do not mount the camera on an incline. Mount the camera so that it isperpendicular to the floor. Do not mount the camera upside down. Tripod Mount•Do not use a tripod screw with a thread of 6 mm (1/4 inch) or more.This may damage the tripod mounting hole.•The camera cannot be mounted depending on the shape of thecamera platform.Wall Mount1.Remove the cable cover, secure the safety wire to the camera usingscrew B (included) and washer M (included).•Make sure you attach the safety wire when mounting the camera, to prevent the camera from falling.2.Connect a LAN cable to the camera and attach the cable cover.•Insert the LAN cable until it clicks into to place.3.Mount the camera on the screws by inserting the screws into thecamera’s wall mounting holes, then sliding the camera down until it is secure.•Leave 2 mm (1/16 inch) of space between the screw heads and the washers, as shown below.4.Secure the safety wire to the wall using screw A (included) and washerL (included).•Leave some slack in the safety wire, as shown.•Attach the safety wire in a position so that if the camera were tobecome detached, it would not fall on nearby people.When mounting on a mortar or concrete surface•Prepare anchors for a 4 mm (3/16 inch) diameter screw for the safety wire, and 3.5 mm (1/8 inch) diameter screws for the wall mounting.1.Mark the points where you are going to make holes.2.Make holes with an electric drill. Insert anchors (customer-provided)into the holes and use a hammer to make them flush with the wall.•Mortar walls break easily when drilling. Be careful of pieces ofmortar which may become loose and fall.3.Mount the camera by following the instructions on this page.4.Mark the point where you are going to make a hole for the safety wire,follow step 2 and secure the safety wire.Connecting to the power transfer unit1.Connect a LAN cable to the power transfer unit and to the switchinghub, router, etc.•The power transfer unit can be fixed in place with 2 pieces fromscrew A (included) (4 mm x 20 mm [3/16 inch x 13/16 inch]).2.Connect a LAN cable from the camera to the power transfer unit.3.Connect the AC adaptor to the power transfer unit and plug the otherend into the power outlet.•The camera will activate.4。
清视图HD2-TD27Z 2兆像素星光HD-AVS眼形摄像头产品介绍说明书
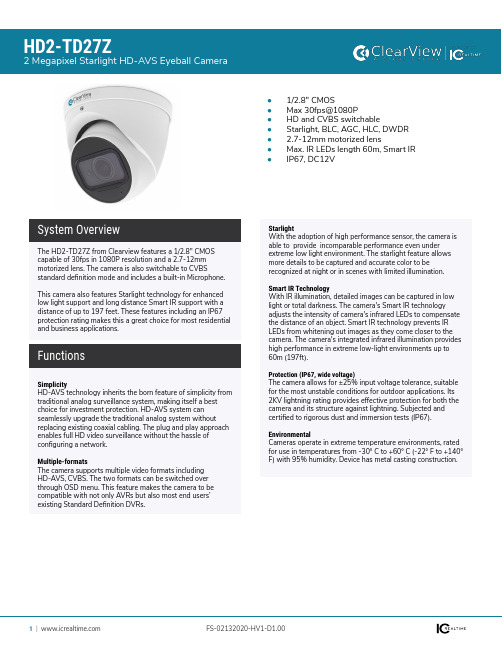
HD2-TD27Z2 Megapixel Starlight HD-AVS Eyeball Camera●1/2.8" CMOS●Max 30fps@1080P●HD and CVBS switchable●Starlight, BLC, AGC, HLC, DWDR ● 2.7-12mm motorized lens●Max. IR LEDs length 60m, Smart IR ●IP67, DC12VSimplicityHD-AVS technology inherits the born feature of simplicity from traditional analog surveillance system, making itself a best choice for investment protection. HD-AVS system can seamlessly upgrade the traditional analog system without replacing existing coaxial cabling. The plug and play approach enables full HD video surveillance without the hassle of configuring a network.Multiple-formatsThe camera supports multiple video formats including HD-AVS, CVBS. The two formats can be switched over through OSD menu. This feature makes the camera to be compatible with not only AVRs but also most end users’ existing Standard Definition DVRs.The HD2-TD27Z from Clearview features a 1/2.8" CMOS capable of 30fps in 1080P resolution and a 2.7-12mm motorized lens. The camera is also switchable to CVBSstandard definition mode and includes a built-in Microphone. This camera also features Starlight technology for enhanced low light support and long distance Smart IR support with a distance of up to 197 feet. These features including an IP67 protection rating makes this a great choice for most residential and business applications.System OverviewFunctionsStarlightWith the adoption of high performance sensor, the camera is able to provide incomparable performance even under extreme low light environment. The starlight feature allows more details to be captured and accurate color to be recognized at night or in scenes with limited illumination.Smart IR TechnologyWith IR illumination, detailed images can be captured in low light or total darkness. The camera's Smart IR technologyadjusts the intensity of camera's infrared LEDs to compensate the distance of an object. Smart IR technology prevents IR LEDs from whitening out images as they come closer to the camera. The camera's integrated infrared illumination provides high performance in extreme low-light environments up to 60m (197ft).Protection (IP67, wide voltage)The camera allows for ±25% input voltage tolerance, suitable for the most unstable conditions for outdoor applications. Its 2KV lightning rating provides effective protection for both the camera and its structure against lightning. Subjected and certified to rigorous dust and immersion tests (IP67).EnvironmentalCameras operate in extreme temperature environments, rated for use in temperatures from -30° C to +60° C (-22° F to +140° F) with 95% humidity. Device has metal casting construction.Technical SpecificationImage Sensor 1/2.8" CMOSEffective Pixels 1920(H)×1080(V), 2MP Scanning System ProgressiveElectronic Shutter SpeedPAL: 1/25~1/100000s NTSC: 1/30~1/100000sMinimum Illumination 0.005Lux/F1.8, 30IRE, 0Lux IR on S/N Ratio More than 65dB IR Distance Up to 60m (197feet)IR On/Off Control Auto / Manual IR LEDs2CameraPan/Tilt/Rotation RangePan: 0° ~ 360°Tilt: 0° ~ 78°Rotation: 0° ~ 360°Pan/Tilt/RotationResolution 1080P (1920×1080)Frame Rate 25/30fps@1080P, 25/30/50/60fps@720PVideo Output 1-channel BNC high definition video output / CVBS video output (Can switch)Day/Night Auto (ICR) / Manual OSD Menu Multi-language BLC Mode BLC / HLC / DWDR WDR DWDR Gain Control AGC Noise Reduction 2DWhite Balance Auto / Manual Smart IRAuto / ManualVideoAudio Interface Built-in mic RS485N/A AlarmN/AInterfacePower Supply 12V DC ±30%Power ConsumptionMax 8.2W (12V DC, IR on)ElectricalOperating Conditions -30°C ~ +60°C (-22°F ~ +140°F) / Less than 90% RH * Start up should be done at above -30°C (-22°F)Storage Conditions -30°C ~ +60°C (-22°F ~ +140°F) / Less than 90% RH Ingress ProtectionIP67EnvironmentalCasing AluminumDimensions 122mm×104mm (4.8"×4.1")Weight 0.57kg (1.26lb)Gross Weight0.72kg (1.59lb)ConstructionLensLens Type Motorized lens / Fixed iris Mount Type Board-in Focal Length 2.7mm~12mm Max. Aperture F1.8Angle of View H: 101.7°~32.3°Focus Control Motorized Close Focus Distance200mm 7.87”DORI DistanceLensDetect Observe Recognize Identify W 153 ft 61 ft 31 ft 15 ft T448 ft179 ft90 ft45 ftAccessories Dimensions (mm/in)。
- 1、下载文档前请自行甄别文档内容的完整性,平台不提供额外的编辑、内容补充、找答案等附加服务。
- 2、"仅部分预览"的文档,不可在线预览部分如存在完整性等问题,可反馈申请退款(可完整预览的文档不适用该条件!)。
- 3、如文档侵犯您的权益,请联系客服反馈,我们会尽快为您处理(人工客服工作时间:9:00-18:30)。
高清晰、彩转黑、感红外一体化摄像机
DCC-627P系列
产品特征:
-1/4″SONY Super HAD CCD
-水平清晰度:540TVL
-光学变倍22倍(4~88mm);23倍(3.9~89.7mm);27倍(3.9~94.5mm)
-最低照度:彩色0.01LUX
-聚焦速度快,色彩还原逼真
-提供外部设备对摄像机控制的开关接口
-RS485远程控制功能
-高信噪比,最高可达52dB
-宽电压设计:适合各种地区的电网及突发高电压
概述
DCC-62X系列内置白天晚上双方案,自动感应白天/晚上不同的光线,自动调整增益,亮度等参数,白天清晰透亮,色彩纯正,晚上加强增益及亮度达到监控效果,(可选感红外效果好)。
多种聚焦模式可选,聚焦速度稳定可靠,清晰透亮,安装调试方便,真正做到以尽量少的投资达到最大的防范效果。
以工程人员现场调试方便,适合各种距离,光线是工程商喜爱使用产品。
支持用户设计下列功能
●电子翻转功能
●隐私遮挡功能
●自动电子快门控制
●EIS电子防抖功能
●控制接口: RS485/232TTL
OSD功能
OSD功能是通过在屏幕显示机器内部菜单,直观调整内部参数设置的功能。
通过按菜单(MENU)按钮打开OSD系统,屏幕上显示主功能菜单通过简单的按键,方便的将调整选项进行设置,屏幕上实时显示操作后的摄像机图像状态。
适合范围
该摄像机已经广泛应用于需日夜及大范围监控的环境,如:车站、码头、广场、小区、体育场、学校和机场等场所。
技术参数。