电磁炉英文说明书
Philips 电磁炉说明书
HD4921EN MS VI ZH-T•Jangan dedahkan periuk aruhan kepada suhu yang tinggi,gas panas, stim atau haba lembap. Jangan letakkan periuk aruhan di atas atau dekat dengan dapur atau pemasak yang sedang beroperasi atau masih panas.•Sentiasa matikan perkakas sebelum anda mencabut plagnya.•Cabut palam perkakas dan biarkan sehingga sejuk sebelum anda membersihkannya.•Letakkan dapur induksi di atas permukaan yang stabil, mendatar dan rata serta pastikan terdapat sekurang-kurangnya 10cm ruang kosong di sekelilingnya untuk mengelakkan pemanasan melampau.•Jangan gunakan dapur induksi di atas dapur gas atau plat logam.•Bagi pengudaraan yang baik, jangan sekat saluran udara keluar dan masuk semasa perkakas sedang beroperasi, cth. jangan gunakan perkakas di atas alas meja plastik.•Jangan letak apa-apa di antara alat memasak dan plat memasak.•Jangan letakkan objek berat di atas periuk aruhan.•Berhati-hati dengan stim panas yang keluar dari alat memasak semasa memasak atau apabila anda membuka penutupnya.•Jangan angkat atau pindahkan dapur induksi semasa digunakan.•Jangan letak alatmemasak yang kosongdi atas periuk aruhanyang telah dihidupkan,kerana ini bolehmenyebabkan alatmemasak tersebutmenjadi terherot dangegelung pemanasanmenjadi rosak.•Jangan simpan bahandan cecair mudahterbakar berhampiranatau di atas periukaruhan.•Elakkan sentuhanyang kuat antaraalat memasak atauobjek lain dengan platmemasak kristalit.•Sentiasa letakkan alatmemasak pada zonmemasak apabilamemasak.Pematian automatikPerkakas dilengkapi dengan pematian automatik.Ia akan mati secara automatik dalam keadaanberikut:• Jika alat memasak dengan dasarnya bergarispusat kurang daripada 6cm, atau objek kecilseperti pisau, garpu atau sudu diletakkan di atasplat semasa memasak.• Jika voltan lebih rendah daripada 120±5V ataulebih tinggi daripada 280±5V.• Jika tiada alat memasak diletakkan di zonmemasak semasa periuk aruhan sedangberoperasi selama 1 minit.• Jika periuk aruhan telah melahu terlalu lama.• Jika suhu di pertengahan plat lebih tinggidaripada 300°C, atau suhu dalaman periukaruhan terlalu tinggi.Medan elektromagnet (EMF)Perkakas Philips ini mematuhi semua piawai yangberkaitan dengan medan elektromagnet (EMF). Jikadikendalikan dengan betul dan menurut arahan didalam manual pengguna ini, perkakas ini selamatuntuk digunakan berdasarkan bukti saintifik yangada pada masa ini.Hãy đọc kỹ tài liệu thông tin quan trọng này trước khi sửdụng thiết bị và hãy cất giữ để tiện tham khảo sau này.Nguy hiểm•Không được ngâm nhúngthiết bị.Cảnh báo•Thiết bị này được thiết kếđể sử dụng trong nhà vànhững nơi tương tự như:•khu vực nhà bếp cho nhânviên trong cửa hàng, vănphòng và các môi trườnglàm việc khác;• nhà trại;•dùng trong khách sạn, nhànghỉ và khu dân cư;•loại hình nhà trọ qua đêmcó phục vụ ăn sáng.•Thiết bị này không dành chongười dùng (bao gồm cả trẻem) có sức khỏe kém, khảnăng giác quan hoặc thầnkinh suy giảm, hoặc thiếukinh nghiệm và kiến thức,trừ khi họ được giám sáthoặc hướng dẫn sử dụngthiết bị bởi người có tráchnhiệm đảm bảo an toàn chohọ.•Trẻ em phải được giám sátđể đảm bảo rằng chúngkhông chơi đùa với thiết bịnày.•Thiết bị này không đượcthiết kế để hoạt động nhưbộ hẹn giờ cắm ngoài hoặchệ thống điều khiển từ xariêng.•Nếu dây điện bị hỏng, bạnphải thay dây điện tại nhàsản xuất, trung tâm dịch vụhoặc những nơi có khả năngvà trình độ tương đương đểtránh gây nguy hiểm.•Không nên đặt các vật bằngkim loại như là dao, nĩa, thìavà nắp trên bếp từ vì chúngcó thể bị làm nóng.•CẢNH BÁO: Nếu bề mặtcủa tấm nấu bị rạn nứt, hãytắt thiết bị và không tiếp tụcsử dụng nó để tránh nguycơ bị điện giật.•Kiểm tra xem điện áp ghitrên thiết bị có tương ứngvới điện áp nguồn nơi sửdụng trước khi nối thiết bịvới nguồn điện.•Luôn đảm bảo rằng phíchcắm được cắm chắc chắnvào ổ điện.•Không sử dụng thiết bị nếuphích cắm, dây điện nguồnhay chính thiết bị bị hưhỏng.•Nếu thiết bị được sử dụngkhông đúng cách hoặc dùngcho những mục đích chuyênnghiệp hay bán chuyênnghiệp hoặc nếu thiết bịđược sử dụng không theohướng dẫn, chế độ bảo hànhsẽ bị mất hiệu lực và Philipssẽ không chịu trách nhiệmđối với bất cứ hư hỏng nàophát sinh.•Để thiết bị và dây điệnngoài tầm với của trẻ emdưới 8 tuổi. Không để dâyđiện nguồn treo trên cạnhbàn hoặc nơi chuẩn bị đồ ăncó đặt thiết bị trên đó.•Nhiệt độ bề mặt có thể tiếpxúc có thể cao khi thiết bịhoạt động.•Đảm bảo tấm nấu sạch sẽvà khô trước khi bật bếp.•Không che cửa thoát khí khibếp từ đang hoạt động.•Không cắm phích cắm củathiết bị vào ổ điện hay sửdụng bảng điều khiển bằngtay ướt.•Không chạm vào tấm nấusau khi nấu, vì tấm này vẫngiữ nhiệt của dụng cụ nấu.•Không nhét các vật lạ nhưdây thép hoặc bu lông vàothiết bị.•Không dùng nhôm che phủbất kỳ phần nào của tấmnấu để tránh nguy cơ bịđiện giật, đoản mạch hoặchỏa hoạn.Chú ý•Không sử dụng bất kỳ phụkiện hoặc bộ phận nàomà Philips không đặc biệtkhuyên dùng. Nếu bạn sửdụng các phụ kiện hoặc bộphận không phải của Philips,bảo hành sẽ bị mất hiệu lực.•Không cho bếp từ tiếp xúcvới nhiệt độ cao, khí nóng,hơi nước hoặc nhiệt ẩm.Không đặt bếp từ trên hoặcgần bếp hay thiết bị đunđang hoạt động hoặc vẫncòn nóng.•Luôn tắt thiết bị trước khirút phích cắm điện.•Luôn rút phích cắm củathiết bị ra và để cho thiết bịnguội xuống trước khi lauchùi.•Đặt bếp từ trên một mặtphẳng nằm ngang, vữngchắc và bằng phẳng và đảmbảo bếp cách các vật quanhnó một khoảng tối thiểu là10cm để tránh bị nóng quá.•Không sử dụng bếp từ trênbếp ga hoặc tấm kim loại.•Để thông khí tốt hơn,không che chắn cửa cấp khívà thoát khí khi thiết bị đanghoạt động, ví dụ: không đểthiết bị hoạt động trên khănlau bàn bằng nhựa.•Không đặt bất cứ thứ gì giữadụng cụ nấu và tấm nấu.•Không đặt các vật nặng lênbếp từ.•Hãy thận trọng với hơi nướcthoát ra từ dụng cụ nấu khiđang nấu hoặc mở nắp.•Không nhấc và di chuyểnbếp từ trong khi bếp đanghoạt động.•Không đặt dụng cụ nấukhông có gì trên bếp từ đãbật, vì làm như vậy có thểlàm cho dụng cụ nấu bịméo hoặc làm hư cuộn dâylàm nóng.•Không cất giữ chất lỏnghoặc vật liệu dễ cháy gầnhoặc trên bếp từ.•Tránh tiếp xúc mạnh giữadụng cụ nấu hoặc các đồvật khác và tấm nấu bằngpha lê.•Luôn đặt dụng cụ nấu trênvùng nấu trong khi nấu ăn.Tự động ngắt điệnThiết bị này được trang bị chức năng tự động ngắt điện.Thiếtbị tự động tắt trong các tình huống sau đây:• Nếu dụng cụ nấu có đường kính đáy dưới 6 cm hoặcnhững vật như dao,dĩa hoặc thìa được đặt trên tấm khiđang nấu.• Nếu điện áp thấp hơn 120V±5V hoặc cao hơn 280V±5V.• Nếu dụng cụ nấu được đặt trên vùng nấu khi bếp từ hoạtđộng trong 1 phút.• Nếu bếp từ không được sử dụng trong thời gian dài.• Nếu nhiệt độ của tấm giữa cao hơn 300°C hoặc nhiệt độbên trong của bếp từ quá cao.Điện từ trường (EMF)Thiết bị Philips này tuân thủ tất cả các tiêu chuẩn liên quanđến điện từ trường (EMF).Nếu được sử dụng đúng và tuânthủ các hướng dẫn trong hướng dẫn sử dụng này,theo cácbằng chứng khoa học hiện nay,việc sử dụng thiết bị này là antoàn.使用本產品前請先閱讀本重要資訊手冊,並保管以作將來參考。
AEG电磁炉说明书

ZH用户手册2HC452601EB 铁板烧盘EN User Manual18Teppan yaki grill plate内容1. 安全信息.............................................................................................................32. 安全说明.............................................................................................................43. 产品说明.............................................................................................................54. 日常使用.............................................................................................................75. 建议和提示..........................................................................................................96. 养护和清洁........................................................................................................117. 故障排除...........................................................................................................128. 安装...................................................................................................................139. 技术数据.. (16)力求完美感谢您选择这款 AEG 产品。
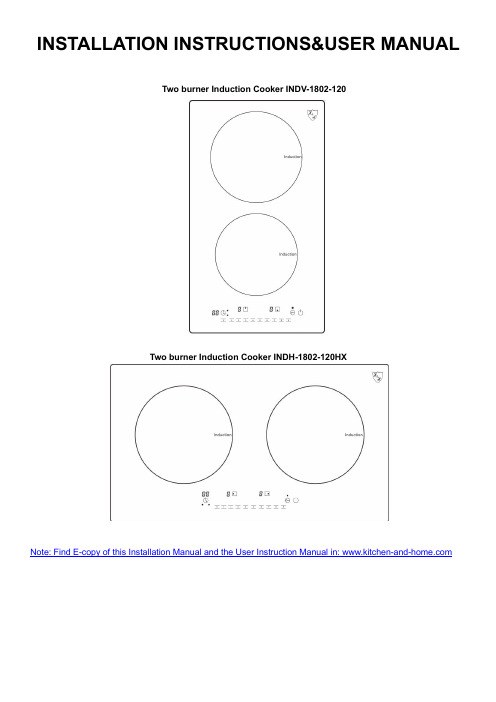
厨房和家居 INDV-1802-120 两炉电磁炉使用说明书
Read all instructions. The appliance must be disconnected from the power supply before installation. Proper Installation – Be sure your appliance is properly installed and grounded by a qualified technician. Never Use Your Appliance for Warming or Heating the Room. Do Not Leave Children Alone – Children should not be left alone or unattended in area where appliance is in
use. They should never be allowed to sit or stand on any part of the appliance. Wear Proper Apparel – Loose-fitting or hanging garments should never be worn while using the appliance. User Servicing – Do not repair or replace any part of the appliance unless specifically recommended in the
let potholder touch hot heating elements. Do not use a towel or other bulky cloth. Use Proper Pan Size – This appliance is equipped with one or more surface units of different size. Select
电磁炉英文说明书

Ⅰ.Specification1). Item No.: 23022). Power Rate:3500W/Left Rate:1500W/Right:2000W3). Voltage:220-240V~ / 50/60 HzⅡ.Cautions1). Do not plug with wet hands.2). Do not plug into a socket where several other appliances are plugged in.3). Do not use if the plug cord is damaged or the power plug does not fit the socket safely.4). Do not modify the parts, or repair the unit by yourself.5). Do not use the unit near flame or wet places.6). Do not use where children can easily touch the unit, or allow children to use the unit by themselves.7). Do not place on unstable surfaces.8). Do not move the unit when the pot or the pan is on it.9). Do not heat the pot empty or overheat the pot.10). Do not place metallic objects such as knives, forks, spoons, lids, cans, and aluminum foils on the topplate since they can get hot.11). Use the unit with sufficient space around it. Keep the front side and either right or left side of the unitclear.12). Do not use the unit on carpet or tablecloth (vinyl) or any other low-heat-resistant article.13). Do not place a sheet of paper between the pot or the pan and the unit. The paper may get burnt.14). If the surface is cracked, switch off to avoid the possibility of electric shock and then take to the servicecenter immediately.15). Do not block air intake or exhaust vent.16). Do not touch the top plate right after removing the pot or the pan, as the top plate will still be very hot.17). Do not place the unite near to the objects which are affected by magnet, such as: radios, televisions,automatic-banking cards and cassette tapes.18). The power cord must be replaced by qualified technicians.19)CAUTION: Hot surface.20) This appliance is not intended for use by persons (including children) with reduced physical, sensory ormental capabilities, or lack of experience and knowledge, unless they have been given supervision or instruction concerning use of the appliance by a person responsible for their safety.21) The temperature of accessible surfaces may be high when the appliance is operating.22)This appliances is intended to be used in household and similar applications such as:-staff kitchen areas in shops, offices and others working environments;-farm houses;-by clients in hotels, motels and other residential type environments;-bed and breakfast type environments.23)If the manufacturer wants to limit the use of the appliance to less than above, this must be clearly stated in the instructions.Warning: Children should be supervised to ensure that they do not play with the appliance.Ⅲ.How to Use1). Place suitable cooking utensils in the center of the top plate and plug in, the power light will shine2). Pressing ON/OFF button, power light will shut off, and the light of Function will flash3). Pressing Function button, the cooker will heat at 5-level. Set the cooker at desired power by directlypressing to adjust the power from 1 to 8 or 8 to 1.4). Function: Press the Function pad and to select POWER, TEMP and TIMER.The appliance is equipped with an overheat protection. If the pot or pan is getting too hot, the appliance will switch off power, a buzzer sounds and on the display occurs “E02”. Should this happen, wait for some minutes and cool the appliance down. After that, the appliance works without problems.If meat or vegetables should the roasted, please use the temperature function to avoid any over heating .POWER: 1, 2, 3, 4, 5, 6, 7, 8TIMER: 0, 1, 2, 3, …99; 1 minutes per interval.5). The preset temperature and timer are 180°C and 00 respectively.6). This induction cooker is equipped with memory function. The power level, temperature level andtimer level interval will be stored even you change from POWER to TEMP and then back to POWER.7). If you want to cancel TIMER function, simply press ON/OFF. Press ON/OFF to start again.8). This appliance is liable to get hot during use.Ⅳ.Usable and Non-usable Utensils1). Usable PansSteel or cast iron, enameled iron, stainless steel, flat-bottom pans / pots with diameter from 12 to 26cm.Enameled Iron Iron or Enameled Castiron Pan Iron Pot Deep-Fry Pan Stainless Steel Pot Iron Plate Pot Iron Pot2). Non-usable PansHeat-resistant glass, ceramic container, copper, aluminum pans/pots. Rounded-bottom pans/pots with bottom measuring less than 12cm.Rounded Bottom Aluminum Bottom Measuring Pot with Stands Ceramic Pot Heat-Resistant Pot Copper Pot Less than 12cm Glass PotⅤ.How to Clean1). Disconnect plug and wait until the unit is cooled down completely. Clean after using every time.2). If the pots/pans are used without being cleaned, discoloration or cooked on stains may be caused.3). Do not use benzine, thinner, scrubbing brush or polishing powder to clean the induction cooker.4). Wipe using dish washing agent and damp cloth.5). Use vacuum cleaner to suck up dirt from the air intake and exhaust vent.6). Never run water over the unit (Water gets inside may cause malfunction).。
惠而浦 HR 601 C A 电磁炉使用说明书

HR 601 C A AUS2use Page ENGLISH Instructionsfor1INSTRUCTION FOR USE IMPORTANT SAFETY INSTRUCTIONSBEFORE USING THE GLASS CERAMIC HOB INSTALLATIONELECTRICAL CONNECTIONSENERGY SAVING TIPSSAFEGUARDING THE ENVIRONMENTCARE AND MAINTENANCE OF THE GLASSCERAMIC HOB TROUBLESHOOTING GUIDEAFTER SALES SERVICEPRODUCT DESCRIPTION SHEET2IMPORTANT SAFETY INSTRUCTIONSThese instructions shall also be available on website: www.whirlpool.euYOUR SAFETY AND THAT OF OTHERS IS VERY IMPORTANTThis manual and the appliance itself provide important safety messages, to be read and always observed. WARNING:All messages relevant to safety specify the potential risk to which they refer and indicate how to reduce the risk of injury, damage and electric shocks due to incorrect use of the appliance. Make sure to comply with the following:• The appliance must be disconnected from the power supply before carrying out any installation operation.• Installation and maintenance must be carried out by a specialised technician, in compliance with themanufacturer’s instructions and the local safety regulations in force. Do not repair or replace any part of the appliance unless specifically stated in the user manual.• The appliance must be earthed.• The power cable must be long enough for connecting the appliance, fitted in the cabinet, to the power supply.• For installation to comply with the current safety regulations, an omnipolar switch with minimum contact gap of 3 mm is required.• Do not use multi-sockets or extension cords.• Do not pull the appliance’s power cable.• The electrical parts must not be accessible to the user after installation.• The appliance is designed solely for domestic use for cooking food. No other use is permitted (e.g. heating rooms). The Manufacturer declines any liability for inappropriate use or incorrect setting of the controls.• The appliance and its accessible parts become hot during use. Care should be taken to avoid touching heating elements. Children less than 8 years old shall be kept away unless continuously supervised.• The accessible parts can become very hot during use. Children must be kept away from the appliance and watched over to ensure they do not play with it.• Do not touch the appliance heating elements during and after use. Do not allow the appliance tocome into contact with cloths or other flammable materials until all the components have cooled sufficiently.• Do not place flammable materials on or near the appliance.• Overheated oils and fats catch fire easily. Pay attention when cooking food products rich in fat and oil.• This appliance can be used by children aged from 8 years and above and persons with reduced physical, sensory or mental capabilities or lack of experience and knowledge if they have been given supervision or instruction concerning use of the appliance in a safe way and understand hazards involved.Cleaning and user maintenance shall not be made by children without supervision.• If the surface is cracked,switch off the appliance to avoid the possibility of electric shock.• The appliance is not intended to be operated by means of an external timer or separate remote control system.• Unattended cooking on a hob with fat or oil can be dangerous and may result in fire. NEVER try to extinguish a fire with water, but switch off the appliance and then cover flame e.g. with a lid or a fire blanket. Danger of fire: do not store items on the cooking surfaces.• Do not use steam cleaners.• Metallic objects such as knives,forks, spoons and lids should not be placed on the hob surface since they can get hot.34• To make the most of your new appliance, please read the user instructions carefully and keep them handy for future consultation.BEFORE USING THE GLASS CERAMIC HOBINSTALLATIONCooktop• The cooktop must be set into a worktop between 20 mm and 50 mm deep• There must be nothing between the cooktop and the oven (cross rails, brackets, etc.).• The distance between the lower face of the glass ceramic hob and the cupboard or separating panel must be at least 20 mm.• If the cooktop is to be installed next to a column unit, leave a distance of at least 100 mm from the edge of the cooktop to the side of the column unit.• Make an opening in the worktop, respecting the dimensions indicated in the enclosed product description sheet.• Apply the supplied gasket to the cooktop (unless it has already been fitted), after having cleaned its surface.ImportantIn order to prevent the electronic circuits from overheating, and therefore from being damaged, we recommend the following:• Do not install the cooktop near a dishwasher or washing machine, so that the electronic circuits do not come into contact with steam or moisture, which could damage them.If an oven (from our range of ovens) is installed beneath the cooktop, make sure that it is equipped with a cooling system.If the temperature of the electronic circuits exceeds the maximum permitted temperature, the cooktop will switch off automatically; in this case, wait for a few minutes until the internal temperature of the electronic circuits reaches a tolerable level, at which point it will be possible to switch the hob on again.• Switch the hob off after use.3215ELECTRICAL CONNECTIONSElectrical connection must be made before connecting the appliance to the electricity supply. The appliance must be installed by a qualified electrician who is fully aware of current safety and installation regulations. Specifically, installation must be carried out in compliance with the regulations of the local electricity supply company. Make sure that the voltage shown on the rating plate is the same as the power supply voltage in your home. Regulations require that the appliance be earthed: use conductors (including the earth conductor) of the appropriate size only. The manufacturer declines all liability for injury to persons or animals and for damage to property resulting from failure to observe the above regulations. For the electrical connection use a H05RR-F type cable as indicated in the table below:Power supply voltage.The appliance must be connected to the electricity supply by means of an all-pole disconnect switch with minimum contact gap of 3 mm.Attention: the power supply cable must be long enough to allow the cooktop to be removed from the worktop and must be positioned so as to avoid damage or overheating caused by contact with the base.Connecting to the terminal boardNote: the yellow/green earth wire must be connected to the terminal with thesymbol and must be longer than the other wires.• Remove approx. 70 mm of the cable sheath from the power supply cable (B ).• Strip approx. 10 mm of sheath from the wires. Then insert the power supply cable into the cable clamp and connect the wires to the terminal block as indicated in the connection diagram placed close to the terminal block itself.• Secure the power supply cable (B ) by means of the cable clamp.• Close the terminal board with the cover (A ) securing it with the screw provided.• After the electrical connection, fit the hob from the top and hook it to the support springs, according to the illustration.• Use pots and pans whose bottom diameter is equal to that of the cooking zone or slightly larger.• Only use flat-bottomed pots and pans.• If possible, keep pot lids on when cooking.• Cook vegetables, potatoes, et. with little water in order to cut down cooking time.• A pressure cooker allows you to save even more energy and time.ENERGY SAVING TIPSNO!6SAFEGUARDING THE ENVIRONMENT1. Packing• The packaging material can be 100% recycled, as confirmed by the recycling symbol .2. ProductsThis appliance is marked according to the European directive 2012/19/EU on Waste Electrical and Electronic Equipment (WEEE). By ensuring this product is disposed of correctly, you will help prevent potential negative consequencesproduct, indicates that this appliance may not be treated as household waste. Instead it shall be handed over to the applicable collection point for the recycling of electrical and electronic equipment. Disposal must be carried out in accordance with local environmental regulations for waste disposal. For more detailed information about treatment, recovery and recycling of this product, please contact your local authority, the household waste disposal service or the shop where you purchased the product.Declaration of conformity CE• This cooktop is suitable for contact with foodstuffs and complies with EEC (CE) Regulation n. 1935/ 2004.• The appliances are designed solely for use as cooking appliances. Any other use of the appliances (e.g. for room heating) is considered as improper use and potentially dangerous.• The appliances are designed, built and sold in compliance with:• safety objectives of the “Low Voltage” Directive 2006/95/EC (which replaces 73/23/EEC and subsequent amendments);• the protection requirements of Directive “EMC” 2004/108/EC;CARE AND MAINTENANCE OF THE GLASS-CERAMIC HOBClean the cooktop, when it is cool, after each use. This will prevent the build-up of dirt and make cleaning easier.Important: avoid the use of high pressure water or steam cleaning equipment.• Use a clean cloth, absorbent kitchen wipes and washing up liquid or a specific glass ceramic cleaner.• Remove baked-on dirt with the special scraper tool (if provided) and specific cleaning products.•Food spills should be cleaned off before they bake onto the glass ceramic surface.• Foods with high sugar content (toffee, fruit juice, jam, etc.) that boil over while cooking, or spattered sugar stains must be immediately removed using a scraper.• Do not use abrasive products, bleach, oven-cleaner spray or pan scourers.The cooktop should be treated periodically with a proprietary brand of protective wax for glass-ceramic hobs.TROUBLESHOOTING GUIDECooktop not working• When pressing the control buttons, did you follow the instructions in the section “Using the hob” in the enclosed “Product Description Sheet”?• Is there perhaps a power failure?• Did you dry the hob carefully after cleaning it?1. If a cooking zone has been selected and an “F ” or an “ER ” appear on the display followed by a number, contact the After Sales Service and inform them.-With the exception of the message “F03” or “ER03” that identifies the incorrect cleaning of the controls area.-To solve the problem follow the instruction in the ICleaning and maintenance of the glassceramic hobI paragraph.2. If the hob does not work following intensive use, the hob internal temperature is too high. Wait a few minutes until the hob cools down .AFTER-SALES SERVICEBefore contacting After-sales Service:1. Try to solve the problem (see “Troubleshooting Guide”).2. Turn off the appliance and restart it to see if the fault is repeatedIf after the above checks the fault still occurs, get in touch with the nearest After Sales Service.Please give: a short description of the fault,• the precise type and model of the appliances,• the service number (the number after the word “Service” on the data plate), located under the hob or on the Product Description Sheet.• your complete address and phone number. If any repairs are required, please contact an authorized After-sales Service as indicated in the warranty. In the unlikely event that an operation or repair is carried out by an unauthorised technician, always request a certification of the job carried out and insist on the use of original spare parts. Failure to comply with theseinstructions may compromise the safety and quality of the product.7DIMENSIONS OF THE HOB (mm)1. Radiating cooking zone Ø 1452. Radiating cooking zone Ø 1803. Radiating cooking zone Ø 1454. Radiating cooking zone Ø 2105. DisplayPRODUCT DESCRIPTION SHEET490 mm+2 Min. 40 cmMin. 10 cmMin. 7 cmR = Min. 6,5 mm8A On/OD Key lockBCooking zone and timer selectionHeat setting increase and decreaseHUpon rst installation, the control panel performs a functional test for about 1 second,after which it automatically switches to the “Key lock” function.To deactivate the function, press and hold button “D ”; an acoustic signal will sound and the corresponding led will turn o .NOTE: If a reset occurs, repeat the procedure described above.To switch the hob on, keep button “A ” pressed for approx. 2 seconds. The 4 cooking zonedisplays show “0”. If within 20 seconds none of the cooking zones is activated, the hob switches o automatically as a safety precaution. Press one of the buttons “B ” corresponding to the cooking zone you intend to use. Select the heat setting required with buttons “E ” or “C ”. The other selectable cooking settings go from 1 to 9. Press buttons +/- at the same time to cancel all settings.Pressing button “+” when level 9 is reached, the “Booster” function is activated and the letter “A ” appears on the display.IMPORTANT: the control is deactivated 10 seconds after the heat setting has been selected.To change the heat setting, rst press the selection button “B ” again, then proceed to change the setting, using buttons “E ” or “C ”.MUL TIPLE ZONE (if present): After selecting the desired zone and setting the level (as described in the previous section) press “F ”: an indicator above the button turns on,activating the additional zone.The multiple zone can only be used if:1) The cooking zone is provided with multiple zone;2) The power level selected is greater than 0.To deactivate the multiple zone, press button “B ” of the desired zone, then press “F ” again.To set the Timer function, select the desired cooking zone and power setting then pressthe cooking zone key again and a luminous dot will appear on the display of the timer-controlled cooking zone. The indication “00” blinks on the 2 displays. Press buttons “C ” or “E ” to set the time from 1 to 99.IMPORTANT: after 10 seconds the timer displays will show the power setting of the other cooking zones.To view the remaining cooking time, press the timer-controlled cooking zone key twice.The KEY LOCK function is switched on by holding down button “D ” until a dot lights up abovethe function button. The Key lock function locks all the hob’s other functions, with the exception of the On/O button “A ”. The function remains on even after the hob is switched o and on again and can be deactivated by pressing button “D ” again until the dot above the function button goes o .RESIDUAL HEAT INDICATORWhen the cooking zone is switched o , the residual heat indicator “H” remains on or ashes alternating with “0” until the temperature of the hob returns within safety levels.IMPORTANT:The hob’s safety features include an automatic switching o function. Prolonged use of the same heatsetting triggers automatic switch-o of the cooking zone (for example, after around 1 hour at maximum heat setting, the cooking zone switches o ).BE CAREFUL: To avoid permanently damaging the glass-ceramic top, do not use:- Pots with bottoms that are not perfectly at.- Metal pots with enamelled bottom.Any aesthetic defects (scratches, surface marks, etc.) must be reported immediately upon installation.C-E1951534250004/17AU。
德国宝 GIC-GS20P 电磁炉 说明书

使用說明書O P E R A T I N G I N S T R U C T I O N S可攜式電磁爐GIC-GS20PPortable Induction CookerPlease read these instructions and warranty information carefully before use and keep them handy for future reference.在使用之前請詳細閱讀「使用說明書」及「保用條例」,並妥為保存。
目錄 Table of ContentsControl PanelVenting OutletPower Cord & Power PlugGlass Cook-top Panel(外型圖解只供參考 Structure Diagram For Reference Only )火力、溫度及定時顯示, Temperature and Timer Display火力 / 溫度調校感應區Power / Temperature Touch-sensing Slider溫度鍵及溫度指示燈emperature Button 定時鍵及定時指示燈Timer ButtonConnect power plug. A “beep” sound is heard, indicating that cooker is in “Sleeping” mode.Place cookware in the centre of cooking hob. Press “ ON / OFF ” key and the induction cooker enters stand-by mode. The digital display shows “ ”.Power Setting:In stand-by mode, press “Power ” button. Power indicator lights up and the digital display shows level “5”. Slide along the Touch-Sensing Slider to adjust the power level, which increases if you slide from left to right and decreases from right to left (adjustment range: 5 levels).Temperature Setting:digital display shows “C4”, indicating the default temperature as 200°C. Slide along the Touch-Sensing Slider to adjust the temperature level, C1 to C5.Timer Setting: In the operating state, press the “Timer ” button. The digital display shows “00:00”. Press “Timer ” button to adjust timer. Increase 1 min by each press. The highest ad-justable time is 3 hours.Lock Setting: Press “Lock/Unlock ” button to lock all settings at “Heating” mode or “Timer” mode. Under “Lock” status, induction cooker would not respond to any key press. Press and hold this key for 3 seconds to unlock.After cooking, press “On/Off ” button to switch off the unit and then unplug the power.將電源插頭插入插座,電磁爐發出“嗶”的 一聲,表示電磁爐進入休眠狀態。
KitchenAid KHMC1857 电磁炉厨房设备结合说明书
KitchenAid® Microwave Hood Combination Model KHMC1857 Quick Reference GuidePOPCORN (sensor)3.0-3.5 oz (85-99 g) size bag:Place bag on turntable. Listen for popping to slow to 1 pop every 1 or 2 seconds, then stop the cycle. Fan operates only on low during Popcorn function.BAKED POTATO (sensor)1-4 potatoes (pieces), 10-13 oz (283-369g) each, similar in size: Pierce each potato several times with a fork. Place on paper towel, around turntable edges, at least 1" (2.5 cm) apart. Place single potato to the side of the turntable. Let stand 5minutes after cooking.DINNER PLATE / MEAL REHEAT (sensor)1 serving (1 plate), about 8-16 oz (227-454g):Place food on microwave-safe plate, cover with plastic wrap, and vent.BEVERAGE1 or2 cups, 8 oz (250 mL) each:Do not cover. The diameter of the cup’s opening will affect how the liquid heats. Beverages in cups with smaller openings may heat faster.1 lb DEFROST1 lb (454 g) automatic defrost:Remove wrap and place in microwave-safe dish. Do not cover. Turn over food at signal.REHEAT: Touch REHEAT. Select food item.1 Pizza – 1-3 slices, 4 oz (114 g) each:Place on paper towel or paper plate.2 Casserole – 1-4 cups (250 mL-1 L):Place in microwave-safe container and cover with plastic wrap.Stir and let stand 2-3minutes after reheating.3 Sauce (sensor) – 1-4 cups (250 mL-1 L):Place in microwave-safe container and cover with plastic wrap.Stir and let stand 2-3minutes after reheating.4 Soup (sensor) – 1-4 cups (250 mL-1 L):Place in microwave-safe container and cover with plastic wrap.Stir and let stand 2-3minutes after reheating.5 Baked Goods – 1-6 pieces, 2 oz (57 g) each:Place on paper towel. Two small rolls may be counted as one piece.SOFTEN/MELT: Touch SOFTEN/MELT. Select “Soften” or “Melt.” Select food item.SOFTEN1 Butter/Margarine – 0.5, 1.0, 1.5 or 2.0 sticks:Unwrap and place in microwave-safe dish.2 Ice Cream – 16, 32 or 64 oz (473, 946 or 1893 mL):Place ice cream container on turntable.3 Cream Cheese – 3 or 8 oz (85 or 227 g):Unwrap and place in microwave-safe dish.4 Frozen Juice – 6, 12 or 16 oz (170, 340 or 454 g):Remove lid from container.MELT1 Butter/Margarine – 0.5, 1.0, 1.5 or 2.0 sticks:Unwrap and place in microwave-safe dish.2 Chocolate – 4, 6, 8 or 12 oz (113, 170, 227 or 340 g):Place in microwave-safe dish.3 Cheese – 8 or 16 oz (227 or 454 g):Place in microwave-safe dish. Stir at signal.4Marshmallows – 5 or 10 oz (142 or 283 g):Place in microwave-safe dish. COOK: Touch COOK. Select food item.1 Bacon – 1-6 slices, average thickness:Follow directions on package.2 Canned Vegetables – 1-4 cups (250 mL-1 L):Place in microwave-safe container. Cover with plastic wrap, and vent. Stir and let stand 2-3minutes after cooking.3 French Toast – 1-4 pieces:Follow directions on package.4 Fresh Vegetables (sensor) – 1-4 cups (250 mL-1 L):Place in microwave-safe container. Add 2-4 tbs (30-60 mL) water.Cover with plastic wrap, and vent. Stir and let stand 2-3minutes after cooking.5 Frozen Vegetables (sensor) – 1-4 cups (250 mL-1 L):Remove from package. Place in microwave-safe container. Add 2-4tbs (30-60 mL) water. Cover with plastic wrap, and vent. Stir and let stand 2-3minutes after cooking.6 Rice (sensor) – 0.5-2.0 cups (125-500 mL) dry, white long grain:Follow measurements on package for ingredient amounts. Use microwave-safe dish with loose-fitting lid. Let stand 5minutes after cooking, or until liquid is absorbed. Stir.7 Frozen Entrée – 10 or 20 oz (283 or 567 g) (sensor); 40 or 60 oz(1134 or 1701 g) (non-sensor):Remove from package. Loosen cover on 3 sides. If entrée is not in microwave-safe container, place on plate, cover with plastic wrap, and vent.DEFROST: Touch DEFROST. Select category, then enter weight.1 Meat – 0.2-6.6 lbs (90 g-3 kg):Remove wrap and place in microwave-safe dish. Do not cover.2Poultry – 0.2-6.6 lbs (90 g-3 kg):Remove wrap and place breast side up in microwave-safe dish.Do not cover.3Fish – 0.2-4.4 lbs (90 g-2 kg):Remove wrap and place in microwave-safe dish. Do not cover.W10512462ACONVECTION BAKE: Touch CONVECT BAKE. Select “Auto Convect Bake” or “Manual Convect Bake.”Use the provided convection rack and an ovenproof baking dish. See “Accessory Configurations” in the User Instructions.NOTE: Microwave oven cavity, inside of the door, convection rack and baking dish will be hot. Use oven mitts to remove the dish and to handle the hot convection rack.AUTO CONVECT BAKEPlace the convection rack on the turntable. Select food item. Touch START to begin preheat. Place the food in an ovenproof baking dish. After preheat, place the baking dish with food on the convection rack, then touch START to begin baking.1 Angel Food Cake – 1 cake: Use large tube pan. Invert pan afterbaking.2 Biscuits (regular) – 1 pan: Use refrigerated dough. Use round cakepan or pizza pan.3Biscuits (large) – 1 pan: Use refrigerated dough. Use round cake pan or pizza pan.4Brownies – 8" x 8" (20.3 x 20.3 cm)5Cookies – 1 pan: Use round pizza pan.6Muffins – 1 pan: Use pan with 6 cups.7Pie (fresh) – 1 pie8Pie (frozen) – 1 pie: Follow directions on package.9 Rolls (regular) - 1 pan: Use refrigerated dough. Use round cake panor pizza pan.10 Rolls (large) - 1 pan: Use refrigerated dough. Use round cake panor pizza pan.11 Yeast Bread - 1 loafMANUAL CONVECT BAKEUse for foods such as cookies, pies, cakes and breads. Use same time as recipe. Allow microwave oven to preheat.■Place the convection rack on the turntable. Select temperature.Default temperature is 350°F (177°C).■Touch COOK TIME, and enter time in hours and minutes, up to 4hours. Default time is 4 hours.■Touch START to begin preheat. Preheat may be skipped by touching START again.■After preheat, place baking dish with food on the convection rack, then touch START to begin baking.CONVECTION ROAST: Touch CONVECT ROAST. Select “Auto Convect Roast” or “Manual Convect Roast.”Use the provided convection rack and a microwave-safe, ovenproof baking dish. See “Accessory Configurations” in the User Instructions. NOTE: Microwave oven cavity, inside of the door, convection rack and baking dish will be hot. Use oven mitts to remove the dish and to handle the hot convection rack.AUTO CONVECT ROASTPlace food on convection rack, then place rack with food on the turntable. Place a microwave-safe, ovenproof dish under the rack to catch drippings. Select food item, then touch START to begin roasting. The microwaves will be added automatically at the preset power level.1 Whole Chicken – 2.5-4.5 lbs (1.1-2.0 kg): Let stand, covered, for10minutes after cooking.2 Casserole – 1.5 or 2.0 qt (1.4 or 1.9 L): Let stand 5-10minutes aftercooking.3Lasagna – 8" x 8" (20.3 x 20.3 cm): Let stand 5-10minutes after cooking.4 Beef Roast – 2.0-4.0 lbs (0.9-1.8 kg): Let stand, covered, for10minutes after cooking. Preset time is for medium doneness.5 Thin Crust Pizza (frozen) – 6"-12" (15.2-30.5cm): Place pizzadirectly on convection rack.6 Thick Crust Pizza (frozen) – 6"-12" (15.2-30.5cm): Place pizzadirectly on convection rack.7Turkey Breast - 2.5-4.5 lbs (1.1-2.0 kg): Let stand, covered, for 10minutes after cooking.MANUAL CONVECT ROASTUse for foods such as beef and pork roasts, whole chicken and meat loaf. Decrease time by 10%-20%. Use 30% microwave power for large meats and casseroles. Use 10%-20% microwave power for thin cuts of meat.■Select temperature. Default temperature is 350°F (177°C).■Touch COOK TIME, and enter time in hours and minutes, up to 4hours. Default time is 4 hours.■Touch COOK POWER, and enter power level, from 10% to 30%.Default power is 30%.■Touch START to begin preheat. Preheat may be skipped by touching START again.■After preheat, place baking dish with rack and food on the turntable, then touch START to begin roasting.STEAM/SIMMER (sensor - manual): Touch STEAM/SIMMER. Select “Steam” or “Simmer.”Use the provided steamer vessel for this function. See “Accessory Configurations” in the User Instructions.NOTE: Do not remove the lid while the steamer is in the microwave oven, as a rush of steam would disrupt the sensor readings.STEAMUse 1¹⁄₄ cups (300 mL) water in steamer base. Use 2-6 cups (500 mL-1.5L) vegetables, 0.5-1lb (227-454 g) fish or 5-10oz (142-283g) shrimp. Place food in steamer insert, place insert in base, and cover with steamer lid. Enter steam time. The sensor will detect when the liquid begins to boil and start the steam countdown.Approximate steam times:■Soft vegetables 1-3 min (ex.: spinach - 4 cups [1L] 1 min)■Hard vegetables 3-6 min (ex.: broccoli - 2 cups [500 mL] 4 min)■Frozen vegetables 4-5 min■Fish and seafood 2-3 minUse longer times for more doneness, or when steaming larger quantities.SIMMERDo not use steamer insert. Use same time as in recipe or on package directions.Rice and sauces: Place liquid and food in steamer base and cover with the lid. Enter simmer time. The sensor will detect when the liquid begins to boil, and start the simmer countdown.Pasta: Place liquid in steamer base, and cover with the lid. Enter simmer time of 1 second. The sensor will detect when the liquid begins to boil, and begin the simmer countdown. When the microwave oven stops, remove the steamer, remove the lid, and add the pasta. Re-cover and return the steamer to the microwave oven. Clear the display using the Cancel control, then reprogram the simmer function. Enter simmer time (ex.: dry spaghetti - 11-12min), then touch START to begin simmering.1–250°F (121°C)2–300°F (149°C)3–325°F (163°C)4–350°F (177°C)5–375°F (191°C)6–400°F (204°C)7–425°F (218°C)8–450°F (232°C)1–250°F (121°C)2–300°F (149°C)3–325°F (163°C)4–350°F (177°C)5–375°F (191°C)6–400°F (204°C)7–425°F (218°C)8–450°F (232°C)W10512462A®/™ © 2012 KitchenAid. All rights reserved. 6/12Printed in China。
飞利浦 Philips 型号 XX00 电磁炉 用户手册说明书
User manual ZH-HK 使用手冊3 T ap the On/Off icon .(fig.6-2)»the On/Off indicator lights up.»The induction cooker beeps.»All indicators light up once and then go off.»The induction cooker stays in standby mode.4 T ap the menu icon repeatedly until the desired cooking mode is selected.(fig.6-3)»The cooking mode indicator lights up and the induction cooker starts heating up thecookware.»The remaining cooking time and cooking power or temperature are displayed on the screen insequence.5 When the cooking is finished,tap the On/Off iconto stop the cooking process,and the induction cooker switches to standby mode.6 Unplug the induction cooker after the fan stops working.(fig.6-4)Using the timerThe induction cooker provides you with flexible control over the cooking time you want the appliance to operate in different cooking modes.1 Follow the steps in “Preparing the appliance for use”.2 Plug in the induction cooker.(fig.6-1)3 T ap the On/Off icon .(fig.6-2)4 T ap the menu icon repeatedly until the desired cooking mode is selected.(fig.6-3)5 T ap the Preset/Timer icon until the timer indicator lights up.(fig.6-6)6 Slide your finger clockwise on the circular Power/ Time switch area to increase the cooking timeby 5 minutes;slide anti-clockwise to decrease the cooking time by 5 minutes (fig.6-5).Y ou can also tap the increase or decrease icon to adjust the cooking time by the increment of 1 minute. (fig.6-7)7 When the cooking time has elapsed,the induction cooker beeps and turns off automatically.Note•After you have selected the cooking time,waitfor a few seconds before the induction cookerautomatically confirms it.Preset time for delayed cookingWith the preset funtion,you can set the time at which you want the appliance to start cooking in steam/stew and soup.congee modes.1 Follow the steps in “Preparing the appliance for use”.2 Plug in the induction cooker.(fig.6-1)3 T ap the On/Off icon .(fig.6-2)4 T ap the menu icon repeatedly until the desired cooking mode is selected.(fig.6-3)5 T ap the Preset/Timer icon until the preset indicator lights up.(fig.6-8)6 Slide your finger clockwise on the circular Power/ Time switch area to increase the preset time by 20 minutes;slide anti-clockwise to decrease the preset time by 20 minutes (fig.6-5).Y ou can also tapthe increase or decrease icon to adjust the preset time by the increment of 1 minute.(fig.6-7) 7 When the preset time has elapsed,the induction cooker beeps and starts working automatically.Note•After you have selected the preset time,waitfor a few seconds before the induction cookerautomatically confirms it.Setting up child lock• When the induction cooker is switched on,longtap the childlock icon for 3 seconds to activatechildlock.• T o deactivate childlock,long tap the child lock iconfor 3 seconds again.Note•When childlock is activated,only Childlock andOn/Off are responsive.6 Cleaning (fig. 7)1 Unplug the appliance and let it cool down.2 Clean the appliance with a damp cloth (fig.7-1)and,if necessary,with some mild cleaning agent(fig.7-2).3 Clean the air outlets with a brush.(fig.7-3)7 EnvironmentDo not throw away the appliance with thenormal household waste at the end of its life,but hand it in at an official collection point forrecycling.By doing this,you help to preservethe environment.8 Guarantee and serviceIf you need service or information or if you havea problem,please visit the Philips website at www. or contact the Philips Consumer CareCentre in your country (you will find its phonenumber in the worldwide guarantee leaflet).If there isno Consumer Care Centre in your country,go to yourlocal Philips dealer.9 T roubleshootingIf your induction cooker does not function properlyor if the cooking quality is insufficient,consult the tablebelow.If you are unable to solve the problem,contacta Philips service centre or the Consumer Care Centrein your country.Problem SolutionThe On/Off icondoes notrespondThere is a connection problem.Check if the induction cooker isconnected to the mains and ifthe plug is inserted firmly intothe wall socketWhen I tapthe menu icon,the light of theselected modedoes not go on.The light is defective.T ake theappliance to your Philips dealeror a service centre authorisedby Philips.E5 or E6 isdisplayed on thescreenCheck if the voltage is too lowor too high.Check if the power cord orpower socket is too hot.Check if too many appliances areplugged to the same connector.E0,E1,E2,E3,E4,E8 or E9 isdisplayed on thescreen.The induction cooker hasmalfunctions.T ake the applianceto a Philips dealer or a servicecentre authorised by Philips.The inductioncooker stopsworking or turnsoff automatically.The induction cooker has beenidle for more than 2 hours.Check if the air inlet and outletsare covered.T emperature around theinduction cooker is too high.繁體中文1 您的電磁爐恭喜你購買 Philips 產品,歡迎來到 Philips 世界!要享受 Philips 為您提供的全面支援,請在以下網站 /welcome 註冊您的產品。
Germanpool GIC-CS28B-S 嵌入式电磁炉 用户手册说明书
Please read these instructions and warranty information carefully before use and keep them handy for future reference.Online Warranty RegistrationGIC-CS28B-SBuilt-In Induction Cooker U S E R M A N U A LTable of Contents請即進行保用登記﹗有關保用條款細則,請看本說明書最後一頁。
Please register your warranty information now!For Warranty Terms & Conditions,please refer to the last page of this user manual.Venting OutletPower Cord & Power PlugWarnings and RecommendationsWARNING!• If the surface of the Cooktop is cracked, switch off the appliance to avoid the possibility of electric shock.• Metallic objects such as knives, forks, spoons and lids should not be placed on the induction hotplate since they can get hot.• This appliance is intended to be used in indoor household ONLY.• This appliance is not intended to be operated by means of an external timer or separate remote control system.• The temperature of accessible surfaces may be high when the appliance is operating.•If the supply cord is damaged, it must be replaced by the manufacturer, its service agent or similarly qualified person in order to avoid a hazard.•When the user powered on the appliance without pressing any Control Button, the appliance will stop heating automatically in 1 hour 45 minutes to 2 hours 15 minutes and goes into Standby Mode; this ensures the safety of the appliance.• Single 13 A power jack must be used. Do not share power jack with other appliances.• Do not apply water directly onto the Induction Cooker.• Do not insert any wire or metal objects through the Air Inlet or Venting Outlet of the Induction Cooker.• Please avoid clashing cookware on the Cooktop.• A distance of at least 10cm between the wall and the sides of the Induction Cooker must be maintained for venting purposes.• Do not place or use the Induction Cooker near any heat source.• Do not heat up any metal plate or other magnetic objects on the Cooktop.• Do not heat empty cookware for an extended period of time. Overheating of cookware will cause damages and injuries.• Do not heat up unopened cans on the Cooktop. It may cause explosion.• Unplug the Power Cord when the Induction Cooker is not in use for a long period of time.• This appliance is not intended for use by persons (including children) with reduced physical, sensory or • mental capabilities, or those lack experience and knowledge, unless they have been given supervision or instruction concerning the use of the appliance by a person responsible for their safety.• Children should be supervised to ensure that they do not play with the appliance.• Cannot use steam cleaner.• After use, please press the “ON/OFF” key •This appliance is intended to be used in household and similar applications such as:– staff kitchen areas in shops, offices and other working environments;– farm houses;– by clients in hotels, motels and other residential type environments.Product StructureMain BodyAir InletCook-Top PanelControl PanelMain ON/OFF SwitchControl Panel“Timer” Indicator“Timer” Indicator“Hot” Indicator“Lock/Unlock” IndicatorInstallation InstructionsNotice– There should not be any obstacles surrounding the unit.– Make sure power plug is accessible after installation. Power outlet must be earthed.Operating InstructionsCookwarePlease use only German Pool authorized cookware or cookware recommended by us. Any unauthorized cookware may affect induction cooker’s heating capacity and quality.Appropriate Cookware• Material: Metal, ferromagnetic stainless steel or cast iron.• Shape: Flat bottom with a diameter of 12cm or more. Cookware bottom diameter should notexceed 25cm and must not weight over 6kg (with food).1. For ventilation purposes, thereshould be ≥ 250 mm in height ofempty space under the unit body.2. Air vent under the unit must be wellcirculated. Circulation between spaceunder the unit and room atmosphereshould be present.1. According to cutout dimensions ≥ 267mm(W) x ≥ 465mm(D), make a cutout hole on the cabinet /counter top.2. Attach the supplied rubber tape to the bottom part of the unit body, and then place unit throughFerromagneticStainless SteelWater PotMetal Frying Pan FerromagneticStainless SteelCooking PotMetal Saucepan FerromagneticMetal Water PotCast Iron GrillingPanInappropriate Cookware• Material: Non-metallic, non-ferromagnetic, ceramic, glass, aluminum or brass.• Shape: Bottom not flat or too bumpy, or bottom diameter smaller than 8cm.AluminumWater PotGlass Pot Ceramic Pot Pot With Non-Flat/Curved BottomPot WithBumpersPot BottomToo SmallControl Buttons Functions“ON / OFF” KeyUnder “Sleep” mode, press this key to enter “Standby” mode. Press again to return to “Sleep” mode.“TIMER” KeyUnder “Heating” mode, press this key to enter “Timed Heating” mode. Under “Timed Heating” mode,press this key to cancel timer and continue heating with the power level set previously.“+/–” Adjustment KeyUnder “Heating” or “Timed Heating” mode, press to set power level. Or, within 5 seconds after pressing“Timer” key, press to adjust timer.On/Off key, all other keys cannot be operated. Press this key again for 3 seconds to enter “Unlock”mode. Under “Unlock” mode, all keys can be operated.Operating Procedures1.Put the power plug into the socket. Switch on the “Main ON/OFF switch”, a beep sound will be heard.The induction cooker enters standby mode. If no button is pressed for 30s, induction cooker will automatically enters sleeping mode.2. Place cookware onto the centre of the cook-top panel. Press “+/–” switch to enter “Heating” mode (preset as power level 3).3. Under “Heating” mode, press “+/–” key to adjust power level. Press “+” key 3s to “HH”, the max level.4.The induction cooker will limit the power automatically when the inappropriate cookware is put on, the pressing of “+” key will not available and the “Empty or Improper Cookware Indicator” and “E1” will flash as a warning.5.Under “Heating” mode, pres.s “TIMER” key to enter “Timed Heating” mode. Within 5 seconds of pressing the key, “Timing” Indicator will flash and show a flashing “0:30”. Press “-/+” to adjust heating time (1 minute – 9 hours 59 minutes). The unit of adjustment is 1 minute. Press for a longer while to increase the unit of adjustment. After 5 seconds of adjusting, “Timing” Indicator will change from flashing to lighting up. The time is set.6. Under “Timed Heating” mode, press “TIMER” key to enter “Heating” mode .7. When induction cooker is operating, press “LOCK/UNLOCK” key to enter “Lock” mode. Press this key again for 3 seconds to enter “Unlock” mode.8. When induction cooker is operating, press “ON/OFF” switch to stop operating and enter “Sleep” mode.9.In the following conditions, induction cooker will automatically exit “Heating” and enter “Standby” mode:- (Under “Heating” mode) no appropriate cookware is placed on the cook-top for 30 seconds - (Under “Heating” mode) no button is pressed for 120 minutes- The another abnormal situations. Under the “Standby” mode, the induction cooker will enter the “sleeping” after 30s.10.When finish, press “ON/OFF” switch to turn off induction cooker.*E3 & E4 are not product errors. Operation can be resumed when power voltage returns to normal rating (170V - 250V).Fault Code and DescriptionCleaning & Maintenance• Power plug must be disconnected before cleaning.• Any stain or deposit on the cook-top surface must be cleaned off immediately before reusing.• Cleaning must be done when cook-top surface has completely cooled down.• To clean the cook-top, wipe with a dry cloth. If stain remains, clean with a moist sponge soaked with mild soap, and then wipe again with a moist cloth.• To clean the body of induction cooker, wipe with a soft moist cloth. If stain remains, clean with a moist sponge soaked with mild soap, and then wipe with a moist cloth.• Do not immerse induction cooker into water.• Do not clean cook-top with any rough cloth or abrasive tool.•Do not use organic solvents or any cleaning products that contain chemicals such as Benzene.Note: Over time, cook-top panel may be discoloured due to one of the following situations. Operation of induction cooker would not be affected as this is normal.• Overheating or burning empty cookware • Spillage not cleaned immediately • Cookware not clean • Long period of usageTroubleshootingWhen you run into any problem operating this product, use the table below to troubleshoot the problem.If the problem persists, contact our Repairs & Customer Service Centre.• Above table enlists the most common problems regarding the operations of the product and their possi-ble causes as well as suggested solutions. It is strictly for users’ reference only.•Should there be any product malfunction or breakdown, DO NOT repair it yourself. Contact our Repairs & Customer Service Centre or consult a licensed technician immediately.Technical SpecificationsIf there is any inconsistency or ambiguity between the English version and the Chinese version, the Chinese version shall prevail.Refer to for the most up-to-date version of the Operating Instructions.注意事項警告:• 如果器具面(面板)有破裂,必需關閉電器電源,以避免觸電的可能性。
Miller Electric Mfg. Co. 电磁炉说明书
Miller Electric Mfg. Co.An Illinois Tool Works Company 1635 West Spencer Street Appleton, WI 54914 USAWeb SiteInternational HeadquartersPhone: 920-735-4505USA FAX: 920-735-4134Canadian FAX: 920-735-4169International FAX: 920-735-4125The induction process heats the material from within providing heat uniformity along and throughout the heat zone of the part and eliminates cold spots in hard-to-reach areas.Air-cooled system eliminates the need for conventional water-cooled equipment,provides greater flexibility and reduces installation costs.Thermostatic protection safeguards against over-heating and thermal failure.Variable power control allows operator to control rate at which material heats by presetting the exact value over the entire output range.The power source is equipped with patent-pending ground fault protection ®which provides automatic system shutdown should powersource output short to ground.A sense lead cable provides direct feedback to the power source of a fault condition.Induction heating permits welding while blanketsremain attached to weldment and improves safety by eliminating open flame,explosive gas and hot element hazards associated withpropane and resistive heating.The portable unit is compact (footprint of 3.3 sq. ft), lightweight (165 lb) and ideal for heavy-wall materials or when speed counts (such as production work).A variety of standard size blankets support a wide range of heating applications including flat applications and standard pipe diameters from 12 to 52 in. Specially designed Kevlar ®sleeve protects the blanket from damage due to abrasion, cuts and tears. Hook-and-loop Velcro ®on sleeve allows trouble-free replacement.Induction Heating System20 kW/25 kW PreheatInduction HeatingSystemIssued May 2002 • Index No. IN/10.0The Power of Blue ®.Highly energy-efficient system (near 95%efficient) transfers more energy to the part,decreasing heating times compared to resistive or flame-heating methods (less than 50%).Multiple controller options meet avariety of applications. Remote Contactor Control provides remote on/off operation of the power source output. The IH/TC Temperature Control provides activetemperature feedback to the power source for maintaining the desired presettemperature. The IH/PC Pendant Controller is valuable for troubleshooting and verification of system performance and operating parameters.2System ComponentsIntellifire ™Power SourceSee Lit. Index No. IN/1.0Intellifire ™204Power SourceSee Lit. Index No. IN/6.0Switch (shown)or IH/TC Temperature Controller (not shown)or IH/PC Pendant Controller (not shown)Induction Blanket with Kevlar ®SleeveSee Lit. Index No. IN/3.0123Intellifire ™Power Sources1Remote On/Off Switch2The Miller Remote Contactor Control is a simple lightweight control for manually and remotely turning the power source output on and off. It is designed to interface with the Intellifire ™power source through the 14-contact receptacle.The simple rocker-style contact switch is mounted in a rugged housing and includes a 25 ft (7.6 m) cable and 14-contact connector.The Miller Intellifire ™is an inverter-based, solid-state, high-frequency induction heating power source that provides infinite control over a range of 0 to 25 kW and 0 to 20 kW for the 400-volt power source. It combines flexibility, precision and reliability into a compact lightweightpackage that provides all the features required for reliable, consistent and efficient heating using the induction process. The Intellifire ™100%-duty-cycle, air-cooled unit is perfect for heating operations —especially large diameter pipe, heavy-wall steel plate and critical time-to-temperature applications. Shown with optional running gear.Power Extension Cable with Twistlock Connectors4System Components (Continued) IH/TC Temperature Controller2The Miller IH/TC is a temperature control package designed specifically to interface with the IHPS™II and Intellifire™power sources. The single-station controller processes temperature feedback from a single thermocouple sensor and adjusts power source output to regulate or maintain part temperature. The IH/TC is supplied with a temperature sensor, sensor extension cable and interconnect control cord for use with the induction heating systems.Temperature Control Flexibility: The IH/TC iscapable of maintaining temperature at a specifiedset-point or following a defined temperature profile.“Heat On” Indicator Light: The IH/TC is suppliedwith a panel-mounted LED that illuminates whenthe induction coil is energized. The LED turns offwhen the desired temperature is reached or thecoil is de-energized.Local or Remote On/Off Capability: The IH/TC iseasily configured for either local or remote on/offcontrol of induction power via a front-panel-mounted selection switch. When set in the panelmode, output is activated by the panel-mountedoutput switch. When set in the remote mode, aRemote Contactor Control or IH/PC™attachedto the 14-pin output connector on the rearof the IH/TC allows for remote on/off of thesystem output.Module Lock-Out: A manual lockout feature isprovided on the IH/TC control module to protectagainst manipulation of temperature settings ormodule programming. The factory-set lockoutcode can be easily programmed to a user-definedcode, if desired.Remote Programming and Data RecordingCapability: A dedicated RS-232 communicationsport on the rear of the unit provides the optionto remotely program and record temperaturedata. With the use of a personal computer andoptional Windows-based software, pre-existingtemperature profiles from a user-created librarycan be downloaded to the IH/TC. Additionally, usingthe same computer/software setup, real-timetemperature data can be recorded to documentpreheat temperatures or temperature profiles.Thermocouple Input:K typeCommunication Input Port:RS-232, 9-pinrectangular DDimensions:Height 4.0 in (102 mm);width 6.5 in (165 mm); depth 9.0 in (229 mm)Net Weight:4 lb (1.8 kg)Power Extension Cables4Available in 25 and 50 ft (7.6 and 15.2 m)lengths. Interconnection between the powersource and Flexible Induction Blanket isaccomplished through Miller-manufacturedOutput Extension Cables. This product includesdurable twistlock connectors for attachment to theinduction blanket. Power source connection ismade using ring lugs to the rear of the Intellifire™power source. A special cable-potting process isutilized at the cable ends to assure the productwithstands the rugged environment experiencedin the industrial and construction markets.3 3Miller’s Flexible Induction Blanket (patent-pending)is the newest innovation in preheattechnology from a leader in the welding industry.The flexible, lightweight induction heatingblankets come in a variety of sizes and arecapable of preheat temperatures up to 400°F(204°C). The blankets easily conform to circularand flat parts and install in a matter of seconds.Manufactured from durable high-temperaturematerials, flexible induction blankets aredesigned to withstand the tough conditions inboth industrial and construction applications.Each blanket is supplied with two spare blanket-securing straps and one replaceable Kevlar®sleeve which provides added protection againstabrasion, cuts and tears, extending blanket life.Induction BlanketIH/PC Pendant Controller2The IH/PC provides real-time system monitoringvia a LCD display, which is valuable for trouble-shooting and verification of system performanceand operating parameters. One is recommendedto support one or more systems. See LiteratureIndex No. IN/4.0 for additional information onthis product.Litho in USADistributed by:Equipment and Options Stock No.DescriptionQty.PriceIntellifire ™204#903 7613-phase, 400 VAC, 50/60 Hz, 20 kW power source Intellifire ™250 #903 4693-phase, 460 VAC, 50/60 Hz, 25 kW power source Running Gear#043 924For Intellifire power sources Controls, Cables and Accessories#043 109IH/PC pendant controller #043 932Remote contactor control#194 672IHTC temperature control (includes #200 202, #200 201, #200 200)#200 202IHTC temperature sensor#200 201IHTC thermocouple extension cable, 25 ft, type K, armored #200 200Interconnect control cable, 36 in (IH/PC or IH/TC)#042 715Interconnect control cable, 15 ft (IH/PC or IH/TC)#042 985Interconnect control extension, 25 ft (IH/PC or IH/TC)Output Extension Cables (Air-Cooled)#198 52825 ft, 20/25 kW #194 70350 ft, 20/25 kW #198 28418 in series adapterInduction Blankets (Air-Cooled)#195 967157" x 11.5"#194 886For 12 in pipe (47" X 10.1" with sleeve)#194 885For 14 in pipe (53" X 10.1" with sleeve)#194 884For 16 in pipe (60" X 10.1" with sleeve)#194 699For 18 in pipe (66" X 9.0" with sleeve)#198 657For 20 in pipe (72" X 9.0" with sleeve)#198 658For 22 in pipe (78" X 9.0" with sleeve)#194 686For 24 in pipe (85" X 9.0" with sleeve)#198 659For 26 in pipe (91" X 9.0" with sleeve)#198 660For 28 in pipe (97" X 9.0" with sleeve)#198 661For 30 in pipe (104" X 9.0" with sleeve)#194 817For 32 in pipe (110" X 7.5" with sleeve)#194 818For 34 in pipe (116" X 7.5" with sleeve)#194 687For 36 in pipe (122" X 7.5" with sleeve)#194 819For 38 in pipe (129" X 7.5" with sleeve)#198 662For 42 in pipe (141" X 7.5" with sleeve)#198 663For 48 in pipe (160" X 7.5" with sleeve)#198 066For 52 in pipe (173" X 7.5" with sleeve)Replacement Blanket Sleeves#194 889For 12 in pipe (49" X 10.1")#194 888For 14 in pipe (55" X 10.1")#194 887For 16 in pipe (62" X 10.1")#194 707For 18 in pipe (68" X 9.0")#198 664For 20 in pipe (74" X 9.0")#198 665For 22 in pipe (81" X 9.0")#194 706For 24 in pipe (87" X 9.0")#198 666For 26 in pipe (94" X 9.0")#198 667For 28 in pipe (100" X 9.0")#198 668For 30 in pipe (107" X 9.0")#194 811For 32 in pipe (114" X 7.5")#194 812For 34 in pipe (120" X 7.5")#194 705For 36 in pipe (127" X 7.5")#194 813For 38 in pipe (133" X 7.5")#198 669For 42 in pipe (146" X 7.5")#198 670For 48 in pipe (166" X 7.5")#200 262For 52 in pipe (179" X 7.5")Date:Total Quoted Price:Ordering InformationPower SourceControlBlankets (flat or wrap)ControlPower SourceSeries and Parallel System Configurations。
- 1、下载文档前请自行甄别文档内容的完整性,平台不提供额外的编辑、内容补充、找答案等附加服务。
- 2、"仅部分预览"的文档,不可在线预览部分如存在完整性等问题,可反馈申请退款(可完整预览的文档不适用该条件!)。
- 3、如文档侵犯您的权益,请联系客服反馈,我们会尽快为您处理(人工客服工作时间:9:00-18:30)。
Ⅰ.Specification1). Item No.: 23022). Power Rate:3500W/Left Rate:1500W/Right:2000W3). Voltage:220-240V~ / 50/60 HzⅡ.Cautions1). Do not plug with wet hands.2). Do not plug into a socket where several other appliances are plugged in.3). Do not use if the plug cord is damaged or the power plug does not fit the socket safely.4). Do not modify the parts, or repair the unit by yourself.5). Do not use the unit near flame or wet places.6). Do not use where children can easily touch the unit, or allow children to use the unit by themselves.7). Do not place on unstable surfaces.8). Do not move the unit when the pot or the pan is on it.9). Do not heat the pot empty or overheat the pot.10). Do not place metallic objects such as knives, forks, spoons, lids, cans, and aluminum foils on the topplate since they can get hot.11). Use the unit with sufficient space around it. Keep the front side and either right or left side of the unitclear.12). Do not use the unit on carpet or tablecloth (vinyl) or any other low-heat-resistant article.13). Do not place a sheet of paper between the pot or the pan and the unit. The paper may get burnt.14). If the surface is cracked, switch off to avoid the possibility of electric shock and then take to the servicecenter immediately.15). Do not block air intake or exhaust vent.16). Do not touch the top plate right after removing the pot or the pan, as the top plate will still be very hot.17). Do not place the unite near to the objects which are affected by magnet, such as: radios, televisions,automatic-banking cards and cassette tapes.18). The power cord must be replaced by qualified technicians.19)CAUTION: Hot surface.20) This appliance is not intended for use by persons (including children) with reduced physical, sensory ormental capabilities, or lack of experience and knowledge, unless they have been given supervision or instruction concerning use of the appliance by a person responsible for their safety.21) The temperature of accessible surfaces may be high when the appliance is operating.22)This appliances is intended to be used in household and similar applications such as:-staff kitchen areas in shops, offices and others working environments;-farm houses;-by clients in hotels, motels and other residential type environments;-bed and breakfast type environments.23)If the manufacturer wants to limit the use of the appliance to less than above, this must be clearly stated in the instructions.Warning: Children should be supervised to ensure that they do not play with the appliance.Ⅲ.How to Use1). Place suitable cooking utensils in the center of the top plate and plug in, the power light will shine2). Pressing ON/OFF button, power light will shut off, and the light of Function will flash3). Pressing Function button, the cooker will heat at 5-level. Set the cooker at desired power by directlypressing to adjust the power from 1 to 8 or 8 to 1.4). Function: Press the Function pad and to select POWER, TEMP and TIMER.The appliance is equipped with an overheat protection. If the pot or pan is getting too hot, the appliance will switch off power, a buzzer sounds and on the display occurs “E02”. Should this happen, wait for some minutes and cool the appliance down. After that, the appliance works without problems.If meat or vegetables should the roasted, please use the temperature function to avoid any over heating .POWER: 1, 2, 3, 4, 5, 6, 7, 8TIMER: 0, 1, 2, 3, …99; 1 minutes per interval.5). The preset temperature and timer are 180°C and 00 respectively.6). This induction cooker is equipped with memory function. The power level, temperature level andtimer level interval will be stored even you change from POWER to TEMP and then back to POWER.7). If you want to cancel TIMER function, simply press ON/OFF. Press ON/OFF to start again.8). This appliance is liable to get hot during use.Ⅳ.Usable and Non-usable Utensils1). Usable PansSteel or cast iron, enameled iron, stainless steel, flat-bottom pans / pots with diameter from 12 to 26cm.Enameled Iron Iron or Enameled Castiron Pan Iron Pot Deep-Fry Pan Stainless Steel Pot Iron Plate Pot Iron Pot2). Non-usable PansHeat-resistant glass, ceramic container, copper, aluminum pans/pots. Rounded-bottom pans/pots with bottom measuring less than 12cm.Rounded Bottom Aluminum Bottom Measuring Pot with Stands Ceramic Pot Heat-Resistant Pot Copper Pot Less than 12cm Glass PotⅤ.How to Clean1). Disconnect plug and wait until the unit is cooled down completely. Clean after using every time.2). If the pots/pans are used without being cleaned, discoloration or cooked on stains may be caused.3). Do not use benzine, thinner, scrubbing brush or polishing powder to clean the induction cooker.4). Wipe using dish washing agent and damp cloth.5). Use vacuum cleaner to suck up dirt from the air intake and exhaust vent.6). Never run water over the unit (Water gets inside may cause malfunction).。