FLEX流媒体服务器配置说明
Flex4.5环境配置和使用
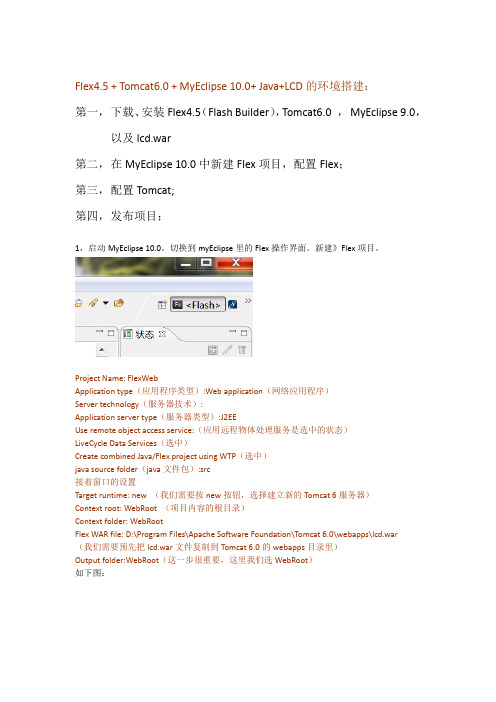
Flex4.5 + Tomcat6.0 + MyEclipse 10.0+ Java+LCD的环境搭建:第一,下载、安装Flex4.5(Flash Builder),Tomcat6.0 ,MyEclipse 9.0,以及lcd.war第二,在MyEclipse 10.0中新建Flex项目,配置Flex;第三,配置Tomcat;第四,发布项目;1,启动MyEclipse 10.0。
切换到myEclipse里的Flex操作界面。
新建》Flex项目。
Project Name: FlexWebApplication type(应用程序类型):Web application(网络应用程序)Server technology(服务器技术):Application server type(服务器类型):J2EEUse remote object access service:(应用远程物体处理服务是选中的状态)LiveCycle Data Services(选中)Create combined Java/Flex project using WTP(选中)java source folder(java文件包):src接着窗口的设置Target runtime: new (我们需要按new按钮,选择建立新的Tomcat 6服务器)Context root: WebRoot (项目内容的根目录)Context folder: WebRootFlex WAR file: D:\Program Files\Apache Software Foundation\Tomcat 6.0\webapps\lcd.war(我们需要预先把lcd.war文件复制到Tomcat 6.0的webapps目录里)Output folder:WebRoot(这一步很重要,这里我们选WebRoot)如下图:下一步:2,配置TOMCAT新建,选择Tomcat 6.0服务器。
Flex Gateway G2 用户手册说明书

User Manual Flex Gateway G204 / 25 / 2018Revision 21. CPS Data & Controls System Description (3)1.1) Standard Inverter Modbus Communication Card (4)1.2) Optional Flex Gateway Communications Card (5)1.3) Chint Power Systems Connect (CPS Connect) Mobile App (6)1.4) CPS Service Portal (6)2. Interface & Indicators (7)3. Installation Options (9)3.1) Inverter Wirebox (9)3.2) External Installation (10)4. Site Activation (11)4.1) Download the APP : CPS Connect ( Chint Power Systems Connect) (11)4.2) Connect the Flex Gateway (12)4.3) Status of Wifi Module (13)4.4) Test and Save the Configuration (14)4.5) Activate Flex Gateway (15)5. Hardware Datasheet of Flex Gateway 2.0 (18)1. CPS Data & Controls System DescriptionChint Power Systems (CPS) offers a complete inverter data acquisition and controls solution for its customers in North and Central America. Our platform aims to:Enable advanced inverter data communications & controlReduce communications HW cost and installation laborSupport seamless 3rd party integrationReduce O&M costs and improve field performanceEnable customers with direct data accessThe system comprises of four key components:Standard Inverter Modbus CommunicationsOptional Flex Gateway Communications CardChint Power Connect (CPS Connect) Mobile AppCPS Service Web Portal1.1) Standard Inverter Modbus Communication CardEach CPS three phase string inverter (Models SCA23KTL-X, SCA28KTL-X, SCA36KTL-X, SCA50KTL-X, SCA60KTL-X, SCA100KTL-X, SCA125KTL-X) ships standard, at no charge, with Modbus communications capability. This built in communications capability offers both data read access to approximately 32 parameters, depending on inverter model, but also advanced and remote controls of as many as 56 parameters.To enable inverter level data access, each inverter must be connected to a 3rd party monitoring gateway via standard RS-485 twisted shield pair Modbus daisy chain. Modbus wiring instructions are provided in the respective inverter product manuals.Standard built-in communicationsin every inverter wireboxApplication guides and Modbus data maps are available at the website athttps:///downloads.htmlor by contacting CPS applications engineering at 1-855-584-7168.1.2) Optional Flex Gateway Communications CardThe optional Flex Gateway card offers a site level inverter communications capability to customers and to CPS Service. This card works as a Modbus master gateway (site level) and connects to the inverter Modbus daisy chain network.The Flex Gateway enables the following additional features above standard Modbuscommunications:Remote inverter firmware upgrade support by CPS ServiceRemote diagnostics by CPS ServiceBroadcast controls commands to speed up control loops for advanced applications like power quality management or zero export requirementsDirect customer data from the Flex Gateway via a programmable Ethernet XML Sunspec Data Exchange connection for customers who want to manage their owndata directlyPass thru Modbus communications to a 3rd party gatewayOptional Flex Gateway1.3) Chint Power Systems Connect (CPS Connect) Mobile AppThe CPS Connect mobile application is used to wirelessly program and setup the Flex Gateway in the field. It is intended to be used by installers, operations, maintenance and other site personnel to program the communications equipment. The app is available at the Apple iOS store and at the Google store for Android based devices.Each Flex Gateway ships with a Wi-Fi Module that connects to the Flex Gateway to create a local Wi-Fi network. Once connected to the Flex Gateway, all inverters on the Modbus daisy chain network can be programmed.1.4) CPS Service PortalThe CPS Service Portal is a web based interface intended for use by the CPS service team. This advanced portal enables remote diagnostics and FW management of connected systems.2. Interface & IndicatorsSwitchSwitchSwitch Switch3. Installation Options3.1) Inverter Wirebox3.2) External Installation4. Site Activation4.1) Download the APP: CPS Connect (Chint Power Systems Connect)Scan the following QR-code to complete APP download and installation by using the mobile phones that can access the Internet.and Web Portal.4.2) Connect the Flex GatewayOpen the APP – CPS Connect and choose Flex Gateway. Click Wi-Fi Setting and switch to Wi-Fi configuration of mobile phone.Ensure to connect the SSID starts with CPLK-XXXXXXX.4.3) Status of Wi-Fi Module4.4) Test and Save the ConfigurationClick Test to check the default configuration.The APP will send the default configuration to the Flex Gateway and start testing. Click Save the Config to ensure all settings take effect.Auto start to scan the address in turn according to Modbus range after the Sever testing.4.5) Activate Flex GatewayAfter testing and saving the configuration, the Activate button will be enabled. Click Activate and move to the next step. Ensure the mobile phone is connected to the Internet during this step.Input the site owner’s email address and click Next.Click Apply to proceed with activation. Name a new site or choose an existingsite. Name a new Flex Gateway.Choose the time zone of the site.When the installer logs out and back to the area of the same Flex Gateway again. This Flex Gateway should be shown as Activated. Click Activated.It displays the basic information of this Flex Gateway including the date of the last upload and the connection status of Servers.5. Hardware Datasheet of Flex Gateway 2.0Address 7060 Koll Center Parkway, Suite 318Pleasanton, CA 94566Hotline 855 584 7168Website 。
flex接口简易说明

Flex接口简易说明一、接口介绍本接口由Flex技术实现,接口调用的表现形式为JS方法,用户只需要调用相关JS方法即可实现呼叫中心大部分功能。
二、接口调用只需在WEB页面包含下面一行代码即可:<script type="text/javascript" src="http://IP/interface.js"></script>三、函数列表1.mixConnect(ip, port)用来将接口与呼叫中心进行连接,参数为呼叫中心IP地址及端口号。
连接成功后,接口会自动调用mixOnConnect()方法。
2.mixDisconnect()用来将接口与呼叫中心断开连接,无参数。
3.mixGetVersion(actionid)获取接口版本号,actionid为用户传递的唯一标识,该actionid会在执行结果中返回。
该方法执行后,接口会自动调用mixOnResult(str)方法,并将执行结果以参数形式传递给mixOnResult(str)方法。
返回结果如:Response: SuccessActionType: mixGetVersionActionID: 10000FlexVersion: V100R001B01D01-20110712JSVersion:4.mixSetDND(exten, dnd, actionid)设置分机示忙/示闲,exten为分机号码,dnd为-1时表示示闲,其它非空值为示忙,actionid为用户传递的唯一标识,该actionid会在执行结果中返回。
该方法执行后,接口会自动调用mixOnResult(str)方法,并将执行结果以参数形式传递给mixOnResult(str)方法。
返回结果如:Response: SuccessActionType: mixSetDNDActionID: 777Value: -1(参数dnd的值)5.mixGetDND(exten, actionid)获取分机示忙状态,exten为分机号码,actionid为用户传递的唯一标识,该actionid会在执行结果中返回。
架设流媒体服务器步骤
架设流媒体服务器配置
Ip:192.168.1.100(可以填写其他的)
基本步骤:
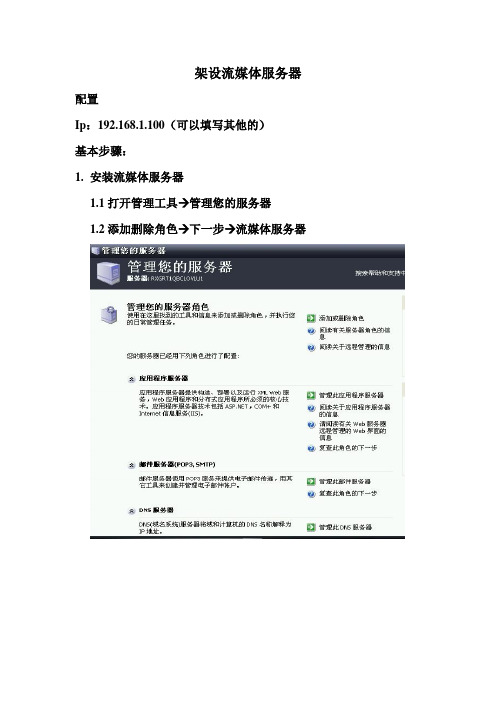
1.安装流媒体服务器
1.1打开管理工具→管理您的服务器
1.2添加删除角色→下一步→流媒体服务器
2.发布站点
2.1打开Windows Media Servers管理控制台右击发布图标,选择
添加发布(向导)命令
2.2为发布点取名(可以去任何名字)
2.3选择发布内容→选择目录中的文件→下一步
2.4选择点播式发布→下一步
2.5循着视频目录类容(该虚拟机在C:\WMPub\WMRoot)
选择完成!可以在服务器上测试是否能播放!
3从客户端访问流媒体服务器
3.1在客户端上选择→开始→所有程序→附件→娱乐→Windows
Media Player命令启动Windows媒体播放器
出来是这样的
选右下角的切换
这才有【文件】
才能选3.2这个步骤!
3.2在【文件】菜单中选【打开URL】,在弹出的对话框中填写
“mms://192.168.1.100/eshine+(文件名如:legacy_content_clip.wmv)
Ok啦!详细步骤见下面贴图!
贴到上图的空里!
再在后面添加具体文件名!/RXGRT1QBCLOVLU1/可以换为ip!
部文件名复制粘贴过去!得到
选择确定就可以!。
FlexFusion 服务器柜说明书
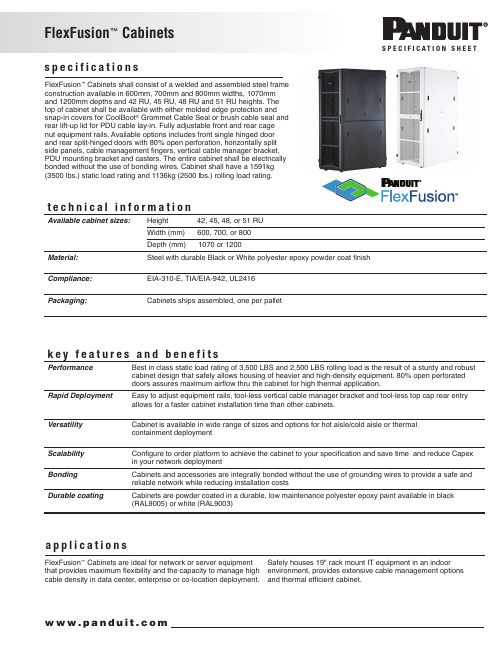
FlexFusion ™ Cabinetss p e c i f i c a t i on sFlexFusion ™ Cabinets shall consist of a welded and assembled steel frame construction available in 600mm, 700mm and 800mm widths, 1070mm and 1200mm depths and 42 RU, 45 RU, 48 RU and 51 RU heights. The top of cabinet shall be available with either molded edge protection and snap-in covers for CoolBoot ® Grommet Cable Seal or brush cable seal and rear lift-up lid for PDU cable lay-in. Fully adjustable front and rear cage nut equipment rails. Available options includes front single hinged door and rear split-hinged doors with 80% open perforation, horizontally split side panels, cable management fingers, vertical cable manager bracket, PDU mounting bracket and casters. The entire cabinet shall be electrically bonded without the use of bonding wires. Cabinet shall have a 1591kg (3500 lbs.) static load rating and 1136kg (2500 lbs.) rolling load rating.a p p l i c a t i on sFlexFusion ™ Cabinets are ideal for network or server equipment that provides maximum flexibility and the capacity to manage high cable density in data center, enterprise or co-location deployment. Safely houses 19" rack mount IT equipment in an indoor environment, provides extensive cable management options and thermal efficient cabinet.S P E C I F I C A T I O N S H E E Tk e y f e a t u r e s a n d b e n e f i t sPerformance Best in class static load rating of 3,500 LBS and 2,500 LBS rolling load is the result of a sturdy and robust cabinet design that safely allows housing of heavier and high-density equipment. 80% open perforated doors assures maximum airflow thru the cabinet for high thermal application.Rapid Deployment Easy to adjust equipment rails, tool-less vertical cable manager bracket and tool-less top cap rear entry allows for a faster cabinet installation time than other cabinets.Versatility Cabinet is available in wide range of sizes and options for hot aisle/cold aisle or thermal containment deploymentScalability Configure to order platform to achieve the cabinet to your specification and save time and reduce Capex in your network deploymentBonding Cabinets and accessories are integrally bonded without the use of grounding wires to provide a safe and reliable network while reducing installation costsDurable coatingCabinets are powder coated in a durable, low maintenance polyester epoxy paint available in black (RAL9005) or white (RAL9003)t e c h n i c a l i n f o r m a t i o nAvailable cabinet sizes:Height 42, 45, 48, or 51 RU Width (mm) 600, 700, or 800Depth (mm) 1070 or 1200Material: Steel with durable Black or White polyester epoxy powder coat finish Compliance: EIA-310-E, TIA/EIA-942, UL2416Packaging:Cabinets ships assembled, one per palletFlexFusion ™ Configured CabinetFlexFusion ™CabinetsFlexFusion ™ Cabinet Part Number SampleFlexFusion ™Cabinet Options** Requires electronic handle.FlexFusion™AccessoriesXG-SPFS452B is a side panel kit for 45 RU, 1200mm deep, Black cabinet.XG-SPFS482W is a side panel kit for 48 RU, 1200mm deep, White cabinet.©2021 Panduit Corp.FlexFusion ™ Cabinet DimensionsAll cabinets include:● Adjustable front and rear equipment rails ● Rail position markers ● Heavy-duty levelling legs● Ganging brackets● Standard floor mounting brackets ● 25 each M6 cage nuts and screwsWORLDWIDE SUBSIDIARIES AND SALES OFFICESFor a copy of Panduit product warranties, log on to /warrantyPANDUIT US/CANADA Phone: 800.777.3300PANDUIT EUROPE LTD. London, UKPhone: 44.20.8601.7200PANDUIT JAPAN Tokyo, JapanPhone: 81.3.6863.6000PANDUIT SINGAPORE PTE. LTD. Republic of Singapore Phone: 65.6305.7575PANDUIT AUSTRALIA PTY. LTD. Victoria, Australia Phone: 61.3.9794.9020PANDUIT LATIN AMERICA Guadalajara, Mexico Phone: 52.33.3777.6000Visit us at For more information。
流媒体服务器的配置
流媒体服务器的配置一、前言随着互联网技术的不断发展,流媒体服务器在各种网络应用中扮演着越来越重要的角色。
流媒体服务器主要负责处理音频、视频以及其他多媒体数据的传输,提供流畅、高质量的媒体内容。
本文将探讨如何配置一个稳定、高效的流媒体服务器。
二、流媒体服务器硬件选择1、处理器:选择具有高性能处理器的服务器,这样可以提供更快的处理速度,确保流媒体的顺畅播放。
2、内存:选择具有较大内存容量的服务器,这样可以存储更多的媒体数据,提高服务器的响应速度。
3、网络接口:选择具有高速网络接口的服务器,这样可以提供更快的网络传输速度,保证流媒体的实时传输。
4、存储设备:选择具有大容量、高速度的存储设备的服务器,这样可以存储更多的媒体文件,提高服务器的性能。
三、流媒体服务器软件配置1、操作系统:选择稳定的操作系统,例如Linux,因为它具有强大的网络功能和稳定的性能。
2、流媒体软件:选择成熟的流媒体软件,例如Windows Media Services、Real Networks Streaming Server等,它们具有强大的流媒体处理功能。
3、配置网络连接:确保服务器具有稳定的网络连接,以便于媒体内容的传输。
4、配置存储设备:确保存储设备能够满足服务器的需求,并提供足够的存储空间。
四、流媒体服务器安全配置1、防火墙:配置防火墙以防止未经授权的访问和攻击。
2、安全策略:制定安全策略以保护服务器免受恶意攻击。
3、定期更新:定期更新服务器软件和操作系统,以确保服务器的安全。
五、总结配置一个稳定、高效的流媒体服务器需要考虑多个方面,包括硬件选择、软件配置以及安全配置。
只有充分考虑到这些因素,才能建立一个满足需求的流媒体服务器。
希望本文能够帮助大家了解如何进行流媒体服务器的配置。
流媒体服务器的搭建随着互联网的快速发展,流媒体技术已经成为了一种重要的信息传播方式。
流媒体服务器是流媒体技术的核心组成部分,可以实现音视频数据的实时传输、存储和播放等功能。
FLEX简介

Tony
© Copyright, Suzsoft Co., Ltd. Confidential and Proprietary Information. All Rights Reserved.
1
第一部分:
走近Flex
02:13
© Copyright, Suzsoft Co., Ltd. Confidential and Proprietary Information. All Rights Reserved.
02:13
© Copyright, Suzsoft Co., Ltd. Confidential and Proprietary Information. All Rights Reserved.
9
02:13
© Copyright, Suzsoft Co., Ltd. Confidential and Proprietary Information. All Rights Reserved.
2
什么是Flex?
Flex是一个针对企业级富互联网应用的表示层 解决方案。 富互联网应用程序(Rich Internet Application, RIA),传统的网络程序由HTML语言来标记表 现层,只适合图文,形式上受限。RIA具有强 交互性,表现内容丰富。 swf,一种RIA表现形式。 Flex,用编译器来生成swf,实现Web应用 (Flash Player)。
02:13
© Copyright, Suzsoft Co., Ltd. Confidential and Proprietary Information. All Rights Reserved. 16
MXML文件结构(3)
如何搭建流媒体服务器
如何搭建流媒体服务器随着互联网的快速发展,流媒体内容的需求也越来越大。
为了满足用户对高质量流媒体内容的追求,搭建流媒体服务器成为了一个重要的任务。
本文将从硬件选购、软件安装和配置以及服务器维护等方面,为您介绍如何搭建流媒体服务器。
一、硬件选购搭建流媒体服务器所需要的主要硬件有服务器主机和存储设备。
对于服务器主机,建议选择性能强大、稳定可靠的服务器,以保证流媒体内容的传输和播放质量。
同时,服务器主机应具备足够的内存和处理器性能来处理高并发的请求。
对于存储设备,可选择大容量的硬盘或者专门的网络存储设备,以满足大规模的流媒体内容储存需求。
二、软件安装和配置1. 操作系统选择流媒体服务器的操作系统可以选择Linux、Windows Server等,其中Linux是最常用的选择之一。
可以根据自身的需求和了解程度来选择操作系统。
2. 流媒体服务器软件选择常见的流媒体服务器软件有Nginx、Apache、Wowza Media Server 等。
Nginx是一个高性能的HTTP和反向代理服务器,可用于搭建流媒体服务器。
Apache也是一个流行的服务器软件,但对于流媒体服务器的性能要求相对较低。
而Wowza Media Server则是一个全功能的流媒体服务器软件,支持多种流媒体协议和编码格式。
3. 配置流媒体服务器根据所选择的流媒体服务器软件,按照其官方文档或者在线教程进行安装和配置。
主要的配置内容包括监听端口、域名绑定、转发规则等。
确保配置正确无误后,启动服务器软件。
三、服务器维护搭建好流媒体服务器后,还需要进行一些常规的维护工作,以保证服务器的正常运行和流媒体内容的稳定传输。
1. 安全设置流媒体服务器应当进行适当的安全设置,防止未经授权的访问和攻击。
建议采用防火墙、访问控制列表等方式,限制对服务器的访问和操作权限。
2. 定期备份定期备份是保证流媒体内容安全的重要措施。
应根据流媒体服务器的使用情况和内容更新频率,设定合适的备份间隔,并定期将关键数据备份到可靠的存储设备中。
- 1、下载文档前请自行甄别文档内容的完整性,平台不提供额外的编辑、内容补充、找答案等附加服务。
- 2、"仅部分预览"的文档,不可在线预览部分如存在完整性等问题,可反馈申请退款(可完整预览的文档不适用该条件!)。
- 3、如文档侵犯您的权益,请联系客服反馈,我们会尽快为您处理(人工客服工作时间:9:00-18:30)。
流媒体服务器配置说明作者:崔红斌QQ : 61.前言为什么要用red5建立流媒体服务器,因为Red5是一个采用Java开发开源的Flash流媒体服务器,免费。
Red5使用RTMP作为流媒体传输协议,这与FMS完全兼容。
它具有流化FLV、MP3文件,实时录制客户端流为FLV文件,共享对象,实时视频播放、 Remoting等功能。
2.流媒体服务器的配置1.JDKRed5的安装需要java环境的支持,先配置好JDK。
2.RED5安装本demo red5安装在工作环境中,X:\TAIZHOU\webroot\Red5\流媒体服务器读取文件的目录为:X:\TAIZHOU\webroot\Red5\webapps\OLDOLD文件下有两个文件夹:streams和WEB-INF其中streams中存放所有的视频资料,WEB-INF则是一些重要的配置文件。
Webapps配置说明:classes文件夹(用来存放编译后的java类文件)。
中需配置:指定应用程序唯一的名称为:OLD<context-param><param-name>webAppRootKey</param-name><param-value>/OLD</param-value></context-param>如果该文件中没有请添加如下:<security-constraint><web-resource-collection><web-resource-name>Forbidden</web-resource-name><url-pattern>/streams/*</url-pattern></web-resource-collection><auth-constraint/></security-constraint>2.red5-web.xml 中需要添加控制器(Handlers)<bean id="web.handler" class="app.Application" singleton="true" />这个类文件放在classes中。
主要是实现客户端和流媒体服务器的连接。
3. red5-web.properties 中需配置webapp.contextPath=/OLDwebapp.virtualHosts=*,localhost,虚拟主机应添加*,即任何地址都可访问。
否则其他电脑无法读取流媒体。
3.FLEX BUILDER3 或者Flex SDK的安装这两者的区别是,FLEX BUILDER3 集成SDK和可视化编辑窗口,Flex SDK包含了有Flex Framework、Adobe AIR Framework、Flex Tools等重要的组件库与API。
对于开发人员来说,最好安装FLEX BUILDER3,而服务器建议安装Flex SDK。
为什么要安装这个工具呢?因为flex程序的编译要用到其中的SDK。
下面会讲到。
Flex SDK 安装后需要配置环境变量,在path中添加:C:\flex_sdk_3\bin;C:\flex_sdk_3\frameworks;Linux下添加环境变量,这里就不说了。
Flex程序以MXML(主程序)和AS为主。
开发MXML程序说明:因为red5 采用RTMP 协议传输数据流,所以在MXML中需要定义RTMP连接地址来找到red5的工作目录。
如下程序,本人开发的第一版视频播放器源代码,可以用FLEX BUILDER3新建一个项目,把代码考过去,然后运行就能看到生成SWF视频文件了,由于界面比较难看,所以本人抛弃了它。
<?xml version="1.0" encoding="utf-8"?><mx:Application xmlns:mx="/mxml" layout="absolute" verticalAlign="middle"width="356" height="324"><mx:Script><![CDATA[import ;import ;private var rtmpURL:String="";private var conn:NetConnection=new NetConnection();private var isConnectSuccess:Boolean=false;private var netStream:NetStream;private var video:Video=new Video();private var sound:SoundTransform;private function clickConnect(e:MouseEvent):void{if(!isConnectSuccess){conn.addEventListener(_STATUS,netStatus);conn.connect(rtmpURL);}}private function netStatus(e:NetStatusEvent):void{trace(;if(""){isConnectSuccess=true;netStream=new NetStream(conn);sound = netStream.soundTransform;video.attachNetStream(netStream);netStream.play("on2_flash8_w_audio.flv");ui.addChild(video);remoteObject.insert();}}private function StopBtn_Click(e:MouseEvent):void{netStream.close();isConnectSuccess = false;}private function PauseBtn_Click(e:MouseEvent):void{netStream.pause();}private function ReturnBtn_Click(e:MouseEvent):void{netStream.resume();}// Handle the recevied message.private function resultHandler(event:ResultEvent):void {ta.text += "Server responded: "+ event.result + "\n";}// Handle a message fault.private function faultHandler(event:FaultEvent):void {ta.text += "Received fault: " + event.fault + "\n";}]]></mx:Script><mx:RemoteObject id="remoteObject"destination="blatojava"result="resultHandler(event);"fault="faultHandler(event);"/><mx:Panel width="356" x="0" y="0" height="324"><mx:VideoDisplay id="ui" width="336" height="230" autoPlay="false"/><mx:VBox width="100%"><mx:ProgressBar source="myVideo" labelPlacement="left" width="332"/><mx:Canvas width="100%"><mx:Button id="playBtn" label="play" y="0" click="this.clickConnect(event)"/><mx:Button id="pauseBtn" label="pause" y="0" click="this.PauseBtn_Click(event)" x="58"/><mx:Button id="ReturnBtn" label="return" y="0"click="this.ReturnBtn_Click(event)" x="126"/><mx:Button id="StopBtn" label="stop" y="0" click="this.StopBtn_Click(event)"x="198"/></mx:Canvas></mx:VBox></mx:Panel></mx:Application>采用RTMP协议,需注意:private var rtmpURL:String="";RTMP所访问的路径为服务器上RED5的工作目录(即IP+工作文件夹)。
上面已经说明,工作文件夹为OLD,最重要的是IP地址不要写成:localhost或者,否则除此之外的客户端无法访问到服务器的流媒体,一定要外网IP。