维真显示27寸裸眼3D显示器规格书
VA27V系列 液晶显示器 用户指南说明书

V A27V系列液晶显示器用户指南ii版权所有 $6867H. &20387(5 ,1& 保留所有权利。
除了购买者出于备份目的而保留的文档外,未经 ASUSTeK COMPUTER INC.(“ASUS ”)明确书面许可,不得以任何形式或通过任何方式复制、传播、转录本手册的任何部分,包括其中介绍的产品和软件,也不得将其存储到检索系统中或翻译成任何语言 。
在下列情况下,将不能享受产品保修或维修服务:(1) 产品被修理或改动,除非此类修理或改动得到 ASUS 的书面授权;(2) 产品序列号损毁或缺失。
ASUS “按原样”提供本手册,不提供明示或暗示担保,包括但不限于对于适销性或针对特定目的适用性的隐含担保或条件。
无论在任何情况下,ASUS 及其董事成员、高级职员、员工或代理不对由于本手册或产品中存在任何缺陷或错误而导致的任何间接、特殊、偶然或必然损失(包括收益损失、业务损失、不能使用或数据丢失、业务中断等)承担任何责任,即使ASUS 已被告知此类损失的可能性。
针对本手册中包含的规格和信息仅供一般性参考,如若随时变更,恕不另行通知,因此不应构成 ASUS 的承诺。
ASUS 对本手册(包括其中介绍的产品和软件)中可能存在的任何错误不承担任何责任。
本手册中出现的产品名称和公司名称可能分别是或不是相应公司的注册商标或版权,仅用于标示或解释目的,无意侵犯其所有者的权益。
第一版2021 年 5 月目录Notices (iv)安全信息 (v)保养和清洁 (vi)回收服务 (vii)1.1 欢迎使用! ........................................................................................1-11.2 物品清单.........................................................................................1-11.3 组装显示器底座..............................................................................1-21.4 连接线缆.........................................................................................1-31.4.1 液晶显示器后部...............................................................1-31.5 显示器简介 .....................................................................................1-41.5.1 使用控制按钮 ..................................................................1-42.1 调整显示器 .....................................................................................2-12.2 卸下底座......................................................................................... 2-23.1 OSD(屏幕显示)菜单...................................................................3-13.1.1 如何重新配置 ..................................................................3-13.1.2 QuickFit 功能 .................................................................3-23.2 规格..............................................................................................3-103.3外观尺寸.......................................................................................3-113.4故障排除(常见问题) .................................................................3-123.5支持的时序列表 ............................................................................3-13iiiiv声明联邦通信委员会声明本设备符合 FCC 规则第 15 部分的要求。
27寸屏规格书

WLED
灯管数量(Lamp Number)
18S4P pcs
灯管形状(Lamp Shape)
4串
背光寿命(Life Time of Lamp)
30K Hours
单一灯管电压(Voltage of Lamp)
59.4V
单一灯管电流(Current of Lamp)
120mA
背光接口数量(Quantity of Backlight Interface)
1 pcs
背光接口脚距(Pitch of Backlight Interface)
1.0 mm mm
背光接口定义(Backlight Interface Define )
BLE-6PINS-CCAACC
每箱数量(Quantity Per Box)
5.0V
面板输入电流(Input Current)
0.8A
信号接口类型(Kind of Singnal Interface)
端子
信号接口品牌(Brand of Singnal Interface)
E&T
信号接口型号(Model of Singnal Interface)
FI-XPB30SRLA-HF11
内置灯管驱动器(Driver of Backlight)
无
背光接口类型(Kind of Backlight Interface)
端子
背光接口品牌(Brand of Backlight Interface)
E&T
背光接口型号(Model of Backlight Interface)
3707K-Q06N-01R
制造商(Productor)
宁波维真-大尺寸光学绑定全贴合工艺流程
17
12
维真显示科技
• • • • • • • • 高水平研发团队 智能化工业生产管理 专注大尺寸触摸屏 最先进的全贴合工艺 自主产权,自主生产 产能:100片/天 尺寸:27"- 84"更大尺寸可以定制 良率:55"以下良率达98%,55"以上良率达90%。
13
维真专注大尺寸
注:维真产品实景对比图(50’’ 框贴合,46’’ 全贴合)
9
贴合综合性能对比
性能 光源利用率 背光损耗 全贴合 高 低 框贴哈 低 高
TP强度 机械结构稳定性
玻璃安全系数 防灰尘 防水汽 外观效果
高 强
高 强 强 好
低 弱
低 弱 弱 差
10
全贴合应用与优势
11
全贴合触屏现状
• • • • • • • 以小尺寸(<17")为主, 智能手机和PAD是主流应用市场, 技术要求非常高, 全贴合优势明显, 成本大, 良率低, 大尺寸是趋势。
1
大尺寸光学绑定 全贴合工艺
宁波维真显示科技 2015
2
贴合(Lamination)
1.框贴合(Air-gap) 用双面胶将面板与触摸屏以口字形沿四周粘合在一起。
2.全贴合(Full lamination) 用光学胶将面板与触摸屏以无缝隙的方式完全粘合在一 起。
3
框贴合与全贴合示例图
4
贴合光学对比图
14
贴合项目(27 ’ - 84’)
• • • • • 红外触控模组+LCM(玻璃内无结雾) TP贴合(COVER+SENSOR) 电脑一体机全贴合(AIO) 裸眼3D全贴合(Grating film+LCM) 军工业触显等其他大尺寸贴合领域。
LG LED显示器指南 - 27GN750、27GN75P、27GN75B说明书
* L G LED Monitor applies LCD screen with LED backlights.Please read this manual carefully before operating your set and retain it for future reference.27GN75027GN75P 27GN75B Copyright © 2019 LG Electronics Inc. All Rights Reserved.2TABLE OF CONTENTSLICENSE (3)OPEN SOURCE SOFTWARE NOTICE INFORMATION (4)ASSEMBLING AND PREPARING 4 -Supported Drivers and Software (5)-Product and Button Description (5)How to Use the Joystick Button-Moving and Lifting the Monitor (6)Installing on a TableAdjusting the Stand HeightAdjusting the AnglePivot FeatureTidying up CablesUsing the Kensington LockInstalling the Wall Mount Plate Installing on the Wall USING THE MONITOR (15)-Connecting to a PC (16)HDMI ConnectionDisplayPort Connection-Connecting AV Devices (17)HDMI Connection-Connecting Peripherals (17)USB Device connectionConnecting HeadphonesUSER SETTINGS (19)-Activating the Main Menu (19)Main Menu Features-User Settings (21)Menu SettingsTROUBLESHOOTING (31)PRODUCT SPECIFICATION (34)-Factory Support Mode (36)-HDMI Timing (Video) (37)-Power LED (38)-Beep Guide (39)3LICENSEEach model has different licenses. Visit for more information on the license.The terms HDMI and HDMI High-Definition Multimedia Interface, and the HDMI Logo are trademarks or registered trademarks ofHDMI Licensing Administrator, Inc.The SuperSpeed USB Trident logo is a registered trademark of USB Implementers Forum, Inc.4OPEN SOURCE SOFTWARE NOTICE INFORMATIONTo obtain the source code under GPL, LGPL, MPL, and other open source licenses, that is contained in this product, please visit .In addition to the source code, all referred license terms, warranty disclaimers and copyright notices are available for download.LG Electronics will also provide open source code to you on CD-ROM for a charge covering the cost of performing such distribution (such as the cost of media, shipping, and handling) upon email request to ******************.This offer is valid for a period of three years after our last shipment of this product. This offer is valid to anyone in receipt of this information.ASSEMBLING AND PREPARINGCAUTION•Always use genuine LG components to ensure safety and product performance.•The product warranty will not cover damage or injury caused by the use of unauthorized components.•It is recommended that use the supplied components.•If you use generic cables not certified by LG, the screen may not display or there may be image noises.•Illustrations in this document represent typical procedures, so they may look different from the actual product.•Do not apply foreign substances (oils, lubricants, etc.) to the screw parts when assembling the product. (Doing so may damage the product.)•Applying excessive force when tightening screws may cause damage to the monitor. Damage caused in this way will not be covered by the product warranty.•Do not carry the monitor upside down by just holding the base. This may cause the monitor to fall off the stand and could result in personal injury.•When lifting or moving the monitor, do not touch the monitor screen. The force applied to the monitor screen may cause damage to it.•For wave pattern on appearance, unlike the general method of coating, it’s applied to added glittering material in raw material.With no peeled-off appearance, it has good durability. Please use it with confidence because there is no problem in using the product at all.NOTE•The components may look different from those illustrated here.•Without prior notice, all product information and specifications contained in this manual are subject to change to improve the performance of the product.•To purchase optional accessories, visit an electronics store or an online shopping site, or contact the retailer from which you purchased the product.•The power cord provided may differ depending upon the region.5ENGLISHSupported Drivers and SoftwareYou can download and install the latest version from the LGE website ().6How to Use the Joystick ButtonYou can easily control the functions of the monitor by pressing the joystick button or moving it left/right with your finger.Basic FunctionsNOTE•The joystick button is located at the bottom of the monitor.Moving and Lifting the MonitorWhen moving or lifting the monitor, follow these instructions to prevent the monitor from being scratched or damaged and to ensure safe transportation, regardless of its shape or size.•Place the monitor in the original box or packing material before attempting to move it.•Before moving or lifting the monitor, disconnect the power cord and all other cables.•Hold the bottom and side of the monitor frame firmly. Do not hold the panel itself.7ENGLISH•If you use the monitor panel without the stand base, its joystick button may cause the monitor to become unstable and fall, resulting in damage to the monitor or human injury. In addition, this may cause the joystick button to malfunction.•When holding the monitor, the screen should face away from you to prevent it from being scratched.•When transporting the monitor, do not expose the monitor to shock or excessive vibration.•When moving the monitor, keep it upright and never turn the monitor on its side or tilt it sideways.CAUTION•Avoid touching the monitor screen as much as possible.-This may result in damage to the screen or some of the pixels used to create images.8Installing on a Table•Lift the monitor and place it on the table in an upright position. Place the monitor at least 100 mm (3.94 inches) away from the wall to ensure sufficient ventilation.CAUTION•Unplug the power cord before moving or installing the monitor. There is risk of electric shock.•Make sure to use the power cord that is provided in the product package and connect it to a grounded power outlet.•If you need another power cord, please contact your local dealer or the nearest retail store.9ENGLISH1 2 Handle the monitor with both hands for safety.WARNINGAdjusting the Angle1 Place the monitor mounted on the stand base in an upright position.2 Adjust the angle of the screen.The angle of the screen can be adjusted forward or backward from -5° to 15° for a comfortable viewing experience.FrontRear10WARNING•To avoid injury to the fingers when adjusting the screen, do not hold the lower part of the monitor’s frame as illustrated below.•monitor.Pivot FeatureThe pivot feature allows the monitor to rotate 90° clockwise.ENGLISH2figure.3may not support the pivot key at all.Using the Kensington LockThe connector for the Kensington security system is located at the bottom of the monitor.For more information on installation and usage, refer to the Kensington lock owner’s manual or visit the website at .Connect the monitor to a table using the Kensington security system cable.•The Kensington security system is optional. You can obtain optional accessories from most electronics stores.Installing the Wall Mount PlateThis monitor meets the specifications for the wall mount plate or other compatible devices.1 Place the screen face down. To protect the monitor panel (screen), cover thesurface with a soft cloth or the monitor protection pad included in the product package.2 Remove the four screws tightened on the back of the monitor.3 Place the wall mount plate onto the monitor and align it with the screw holes.4 Tighten the four screws using a screwdriver to fix the plate to the monitor.NOTE•The wall mount plate is sold separately.•For more information on installation, refer to the wall mount plate’s installation guide.•Be careful not to apply too much force while mounting the wall mount plate as it may cause damage to the screen.Installing on the WallInstall the monitor at least 100 mm (3.94 inches) away from the wall and leave about 100 mm (3.94 inches) of space at each side of the monitor to ensure sufficient ventilation. Detailed installation instructions can be obtained from your local retail store. Alternatively, please refer to the manual for how to install and set up a tilting wall mounting bracket.To install the monitor to a wall, attach a wall mounting bracket (optional) to the back of the monitor.Make sure that the wall mounting bracket is securely fixed to the monitor and to the wall.1 If you use screws longer than the standard length, it may damage the inside ofthe product.2 A non-VESA standard screw may damage the product and cause the monitorto fall. LG Electronics is not liable for any accidents relating to the use of non-standard screws.Wall Mount (mm)100 x 100Standard screw M4 x L10Number of screws4Wall Mount Plate (Optional)LSW 149NOTE•Use the screws specified by VESA standards.•The wall mount kit includes the installation guide and all necessary parts.•The wall mounting bracket is optional. You can obtain optional accessories from your local dealer.•The length of the screw may differ for each wall mounting bracket. Be sure to use the proper length.•For more information, please refer to the user manual for the wall mounting bracket.CAUTION•Unplug the power cord before moving or installing the monitor to avoid electric shock.•Installing the monitor on the ceiling or on a slanted wall may result in the monitor falling off, which could lead to injury. Use an authorized LG wall mount and contact the local dealer or qualified personnel.•Applying excessive force when tightening screws may cause damage to the monitor. Damage caused in this way will not be covered by the product warranty.•Use the wall mounting bracket and screws that conform to VESA standards. Damage caused by the use or misuse of inappropriate components will not be covered by the product warranty.•When measured from the back of the monitor, the length of each installed screw must be 8 mm (0.3 inches) or less.USING THE MONITOR•Illustrations in this manual may differ from the actual product.Press the joystick button, go to Menu→Input, and then select the input option.CAUTION•Do not press the screen for a prolonged time. This may cause image distortion.•Do not display a still image on the screen for a prolonged time. This may cause image retention. Use a screensaver if possible.NOTE•When connecting the power cord to the outlet, use a grounded (3-hole) power strip or a grounded power outlet.•The monitor may flicker when turned on in an area where the temperature is low. This is normal.•Sometimes red, green, or blue spots may appear on the screen. This is normal.Connecting to a PC•This monitor supports the *Plug and Play feature.* Plug and Play: A feature that allows you to add a device to your computer without having to reconfigure anything or install any manual drivers.HDMI ConnectionTransmits digital video and audio signals from your PC to the monitor.CAUTION•Using a DVI to HDMI / DP (DisplayPort) to HDMI cable may cause compatibility issues.•Use a certified cable with the HDMI logo attached. If you do not use a certified HDMI cable, the screen may not display or a connection error may occur.•Recommended HDMI cable types-High-Speed HDMI®/TM cable-High-Speed HDMI®/TM cable with Ethernet DisplayPort ConnectionTransmits digital video and audio signals from your PC to the monitor.NOTE•There may be no video or audio output depending on the DP (DisplayPort) version of the PC.•If you are using a Mini DisplayPort output graphics card, use a Mini DP to DP (Mini DisplayPort to DisplayPort) cable or gender that supports DisplayPort1.4. (sold separately)Connecting AV DevicesHDMI ConnectionHDMI transmits digital video and audio signals from your AV device to the monitor.NOTE•Using a DVI to HDMI / DP (DisplayPort) to HDMI cable may cause compatibility issues.•Use a certified cable with the HDMI logo attached. If you do not use a certified HDMI cable, the screen may not display or a connection error may occur.•Recommended HDMI cable types-High-Speed HDMI®/TM cable-High-Speed HDMI®/TM cable with Ethernet Connecting PeripheralsUSB Device connectionThe USB port on the product functions as a USB hub.NOTE•It is recommended you install all Windows Updates to keep your Windows up-to-date before connecting to the product for use.•Peripheral devices are sold separately.•A keyboard, mouse, or USB device can be connected to the USB port.•The charging speed may vary depending on the device.CAUTIONCautions When Using a USB Device•A USB device with an automatic recognition program installed, or that uses its own driver, may not be recognized.•Some USB devices may not be supported or may not work properly.•It is recommended to use a USB hub or hard disk drive with power supplied. (If the power supply is not adequate, the USB device may not be recognized properly.)Connecting HeadphonesConnect peripherals to the monitor via the headphones port.NOTE•Peripheral devices are sold separately.•If you use angled earphones, it may cause a problem with connecting another external device to the monitor. Therefore, it is recommended to use straight earphones.•Depending on the audio settings of the PC and external device, headphones and speaker functions may be limited.ENGLISHUSER SETTINGSNOTE•Your monitor’s OSD (On Screen Display) may differ slightly from that shown in this manual.•When Beep Guide is activated, pressing the joystick button will take you to Menu right away.Activating the Main Menu1 Press the joystick button on the bottom of themonitor.2 Move the joystick up/down ( / ) and left/right ( / ) to set the options.Main Menu FeaturesUser SettingsMenu Settings1 To view the OSD menu, press the joystick button at the bottom of the monitor and then enter the Menu.2 Configure the options by moving the joystick up/down/left/right.3 To return to the upper menu or set other menu items, move the joystick to or pressing () it.4 If you want to exit the OSD menu, move the joystick to until you exit.Game Mode Game Adjust Picture Adjust Input GeneralENGLISHENGLISHENGLISHENGLISHTROUBLESHOOTINGNOTE•Vertical Frequency: In order to display an image, the screen must be refreshed dozens of times per second, like a fluorescent lamp. The number of times the screen is refreshed per second is called vertical frequency, or refresh rate, and is represented by Hz.•Horizontal Frequency: The time it takes to display one horizontal line is called the horizontal cycle. If 1 is divided by the horizontal interval, the result is the number of horizontal lines displayed per second. This is called horizontal frequency and is represented by kHz.•Check if the graphics card’s resolution or frequency is within the range allowed by the monitor and set it to the recommended (optimal) resolution Control Panel > Display > Menu in Windows. (The settings may differ depending on the operating system (OS) you use.)•Not setting the graphics card to the recommended (optimal) resolution may result in blurred text, a dimmed screen, a truncated display area or misalignment of the display.•The setting methods may be different depending on the computer or operating system, and some resolutions may not be available depending on the performance of the graphics card. If this is the case, contact the manufacturer of the computer or graphics card for assistance.•Some graphics cards may not support 1920 x 1080 resolution. If the resolution cannot be displayed, contact the manufacturer of your graphics card.ENGLISHPRODUCT SPECIFICATIONLCD Screen Color Depth HDMI8-bit color is supported.DP (DisplayPort)8-bit color is supported. Resolution Max Resolution1920 x 1080 @ 240 Hz (HDMI)1920 x 1080 @ 240 Hz (DP)Recommended Resolution1920 x 1080 @ 240 Hz (HDMI)1920 x 1080 @ 240 Hz (DP)Power Sources Power Rating19 V 2.4 APower Consumption (Typical)On mode: 45 W Typ. (Outgoing condition)* Sleep Mode (Standby Mode) : ≤ 0.5 W ** Off Mode: ≤ 0.3 WAC/DC Adapter DA-48F19, manufactured by Asian Power Devices Inc.ADS-48FSK-19 19048EPCU-1, manufactured by SHENZHEN HONOR ELECTRONICADS-48FSK-19 19048EPK-1, manufactured by SHENZHEN HONOR ELECTRONICADS-48FSK-19 19048EPG-1, manufactured by SHENZHEN HONOR ELECTRONICMS-Z2530R190-048M0-E, manufactured by MOSO POWER SUPPLY TECHNOLOGY CO LTDMS-V2530R190-048L0-DE, manufactured by MOSO POWER SUPPLY TECHNOLOGY CO LTDMS-V2530R190-048L0-KR, manufactured by MOSO POWER SUPPLY TECHNOLOGY CO LTDMS-V2530R190-048L0-US, manufactured by MOSO POWER SUPPLY TECHNOLOGY CO LTDOutput: 19 V 2.53 AEnvironmental Conditions Operating Conditions Temperature0 °C to 40 °C (32 °F to 104 °F)Humidity Less than 80 %Storing Conditions Temperature-20 °C to 60 °C (-4 °F to 140 °F)Humidity Less than 85 %Dimensions Monitor Size (Width x Height x Depth)With Stand614.2 x 574.8 x 274.4 (mm)24.1 x 22.6 x 10.8 (inches)Without Stand614.2 x 364.8 x 56.3 (mm)24.1 x 14.3 x 2.2 (inches) Weight (Without Packaging)With Stand 5.8 kg (12.7 lbs)Without Stand 3.9 kg (8.5 lbs) Specifications are subject to change without notice.The Power Consumption level can be different by operating condition and monitor setting.* The On mode power consumption is measured with LGE test standard (Full White pattern , Maximum resolution). ** The monitor goes to the Sleep Mode in a couple of minutes(Max 5 minutes).Factory Support Mode(Preset Mode, HDMI/ DisplayPort PC)If you use an input timing that is outside the supported frequency, you may experience poor response speed or image quality.HDMI Timing (Video)Power LEDBeep GuideThe model and serial number of the product are located on the back and on one side of the product.Record them below in case you ever need service.Model Serial No.Supplier’s Declaration of ConformityTrade Name LGResponsible Party LG Electronics USA, Inc.Address 111 Sylvan Avenue, North Building,Englewood Cliffs, NJ 07632******************************。
AOC显示器基本型号及参数

显示器尺寸对应的最佳分辨率AOC V24t详细参数切换到传统表格版基本参数显示参数面板控制接口其它显示器附件保修信息基本参数•产品定位:娱乐影音•屏幕尺寸:23.6英寸•屏幕比例:16:9(宽屏)•最大分辨率:1920x1080 •最佳分辨率:1920x1080•高清标准:1080p(全高清)•面板类型:TN•背光类型:CCFL背光•动态对比度:60000:1•黑白响应时间:5ms显示参数•点距:0.2715mm•亮度:300cd/㎡•可视面积:521.28×293.22mm •可视角度:170/160°•显示颜色:16.7M•扫描频率:水平:30-80KHz 垂直:55-75Hz•带宽:148.5MHz面板控制•控制方式:按键•语言菜单:英文,德语,法语,意大利语,西班牙语,俄语,葡萄牙语,土耳其语,简体中文接口•视频接口:D-Sub(VGA),HDMI,色差,S端子,复合信号CVBS •其它接口:TV,音频输出外观设计•机身颜色:黑色烤漆,银色底座•外观设计:超薄设计,最薄处2.5cm•产品尺寸:595.4×483.54×220.13mm(包含底座)668×565×117mm(包装)•产品重量:5.5kg(净重)7.5kg(毛重)•底座功能:倾斜•音箱:内置音箱(2×2.5W)•壁挂:100×100mm其它•电视功能:支持电视功能•HDCP:支持HDCP•电源性能:90~240V交流, 50/60Hz External Adapter •消耗功率:最大:60W待机:1W•安规认证:CCC, CB, CE, GOST,EPA•其它性能:仰角:-3-10度•其它特点:Eco Mode 5种亮度情景模式获得EPEA T金奖•上市时间:2009年06月显示器附件•包装清单:显示器主机 x1 底座 x1电源线 x1信号线 x1保修卡 x1电子光盘说明书 x1保修信息•保修政策:全国联保,享受三包服务•质保时间:3年•质保备注:整机1月内包换,2年免费上门,3年免费全保•客服电话:400-887-8007•电话备注:8:00-22:00•详细内容:在中国大陆(不包括香港、澳门特别政区)购买并在大陆地区使用的显示器,出现保修范围内的硬件故障时,凭显示器保修证正本和购机发票到“冠捷国内维修站一览表”中的任何一个维修站均可享受1个月包换,2年在规定的城市地区免费上门维修服务,3年免费保修(包含CRT及LCD面板)的123保修服务。
HMS4C27医用显示器产品整机规格书
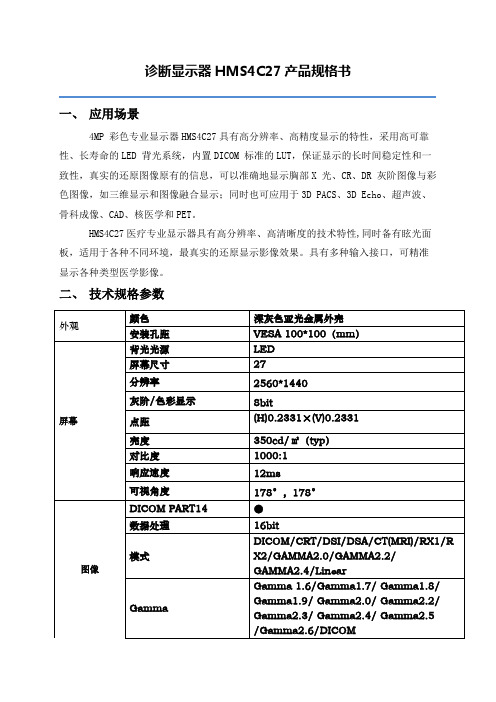
诊断显示器HMS4C27产品规格书
一、应用场景
4MP 彩色专业显示器HMS4C27具有高分辨率、高精度显示的特性,采用高可靠性、长寿命的LED 背光系统,内置DICOM 标准的LUT,保证显示的长时间稳定性和一致性,真实的还原图像原有的信息,可以准确地显示胸部X 光、CR、DR 灰阶图像与彩色图像,如三维显示和图像融合显示;同时也可应用于3D PACS、3D Echo、超声波、骨科成像、CAD、核医学和PET。
HMS4C27医疗专业显示器具有高分辨率、高清晰度的技术特性,同时备有眩光面板,适用于各种不同环境,最真实的还原显示影像效果。
具有多种输入接口,可精准显示各种类型医学影像。
二、技术规格参数
Page 2 of 2。
戴尔 Dell EV2736W 27英寸 IPS LCD 显示器说明书
With an impressive 27-inch diagonal and a resolution of 2560 x 1440 pixels, the EV2736W offers all the space that’s needed for efficient on-screen work. No matter if it’s text, graphics, photos or videos: This is the perfect screen for anyone who likes to view their content detailed and crystal-clear. Anti-glare and IPS LCD technology facilitate ergonomic working methods, ideal for users who wish to maintain a clear view from all angles at all times. A backlighting system based on economical yet bright LED technology further enhances the viewing experience. This big screen requires just 24 watts in regular use. Thanks to the built-in EcoView functions, power consumption is throttled whenever the screen is not in use or when the brightness can be reduced.♦ IPS LCD module with 2560 x 1440 pixels in a compact, space-saving design ♦ Contrast 1000:1, brightness 300 cd/m², 178° viewing angle ♦ 6 ms grey-grey changeover time thanks to overdrive function ♦ Auto EcoView, EcoView Index and EcoView Sensefor maximum power savings and superb ergonomics ♦ Integrated loudspeakers ♦ DisplayPort and DVI-D inputsEIZO EV2736W27” widescreen LCD monitor with 16:9 aspect ratioCompact, space-saving designThe sophisticated LCD module has a very narrow border and is designed for an extremely compact housing. The border around the image is no more than 20.5 mm. Power supply and signal interfaces are unobtrusively integrated into the unit.Outstanding image qualityA resolution of 2560 x 1440 pixels, a contrast ratio of 1000:1 and brightness of 300 cd/m² all ensure first-class image quality with clear graphics and structures as well as sharp text contours. No matter if you’re sitting directly in front of the display or at an angle, the entire screen complete with all corners always has superb colour and greyscale contrast.Economical and environmentally-friendlyThe mercury-free backlight with efficient but bright, white LEDs is a particularly impressive feature of the EV2736W. It requires just 24 watts in regular use. This reduces energy costs as well as CO2 emissions.Auto EcoViewThe EcoView sensor measures the light in the environment and automatically adjusts the display brightness accordingly. Theimage brightness is stronger in the case of bright illumination and it is reduced in the dark. It is also possible to control thebrightness manually. The user can freely determine minimum and maximum image brightness. The EcoView index indicates how environmentally-friendly each setting is. Auto EcoView is activated simply by pressing a button.EcoView SenseWhen it comes to power savings, the EV2736W excels thanks its EcoView Sense function. It switches the display on or off entirely automatically depending on whether the user is present or not in front of the screen. EcoView Sense detects the user’s return even before the keyboard or mouse are touched. This means the display is always ready for operation, yet it does not waste any power while the user is away.Eco Timer EIZO uses two methods to save energy: After a predefined time, Eco Timer automatically switches the monitor into standby mode, reducing power consumption. The powerswitch, located directly on the monitor, switches the power supply off completely and therefore minimises unnecessary CO² emissions as well as costs.OverdriveThe precalculated Overdrive function accelerates pixel conversion to a level where the changeover time between different hue values is a mere 6 ms on average. Moving images in fast video sequences, games and 3D CAD animations are displayed at a stunning speed and without any annoying delays.High-precision colour controlColour temperature control allows the white balance to be adjusted at intervals of 500 between 4,000 and 10,000 K. In addition, the colour saturation (gain) for RGB colours can be configured separately.EIZO EV2736W FeaturesFineContrastThis function offers a wide range of display modes with various default settings for brightness, colourtemperature and gamma. It offers ideal views for office applications, Internet and images (sRGB) at the push of a button. ‘Paper’ mode simulates the pleasing contrast and white balance of printed documents. In addition, two user modes are also available for separate settings.Digital and analogue inputsOne DisplayPort and one DVI-D input enable theconnection of a wide variety of digital signals. A D-Sub input is available for analogue signals. Up to three computers can be connected at the same time.USB hubAn integrated USB hub is provided for the connection of peripheral devices. For example, a keyboard and mouse can be connected to the monitor right on the desk. ScreenManager Pro for DDCScreenManager Pro is used for convenient monitor control using software via the Windows interfaceas an alternative to the on-screen display. The signal cable is all that is required for connection. It is even possible to link monitor settings to specific applications, for example, switching to sRGB display properties when opening the browser.Audio-enabledLoudspeakers and headphone jack are discreetly integrated into the housing.FlexStandThis enables turning and tilting as well as operation in portrait and landscape format. The continuous height adjustment starts very low near the desk and has a range of 15 centimetres. This guarantees optimal ergonomics, regardless ofwhether the user is sitting or standing in front of the screen. The FlexStand base is always fully stable, despite its maximum range of movement.Test marksDiagonal68 cm (27 inches) 16:9 aspect ratio Models (housing colour) EV2736WFS-GY (light grey) EV2736WFS-BK (black)Visible image size 597 mm (width) x 336 mm (height) Visible diagonal685 mmIdeal and recommended resolution 2560 pixels x 1440 lines Dot pitch0.233 mm x 0.233 mm Displayed colours 16.7 millionMax. brightness300 cd/m² (typical) Max. dark room contrast 1000:1 (typical)Max. viewing angle Horizontal: 178°; vertical: 178° LCD technologyIPS Typical mid-tone reaction time6 msFeaturesEcoView Sense, Auto EcoView, EcoView Index, Overdrive, HDCP decoder, FineContrast, On-Screen Display,PowerManager by VESA DPMS, Plug & Play via VESA DDC CI, USB hub, integrated loudspeakers and power supplyConfiguration optionsBrightness, contrast, gamma, colour saturation for RGB, colour temperature, clock, phase, image position, resolution, Eco Timer, OSD language (DE, UK, FR, SE, ES, IT), interpolationResolutionsMax. 2560 x 1440 full image 1:1, 1920 x 1200, 1600 x 1200, 1680 x 1050,1280 x 1024, 1024 x 768, 800 x 600, 720 x 400, 640 x 480, enlarged to full image or 1:1Horizontal frequency Digital: 31–89 kHz Vertical frequency Digital: 59–61 Hz Video bandwidth Digital: 242 MHzGraphic signals DisplayPort, DVI (TMDS), Signal inputs DisplayPort and DVI-D Plug & PlayVESA DDC CIPower management VESA DPMS, DVI-DMPMPower consumptionmax.* 67 watts, typically 24 watts, less than 0.5 watts in standby mode, 0 watts when power switch is OFF Dimensions (WxHxD) 64 cm x (40–54 cm) x 25 cm Weight 10 kgTest marksCE, TÜV GS, TÜV certified ergonomics, ISO 9241-307 Class 1, TCO 6 Energy Star Speakers Left and rightAudio input 3.5 mm stereo jack Audio output 3.5 mm stereo jack (for headphones)Flexibility172° right/left, 30° to the back,90° rotatable, 14 cm height adjustment USB hubOne upstream/two downstream, rev. 2.0 Accessories includedManual in German, English and French, power-, USB- and signal cables (DP-DP and DVI-D-DVI-D), ICC colour profileService Five-year on-site replacement serviceErrors excepted 09/12EIZO EV2736W Specifications* at maximum brightness, USB hub as well as all signal inputs and speakers in operation。
BenQ 液晶显示器 说明书
将支撑底座的插口与支撑臂对准并与其保持平行,然 后将它们推压,直至锁定到位。
轻轻尝试将它们拉开以检查它们是否正确接合。
正视图 .................................................................................................................................... 6 后视图 .................................................................................................................................... 6 如何安装显示器硬件 ................................................................................................................... 7 如何分开支撑底座 ........................................................................................................... 11 充分利用 BenQ 显示器 .............................................................................................................. 12 如何在新电脑上安装显示器............................................................................................. 13 如何在现有的电脑上升级显示器 .................................................................................... 14 在 Windows Vista 系统上安装 .......................................................................................... 15 在 Windows XP 系统上安装.............................................................................................. 16 使用摄像头 (QEye)............................................................................................................. 17 拍摄静止图像或录制视频................................................................................................. 18 图像优化 ...................................................................................................................................... 21 如何调整显示器 .......................................................................................................................... 22 控制面板.............................................................................................................................. 22 热键模式.............................................................................................................................. 23 主菜单模式.......................................................................................................................... 24 故障排除 ...................................................................................................................................... 33 常见问题(FAQ).............................................................................................................. 33 是否需要更多帮助? ......................................................................................................... 34
AOC显示器基本型号及参数
显示器尺寸对应的最佳分辨率AOC V24t详细参数切换到传统表格版基本参数显示参数面板控制接口外观设计其它显示器附件基本参数•产品定位:娱乐影音•屏幕尺寸:23.6英寸•屏幕比例:16:9(宽屏)•最大分辨率:1920x1080 •最佳分辨率:1920x1080•高清标准:1080p(全高清)•面板类型:TN•背光类型:CCFL背光•动态对比度:60000:1•黑白响应时间:5ms显示参数•点距:0.2715mm•亮度:300cd/㎡•可视面积:521.28×293.22mm •可视角度:170/160°•显示颜色:16.7M•扫描频率:水平:30-80KHz •垂直:55-75Hz•带宽:148.5MHz面板控制•控制方式:按键•语言菜单:英文,德语,法语,意大利语,西班牙语,俄语,葡萄牙语,土耳其语,简体中文接口•视频接口:D-Sub(VGA),HDMI,色差,S端子,复合信号CVBS •其它接口:TV,音频输出外观设计•机身颜色:黑色烤漆,银色底座•外观设计:超薄设计,最薄处2.5cm•产品尺寸:595.4×483.54×220.13mm(包含底座)•668×565×117mm(包装)•产品重量:5.5kg(净重)•7.5kg(毛重)•底座功能:倾斜•音箱:内置音箱(2×2.5W)•壁挂:100×100mm其它•电视功能:支持电视功能•HDCP:支持HDCP•电源性能:90~240V交流, 50/60Hz External Adapter •消耗功率:最大:60W•待机:1W•安规认证:CCC, CB, CE, GOST,EPA•其它性能:仰角:-3-10度•其它特点:Eco Mode 5种亮度情景模式•获得EPEAT金奖•上市时间:2009年06月显示器附•包装清单:显示器主机x1 •底座x1件•电源线x1•信号线x1•保修卡x1•电子光盘说明书x1保修信息•保修政策:全国联保,享受三包服务•质保时间:3年•质保备注:整机1月内包换,2年免费上门,3年免费全保•客服电话:400-887-8007•电话备注:8:00-22:00•详细内容:在中国大陆(不包括香港、澳门特别政区)购买并在大陆地区使用的显示器,出现保修范围内的硬件故障时,凭显示器保修证正本和购机发票到“冠捷国内维修站一览表”中的任何一个维修站均可享受1个月包换,2年在规定的城市地区免费上门维修服务,3年免费保修(包含CRT及LCD面板)的123保修服务。
Philips 27 Gioco 3D Ambiglow 竖屏游戏显示屏说明书
Philips Brilliance LCD monitor with AmbiglowGioco27" (68.6 cm)3D Ambiglow display278G4DHSDBrilliant Ambiglow displayfor immersive 3D gamingIntensify your gaming with this iconic Philips Gioco 3D display with Ambiglow. By creating a image-matching halo of light on rear wall, the innovative Ambiglow visually enlarges the screen and gives you a truly immersive 3D experienceBrilliant Ambiglow performance•Ambiglow intensifies your 3D experience with halo of light •Smart Bias 6500K lighting ensures optimum viewing experience •AH-IPS display for brilliant images with vivid colors •Adjust ambiance to your liking and reduce eye fatigue•USB 3.0 enables fast data transfers and smart phone charging •Fast-charge your mobile deviceImmersive 3D gaming•Flicker free 3D performance•Play 3D games on your PC with bundled software•Auto 3D with latest Blu-ray and game consoles with HDMI •SmartImage game mode optimized for gamers Iconic design reflects your lifestyle•Minimalistic looks with Ultra Narrow Bezel •Iconic design with diamond faceted backHighlightsAmbiglowAmbiglow adds a new dimension to your viewing experience. The innovative Ambiglow technology enlarges the screen by creating a halo of light on the surrounding wall from the rear of the monitor. Its fast processor analyses the incoming image content and continuously adapts the color and brightness of the emitted light to match the image. User friendly options allow you to adjust the ambiance to your liking and also help reduce eye fatigue. Especially suited for watching movies, sports or playing 2D or 3D games, Philips Ambiglow offers you a unique and immersive viewing experience.Smart Bias lightSmart Bias lighting mode enables you to enjoy optimum image quality with viewing comfort. In a dark room, your eyes dilate and constrict with the constantly changing images which may lead to Computer Vision Syndrome. Smart Bias light creates a soft halo of static 6500k white light on the surrounding wall around the monitor. Especially suited for people who spend extended time on their display, it not only helps reduce eye strain and fatigue, but also eliminates reflections and glares from room lighting enhancing perceived contrast ratio and picture details, preserving correct color perceptionAH-IPS technologyThis latest Philips display uses advanced AH-IPS panels resulting in superior colorreproduction, response time and powerconsumption. Unlike standard TN panels, AH-IPS panels show consistent color even at 178 degrees wide angles and in pivot mode. With remarkable performance, AH-IPS is best suited for applications demanding color accuracy and consistent brightness at all times like photo retouching, graphics applications and web browsing.Ultra Narrow BezelUtilizing latest technology panels, the new Philips displays are designed with minimalistic approach by limiting the outer bezel thickness to about 2.5mm. Combined with in-panel black matrix strip of around 9mm, the overall bezel dimensions are reduced significantly allowing for minimal distractions and maximum viewing size. Especially suited for multi-display or tiling setup like gaming, graphics design andprofessional applications, the Ultra narrow bezel display gives you the feeling of using one large display.Flicker free 3DFlicker free 3D ensures that you get long hours of comfortable entertainment. It's affordable, light weight zero flicker glasses do not require any batteries or cable connections. Now finally you can set yourself free from all the hassles and enjoy 3D performance with your family !Auto 3D with HDMIWith Blu-ray gaming and movie players with HDMI 1.4a compatible connection, the Philips 3D display will auto-switch to 3D mode and give you awesome images straight away. No more fussing with adjustments!SmartImage Game modeThe new Philips gaming display has quick access OSD fine tuned for gamers, offering you multiple options. "FPS" mode (First personshooting) improves dark themes in games, allowing you to see hidden objects in dark areas. "Racing" mode adapts display with fastest response time, high color, along with image adjustments. "RTS" mode (Real time strategy) has a special SmartFrame mode which enables highlighting of specific area and allows for size and image adjustments. Gamer 1 and Gamer 2 enable you to save personal customized settings based on different games, ensuring best performance.USB 3.0 super speedSuper Speed USB 3.0 deploys 5.0 gbit/s transfer rate, which is about 10 times faster than USB 2.0 standard significantly reducing data transfer time saving you time and money. With more bandwidth, super speed transfer rates, better power management and superior overall performance, USB 3.0 sets the latest global standard allowing you to use the large capacity storage devices. Sync-N-Go technology ensures you don't have to wait anymore for bandwidth to be freed up. Your investment in USB 2.0 devices is protected as it is backward compatible.Fast mobile device chargerThis new Philips display comes with a built in USB 3.0 fast-charger. Employing a special circuit which boosts power output to 1.5A, this display will fast charge your mobile device while allowing for simultaneous super-speed data transfers saving you time and money. You can charge any standard device using the USBcharging method.iF Product Design AwardPhilips Gioco wins iF design awardExcellent product design. The iconic design slimPhilips Gioco 3D monitor with Ambiglow technology gives you immersive gaming. Its minimalistic ultra narrow bezel with AHIPS screen ensures brilliant images and underpins its tag line "Brilliant Ambiglowdisplay"Issue date 2022-04-21 Version: 2.0.112 NC: 8670 000 94133 EAN: 87 12581 65730 7© 2022 Koninklijke Philips N.V.All Rights reserved.Specifications are subject to change without notice. Trademarks are the property of Koninklijke Philips N.V. or their respective owners.SpecificationsAmbiglow•Ambiglow features: Auto (on) Variable brightness control, Smart Bias LightPicture/Display•LCD panel type: IPS LCD•Backlight type: W-LED system•Panel Size: 27 inch / 68.6 cm•Aspect ratio: 16:9•Optimum resolution: 1920 x 1080 @ 60Hz •Response time (typical): 14 ms •SmartResponse: 7 ms in 2D mode •Brightness: 250 cd/m²•Contrast ratio (typical): 1000:1•SmartContrast: 20,000,000:1•Pixel pitch: 0.311 x 0.311 mm•Viewing angle: 178º (H) / 178º (V), @ C/R > 10•3D Viewing angle: 60º @ 3D CT < 10•Picture enhancement: SmartImage game •Display colors: 16.7 M•Effective viewing area: 597.9 (H) x 336.3 (V) mm •Scanning Frequency: 30 - 83 kHz (H) / 50 - 75 Hz (V)•sRGBConnectivity•USB: USB 3.0 x 4•Signal Input: HDMI x 3, VGA (Analog )•Sync Input: Separate Sync, Sync on Green •Audio (In/Out): HDMI audio out Convenience•User convenience: 3D/Up, Ambiglow/Down, SmartImage game/Back, Menu/OK, Power On/Off •OSD Languages: English, French, German, Italian, Portuguese, Russian, Simplified Chinese, Spanish •Other convenience: Kensington lock•Plug & Play Compatibility: DDC/CI, Mac OS X, sRGB, Windows 7Stand•Tilt: -5/+20 degreePower•On mode: 25.94 W (typ.) (energyStar 5.0 testmethod)•Standby mode: 0.5 W (typ.)•Off mode: 0.3 W•Power LED indicator: Operation - White, Standbymode- White (blinking)•Power supply: 100-240VAC, 50-60Hz, ExternalDimensions•Product with stand (mm): 623 x 471 x 197 mm•Product without stand (mm): 623 x 376 x 44 mm•Packaging in mm (WxHxD): 685 x 527 x 142 mmWeight•Product with stand (kg): 5.44 kg•Product without stand (kg): 5.00 kg•Product with packaging (kg): 9.25 kgOperating conditions•Temperature range (operation): 0°C to 40°C °C•Temperature range (storage): -20°C to 60°C °C•Relative humidity: 20%-80 %•Altitude: Operation: +12,000ft (3,658m), Non-operation: +40,000ft (12,192m)•MTBF: 30,000 hour(s)Sustainability•Environmental and energy: EPEAT Silver,EnergyStar 5.0, RoHS, Lead-free, Mercury Free•Recyclable packaging material: 100 %Compliance and standards•Regulatory Approvals: BSMI, CE Mark, FCC ClassB, GOST, SEMKO, TCO certified, TUV/ISO9241-307, UL/cUL, WEEECabinet•Color: Black Cherry•Finish:Glossy3D Requirements•Software: Free Tridef 3D software bundle•PC hardware: Requires AMD/nVidia VGA card*,2D to 3D: Support all VGA card•Auto 3D: Requires HDMI 1.4a*Avoid looking directly at the Ambiglow LED's as they are very bright,and may cause temporary blurred vision.*If you experience any discomfort such as dizziness, headache ordisorientation, we recommend not watching 3D for extendedperiods of time.*Parents should monitor their children during 3D viewing and ensurethey do not experience any discomfort as mentioned above.Watching 3D is not recommended for children under 6 years of age.*Please carefully read the instruction manual to learn more about 3Dand health*For VGA card and other requirements for 3D operation, please visit/support for further details.。
- 1、下载文档前请自行甄别文档内容的完整性,平台不提供额外的编辑、内容补充、找答案等附加服务。
- 2、"仅部分预览"的文档,不可在线预览部分如存在完整性等问题,可反馈申请退款(可完整预览的文档不适用该条件!)。
- 3、如文档侵犯您的权益,请联系客服反馈,我们会尽快为您处理(人工客服工作时间:9:00-18:30)。
电子特性
扫描频率 反转扫描 功率总耗 屏幕刷新率 接口 扬声器 60Hz No 33.1W (Typ.) 60Hz DVI 外置
3
Model Name: VS2708 Preliminary Specifications
产品特点
1.显示立体内容:立体显示屏显示三维立体影象,还原真实世界。 2.裸眼:无需借助任何辅助设备即可观看三维立体影像效果。 3.多视点:水平观看角度达到 140 度。 4.高亮度:与当前世界 3D 显示器各厂商产品相比,有更高的亮度,对环 境光线没有任何要求条件,适合各个场所的立体展示。 5.高清晰:专门算法能有效去除摩尔纹,双眼没有障碍地接受视频图像, 如身临其境。 6.大纵深:视觉纵深能达到±1.5 米。 7.应用范围广:适用于所有用户形象展示的场所,效果震撼。 8.支持片源格式:九宫格。
596.736 (H)×335.664(V) 612.5 612.5 10kg (H)×356.2 (H)×356.2 (V)×8.8 (V)×12.8
光栅参数
光栅尺寸 光栅倾斜方向 光栅安装方式 光栅透光度 光栅精度 604.5 (H)×348.2 (V)×4 (D) mm
左上到右下 □右上到左下 向内 >92% ±0.2μm 向外 □
1
基本信息
面板型号 面板类型 工作温度 存储温度 寿命 光栅种类 封装方式 3D 最佳观看距离 3D 可视角度 视点数 HR270QH1-100 a-Si TFT-LCD 0~50℃ -20~60℃ >3000性
面板尺寸 分辨率 像素间距 显示区域 面板外观尺寸 3D 模组尺寸 重量 27 inch 2560(RGB)×1440 (Quad-HD) 0.2331 (H)×0.2331 (V) mm mm (D) (D) mm mm
光学特性
显示模式 面板亮度 对比度 显示颜色 色彩饱和度 ADS,常黑显示,透射式 350cd/㎡ (Typ.) 1000:1(Typ. ) 1.07B (10-bit) 72%
2
响应时间 白色色度 白场变动
14 (Typ.)(G to G) (ms) X:0.313;Y:0.329 1.25/1.33 (Typ./Max.)(9 points)