糖度计 RX-7000a(9000a)中文说明书
多糖含量试剂盒说明书(3篇)

第1篇一、产品概述本试剂盒是针对多糖含量测定而设计的高效、便捷的检测工具。
适用于各类生物样本中多糖含量的定量分析,包括但不限于植物提取物、动物组织、微生物发酵液等。
本试剂盒采用酶联免疫吸附法(ELISA)原理,通过特异性抗体与多糖的结合,实现对多糖含量的精确测定。
二、产品组成1. 试剂盒- 多糖抗体- 标准品- 酶标抗体- 底物溶液- 洗涤缓冲液- 封闭液- 终止液2. 仪器- 酶标仪- 微量移液器- 恒温水浴箱- 试管3. 试剂- 酶标仪专用缓冲液- 酶标仪专用洗涤液三、使用方法1. 样本准备- 将待测样本按照说明书要求进行稀释。
- 确保样本无污染,避免酶标仪读取误差。
2. 加样- 在酶标板孔中加入50μl的标准品或样本稀释液。
- 在所有孔中加入50μl的多糖抗体。
3. 孵育- 将酶标板放入恒温水浴箱,37℃孵育1小时。
4. 洗涤- 使用酶标仪专用洗涤液,将酶标板充分洗涤3次。
5. 加酶标抗体- 在所有孔中加入50μl的酶标抗体。
- 37℃孵育1小时。
6. 洗涤- 使用酶标仪专用洗涤液,将酶标板充分洗涤3次。
7. 加底物溶液- 在所有孔中加入50μl的底物溶液。
- 避光孵育15分钟。
8. 终止- 在所有孔中加入50μl的终止液。
9. 检测- 使用酶标仪在450nm波长下检测各孔的吸光度(OD值)。
10. 数据分析- 将测得的OD值与标准曲线进行比较,计算多糖含量。
四、注意事项1. 试剂和仪器- 使用前请仔细阅读说明书,确保试剂和仪器符合使用要求。
- 使用酶标仪时,请按照仪器说明书进行操作。
2. 样本处理- 样本处理过程中,请确保无污染,避免影响检测结果。
- 样本稀释时,请使用适宜的稀释液,确保稀释倍数合理。
3. 操作步骤- 操作过程中,请严格按照说明书进行,避免人为误差。
- 注意操作环境,避免交叉污染。
4. 标准曲线- 标准曲线的绘制应使用新鲜标准品,并确保标准曲线线性良好。
5. 质量控制- 定期进行质量控制,确保试剂盒的准确性和可靠性。
温度测量仪器说明书.pdf_1694208893.0651798

1Warning!EN61326-1EN60825-11. Safety notices Before using the thermodetector, please read the manual carefully. Do not use any solvent to clean the thermodetector. Safety symbols:Important information prompt for dangerComplies with European CE safety specificationThe instrument complies with the following standards:Do not align the laser to human eyes or reflective surface2. Notes When the ambient temperature changes in a sudden, it is required to place the thermodetector in the environment for 30 minutes , and measure when internal and external temperatures of the thermodetector coincide.Try to avoid any electromagnetic field caused by electric welding and induction heating.Do not place the thermodetector close to or on a high temperature object.Keep the thermodetector clean, and avoid dust from entering the tube.23. Appearance description1. Alarm indicator2. Liquid crystal display3. Laser control key/digital turn down key ▼4. Mode key5. Back-light/digital turn up key ▲6. Infrared sensor induction zone7. Laser indicator8. Measurement trigger 9. Battery cover4. Liquid crystal display description1: Primary display: Displays measured temperature.2: Function indication: MAX (Maximum value)3: Displays the maximum value4: Fahrenheit degree5: Centigrade degree6: Low voltage indication7: Laser indication8: Measurement indication9: Low alarming10: High alarming11: Data hold12: Radiance indication35. Measurement methods1. Set the upper limit of the instrument alarm:Press and hold the Mode key for 2 seconds, to enter instrument setting, and press MODE key to shift to alarm upper limit setting, in this case, Hi is displayed in the instrument function indication zone, and the alarm upper limit is displayed in the zone. Press ▲/▼ key to increase or decrease the alarm value, and long press ▲/▼ key to accelerate the increase or decrease of the set value.2: Set the low alarm value of the instrumentPress and hold the Mode key for 2 seconds, to enter instrument setting, and press MODE key to shift to alarm lower limit setting, in this case, Low is displayed in the instrument function indication zone, and the alarm lower limit is displayed in the zone. Press ▲/▼ key to increase or decrease the alarm value, and long press ▲/▼ key to accelerate the increase or decrease of the set value.3: Set the instrument radiancePress and hold the Mode key for 2 seconds, to enter the instrument setting, and press the MODE key to shift to the instrument radiance setting, in this case, the instrument radiance indication zone flashes. Press the ▲/▼ key to increase or decrease the radiation value, and long press the ▲/▼ key to accelerate the increase or decrease of the set value.44: Set the instrument temperature unitPress and hold the MODE key for 2 seconds, to enter the instrument setting, and press the MODE key to shift to the instrument temperature measurement unit, the unit symbol on the display flashes, and press the ▲/▼ key to change the unit symbol.5: Exit the settingPress the trigger or long press the MODE key, to exit the instrument setting.6: Turn on/off laserPress the key to turn on or off laser, and the instrument will display the laser symbol7:Turn on or off back-lightPress the key to turn on or off back-light.8: Non-contact temperature measurementAim the thermodetector at the object, and hold the trigger, to conduct continuous measurement of temperature. After displaying stably, release the trigger, and the5When holding the trigger, the secondary display of the instrument will display the maximum value of the measured temperature.When the measured value is greater than the upper limit of high alarm or the measured value is less than the lower limit of low alarm, the red alarm indicator will turn on to alarm.6. Target distance ratio (D:S ratio)The thermodetector has a certain visual angle and visual field, as shown in the following figure.The measured target Tube Light-sensitive componentIn order to guarantee the measured object fills in the visual field of the thermodetector, which means the thermodetector only "sees" the measured object rather than other objects. Larger objects may cause larger temperature measurement distances; for smaller objects, the measurement distances must be close. The ratio of measurement distance to the measured target (D:S) is 12:1, as shown in the following figure:677. RadianceThe radiance characterizes the ability of an object to radiate infrared ray. Larger radiance will lead to stronger radiation ability on the object surface.Radiance of the majority of organic matters or metal oxidized surfaces ranges between 0.85 and 0.98. The radiance of the thermodetector is 0.95 by default. During measurement, set the radiance of the instrument the same with the radiance of the measured object. During measurement, please pay attention to the impact of emissivity on measurement results.The following table is the radiance reference table.Measured surfaceRadiance Aluminum Oxidized0.2~0.4A3003alloy (oxidized)0.3A3003alloy (coarse)0.1~0.3Brass Polishing0.3Oxidized0.5 Copper Oxidized0.4~0.80.6Electrical terminalboardHastelloy0.3~0.8 Ferro-nickel Oxidized0.7~0.95Abrasive blasting0.3~0.6Electropolishing0.15Iron Oxidized0.5~0.9Rust0.5~0.7 Iron(casting)Oxidized0.6~0.95Unoxidized0.2Fusion cast0.2~0.3 Iron(casting)passivation0.9Lead Coarse0.4Oxidized0.2~0.6 Molybdenum oxidation0.2~0.68Nickel oxidation0.2~0.5 Platinum black0.9 Steel Cold rolling0.7~0.9Grinding steel plate0.4~0.6Polished steel plate0.1 ZincOxidized0.1 Asbestos0.95 Asphalt0.95 Basalt0.7 Carbon(unoxidized)0.8~0.9 Graphite0.7~0.8 Silicon carbide0.9 Ceramics0.95 Clay0.95 Concrete0.95 Cloth0.95 Glass plate0.85 Gravel0.9519LCD displayColor LCD display D:S12:18. Replacement of battery When battery is low, the battery symbol will light up, in this case, it is required to replace the battery. Open the battery cover with your hands, a nd replace with a new1.5Vx2AAA battery. Refer to the following figure:9.Technical indexes。
Titrette瓶嘴浓度计说明书

AND The next generation Digital Burette!I High accuracyPrecise titration within the errorlimits of Class AI Smooth, low-force operationFor sensitive, drop-wisetitrationI Compact designLight and stableI Easy handlingNo switching between 'fill'and 'titrate'I Simple maintenanceCleaning and part replacementright in the labI PC interface (optional)Data transmission directly tothe PCWith the Titrette® bottle-topburette, available in 10 ml,25 ml, and 50 ml sizes, youcan titrate quickly and reliablywith highest precision, even inclose quarters, with no powerhookup needed – in the lab, inproduction, or in the field!class A precision Titrette®A closer lookThe control elements of the Titrette® bottle-top burette havean intuitive layout. Separate buttons for On/Off and Pause;Clear button allows user to reset the display and selectfunctions. Easy-grip hand wheel action and smoothprecision gears for fast or drop-wise titration makehandling extremely simple and reliable.CLEAR/Select buttonDigital displayPause button On/Off buttonPistonDispensing cylinderTitration andrecirculating valve Inspection windowValve blockFreely rotating(Bottle thread GL 45) Titrating tubevertically adjustable,with integrateddischarge valveScrew capTelescoping filling tubeRecirculating tubePC interface (optional) (see ordering information)Replaceable batteriesHand wheelsAdjustment with Easy CalibrationWith Easy Calibration technology, you can easily make calibra-tion adjustments of the instrument 'at the push of a button'. No tools needed! An ad-justment may be neces-sary if the instrument has been in use for a longer period or if parts arereplaced. To show that an adjustment has been carried out, a small 'CAL' icon will be shown in the upper portion of the display.Changing decimal place settingsFor use as a micro-burette, you can switchthe titrated volume display from 2 to 3 decimal places under 'dP' (decimal point).Above 20.00 ml, the display automa-tically switches to 2 decimal places.Calibration scheduleTo save a date for the next calibration, simply store it under 'GLP'. The date can be called up each time the instru-ment is turned on. Hold the on/off button down for a little longer, and the letters 'GLP', along with the month and year of the calibration date, are shown.Save power with Auto Power OffThe instrument switches off automatically after longer periods of inactivity. The current display value is stored, and returned to the display after the power is switched on again manually. Under 'APO' (Auto Power Off), you can set the time until automatic power-offfrom 1 to 30 minutes.Four additional helpful electronic functions make your work easier. Hold down the CLEAR button to select the desired function:ExtrasNo switching needed!To change between filling and titration, no switching is needed. The instrument automatically detects whether you are filling or titrating by the direction of hand wheel rotation greatly reducing the risk of handling errors. Pressing the Pause but-ton allows you to interrupt the titration if priming was incom-plete. Simply push the button again to resume titration.Class A precision!The Titrette ® bottle-top burette has an innovative new mea-suring system which matches the Class A accuracy of glass burettes and, if needed, can offer the precision of 3 decimal places below 20 ml. This is an important feature for users who need to work within the Class A error limits of glass burettes according to DIN EN ISO 385 (e.g., in pharmaceutical work).Drop by drop!The large, easy-grip hand wheels are conveniently easy to turn. With the optimized gear ratio, you can fill the device quickly and titrate drop-wise with great sensitivity.The drop size for the 10 ml in-strument is approx. 20 µl, and for the 25 and 50 ml instru-ments approx. 30 µl.With the Titrette ® bottle-top burette, you can titrate drop-wise with great sensitivity. No switching needed between filling and titrating! The instrument is light-weight, compact, and can be dismantled for cleaning and maintenance in the lab. Easy handling!Easy HandlingLight-weight and compact!All components move within the housing, reducing headroom requirements. The compact design and the light weight ensure good stability. The titrating tube can be adjusted horizontally and vertically. This provides flexibility when posi-tioning the instrument, e.g., when using a magnetic stirrer or different bottle sizes.User seviceable!We have designed the instru-ment to be disassembledquickly and easily – in a matter of minutes – for cleaning, to replace the piston/cylinder, or to replace the batteries.Now you can carry out mainte-nance conveniently and easily in the lab, and in a few minutes the instrument is ready to go again!Light protection!For protection of light-sensitive media, you can replace the clear inspection windows with the amber colored windows (included). It's quick and easy, because the windows just clip into place.Easy HandlingComparison of error limits* Error limits related to the nominal capacity (= maximum volume) indicated on the instrument, obtained when instrument anddistilled water are equilibrated at ambient temperature (20 °C/68 °F) and with smooth operation.** Error limit: EL = A + 2CV, according to DIN EN ISO 8655-6 Annex B(A = accuracy, CV = coefficient of variation, EL = error limit)Operating limitsThis instrument is designed for titrating liquids,observing the following physical limits:I +15 °C to +40 °C (59 °F to 104 °F)of instrument and reagentI Vapor pressure up to 500 mbarI Viscosity up to 500 mm2/sI Altitude: maximum 3000 m above sea levelI Relative humidity: 20% to 90%Limitations of useChlorinated and fluorinated hydrocarbons orchemical combinations which form depositsmay make the piston difficult to move or maycause jamming.Compatibility of the instrument for a specialapplication (e.g., trace material analysis) mustbe checked by the user. For additional infor-mation, please contact the manufacturer.The instrument is not autoclavable!The instrument can be used for the following titration media(maximum concentration 1 mol/l):When the instrument is properly handled, dispensed liquid will only come into contact with thefollowing chemically resistant materials: borosilicate glass, Al2O3, ETFE, PFA, FEP, PTFE,platinum-iridium; PP (screw cap).Material and reagentsNote:If you need an official certification which confirms theerror limits that are much stricter than those of DIN ENISO 8655-3, we recommend a calibration certificatefrom an accredited calibration laboratory (e.g., theDAkkS laboratory at BRAND). Technical dataAcetic acidAlcoholic potassium hydroxidesolutionAmmonium iron (II) sulfate solutionAmmonium thiocyanate solutionBarium chloride solutionBromide bromate solutionCerium (IV) sulfate solutionEDTA solutionHydrochloric acidHydrochloric acid in AcetoneIodide Iodate solution*Iodine solution*Iron (II) sulfate solutionNitric acidOxalic acid solutionPerchloric acidPerchloric acid in glacial aceticacidPotassium bromate solutionPotassium bromide bromatesolutionPotassium dichromate solutionPotassium hydroxide solutionPotassium iodate solutionPotassium permanganate solution*Potassium thiocyanate solutionSilver nitrate solution*Sodium arsenite solutionSodium carbonate solutionSodium chloride solutionSodium hydroxide solutionSodium nitrite solutionSodium thiosulfate solutionSulfuric acidTetra-n-butylammoniumhydroxide solutionTriethanolamine in Acetone*Zinc sulfate solutionThe titration volume is displayed in steps of 1 µl at instruments with 10 mland 25 ml size and in steps of 2 µl for 50 ml size instruments. For titrationvolumes above 20 ml the display will automatically switch to steps of 10 µl.* Use light shield inspection windowOrdering informationTitrette ®Items supplied:Titrette ® bottle-top burette, conformity certified, performance certificate, telescoping filling tube (170 - 330 mm), recirculation tube, 2 batteries (AAA/UM4/LR03), 3 PP bottle adapters (GL 45/32, GL 45/S 40, GL 32/NS 29/32), 2 colored light shield inspection windows, operating manual.Storage conditionsStore the instrument and accessories at dry conditions.Storage temperature: -20 °C to +50 °C Relative air humidity: 5% to 95%* Additionally included:connector cable (Sub-D plug connector, 9-pin), one CD (driver software and open RS232 communication protocol). The CD also includes an example application in XLS-file format, as well as a special operating manual.The instrument is available with an optional RS 232 communica-tions interface.Advantages compared to the standard configuration:I The titration results are automatically transmitted to the PC by double-clicking on the CLEAR key. This eliminates transcript- ion errors while recording primary data, and complies with an important requirement of GLP.I With each data transfer, the burette sends the titrated volume, the serial number of the instrument, the nominal volume and the adjustment value, as well as the next scheduled calibration date. Thus, all raw data is collected and displayed together with actual date/time stamp from the PC.The transmitted data is recognized as keyboard inputs by the PC. This universal input format ensures that the instrument is compatible with all PC applications that accept keyboard inputs.To connect the instrument to a USB interface, simply use a standard USB/RS 232 adapter.PC interface (optional)Note:When ordering devices with DKD certificates, the prefix "DKD" must be added to the order number, e.g., DKD 4760 161.BRAND GMBH + CO KG · P.O. Box 1155 · 97861 Wertheim · GermanyTel.:+499342808-0·Fax:+499342808-98000·E-Mail:*************·Internet:www.brand.de9943 55 · P r i n t e d i n G e r m a n y · 13/0813Titrette ® and BRAND ® are trademarks of BRAND GMBH + CO KG, Germany.Our technical literature is intended to inform and advise our customers. However, the validity of general empirical values, and of results obtained under test conditions, for specific applications depends on many factors beyond our control. Please appreciate, therefore, that no claims can be derived from our advice. The user is responsible for checking the appropriateness of the product for any particular application.Subject to technical modification without notice. Errors excepted.Accessories · Spare partsInspection window1 set colorless and 1 set amber colored (light shield).Filling valvewith olive-shaped nozzle and sealing ring. Pack of 1.Telescoping filling tube FEP.Pack of 1.Cat. No.6783Cat. No.6636Cat. No.7042 04Cat. No.7042 05170 - 330 mm250 - 480 mmTitrating tubewith screw cap and integrated discharge and recirculationvalve. Pack of 1.for volume ml Cat. No.* M anufactured from Jan. 2012 onwards (serial number 01K)PistonPack of 1.for volume ml Cat. No.Dispensing cylinder with valve blockPack of 1.for volume ml Cat. No.* M anufactured from Jan. 2012 onwards (serial number 01K)Bottle StandPP. Full plastic material. Support rod 325 mm, base plate 220 x 160 mm, weight 1130 g. Pack of 1.Cat. No.7042 75Drying tubeDrying tube and seal, without drying agent. Pack of 1.Cat. No.7079 30For laboratory bottles, and an assortment of adapters, please visit www.brand.de.。
ELSA 血糖监测系统用户手册说明书
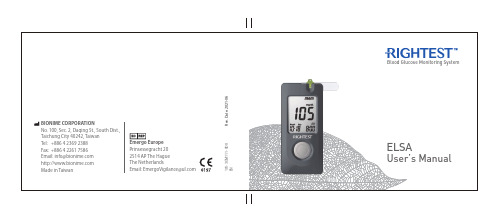
Thank you for choosing the RIGHTEST ELSA Blood Glucose Monitoring System. Please read this manual thoroughly before testing. It provides all the information you need to use your product.The RIGHTEST ELSA Blood Glucose Meter must only be used with RIGHTEST ELSA Blood Glucose T est Strips and Control Solution GC570. Use of other test strips or control solutions may lead to incorrect results.Please only purchase test strips in the same country as which you purchased your meter. Use of test strips from different countries may result in inaccurate test results.You are recommended to monitor blood glucose regularly. The RIGHTEST ELSA Blood Glucose Monitoring System is accurate and easy-to-use making it your reliable diabetes management assistant.The RIGHTEST ELSA Blood Glucose Monitoring System is manufactured and supported by Bionime Corporation. If you have any questions or concerns, please contact Bionime Customer Service or*****************************.The RIGHTEST ELSA Blood Glucose Monitoring System is designed for in vitro diagnostic (fortesting outside the body) use only and can be used by home user and healthcare professional.The system can test glucose concentration in fresh capillary whole blood (drawn from fingertip, palmand forearm).The glucose result displayed is calibrated into the plasma glucose testing equivalent.The system is not intended for screening or diagnoses of diabetes mellitus.Preface3 2Intended Use76Table of ContentsTable of Contents3031About RIGHTEST Blood Glucose Monitoring SystemContents of the RIGHTEST Blood Glucose Monitoring SystemRIGHTEST MeterRIGHTEST T est Strip Preparing for a TestActivating the Meter and Changing the BatterySetting Up Your Meter - Setting the Time, Date, Volume and T est UnitT urning the Meter On/Off Testing ProcedurePerforming a Blood Glucose T estAlternative Site T esting (AST)Viewing Window Appearance81014161822232729Quality Control " Lo " and " Hi " Readings Quality Control T est Reviewing Stored ResultsPerforming a Quality Control T est Recalling Results and Viewing the Average Result Product MaintenanceError Messages and TroubleshootingSpecification Limitations Customer Service Warranty 3842454748493335Product MaintenanceIndirect transmission of Human Immunodeficiency Virus (HIV), Hepatitis B Virus (HBV) and Hepatitis C Virus (HCV) during the delivery of healthcare services has been increasingly reported. Persons using blood glucose monitoring systems have been identified as one risk group due to sharing of lancets, lancing devices, and blood glucose meters.The cleaning procedure is to remove dust, blood and body fluids from the surfaces and should be performed whenever the meter or lancing device is visibly dirty. The disinfecting procedure is necessary to kill pathogens such as HIV, HBV and HCV on the device.NOTE: the cleaning procedure can only remove visible contaminates from surfaces. Only the disinfecting procedure can eliminate non-visible pathogens.If the meter is being operated by a second person who is providing testing assistance to the user, the meter and lancing device should be decontaminated prior to use by the second person.The following disinfecting wipe has been tested and may be used to clean and disinfect the meter and lancing device:Caviwipes Disinfecting T owelettes, manufactured by Metrex. Uses Isopropanol as the active ingredient and has been shown to be safe for use with the meter and lancing device.MaintainingKeep your meter and test strip free of dust, water or any other liquid. Store the meter in the carrying case when not in use. If your meter is dropped or damaged, perform a quality control test with the control solution before performing a blood glucose test.Product Maintenance3938SpecificationMeter Battery LifeMeter DimensionsMeter WeightMonitorDisplay AreaStorage / Transportation ConditionsSampleMinimum Sample VolumeHematocritT est Strip Storage / Transportation Conditions Approx. 1,000 tests95.0 mm x 43.8 mm x 13.0 mm43.0 ± 5 g (with battery)LCD display29.0 mm x 38.0 mm10 - 40˚C (50 - 104˚F), 10 - 90% RHRefer to RIGHTEST ELSA Strip insertLimitations- RIGHTEST ELSA Blood Glucose Monitoring System is not intended for serum or plasma test.- Inaccurate test results may be obtained at high altitude more than about 3,048 meters (10,000 feet)above sea level.- T est results may be falsely low if the patient is severely dehydrated, in shock, or in a hyperosmolarstate (with or without ketosis).- Patients going through oxygen therapy may yield falsely low results.- These test strips should not beused with meters to test critically ill patients or neonates.- The blood glucose test result may be affected by high blood concentration of interferenceingredients,if you need more detail information about interference ingredients, please see Blood Glucose ELSAT est Strip Insert.- Alternative site testing (AST) should only be performed during steady-state times (when glucose isnotchanging rapidly).- Please refer to the (Alternative site testing (AST)) chapter if you want to test on palm or forearm.- DO NOT test on alternative site (palm, forearm) if you are testing for insulin dose calculations orforContinuous Glucose Monitoring (CGM) devices calibration, or hypoglycemia (Low blood glucose).- T o avoid potential electromagnetic or other interference, keep meter away fromelectromagneticradiation sources such as X-ray or MRI.- Keep your meter away from dust, water orany liquid.4746。
ATAGO糖度计参数说明
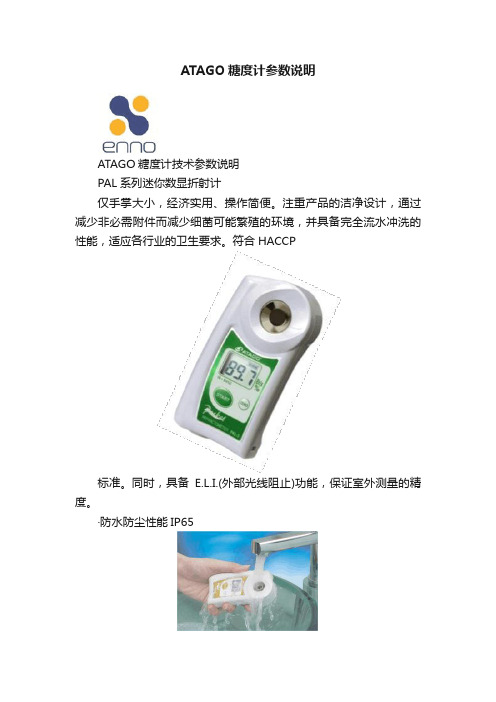
ATAGO糖度计参数说明ATAGO糖度计技术参数说明PAL系列迷你数显折射计仅手掌大小,经济实用、操作简便。
注重产品的洁净设计,通过减少非必需附件而减少细菌可能繁殖的环境,并具备完全流水冲洗的性能,适应各行业的卫生要求。
符合HACCP标准。
同时,具备E.L.I.(外部光线阻止)功能,保证室外测量的精度。
·防水防尘性能IP65·E.L.I.(外部光线阻止)功能·清水归零,操作简便·小巧轻便,仅重100g·自动温度补偿功能·设计简洁,可单手操作·配便携式挂钩,便于携带手持式糖度计PR-α系列·精度提高至Brix±0.1%,可同时测量果汁、食品、饮料等的糖度及化工液体浓度如:切削油、清洗液、不冻液等·可设置客户专用标度,客户自己预设系数(浓度=Brix X系数)就可直接读出此样品浓度·采用E.L.I.,可防止强光下的误测量,保证稳定的测量结果·清水较零,自动温度补偿·响应时间3秒·样品体积0.1ml·防护等级IP64自动折射仪 RX-5000αRX-5000α( alpha ) 是能够内部设定测量温度的自动折射仪,能够快速地测量折射指数、糖度或各式液体的浓度,以下为本产品的特性:因为RX-5000α ( alpha ) 具有电热模块以控制温度,所以不需要恒温水箱。
在样本达到目标温度之后,测量会自动开始。
在目标温度下,折射指数与糖度会快速显示可取得高糖度± 0.03% 与折射指数± 0.00004 准确度。
RX-5000α ( alpha ) 会显示您所设的控制范围的高低界线。
如果测量值与您的标准液体值或其它折射仪测量的不同,将能做部分调整。
根据您的样本,能够输入60种使用者标度。
RX-5000α ( alpha ) 能够显示最少30个最近的测量值。
Omega FMA-7000E 高精度质量控制器说明书

ߜ Normally Closed Valve
ߜ Low Pressure Drop
ߜ Compact Design
ߜ For Clean, Non-Coating Gases
Mating connector included.
Units for 2 or 4 Flowmeters,
D
See page D-29.
SYSTEM 2
Display and Alarm DPF64, $289, See Page M-19.
Setpoint Potentiometer (1000⍀)
Computer Interface FC-21 $764, Basic Unit FC-22 $1076, Basic Unit See Page M-25.
CUSTOM BUILT TO ORDER!
To Order (Specify Model Number)
Model No. 1⁄4"
Compression
Model No.
Fitting
Price 1⁄4" VCO
Model No. Price 1⁄4" VCR
Price Max Range
FMA-7100E-(*) $2120 FMA-7200E-(*) $2180 FMA-7300E-(*) $2120 to 10 SCCM
Complete the System
After Choosing Your Flowmeter, Select the System to Meet Your Requirements
PR系列糖度计简易使用说明
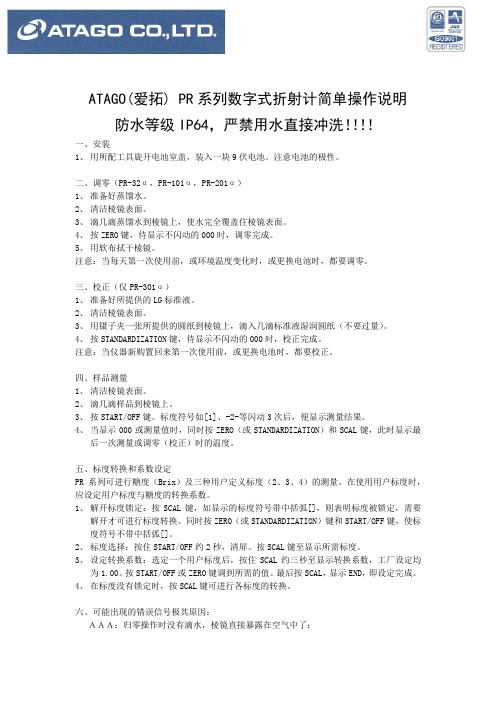
ATAGO(爱拓) PR系列数字式折射计简单操作说明防水等级IP64,严禁用水直接冲洗!!!!一、安装1、用所配工具旋开电池室盖,装入一块9伏电池。
注意电池的极性。
二、调零(PR-32α,PR-101α,PR-201α)1、准备好蒸馏水。
2、清洁棱镜表面。
3、滴几滴蒸馏水到棱镜上,使水完全覆盖住棱镜表面。
4、按ZERO键,待显示不闪动的000时,调零完成。
5、用软布拭干棱镜。
注意:当每天第一次使用前,或环境温度变化时,或更换电池时,都要调零。
三、校正(仅PR-301α)1、准备好所提供的LG标准液。
2、清洁棱镜表面。
3、用镊子夹一张所提供的圆纸到棱镜上,滴入几滴标准液湿润圆纸(不要过量)。
4、按STANDARDIZATION键,待显示不闪动的000时,校正完成。
注意:当仪器新购置回来第一次使用前,或更换电池时,都要校正。
四、样品测量1、清洁棱镜表面。
2、滴几滴样品到棱镜上。
3、按START/OFF键。
标度符号如[1]、-2-等闪动3次后,便显示测量结果。
4、当显示000或测量值时,同时按ZERO(或STANDARDIZATION)和SCAL键,此时显示最后一次测量或调零(校正)时的温度。
五、标度转换和系数设定PR系列可进行糖度(Brix)及三种用户定义标度(2、3、4)的测量。
在使用用户标度时,应设定用户标度与糖度的转换系数。
1、解开标度锁定:按SCAL键,如显示的标度符号带中括弧[],则表明标度被锁定,需要解开才可进行标度转换。
同时按ZERO(或STANDARDIZATION)键和START/OFF键,使标度符号不带中括弧[]。
2、标度选择:按住START/OFF约2秒,清屏。
按SCAL键至显示所需标度。
3、设定转换系数:选定一个用户标度后,按住SCAL约三秒至显示转换系数,工厂设定均为1.00。
按START/OFF或ZERO键调到所需的值。
最后按SCAL,显示END,即设定完成。
4、在标度没有锁定时,按SCAL键可进行各标度的转换。
MICROMEGA CN77000系列温控器说明书

The high-accuracy, high-quality MICROMEGA ® controllers offer unparalleled flexibility in process control. Each unit allows theuser to select the input type, from 10 thermocouple Types (J, K, T, E, R, S, B, C, N, and J DIN), Pt RTDs (100, 500, or 1000 Ω, with either 385 or 392 curve), or analog voltage or current input. The voltage/current inputs are fully scalable to engineering units, with a selectable decimal point, perfect for use with pressure, flow, or other process inputs.The MICROMEGA ® controller features a large, dual LED display, front-panel configuration, selectable temperature/ process inputs, and universal power supply that accepts 90 to 250 Vac or Vdc. Available in single- and dual-output configurations, the CN77000CN77000 R300 and R500 controllers shown with model RHS-43 hole saw for easy-to-drill round holes. See last page for ordering information.CN77333-A2 NEMA 12 style square cutout.CN77533 NEMA 4 square cutout.Shown actual size.1⁄16 DIN MICROMEGA ® Autotune PIDTemperature/Process ControllersSeries is available with relay, SSR, DC pulse, or analog voltage or current outputs. A single alarm is standard. Options include a second alarm, RS232, RS485, analog output, and remote setpoint selection.The “300” Series controllers offer many features of larger, 1⁄4 DINcontrollers in a compact, 1⁄16 DIN size. These controllers feature a 1⁄16 DIN cutout and bezel with a NEMA 12 (IP54) rating, and dual LED displays, which show different colors for the process and setpoint values. Individual indicators provide output and alarm status.The “500” features a 1⁄16 DIN cutout, 53.3 mm (2.1") square face withNEMA 4 (IP65) rating, large dual LED display, front-panel configuration, and selectable temperature/process inputs. Available in single- and dual-output configurations, theCN77500 is available with relay, SSR, DC pulse, or analog voltage or current outputs. A single alarm is standard.The R300 and R500 controllers feature a detachable display and adaptor to allow mounting in a round, 44 mm (1.75") cutout. This feature allows users to prepare the panel with a standard round hole saw as well as the conventional 1⁄16 DIN cutout.The 2-piece design snaps together, for quick, easy installation.U H igh Accuracy: ±0.5°C (0.9°F), 0.03% Rdg U H igh Quality Backed by 5-Year Warranty U U niversal Inputs—Process Voltage/Current, Thermocouple, RTD U D ual 4-Digit LED Display and Indicators for Output and Alarm Status U O ptional RS232 orRS485, OMEGA ® Protocol U R elay, SSR, DC Pulse, 0 to 10 V, and 0 to 20 mA Output TypesU R amp-to-Setpoint Feature U U niversal Power Supply, 90 to 250 Vac or Vdc U D ual Output andDual Alarm Capability U I solated Analog Output or Remote Setpoint SelectionP u t a S q u a r e C o n t r o l l e r i n a R o u n d H o l e !P a n e l P u nc h e sA v a i l a b l e , V i s i to m e g a .c o m /p a n e l p u n c h e sSpecificationsAccuracy: ±0.5°C (0.9°F) temp;0.03% rdg processResolution: 1°/0.1°; 10 µV process Temperature Stability:0.08°C/°C; 50 ppm/°C process Thermocouple Cold-End Tracking: 0.05°C/°CNMRR: 60 dBCMRR: 120 dBCommon-Mode Voltage: 1500 V peak test, 350 V per IEC spacingA/D Conversion: Dual slope Reading Rate: 3 samples/sDigital Filter: Programmable Display: Dual 4-digit, 7-segment LED, 9.2 mm (0.36"); red process variable, green setpoint; indicators for output and alarm status; 7.6 mm (0.3") for NEMA 12 (IP54) unitsWarm-Up to Rated Accuracy: 30 min InputInput Types: Thermocouple, RTD, analog voltage, analog current Thermocouple Lead Resistance:100 Ω maximumRTD Input: 2-, 3- or 4-wire; 100,500 and 1000 Ω; 0.00385 or0.00392 Pt curveVoltage Input:0 to 100 mV, 0 to 1V, 0 to 10 Vdc Current Input: 0 to 20 mA, 4 to 20 mA Configuration: Single-ended Polarity: UnipolarStep Response: 0.7 s for 99.9% Decimal Selection: None, 0.1 or 0.01 Span Adjustment:0.001 to 9999 countsOffset Adjustment: -9999 to 9999 ControlAction: Reverse (heat) or direct (cool) Modes: Time proportioning and proportional control modes; selectable preset tune, autotune, PID, proportional, proportional with integral, proportional with derivative with anti-reset windup, on/offRate: 0 to 999.9 sReset: 0 to 99 minutes, 59 seconds Cycle Time: 1 to 199 seconds;set to 0 for on/off operationGain: 0.5 to 100% of span;setpoints 1 or 2Damping: 1 to 8 in unit stepsSoak: 00.00 to 99.59 (HH.MM)Ramp to Setpoint:00.00 to 99.59 (HH.MM)Autotune: For heating onlyBreak Protection:Programmable up- or down-scale Control OutputRelay: 5 A @ 120 Vac, 3 A @ 240 Vac; configurable for on/off, PID or ramp and soak; output 1: SPDT type; output 2: SPST typeSSR: Rated 0.5 A @ 120/240 Vac, continuousDC Pulse: Non-isolated;10 Vdc @ 20 mA Analog Output: Non-isolated 0 to10 Vdc or 0 to 20 mA; 500 Ω maximumOptionsRemote Setpoint Selection:Up to 4 setpoints stored in memory;contact closure selectionAnalog Output: Isolated 0 to 10 Vdc or0 to 20 mA, programmableCommunicationsRS232 or RS485: OMEGA® protocol300 to 19.2 Kb; complete programmablesetup capability; program to transmitcurrent display, alarm status, min/max,actual measured input value and statusRS485: Addressable from 0 to 199Connection: Screw terminalsAlarmsType: SPST relay, 5 A @ 120 Vac,3 A @ 240 VacOperation: High/low, latching/non-latching and process/deviation;front-panel configurationInsulationPower to Input or Output:2500 Vac/Vdc, except alarm2 option has only 1500 Vac/Vdcbetween inputs 500 Vac/VdcGeneralPower: 90 to 250 Vac/Vdc, 50 to 400 HzOperating Ambient: 0 to 55°C(32 to 131°F), 90% RH non-condensingPower Consumption:6 VA maximum @ 120 VacPanel CutoutCN77R000 Series:44.5 mm (1.75") diameter round cutoutCN77300 and CN77500 Series:45 mm (1.772") square, 1⁄16 DINDimensions:CN77R000 Series:48 H x 48 W x 135 mm D(1.89 x 1.89 x 5.32")CN77300 Series:48 H x 48 W x 123.3 mm D(1.89 x 1.89 x 4.85")CN77500 Series:53 H x 53 W x 123.3 mm D(2.1 x 2.1 x 4.85")Weight: 227 g (0.5 lb)SPC116-S splashproof TP6.TP4.Trim plates formounting 1⁄16controller inexisting 1⁄4 DIN or1⁄8DIN cutouts.CN77500 Series NEMA 4 (IP65) faceplateRear ViewOrdering Examples: CN77533-PV, dual-output controller, 1⁄16 DIN cutout and bezel, NEMA 4/ IP65 face, with 5 A SPDT relay output 1, 5 A SPST relay output 2, and optional analog output. CN77R544-A2, controller with dual pulse-type output and second alarm relay, RHS-43, arbored hole saw.CN77353, controller with NEMA 12 face, analog output and relay output, TP4, trim plate adaptor.Programming CradleWith the MICROMEGA ®programming Cradle and our FREE software, settingup and configuring any quantity ofMICROMEGA ®controllers is fast andeasy—especially valuable for OEM applications and systems integrators.Both the CN775 and CN773front-removable MICROMEGA ®controllers with serial communicationsare quickly and easily plugged in,programmed, and removed from the cradle. The cradle includes a standard9-pin mini DIN cable for connectionto a computer’s RS232 (or RS485) serial port and is powered by 90 to250 Vac/Vdc. The free Windowsconfiguration software is menu driven and extremely user friendly (requireseither MICROMEGA ® “C2” RS232 or “C4” RS485 serial communications options).。
- 1、下载文档前请自行甄别文档内容的完整性,平台不提供额外的编辑、内容补充、找答案等附加服务。
- 2、"仅部分预览"的文档,不可在线预览部分如存在完整性等问题,可反馈申请退款(可完整预览的文档不适用该条件!)。
- 3、如文档侵犯您的权益,请联系客服反馈,我们会尽快为您处理(人工客服工作时间:9:00-18:30)。
当开机后显示屏无显示,应先把电源关掉,等 1 分钟后再开电源
电话: 020-38106065 020-38108256 传真:020-38109695
9
ATAGO(爱拓)中国
7、屏幕显示
(1)测量显示屏 测量时有下列六种显示方式
中文仪器使用说明书
2. 把打印电源线一端插进 DP-RX 背面的电源插孔 3. 打印电源线另一端与 RX-7000α 背面的电源输出接口连接
6、开机
1. 把电源线插头插进电源插座 2. 若已经连接了打印机,先把打印机的电源开关打到“I”位置 3. 把主机的电源开关打到“I”位置 4. 开机后,仪器显示屏显示“RX-7000α”字样及公司名称
情况下继续使用仪器时可能会导致火灾或者仪器故障。请您的仪器供应商请求检查仪器
。
◇请勿尝试修理、检查、拆卸仪器,不正确的操作也有可能导致火灾、触电或者烧伤
。
◇如果仪器掉落或者重物撞击请跟 ATAGO 的供应商联系,如果继续使用可能会导致火灾或者
仪器故障
。
注意
◇请勿将水或者样品放置在除了棱镜以外的部位,否则将会导致仪器故障
3
ATAGO(爱拓)中国 中文仪器使用说明书
插座的使用
版权所有 不得翻印 违者必究
警告 ◇确保使用 RX-7000a 所提供的电源线,如果使用别的电源线,多余的电压或者电源的极性可
能会搞错,这样可能会导致火灾或冒烟
。
◇请勿将插座插在除了 100V 或 240V 以外的电源上,如果将仪器插在别的电源上可能会短路、
ATAGO(爱拓)中国 中文仪器使用说明书
(2) 安装
版权所有 不得翻印 违者必究
a)使用 100-240V 交流电源(50Hz/60Hz) b)将仪器放置在 5~40℃的环境中 c)由于是精密仪器,请勿放置在太阳直射、热源附近,请勿受到强烈震荡,请勿放置在灰尘 太多的地方 d) 应水平放置,勿压重物
冒烟或者
。
◇如果电源线有坏了请勿再使用,如果使用火灾、电击或者烧伤可能发生,此时要联系 ATAGO
的经销商购买新的电缆线
。
警告
◇请勿用是收受插拔电源
。
◇请勿必拿着插入或者拔出电源线,不正当的拉扯电源线可能将电源线弄坏,这样可能会导
致火灾或电击
。
恒温的操作
警告
◇当温度过高时采取其余的措施重新设定
。
电话: 020-38106065 020-38108256 传真:020-38109695
2. 按动上下箭,把箭头移到“6 DATE&TIME”,再按“←”(或在数字面板上按“6PQR”, 再按“←”)
3. 屏幕显示月、日、年、小时、分钟等,用数字输入月份,再按“←” 4. 依次输入日、年、小时、分钟,若输入错误,按“QUIT”取消,再重新输入。 5. 全部设置完后按“←”,此时你会听到蜂鸣音,仪器回到设置菜单状态。按“QUIT”
。
◇如果用此仪器测量高温或者强酸性的样品,棱镜将会损伤并且导致不准确的测量结果
。 使用此仪器
警告 ◇棱镜是由光学玻璃做的,请勿用金属工具例如勺子或镊子敲打或接触棱镜表面,如果棱镜
电话: 020-38106065 020-38108256 传真:020-38109695
2
ATAGO(爱拓)中国 中文仪器使用说明书
版权所有 不得翻印 违者必究
RX-7000a DIGITAL REFRACTOMETER
日本 ATAGO 精密数字糖度/折光仪 使用说明书
(中文版 1.0)
ATAGO(爱宕)中国
地址:广州市天河区林和西路 9 号耀中广场 A 座 702 室 邮编:510010 电话:020-38106065 38108256 传真:020-38109695
版权所有 不得翻印 违者必究
(2)设定菜单模式
电话: 020-38106065 020-38108256 传真:020-38109695
10
ATAGO(爱拓)中国 中文仪器使用说明书 8、设置日期及时间
版权所有 不得翻印 违者必究
1. 在测量状态下或显示屏显示“ZERO SET END”时,按菜单键(MENU),此时会 显示设置菜单(SET UP MENU)
8
ATAGO(爱拓)中国 中文仪器使用说明书
版权所有 不得翻印 违者必究
(3) DP-RX 数字打印机(选配件)
主机顶部
1. 装纸盖 2. 切纸器 3. 电源开关 4. 进纸开关:按下此开关,打印纸出纸,进纸前,应确认“OFF
“ON LINE”灯亮时不能进纸) 5. 在线开关:按下此开关,转换在线或不在线状态 6. 电源指示灯 7. 在线指示灯 8. 指示灯:亮时表示不在线,闪烁时表示缺纸
电话: 020-38106065 020-38108256 传真:020-38109695
5
ATAGO(爱拓)中国 中文仪器使用说明书
操作注意事项 ◇请勿使仪器跌落或受到强烈冲击 ◇请勿拉、绞、折电缆线或在电缆线上放重物
日常维护 ◇仪器太脏时用软布清洁 ◇请勿用挥发性物质或油漆清洁仪器
指示的解释
警告 如果忽视了此说明书不正确的操作此仪器的,可能造成使用者受伤甚至死亡。
警告 如果忽视了此说明书不正确的操作此仪器的,可能造成使用者受伤和财产的损失。 标志的解释
这个标识表明警告,警告的内容会在△附近详细的描述。
这个标识表示禁止(一个被禁止的项目),禁止的内容在○附近详细描述。
这个标识表示必须做,操作的内容在●附近详细描述。 使用此仪器
◇制造商不会对由于使用者不正确的使用仪器或用仪器测量非被设计的参数(糖度、盐度、
液体含量)造成的仪器损害负责。
◇在样品池上面的用来放样品测量的棱镜是消耗品。
◇ATAGO 公司不负责用仪器测量会对仪器有损害的样品所产生的损害。
电话: 020-38106065 020-38108256 传真:020-38109695
使用环境
◇在海拔高度 5000M 以下 ◇室内使用 ◇置于水平位置 ◇环境温度:5-40℃ ◇湿度:小于 90% ◇请勿放置在放在太阳直射或有热源的地方 置于水平位置 ◇请勿突然改变环境 ◇请勿放置在可受到强烈震荡的地方 ◇请勿放置在灰尘太多的地方 ◇请勿放置在温度太低的地方 ◇请勿放置在危险的地方 ◇请勿在仪器上放重物 ◇在适宜的湿度环境下使用(31℃时不超过 80%,40℃时不超过 50%) ◇电压变化不要超过 10% ◇安装等级(耐压等级):II 级 ◇防污等级(IEC60664):2 级
7
ATAGO(爱拓)中国 中文仪器使用说明书
(2)控制面板
版权所有 不得翻印 违者必究
液晶显示器, 可同时显示日期, 时间, 温度, 测定结果,操作过程提示信息, SW1-SW4 四
个功能键的测定当时的功能。
操作键:五个防尘防水薄膜按键, [START]和[SW1],[SW2],[SW3],[SW4], 通常情况下只需
仪器回到测量状态,表明刚才的设置已保存。
9、显示屏设置
重复按下方的“SW4(SCALE)“键,选择所需测量页面(测量单位)
10、模式设置
(1)模式 三种测量模式: MODE-1:用户任意设置所需温度,仪器达到设置温度后开始测量。此为默认设置 MODE-2:用户任意设置温度,仪器在接近测量温度时开始测量,这是一个快速测量法” MODE-3:按 START 键 4 秒后仪器进行测量。控温或不控温均可 MODE-S:非稳定性样品测量
4
ATAGO(爱拓)中国 中文仪器使用说明书
版权所有 不得翻印 违者必究
◇当温度过高采取措施重新设置时,请勿用手触摸样品或者样品池,否则可能会烫伤自己
。 选配件(打印机等)
警告
◇当连接附件时,请确保电源插头关闭,如果不关闭,可能会被电击
。
●使用时注意的项目 ●
的状态, 方便操作者使用这些功能键。
a) 测量模式
b) 日期和时间
c) 标度
d) 测量值
e) 测量温度(FIX)
f) 实时温度(PRESENT)
g) 设置温度(TARGET)
h) SW1、SW2、SW3、SW4 为功能键
i) START 开始键
电话: 020-38106065 020-38108256 传真:020-38109695
DP-RX 主机
1台
热敏纸
1台
打印机电源线
1条
信号线
1条
说明书
1本
键盘的使用
RX-7000a 键盘是用来阻止操作过程中的错误的,如果使用了键盘则只有零键和开始键
还可以操作的。
电话: 020-38106065 020-38108256 传真:020-38109695
6
4.仪器各部件的名称及用途
(1)RX-7000a 主机 a)样品池 将样品滴加在样品池的中间部位,棱镜在样品池的中间部位,这个池被设计成椭圆型为了防 止样品的飞溅。 b) 棱镜 c) 盖板 d) 电源开关 e) 电源插口 f) 打印机接口 g) 信号输出接口 h) 冷却水接口 i) 风扇
电话: 020-38106065 020-38108256 传真:020-38109695
LINE”灯是亮的(当
主机背面
1. 串行输入接口:用于连接 AP-100 2. 并行输入接口:连接 AP-100 时,此接口不用 3. 电源插孔
主机底部 后盖-没必要动用
5、连接
(1)、 连接电源线
把电源线插进仪器背面的电源插口(注:不要插进电源输出口)
(2)、 打印机 DP-RX 的连接
1. 把打印信号线一端与 RX-7000α 打印输出接口连接,另一端与 DP-RX 串行输入接口 连接