电子管大厂 3
【精品】电子管大厂介绍 1
电子管大厂介绍1NOS(NewOldStock,意为未用过的早期库存管)或二手胆管。
一、前述1904年,英国人弗莱明发明的具有划时代历史意义的电子二极管标志着人类进入了无线电时代。
在半导体器件未得到广泛应用之前的半个多世纪中,胆管在无线电广播通讯、音频放大、仪器仪表和其他工业自动化控制方面扮演着"独一无二"的角色,为人类的文明进步立下了"赫赫战功"。
许多人可能不知,1946年美国人发明的世界上第一台电子计算机ENIAC就是由18000多个胆管构成的。
西欧是胆管的发源地之一,也是世界上生产胆管最集中的地方。
据不完全统计,鼎盛时期的西欧胆管品牌过百,每年生产的各类胆管遍及世界各地,多不胜数。
随着半导体器件的广泛应用,西欧的胆管生产厂早在二十多年前已陆续停产。
众多的著名胆管品牌也因此或改弦易辙,或随之消失。
幸好如今还能在NOS管上一见其昔日的风采。
胆管逐渐淡出绝大部分应用领域后,一般的人只能在音频这块"绿洲"中还能见到胆管的"靓影"。
就音频用管而言,人们公认西欧上世纪五六十年代(凡"年代"均指上世纪,下同)生产的胆管品质超群,无与伦比,一些发烧友更非"西胆"不听。
也许有人会问,随着科技的进步,越近期的产品其质量应越好才是。
其实不然,胆管的生产工艺在那时已达到了炉火纯青的地步,改进的余地很有限。
加上当时正值胆管火红的年代,各品牌之间竞争激烈。
在某些领域如国防、仪器仪表也需要高质量的胆管。
从七十年代起,胆管需求已逐渐衰落,生产成本能省则省,品质控制也大不如以前。
在西欧各胆管生产厂相继关闭后,一些品牌虽还在发行胆管,但产品已非原厂产,而是来自"五湖四海",难循其踪,质量更是无法保证。
这种情况连一些著名品牌也未能幸免。
因此,玩胆者在搜罗胆管时,把目光投向早期的产品不无道理。
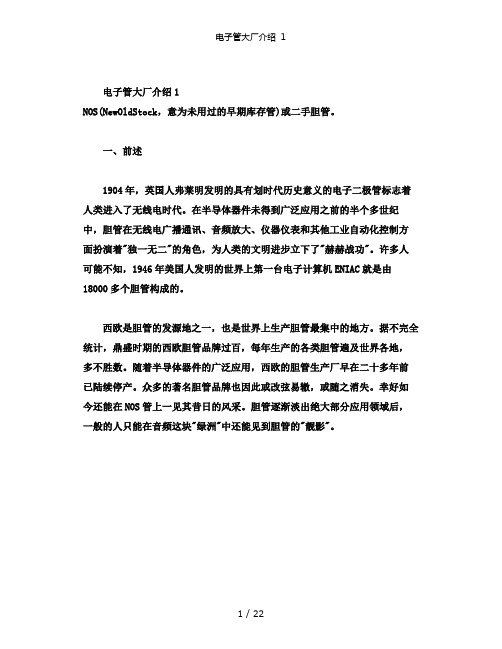
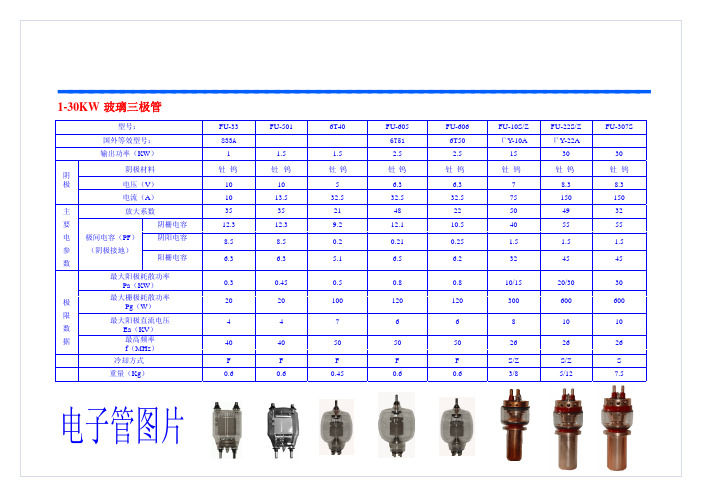
大中功率电子管参数
7.5
7.5
8
8
8
8
12
14
14
f(MHz)
50
50
110
110
110
110
45
40
40
冷却方式
F
F
F
F
F
F
F
F
F
重量(Kg)
1
2.3
1.5
2.8
2.8
2.8
9
18
18.5
电子管图片
-5--3-50-K-W--陶-瓷-三-极-管-系-列--------------------------------------------
20 0.8
18 0.7
18 0.7
22 0.9
46
47
1.8
2.3
数 (阴极接地) 阳栅电容
8.8
11
13
15
13
13
16
32
32
极
最大阳极耗散功率 Pa(KW)
0.8
2
2.5
4.5
5
5
10
15
20
限
最大栅极耗散功率
Pg(W)
50
90
130
150
150
150
250பைடு நூலகம்
400
600
数
最大阳极直流电压
据
Ea(KV)
最高频率 f(MHz)
110
110
30
冷却方式
F/Z
F/Z
Z
F
F
S
重量(Kg)
4.3/3
4/3.3
30
菲尔德曼(Friedman)20W 电子管(EL-84)强大的小型杰克·莱斯(Jerry Cantr

INSTRUCTION MANUALCongratulations on purchasing this incredible new guitar amplifier designed by one of the most well-known amp modders and designers in the LA Music scene for the past 20 years, Dave Friedman.Dave Friedman has been designing and building guitar rigs for the stars since the early nineties. After many years of modding amplifiers and consulting for other well-known amplifier companies, Dave finally brought his talent to a new line of production amps under his name, Friedman Amplification.The signature JJ-JR was designed with Alice In Chains guitar player Jerry Cantrell. Jerry has been relying on Friedman amps for years and has now teamed up with Dave to create a low-wattage Friedman of his own. Months of seemingly endless tweaking, refining and playing has resulted in Jerry's dream little amp. The JJ amp Jerry relies on every day is identical in tone to the JJ-JR amplifier you have purchased.A lot of people don’t believe an EL-84 20-watt amp can sound just like the big one. We beg to differ!You will notice instantly, the tight bottom end and rich harmonically detailed chords and single notes. This amp cleans up remarkably well with the guitar’s volume control, even with the amp on higher gain settings.The JJ JR takes pedals very well and loves boosts, OD’s, phasers, flangers, tremolos, wahs, etc. The JJ JR also has an ultra transparent Series FX loop that takes time-based FX pedals and rack units equally well. SPEAKER EMALUTED DIRECT INTERFACE:On the back panel you will find an XLR output that delivers an authentic MICed cab response. This output accurately reproduces the tone of a classic MIC and vintage speaker.KEY FEATURES:•Hand Wired the USA•20-Watt all tube head or 1x12 combo •The JJ Junior combo comes loadedwith a 16-ohm, 12” Celestion G12M 65Creamback speaker•Two channels• 2 x EL-84 power tubes• 3 x 12AX7 preamp tubes•Master volume and gain controls•Dirty Channel featuring full EQconsisting of bass, middle, treble andpresence•Clean channel featuring volume and 3-way bright switch•JBE voice switch for a higher gain more saturated sound•Ultra transparent series FX Loop•8 and 16 ohm Impedance SelectorSwitch•Custom made transformers•5-Year Limited warrantyPLUGGING INWe recommend starting the amp on thenormal dirty channel with the Bass on 10, the Mids at around 6, the Treble at 5 and thePresence at 5. Set the Gain around 8 and then bring the master up to taste. After plugging in, you will notice instantly, the tight bottom end and rich harmonically detailed chords and single notes, that’s the Friedman sound. This amp cleans up remarkably well with theguitar’s volume control even with the amp on higher gain settings. For even more gain, switch to the JBE mode using the switch on the front panel. Switching to the Clean, turn the Volume up and experiment with the Bright Switch to find the tone you need.We know you will love your new JJ JR.If you have any questions or need help don’t hesitate to email us at**********************.INSTRUCTIONSPlease keep this instruction manual for future reference and for the duration of owning this Friedman Amplifier. Please carefully read and understand the instructions inside this user’s manual before attempting to operate your new amp. This instruction manual includes essential safety information regarding the use and maintenance of the amplifier. Takespecial care to heed all warning symbols and signs inside this manual and those printed on the amplifier itself.WARNING!TO PREVENT FIRE OR SHOCK HAZARD, DO NOT EXPOSE THE AMPLIFIER TO WATER OR MOISTURE. DO NOT OPERATE NEAR ANYWATER SOURCEWHAT’S THE MEANING OF THIS? The lightning flash with an arrow triangular symbol is intended to alert the user to thepresence of non-insulated “dangerousvoltage” within the products enclosure, and may be of sufficient magnitude to constitute a risk of electric shockWHAT’S THE MEANING OF THIS? The exclamation point triangular symbol is intended to alert the user to the presence of important operating and maintenance (servicing) instructions in the user manual accompanying this amplifier!1. Read Instructions – All the safety andoperating instructions should be read before this product is operated.2. The safety and operating instructions should be retained for future reference.3. Heed Warnings – All warnings on the amplifier and in the operating instructions should be adhered to.4. Follow Instructions – All operating and use instructions should be followed.5. Water and Moisture – The amplifier should not be used near water – for example, abathtub, washbowl, kitchen sink, laundry tub, wet basement, or near a swimming pool, and the like.6. Heat – Amplifier should be situated away from heat sources such as radiators, heat registers, stoves, or other amplifiers that produce heat.7. Power Sources – This product should be operated only from the type of power source indicated on the rating label.If you are not sure of the type of power supply to your home, consult your product dealer or local power company.8. Grounding or Polarization– This product may be equipped with apolarized alternation-current line plug (a plug having one blade wider than the other). This plug will fit into the power outlet only one way. This is a safety feature. If you are unable to insert the plug fully into the outlet, try reversing the plug. If the plug should still fail to fit, contact your electrician to replace yourobsolete outlet. Do not defeat the safety purpose of the polarized plug.9. Power-Cord Protection– Power-supply cords should be routed so that they are not likely to be walked on or pinched by items placed upon or against them, paying particular attention to the cord in correspondence of plugs, convenience receptacles, and the point where they exit from the amplifier.10. Cleaning – The amplifier should be cleaned only as recommended by the manufacturer. Clean by wiping with a cloth slightly damp with water. Avoid getting water inside the amplifier.11. Non-use Periods – The power cord of the amplifier should be unplugged from the outlet when left unused for a long period of time. 12. Object and Liquid Entry– Care should be taken so that objects do not fall, and liquids are not spilled into the enclosure through openings.13. Damage Requiring Service– The amplifier should be serviced by qualified service personnel when:A. The power-supply cord or the plug has been damaged; orB. Objects have fallen, or liquid has been spilled into the amplifier; orC. The amplifier has been exposed to rain; orD. The amplifier does not appear to operate normally or exhibits a marked change in performance; orE. The amplifier has been dropped, or the enclosure damaged.F. The amplifier needs tube replacement or biasing14. Servicing – The user should not attempt any service to the amplifier beyond that described in the operating instructions.All other servicing should be referred to qualified service personnel.15. Ventilation – Slots and openings in the cabinet are provided for ventilation and to ensure reliable operation of the product and to protect it from overheating, and these openings must not be blocked or covered. 16. Attachments – do not use attachments not recommended by the product manufacturer as they may cause hazards. 17. Accessories – Do not place this product on an unstable cart, stand, tripod, bracket, or table. The product may fall, causing serious injury to a child or adult, and serious damage to the product. Use only with a cart, stand, tripod, bracket, or table recommended by the manufacturer, or sold with the product. 18. Lightning – For added protection for this product before a lightning storm, or when it is left unattended and unused for long periods of time, unplug it from the wall outlet. This will prevent damage to the product due to lightning and power line surges.19. Replacement Parts – When replacement parts are required, be sure the service technician has used replacement parts specified by the manufacturer or have the same characteristics as the original part. Unauthorized substitutions may result in fire, electric shock, or other hazards.20. Safety Check – Upon completion of any service or repairs to this product, ask the service technician to perform safety checks to determine that the product is in proper operating condition.21. FUSES – Always use the correct rating and type of fuse as indicated on the rear panel. Note the proper rating fuse is determined by the AC line voltage in the country this unit is being operated.POWER SWITCH: This turns the amp on.PRESENCE CONTROL: Adjusts the upper mids and highs in the power amp section. Global on all channels. Start at about 4-5 and adjust to taste.Note: This pot will sound scratchy when adjusted – this is normal.MASTER: This is the dirty channels VOLUME. The more you turn it up, the louder it gets. TREBLE CONTROL: This adds or reduces treble. Start at 5 and adjust to taste.MIDDLE CONTROL: Adds or reduces midrange. Start at 5 or 6. Lower settings will scoop the mids, higher levels will allow your audience to actually hear the guitar in the mix.BASS CONTROL: This adds or reduces bass or bottom end. As the amp gets louder, you may want to back this off a bit. Start at 7-10 for bedroom volumes.GAIN CONTROL: This adds gain/distortion. Adjust to taste. Don’t be afraid.JBE SWITCH: Primarily designed to add gain, compression and saturation. It is normal for the volume level to drop with this switch engaged. Compensate with the amp’s Master volume.CHANNEL SELECTOR SWITCH: Switches between Clean and Dirty channels when Footswitch is not connected.BRIGHT SWITCH: 3 position switch that varies the overall brightness of the Clean Channel ONLY. CLEAN VOLUME: Adjusts the clean channel’s volume.INPUT: Just like it says. This is the JJ’s guitar input jack.FOOTSWITCH JACK: This is where you plug in the footswitch.SEND JACK: This is where you plug the INPUT of your Effect(s). Use a high-quality shielded guitar cable.RETURN JACK: This is where you plug the OUT of your Effect(s). Use a high-quality shielded guitar cable.BALANCED OUTPUT: XLR output used to send your JJ JR tone straight to the mixing board. (No speaker cab necessary if you want silent recording ability.)GND SWITCH: Lift ground to prevent ground loops. Start with placing in LIFT position.AXIS SWITCH: Simulates MIC placement on the center of the speaker or the edge/surround.LEVEL SWITCH: A level pad for the XLR outputSPEAKER OUT JACKS (2): Plug speaker cabinets here. Set Impedance selector to appropriate position.If using only one cabinet, connect to “USE FIRST” jack.The JJ-JR has a built-in dummy load in case you want to use the XLR output without having a speaker connected. If you would like to use this option, make sure there are no cables plugged into either speaker jack.IMPEDANCE SELECTOR SWITCH: Set to correct speaker load impedance that is connected to your amp.MAINS INPUT: Plug the supplied IEC power cord here and into a wall outlet to power the beast. Only plug into a wall outlet that matches the voltage of the amp.MAIN FUSE: This fuse is in the compartment found below the AC receptacle. Replace with a 3 Amp slo blow fuse for 120V or 1.5 Amp slo blow for 230V. This most likely is the result of a bad tube. Constant blowing of this fuse (even when using new tubes) is an indication that something could be seriously wrong with your amp. STOP and call us so we may help you diagnose.HT FUSE: Only replace with Type indicated on rear panel. If this fuse blows, don’t freak out too much.It’s most likely a bad power tube. We recommend you carry a few spare fuses and a spare set of tubes when gigging.FRIEDMAN LIMITED LIFETIME WARRANTY Thank you for choosing Friedman. Friedman manufactures some of the world’s most reliable hand-wired, all-tube amplifiers and speaker cabinets. Friedman takes great pride in an extremely thorough testing procedure, which is implemented on each product prior to shipment. In the unlikely event that you have a problem with your amplifier, please refer to warranty below. Friedman stands behind our products like no other and we’re here to help you! AMPLIFIERS: Friedman offers a limited lifetime warranty to the original purchaser that a Friedman amplifier will be free from defects in material and workmanship. A dated sales receipt will establish coverage under this warranty, PLEASE KEEP YOUR PROOF OF PURCHASE TO USE YOUR WARRANTY. This warranty does not cover service or parts to repair damage caused by accident, neglect, abuse, normal wear, disaster, misuse, abuse, over-powering, negligence, inadequate packing or shipping procedures and service, repair or any modifications to the product which have not been authorized or approved by Friedman in writing. ANY MODIFICATION TO THE AMPLIFIER WILL VOID YOUR WARRANTY. If this product is defective in materials or workmanship as warranted above, your sole remedy shall be repair or replacement by Friedman as provided below. CAUTION:Do NOT attempt to repair, modify or service your amplifier by yourself Please read the instruction manual for all safety notifications, warnings and instructions. Friedman, like all tube amplifiers, has extremely high voltages that can cause serious injury or death. Do not remove the chassis from the amplifier. All repair and service work must be performed by Friedman or an authorized service center of Friedman. ANY UNAUTHORIZED REPAIRS WILL VOID YOUR WARRANTY. TUBES: Friedman warrants the original purchaser that the specific tubes used in Friedman will be free from defects in material and workmanship for a period of 90 days from the original date of purchase. A dated sales receipt will establish coverage under this warranty. This tube warranty will automatically terminate 90 days after the original retail sales date. This tube warranty is in lieu of all other expressed warranties. If tubes fail within the 90-day warranty period your sole remedy shall be replacement of tubes as provided below.RETURN PROCEDURES: In the unlikely event that a defect occurs please email us at***********************.Inmostcaseswe can help you diagnose the problem over the phone. If a product must be sent to us, please follow the procedure outlined below.•Defective products must be shipped,together with proof of purchase, freightpre-paid and insured to the AuthorizedFriedman Service Center or directly toFriedman.•If a product must be returned to Friedman for warranty replacement/repair, a ReturnAuthorization Number must be obtainedfrom our Customer Service Departmentprior to shipping the product.•Please contact Friedman Customer Service Department for the Authorized FriedmanService Center nearest you.•Products must be shipped in their original packaging or its equivalent; in any case,the risk of loss or damage in transit is to beborne by the purchaser.•The Return Authorization Number must appear in large print directly below theshipping address.•Always include a brief description of the defect, along with your correct returnaddress and telephone number.•When calling to inquire about a returned product, always refer to the ReturnAuthorization Number.If Friedman determines that the unit was defective in materials or workmanship at any time during the warranty period, Friedman has the option of repairing or replacing the product at no additional charge, except as set forth below.•All replaced parts become a property of Friedman. Products replaced or repairedunder this warranty will be returned viaground shipping within the United Statesor Canada - freight prepaid.•Friedman is not responsible for costsassociated with expedited shipping, eitherto Friedman or the return of the product tothe customer.All warranty repairs outside the United States and Canada must be directed to the dealer or distributor from which you purchased the product.INCIDENTAL OR CONSEQUENTIAL DAMAGE: In no event will Friedman be liable for any incidental or consequential damages arising out of the use or inability to use of any Friedman product, even if a Friedman dealer has been advised of the possibility of such damages, or any other claim by any other party. Some states do not allow the exclusion or limitation of consequential damages, so the above limitation and exclusion may not apply to you. This warranty gives you specific legal rights and you may also have other rights, which may vary from state to state.FOR YOUR PROTECTION: Please complete and send in the completed warranty registration card to: Friedman Amplification, care of Boutique Amps Distribution, 3383 Gage Ave., Huntington Park, CA 90255. Please send within (10) ten days of the date of purchase so that we may contact you directly in the event a safety notification issued in accordance with the 1972 Consumer Product Safety Act.CUSTOMER SUPPORT: Our dedicated and friendly staff is ready to help you with any warranty or product questions you may have. Please email us ************************Thank you again for choosing Friedman and we look forward to a long relationship!。
电子管等级——精选推荐
电子管等级曾经和玩军用电台的朋友探讨过器件的等级问题.在我国刚开始工业的那个年代,器件都是精益求精的.对军品和民品划分也非常严格.最严格的,莫过于传说中的"七专"器件了.我自己也收藏有一个退役的军用收信机,里面的管子都是打☆标志的军用管子,据说价钱比J级管子贵上十倍呢.上面所说的七专就是"专批、专料、专人、专机、专验、专筛、专卡"的器件(那个年代,机器的每个器件出现问题是责任到人的:cool:)相关介绍如下:(一)、民品标记为"M"或不作标记.(二)、军品1、普军品标记为"J",每只产品都检验,并提供单只产品检验参数.2、筛选品(特级品)标记为"S/T",在军品基础上增加筛选控制以剔除早期失效产品。
.3、"七专品"标记为"G",按"七专"技术条件和"七专"控制措施进行控制生产、筛选和交付.4、"七专"加严标记为"G+",符合"七专"加严技术要求的产品,等级高于"七专"产品.5、军检品需军代表检验的产品,军检筛选标记为S/T;军检"七专"品标记为G;军检"七专"加严品标记为G+.上面的标注,适用国产的多数电子管和晶体管器件.楼主所说的"Q"级别,我不太清楚,印象里好像见到过.试澄清--电子管级别的误解!之所以标题为"试澄清"其意在于我手头能找到的白纸黑字的资料也不多.但好歹能说明点问题,请各位坛友和老师积极参与讨论,不当之处请直言拍砖!附图为人民邮电出版社在70年代也就是所谓的"电子管"年代出版的《无线电通讯用电真空器件手册》(这本手册在当时的作用我想就不用我多说了吧)正文第10页的的截图,其中有一些关于电子管后缀型号的简略说明,虽说简练,但足以说明一些常见的问题.电子管的命名和级别由于国家、厂家、年代、地区的差别而有加大的不同.比如我国就有很多种方式.最早生产的如电工、南京做的仿欧美产品(比如6SQ7、80)等,未见或很少见级别的标注.仿造苏联型号的产品,南京厂标注级别的也很少北京厂一般都有标注.主要原因我想是当时国标体系还不太健全.但生产的国产型号就有级别标注了!现简单罗列一些常见的国产管级别标注极其我知道的(谨代表我)简单解释:1、国营南京电子管厂:"一级"、"二级"、"三级"解释:这样的级别标注常见于早期的管子,其中"一级"最高,"三级"最低,为业余品."专用"(菱形方标)用繁体字标于管蒂上、"军用(J)"早期多用繁体文字,也是菱形方标,标于管蒂上、"特殊(T)"这一级多是标字母,菱形方标于管蒂上标注。
电子管代换及说明

常用电压放大级即前级放大胆管代换表6N1ECC85,6AQ8,6H1л6N412AX7,ECC83,E83CC,7729,CV4004,B759,CV4926N10 12AU7,ECC82,E82CC,7316,CV4003,5814,B749,61896N11 6DJ8,E88CC,ECC88,6922,ECC189,6J5,6H11N,7308,El88CC6N8P 6SN7,B65,5692,33S30,CV1988,6H8C,6HM,6F8G,16336H8C 6HM,6F8G,1633,9002,6C8G6J8P 6SJ7,6267,EF86,12A T7ECC81,CV4024,6201,B739,A2900,2025,ECC80156N9P 6SL7,5691,33S29,VT2296F2ECF82,6U86N26H2л电子管代换及说明可以直接代用12AU7的型号有:ECC82,E82CC,ECC802S,B329,CV491,CV4003,CV8155,M8136,5814,6189,7730,6067,7730。
可以直接代用12AX7的管子有:ECC83,ECC803S,B339,E283CC,M8137,CV492,CV4004,CV8156,6057,7729。
7025,5751,7058,6N4。
前级管的选择:12AX7:品牌一:AMPEREX 『橙字』『地球嘜』品牌二:RCA 5751 『红字』『黑屏』『方环胆』『三云母』三:『黃字』『三雲母』『黑屏』『方環』『閃電嘜』 SYLVANIA 5157。
12AU7:品牌一:AMPEREX『地球嘜』品牌二:MULLARD ecc826922:品牌一:西门子 CCA品牌二:AMPEREX 7308PHILIPS电子管大家族“买Philips电子管?不是真的吧,他们好像只是生产灯泡和光管,其音响用电子管的质素想必好不到哪里吧!”,“Philips电子管?他们根本没有生产音响用电子管,全部都是买别人家的出品回来印牌发售,又谈何Philips电子管的音色呢?”“Amperex电子管?Amperex只是一个商标,并无自己的出品,好像其吹喇叭系列电子管,都是买Philips 电子管来印牌发售的”。
基于10款不同厂家生产的EL34电子管的音质对比
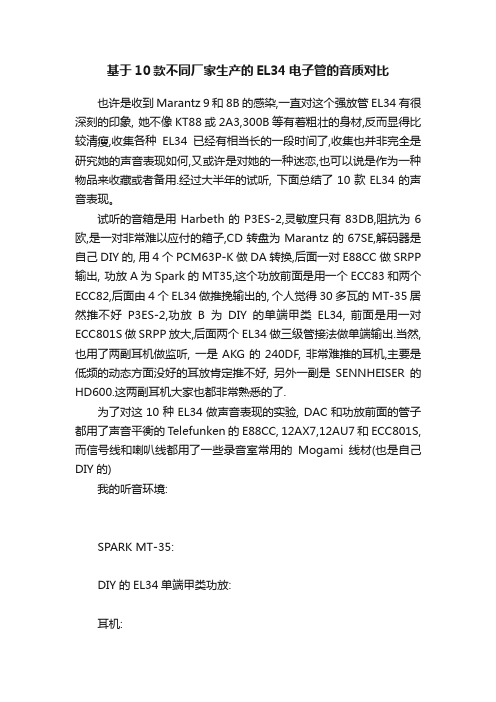
基于10款不同厂家生产的EL34电子管的音质对比也许是收到Marantz 9 和8B的感染,一直对这个强放管EL34有很深刻的印象, 她不像KT88或2A3,300B等有着粗壮的身材,反而显得比较清瘦,收集各种EL34已经有相当长的一段时间了,收集也并非完全是研究她的声音表现如何,又或许是对她的一种迷恋,也可以说是作为一种物品来收藏或者备用.经过大半年的试听, 下面总结了10款EL34的声音表现。
试听的音箱是用Harbeth的P3ES-2,灵敏度只有83DB,阻抗为6欧,是一对非常难以应付的箱子,CD转盘为Marantz的67SE,解码器是自己DIY的, 用4个PCM63P-K做DA转换,后面一对E88CC做SRPP 输出, 功放A为Spark的MT35,这个功放前面是用一个ECC83和两个ECC82,后面由4个EL34做推挽输出的, 个人觉得30多瓦的MT-35居然推不好P3ES-2,功放B为DIY的单端甲类EL34, 前面是用一对ECC801S做SRPP放大,后面两个EL34做三级管接法做单端输出.当然,也用了两副耳机做监听, 一是AKG的240DF, 非常难推的耳机,主要是低频的动态方面没好的耳放肯定推不好, 另外一副是SENNHEISER的HD600.这两副耳机大家也都非常熟悉的了.为了对这10种EL34做声音表现的实验, DAC和功放前面的管子都用了声音平衡的T elefunken的E88CC, 12AX7,12AU7和ECC801S,而信号线和喇叭线都用了一些录音室常用的Mogami线材(也是自己DIY的)我的听音环境:SPARK MT-35:DIY的EL34单端甲类功放:耳机:1,国产曙光EL34B曙光的EL34B是曙光现代新做的管,价钱大概45-50元一个,声音的表现为中频很厚实, 低频动态不错, 但声音比较粗糙, 分析力不高.据说国产的北京早期的EL34很不错,有机会找来听听。
常用国产电子管参数

—
—
Rg<Ω
6N9P
250
-8
—
—
44
1.6
70
275
—
—
Rg<Ω
6N10
250
Rk=800Ω
—
—
7.7
17
250
—
—
6N11
90
16
Rk=90Ω
—
—
27
130
2
—
—
Rg<1MΩ
6N12P
180
23
-7
—
—
7
17
300
—
—
Rg<100kΩ
6N13P
90
80±32
-30
—
—
Ri≤460Ω
5
—
300
Rk=68Ω
100
<6
850
—
300
3
125
Rg< 500kΩ
12K3P
250
9
-3
100
±1
—
2±
—
330
140
2P2
60mA30
60
±
-
60
<
—
>
—
90
90
—
P0≥50mW
2P3
135
16±4
-
90
≤3
—
2. 4
—
1. 54
3. 08
1. 26
2. 52
150
2
135
0. 5
P0≥0. 5W
2P19B
为变频互导
6A7P
电子管王300b知多少
三极管王300b知多少电子管机发烧友大概已有一个共识,就是三极管的声音较好,功率管中又发直热式三极管为上品。
原理上三极管线性较好,所产生的谐波少,虽然直热式三极管比旁热式的好声难以在工程学上得出证明,只是人人皆知此说,我等也只能随俗而人云亦云了。
由于内部结构和材料不同,直热式三极管中不同编号的如300b及2a3,其发声便有所有分别。
即使是同一编号的管子,不同厂家的产品也大为不同,主要也是材料、手工及制造机械相异之故。
有些厂家的品质控制比较严格,如"西电"(wec)及bendix等,堪称一流,其产品贵精不贵多。
大路货中以rca公推第一,ge及sylvania则略逊一筹,其它杂牌厂货则更差了。
一只管子之所以能成为经典,主要在其声音出类拔萃,而不是以测量数据取胜。
今日300b有很多厂家生产,它们的互导率、屏阻等特性是一样的,但唯独"西电"we300b独领风骚,其中原因如上述。
笔者最近收集了一些有关300b的资料,荼余饭后的谈话题材。
we300b的源流应追溯到1930年"西电"推出的we252a,当时用以抗衡westinghouse及rca的ux-250,两种管子的特性相近,作单端输出时功率达8w。
此管只有洋葱头一种外形,主要用于"西电"的75a、59a、59b及67a几种扩音机上,在酒店、百货商店及舞池歌厅场合使用。
we 252a于30年代中期便告停产,今日已成为无价宝,可遇而不可求了。
1933年"西电"推出特性相近的300a代替252a,管身改成st19型,即与今日见300b一样。
管座为标准四脚ux-4式,但座身上有定位针。
管子可使用811a大发射管有护颈套的管座或平板型(wafer)四脚座。
300a设计用于10w以内的输出,适合工作于较低屏压电路上,系列内包括86a、87a、91a及92a等扩音机,300a于1940年完全为300b取代而停产。
- 1、下载文档前请自行甄别文档内容的完整性,平台不提供额外的编辑、内容补充、找答案等附加服务。
- 2、"仅部分预览"的文档,不可在线预览部分如存在完整性等问题,可反馈申请退款(可完整预览的文档不适用该条件!)。
- 3、如文档侵犯您的权益,请联系客服反馈,我们会尽快为您处理(人工客服工作时间:9:00-18:30)。
电子管大厂3以下请诸位格外注意:欧洲生产的调谐指示管,喜欢采用十字结构,不知道其中的缘故,大概是和宗教信仰有关系。
欧洲调谐指示管起源于荷兰飞利浦集团,在1936年开发的AM1、EM1,后来广泛应用的是EM4、UM4型等等,关乎您提到的EM11型,1950年,E11\E41系列电子管应用于各种高级收讯机,在1953-1954年期间,飞利浦公司EM4型调谐管逐步淘汰,EM11型作为替代它的产品。
在50年代的时候,我国和各个社会主义国家有经贸关系。
欧洲系列的电子管也有少量进口。
捷克斯洛伐克的特斯拉、民主德国的RFT、匈牙利天梭等等生产的一些电子管和其它欧洲资本主义国家的厂家,比如飞利浦下属的英国MULLARD、英国天梭、法国RT、法国马资达、西德VALVO以及AEG下属的TELEFUNKEN、西门子等等电子管相同的型号都可以互换使用。
好像当时北京有商店可以买到一些欧洲的社会主义国家生产的收音机用的电子管,尽管数量很少并且型号不齐全,但是其中就有EM11,好像是特斯拉的产品。
除了灯丝以外,EM11和UM11是完全相同的。
不知道您的那个管是否是透明玻璃的,您可以看看这个内部结构。
调谐指示管一般而言是寿命最短的电子管。
通常寿命在1000小时以内,而且二手的调谐管多数寿命殆尽。
6E2这类还能略微好些,所以一般还是不要购买二手货为好。
电子管:80管发1927年,在交流收音机广泛应用的大背景下,80整流管应运而生。
此电子管堪称生产历史最长的电子管之一。
不仅数量多、产量大,生产厂家也多。
用途广泛就不用多说了,收音机、扩音机、发射机、电子仪器都可以见到它的影子。
我国也有大量生产,我国的南京电子管厂就有80生产,后来改名为5Z1P。
80的性能完全等同于5Y3GT、5Z2P。
#|在早期业余无线电试验中,几乎百分之百都是用80整流,80电子管故此也非常深入人心。
大家可以看到,早期的280外形非常漂亮,给人一种古朴典雅之美感。
从审美角度来看,个人认为雷声的ER280最为好看,因为它的屏极是有字的,虽然早期电子管屏极压字并不少见,可是雷声公司的管子大多是灰色的碳化镍屏极,压的字非常清晰。
从30年代开始,电子管都是改革为ST,机械性能比以前好得多,80的生产也更加普及开来,以适应更加增长的需求。
大概在70年代,80停止生产。
40多年的生产历史在电子器件的生产历史中算是非常悠远的。
日本的电子管开发中,改进美国管成为一个传统。
日本独自开发的电子管80K,80S,80BK,80HK是对80的改进。
80S是大电流的80管,可以提供接近5Z3P的电流。
80K是80的全波旁热管,类似于5Z4P。
80BK和80HK都是半波整流管。
发即便是现在,80也不难买到。
不过1N4007的价格实在是太具有竞争力,1A的电流和80那125MA比较,就说明了问题。
再多说一点,有些朋友装配电子设备,希望用直热管整流,便四处寻找80。
其实,看看一些欧洲的80管,比如英国BRIMAR的产品,可以看到除了管脚和5Z2P不同之外,其他完全相同。
所以,如果找不到80而要用直热整流,5Z2P代用没有任何问题,心理上不要有负担。
$电子管:RCA UX-250功率管作为第一个专门为音频功率放大而设计的电子管,它的出现开创了音频放大专用管的新纪元.在1928年,WESTINGHOUSE公司凭借着自己在低频功率放大管的技术优势,开发了音频功率放大专用的电子管UX-250,作为RCA公司的供货商,以RADIOTRON的商标出售。
UX-250电子管在当时主要作为高品质音频功率放大用的功率管,用于公众广播扩音机之中。
当时用得最多的功率管是UX-210,我也曾经介绍过210。
250比210的工作电流大、内阻低。
非常适合用于音频功率放大之用。
在二十年代,美国各个电子管厂家也均有生产S型50电子管。
目前最常见到的是CUNNINGHAM的产品,CUNNINGHAM和RCA的关系我不必赘述,同样是WESTINGHOUSE的OEM产品,素质自然很高。
另外一个非常响亮的品牌就是DEFOREST的450,德弗里斯特作为电子管的发明人,制造技术当然卓然超群。
此外SYLVANIA、CARDON、MAJESTIC等等厂家的产品也非常不错。
进入三十年代,ST电子管开始取代S管。
各个厂家纷纷开始制造ST的50,价格也开始大众化.在当时UX-250是名副其实的昂贵管型,在一张二十年代美国无线电器材商店的广告上,标明当时一些管子的价钱。
其中,UX-250最为昂贵是11美元,而UX-245是2美元。
可见,UX-250的贵族地位由来已久。
廉价的UX-245是当时很多人的选择,后来的2A3更成为普及的型号,这也是UX-250电子管存世甚少的主要原因。
真空管:2A3在30年代早期,还没有发明束射四极管,三极管还是如日中天,美国RCA公司改良了WESTINGHOUSE在20年代末开发的UX-245功率管,推出2A3功率管。
此管一经推出,广泛应用于各种场合,成为30年代早期最最著名的小功率管。
RCA公司的多款顶级收音机都用RCA 2A3作为推挽功率输出。
各个厂家也纷纷制作,苏联和欧洲也有类似产品问世,并且有多种变形产品问世。
时至今日,仍然可以找到RCA,GE等公司的产品,在许多爱好电子管的朋友中也多有使用。
我国的长沙电子管厂,以美国RCA公司的标准产品为蓝本,制作的2A3电子管出售。
最早的2A3电子管并不类似于今天我们见到的2A3,最早的2A3是单屏极电子管。
后来,改为双屏极。
标准RCA量产版的2A3有一个显著的特征:2A3的灯丝没有采用悬挂,而是直接靠云母片来固定,类似于常见的5Z2P。
我国产品也如此。
但是有很多厂家的产品就不是这样,比如日本东芝2A3采用弹簧悬挂灯丝,也有采用吊钩悬挂灯丝的。
从技术来看,RCA这种方法并不好,没有灯丝悬挂对于直热电子管而言容易引起震动噪音。
故此,如果用RCA或者曙光等产品就要注意,电源变压器的噪音是否会传递到电子管座,不过通常还不太严重。
RCA的2A3据我见到的都用的是涂敷石墨屏极,我们知道这是一种古老的做法。
有少数2A3,如STC的产品,两个并联的屏极是横向排列,而不是纵向排列。
不过相信这些结构的差别并不会影响电子管的电气参数。
6.3V灯丝的此种电子管6A3和6B4G,用法和2.5V灯丝的相同。
2A3电子管甲类单管满功率输出所需推动电压大概在近50伏特,所以推动问题显得很重要。
有许多电路设计采用高放大系数的五极管来推动,这是比较简单的办法。
用在小功率放大器中,如果讯号源的输出在伏特数量级没有问题。
但是如果用于收音机中则不合用。
如果有朋友希望在自己做的收音机中用2A3来做功率放大。
敝人建议低频放大用两级比较合适,第一级用电压放大五极管,比如6J8P或者6B8P的五极管部分。
第二级用低放大系数的三级管,比如6C5P,6J5等等。
这样就会有足够的增益,并且可以加入负反馈和音调控制。
2A3的推挽运用一直是一个被广大无线电爱好者喜爱的电路,太多太多的书籍报刊中都有介绍。
三极管开环失真小的特点的确非常可爱,尤其在做推挽放大使用,加上很小量的负反馈就可以让整个电路达到非常好的电气参数。
收音用电子管。
遥截止电子管--顾名思义,就是截止比较遥远之意思。
主要是为了供给超外差收音机的放大之用而设计出来。
从30年代起,超外差接收机开始广泛普及,对于微弱的讯号,人们可以放大成千上万倍。
随着通讯频率向短波迈进,衰落问题成为需要解决的重要课题,通过在高频、中频放大电路中增加AGC来减小衰落造成的影响成为一个最好的方法。
故此需要有这样一种电子管,在小的栅极负电压下,可以有较高的跨导获得比较高的放大增益;在大的栅负压下,并不截止,而是仍然有小小的屏流。
故此,通过绕制栅极丝时候特别绕法,制造出来遥截止五极管来供给通讯机使用.相同构造的遥截止和锐截止五极管,比如58和57比较,除了截止的特性不相同以外,其它的参数也不相同。
以57和58比较,57的内阻要高于58,这主要是因为为了获得遥截止的特性,58的栅极丝中间绕的比较疏落,不如57致密所导致。
也因为此,的屏极电流要比57高一些。
同样的6J7和6K7也有如上的区别。
有些朋友希望用五极管作为音频电压放大使用,在找不到锐截止五极管的时候,用遥截止五极管代用。
从理论上来说是并不合适的。
电子管放大器之中,造成大信号失真的一个重要的原因就是三极管中的变μ现象和五极管中的变S现象。
这是造成大信号失真的一个原因,虽然程度有所不同,不过一般而言,还是不用遥截止电子管作为音频放大为好。
有朋友要问:6B8P电子管的五极管部分是遥截止特性,不是一样用于音频放大么?抑或许多的书籍资料中的电路中也多见到遥截止五极管用于音频放大的线路。
我这里要说明:不论是6B8P用于音频放大,或者是别的遥截止电子管用于音频放大,不是不能用,而是不算好。
当然这样使用也不会出现危险,但是大信号输入就绝对会有失真。
有些朋友认为:将遥截止五极管作为三极管连接使用,便没有问题。
这也是错误的,遥截止的五极管作为三极管连接,它的截止特性仍然是遥截止的,因为三极管接法并不能让管子内部的栅极丝有任何改变,所以仍然不适合用于音频放大电路。
我曾经用6K4接成三极管试验过,线性不好,用示波器清晰可见。
遥截止五极管:58、6K7、6SK7、6K4等等型号,究竟那种好些?答案是,越晚期的性能越好。
一些大师们有一种说法,谓之:越早越靓声。
实在是错误。
这里不想再多说。
不过本次介绍的是6SK7,下面就详细说说这种电子管从大量装配时候的流水化作业角度而言,有帽子的电子管是不好的,不论从电子管的生产还是接收机的装配来说,都不利于实现高速作业。
对于一个五极管而言,最多有七条电极引出线。
八个管脚完全够用,自然而然的,栅极就从下面引出来。
从58到6D6到6K7到6SK7是一脉相承的东西,6SK7内部有完善的屏蔽措施,来保证高频率放大的稳定性。
首先从金属外壳的6SK7来看。
电子管内部上下两个云母片都有金属的屏蔽,屏极是敞开的片状,可以减低跨路电容。
这也是6SK7比6K7进步的一个地方,后来的6BA6、6BD6、6K4也都采用这种屏极构造。
同时因为金属电子管本身外壳和地相连,故此不再设立屏蔽罩。
这种电子管的材料上没有任何特殊之处,第一栅极是应该镀金的,但是第一栅极支柱不需要安装散热片。
玻璃外壳的6SK7G/GT和金属管的结构非常相似,只是外部多了一个屏蔽罩。
这个屏蔽罩可以起到隔离屏蔽作用,同时从屏蔽罩上一直延伸到芯柱上面有两片屏蔽,用于隔离芯柱(有个别产品没有)。
由于这个原因,所以6SK7G/GT电子管的消气剂都是在管子的顶部。
同时又有云母片在管顶将消气剂隔离开来,防止跨路电容的增加。
6SK7G/GT电子管屏蔽罩不同厂家有不同的设计,有些使用的是网状,有些是金属片。