
phpMyAdmin教程
phpMyAdmin教程#1 phpMyAdmin教程先下载一份最新版的phpMyAdmin MYSQL管理器。
解压后得到一个phpMyAdmin的目录(你可以改名)找到目录里的config.inc.php文件,打开找到$cfg['PmaAbsoluteUri']修改你将上传到空间的phpMyAdmin的网址如:$cfg['PmaAbsoluteUri'] = '/phpmyadmin/';还有下面的$cfg['Servers'][$i]['host'] = 'localhost';(通常用默认,也有例外)$cfg['Servers'][$i]['auth_type'] = 'config'; // Authentication method (config, http or cookie based)? 在自己的机子里调试用config,如果在网上用cookie。
$cfg['Servers'][$i]['user'] = 'root'; // MySQL user(用户名,自己机里用root,在网上设你的ftp 用户名)$cfg['Servers'][$i]['password'] = ''; // MySQL password (only needed自己机里不用设$cfg['Servers'][$i]['only_db'] = ''; // If set to a db-name, only(你只有一个数据就设置一下)还有设$cfg['DefaultLang'] = 'zh';设置完毕可以上传到网上了。
其实在使用的实际过程中,以上的方法并不是适合在网络上使用的。
其实实际设置下面几项就可以了:$cfg['blowfish_secret'] = '1'; (设置为相应数字,好像表示为一个开关。
使用某种登陆机制的问题。
好像和php系统的设置也有一些关系)$cfg['Servers'][$i]['host'] = ''; (设置你的mysql数据库主机地址,这是必须的。
)$cfg['Servers'][$i]['auth_type'] = 'cookie'; (设置用户登录的模式,在网络上的话使用http或者cache)$cfg['ServerDefault'] = 1; (如果你要管理登陆多个mysql数据库的话,你需要把它设置为0。
并且设置不止一个$cfg['Servers'][$i]['host'])修正备忘一下留用#2一、概述:phpMyAdmin是一套以php3写成,针对MySQL资料库系统的Web管理界面。
它可以很方便地以图形化界面,来对MySQL资料库内之资料做增删的做动,更可以做资料库本身的增删管理;另外附带的好处是,您也可以籍著这个界面来学习SQL正确的语法。
二、资源:作业环境:RedHat 6.0 + CLE 0.8p1原始出处:/phpMyAdmin/教程地址:/bbs/read.php?tid=9200版本:phpMyAdmin 2.0.5 版档案来源:ftp://.tw/pub/apache_php3_mysql/或.tw/downloa...che+php+mysql/中文套件来源:.tw/down_b/hits.php3或ftp://.tw/pub/apache_php3_mysql/档案列表:-rw-r--r-- 1 root ftp 58357 Dec 10 11:24 phpMyAdmin_2.0.5.tar.gz-rw-r--r-- 1 root ftp 2200 Dec 14 10:14 phpMyAdmin-big5-lang.tar.gz网路资源:瑞琦资讯工作室phpMyAdmin 交流讨论区三、安装取得原始档。
将原始档解压缩到Web伺服器的文件根目录tar zvxf phpMyAdmin_2.0.5.tar.gz -C /home/httpd/html变换到phpMyAdmin的目录底下cd /home/httpd/html/phpMyAdmin修改设定档config.inc.php3:将原来的设定$cfgServers[1]['host'] = ''; // MySQL hostname$cfgServers[1]['port'] = ''; // MySQL port - leave blank for default port$cfgServers[1]['adv_auth'] = false; // Use advanced authentication?$cfgServers[1]['stduser'] = ''; // MySQL standard user (only needed with advanced auth) $cfgServers[1]['stdpass'] = ''; // MySQL standard password (only needed with advanced auth) $cfgServers[1]['user'] = ''; // MySQL user (only needed withbasic auth)$cfgServers[1]['password'] = ''; // MySQL password (only needed with basic auth) $cfgServers[1]['only_db'] = ''; // If set to a db-name, only this db is accessible$cfgServers[1]['verbose'] = ''; // Verbose name for this host -leave blank to show the hostname::require("english.inc.php3");修改成$cfgServers[1]['host'] = 'MySQL Server的hostname'; // 填入您的MySQL Server的主机名称$cfgServers[1]['port'] = ''; // 填入连结MySQL的port,不填则以预设的port进行连结$cfgServers[1]['adv_auth'] = true; // 改成true则进入phpMyAdmin必须先身份认证$cfgServers[1]['stduser'] = 'root'; // MySQL使用者的帐号$cfgServers[1]['stdpass'] = '密码'; // MySQL使用者的密码$cfgServers[1]['user'] = 'root'; // MySQL管理帐号$cfgServers[1]['password'] = '密码'; // MySQL管理密码$cfgServers[1]['only_db'] = ''; // 指定管理的资库名称,不填则可以管理整个Server $cfgServers[1]['verbose'] = ''; // 指定MySQL的名称,不填则使用系统本身的hostname::require("chinese_big5.inc.php3"); //将语言介面改成中文,因中文翻译的不好,在此不建议使用说明:(1)因本管理介面,可以以一个介面,管理多个MySQL Server,所以可以在config.inc.php3中找到$cfgServers[1]...$cfgServers[1]...$cfgServers[1]...:$cfgServers[2]...$cfgServers[2]...$cfgServers[2]...的 述,其中[1]代表第一个MySQL Server,[2]代表第二个MySQL Server,您要管理的MySQL Server超过三台以上,您可以依照同样的 述,增加[4].....下去!(2)若您的MySQL Server与http Server是同一台,则$cfgServers[1]['host'] =可直接填入localhost。
打开流览器,输入http://你的网址/phpMyAdmin 之后您会看到一个密码验证的小视窗,输入您的MySQL管理帐号及密码,即可成功地看到phpMyAdmin的管理画面。
开始享受吧!!四、多台MySQL站台管理适用范围为您有多个MySQL Server,且需要用同一个phpMyAdmin来管理。
或是您的phpMyAdmin与MySQL在不同的主机。
确认你的phpMyAdmin站台的位址完整名称(host+domain)在MySQL Server上,加入要phpMyAdmin控管之帐号。
进入以管理者的帐号进入mysql的资料库mysql mysql -uroot -proot的密码针对phpMyAdmin,增加一个帐号,并提供完全的权限给phpMySQL做控管。
mysql> GRANT ALL PRIVILEGES ON *.* TO 帐号@phpMySQL的位址IDENTIFIED BY '密码';或mysql> insert into user values ('phpMyAdmin的位址','帐号',password('密码'), 'y','y','y','y','y','y','y','y','y','y','y','y','y','y');修改phpMyAdmin中的config.ini.php3设定档$cfgServers[2]['host'] = 'MySQL Server的hostname'; // 填入您的MySQL Server的主机名称$cfgServers[2]['port'] = ''; // 填入连结MySQL的port,不填则以预设的port进行连结$cfgServers[2]['adv_auth'] = false; // 改成true则进入phpMyAdmin必须先身份认证$cfgServers[2]['stduser'] = '刚刚新设的帐号'; // MySQL使用者的帐号$cfgServers[2]['stdpass'] = '密码'; // MySQL使用者的密码$cfgServers[2]['user'] = '刚刚新设的帐号'; // MySQL管理帐号$cfgServers[2]['password'] = '密码'; // MySQL管理密码$cfgServers[2]['only_db'] = ''; // 指定管理的资库名称,不填则可以管理整个Server $cfgServers[2]['verbose'] = ''; // 指定MySQL的名称,不填则使用系统本身的hostname打开流览器,输入http://你的网址/phpMyAdmin 之后您会看到一个密码验证的小视窗,输入您的MySQL管理帐号及密码,即可成功地看到phpMyAdmin的管理画面。
phpmyadmin建立数据库、用户基本教程
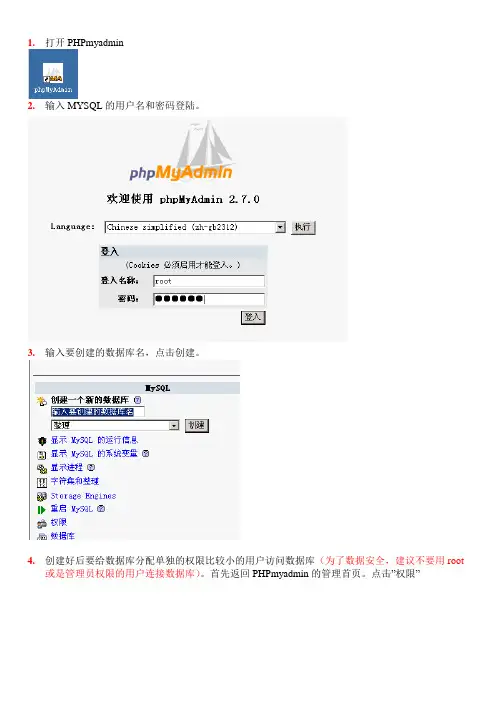
1.打开PHPmyadmin
2.输入MYSQL的用户名和密码登陆。
3.输入要创建的数据库名,点击创建。
4.创建好后要给数据库分配单独的权限比较小的用户访问数据库(为了数据安全,建议不要用root
或是管理员权限的用户连接数据库)。
首先返回PHPmyadmin的管理首页。
点击”权限”
5.点击”添加新用户”,创建访问数据库的用户。
6.输入要创建的用户名和密码,“全局权限”不用理它,什么都不选,然后拉到底下点击“执行”按
钮,此时建立的用户是没有一点权限的。
7.点击主目录按钮返回管理界面首页
8.在管理首页页面上再点击“权限”进入用户管理界面,然后选择刚才创建的用户,点击后面的“编
辑权限”按钮,进一步为这个用户分配权限。
9.在数据库指定权限下面的“在下列数据库添加权限”中找到并选中数据库为其指定权限,如选中
刚建立好的数据库“testname”,
10.然后会展开并进入这个用户所能访问的数据库的权限配置页面,里面有很多的设置。
11.在按数据库指定权限这里选择上你要给这个用户访问这个数据库的权限,如果你不懂的话就全选,
然后点“执行”。
这样就给相应的数据库分配好了用户访问权限。
phpMyadmin配置

在PHP网站开发中,最基本的PHP环境搭建涉及PHP、Apache/IIS、Mysql,对于数据库的管理,除了Mysql数据库自身提供了命令行工具方便开发人员管理数据库外,基于PHP 开发的phpmyadmin也是一个非常好用的Mysql数据库管理程序,在xampp等PHP环境配置安装程序中,phpmyadmin也是一个必备的PHP程序。
今天和大家分享如何安装、配置phpmyadmin。
phpmyadmin安装配置准备工作首先当然是下载phpmyadmin的安装包,提供两个phpmyadmin的下载地址:phpmyadmin 下载地址1,phpmyadmin下载地址2,地址1罗列了phpmyadmin2.x和phpmyadmin3.x,地址2只是最新的phpmyadmin版本。
我下载的是phpmyadmin3.3,在进行phpmyadmin3安装时需要的PHP环境至少为PHP5.2,Mysql5以上的版本。
如何进行PHP环境配置?phpmyadmin安装教程:如何安装phpmyadmin首先解压phpMyAdmin-3.3.3-rc1-all-languages.zip,然后重命名为phpmyadmin3,将其复制到php程序运行目录,我复制到D:\PHPWEB目录下。
在完成phpmyadmin3的这步安装步骤后,请确保你的IIS或者Apache服务器已开启,以及Mysql服务是否已开启,你可以在CMD模式下输入net start mysql开启Mysql数据库服务,同时请确保PHP已启用了Mysql的扩展库。
只要有一项没有开启,即可能导致phpmyadmin3打不开,访问出错。
至此phpmyadmin3的安装工作就算完成了,接下去就要进行phpmyadmin的配置工作。
phpmyadmin配置教程首先在游览器中输入phpmyadmin的远程访问地址:http://localhost/phpmyadmin3,出现如下界面phpmyadmin 远程访问配置用户名密码此界面说明:1、必须以cookies 方式登录,2、必须以合法用户名和密码进行远程登录,如果没有配置phpmyadmin 的用户名和密码,访问会被拒绝。
PhpMyAdmin基本操作(V1.0)
PhpMyAdmin基本操作(V1.0)一、使用PhpMyAdmin创建数据库及为数据库添加管理帐户:1、新建数据库:①建立一个名为“data_test”的数据库,在文本框中输入“data_test”然后点击“创建”即可:②创建成功则显示如下:2、为新建立数据库添加管理帐户:新创建好的数据库为空数据库,没有任何数据表,也没有任何独立用户拥有对它的操作权限(root用户除外),下面我们来为“data_test”数据库增加用户和相应的权限:①在Phpmyadmin登陆后的界面左边的数据库列表中选中“data_test”进入该数据库,点击上方的“权限”按钮,会出现权限列表页面,此页面中会列出所有能够对该数据库进行操作的用户及相应的权限,如下图:②点击左下角“添加新用户”(如上图红圈区域),进入用户创建界面。
在这里,我们可以给数据库用户设定用户名、密码和权限:注意上图中红圈部分,在创建用户时,默认会选中“授予数据库’data_test’的所有权限”;主机设置为本地(localhost),设置好后,点击右下角的“执行”按钮。
③创建成功则显示如下:3、新建帐户并为其分配数据库:①新建帐户:点击MySql主界面上方“权限”链接,进入“查看用户界面”,在此界面点击“添加新用户”新建数据库帐户,方法与上相同,不再复述:②分配数据库及提升相应权限:建立成功后,单击新建帐户右边操作按钮,进入权限编辑页面,在下方“按数据库指定权限”框中,选择刚才建立的“data_test”③进入到权限编辑页面,添加用户的数据操作权限与结构操作权限:二、使用PhpMyAdmin导入和导出数据库:刚刚创建的“data_test”为新数据库,里面没有任何数据信息。
下面我们来试着为它导入一些数据。
一般可以使用.sql文件进行导入。
1、数据导入:①选中“data_test”数据库,点击“导入”,进入导入数据页面。
在此页面中可以选择要导入的文件,并设置文件的字符集。
phpmyadmin下载、安装、配置教程

phpmyadmin下载、安装、配置教程本⽂为⼤家分享了phpmyadmin下载安装配置教程,供⼤家参考,具体内容如下点击右上⾓下载按钮下载得到phpMyAdmin-4.7.0-all-languages.zip解压到C盘根⽬录下,重命名为phpMyAdmin,进⼊该⽂件夹,找到config.sample.inc.php,改名为config.inc.php,⽤⽂本编辑器打开改⽂件。
找到下列代码$cfg['blowfish_secret'] = ''改成$cfg['blowfish_secret'] = 'c4ca4238a0b923820dcc509a6f75849b';//⼀个长字符串密码就⾏保存退出进⼊apache的conf⽂件夹下,新建⼀个phpmyadmin.conf⽂件,⽂本编辑器打开,加⼊下列代码,Alias /phpmyadmin "c:/phpMyAdmin/"<Directory "c:/phpMyAdmin/">Options Indexes FollowSymLinks MultiViewsAllowOverride allRequire all grantedphp_admin_value upload_max_filesize 128Mphp_admin_value post_max_size 128Mphp_admin_value max_execution_time 360php_admin_value max_input_time 360</Directory>保存退出在该⽂件夹内找到配置⽂件httdp.conf,⽤⽂本编辑器打开,在末尾增加⼀⾏Include conf/phpmyadmin.conf保存退出,重启apache即可。
以上就是本⽂的全部内容,希望对⼤家的学习有所帮助,也希望⼤家多多⽀持。
phpmyadmin教程(免费教程)说明书
Table of ContentsAbout1 Chapter 1: Getting started with phpmyadmin2 Remarks2 Versions2 Examples3 Installation or Setup3 How to create a database and grant privileges for database user.10 Credits14AboutYou can share this PDF with anyone you feel could benefit from it, downloaded the latest version from: phpmyadminIt is an unofficial and free phpmyadmin ebook created for educational purposes. All the content is extracted from Stack Overflow Documentation, which is written by many hardworking individuals at Stack Overflow. It is neither affiliated with Stack Overflow nor official phpmyadmin.The content is released under Creative Commons BY-SA, and the list of contributors to each chapter are provided in the credits section at the end of this book. Images may be copyright of their respective owners unless otherwise specified. All trademarks and registered trademarks are the property of their respective company owners.Use the content presented in this book at your own risk; it is not guaranteed to be correct nor accurate, please send your feedback and corrections to ********************Chapter 1: Getting started with phpmyadmin RemarksphpMyAdmin is a free software used to manage MySQL databases via web interface. It is much easier than using MySQL console where the user must use commands to manage databases. By using phpMyAdmin, with a few mouse clicks people can create database and grant privileges for MySQL user for that database.Official documentationWikiVersionsExamplesInstallation or SetupDescription:phpMyAdmin is a free software tool written in PHP, intended to handle the administration of MySQL over the Web. phpMyAdmin supports a wide range of operations on MySQL and MariaDB. Frequently used operations (managing databases, tables, columns, relations, indexes, users, permissions, etc) can be performed via the user interface, while you still have the ability to directly execute any SQL statement.Note 1: Many operating systems already include a phpMyAdmin package and will automatically keep it updated, however these versions are sometimes slightly outdated and therefore may be missing the latest features.Note 2: These method assumes that you have already setup a local web server with MySQL. Windows:Third Party Products:•The easiest way to get phpMyAdmin on Windows is using third party products which include phpMyAdmin together with a database and web server such as XAMPP(cross-platform).•List of Cross-Platform third party products:XAMPP, AMPPS, Zend Server Community EditionList of Windows Specific third party products:WampServer, EasyPHP Devserver, •Uniform Server, Bitnami WAMP Stack, WPN-XM Server Stack, WTServer, UwAmp, Vertrigo•Manual Installation :You can select any kit from given phpmyadmin kits.Example:For all languages choose some thing like phpMyAdmin-4.6.4-all-languages.7z or forlanguage specific choose something like phpMyAdmin-4.6.4-english.7zAfter Choosing a phpmyadmin kit extract the folder. Rename the extracted folder tophpMyAdmin it's easy to reference. Copy the extracted folder to your local web server'sdocument root. Depending on how you have configured your web server, this could be the www, htdocs, html, or public_html folder. If you are using IIS, open IIS Manager. In the left navigation tree, right-click on "Default Web Site" and select "Explore". Copy and paste the extracted phpMyAdmin folder into the location that opens.Linux distributionsNote: phpMyAdmin is included in most Linux distributions. It is recommended to use distribution packages when possible. They usually provide integration to your distribution and you will automatically get security updates from your distribution.•Third Party Products:XAMPP, TurnKey Linux LAMP stack, Bitnami LAMPStack,•Manual Installation::You can select any kit from given phpmyadmin kits.Example:For all languages choose some thing like phpMyAdmin-4.6.4-all-languages.7z or for language specific choose something like phpMyAdmin-4.6.4-english.7zAfter Choosing a phpmyadmin kit extract the folder. Rename the extracted folder to phpMyAdmin it's easy to reference. Copy the extracted folder to your local web server's document root. Depending on how you have configured your web server, this could be the htdocs or public_html folder.Debian:•Debian’s package repositories include a phpMyAdmin package, but be aware that theconfiguration file is maintained in /etc/phpmyadmin and may differ in some ways from the official phpMyAdmin documentation. Specifically it does:1.Configuration of web server (works for Apache and lighttpd).2.Creating of phpMyAdmin configuration storage using dbconfig-common.Securing setup script, see Setup script on Debian, Ubuntu and derivatives.3.•Terminal: The easiest way to install phpmyadmin in Debian is through apt-getsudo apt-get install phpmyadminDuring the installation, phpMyAdmin will walk you through a basic configuration. After the process starts follow these steps:1.Select Apache2 for the serverChoose YES when asked about whether to Configure the database for phpmyadmin with2.dbconfig-common3.Enter your MySQL password when promptedEnter the password that you want to use to log into phpmyadmin4.After the installation has completed, add phpmyadmin to the apache configuration.sudo nano /etc/apache2/apache2.confAdd the phpmyadmin config to the file.Include /etc/phpmyadmin/apache.confRestart apache:sudo service apache2 restartYou can then access phpmyadmin by going to your-ip-address/phpmyadmin.Security:Unfortunately, older versions of phpMyAdmin have had serious security vulnerabilities, including allowing remote users to eventually exploit root on the underlying virtual private server. One can prevent a majority of these attacks through a simple process: locking down the entire directory with Apache's native user/password restrictions which will prevent these remote users from even attempting to exploit older versions of phpMyAdmin.Set Up the .htaccess File:To set this up, start off by allowing the .htaccess file to work within the phpmyadmin directory. You can accomplish this in the phpmyadmin configuration file:sudo nano /etc/phpmyadmin/apache.confUnder the directory section, add the line “AllowOverride All” under “Directory Index”, making the section look like this:<Directory /usr/share/phpmyadmin>Options FollowSymLinksDirectoryIndex index.phpAllowOverride All[...]Configure the .htaccess fileWith the .htaccess file allowed, we can proceed to set up a native user whose login would be required to even access the phpmyadmin login page.Start by creating the .htaccess page in the phpmyadmin directory:sudo nano /usr/share/phpmyadmin/.htaccessFollow up by setting up the user authorization within .htaccess file. Copy and paste the following text inAuthType BasicAuthName "Restricted Files"AuthUserFile /path/to/passwords/.htpasswdRequire valid-userAuthType: This refers to the type of authentication that will be used to the check the passwords. The passwords are checked via HTTP and the keyword Basic should not be changed.AuthName: This is text that will be displayed at the password prompt. You can put anything here. AuthUserFile: This line designates the server path to the password file (which we will create in the next step.) Require valid-user: This line tells the .htaccess file that only users defined in the password file can access the phpMyAdmin login screen.Create the htpasswd file:Now we will go ahead and create the valid user information.Start by creating a htpasswd file. Use the htpasswd command, and place the file in a directory of your choice as long as it is not accessible from a browser. Although you can name the password file whatever you prefer, the convention is to name it .htpasswd.sudo htpasswd -c /path/to/passwords/.htpasswd usernameA prompt will ask you to provide and confirm your password.Once the username and passwords pair are saved you can see that the password is encrypted inthe file.Finish up by restarting apache:sudo service apache2 restartAccessing phpMyAdmin:phpMyAdmin will now be much more secure since only authorized users will be able to reach the login page.Fill it in with the username and password that you generated. After you login you can access phpmyadmin with the MySQL username and password.•Ubuntu:To get started, we can simply install phpMyAdmin from the default Ubuntu repositories.We can do this by updating our local package index and then using the apt packaging system to pull down the files and install them on our system:sudo apt-get updatesudo apt-get install phpmyadminWarning:When the first prompt appears, apache2 is highlighted, but not selected. If you do nothit "SPACE" to select Apache, the installer will not move the necessary files duringinstallation. Hit "SPACE", "TAB", and then "ENTER" to select Apache.1.For the server selection, choose apache2.2.Select yes when asked whether to use dbconfig-common to set up the database3.You will be prompted for your database administrator's passwordYou will then be asked to choose and confirm a password for the phpMyAdmin application4.itselfThe installation process actually adds the phpMyAdmin Apache configuration file into the/etc/apache2/conf-enabled/ directory, where it is automatically read.The only thing we need to do is explicitly enable the php5-mcrypt extension, which we can do by typing:sudo php5enmod mcryptAfterwards, you'll need to restart Apache for your changes to be recognized:sudo service apache2 restartYou can then access phpmyadmin by going to your-ip-address/phpmyadmin.•Fedora:Fedora ships the phpMyAdmin package, but be aware that the configuration file is maintained in /etc/phpMyAdmin/ and may differ in some ways from the official phpMyAdmin documentation. Terminal:First, you’ll follow a simple best practice: ensuring the list of available packages is up to date before installing anything new.dnf -y updateThen it’s a matter of just running one command for installation via apt-get:dnf -y install phpmyadminSecurity:To secure phpMyAdmin we should lock down access to a specific IP address.When the phpMyAdmin package is installed, an Apache Virtual Host file is added to configure web access. Let’s edit that file:vim /etc/httpd/conf.d/phpMyAdmin.confBy default, the configuration for phpMyAdmin only allows access from the server on which it is installed.Change each IP address to the one you found in what is my ip address? or another IP address that will be connecting to phpMyAdmin remotely:Require ip 127.0.0.1Allow from 127.0.0.1Require ip 127.0.0.1Allow from 127.0.0.1Restart Apache:systemctl restart httpdVerify that phpMyAdmin is working by visiting http://the_IP_of_your_server/phpmyadmin For example: http://1.2.3.4/phpmyadminComposer:•You can install phpMyAdmin using Composer, however it’s currently not available in the defaultPackagist repository due to its technical limitations.The installation is possible by adding our own repositoryhttps:///packages.json:composer create-project phpmyadmin/phpmyadmin --repository-url=https:///packages.json --no-dev•Installing from Git:You can clone current phpMyAdmin source from https:///phpmyadmin/phpmyadmin.git: git clone https:///phpmyadmin/phpmyadmin.gitAdditionally you need to install dependencies using Composer:composer updateIf you do not intend to develop, you can skip installation of developer tools by invoking:composer update --no-devMac:•Third Party Products : MAMP, AMPPS, Bitnami MAMPStack, XAMPP•Manually:Download phpMyAdmin , For all languages choose something like phpMyAdmin-4.6.4-all-languages.tar.bz2 or for language specific choose something like phpMyAdmin-4.6.4-english.tar.gzAfter Choosing a phpmyadmin kit extract the folder. Rename the extracted folder to phpMyAdmin it's easy to reference. Copy the extracted folder to your local web server's document root. Depending on how you have configured your web server, this could be the htdocs or public_html folder.Make the config foldermkdir ~/Sites/phpmyadmin/configChange the permissionschmod o+w ~/Sites/phpmyadmin/configRun the set up in the browserhttp://localhost/~username/phpmyadmin/setup/ or http://localhost/phpmyadmin/setup/You need to create a new localhost mysql server connection, click new server.Switch to the Authentication tab and set the local mysql root user and the password. Add in the username “root” (maybe already populated, add in the password that you set up earlier for the MySQL root user set up, click on save and you are returned to the previous screen. (This is not the OSX Admin or root password – it is the MySQL root user).Make sure you click on save, then a config.inc.php is now in the /config directory of phpmyadmin directory, move this file to the root level of /phpmyadmin and then remove the now empty /config directory.Now going to http://localhost/~username/phpmyadmin/ will now allow you to interact with your MySQL databases.Note: Change localhost with your-ip-addressHow to create a database and grant privileges for database user.1.Navigate to phpMyAdmin by URL http://your_ip/phpmyadmin or http://localhost/phpmyadmin2.Login using username root and root password.3.Click on Databases tab.Enter database name, select collation (you may leave it to default) and click create.4.Click on Privileges tab and select "Add user account".5.6.You can select localhost if the connection is made only form local. Select "any host" if you are planing to connect from different hosts.7.Enter new username and password.Select the privileges you need for that user.8.9.Click on Database tab and select the database for which you need to give access(in our case the newly created database in step 4). Click Go.Read Getting started with phpmyadmin online:https:///phpmyadmin/topic/5577/getting-started-with-phpmyadminCredits。
phpMyAdmin配置图文教程
phpMyAdmin配置图文教程一、下载先到互联网上下载 phpMyAdmin,也可以到 phpMyAdmin 官方网站下载,地址为:/soft/2799.html再解压到 web 可以访问的目录下,如果是虚拟空间,可以解压后通过 ftp 工具上传到 web 目录下,同时您可以修改解压后该文件的名称。
二、配置打开 libraries 目录下的 config.default.php 文件,依次找到下面各项,按照说明配置即可。
1、访问网址2、 MySQL 主机信息填写 localhost 或 MySQL 所在服务器的 ip 地址,如果 MySQL 和该 phpMyAdmin 在同一服务器,则按默认 localhostMySQL 端口,默认为 3306,保留为空即可,如果您安装 MySQL 时使用了其它的端口,需要在这里填写。
3、 MySQL 用户名和密码4、认证方法在此有四种模式可供选择,cookie,http,HTTP,config; config 方式即输入 phpMyAdmin 的访问网址即可直接进入,无需输入用户名和密码,是不安全的,不推荐使用。
当该项设置为 cookie,http 或 HTTP 时,登录 phpMyAdmin 需要数据用户名和密码进行验证,具体如下:PHP 安装模式为 Apache,可以使用 http 和 cookie;PHP 安装模式为 CGI,可以使用 cookie。
5、短语密码(blowfish_secret)的设置6、修改界面语言修改此属性为zh[简体中文]7、测试PhpMyAdminphpMyAdmin配置安装全攻略核心提示:phpMyAdmin配置安装全攻略phpMyAdmin安装配置教程傻瓜版,主要为phpMyAdmin 2.11.X 配置安装,其它版本安装方法一样。
phpMyAdmin配置安装全攻略phpMyAdmin安装配置教程傻瓜版,主要为phpMyAdmin 2.11.X 配置安装,其它版本安装方法一样。
使用phpmyadmin管理mysql数据库
phpmyadmin管理mysql第一讲:如何登陆phpmyadmin不管是本机测试,服务器维护,还是虚拟主机用户管理mysql,我们都经常要用到phpmyadmin这个在线软件来管理mysql。
登陆地址:本机或者服务器用户:一般默认的地址是: ip:端口虚拟主机用户请咨询您的服务器提供商服务器用户为了使用方便,可以给自己的phpmyadmin绑定一个域名。
打开首页后,我们看到如下界面,这时我们必须使用拥有创建数据库权限的账号登陆才能进行下面的操作,一般顶级的管理员账号默认为root账号。
使用账户和密码输入后,点击“执行”这样就可以登录了。
这里说明下,在phpmyadmin管理中,没有“确认”这个按钮,一般都是使用“执行”按钮,其实意思是一样的。
以phpMyAdmin - 2.11.9.5为例,会看到以下页面第二讲:熟悉phpmyadmin页面左上角5个按钮的前2个是非常常用的按钮,一定要记得。
第一个是返回到主页的意思。
第二个是退出登录的意思。
第三个高级用户常用,是直接执行sql语句。
第四个第五个分别是phpmyadmin和mysql的帮助文档。
第三讲:使用phpmyadmin创建数据库用户名phpmyadmin管理mysql第三讲:使用phpmyadmin创建新用户在前面的课程中,我们熟悉了页面。
下面我们进入第一个实际应用,创建一个新用户,这个功能非常实用,为什么这么说呢?在服务器或者虚拟主机管理上,每个网站都会创建一个唯一专属使用的数据库用户名,这个是为了安全和管理的需要。
在我们登陆到phpmyadmin首页后,不在首页的,请点首页恢复到首页页面哦。
点击右边下部分的“权限”点击后会出现当前的mysql已经存在的会员账号列表。
点击添加新用户进入用户创建过程第四讲:使用phpmyadmin创建数据库名phpmyadmin管理mysql第四讲:使用phpmyadmin创建数据库名在页面的首页右边栏目中部或者点击数据库按钮链接进去后,都可以找到这个部分内容。
phpMyAdmin 的详细使用教程,phpMyAdmin创建数据库,创建用户图解教程
phpMyAdmin 的详细使用教程,phpMyAdmin创建数据库,创建用户图解教程一、设置数据库用户权限安装好以后,打开 phpMyAdmin 的首页,点击“权限”,如下图所示:点击“添加新用户”,如下图所示:现在按照要求填写,勾选权限,最后点击右下角的“执行”,如下图所示:下面对这些权限进行详细的描述:1、数据部分1.SELECT:是指允许读取数据2.INSERT:是指允许插入和替换数据3.UPDATE:是指允许更改数据4.DELETE:是指允许删除数据5.FILE:是指允许从数据中导入数据,以及允许将数据导出至文件2、结构部分1.CTEATE:允许创建新的数据库和表2.ALTER:允许修改现有表的结构3.INDEX:允许创建和删除索引4.DROP:允许删除数据库和表5.CREATE TEMPORARY TABLES:允许创建暂时表6.CREATE VIEW:允许创建新的视图7.SHOW VIEW:允许查询试图8.CREATE ROUTINE:允许创建新的存储过程9.ALTER ROUTINE:允许修改存储过程10.EXECUTE:允许执行查询在“权限”页面里点击最右边的“编辑权限的图标”,然后可以修改此用户的各种权限,如下图所示:修改完用户权限以后,需要回到 phpMyAdmin 的首页,重新加载一下授权,如下图所示:二、检查和修改数据库需要检查和修改数据库时,打开 phpMyAdmin 的首页,左边的侧边栏里显示着服务器上的各个数据库,点击就可以进入,也可以点击“数据库”图标,如下图所示:进入数据库以后,现在左边的侧边栏里显示着数据库的各个表,点击就可以进入,也可以点击右边的图标,如下图所示:进入表以后,现在可以对表进行插入、修改、删除等各种操作,如下图所示:三、修复数据库数据表损坏时,可以通过 PHPMyAdmin 进行修复。
1、登录 phpMyAdmin,进入需要修复的数据库页面,选择一个数据表前的方框,如下图所示:2、页面下方“选中项”下拉选择“修复表”,如下图所示:四、恢复和备份数据库1、导出备份数据库登录 phpMyAdmin,点击右边的“导出”,如下图所示:选择需要导出备份的数据库(按住 ctrl 可以多选),选择完毕,点击右下角的“执行”,如下图所示:2、导出备份数据表登录 phpMyAdmin,进入一个数据库页面,点击右边的“导出”,如下图所示:选择需要导出备份的数据表(按住 ctrl 可以多选),选择完毕,点击右下角的“执行”,如下图所示:3、导入SQL文件登录 phpMyAdmin,点击右边的“Import”导入,如下图所示:浏览文件位置,选择一个数据库文件,选择完毕,点击右下角的“执行”,如下图所示:五、执行 SQL 语句在 PHPMyAdmin 中可以输入 SQL 语句,进行各种数据库操作,输入 SQL 语句完毕,点击右下角的“执行”,如下图所示:。
附录C phpMyAdmin基本操作_MySQL数据库教程_[共10页]
279附录CphpMyAdmin 基本操作phpMyAdmin 是一个用PHP 编写的软件工具,可以通过Web 方式控制和操作MySQL 数据库。
通过phpMyAdmin 可以完全对数据库进行操作,例如建立、复制和删除数据等,对MySQL 数据库的管理变得相当简单。
C.1 安装phpMyAdmin 环境phpMyAdmin 是基于PHP 的Web 客户端软件,在使用之前必须首先搭好PHP 的运行环境,包括安装Apache 服务器和PHP 插件。
(1)安装Apache 服务器Apache 是开源软件,用户可以在其官方网站上免费下载。
适用于Windows 的Apache 分为安装版和免安装版,安装版又分为openssl 和no ssl 两个版本,为初学者方便,本书选用的是openssl 安装版。
下载得到安装包,双击启动安装向导,在服务器信息页填入如下信息:Network Domain: localhostServer Name: localhostAdminstrator’s Email Address: easybooks@安装过程的其余步骤都取它的默认设置,按向导提示操作即可。
Apache 安装成功后在屏幕右下角会出现一个图标,图标内的三角形为绿色时表示服务正在运行,红色表示服务停止。
双击该图标会弹出Apache 管理界面。
单击【Start 】、【Stop 】和【Restart 】按钮分别表示开始、停止和重启Apache 服务。
Apache 安装完后可以测试一下看能否运行。
在IE 地址栏中输入http://localhost 或http://127.0.0.1后按“Enter ”键。
如果测试成功会出现“It works !”页面。
(2)安装PHP 插件Apache 安装完成后,只支持HTML 和JavaScript 等语言,要想其支持PHP ,还需要为其安装PHP 插件。
目前的PHP 也提供了软件安装版,本书将采用这个版本。
phpmyadmin写shell的方法
phpmyadmin写shell的方法以phpmyadmin写shell的方法PHPMyAdmin是一款流行的MySQL数据库管理工具,它提供了一个直观和易于使用的Web界面,可以通过这个界面轻松地管理MySQL数据库。
除此之外,PHPMyAdmin也提供了一些有用的功能,例如执行SQL查询和导出数据库等。
在PHPMyAdmin中,我们可以通过编写shell脚本来自动化一些数据库操作,例如备份数据库或导入数据等。
在本文中,我们将介绍如何使用PHPMyAdmin编写shell脚本。
步骤一:登录PHPMyAdmin我们需要登录PHPMyAdmin,进入我们要管理的数据库。
在登录后,我们可以看到左侧的导航栏,其中包含了许多可用的功能。
步骤二:选择SQL选项卡在左侧导航栏中,选择“SQL”选项卡。
这个选项卡可以让我们执行SQL查询和命令。
步骤三:编写shell脚本在SQL编辑器中,我们可以编写我们的shell脚本。
下面是一个简单的备份数据库的shell脚本示例:```#!/bin/bashDATE=`date +%Y%m%d%H%M%S`mysqldump -u root -pPASSWORD dbname > /path/to/backup/$DATE-dbname.sql```请注意,这个脚本需要替换其中的“PASSWORD”和“dbname”为实际的MySQL密码和数据库名。
此脚本使用了“mysqldump”命令来备份数据库,并将备份文件保存到指定的目录中。
备份文件的文件名包含了当前日期和时间,这样可以保证每次备份的文件名都是唯一的。
步骤四:执行shell脚本在编写完shell脚本后,我们可以点击“执行”按钮来运行它。
如果一切正常,我们应该可以看到备份过程的输出。
步骤五:检查备份文件备份完成后,我们可以通过FTP或其他文件管理工具来检查备份文件是否存在于指定的目录中。
如果一切正常,我们应该可以看到一个新的备份文件,包含了当前日期和时间。