Windows_Embedded_Standard_7安装及使用指南南
windowsembeddedstandard7安装教程

W i n d o w s E m b e d d e d S t a n d a r d7安装教程-CAL-FENGHAI-(2020YEAR-YICAI)_JINGBIANWES7安装过程1.Windows本体安装过程:2.先用Bootcamp助理下载驱动并且分区,然后是标准的Windows安装。
3.选Build an Image开始安装2选模板Thin Client区域选择,也可以以后改注意,在下面Modify Features打钩,手动添加部分组件包推荐组件包1:简体中文字体,避免乱码推荐组件包2:国际语言包支持,以后可以在控制面板添加语言包推荐组件包3:Windows Defender。
不装这个也可以,但是以后windows会提醒你打开windows defender。
然后你点它,它就弱智的把system32目录打开。
推荐组件包4:windows search。
搜索功能。
其他组件包可以自己选,选完之后点Resolve Dependencies,会自动选上依赖包好了,下面是大家关心的序列号(1)永久激活(必须在OOBE阶段):在第一次提示输入序列号的时候,使用 XGY72-BRBBT-FF8MH-2GG8H-W7KCW(2)Dreamspark一年试用版,可以rearm 5次(即可用6年),登陆界面会显示Evaluation Copy,其他几乎一样:在第一次提示输入序列号的时候,使用 TJHCC-9DKQT-RB9PJ-YCQPV-3KDJG其他安装,看个人需要驱动安装IE9安装Windows Update如果需要中文语言包,可以在64bit语言包页面,找Chinese(Simplified)/download/en/details.aspx?id=26216下载下来的lp.cab,放到C盘根目录,在管理员权限的cmd窗口,运行下面命令并且重启:Dism /Online /Add-Package /PackagePath:C:\lp.cab8、WES7 控制面板推荐设置:9、(1)System -- System -- 虚拟内存,参考后面10、-- Power Options -- 关闭休眠,建议用命令行:以管理员身份运行cmd,然后运行powercfg -h off11、(2)Network -- IE Options: 主页 / 默认浏览器提醒12、-- Advanced sharing settings -- Turn on network discovery13、(3)Hardware -- Mouse: 鼠标加速度14、-- NVIDIA: 垂直同步15、(4)User Account -- Change Picture 更改用户头像16、(5)Appearance -- Personalization -- Aero主题17、-- Taskbar & SM -- Notification Area / Highlight New Programs18、(6)Regional -- Keyboard: 只留下CH美国键盘,其他删掉19、-- Administrative -- Copy Settings 让登陆界面和其他用户使用相同的设置WES7 对于SSD的优化:0) 如果你的主板是Intel芯片组,理论上可以骗过系统开启AHCI。
Windows Embedded 7 Standard 裁剪过程图解教程
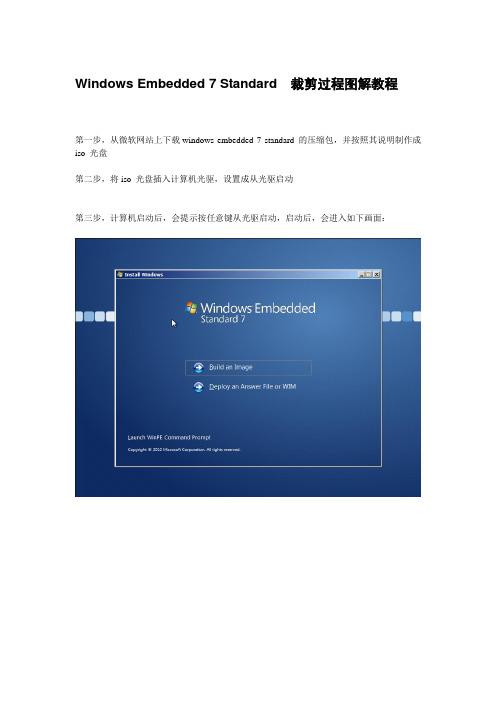
Windows Embedded 7 Standard 裁剪过程图解教程第一步,从微软网站上下载windows embedded 7 standard 的压缩包,并按照其说明制作成iso 光盘第二步,将iso 光盘插入计算机光驱,设置成从光驱启动第三步,计算机启动后,会提示按任意键从光驱启动,启动后,会进入如下画面:第四步,选择"Build an Image". 出现license 声明,勾选"I accept the license terms"后,点击"Next"第五步,选择安装方式,然后点击"Next"第六步,Choose a language and other preferences.第七步,根据实际情况,勾选"Modify Drivers" 或"Modify Features" 复选框。
第八步,Select the packages to include in your image第九步,去掉复选框"Resolve optional dependencies"和"Include applicable updates"前面的√第十步,勾选如下项目:.NET FrameworkApplication SupportWindows Boot EnvironmentBrowsersData Access and StorageShardow Copy Volume InterfaceDevice FrameworkDevice User ExperienceDriver FrameworksPrinting Utilities and ManagementStandard Windows USB StackDiagnosticsWindows Embedded Standard Startup ScreensTrueType FontsWestern FontsMicrosoft DTV-DVD Audio Decoder(MPEG-2,AAC)(license required) Microsoft DTV-DVD Video Decoder(MPEG-2,H.264)(license required) MPEG Layer-3 Audio Codes (MP3)(license required)MPEG-2 Audio and Video Encoder(license required)MPEG-4 Decoders(license required)Audio and Video Engines and Media FoundationDriectX and Windows Device ExperienceGraphics PlatformImage Mastering API V2Internet Information Services-IISSystem ManagementWindows Update Standalone InstallerParental ControlPower ManagementWindows Application CompatibilityWindows PowerShell 2.0BaseDomain ServicesIRDA and UNIMODEMNetwork DiagnosticsTelephony API ClientCredentials and Certificate ManagementApplication SecuritySecurity BaseCore File SystemFile Compression UtilityRemote Procedure CallWindows InstallerEmbedded Core Help ContentHelp and Support EngineWindows ShellAccessibilityNatural Language 6Search IndexingWindows Searchen-US勾选完毕后,点击"Next", 得到如下图所示的画面,继续点击"Next"第十一步,选择要安装到那个硬盘及分区(此时可以根据需要,创建多个分区)第十二步,安装程序已经获取到足够的信息,将进行安装过程,接下来按照系统提示进行操作即可。
使用Windows Embedded Standard 7代替windows 7
1. WES7 安装源文件可从微软官方网站下载180天(本文后面会讲到如何激活)评估版/en-us/download/details.aspx?id=118872. 中文语言包从微软网站下载语言包文件(注意只下载SP1\Chinese (Simplified) Language Pack即可)32位:/en-us/download/details.aspx?id=2621564位:/en-us/download/details.aspx?id=26216建议在安装时使用微软官方的密钥(GJVTR-C4WQ6-BKRH3-DRFFH-J83DM),可以有180天的试用期,通过重置设置,可以使用长达N年。
3. 一个4G以上容量的U盘,用来制作可启动的WES7引导盘,如果使用虚拟机,可不必使用。
我掌握在windows 7 PE下从硬盘安装WES7,竟然无法定制组件,没找到解决办法。
将下载的文件解压缩得到一个2.9G左中的ISO文件,将这个文件用ultraISO刻录到U盘中(将ISO刻录到U盘中用来生成U盘引导功能)安装WES7的主要流程是:1. 安装系统时选择组件2. 安装完成之后,再安装中文包3. 调整区域选项如果本文的图片丢失或有疑惑,可向笔者发送电子邮件索取或讨论 zhangxugg#下面我们逐个介绍这几个重要步骤一、系统安装1. 启动安装使用刻录的U盘或光盘启动计算机,引导到如下界面选择 Build an Image, 表示我们将在本机上安装一个windows系统。
在接下来的对话框中接受许可协议,点击下一步。
接下来让我们选择安装模板,WES7已经内容了一些安装模板,用于简化我们的工作,对一般的PC日常应用而言,建议选择Internet Explorer, windows media player,remote desktop。
为了达到较好的定制效果,我们不使用模板,而手工指定要安装的组件,这样的好处就是让我们达到最大程度上的个性化定制目的。
win7安装版安装教程
win7安装版安装教程Windows 7是微软推出的操作系统,相比于其前任Windows Vista,Windows 7更加稳定、高效,并且采用了全新的用户界面设计。
下面将为大家介绍Windows 7安装版的安装教程。
1. 准备工作:在进行安装之前,需要确保您的电脑满足Windows 7的最低系统要求。
包括:1GHz的处理器、1GB的内存(32位系统)或2GB的内存(64位系统)、16GB的硬盘空间和DirectX 9图形设备。
2. 下载Windows 7安装文件:您可以从Microsoft官方网站上下载Windows 7的安装文件,选择适合您的系统架构和语言版本。
将下载的ISO文件保存至本地磁盘。
3. 制作安装盘:您可以使用U盘或者DVD光盘来制作Windows 7的安装盘。
如果使用U盘,您需要确保其容量足够,并使用第三方软件制作启动盘。
如果使用DVD光盘,您需要一个可刻录DVD的光驱,并使用刻录软件将ISO文件刻录至光盘上。
4. 安装准备:在进行安装之前,建议您备份重要的文件和数据,以免发生不可预测的事故。
另外,您还需要关闭所有的安全软件和防火墙,以免对安装过程产生干扰。
5. 启动安装:将安装盘插入电脑,并重新启动电脑。
在开机过程中,按下相应的按键(通常是F2、F12或者ESC键)进入BIOS设置。
在BIOS中将启动选项设置为从U盘或者光盘启动。
6. 安装过程:一旦成功进入安装程序,您将看到一系列选项。
您可以选择语言、时区、键盘布局等参数。
接下来,您需要接受许可协议,并选择“自定义安装”选项。
7. 分区:在自定义安装过程中,您需要对硬盘进行分区。
您可以选择将Windows 7安装在现有的分区上,或者创建新的分区。
根据您的需求进行选择,并且确保至少有一个分区具有足够的空间供Windows 7使用。
8. 安装:在确认分区设置后,您只需点击“下一步”按钮,安装程序将自动开始安装Windows 7。
Windows Embedded Standard 7安装教程
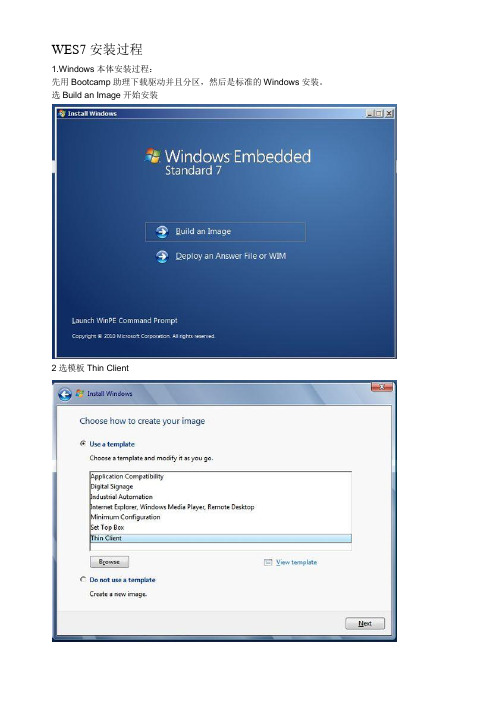
WES7安装过程1.Windows本体安装过程:先用Bootcamp助理下载驱动并且分区,然后是标准的Windows安装。
选Build an Image开始安装2选模板Thin Client区域选择,也可以以后改注意,在下面Modify Features打钩,手动添加部分组件包推荐组件包1:简体中文字体,避免乱码推荐组件包2:国际语言包支持,以后可以在控制面板添加语言包推荐组件包3:Windows Defender。
不装这个也可以,但是以后windows会提醒你打开windows defender。
然后你点它,它就弱智的把system32目录打开。
推荐组件包4:windows search。
搜索功能。
其他组件包可以自己选,选完之后点Resolve Dependencies,会自动选上依赖包好了,下面是大家关心的序列号(1)永久激活(必须在OOBE阶段):在第一次提示输入序列号的时候,使用XGY72-BRBBT-FF8MH-2GG8H-W7KCW(2)Dreamspark一年试用版,可以rearm 5次(即可用6年),登陆界面会显示Evaluation Copy,其他几乎一样:在第一次提示输入序列号的时候,使用TJHCC-9DKQT-RB9PJ-YCQPV-3KDJG其他安装,看个人需要驱动安装IE9安装Windows Update如果需要中文语言包,可以在64bit语言包页面,找Chinese(Simplified)/download/en/details.aspx?id=26216下载下来的lp.cab,放到C盘根目录,在管理员权限的cmd窗口,运行下面命令并且重启:Dism /Online /Add-Package /PackagePath:C:\lp.cab8、WES7 控制面板推荐设置:(1)System -- System -- 虚拟内存,参考后面-- Power Options -- 关闭休眠,建议用命令行:以管理员身份运行cmd,然后运行powercfg -h off (2)Network -- IE Options: 主页/ 默认浏览器提醒-- Advanced sharing settings -- Turn on network discovery(3)Hardware -- Mouse: 鼠标加速度-- NVIDIA: 垂直同步(4)User Account -- Change Picture 更改用户头像(5)Appearance -- Personalization -- Aero主题-- Taskbar & SM -- Notification Area / Highlight New Programs(6)Regional -- Keyboard: 只留下CH美国键盘,其他删掉-- Administrative -- Copy Settings 让登陆界面和其他用户使用相同的设置WES7 对于SSD的优化:0) 如果你的主板是Intel芯片组,理论上可以骗过系统开启AHCI。
windows 7 安装教程
windows 7 安装教程Windows 7是由微软公司开发的操作系统。
它是Windows操作系统系列的第七个版本,于2009年10月22日正式发布。
Windows 7相较于之前的Windows Vista来说更加稳定、更易于使用,因此广受欢迎。
下面将为您简要介绍Windows 7的安装教程。
首先,为了安装Windows 7,您需要一台电脑和一张Windows 7安装光盘或者一个安装U盘。
如果您已经拥有了这些东西,那么就可以进行以下操作。
1. 首先,插入Windows 7安装光盘或安装U盘并重启电脑。
在重启的过程中,您可能需要按下一个键来进入电脑的启动菜单。
不同的电脑品牌可能有不同的按键,通常是F2、F12或Delete键。
您可以参考您电脑的使用手册来确认正确的按键。
2. 进入启动菜单后,选择从光盘或U盘启动。
您可以使用键盘上的上下键来选择,并按下回车键确认。
3. 接下来,您将看到一个蓝色的Windows 7安装界面。
按照屏幕上的提示,选择您想要的语言、时区和键盘布局,然后点击“下一步”。
4. 在下一个界面上,您将看到两个选项:安装和修复电脑。
选择“安装”以继续安装Windows 7。
5. 下一步是接受许可协议。
阅读并选中“我接受许可条款”后,点击“下一步”。
6. 在接下来的界面上,您将看到两个选项:升级和自定义。
如果您想要将Windows 7安装在目前的操作系统上,选择“升级”。
如果您想要进行全新安装,选择“自定义”。
7. 在自定义安装选项中,您需要选择安装Windows 7的目标硬盘或分区。
如果您只有一个硬盘并希望将Windows 7安装在上面,选择默认选项即可。
如果您有多个硬盘或分区,可以选择其中一个来安装。
8. 点击“下一步”后,Windows 7开始安装。
整个过程可能需要一些时间,这取决于您的电脑性能和硬盘速度。
9. 在安装期间,您需要进行一些设置,如选择您的电脑名称、密码等。
按照屏幕上的提示进行设置即可。
Windows Embedded Standard 7 应用程序依赖分析说明书
Using Application Dependency Analysis to Enable Your Application on Windows Embedded Standard 7White PaperPublished April 2010Revised March 2012For the latest information, please see Table of ContentsUsing Application Dependency Analysis to Enable Your Application on Windows Embedded Standard 7 (1)Overview (3)Creating a Target Image (3)Reference Platform for Dependency Analysis (3)Understanding Application Dependencies (3)Types of Dependencies (4)Capturing the Dependencies (4)Using Package Mapper (5)Trimming the Answer File (6)Creating a Windows Embedded Standard 7 Image (6)Summary (7)Appendix A – Procmon (8)Introduction to Procmon (8)Specifying a Backing File (8)Process Tree Feature (8)Appendix B – Package Mapper (11)Introduction to Package Mapper (11)Prerequisites (11)Input Configuration File (12)Orphan Files (12)Files Mapped to Multiple Packages (12)Output Files (12)Additional Resources (13)OverviewThe design goal for an embedded system is typically very different from the design goal of a fully functional, general-purpose system. A general-purpose system with a full complement of features enables its users to enjoy the most free form, creative experience possible, and also to utilize the capabilities of its hardware platform to the fullest. An embedded system, by contrast, strives to lock down the functionality to enable only the function of the embedded application. Windows Embedded Standard 7 has achieved this goal, and it thus requires embedded systems developers to know the techniques and tools to determine the exact dependencies of the embedded application for inclusion in the operating system image. The purpose of this white paper is to educate the reader about those techniques and tools.Creating a Target ImageTo create a Target image, follow these three steps:1.Identify the dependencies of your Target applications with Process Monitor, a WindowsSysinternals tool.2.Feed the output of Step 1 to Package Mapper (a Windows Embedded Standard 7 application) tocreate a Windows Embedded Standard 7 Answer file.3.Create an embedded image with the Windows Embedded Standard 7 Answer file.Reference Platform for Dependency AnalysisIt is recommended to have one of the following operating systems for dependency analysis:∙Windows 7.∙Maxboot Image of Windows Embedded Standard 7 (Windows Embedded Standard 7 image with all of the packages included).It is always good to have a clean reference platform with an absolute minimum of applications and services running. This helps ensure that fewer events occur during dependency analysis. To keep the reference platform clean during dependency analysis, follow these suggestions:1.Do not install any extra applications.2.Do not enable Windows Update.3.Disable Prefetching.Understanding Application DependenciesEach application has a list of implicit dependencies that are mandatory for launching an application successfully.In addition to implicit dependencies, each application can have runtime dependencies that are loaded on demand. These are loaded only when a particular functionality within an application is exercised. Procmon (a Sysinternals application) is capable of capturing both of these dependencies together.Types of DependenciesFor each application, two types of dependencies must be identified:1.Installer dependencies, which are required for an application to be installed successfully (if theapplication has an installer).2. Application dependencies, which are needed for an application to run successfully.Capturing the Dependenciesunch Procmon (refer to Appendix A).2.Configure the settings (refer to Appendix A).3.Reset the events that are captured already (Edit->Clear Display).4.Enable Capture Events (File->Capture Events).5.To capture the Installer dependencies, launch the installer and install the Target application. Tocapture the Applications dependencies, launch the application and run through the list of test cases, exercising all of the functionalities that the application should satisfy (Procmon captures all of the events that happen during this activity).6.Disable Capture Events, as we are not interested in any further events.unch Process Tree in Procmon (Tools->Process Tree).8.Identify the Process IDs corresponding to the application (refer to Appendix A).9.There are two types of events that are important in this situation:a.Load Image activity, which gives the list of binaries loaded in the Target applicationaddress space.b.File Read activity, which provides the list of files read by the Target application.The steps that follow illustrate how these dependencies can be extracted by setting the rightfilters.Figure 1- Process Monitor Filter.unch Filter dialog (Filter->Filter…). Click the Reset button to reset any filters that are currentlyin effect. After clicking Reset, there will be still some entries in the Filter list. These excludesystem activity and Procmon’s own activity. It is permissible to have these events). Now addthe following filters:a.Add Include Filters for the Process IDs identified in Step 8.b.Add Include Filter for the Operation Load Image.c.Add Include Filter for the Result Success.unch Tools->Count Occurrences. Choose Path from the combo box adjacent to the label“Column” (see Figure 2 below) and click the Count Button. Click the Save button to save theoutput.Figure 2- Process Monitor Count Occurrences Dialog.unch Filter dialog (Filter->Filter…). Change the following filters:a.Remove the Include Filter for Operation Load Image (this Filter was added in Step 10).b.Add Include Filter for the Operation ReadFile.unch Tools->Count Occurrences. Choose Path from the combo box adjacent to the label“Column” and click on the button “Count”. Click on the “Save” button to save the output.14.Building an OS image in Windows Embedded Standard 7 involves identifying a set of packages.Each package encapsulates an OS feature and contains all of the binaries that contribute to that feature. After identifying the set of binaries from the steps above, the binaries must be mapped to the packages with Package Mapper.Using Package MapperPackage Mapper is a Windows application located in the Value-Add Folder in the media. Refer to Appendix B for more details on Package Mapper.Package Mapper application maps binary files to packages. Package Mapper is also capable of processing the Procmon Output file.To use the Procmon Output file with Package Mapper, follow these two steps:1.Open the Procmon Output file (captured in the previous section) in Excel and delete the Countcolumn. Also delete the header line in the first column.2.Feed this file as input to Package Mapper (refer to the Package Mapper manual for the inputparameters).The output of Package Mapper is a Windows Embedded Standard 7 Answer file, which lists the packages that are necessary for the Target application to run successfully on an Embedded OS.Package Mapper accepts any number of Input files; it can also be used to pass in both of the Output files (Installer dependencies and Application dependencies). The output of Package Mapper is a Windows Embedded Standard Answer file that will support the entire Target application.Package Mapper also outputs a Mapping file. This file lists the packages in the Answer file and the binary files that are contained in those packages.Trimming the Answer File1.Open the Answer file in Image Configuration Editor and review the packages in Answer file.2.Open the Mapping file (one of the Output files of Package Mapper) to see why each package hasbeen brought in. If there are very few binary dependencies for any package, it is worthwhile to investigate to see if the package can be removed. If a package looks totally irrelevant,investigate to see if it can be removed.3.Make a careful judgment whether or not this package can be removed by understanding thefunctionality provided by the package in Windows Embedded Standard 7. If you decide toremove the package, you can do so safely within Image Configuration Editor.4.Resolve the required package dependencies within Image Configuration Editor and save the finalAnswer file.Creating a Windows Embedded Standard 7 Imageunch Windows Embedded Standard 7 Setup.2.Choose “Build an Image” in the first screen and continue through the Wizard.3.In the Wizard step “Choose How to create your Image,” click “Use a Template” then browse tothe path that contains your Answer file. Continue through the Wizard.4.In the Wizard step “Summary of Drivers and Features”check “Modify Drivers” and “ModifyFeatures.” Continue through the Wizard.5.In the Wizard step “Find and Select Device D rivers,” choose “Automatically Detect Devices.” Ifyou have a PMQ file, choose the second Option. Continue through the Wizard.6.In the Wizard step “Select the P ackages to Include in Your Image,” uncheck “Resolve OptionalDependencies.” Review the packages on this screen. Add/Remove packages as needed. Click“Resolve” to resolve the dependencies. Continue through the Wizard.SummaryYou have now successfully created a Windows Embedded Standard 7 image that should support all of the Target applications. Install the Target application and run through all of its test cases to ensure that it is running 100% successfully on the new Windows Embedded Standard 7 image.Appendix A – ProcmonIntroduction to ProcmonProcmon is a Sysinternals tool that monitors file system activity, network activity, registry activity and process and thread activity. You can download and learn more about Procmon here.Specifying a Backing FileBy default, Procmon saves the Capture data in the Paging file. In Windows Embedded Standard 7, the Page file is disabled by default. This means that Procmon would continue to consume the system RAM for events tracing and would gradually slow down the system. Using a Backing file improves performance. Backing files can be specified as follows:unch File->Backing Files.Figure 3- Process Monitor Backing File specification.2.Click on the Radio button “Use File Named” and specify a B acking file on a drive that hassufficient space.There is also an option to provide a Backing file while launching Procmon from the Command line. The syntax is as follows:Command:Procmon.exe /BackingFile “c:\backFile.pml”Process Tree FeatureEach application has a list of binary dependencies. In addition, there may be dependencies between applications. An application might, for example, create a Child Process and depend on it. An applicationcan also depend on some Windows Services. It is essential to identify these inter-process dependencies, and the Process Tree can be very helpful in doing so.By using Process Tree, for instance, you can easily identify the Child Process that your application is creating.Figure 4- Process Tree feature.The Process Tree has six features that are helpful for analysis:1.List of all processes running at the time an event is captured. The Process Tree helps in easilyidentifying an application's Parent Process and Child Process.2.Full Path of the Executable file for each process in the Tree.mand line parameter of each process.4.Start Time and End Time of all processes.5.Life Time graph (third column in the figure above).6.Process ID of each process.The following steps help to identify the list of dependencies of these processes:1.Any Child Process that is created by the Target application is a dependency.2.Any process that is running from the application installation directory/sub-directory is adependency.3.Any process that is created after the Target application is created is a good candidate for being adependency. Look for its Command-line parameters to see if this process might be adependency. The Life Time column has a graph to easily identify the list of processes that is created after the creation of the Target application.Appendix B – Package MapperIntroduction to Package MapperPackage Mapper is a Windows Embedded Standard 7 application that helps to map binaries to packages. The output of Package Mapper is a Windows Embedded Standard 7 Answer file. You can find the most recent version of Package Mapper and the manual on the Application Compatibility Web site here. Prerequisites∙.NET 3.5 Framework is a requirement for this application to work.∙ICE (Image Configuration Editor) should be installed.∙Register the COM DLL EmbeddedDSI.dll present in the ICE installation folder(regsvr32 EmbeddedDSI.dll).Figure 5- Package Mapper.Input Configuration FilePackage Mapper application takes a Configuration file as input. A sample Configuration file is listed below:This Configuration file has three types of entries:∙[InputFile] — Full path to the input CSV/TXT file. The CSV/TXT file has only one column, which isa list of binary names. The file names can be absolute/relative. If you have multiple CSV Files,you can specify one [InputFile] entry for each.∙[DSPath] – Full path to the Distribution Share. This can be 32-bit or a 64-bit Distribution Share.∙[ICEPath] – Full path to the ICE (Image Configuration Editor) installation path.Orphan FilesThe Orphan files section contains binaries that are not OS binaries. Only OS binaries are encapsulated inside packages. Orphan files might contain binaries installed from some out-of-box applications. Review the list to identify the out-of-box application that must be installed.Files Mapped to Multiple PackagesThere are some files that are found in more than one package. Review this list and resolve the packages to be included in the Answer file. It is optional to resolve the packages. You can still continue to save the Answer file without resolving some/all of the entries in this list.Output FilesPackage Mapper has two Output files:1.Windows Embedded Standard 7 Answer file. This file contains a list of packages thatencapsulates the binaries specified in the Input files.2.Mapping file. This file lists the packages in the Answer file and the Binary files that arecontained in each package.Additional ResourcesMicrosoft Windows Embedded Web site:/windowsembeddedThe information contained in this document represents the current view of Microsoft Corporation on the issues discussed as of the date of publication. Because Microsoft must respond to changing market conditions, it should not be interpreted to be a commitment on the part of Microsoft, and Microsoft cannot guarantee the accuracy of any information presented after the date of publication.This white paper is for informational purposes only. MICROSOFT MAKES NO WARRANTIES, EXPRESS OR IMPLIED, IN THISDOCUMENT.Complying with all applicable copyright laws is the responsibility of the user. Without limiting the rights under copyright, no part of this document may be reproduced, stored in, or introduced into a retrieval system, or transmitted in any form or by any means (electronic, mechanical, photocopying, recording, or otherwise), or for any purpose, without the express written permission of Microsoft Corporation.Microsoft may have patents, patent applications, trademarks, copyrights, or other intellectual property rights covering subject matter in this document. Except as expressly provided in any written license agreement from Microsoft, the furnishing of this document does not give you any license to these patents, trademarks, copyrights, or other intellectual property.© 2010 Microsoft Corporation. All rights reserved.Microsoft, MS-DOS, Windows, Windows Server, Windows Vista, Excel, Groove, InfoPath, OneNote, Outlook, PowerPoint, Visual Studio Windows, Fluent, and Windows Server are either registered trademarks or trademarks of Microsoft Corporation in the United States and/or other countries.。
Windows_Embedded_Standard_7安装及使用指南南
Windows Embedded Standard 7安装及使用指南第一章概述1.1Windows Embedded Standard 7概述Windows Embedded Standard 7 以组件化形式提供Windows 7 操作系统的功能、熟悉度和稳定性,能开发人员创建运行成千上万种现有Windows 应用程序和驱动程序的高级商务设备和消费类设备。
使用适合现有客户基础结构的坚实平台,在Windows Embedded Standard 7 中释放Windows 7 技术的强大功能。
技术参数:处理器体系结构支持多处理器体系结构:- x86- x64工具改进的开发人员体验,可满足整个开发周期的要求:- 使用映像构建器向导(IBW) 的向导体验,可快速建立原型- 使用映像配置编辑器(ICE) 的高级配置最新的桌面技术创新- Internet Explorer 8- Windows Media Player 12- 远程桌面协议7- Silverlight 3- .net Framework 3.5 SP1适当级别的组件化适用于构建专用设备的粒度级别:- 150 多个基于Windows 7 的最新创新的直观功能包- 用于满足嵌入式特定要求的嵌入式功能,例如增强型写入筛选器、基于文件的写入筛选器、注册表筛选器、休眠一次恢复多次(HORM)、USB 启动、对话框筛选器和自定义外壳程序- 450 多个用于实现与不断增长的设备硬件和外设集的兼容性的驱动程序集应用程序兼容性用于Windows 7 的应用程序和驱动程序可以在Windows Embedded Standard 7 上运行,而无需困难、昂贵且耗时的端口设定工作企业连接性和可管理性- 支持Active Directory、域加入、组策略、网络访问保护和IPv6,以实现连接性丰富的沉浸式用户体验通过Windows Aero 和Windows 触控,提供丰富的交互式用户体验。
- 1、下载文档前请自行甄别文档内容的完整性,平台不提供额外的编辑、内容补充、找答案等附加服务。
- 2、"仅部分预览"的文档,不可在线预览部分如存在完整性等问题,可反馈申请退款(可完整预览的文档不适用该条件!)。
- 3、如文档侵犯您的权益,请联系客服反馈,我们会尽快为您处理(人工客服工作时间:9:00-18:30)。
Windows Embedded Standard 7安装及使用指南第一章概述1.1Windows Embedded Standard 7概述Windows Embedded Standard 7 以组件化形式提供Windows 7 操作系统的功能、熟悉度和稳定性,能开发人员创建运行成千上万种现有Windows 应用程序和驱动程序的高级商务设备和消费类设备。
使用适合现有客户基础结构的坚实平台,在Windows Embedded Standard 7 中释放Windows 7 技术的强大功能。
技术参数:处理器体系结构支持多处理器体系结构:- x86- x64工具改进的开发人员体验,可满足整个开发周期的要求:- 使用映像构建器向导(IBW) 的向导体验,可快速建立原型- 使用映像配置编辑器(ICE) 的高级配置最新的桌面技术创新- Internet Explorer 8- Windows Media Player 12- 远程桌面协议7- Silverlight 3- .net Framework 3.5 SP1适当级别的组件化适用于构建专用设备的粒度级别:- 150 多个基于Windows 7 的最新创新的直观功能包- 用于满足嵌入式特定要求的嵌入式功能,例如增强型写入筛选器、基于文件的写入筛选器、注册表筛选器、休眠一次恢复多次(HORM)、USB 启动、对话框筛选器和自定义外壳程序- 450 多个用于实现与不断增长的设备硬件和外设集的兼容性的驱动程序集应用程序兼容性用于Windows 7 的应用程序和驱动程序可以在Windows Embedded Standard 7 上运行,而无需困难、昂贵且耗时的端口设定工作企业连接性和可管理性- 支持Active Directory、域加入、组策略、网络访问保护和IPv6,以实现连接性丰富的沉浸式用户体验通过Windows Aero 和Windows 触控,提供丰富的交互式用户体验。
用于构建创新体验的稳定框架Windows Presentation Foundation改进的电源管理通过使用智能电源管理API,可以构建改进CPU 空闲时间的应用程序。
开发人员可以使用Windows Embedded Standard 7 创建各种智能、互连、面向服务的高级商用设备和消费类设备。
这些设备可以运行成千上万种现有Windows 应用程序和驱动程序,范围从瘦客户端到多功能打印机,其中包括:o高级机顶盒o加油机o功能齐全的服务点o游戏设备o家庭自动化网关o工业控制o智能装置o多媒体Internet 设备o网亭o数字标牌o移动服务点o监控设备o多功能打印机o联网式媒体设备o瘦客户端1.2 Windows Embedded Standard 7 与上一代开发工具的不同之处简单来说Windows Embedded Standard (WES) 7是Windows 7的组件化和添加了一些嵌入式特性的适合嵌入式应用领域的Windows 7,与Windows XP Embedded(Windows Embedded Standard 2009)不同的是组件化的颗粒度更粗,减少了组件的数量。
颠覆了嵌入式系统的开发方式和部署。
要特别注意WES 7的Runtime 系统镜像需要进行产品激活!详细内容见表1-1。
表1-1 Windows Embedded Standard 7与Windows XP Embedded的技术参数对比1.3Windows Embedded Standard 7的优势Windows Embedded Standard 7 的优势体现在:o通过利用熟悉的工具集,缩短了产品上市时间。
利用您掌握的Visual Studio 知识,使用包括Microsoft Silverlight、Internet Explorer、Windows Media Player 和.NETFramework 在内的综合技术进行开发,创建应用程序和驱动程序。
o通过只选择所需组件,优化了设备上操作系统的空间占用量。
通过只选择所需的驱动程序、服务和应用程序,您可以缩短开发时间,优化操作系统大小并降低硬件成本。
o经济划算,因为其运行时许可证费用由交付单位决定。
o与许多常见行业标准和各种Microsoft 桌面及服务器技术连接,可降低应用程序开发、操作系统部署、服务以及维护成本。
o新功能可实现下一代媒体体验、功能丰富的交互式应用程序和引人注目的用户界面。
o由Windows Embedded Standard 专家组成的整个合作体系可帮助确保设备制造商能够灵活地访问开发下一代设备所需的技能。
1.4Windows Embedded Standard 7开发流程Windows Embedded Standard 7开发套件一共包含三张光盘。
见图1-1,一张Toolkit、一张x86的Bootable IBW、一张x64的Bootable IBW。
两张Bootable IBW是可启动光盘。
目标设备从Bootable IBW光盘启动之后会加载Image Builder Wizard(IBW),用户可以一步一步的操作IBW,来给目标设备安装一个系统。
这个过程和安装普通的Win7很像不过有了更多的选择项目。
Image Builder Wizard(IBW)是运行在Windows PE上的,不需要去安装其他工具直接使用Bootable IBW光盘就可以构建Runtime 镜像(目标系统镜像),这颠覆了传统嵌入式开发的方式。
目前已经可以从/windowsembedded/zh-cn/downloads/default.mspx下载WES 7的评估版。
图1-1 Windows Embedded Standsrd 7 的评估版光盘见图1-2、1-3,整个开发流程包含5个阶段:1.配置,该阶段分为两种方式:直接使用IBW构建系统镜像或者使用Image Configuration Editor(ICE)编写一个应答文件,然后IBW根据应答文件来操作。
2.构建,Image Builder Engune(IBE)根据配置阶段的信息,在目标设备中完成镜像的构建。
大约需要30-90分钟完成目标系统镜像构建(这部分不需要人为干预,但最后OOBE阶段除外)。
3.定制,目标系统镜像构建完成后,开发人员可以在运行的目标嵌入式镜像上进行一些定制(例如:修改注册表、安装应用软件等)。
4.捕获,将已经完成定制的目标系统镜像,通过ImageX捕获成*.wim个格式的镜像文件。
5.部署,将捕获成*.wim个格式的镜像文件,通过网络、USB存储设备、光盘等介质批来部署到同型号的其他目标设备中。
图1-2 开发流程-1图1-3 开发流程-21.5正版识别可以访问以下网站:/windowsembedded/zh-cn/local/genuine-advantage.mspx要购买产品授权可以访问以下网站查询分销商/windowsembedded/zh-cn/partners/distributors/search.mspx?Countr yID=46第二章 Image Builder Wizard (IBW)2.1 Image Builder Wizard (IBW)概述Image Builder Wizard (IBW,镜像构建向导)是一个工具,您可以用它来创建,配置,安装一个Windows Embedded Standard 7嵌入式系统镜像到您的嵌入式设备上。
Image Builder Wizard可以直接运行在您的嵌入式设备上(IBW是运行在Windows PE 3.0上的),通过这个向导指导您完成一个Windows Embedded Standard 7嵌入式系统镜像的配置。
然后,您可以并将镜像安装到您的设备中,或者您可以部署一个已经捕获好的WIM(Windows Imaging Format)镜像文件(*.wim格式的文件)或Answer File(应答文件,*.xml格式的文件)。
2.2 Hello! Windows Embedded Standard 7据不完全统计(主要是我自己的估计)大多数程序员写的第一个程序是”Hello”、”Hello World”、”Hello,My name is……”;我相信本文的读者大多数都是第一次接触Windows Embedded Standard 7(WES 7),在本节中我们要对WES 7说一声”Hello”,我们要使用Image Builder Wizard (IBW)构建一个目标系统镜像。
放心这很容易,不需要写一行代码。
注意:正如本节所演示的,请在虚拟机中完成这系统镜像的构建,因为部分操作会将您硬盘的数据完全摸掉!• 步骤 1:“Standard_7_32bit.iso”载入虚拟机的光盘驱动器,然后配置虚拟机从光盘驱动器引导。
如果是实体机,请将“Standard_7_32bit.iso”烧录光盘,然后修改BIOS的启动项设置将“CDROM”配置成第一启动设备,然后插入刚才烧录的光盘。
最后启动实体机,让实体机从光盘引导。
虚拟机(实体机)启动后确认进度条,见图 2-1。
耐心等待几分钟直到出现如“图 2-2”的欢迎画面。
图2-1 进度条• 步骤 2:这里一共有三个选项:“BUild an Image(构建一个镜像)”、“Deploy an Answer File or WIM(部署一个应答文件或WIM文件)”和“Launch WinPE Command Prompt(加载WinPE 命令提示符,CMD)。
”我们选择:“Build an Image”来启动IBW。
图2-2 欢迎界面• 步骤 3:选中“I accept the license terms”代表接受许可协议(见图2-3),然后单击“Next”按钮继续。
图2-3 许可协议•步骤 4:选中“Use a template(使用一个模板)”,选中“Thin Client”(见图2-4),然后单击“Next”按钮。
在这里我们选择的是使用“Thin Client(瘦客户机)”模板。
模板类似于WES 2009的宏组件带有是一组组件和配置的集合。
默认WES 7带有以下模板:“Application Compatibility”,应用程序兼容性,用来解决应用程序因缺少组件而无法正常工作的问题。
“Digital Signage”,数字标牌,包含数字广告投放领域需要的组件。
“Industrial Automation”,工业自动化,包含工业自动化领域需要的组件。
“Internet Explorer, Windows Media Player, Remote Desktop”,包含完整的IE 浏览器、WMP播放器、远程桌面组件。