
CAS 单点登录操作文档
这人CAS 在 Tomcat 中实现单点登录1证书生成及导入1.1Server端证书配置1.2JAVA信任证书库D:\Program Files\Java\jdk1.5.0\jre\lib\security\cacertscacerts证书库默认密码-storepass changeit查看证书1.1.1.2 keytool -list -keystore cacerts -storepass changeit如果存在则删除1.1.1.1 keytool -delete -alias tomcatsso -keystore cacerts -storepass changeit创建证书库1.1.1.3 keytool -genkey -keyalg RSA -alias tomcatsso -dname "cn=" -keystore server.keystore -storepass 12345678导出证书1.1.1.4 keytool -export -alias tomcatsso -file tomcatsso.crt -keystore server.keystore -storepass 12345678加入JAVA信任证书库1.1.1.5 keytool -import -alias tomcatsso -file tomcatsso.crt-keystore ../jre/lib/security/cacerts -storepass changeit说明:在生成key的过程,"cn=" 中的为Server端的域名(必填)。
1.2.1TOMCAT 配置SSL支持<Connector port="8443" protocol="HTTP/1.1" SSLEnabled="true"minSpareThreads="5" maxSpareThreads="75"enableLookups="true" disableUploadTimeout="true"acceptCount="100" maxThreads="200"scheme="https" secure="true"clientAuth="false" sslProtocol="TLS"keystoreFile="D:/javatools/Tomcat 6.0/conf/server.keystore"keystorePass="12345678"truststoreFile="D:/ProgramFiles/Java/jdk1.5.0/jre/lib/security/cacerts"truststorePass="changeit"/>常用的配置属性:clientAuth如果想要Tomcat为了使用这个socket而要求所有SSL客户出示一个客户证书,置该值为true。
keystoreFile如果创建的keystore文件不在Tomcat认为的缺省位置(一个在Tomcat运行的home目录下的叫.keystore的文件),则加上该属性。
可以指定一个绝对路径或依赖$CATALINA_BASE环境变量的相对路径。
keystorePass如果使用了一个与Tomcat预期不同的keystore(和证书)密码,则加入该属性。
keystoreType如果使用了一个PKCS12 keystore,加入该属性。
有效值是JKS和PKCS12。
sslProtocolsocket使用的加密/解密协议。
如果使用的是Sun的JVM,则不建议改变这个值。
据说IBM的1.4.1版的TLS协议的实现和一些流行的浏览器不兼容。
这种情况下,使用SSL。
ciphers此socket允许使用的被逗号分隔的密码列表。
缺省情况下,可以使用任何可用的密码。
algorithm使用的X509算法。
缺省为Sun的实现(SunX509)。
对于IBM JVMS应该使用ibmX509。
对于其它JVM,参考JVM文档取正确的值。
truststoreFile用来验证客户证书的TrustStore文件。
truststorePass访问TrustStore使用的密码。
缺省值是keystorePass。
truststoreType如果使用一个不同于正在使用的KeyStore的TrustStore格式,加入该属性。
有效值是JKS和PKCS12。
单点登录(Single Sign On , 简称 SSO )是目前比较流行的服务于企业业务整合的解决方案之一, SSO 使得在多个应用系统中,用户只需要登录一次就可以访问所有相互信任的应用系统。
CAS(Central Authentication Service)是一款不错的针对 Web 应用的单点登录框架,本文介绍了 CAS 的原理、协议、在 Tomcat 中的配置和使用,对于采用 CAS 实现轻量级单点登录解决方案的入门读者具有一定指导作用。
CAS 介绍CAS 是 Yale 大学发起的一个开源项目,旨在为 Web 应用系统提供一种可靠的单点登录方法,CAS 在 2004 年 12 月正式成为 JA-SIG 的一个项目。
CAS 具有以下特点:∙开源的企业级单点登录解决方案。
∙CAS Server 为需要独立部署的 Web 应用。
∙CAS Client 支持非常多的客户端(这里指单点登录系统中的各个 Web 应用),包括 Java, .Net,PHP, Perl, Apache, uPortal, Ruby 等。
CAS 原理和协议从结构上看,CAS 包含两个部分: CAS Server 和 CAS Client。
CAS Server 需要独立部署,主要负责对用户的认证工作;CAS Client 负责处理对客户端受保护资源的访问请求,需要登录时,重定向到 CAS Server。
图1 是 CAS 最基本的协议过程:图 1. CAS 基础协议CAS Client 与受保护的客户端应用部署在一起,以 Filter 方式保护受保护的资源。
对于访问受保护资源的每个 Web 请求,CAS Client 会分析该请求的 Http 请求中是否包含 Service Ticket,如果没有,则说明当前用户尚未登录,于是将请求重定向到指定好的 CAS Server 登录地址,并传递 Service (也就是要访问的目的资源地址),以便登录成功过后转回该地址。
用户在第 3 步中输入认证信息,如果登录成功,CAS Server 随机产生一个相当长度、唯一、不可伪造的 Service Ticket,并缓存以待将来验证,之后系统自动重定向到 Service 所在地址,并为客户端浏览器设置一个 Ticket Granted Cookie(TGC),CAS Client 在拿到 Service 和新产生的 Ticket 过后,在第 5,6 步中与 CAS Server 进行身份合适,以确保 Service Ticket 的合法性。
在该协议中,所有与 CAS 的交互均采用 SSL 协议,确保,ST 和 TGC 的安全性。
协议工作过程中会有 2 次重定向的过程,但是 CAS Client 与 CAS Server 之间进行 Ticket 验证的过程对于用户是透明的。
另外,CAS 协议中还提供了 Proxy (代理)模式,以适应更加高级、复杂的应用场景,具体介绍可以参考CAS 官方网站上的相关文档。
准备工作本文中的例子以 tomcat5.5 为例进行讲解,下载地址:/download-55.cgi到 CAS 官方网站下载 CAS Server 和 Client,地址分别为:/downloads/cas/cas-server-3.1.1-release.zip/downloads/cas-clients/cas-client-java-2.1.1.zip部署 CAS ServerCAS Server 是一套基于 Java 实现的服务,该服务以一个 Java Web Application 单独部署在与servlet2.3 兼容的 Web 服务器上,另外,由于 Client 与 CAS Server 之间的交互采用 Https 协议,因此部署 CAS Server 的服务器还需要支持 SSL 协议。
当 SSL 配置成功过后,像普通 Web 应用一样将 CAS Server 部署在服务器上就能正常运行了,不过,在真正使用之前,还需要扩展验证用户的接口。
在 Tomcat 上部署一个完整的 CAS Server 主要按照以下几个步骤:配置 Tomcat 使用 Https 协议如果希望 Tomcat 支持 Https,主要的工作是配置 SSL 协议,其配置过程和配置方法可以参考 Tomcat 的相关文档。
不过在生成证书的过程中,会有需要用到主机名的地方,CAS 建议不要使用 IP 地址,而要使用机器名或域名。
部署 CAS ServerCAS Server 是一个 Web 应用包,将前面下载的 cas-server-3.1.1-release.zip 解开,把其中的cas-server-webapp-3.1.1.war 拷贝到 tomcat的 webapps 目录,并更名为 cas.war。
由于前面已配置好tomcat 的 https 协议,可以重新启动 tomcat,然后访问:https://localhost:8443/cas ,如果能出现正常的 CAS 登录页面,则说明 CAS Server 已经部署成功。
虽然 CAS Server 已经部署成功,但这只是一个缺省的实现,在实际使用的时候,还需要根据实际概况做扩展和定制,最主要的是扩展认证 (Authentication) 接口和 CAS Server 的界面。
扩展认证接口CAS Server 负责完成对用户的认证工作,它会处理登录时的用户凭证 (Credentials) 信息,用户名/密码对是最常见的凭证信息。
CAS Server 可能需要到数据库检索一条用户帐号信息,也可能在 XML 文件中检索用户名/密码,还可能通过 LDAP Server 获取等,在这种情况下,CAS 提供了一种灵活但统一的接口和实现分离的方式,实际使用中 CAS 采用哪种方式认证是与 CAS 的基本协议分离开的,用户可以根据认证的接口去定制和扩展。
CAS单点登录配置全过程
CAS配置全过程软件工具:1.cas-server-3.3.5-release.zip(CAS服务端)2.cas-client-3.1.10-release.zip(CAS客户端)3.apache-tomcat-7.0.40mons-dbcp-all-1.3-r699049.jar5.mysql-connector-java-5.1.18-bin.jar6.cas-server-jdbc-3.0.5-rc2.jar写在前面的话此配置是根据当前系统,当前的版本,仅供参考,如果有什么其他的问题可以一起研究。
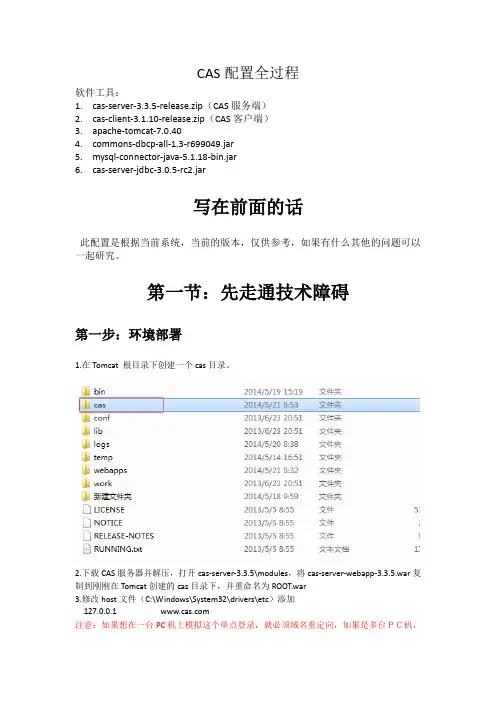
第一节:先走通技术障碍第一步:环境部署1.在Tomcat 根目录下创建一个cas目录。
2.下载CAS服务器并解压,打开cas-server-3.3.5\modules,将cas-server-webapp-3.3.5.war复制到刚刚在Tomcat创建的cas目录下,并重命名为ROOT.war3.修改host文件(C:\Windows\System32\drivers\etc)添加127.0.0.1 注意:如果想在一台PC机上模拟这个单点登录,就必须域名重定向,如果是多台PC机,可以不配置此项,下文有用到,可以用相应PC机的IP代替4.修改Tomcat文件下的server.xml(apache-tomcat-7.0.40\conf\server.xml)添加内容:<Host name="" appBase="cas"unpackWARs="true" autoDeploy="true"></Host>5.启动Tomcat服务,查看信息,(如果有报错,可以根据信息查找错误),打开浏览器,输入:8080如果出现以下界面,则CAS服务端配置成功。
注:这个是最简单的CAS服务,只要输入的用户名跟密码一样,就可以正常登陆,在我们实际开发中,这个验证因为跟数据库作比较,接下来,我们就配置数据库校验。
CAS干单点登陆(SSO)

CAS⼲单点登陆(SSO)CAS做单点登陆(SSO)——集成Java Web 项⽬添加cas-client的jar包下载cas-client,地址:/downloads/cas-clients/,当前最新版本是cas-client-3.2.1-release.zip。
然后解压cas-client-3.2.1-release.zip,在modules拷贝cas-client-core-3.2.1.jar到应⽤的WEB-INF/lib⽬录中。
撰写⽀持CAS集成的客户化包除了在web.xml添加CAS内置的filter外(具体看配置web.xml),我们需要撰写⾃⼰⽀持CAS集成的客户化包。
⼤致思路如下:@Overridepublic void doFilter(ServletRequest servletRequest, ServletResponse servletResponse, FilterChain filterChain) throws IOException, ServletException {HttpServletRequest request = (HttpServletRequest)servletRequest;HttpServletResponse response = (HttpServletResponse)servletResponse;HttpSession session = request.getSession();//在session中⾃定义⼀个参数,以它来校验是否完成过⾃动登陆Object user_login = session.getAttribute(AURORA_USER_LOGIN);if (user_login != null){//登陆过,就继续执⾏其他filterfilterChain.doFilter(request, response);return;}//通过CAS的API获得登陆账号String loginName = AssertionHolder.getAssertion().getPrincipal().getName();try {//执⾏本系统的登陆。
CAS单点登录配置全过程

CAS配置全过程说明:这里只是简单的配置了CAS单点登录的过程,并没有加入复杂的验证,也没有做MD5的校验。
输入数据库中存在的用户名跟密码就会登录成功一.首先需要下载cas-server-3.4.2-release.zip包,这个包里面包含CAS Server服务器的war包。
解压之后放到找到cas-server-3.4.2\modules 下的cas-server-webapp-3.4.2.war , 拷tomcat\webapps\下并改名为cas.war。
启动tomcat后会在webapps下看到cas文件,然后停止tomcat.二. 配置tomcat以及修改cas server的配置1.生成证书并导入到jdk的jre中请直接运行附件中的.bat文件会自动把证书生成在D盘根目录下并导入到jre 中这是bat脚本内容keytool -genkey -alias tomcatgecko -keyalg RSA -keystore d:\mykeystore -dname "CN=gecko-4d4611f2e, OU=gecko-4d4611f2e, O=gecko-4d4611f2e, L=SH, ST=SH, C=CN"-keypass changeit -storepass changeitkeytool -export -alias tomcatgecko -keystore d:\mykeystore -file d:\mycerts.crt -storepass changeitkeytool -import -keystore "%JAVA_HOME%/JRE/LIB/SECURITY/CACERTS" -file d:\mycerts.crt -alias tomcatgecko这里要注意:证书是要导入到tomcat使用的jdk。
不然CAS在跳转时会找不到本地域名脚本中红色的部分是写自己的计算机名称然后在C:\WINDOWS\system32\drivers\etc\hosts配置自己的本地域名,跟计算机名称相同2.启动tomcat之后会在tomcat\webapps下看到cas.war解压出来之后的cas文件夹;找到tomcat\conf\server.xml文件。
CAS单点登录系统实操指南

CAS单点登录系统实操指南CAS单点登录系统实操指南 (1)1. CAS单点登录介绍 (3)1.1. 什么是单点登录 (3)1.2. 什么是CAS (3)2. CAS服务端部署及配置 (5)2.1. 基础部署配置 (5)2.2. 去除https认证 (7)2.3. 登录数据源设置 (8)2.3.1 密码未加密处理 (8)2.3.2 密码MD5加密配置 (9)2.4. 登录页面的极简改造 (10)3. CAS客户端搭建 (11)3.1. 搭建工程并添加依赖 (11)3.2. 单点登录配置 (12)3.3. 单点登出配置 (14)3.3.1 未重定向登出 (14)3.3.2 重定向地址登出 (15)3.4. 获取登录用户信息配置 (15)4. CAS客户端与SpringSecurity集成 (16)4.1. 搭建工程并添加依赖 (16)4.2. 修改和创建配置文件 (18)4.3. 创建Spring-security认证脚本 (22)4.4. 获取登录名 (22)1. CAS单点登录介绍1.1. 什么是单点登录单点登录(Single Sign On),简称为SSO,是目前比较流行的企业业务整合的解决方案之一。
SSO的定义是在多个应用系统中,用户只需要登录一次就可以访问所有相互信任的应用系统。
我们目前的系统存在诸多子系统,而这些子系统是分别部署在不同的服务器中,那么使用传统方式的session是无法解决的,我们需要使用相关的单点登录技术来解决。
1.2. 什么是CASCAS 是Yale 大学发起的一个开源项目,旨在为Web 应用系统提供一种可靠的单点登录方法,CAS 在2004 年12 月正式成为JA-SIG 的一个项目。
CAS 具有以下特点:【1】开源的企业级单点登录解决方案。
【2】CAS Server 为需要独立部署的Web 应用。
【3】CAS Client 支持非常多的客户端(这里指单点登录系统中的各个Web 应用),包括Java, .Net, PHP, Perl, Apache, uPortal, Ruby 等。
(转载)cas单点登录 步骤

原创 CAS SSO 单 登录实 详细 骤 登录实作者:孙俊财 联系方式:QQ:271978326 E-mail:imissyousjc@第一步1,用 keytool 生成证书: , 生成证书: 命令: 命令:keytool -genkey -alias sjc -keyalg RSA -keystore c:/store/mykey说明: 说明 这里-alias sjc 是表示生成的这个证书的别名叫 sjc,-keyalg RSA 指的是采用的 RSA 算法, -keystore c:/store/mykey 是指生成的证书存储的位置. 回车后会提示你输入 keystore password, 这可以自己定(这里输入 sunjuncai,下面配 tomcat 时要用的),然后是一些个人信息及组织信息, 可以轻松搞定. 注意:密码输入后,会让你输入其他信息,记得这里第一个姓名必须是服务器的域名 这里我输 入的是完整计算机名称:gaofeng.nmc.hamcc这里要注意如果不这样写就会报如下异常: java.io.IOException: HTTPS hostname wrong: should be <localhost>实战: 实战C:\Documents and Settings\wangyoushi8>keytool -genkey -alias sjc -keyalg RSA -keystore c:/store/mykey 输入 keystore 密码: sunjuncai您的名字与姓氏是什么? [Unknown]: gaofeng.nmc.hamcc 您的组织单位名称是什么? [Unknown]: 上海神洲数港 您的组织名称是什么? [Unknown]: 网络优化 您所在的城市或区域名称是什么? [Unknown]: 郑州 您所在的州或省份名称是什么? [Unknown]: 河南 该单位的两字母国家代码是什么 [Unknown]: ZH CN= gaofeng.nmc.hamcc, OU=上海神洲数港, O=网络优化, L=郑州, ST=河南, C=ZH 正确 吗? [否]: y 输入<sjc>的主密码 (如果和 keystore 密码相同,按回车) :2,创建证书后,就导出证书: ,创建证书后,就导出证书 命令: 命令:keytool -export -file c:/store/server.crt -alias sjc -keystore c:/store/mykey说明: 说明 从 c:/store/mykey 里取出证书入到 c:/store/下,如果没有指定,就是存放在目录下 C:\Documents and Settings\用户目录名\ 实战: 实战:C:\Documents and Settings\wangyoushi8>keytool -export -file c:/store/server.crt -alias sjc -keystore C:/store/mykey 输入 keystore 密码: sunjuncai 保存在文件中的认证 <c:/store/server.crt>3,为客户端的 JVM 导入密钥 , 导入密钥: 命令: 命令:keytool -import -keystore D:/jdk1.5.0_12/jre/lib/security/cacerts -file c:/store/server.crt -alias sjc说明: 说明: 注意:输入密码时密码为"changeit",这是默认密码. 特别说明:这个 D:/jdk1.5.0_12/jre/lib/security/cacerts 是指 JDK 的 JRE 路径下的 lib 目录. 至此,第一步完成. 实战: 实战:C:\Documents and Settings\wangyoushi8> keytool -import -keystore D:/jdk1.5.0_12/jre/lib/security/cacerts -file c:/store/server.crt -alias sjc 输入 keystore 密码: changeitOwner: CN=localhost, OU=上海神洲数港, O=网络优化, L=郑州, ST=河南, C=Zh 发照者: CN=localhost, OU=上海神洲数港, O=网络优化, L=郑州, ST=河南, C=Zh 序号: 4abd6dd0 有效期间: Sat Sep 26 09:26:40 CST 2009 至: Fri Dec 25 09:26:40 CST 2009 认证指纹: MD5: F7:19:E9:F8:53:08:B0:15:E7:A4:46:6D:1E:8A:F4:2B SHA1: 09:ED:CF:67:D0:F5:C0:A4:96:1D:B1:A3:68:D3:2C:9F:FF:1B:7F:DE 信任这个认证? [否]: y 认证已添加至 keystore 中第二步修改服务端 Tomcat 配置文件,(Tomcat 安装路径下的 conf/ server.xml 使用编辑工具显示行号在 95 行处取消注释)即可启用 SSL 如下:<Connector port="8443" maxHttpHeaderSize="8192" maxThreads="150" minSpareThreads="25" maxSpareThreads="75" enableLookups="false" disableUploadTimeout="true" acceptCount="100" scheme="https" secure="true" clientAuth="false" sslProtocol="TLS" keystoreFile="c:/store/mykey" keystorePass="sunjuncai"/>只需修改绿色部分. 完成以上两步,测试一下: 重启 Tomcat 后在地址栏输入:https://localhost:8443 如果浏览器显示:可以把 localhost 用本机 IP 地址,如 https://10.87.59.162:8443/试试.如果配置正确就搞定了, 浏览显示的时候提示安装证书.浏览器的状态栏会显示如图所示:解决办法:a.查看 Host 文件, c:\windows\system32\drivers\etc\hosts,打开 hosts 这个文件, 看看 127.0.0.1 和 localhost 是不是在一行. b.是否用了代理服务器上网,选中"对于本地址不使用代理服务器. "第三步部署 CAS 应用 a.CAS 服务端的配置 CAS Server 的下载 /cas/download CAS Server 安装 把 \cas-server-3.3.3-release\cas-server-3.3.3\modules\cas-server-webapp-3.3.3.war copy 到 tomcat\webapps 下重命名为 cas; 重启 Tomcat 后, ,检查 CAS 应用是否正常启动.在地址栏输入:https://localhost:8443/cas 如浏览器显示:默认的 cas server 的验证是只要用户名和密码一样就可以成功登录.如图:b.CAS 客户端配置 CAS Client 的下载 /downloads/cas-clients/ 把 \cas-client-java-2.1.1\dist\ casclient.jar copy 到你所发布的 webapp 的 WEB-INF/lib 下 在客户端 web 应用中修改 WEB-INF/web.xml 在里面添加过滤器<!-- 用于单点退出 --> <listener> <listener-class>org.jasig.cas.client.session.SingleSignOutHttpSessionListener</listener-class> </listener> <filter> <filter-name>CAS Single Sign Out Filter</filter-name> <filter-class>org.jasig.cas.client.session.SingleSignOutFilter</filter-class> </filter> <!-- 用于单点登录 --> <filter> <filter-name>CASFilter</filter-name> <filter-class>edu.yale.its.tp.cas.client.filter.CASFilter</filter-class> <init-param> <param-name>edu.yale.its.tp.cas.client.filter.loginUrl</param-name> <param-value>https://localhost:8443/cas/login</param-value> <!--这里的 server 是服务端的 IP--> </init-param> <init-param> <param-name>edu.yale.its.tp.cas.client.filter.validateUrl</param-name> <param-value>https://gaofeng.nmc.hamcc:8443/cas/proxyValidate</param-value> <!--这里的 ServerName 是服务端的主机名也就是 CN--> </init-param> <init-param> <param-name>edu.yale.its.tp.cas.client.filter.serverName</param-name> <param-value>localhost:8080</param-value><!--client:port 就是需要 cas 需要拦截的地址和端口,一般就是这个 tomcat 所启动的 ip 和 port--> </init-param> </filter> <filter-mapping> <filter-name>CAS Single Sign Out Filter</filter-name> <url-pattern>/*</url-pattern> </filter-mapping> <filter-mapping> <filter-name>CASFilter</filter-name> <url-pattern>/*</url-pattern> </filter-mapping> </web-app>到此为止,基本配置已经告一段落. (完成),如遇到什么问题,请致信给:Todaysjc.定制和扩展 1:通过直接访问数据库定制密码验证1.新建 Mysql 数据库 cas, 笔者的数据库用户名是 root, 密码为空. 新建文本文件, 命名为 cas.sql/* MySQL Data Transfer Source Host: localhost Source Database: cas Target Host: localhost Target Database: cas Date: 2009-10-9 18:08:58 */ SET FOREIGN_KEY_CHECKS=0; -- ----------------------------- Table structure for user -- ---------------------------DROP TABLE IF EXISTS `user`; CREATE TABLE `user` ( `username` varchar(255) NOT NULL, `password` varchar(255) NOT NULL ) ENGINE=InnoDB DEFAULT CHARSET=gbk; -- ----------------------------- Records -- ---------------------------INSERT INTO `user` VALUES ('1', '1');2. 加入包到 webapps\cas\WEB-INF\lib: mysql-connector-java-5.1.5-bin.jar cas-server-support-jdbc-3.3.1.jar(来自于 cas-server-3.3.1.zip) spring-jdbc-2.5.5.jar 3. 在 webapps\cas\WEB-INF\deployerConfigContext.xml 文件中加入 dateSource 的 Bean<bean id="dataSource" class="org.springframework.jdbc.datasource.DriverManagerDataSource" destroy-method="close"> <property name="driverClassName"><value>com.mysql.jdbc.Driver</value></property> <property name="url"><value>jdbc:mysql://localhost:3306/cas</value></property> <property name="username"><value>root</value></property> <property name="password"><value></value></property> </bean>4. 在 deployerConfigContext.xml 文件中 注释掉:<bean class="org.jasig.cas.authentication.handler.support.SimpleTestUsernamePassword AuthenticationHandler" />换成:<bean class="org.jasig.cas.adaptors.jdbc.QueryDatabaseAuthenticationHandler"> <property name="dataSource" ref="casDataSource" /> <property name="sql" value="select password from user where username=?" /> <property name="passwordEncoder" ref=" passwordEncoder "/> </bean>参考网址: Keytool 详细讲解 /article/pki/case/23823.html Java, Java,咖啡与茶 /blog/165307 (推荐)学习笔记一 /blog/165310 学习笔记二 /blog/165313 学习笔记三 扭曲的铅笔/naruke/archive/2008/08/12/161551.html 配置(上) /naruke/archive/2007/11/19/161574.html 配置(下)Pocky 的工作室 /zh_m_zhou/blog/item/a6236da5765bd6f09052ee8f.html/cmtid/a292b6e cbe99b04579f05516(上篇) /zh%5Fm%5Fzhou/blog/item/a56123071aeae77c02088196.html(下篇)使用 J2EE Policy Agent 保护应使用程序/programming/J2EEJ2ME/200812/273824.html WZK 网址库Spring Framework 开发参考手册 51 视窗/spring_ref/2.0/html/ /hw/asp/ 维护记录:安全证书到期,访问时浏览器显示: 安全证书到期 访问时浏览器显示: 访问时浏览器显示只对第一步的<3>为客户端的 JVM 导入密钥 做一个别名修改 sjc 改为 sjc1987 为客户端的 导入密钥:做一个别名修改 只对第一步的C:\Documents and Settings\wangyoushi8>keytool -import -keystore D:/jdk1.5.0_12/jre/lib/sec urity/cacerts -file c:/store/server.crt -alias sjc1987 输入 keystore 密码: changeit Owner: CN=gaofeng.nmc.hamcc, OU=上海神洲数港, O=网络优化, L=郑州, ST=河南, C=Z H 发照者: CN=gaofeng.nmc.hamcc, OU=上海神洲数港, O=网络优化, L=郑州, ST=河南, C= ZH 序号: 4b3b122d 有效期间: Wed Dec 30 16:41:17 CST 2009 至: Tue Mar 30 16:41:17 CST 2010 认证指纹: MD5: 80:6C:C1:02:B3:6C:BC:F3:A3:B9:EA:69:22:13:56:5A SHA1: 97:33:73:8A:07:0C:B9:49:4E:4B:58:74:4D:FE:20:25:E0:1B:12:D1 信任这个认证? [否]: y 认证已添加至 keystore 中。
CAS3.5.2单点登录详解

服务端cas:从网上下载cas:/在cas下:在cas-client下:解压cas-server-3.5.2-release.zip\cas-server-3.5.2\module\cas-server-webapp-3.5.2.war部署到tomcat上,设置F:\apache-tomcat-6.0.30\webapps\cas\WEB-INF\cas-servlet.xml(大家取实际情况的路径) <bean id="logoutController" class="org.jasig.cas.web.LogoutController"p:followServiceRedirects="${cas.logout.followServiceRedirects:true}"/> 默认为false,这个设置是为了让登出(logout)以后进入到指定页面.设置deployerConfigContext.xml配置数据源和加密:<beanid="dataSource" class="org.springframework.jdbc.datasource.DriverManagerDataSource"> <propertyname="driverClassName"><value>oracle.jdbc.driver.OracleDriver</value></property> <propertyname="url"><value>jdbc:oracle:thin:@127.0.0.1:1521:orcl</value></property><property name="username"><value>require</value></property><property name="password"><value>require</value></property></bean><!-- <beanid="MD5PasswordEncoder"class="org.jasig.cas.authentication.handler.DefaultPasswordEncoder"><constructor-arg index="0"><value>MD5</value></constructor-arg></bean> -->然后注释掉下面这行,这行是为了测试使用,只要账号密码相同就可以通过验证<beanclass="org.jasig.cas.authentication.handler.support.SimpleTestUsernamePasswordAuthentication Handler" />这里看sql语句就知道是连数据库验证账号密码了<bean class="org.jasig.cas.adaptors.jdbc.QueryDatabaseAuthenticationHandler"> <property name="dataSource" ref="dataSource"></property> <property name="sql"value="select userpassword from user_ where useraccount=?"></property><!--<property name="passwordEncoder" ref="MD5PasswordEncoder"></property>--> </bean>CAS服务器端的修改:修改spring-configuration/ticketGrantingTicketCookieGenerator.xml<="" span="">p:cookieSecure="true"p:cookieMaxAge="-1"p:cookieName="CASTGC"p:cookiePath="/cas" />将p:cookieSecure="true" 改为 false false才能避免取消ssl后重复登录这个设置完大家就不要用https了直接使用http:xxx还有一个地方要特别说明:有一个地方设置系统数量的:在spring-configuration/ticketExpirationPolicies.xml设置c:numberOfUses="2";你要加多少个系统就写多少数字。
CAS实现单点登录(SSO)经典完整教程
一、简介1、cas是有耶鲁大学研发的单点登录服务器2、本教材所用环境∙Tomcat7.2∙JDK6∙CAS Service 版本 cas-server-3.4.8-release∙CAS Client版本 cas-client-3.2.1-release二、生成证书证书对于实现此单点登录非常之重要,证书是服务器端和客户端安全通信的凭证,本教程只是演示,所有用了 JDK自带的证书生成工具keytool。
当然在实际项目中你可以到专门的证书认证中心购买证书。
中文官方网站:/cn/1、用JDK自带的keytool生成证书view plain1.命令:keytool -genkey -alias smalllove -keyalg RSA -keystore D:/keys/smallkey此命令是生成一个证书,其中smalllove 是证书别名此命令的执行如图所示:其中名字与姓氏这一最好写你的域名,如果在单击测试你可以在C:\Windows\System32\drivers\etc\hosts文件中映射一个虚拟域名,注意不要写IP。
2、导出证书view plain1.命令:C:\>keytool -export -file d:/keys/small.crt -alias smalllove -keystore d:/keys/smallkey如图:密码为上步设置的密码。
3、把证书导入到客户端JDK中。
view plain1.命令:keytool -import -keystore C:\Java\jdk1.6.0_21\lib\security\cacerts -file D:/keys/small.crt -alias smalllove此命令是把证书导入到JDK中。
如图:到此证书导入成功。
注意:在此步有可能出现如下错误view plain1.C:\>keytool -import -keystore C:\Java\jdk1.6.0_21\lib\security\cacerts -file D:/keys/small.crt -alias smalllove2.输入keystore密码:3. keytool错误: java.io.IOException: Keystore was tampered with, or password was incorrect次错误的解决方法是,把%JAVA_HOME%\lib\security下的cacerts文件删除掉,在执行。
CAS官方文档
Buildgit clone git@:Jasig/java-cas-client.gitcd java-cas-clientmvn clean packagePlease note that to be deployed in Maven Central, we mark a number of JARs as provided (related to JBoss and Memcache Clients). In order to build the clients, you must enable the commented out repositories in the appropriate pom.xml files in the modules(cas-client-integration-jboss and cas-client-support-distributed-memcached) or follow the instructions on how to install the file manually.Components∙Core functionality, which includes CAS authentication/validation filters.<dependency><groupId>org.jasig.cas.client</groupId><artifactId>cas-client-core</artifactId><version>${java.cas.client.version}</version></dependency>∙Support for SAML functionality is provided by this dependency:<dependency><groupId>org.jasig.cas</groupId><artifactId>cas-client-support-saml</artifactId><version>${java.cas.client.version}</version></dependency>∙Distributed proxy ticket caching with Ehcache is provided by this dependency:<dependency><groupId>org.jasig.cas</groupId><artifactId>cas-client-support-distributed-ehcache</artifactId><version>${java.cas.client.version}</version></dependency>∙Distributed proxy ticket caching with Memcached is provided by this dependency:<dependency><groupId>org.jasig.cas</groupId><artifactId>cas-client-support-distributed-memcached</artifactId><version>${java.cas.client.version}</version></dependency>∙Atlassian integration is provided by this dependency:<dependency><groupId>org.jasig.cas</groupId><artifactId>cas-client-integration-atlassian</artifactId><version>${java.cas.client.version}</version></dependency>∙JBoss integration is provided by this dependency:<dependency><groupId>org.jasig.cas</groupId><artifactId>cas-client-integration-jboss</artifactId><version>${java.cas.client.version}</version></dependency>∙Tomcat 6 integration is provided by this dependency:<dependency><groupId>org.jasig.cas</groupId><artifactId>cas-client-integration-tomcat-v6</artifactId><version>${java.cas.client.version}</version></dependency>∙Tomcat 7 is provided by this dependency:<dependency><groupId>org.jasig.cas</groupId><artifactId>cas-client-integration-tomcat-v7</artifactId><version>${java.cas.client.version}</version></dependency>ConfigurationStrategiesThe client provides multiple strategies for the deployer to provide client settings. The following strategies are supported:∙JNDI (JNDI)∙Properties File (PROPERTY_FILE). The configuration is provided via an external properties file.The path may be specified in the web context as such:<param-name>configFileLocation</param-name><param-value>/etc/cas/file.properties</param-value></context-param>If no location is specified, by default /etc/java-cas-client.properties will be used.∙System Properties (SYSTEM_PROPERTIES)∙Web Context (WEB_XML)∙Default (DEFAULT)In order to instruct the client to pick a strategy, strategy name must be specified in the web application's context:<context-param><param-name>configurationStrategy</param-name><param-value>DEFAULT</param-value></context-param>If no configurationStrategy is defined, DEFAULT is used which is a combination of WEB_XML and JNDI. Client Configuration Using web.xmlThe client can be configured in web.xml via a series of context-param s and filter init-param s. Each filter for the client has a required (and optional) set of properties. The filters are designed to look for these properties in the following way:∙Check the filter's local init-param s for a parameter matching the required property name.∙Check the context-param s for a parameter matching the required property name.∙If two properties are found with the same name in the init-param s and the context-param s, the init-param takes precedence.Note: If you're using the serverName property, you should note well that the fragment-URI (the stuff after the #) is not sent to the server by all browsers, thus the CAS client can't capture it as part of the URL. An example application that is protected by the client is available here.org.jasig.cas.client.authentication.AuthenticationFilterThe AuthenticationFilter is what detects whether a user needs to be authenticated or not. If a user needs to be authenticated, it will redirect the user to the CAS server.<filter><filter-name>CAS Authentication Filter</filter-name><filter-class>org.jasig.cas.client.authentication.AuthenticationFilter</filter-clas s><init-param><param-name>casServerLoginUrl</param-name><param-value>https://:8443/cas/login</param-value></init-param><param-name>serverName</param-name><param-value></param-value></init-param></filter><filter-mapping><filter-name>CAS Authentication Filter</filter-name><url-pattern>/*</url-pattern></filter-mapping>Property Description RequiredcasServerLoginUrl Defines the location of the CAS serverlogin URL,i.e. https://localhost:8443/cas/loginYesserverName The name of the server this application is hosted on. Service URL will be dynamically constructed using this, i.e.https://localhost:8443 (you must includethe protocol, but port is optional if it'sa standard port).Yesservice The service URL to send to the CAS server,i.e.https://localhost:8443/yourwebapp/index.htmlNorenew specifies whether renew=true should besent to the CAS server. Valid values are either true/false(or no value at all). Notethat renew cannot be specified aslocal init-param setting.Nogateway specifies whether gateway=true should besent to the CAS server. Valid values are either true/false(or no value at all)NoartifactParameterName specifies the name of the request parameteron where to find the artifact(i.e. ticket).NoserviceParameterName specifies the name of the request parameteron where to find the service (i.e. service)NoencodeServiceUrl Whether the client should auto encode the service url. Defaults to trueNoignorePattern Defines the url pattern to ignore, when intercepting authentication requests.NoProperty Description RequiredignoreUrlPatternType Defines the type of the pattern specified. Defaults to REGEX. Other typesare CONTAINS,EXACT.NogatewayStorageClass The storage class used to record gateway requestsNoauthenticationRedirectStrategyClass The class name of the component to decidehow to handle authn redirects to CASNoorg.jasig.cas.client.authentication.Saml11AuthenticationFilterThe SAML 1.1 AuthenticationFilter is what detects whether a user needs to be authenticated or not.If a user needs to be authenticated, it will redirect the user to the CAS server.<filter><filter-name>CAS Authentication Filter</filter-name><filter-class>org.jasig.cas.client.authentication.Saml11AuthenticationFilter</filter-class><init-param><param-name>casServerLoginUrl</param-name><param-value>https://:8443/cas/login</param-value></init-param><init-param><param-name>serverName</param-name><param-value></param-value></init-param></filter><filter-mapping><filter-name>CAS Authentication Filter</filter-name><url-pattern>/*</url-pattern></filter-mapping>Property Description RequiredcasServerLoginUrl Defines the location of the CAS server login URL,i.e.https://localhost:8443/cas/loginYesserverName The name of the server this application is hostedon. Service URL will be dynamically constructedusing this, i.e. https://localhost:8443 (you must include the protocol, but port is optional if it'sa standard port).YesProperty Description Requiredservice The service URL to send to the CAS server,i.e.https://localhost:8443/yourwebapp/index.htmlNorenew specifies whether renew=true should be sent to theCAS server. Valid values are either true/false(orno value at all). Note that renew cannot bespecified as local init-param setting.Nogateway specifies whether gateway=true should be sent tothe CAS server. Valid values areeither true/false(or no value at all)NoartifactParameterName specifies the name of the request parameter on whereto find the artifact (i.e. SAMLart).NoserviceParameterName specifies the name of the request parameter on whereto find the service (i.e. TARGET)NoencodeServiceUrl Whether the client should auto encode the serviceurl. Defaults to trueNoorg.jasig.cas.client.validation.Cas10TicketValidationFilterValidates tickets using the CAS 1.0 Protocol.<filter><filter-name>CAS Validation Filter</filter-name><filter-class>org.jasig.cas.client.validation.Cas10TicketValidationFilter</filter-class><init-param><param-name>casServerUrlPrefix</param-name><param-value>https://:8443/cas</param-value></init-param></filter><filter-mapping><filter-name>CAS Validation Filter</filter-name><url-pattern>/*</url-pattern></filter-mapping>Property DescriptioncasServerUrlPrefix The start of the CAS server URL, i.e.https://localhost:8443/cas serverName The name of the server this application is hosted on. ServiceProperty Descriptionwill be dynamically constructed using this,i.e. https://localhost:8443(you must include the protocol, bport is optional if it's a standard port).renew Specifies whether renew=true should be sent to the CAS ser Valid values are either true/false(or no value at all). Not that renew cannot be specified as local init-param setting.redirectAfterValidation Whether to redirect to the same URL after ticket validation, without the ticket in the parameter. Defaults to true.useSession Whether to store the Assertion in session or not. If sessions not used, tickets will be required for each request. Defaul to true.exceptionOnValidationFailure Whether to throw an exception or not on ticket validation fail Defaults to true.sslConfigFile A reference to a properties file that includes SSL settings client-side SSL config, used during back-channel calls. The configuration includes keys for protocol which defaultsto SSL,keyStoreType, keyStorePath, keyStorePass,keyManagerType w defaults to SunX509and certificatePassword.encoding Specifies the encoding charset the client should use hostnameVerifier Hostname verifier class name, used when making back-channel c org.jasig.cas.client.validation.Saml11TicketValidationFilterValidates tickets using the SAML 1.1 protocol.<filter><filter-name>CAS Validation Filter</filter-name><filter-class>org.jasig.cas.client.validation.Saml11TicketValidationFilter</filter-class><init-param><param-name>casServerUrlPrefix</param-name><param-value>https://:8443/cas</param-value></init-param><init-param><param-name>serverName</param-name><param-value></param-value></init-param></filter><filter-mapping><filter-name>CAS Validation Filter</filter-name><url-pattern>/*</url-pattern></filter-mapping>Property Description casServerUrlPrefix The start of the CAS server URL, i.e.https://localhost:8443/casserverName The name of the server this application is hosted on. Service will be dynamically constructed using this,i.e. https://localhost:8443(you must include the protocol, b port is optional if it's a standard port).renew Specifies whether renew=true should be sent to the CAS ser Valid values are either true/false(or no value at all). Not that renew cannot be specified as local init-param setting.redirectAfterValidation Whether to redirect to the same URL after ticket validation, without the ticket in the parameter. Defaults to true.useSession Whether to store the Assertion in session or not. If sessions not used, tickets will be required for each request. Defaul to true.exceptionOnValidationFailure whether to throw an exception or not on ticket validation fail Defaults to truetolerance The tolerance for drifting clocks when validating SAML tick Note that 10 seconds should be more than enough for most environments that have NTP time synchronization. Defaults to msecsslConfigFile A reference to a properties file that includes SSL settings client-side SSL config, used during back-channel calls. The configuration includes keys for protocol which defaultsto SSL,keyStoreType, keyStorePath, keyStorePass,keyManagerType w defaults to SunX509and certificatePassword.encoding Specifies the encoding charset the client should use hostnameVerifier Hostname verifier class name, used when making back-channel c org.jasig.cas.client.validation.Cas20ProxyReceivingTicketValidationFilterValidates the tickets using the CAS 2.0 protocol. If you provide either the acceptAnyProxy orthe allowedProxyChains parameters, a Cas20ProxyTicketValidator will be constructed. Otherwise ageneral Cas20ServiceTicketValidator will be constructed that does not accept proxy tickets.Note: If you are using proxy validation, you should place the filter-mapping of the validation filterbefore the authentication filter.<filter><filter-name>CAS Validation Filter</filter-name><filter-class>org.jasig.cas.client.validation.Cas20ProxyReceivingTicketValidationFilter</filter-class><init-param><param-name>casServerUrlPrefix</param-name><param-value>https://:8443/cas</param-value></init-param><init-param><param-name>serverName</param-name><param-value></param-value></init-param></filter><filter-mapping><filter-name>CAS Validation Filter</filter-name><url-pattern>/*</url-pattern></filter-mapping>Property Description casServerUrlPrefix The start of the CAS server URL, i.e.https://localhost:8443/serverName The name of the server this application is hosted on. Serv will be dynamically constructed using this,i.e.https://localhost:8443(you must include the protocol, b is optional if it's a standard port).renew Specifies whether renew=true should be sent to the CAS s Valid values are either true/false(or no value at all). N that renew cannot be specified as local init-param settinredirectAfterValidation Whether to redirect to the same URL after ticket validati without the ticket in the parameter. Defaults to true.useSession Whether to store the Assertion in session or not. If sessi not used, tickets will be required for each request. Def to true.exceptionOnValidationFailure whether to throw an exception or not on ticket validation f Defaults to trueproxyReceptorUrl The URL to watch for PGTIOU/PGT responses from the CAS s Should be defined from the root of the context. For exam your application is deployed in /cas-client-app and you wanProperty Descriptionproxy receptor URL to be/cas-client-app/my/receptor you needconfigure proxyReceptorUrl to be/my/receptor. acceptAnyProxy Specifies whether any proxy is OK. Defaults to false.allowedProxyChains Specifies the proxy chain. Each acceptable proxy chain s include a space-separated list of URLs. Each acceptable prox should appear on its own line.proxyCallbackUrl The callback URL to provide the CAS server to accept Proxy G Tickets.proxyGrantingTicketStorageClass Specify an implementation of the ProxyGrantingTicketStorag that has a no-arg constructor.sslConfigFile A reference to a properties file that includes SSL setti client-side SSL config, used during back-channel calls. configuration includes keys for protocol which defaults to SSL, keyStoreType, keyStorePath,keyStorePass, keyManagerType defaults to SunX509and certificatePassword.encoding Specifies the encoding charset the client should usesecretKey The secret key used by the proxyGrantingTicketStorageClass if supports encryption.cipherAlgorithm The algorithm used by the proxyGrantingTicketStorageClass if i supports encryption. Defaults to DESedemillisBetweenCleanUps Startup delay for the cleanup task to remove expired ticke the storage. Defaults to60000 msecticketValidatorClass Ticket validator class to use/createhostnameVerifier Hostname verifier class name, used when making back-channe org.jasig.cas.client.validation.Cas30ProxyReceivingTicketValidationFilterValidates the tickets using the CAS 3.0 protocol. If you provide either the acceptAnyProxy orthe allowedProxyChains parameters, a Cas30ProxyTicketValidator will be constructed. Otherwise ageneral Cas30ServiceTicketValidator will be constructed that does not accept proxy tickets.Supports all configurations that are available for Cas20ProxyReceivingTicketValidationFilter.Proxy Authentication vs. Distributed CachingThe client has support for clustering and distributing the TGT state among application nodes that arebehind a load balancer. In order to do so, the parameter needs to be defined as such for the filter.EhcacheConfigure the client:<init-param><param-name>proxyGrantingTicketStorageClass</param-name><param-value>org.jasig.cas.client.proxy.EhcacheBackedProxyGrantingTicketStorageImpl </param-value></init-param>The setting provides an implementation for proxy storage using EhCache to take advantage of its replication features so that the PGT is successfully replicated and shared among nodes, regardless which node is selected as the result of the load balancer rerouting.Configuration of this parameter is not enough. The EhCache configuration needs to enable the replication mechanism through once of its suggested ways. A sample of that configuration based on RMI replication can be found here. Please note that while the sample is done for a distributed ticket registry implementation, the basic idea and configuration should easily be transferable.When loading from the web.xml, the Jasig CAS Client relies on a series of default values, one of which being that the cache must be configured in the default location (i.e. classpath:ehcache.xml).<cacheManagerPeerProviderFactoryclass="net.sf.ehcache.distribution.RMICacheManagerPeerProviderFactory"properties="peerDiscovery=automatic,multicastGroupAddress=230.0.0.1, multicastGroupPort=4446"/><cacheManagerPeerListenerFactoryclass="net.sf.ehcache.distribution.RMICacheManagerPeerListenerFactory"/><cachename="org.jasig.cas.client.proxy.EhcacheBackedProxyGrantingTicketStorageImpl.cache"maxElementsInMemory="100"eternal="false"timeToIdleSeconds="100"timeToLiveSeconds="100"overflowToDisk="false"><cacheEventListenerFactoryclass="net.sf.ehcache.distribution.RMICacheReplicatorFactory"/></cache>MemcachedA similar implementation based on Memcached is also available.Configure the client:<init-param><param-name>proxyGrantingTicketStorageClass</param-name><param-value>org.jasig.cas.client.proxy. MemcachedBackedProxyGrantingTicketStorageImpl</param-value></init-param>When loading from the web.xml, the Client relies on a series of default values, one of which being that the list of memcached servers must be defined in /cas/casclient_memcached_hosts.txt on the classpath). The file is a simple list of <hostname>:<ports> on separate lines. BE SURE NOT TO HAVE EXTRA LINE BREAKS.org.jasig.cas.client.util.HttpServletRequestWrapperFilterWraps an HttpServletRequest so that the getRemoteUser and getPrincipal return the CAS related entries.org.jasig.cas.client.util.AssertionThreadLocalFilterPlaces the Assertion in a ThreadLocal for portions of the application that need access to it. This is useful when the Web application that this filter "fronts" needs to get the Principal name, but it has no access to the HttpServletRequest, hence making getRemoteUser() call impossible.<filter><filter-name>CAS Assertion Thread Local Filter</filter-name><filter-class>org.jasig.cas.client.util.AssertionThreadLocalFilter</filter-class> </filter><filter-mapping><filter-name>CAS Assertion Thread Local Filter</filter-name><url-pattern>/*</url-pattern></filter-mapping>Client Configuration Using SpringConfiguration via Spring IoC will depend heavily on DelegatingFilterProxy class. For each filter that will be configured for CAS via Spring, a corresponding DelegatingFilterProxy is needed in the web.xml.Asthe SingleSignOutFilter, HttpServletRequestWrapperFilter and AssertionThreadLocalFilte r have no configuration options, we recommend you just configure them in the web.xml<filter><filter-name>CAS Authentication Filter</filter-name><filter-class>org.springframework.web.filter.DelegatingFilterProxy</filter-class> <init-param><param-name>targetBeanName</param-name><param-value>authenticationFilter</param-value></init-param></filter><filter-mapping><filter-name>CAS Authentication Filter</filter-name><url-pattern>/*</url-pattern></filter-mapping>Bean ConfigurationAuthenticationFilter<beanname="authenticationFilter"class="org.jasig.cas.client.authentication.AuthenticationFilter"p:casServerLoginUrl="https://localhost:8443/cas/login"p:renew="false"p:gateway="false"p:service="https:///cas-client" />Cas10TicketValidationFilter<beanname="ticketValidationFilter"class="org.jasig.cas.client.validation.Cas10TicketValidationFilter"p:service="https:///cas-client"><property name="ticketValidator"><bean class="org.jasig.cas.client.validation.Cas10TicketValidator"><constructor-arg index="0"value="https://localhost:8443/cas" /></bean></property></bean>Saml11TicketValidationFilter<beanname="ticketValidationFilter"class="org.jasig.cas.client.validation.Saml11TicketValidationFilter"p:service="https:///cas-client"><property name="ticketValidator"><bean class="org.jasig.cas.client.validation.Saml11TicketValidator"><constructor-arg index="0"value="https://localhost:8443/cas" /></bean></property></bean>Cas20ProxyReceivingTicketValidationFilterConfiguration to validate tickets:<beanname="ticketValidationFilter"class="org.jasig.cas.client.validation.Cas20ProxyReceivingTicketValidationFilter"p:service="https:///cas-client"><property name="ticketValidator"><bean class="org.jasig.cas.client.validation.Cas20ServiceTicketValidator"> <constructor-arg index="0"value="https://localhost:8443/cas" /></bean></property></bean>Configuration to accept a Proxy Granting Ticket:<beanname="ticketValidationFilter"class="org.jasig.cas.client.validation.Cas20ProxyReceivingTicketValidationFilter"p:service="https:///cas-client"p:proxyReceptorUrl="/proxy/receptor"><property name="ticketValidator"><beanclass="org.jasig.cas.client.validation.Cas20ServiceTicketValidator"p:proxyCallbackUrl="/proxy/receptor"><constructor-arg index="0"value="https://localhost:8443/cas" /></bean></property></bean>Configuration to accept any Proxy Ticket (and Proxy Granting Tickets):<beanname="ticketValidationFilter"class="org.jasig.cas.client.validation.Cas20ProxyReceivingTicketValidationFilter"p:service="https:///cas-client"p:proxyReceptorUrl="/proxy/receptor"><property name="ticketValidator"><bean class="org.jasig.cas.client.validation.Cas20ProxyTicketValidator"p:acceptAnyProxy="true"p:proxyCallbackUrl="/proxy/receptor"><constructor-arg index="0"value="https://localhost:8443/cas" /></bean></property></bean>Configuration to accept Proxy Ticket from a chain (and Proxy Granting Tickets):<beanname="ticketValidationFilter"class="org.jasig.cas.client.validation.Cas20ProxyReceivingTicketValidationFilter"p:service="https:///cas-client"p:proxyReceptorUrl="/proxy/receptor"><property name="ticketValidator"><bean class="org.jasig.cas.client.validation.Cas20ProxyTicketValidator"p:proxyCallbackUrl="/proxy/receptor"><constructor-arg index="0"value="https://localhost:8443/cas" /><property name="allowedProxyChains"><list><value>http://proxy1 http://proxy2</value></list></property></bean></property></bean>The specific filters can be configured in the following ways. Please see the JavaDocs included in the distribution for specific required and optional properties:Client Configuration Using JNDIConfiguring the CAS client via JNDI is essentially the same as configuring the client via the web.xml, except the properties will reside in JNDI and not in the web.xml. All properties that are placed in JNDI should be placed under java:comp/env/casWe use the following conventions: 1. JNDI will first look in java:comp/env/cas/{SHORT FILTER NAME}/{PROPERTY NAME} (i.e. java:comp/env/cas/AuthenticationFilter/serverName) 2. JNDI will as a last resort look in java:comp/env/cas/{PROPERTY NAME} (i.e. java:comp/env/cas/serverName)This is an update to the META-INF/context.xml that is included in Tomcat's Manager application:<?xml version="1.0" encoding="UTF-8"?><Context antiResourceLocking="false"privileged="true"><Environment description="Server Name"name="cas/serverName"override="false"type="ng.String"value="http://localhost:8080"/><Environment description="CAS Login Url"name="cas/AuthenticationFilter/casServerLoginUrl"override="false"type="ng.String"value="https:///cas/login"/><Environment description="CAS Url Prefix"name="cas/Cas20ProxyReceivingTicketValidationFilter/casServerUrlPrefix"override="false"type="ng.String"value="https:///cas"/></Context>Configuring Single Sign OutThe Single Sign Out support in CAS consists of configuring one SingleSignOutFilter andone ContextListener. Please note that if you have configured the CAS Client for Java as Web filters,this filter must come before the other filters as described.The SingleSignOutFilter can affect character encoding. This becomes most obvious when used inconjunction with applications such as Atlassian Confluence. Its recommended you explicitly configureeither the VT Character Encoding Filter or the Spring Character Encoding Filter with explicit encodings.ConfigurationProperty Description RequiredartifactParameterName The ticket artifact parameter name. Defaultsto ticketNologoutParameterName Defaults to logoutRequest No frontLogoutParameterName Defaults to SAMLRequest No relayStateParameterName Defaults to RelayState No eagerlyCreateSessions Defaults to true No artifactParameterOverPost Defaults to false No casServerUrlPrefix URL to root of CAS Web application context. Yes CAS Protocol。
用cas实现mantis单点登录和登出
用cas实现mantis单点登录和登出:1.在论坛根目录下添加casphp目录,目录下包含cas的php客户端验证等相关文件;(内容见后面的附录)2.修改根目录下的login_page.php (备份修改前文件为login_page.php.bak):27行开始(在require_once( 'core.php' )前添加):require_once 'casphp/login_cas.php';$staffid = phpCAS::getUser(); //获取cas登录的用户名(工号)44行开始(在$f_username = gpc_get_string( 'username', '' )后添加):if ($f_username == '' ){$f_username = $staffid;}if( user_is_name_unique( $f_username ) ) { //如果用户不存在,则创建用户user_create( $f_username,'',$f_username.'@' ) ;}107行(在<!-- Login Form BEGIN -->前添加):<div align="center"style="display:none;"> <!--隐藏页面内容 -->260行(在<!-- Autofocus JS -->前添加):</div>265行(在// --></script>前添加):window.document.login_form.submit();//自动提交登录FORM3.取消密码校验,注释掉mantisbt/core/authentication_api.php文件中的以下内容:/*if( "Y"!=$f_discuzflag && !auth_does_password_match( $t_user_id, $p_password ) ) {user_increment_failed_login_count( $t_user_id );return false;}*/4.修改根目录下的logout_page.php (备份修改前文件为logout_page.php.bak):23行开始(在require_once( 'core.php' )前添加):require_once 'casphp/login_cas.php';30行(在auth_logout()之后添加):phpCAS::logout();附:casphp目录:该目录下的文件除了login_cas.php以后,其余都是来自phpCAS-1.3.0RC1包中,可以从/cas-clients/php/中下载,Login_cas.php源码:<?php/*[Discuz!] (C)2001-2009 Comsenz Inc.This is NOT a freeware, use is subject to license terms$Id: logging.php 20592 2009-10-10 06:37:56Z monkey $*/define('CAS_ENABLE', true);// Full Hostname of your CAS Server//$cas_host = '192.168.178.254';$cas_host = 'localhost';// Context of the CAS Server$cas_context = '/cas';// Port of your CAS server. Normally for a https server it's 443$cas_port = 8443;// Path to the ca chain that issued the cas server certificate//$cas_server_ca_cert_path ='/usr/local/share/ca-certificates/3some-cacert.crt';$cas_server_ca_cert_path = 'server.cer';/*The "real" hosts of clustered cas server that send SAML logout messages * Assumes the cas server is load balanced across multiple hosts */ $cas_real_hosts = array ('localhost');/*$cas_real_hosts = array ('192.168.178.254');*/// Load the CAS librequire_once("CAS.php");// Uncomment to enable debuggingphpCAS::setDebug();// Initialize phpCASphpCAS::client(CAS_VERSION_2_0, $cas_host, $cas_port, $cas_context);/*For quick testing you can disable SSL validation of the CAS server. *THIS SETTING IS NOT RECOMMENDED FOR PRODUCTION.*VALIDATING THE CAS SERVER IS CRUCIAL TO THE SECURITY OF THE CAS PROTOCOL! */phpCAS::setNoCasServerValidation();/*For production use set the CA certificate that is the issuer of the cert *on the CAS server and uncomment the line below */// phpCAS::setCasServerCACert($cas_server_ca_cert_path);// handle incoming logout requests//phpCAS::handleLogoutRequests();/* Or as an advanced featue handle SAML logout requests that emanate from the* CAS host exclusively.* Failure to restrict SAML logout requests to authorized hosts could * allow denial of service attacks where at the least the server is* tied up parsing bogus XML messages.* 这里会检测服务器端java退出的通知,就能实现php和java间同步登出了。
CAS单点登录集成文档
一、介绍CAS单点登录为业务系统提供统一的单点登录服务。
业务系统不需要开发自己的登录界面,系统使用者也避免了在多个业务系统间重复输入密码,改善了用户体验,同时密码实现集中维护,提高了系统的安全性。
单点登录演示地址:http://172.16.10.40:1433/cas/login(社管平台测试环境)业务系统可以使用这个地址进行开发测试。
二、下载CAS为J2EE B/S应用提供了应用集成API,可以直接调用实现单点登录的集成。
:cas-client.jar文件下载后复制到业务系统的WEB-INF/lib目录。
三、配置在web.xml中配置认证过滤器(实现单点登录用户认证)和会话监听器(实现单点登录的注销),例如:<listener><listener-class>com.iflytek.cas.listener.LogoutSessionListener</listener-class></listener><filter><filter-name>casFilter</filter-name><filter-class>com.iflytek.cas.filter.TicketValidationFilter</filter-class><init-param><param-name>appUrl</param-name><param-value></param-value></init-param><init-param><param-name>casLoginUrl</param-name><param-value>http://172.16.10.40:1433/cas/login</param-value></init-param><init-param><param-name>ticketValidateUrl</param-name><param-value>http://172.16.10.40:1433/cas/validate</param-value></init-param></filter><filter-mapping><filter-name>casFilter</filter-name><url-pattern>/*</url-pattern></filter-mapping>过滤器参数说明:1、appUrl:Client会根据浏览器请求自动判断这个地址,所以一般情况下是不需要设置的。