Cisco网络设备的SNMP及Syslog配置参考实例
CISCOSNMP配置

Sw02(config)#service timestamps log datetime localtime show-timezone msec
Router(config)#end
注释 注意的是这里启用的仅仅是简单SNMP服务,只会响应SNMP的GET和SET请求,不会发送SNMP traps informs.由于SNMP V1
和V2c都是明文传输community值所以需要后续的一些安全限制。show snmp group可以用来验证
Sw02(config)#snmp-server enable traps snmp authentication snmp trap 验证
Sw02(config)#snmp-server host 192.68.98.166 version 2c public SNMP采用版本2,public作为字串
实际上设置完这个命令后我们通过PRTG依然可以在别的IP地址的计算机上读取出6509设备的SNMP信息,这是因为我们设置的团体名为RO只读权限,当然默认很多团体名权限设置为public读写权限,这是存在安全隐患的,容易造成设备被黑客入侵,所以提醒设置的读者一定要把自己的团体名community改成RO只读权限t
Sw02(config)#set clock 16:48:00 25 aug 2010
Sw02(config)#logging facility local5
Sw02(config)#logging trap 5
Sw02(config)#do wr
SNMP的配置

一、在思科的路由器上配置SNMP(启用SNMP代理)、开启SNMP服务5、案例:配置网管工作站接收被管设备的陷阱消息(1)启用陷阱消息接收器----打开162端口(2)配置团体名(3)在snmp代理上配置陷阱消息snmp-server host 192.168.4.231 sdxh #配置陷阱消息的目标snmp-server enable traps config #配置启用trap 配置事件(注:只是其中的一种消息类型,可以配置多个)(4)效果二、在思科交换机上配置SNMP1、配置管理地址三、在思科ASA上启用SNMP1、防火墙只支持只读SNMP2、SNMPv3支持更强的认证:用户名、认证密钥、加密密钥四、在Windows Server上启用SNMP在Linux中启用SNMP五、五、在1、yum仓库的配置(以本地光盘为yum安装源)mount /dev/cdrom /media/cdrom/rpm --import /etc/pki/rpm-gpg/RPM-GPG-KEY-redhat-release 导入签名密钥1)、vi /etc/yum.repos.d/rhel6.repo[rhel-source] #仓库的名称name=Red Hat Enterprise Linux $releasever - $basearch - Source #描述baseurl=file:///media/cdrom #位置enabled=1 #启用仓库gpgcheck=1 #启用签名检查gpgkey=file:///etc/pki/rpm-gpg/RPM-GPG-KEY-redhat-release #签名密钥3)、相关软件包将snmp服务设为开机自动启动:修改允许查看的MIB库信息87 view all included .1 8091 view mib2 included .dod.internet.mgmt.mib-2 fc 设置团体名的权限(在文件的结尾)snmpwalk -v 2c 192.168.4.213 -c sdxh systemsnmpwalk -v 2c 192.168.4.254 -c sdxh ifDescr.1snmpnetstat -v 2c -c sdxh -Ca -Cp tcp 192.168.4.213 #查看tcp连接启用SNMP-V3:3、【补充】Setting Up SNMPThis HowTo will explain how to install and configure the Net-SNMP agent. At time of writing, the latest version available is 5.4 (published on 12/06/2006).Getting Net-SNMP binariesDepending on your operating system, you'll find packages or tarballs to install Net-SNMP :LinuxUsually every Linux distribution comes with Net-SNMP packages :RedHat / Fedora : install the net-snmp, net-snmp-libs and net-snmp-utils packagesDebian / Ubuntu: install the libsnmp-base, libsnmp5, snmp and snmpd packagesSuSE : install the net-snmp packageGentoo : simply emerge the net-snmp ebuildMandriva : install the libnet-snmp5, net-snmp and net-snmp-utils packages.agentaddress 10.20.30.40:10000You can also make it listens on TCP, which is supported by Cactiagentaddress tcp:161The “tcp” keyword can then be used in Cacti :For those who want some more security, you can use the SNMP version 3 protocol, with MD5 or SHA hashing:createUser frederic MD5 mypassphrase DESgroup groupv3 usm fredericview all included .iso 80access groupv3 "" any auth exact all all allThis creates a user “frederic” whose password is “mypassphrase”. To test it:# snmpget -v 3 -l AuthNoPriv -u frederic -A mypassphrase 10.50.80.45 sysName.0SNMPv2-MIB::sysName.0 = STRING: cyclopesIn Cacti, add your device, choose SNMP version 3, and fill the username and password fields:Now that you're done with access control, add these 2 lines in snmpd.conf to indicate the location and contact name of your device:syslocation Bat. C2syscontact someone@They will then appear in Cacti management interface :Some OIDs return a unit, eg ”-153.1 dBm”.It's a safe idea to turn this off, by adding this to snmpd.conf:dontPrintUnits trueNext step is to graph filesystems in Cacti; the easyest way is to add this line in snmpd.conf:includeAllDisksWhen you'll run the “ucd/net - Get Monitored Partitions” Data Query, all the mounted filesystems will show up:If you want a filesystem not to be listed here, add this line to snmpd.conf:ignoredisk /dev/rdsk/c0t2d0Unfortunatly, some older versions of Net-SNMP do not fully work with the includeAllDisks keywordYou'll then have to list explicitly all filesystems you want to graph:disk /disk /usrdisk /vardisk /oracleYou can also specify NFS mount points.Please note that the Net-SNMP agent can only report filesystems which where mounted before its start.If you manually mount filesystems later, you'll have to reload the Net-SNMP agent (send the HUP signal).You can also graph processes, by adding this to snmpd.conf:proc httpdThe result will be accessible under the ucdavis.prTable.prEntry tree:prCount, number of current processes running with the name in questionprNames, the process name you're counting.In our example, the number of Apache processes will be available under the .1.3.6.1.4.1.2021.2.1.5 OID Some useful mib modules are:mibII/mta_sendmail, to graph MTA (Sendmail, Postfix, etc.) statisticsdiskio, to enable to graph I/O statisticsucd-snmp/lmSensors, for hardware monitoring (Linux and Solaris only)Mib modules can be added like this:$ ./configure --with-mib-modules="module1 module2"To compile Net-SNMP and build a compressed archive, follow these steps:$ ./configure --with-your-options$ make# mkdir /usr/local/dist# make install prefix=/usr/local/dist/usr/local exec_prefix=/usr/local/dist/usr/local# cd /usr/local/dist# tar cvf /tmp/net-snmp-5.3.1-dist.tar usr# gzip /tmp/net-snmp-5.3.1-dist.tar# rm -rf /usr/local/distYou can then copy the /tmp/net-snmp-5.3.1-dist.tar.gz file to other servers, and uncompress it from the root directory (everything will get extracted to /usr/local).Test your configurationOnce Net-SNMP is configured and started, here's how to test it:$ snmpwalk -v 1 -c public localhost .1.3.6.1.2.1.1.1.0SNMPv2-MIB::sysDescr.0 = STRING: Linux cronos 2.4.28 #2 SMP ven jan 14 14:12:01 CET 2005 i686This basic query shows that your Net-SNMP agent is reachable.You can even query which Net-SNMP version is running on a host:$ snmpwalk -v 1 -c public localhost .1.3.6.1.4.1.2021.100.2.0UCD-SNMP-MIB::versionTag.0 = STRING: 5.2.1.2An answer like that one$ snmpwalk -v 1 -c foo localhost .1.3.6.1.2.1.1.1.0Timeout: No Response from localhostindicates that either the agent is not started, or that the community string is incorrect, or that this device is unreachable. Check your community string, add firewall rules if necessary, etc.If using SNMP version 3, specifying an unknown user will result in this error message :$ snmpget -v 3 -l AuthNoPriv -u john -A mypassphrase 10.50.80.45 sysName.0snmpget: Unknown user nameAn incorrect passphrase will result in this error message :$ snmpget -v 3 -l AuthNoPriv -u frederic -A badpassphrase 10.50.80.45 sysName.0snmpget: Authentication failure (incorrect password, community or key)This query will show you what filesystems are mounted:$ snmpwalk -v 1 -c public localhost .1.3.6.1.4.1.2021.9.1.2UCD-SNMP-MIB::dskPath.1 = STRING: /UCD-SNMP-MIB::dskPath.2 = STRING: /BBUCD-SNMP-MIB::dskPath.3 = STRING: /dev/shmIf the answer is empty, usually it means the includeAllDisks is not supported by your Net-SNMP agent (you'll have to list each filesystem you want to graph as explained in previous chapter).Finally, this query will you display your network interfaces:$ snmpwalk -v 1 -c public localhost .1.3.6.1.2.1.2.2.1.2IF-MIB::ifDescr.1 = STRING: loIF-MIB::ifDescr.2 = STRING: eth0IF-MIB::ifDescr.3 = STRING: eth1Extending the SNMP AgentA great functionnality of Net-SNMP is that you can “extend” it.Let's run the /tmp/foo.sh script:$ /tmp/foo.sh -arg1123Now put this in snmpd.conf:exec foo /bin/sh /tmp/foo.sh -arg1The result of your script will be accessible under the ucdavis.extTable.extEntry tree: * output of the script :ucdavis.extTable.extEntry.extOutput * exit status: ucdavis.extTable.extEntry.extResult * command:ucdavis.extTable.extEntry.extCommandYou can check the result with this SNMP query:$ snmpwalk -v 1 -c public localhost .1.3.6.1.4.1.2021.8.1UCD-SNMP-MIB::extIndex.1 = INTEGER: 1UCD-SNMP-MIB::extNames.1 = STRING: fooUCD-SNMP-MIB::extCommand.1 = STRING: /bin/sh /tmp/foo.sh -arg1UCD-SNMP-MIB::extResult.1 = INTEGER: 0UCD-SNMP-MIB::extOutput.1 = STRING: 123UCD-SNMP-MIB::extErrFix.1 = INTEGER: 0UCD-SNMP-MIB::extErrFixCmd.1 = STRING:extOutput translates to .1.3.6.1.4.1.2021.8.1.101 As “foo” is our first exec directive, add .1 at the end of the OID.In Cacti, use the “SNMP - Generic OID Template” like this:Voila! Result of the /tmp/foo.sh script is now graphed in Cacti.Now let's run this second script, which returns more than one result:$ /tmp/bar.sh456789It returns two values, one per line (this is important).Another way to call scripts from snmpd.conf is by specifying an OID, like this:exec .1.3.6.1.4.1.2021.555 /bin/sh /tmp/bar.shRun this query:$ snmpwalk -v 1 -c public localhost .1.3.6.1.4.1.2021.555UCD-SNMP-MIB::ucdavis.555.1.1 = INTEGER: 1UCD-SNMP-MIB::ucdavis.555.2.1 = STRING: "/bin/sh"UCD-SNMP-MIB::ucdavis.555.3.1 = STRING: "/tmp/bar.sh"UCD-SNMP-MIB::ucdavis.555.100.1 = INTEGER: 0UCD-SNMP-MIB::ucdavis.555.101.1 = STRING: "456"UCD-SNMP-MIB::ucdavis.555.101.2 = STRING: "789"UCD-SNMP-MIB::ucdavis.555.102.1 = INTEGER: 0UCD-SNMP-MIB::ucdavis.555.103.1 = ""First line returned by the script will be available at .1.3.6.1.4.1.2021.555.101.1, second one at .1.3.6.1.4.1.2021.555.101.2, and so on.You can then use the “SNMP - Generic OID Template” in Cacti (one Data Source per OID).Let's say you want to count the number of entries in a log file. Add this to snmpd.conf:logmatch cactistats /home/cactiuser/cacti/log/cacti.log 120 SYSTEM STATS* the global count of matches will be available under the .1.3.6.1.4.1.2021.16.2.1.5.1 OID * the “Regex match counter” (which is reset with each file rotation) will be available under the .1.3.6.1.4.1.2021.16.2.1.7.1 OIDTo list all the available variables, use this query:$ snmpwalk -v 1 -c public localhost logMatchUCD-SNMP-MIB::logMatchMaxEntries.0 = INTEGER: 50UCD-SNMP-MIB::logMatchIndex.1 = INTEGER: 1UCD-SNMP-MIB::logMatchName.1 = STRING: cactistatsUCD-SNMP-MIB::logMatchFilename.1 = STRING: /home/cactiuser/cacti/log/cacti.logUCD-SNMP-MIB::logMatchRegEx.1 = STRING: SYSTEM STATSUCD-SNMP-MIB::logMatchGlobalCounter.1 = Counter32: 301634UCD-SNMP-MIB::logMatchGlobalCount.1 = INTEGER: 301634UCD-SNMP-MIB::logMatchCurrentCounter.1 = Counter32: 6692UCD-SNMP-MIB::logMatchCurrentCount.1 = INTEGER: 6692https:///autho/forms/CDClogin.html# 获取端口Index[root@redhat mibs]# snmpwalk -v 2c 192.168.4.254 -c sdxh 1.3.6.1.2.1.2.2.1.1 IF-MIB::ifIndex.1 = INTEGER: 1IF-MIB::ifIndex.2 = INTEGER: 2IF-MIB::ifIndex.3 = INTEGER: 3# 获取端口列表及其描述[root@redhat mibs]# snmpwalk -v 2c 192.168.4.254 -c sdxh 1.3.6.1.2.1.2.2.1.2 IF-MIB::ifDescr.1 = STRING: FastEthernet0/0# 以下为获取交换机第2个端口(INT E GE R: 2)所连接主机的M AC地址操作例子################################### 步骤 1 ##############################snmpwalk -v 2c -c Pub_PCon9-CT 192.168.232.25 1.3.6.1.2.1.17.4.3.1 | grep -w "INTEGER: 2"返回结果:SNMPv2-SMI::mib-2.17.4.3.1.2.0.7.233.63.136.173 = INTEGER: 2################################### 步骤 2 ############################### 从以上步骤1的返回结果获取粗体字"0.7.233.63.136.173" ,并执行以下命令snmpwalk -v 2c -c Pub_PCon9-CT 192.168.232.25 1.3.6.1.2.1.17.4.3.1 | grep "0.7.233.63.136.173" | grep "mib-2.17.4.3.1.1"返回结果:SNMPv2-SMI::mib-2.17.4.3.1.1.0.7.233.63.136.173 = Hex-STRING: 00 07 E9 3F 88 AD00 07 E9 3F 88 AD为交换机的第2口所连接的主机网卡地址################################### 步骤 3 ##############################snmpwalk -v 2c -c Pub_PCon9-CT 192.168.232.25 1.3.6.1.2.1.17.1.4.1.2 | grep -w "SNMPv2-SMI::mib-2.17.1.4.1.2.2"这里的红色2是步骤1的 INTEGER: 2返回结果:SNMPv2-SMI::mib-2.17.1.4.1.2.2 = INTEGER: 2步骤3中获取到的INTEGER: 2才是对应的IfIndexsnmpwalk -v 2c -c Pub_PCon9-CT 192.168.232.41 1.3.6.1.2.1.17.4.3.1.1snmpwalk -v 2c -c Pub_PCon9-CT 192.168.232.41 1.3.6.1.2.1.17.4.3.1.2snmpwalk -v 2c -c Pub_PCon9-CT 192.168.232.41 1.3.6.1.2.1.17.1.4.1.2/en/US/tech/tk648/tk362/technologies_tech_note09186a00801576ff.shtml在华为-H3C设备上启用SNMP服务六、六、在华为在线文档:实验环境:1、开启SNMP-Agent<Huawei> system-view[Huawei]interface g0/0/1[Huawei]acl 2001[Huawei]snmp-agent community write xinhua acl 20013、配置SNMP trap消息[AR2220]snmp-agent target-host trap-hostname mbxb address 192.168.4.231 udp-port 162 trap-paramsname sdxh4、保存配置七、在华为交换机上启用SNMP华为交换机的基本操作:[Huawei]interface vlanif 1[Huawei-Vlanif1]ip address 192.168.1.4 24[Huawei]interface GigabitEthernet0/0/1port link-type access #设置接口的类型-accessport default vlan 1 #设置默认VLANundo shutdown[Huawei]snmp-agent community read xinhua[Huawei]snmp-agent sys-info contact 12345[Huawei]snmp-agent sys-info location jinanshi[Huawei]snmp-agent sys-info version all[Huawei]snmp-agent target-host trap address udp-domain 192.168.1.230 udp-port 162 params securityname xinhua [Huawei]snmp-agent trap enable。
Cisco网络设备的SNMP及Syslog配置参考实例
Cisco网络设备的SNMP及Syslog配置参考实例IOS设备在IOS的Enable状态下,敲入config terminal 进入全局配置状态SNMP配置Cdp run 启用CDPsnmp-server community gsunion ro 配置本路由器的只读字串为gsunion snmp-server community gsunion rw 配置本路由器的读写字串为gsunion snmp-server enable traps 允许路由器将所有类型SNMP Trap发送出去snmp-server host IP-address-server traps trapcomm 指定路由器SNMP Trap 的接收者为10.238.18.17,发送Trap时采用trapcomm作为字串snmp-server trap-source loopback0 将loopback接口的IP地址作为SNMP Trap 的发送源地址syslog配置1. 必配,配置将日志信息发送到指定服务器(监视服务器)logging on 起动log机制logging IP-address-server 将log记录发送到10.238.18.17 (CW2K安装机器的IP地址)上的syslog server2. 选配,设置日志发送的高级属性logging facility local7 将记录事件类型定义为local7logging trap warning 将记录事件严重级别定义为从warningl开始,一直到最紧急级别的事件全部记录到前边指定的syslog server.logging source-interface loopback0 指定记录事件的发送源地址为loopback0的IP地址service timestamps log datetime 发送记录事件的时候包含时间标记enable password ******line tty 0 4password ******login local 设置Enable口令和Telnet口令show runningcopy running start或write terminal 显示并检查配置保存配置-------------------------------------------------------------------------------------------------logging trap level //指定日志消息的级别(0:紧急(Emergencies)1:告警(Alerts)2:严重的(Critical)3:错误(Errors)4:警告(Warnings)5:通知(Notifications)6:信息(Informational)7:调试(Debugging))logging trap 7 //把调试信息设置为Debug级,记录FTP命令和WWW的URL另外可用logging facility命令更改设备号,PIX默认为local4(20)//facility标识, RFC3164 规定的本地设备标识为 local0 - local7这个是对设备的重要性进行标识而已,跟日志本身没有关系,用默认的local7即可.syslog要考虑的主要是哪些日志需要发送到日志服务器上,即日志等级,使用如下命令:device(config)#logging trap warning //日志记录级别,可用"?"查看详细内容• emergency—Logs only emergency events.• alert—Logs alert and more severe events.• critical—Logs critical and more severe events.• error—Logs error and more severe events.• warning—Logs warning and more severe events.• notice—Logs notice and more severe events.• informational—Logs informational and more severe events.• debug—Logs all events, including debug events.为了防止日志量太大,一般设置成warning就行了。
常见网络设备SNMP及SYSLOG配置指南V1.3

错误!未找到引用源。
文档说明本文档目的是为了推进互相交流学习使用目录1 文档说明 (5)1.1 字体约定 (5)2 交换机部分 (6)2.1 Cisco交换机 (6)2.1.1 SNMP配置 (6)2.1.2 TRAP配置 (6)2.1.3 Syslog配置 (7)2.2 华为交换机 (8)2.2.1 SNMP配置 (8)2.2.2 TRAP配置 (8)2.2.3 Syslog配置 (9)2.3 ZTE交换机 (9)2.3.1 SNMP配置 (10)2.3.2 TRAP配置 (10)2.3.3 Syslog配置 (11)3 路由器部分 (12)3.1 Cisco路由器 (12)3.1.1 SNMP配置 (12)3.1.2 TRAP配置 (13)3.1.3 Syslog配置 (13)3.2 华为路由器 (14)3.2.1 SNMP配置 (14)3.2.2 TRAP配置 (15)3.2.3 Syslog配置 (15)3.3 阿尔卡特路由器 (16)3.3.1 SNMP配置 (16)3.3.2 TRAP配置 (16)3.3.3 SYSLOG配置 (16)3.4 Juniper路由器 (16)3.4.1 SNMP配置 (17)3.4.2 TRAP 配置 (17)3.4.3 Syslog配置 (18)4 防火墙部分 (19)4.1 Netscreen防火墙 (19)4.1.1 SNMP配置 (19)4.1.2 TRAP配置 (20)4.1.3 Syslog配置 (21)4.2 Cisco PIX防火墙 (21)4.2.1 SNMP配置 (22)4.2.2 TRAP配置 (22)4.2.3 Syslog配置 (22)5 四层交换机 (24)5.1 F5负载均衡 (24)5.1.1 SNMP配置 (24)5.1.2 TRAP配置 (25)1 文档说明1.1 字体约定黑字体表示在系统中执行的命令。
斜字体表示变量。
SNMP配置举例
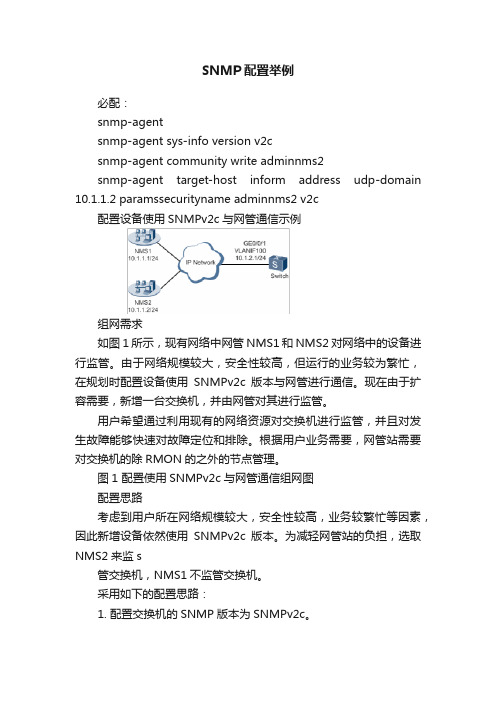
SNMP配置举例必配:snmp-agentsnmp-agent sys-info version v2csnmp-agent community write adminnms2snmp-agent target-host inform address udp-domain 10.1.1.2 paramssecurityname adminnms2 v2c配置设备使用SNMPv2c与网管通信示例组网需求如图1所示,现有网络中网管NMS1和NMS2对网络中的设备进行监管。
由于网络规模较大,安全性较高,但运行的业务较为繁忙,在规划时配置设备使用SNMPv2c版本与网管进行通信。
现在由于扩容需要,新增一台交换机,并由网管对其进行监管。
用户希望通过利用现有的网络资源对交换机进行监管,并且对发生故障能够快速对故障定位和排除。
根据用户业务需要,网管站需要对交换机的除RMON的之外的节点管理。
图1 配置使用SNMPv2c与网管通信组网图配置思路考虑到用户所在网络规模较大,安全性较高,业务较繁忙等因素,因此新增设备依然使用SNMPv2c版本。
为减轻网管站的负担,选取NMS2来监s管交换机,NMS1不监管交换机。
采用如下的配置思路:1. 配置交换机的SNMP版本为SNMPv2c。
2. 配置访问权限,使NMS2可以管理交换机上RMON之外的节点。
3. 配置告警主机,此处配置交换机的Inform告警功能,使交换机产生的告警能够发送至NMS2。
为了方便对告警信息进行定位,避免过多的无用告警对处理问题造成干扰,仅允许缺省打开的模块可以发送告警。
4. 配置网管站(仅NMS2)。
操作步骤1. 配置交换机的接口IP地址system-view[HUAWEI] sysname Switch[Switch] vlan 100[Switch-vlan100] quit[Switch] interface gigabitethernet 0/0/1[Switch-GigabitEthernet0/0/1] port link-type hybrid[Switch-GigabitEthernet0/0/1] port hybrid pvidvlan 100[Switch-GigabitEthernet0/0/1] port hybrid untagged vlan 100[Switch-GigabitEthernet0/0/1] quit[Switch] interface vlanif 100[Switch-Vlanif100] ip address 10.1.2.1 24[Switch-Vlanif100] quit2. 配置交换机和网管站之间路由可达3. [Switch] ospf4. [Switch-ospf-1] area 05. [Switch-ospf-1-area-0.0.0.0] network 10.1.2.0 0.0.0.2556. [Switch-ospf-1-area-0.0.0.0] quit[Switch-ospf-1] quit7. 配置交换机的SNMP版本为SNMPv2c[Switch] snmp-agent sys-info version v2c8. 配置访问权限# 配置ACL,使NMS2可以管理交换机,NMS1不允许管理交换机。
网络设备ping、snmp、telnet、syslog测试脚本使用说明文档(脚本见附件,网管软件必备)

Write by 王腾蛟sevenping、snmp、telnet、syslog测试脚本使用说明文档(脚本见附件)为了方便纳管测试,提高工作效率,按要求写了相关测试脚本,测试通过,可以正常使用。
ping、snmp、telnet测试脚本使用说明把脚本ping+telnet+snmp-test.py放在网管服务器的/var/log 目录下,可以直接使用,测试结果分别放在/var/log/ping.log,/var/log/snmp.log,/var/log/telnet.log,使用步骤如下:●到/var/log/ 目录下,清空ping.log,snmp.log,telnet.log,ipaddr.txt四个文件cd /var/log>ping.log>snmp.log>telnet.log>ipaddr.txt●把需要测试的管理地址放入ipaddr.txt,执行脚本文件vi ipaddr.txt,编辑,输入ip地址,wq保存退出python ping+telnet+snmp-test.py●运行结束,查看测试结果more ping.logmore snmp.logmore telnet.logsyslog测试脚本使用说明把脚本syslogtest.py放在syslog服务器的/var/log 目录下,可以直接使用,测试结果放在/var/log/syslog.log,使用步骤如下:●到/var/log/ 目录下,清空syslog.log,ipaddr.txt两个文件。
cd /var/log>syslog.log>ipaddr.txt●把需要测试的管理地址放入ipaddr.txt,执行脚本文件vi ipaddr.txt,编辑,输入ip地址,wq保存退出python syslogtest.py●运行结束,查看测试结果more syslog.log附件祝小伙伴们纳管顺利,(*^__^*) ……。
syslog和trap配置方式指南
数据网主流设备配置指南各厂商syslog配置的事件级别以及local设置见下表:厂商event级别local设置Juniper info 1cisco warning 2华为warning 3港湾warning 5一CISCO设备1.1设置IOS设备(路由器)在IOS的Enable状态下,敲入config terminal 进入全局配置状态Cdp run 启用CDP(Cisco Disco very Protocol)snmp-server community XXXXXX ro 配置本路由器的只读字串为XXXXXXsnmp-server community XXXXXX rw 配置本路由器的读写字串为XXXXXX(本项目不需配置) logging on 起动log机制logging IP-address-server将log记录发送到本地采集器地址上logging facility local2 将记录事件类型定义为local2(各厂商syslog对应的local见上表所示) logging trap warning 将发送的记录事件定义为warning以上.logging source-interface loopback0 指定记录事件的发送源地址为loopback0的IP地址(如果没有设置loopback地址,则请将该IP地址指向提供给综合网管的管理地址)service timestamps log datetime 发送记录事件的时候包含时间标记保存配置,完成cisco下IOS操作系统设备的syslog和snmp配置。
1.2设置CatOS设备(交换机)在CatOS的Enable状态下,敲入set interface sc0 VLAN ID IP address 配置交换机本地管理接口所在VLAN ID,IP地址,子网掩码Set cdp enable all 启用CDPset snmp community read-only XXXXXX 配置本交换机的只读字串为XXXXXXset snmp community read-write-all XXXXXX 配置本交换机的读写字串为XXXXXXset logging enable 起动log机制set logging server IP-address-server将log记录发送到本地采集器地址上set logging level 4将发送的记录事件定义为warning以上.set logging server facility local2将记录事件类型定义为local2(各厂商syslog对应的local见上表所示)set logging timestamp 发送记录事件的时候包含时间标记保存配置,完成cisco下CatOS操作系统设备的syslog和snmp配置。
思科 神州数码 中兴等 镜像 snmp等配置 手册

思科神州数码中兴等镜像snmp等配置手册一.连接交换机进行配置1.硬件连接交换机A.交换机Console方式进行连接,另外一端连接电脑的Com口或是com转接usb口B.Telnet等方式远程登录连接(需要配置交换机IP以及启用相关的功能)2.硬件连接之后,本地连接交换机进行相关的配置.A. Console-Com口通讯方式配置:开始→附件→通讯→超级终端.建立一个新的连接,连接使用Com口,将填入相关的参数.B. Telnet等方式进行远程访问.在运行里面输入telnet Ip地址进行连接配置二.相关交换机的镜像配置本处将列举思科华为H3C神州数码中兴等部分交换机的镜像配置方法,今后将对其它交换机配置方法进行补充.交换机权限>enable 进入enable模式#config Terminal 进入config模式(config) #interface FastEthernet 0/1 进入0/1端口配置(config-if)#每个权限下有各个权限的命令,在别的权限下输入命令不会生效镜像和SNMP都是在(config)#权限下进行配置的1.思科A. 29XX型号(部分,可以跟下面B.部分结合使用)(config)#monitor session 1 source interface FastEthernet 0/1-23 (config)#monitor session 1 destination interface FastEthernet 0/24 end命令解释将交换机的0号模块1-23号端口作为mirrored端口将交换机的0好模块24端口作为mirror端口取消镜像功能(config)#no monitor session 1 source interface FastEthernet 0/1-23B.思科2900XL/3500XL/2950(部分,命令可以参考A部分)(config)#interface FastEthernet 0/1(config-if)prot monitor FastEthernet 0/12-18end命令解释进入0/1模块进行配置将0/12到18端口的数据mirror到0/1端口C.4000,5000, 6000 系列(config)#set span 0/12-17 0/1end命令解释将0/12到17的数据mirror到0/1端口特别注意:配置好镜像功能后,必须在#模式下对路由器做的配置进行保存,命令为#write2.华为镜像配置华为交换机权限分为< >和[ ]两种模式,在<>模式下是不能对交换机进行配置的,在<>模式下键入system进入[]模式.A.S2008/S2016/S2026/S2403H/S3026等型号[ ]monitor-prot Ethernet 0/1[ ]port mirror ethernet 0/10 to ethernet 0/15[ ]save命令解释:将ethernet 0/1 作为mirror端口将Ethernet0/10到0/15端口作为mirrored端口保存配置.3.H3C镜像配置H3c交换机权限分为<>和[],在模式下不能对交换机进行配置,在<>模式下键入system-view进入[ ]模式哦A.S3100/S3600/S5100/S7500等产品配置[ ]mirror-group 1 local[ ]mirror-group 1 monitor-port FastEthernet1/0/7[ ]mirror-group 1 mirroring-port FastEthernet1/0/1[ ]save命令解释:镜像源端口为1/0/1 对接受发送的报文都进行镜像镜像目的端口为1/0/7保存设置4.神州数码镜像配置(config)#monitor session 1 source interface FastEthernet 0/1-23 (config)#monitor session 1 destination interface FastEthernet 0/24 end命令解释将交换机的0号模块1-23号端口作为mirrored端口将交换机的0好模块24端口作为mirror端口5.中兴交换机镜像配置A. zxr10 t160g/t64g/t40g等镜像配置(config)#interface fei_1/1(config-if)#monitor session 1 source(config)#interface fei_1/3(config-if)#monitor session 1 destination命令解释:将fei_1/1端口作为镜像源将fei_1/3端口作为目的地综上:作为mirrored端口的速度要小于mirror端口,否则接受的信息不会完整,上述的例子中可能会存在千兆网卡(Gigabit Ethernet),部分交换机支持简写如Gigabit Ethernet 简写为GE或gei, FastEthernet 简写为FE 或是fei. 将镜像配置完全后必须要save或是write到交换机中.三.相关交换机的SNMP配置思科大部分交换机配置snmp为:在(config)#模式下(config)#snmp-server community publice ro(config)#snmp-server community private rw(config)#snmp-server enable traps(config)#snmp-server host ip rw(config)#end#write命令解释:配置snmp信息的只读字符串(ro)为public配置snmp信息的读写字符串(rw)为private启用snmp的tarps功能配置网管工作站ip 地址退出保存注意:public 和private 可以自己随便设置.部分思科交换机的配置:(config)#snmp-agent community read public(config)#snmp-agent community write private(config)#snmp-agent trap enable(config)#snmp-agent target-host trap address udp-domain ip udp-port 5000 params securityname public命令解释:交换机只读字符串为public交换机读写字符串为private交换机启用trap功能配置管理网关地址ip 5000端口华为交换机snmp配置[ ]snmp-agent community read public[ ]snmp-agent community write private[ ]snmp-agent sys-info version all命令解释交换机制度字符串为public交换机读写字符串为private交换机认证版本为全部版本(可以是1\2c\v3)神舟数码snmp配置(config)#snmp-server community rw private (config)#snmp-server community ro public (config)#snmp-server securityip ip命令解释:设置snmp读写字符串为private设置snmp只读字符串为public设置网关管理ip地址h3c snmp配置(config)#snmp-agent community read public (config)#snmp-agent community write public (config)#snmp-agent sys-info version all命令解释:设置snmp读写字符串为private设置snmp只读字符串为public设置snmp认证版本信息为all(可以是1\2c\v3) 中兴snmp设置SNMP的团体名目前只设置只读属性的share,SNMP的目标主机为两个:218.22.16.5和202.102.198.62。
- 1、下载文档前请自行甄别文档内容的完整性,平台不提供额外的编辑、内容补充、找答案等附加服务。
- 2、"仅部分预览"的文档,不可在线预览部分如存在完整性等问题,可反馈申请退款(可完整预览的文档不适用该条件!)。
- 3、如文档侵犯您的权益,请联系客服反馈,我们会尽快为您处理(人工客服工作时间:9:00-18:30)。
Cisco网络设备的SNMP及Syslog配置参考实例在IOS的Enable状态下,敲入config terminal 进入全局配置状态SNMP配置Cdp run 启用CDPsnmp-server community gsunion ro 配置本路由器的只读字串为gsunionsnmp-server community gsunion rw 配置本路由器的读写字串为gsunionsnmp-server enable traps 允许路由器将所有类型SNMP Trap发送出去snmp-server host IP-address-server traps trapcomm 指定路由器SNMP Trap的接收者为10.238.18.17,发送Trap时采用trapcomm作为字串snmp-server trap-source loopback0 将loopback接口的IP地址作为SNMP Trap的发送源地址syslog配置1. 必配,配置将日志信息发送到指定服务器(监视服务器)logging on 起动log机制logging IP-address-server 将log记录发送到10.238.18.17 (CW2K安装机器的IP地址)上的syslog server2. 选配,设置日志发送的高级属性logging facility local7 将记录事件类型定义为local7logging trap warning 将记录事件严重级别定义为从warningl开始,一直到最紧急级别的事件全部记录到前边指定的syslog server.logging source-interface loopback0 指定记录事件的发送源地址为loopback0的IP地址service timestamps log datetime 发送记录事件的时候包含时间标记enable password ******line tty 0 4password ******login local 设置Enable口令和Telnet口令show runningcopy running start或write terminal 显示并检查配置保存配置-------------------------------------------------------------------------------------------------logging trap level //指定日志消息的级别(0:紧急(Emergencies)1:告警(Alerts)2:严重的(Critical)3:错误(Errors)4:警告(Warnings)5:通知(Notifications)6:信息(Informational)7:调试(Debugging))logging trap 7 //把调试信息设置为Debug级,记录FTP命令和WWW的URL另外可用logging facility命令更改设备号,PIX默认为local4(20)//facility标识, RFC3164 规定的本地设备标识为 local0 - local7这个是对设备的重要性进行标识而已,跟日志本身没有关系,用默认的local7即可.syslog要考虑的主要是哪些日志需要发送到日志服务器上,即日志等级,使用如下命令:device(config)#logging trap warning //日志记录级别,可用"?"查看详细内容• emergency—Logs only emergency events.• alert—Logs alert and more severe events.• critical—Logs critical and more severe events.• error—Logs error and more severe events.• warning—Logs warning and more severe events.• notice—Logs notice and more severe events.• informational—Logs informational and more severe events.• debug—Logs all events, including debug events.为了防止日志量太大,一般设置成warning就行了。
---------------------------------------------------------------------------------------------------------------CatOS设备在CatOS的Enable状态下,敲入SNMP配置set interface sc0 VLAN ID IP address 配置交换机本地管理接口所在VLAN ID,IP地址,子网掩码Set cdp enable all 启用CDPset snmp community read-only gsunion 配置本交换机的只读字串为publicset snmp community read-write-all gsunion 配置本交换机的读写字串为privateset snmp trap server-ip gsunion 指定交换机SNMP Trap的接收者为网管服务器,发送Trap时采用gsunion作为字串set snmp trap enable all 将全部类型的SNMP Trap发送出去set snmp rmon enable 激活交换机的SNMP RMON功能syslog配置set logging server IP-address-server 将log记录发送到网管服务器的IP (CW2K安装机器的IP地址)上的syslog serverset logging level 6 将记录事件严重级别定义为从informational开始,一直到最紧急级别的事件全部记录到前边指定的syslog serverset logging server facility local7 将记录事件类型定义为local7set logging timestamp 发送记录事件的时候包含时间标记set logging enable 起动log机制set password ******set enablepass ******设置Enable口令和Telnet口令show runningwrite terminal 显示并检查配置保存配置PIX设备Logging on 在PIX上面启用日志记录Snmp-server community gsunion 为PIX设备配置共同体串gsunionSnmp-server enable traps 配置PIX设备将SNMP消息发送到网管服务器Snmp-server host server-ip 在PIX设备上面配置SNMP网管服务器Logging history warning为PIX设备SNMP系统日志消息设置warning级别。
log信息到一台Syslog服务器第一步:指定一台主机接收log信息logging host [interface] ip_address [tcp[/port] | udp[/port]] [format emblem]例子logging host dmz1 192.168.1.5可以指定多台服务器来接收log信息,这样当一台服务器不在线的时候其它的服务器仍可以接收信息。
第二步:设置log级别。
logging trap severity_level (1-7)第三步:如果想在信息中包含设备的ID使用如下命令logging device-id {hostname | ipaddress if_name | string text}包含特定设备的ID(设备的名字,和特定接口的IP或者一个字串)log信息发送到SNMP管理机第一步:设置SNMP管理机的IP地址snmp-server host [if_name] ip_addr第二步:设备其它SNMP服务器的设置,也是必需的snmp-server location textsnmp-server contact textsnmp-server community key通过下面的设置来配置发送log信息到SNMP服务器上。
第一步snmp-server enable traps第二步:设置log级别:logging history severity_level (1-7)第三步:关闭syslog捕获用下面的命令:no snmp-server enable trapsCisco PIX Syslog 配置说明一:启动log服务第一步:启动loglogging on注:By de fault, the logging level is set to 3 (error).默认log的级别为3(error)第二步:设置log级别logging trap severity_level (1-7)第三步:检查log设置show logging二:测试log输出通过下面几个步骤测试log信息输出:第一步:log信息发送到console口。
logging console 7quit这个测试会产生下面的syslog信息111005: nobody End configuration: OK这个信息显示已经退出configureation mode.”111005”是该信息标识号。
“nobody”指出你是通过console口登录PIX的。
第二步:停止输送log信息到consoleno logging console 7quit三、发送syslog信息到缓存第一步:保存显示的信息logging buffered severity_level (1-7)第二步:查看console口上的信息show logging第三步:清除缓存中的信息以便接收查看新的信息clear logging第四步:停止发送log信息到缓存no logging buffered新的信息到列表的尾部。
四、把log信息发送到一个telnet会话第一步:在PIX的内部配置一个host允许telnet到PIXa. 输入下面的命令:telnet ip_address [subnet_mask] [if_name]For example, if a host has the IP address 192.168.1.2, the command is: telnet 192.168.1.2 255.255.255.255b.设置一个telnet会话的空闲时间,默认为5分钟,建议值15分钟。