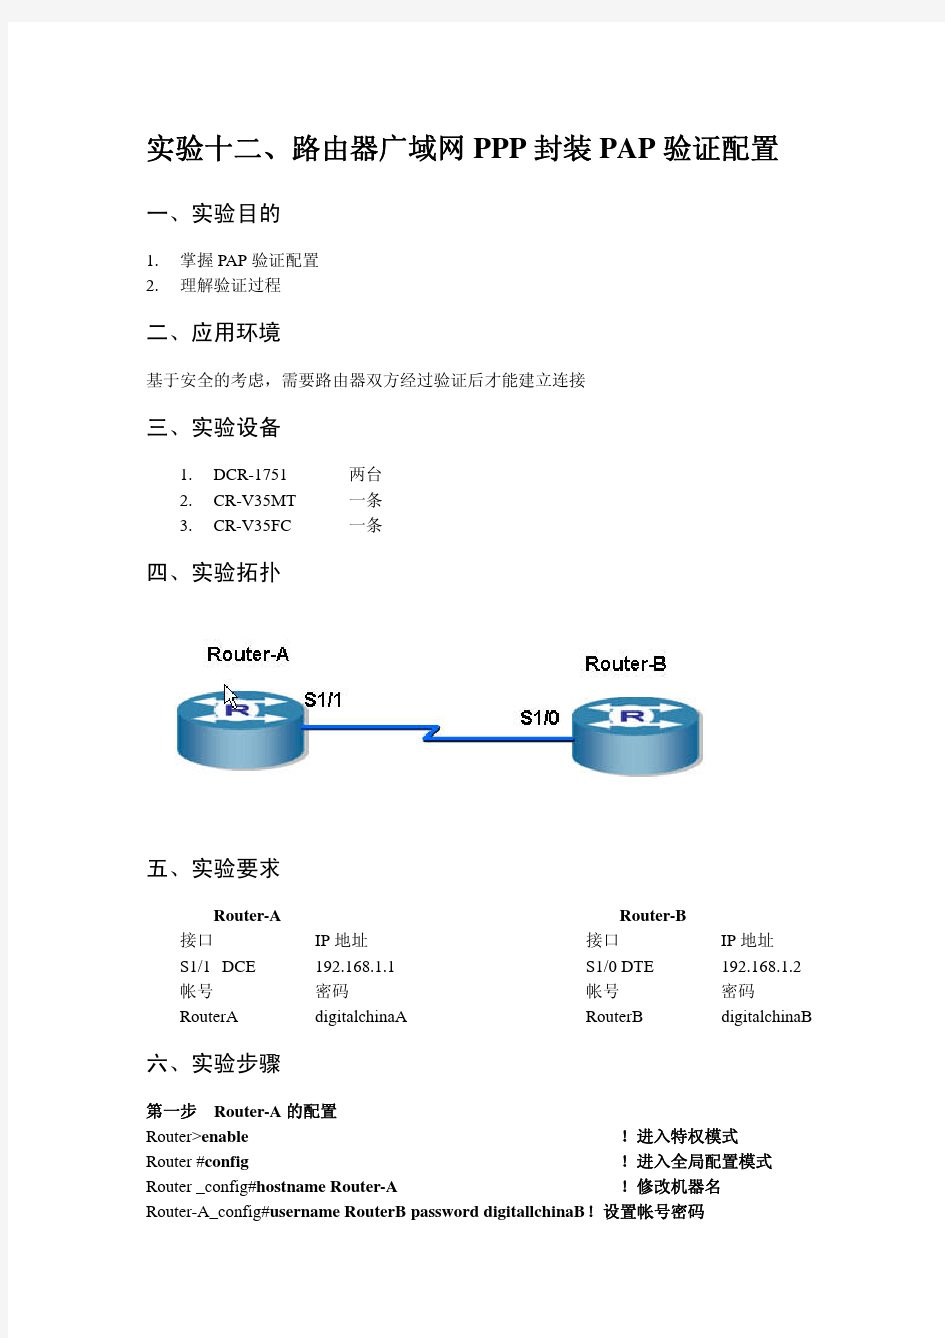
神州数码路由器广域网PPP封装PAP验证配置
神州数码交换机路由器命令汇总(最简输入版)
神州数码交换机路由器命令汇总(部分) 2016年3月23日星期三修改_________________________________________________________________________ 注:本文档命令为最简命令,如不懂请在机器上实验 注:交换机版本信息: DCRS-5650-28(R4) Device, Compiled on Aug 12 10:58:26 2013 sysLocation China CPU Mac 00:03:0f:24:a2:a7 Vlan MAC 00:03:0f:24:a2:a6 SoftWare Version 7.0.3.1(B0043.0003) BootRom Version 7.1.103 HardWare Version 2.0.1 CPLD Version N/A Serial No.:1 Copyright (C) 2001-2013 by Digital China Networks Limited. All rights reserved Last reboot is warm reset. Uptime is 0 weeks, 0 days, 1 hours, 42 minutes 路由器版本信息: Digital China Networks Limited Internetwork Operating System Software DCR-2659 Series Software, Version 1.3.3H (MIDDLE), RELEASE SOFTWARE Copyright 2012 by Digital China Networks(BeiJing) Limited Compiled: 2012-06-07 11:58:07 by system, Image text-base: 0x6004 ROM: System Bootstrap, Version 0.4.2 Serial num:8IRTJ610CA15000001, ID num:201404 System image file is "DCR-2659_1.3.3H.bin" Digital China-DCR-2659 (PowerPC) Processor 65536K bytes of memory,16384K bytes of flash Router uptime is 0:00:44:44, The current time: 2002-01-01 00:44:44 Slot 0: SCC Slot Port 0: 10/100Mbps full-duplex Ethernet Port 1: 2M full-duplex Serial Port 2: 2M full-duplex Serial Port 3: 1000Mbps full-duplex Ethernet Port 4: 1000Mbps full-duplex Ethernet Port 5: 1000Mbps full-duplex Ethernet Port 6: 1000Mbps full-duplex Ethernet
神州数码配置命令总结 (已更新)
第一部分交换机配置 一、基础配置 1、模式进入 Switch> Switch>en Switch#config Switch(Config)#interface ethernet 0/2 2、配置交换机主机名 命令:hostname <主机名> 3、配置交换机IP地址 Switch(Config)#interface vlan 1 Switch(Config-If-Vlan1)#ip address 10.1.128.251 255.255.255.0 Switch(Config-If-Vlan1)#no shut 4、为交换机设置Telnet授权用户和口令: 登录到Telnet的配置界面,需要输入正确的用户名和口令,否则交换机将拒绝该Telnet用户的访问。该项措施是为了保护交换机免受非授权用户的非法操作。若交换机没有设置授权Telnet用户,则任何用户都无法进入交换机的Telnet配置界面。因此在允许Telnet方式配置管理交换机时,必须在Console的全局配置模式下使用命令username
神州数码路由交换配置命令(全)
路由 ssh aaa authentication login ssh local aaa authentication enable default enable enable password 0 123456 username admin password 0 123456 ip sshd enable ip sshd auth-method ssh ip sshd auth-retries 5 ip sshd timeout 60 TELNET R1_config#aaa authentication login default local R1_config#aaa authentication enable default enable R1_config#enable password 0 ruijie R1_config#line vty 0 4 R1_config_line#login authentication default R1_config_line#password 0 cisco 方法2,不需要经过3A认证 R1_config#aaa authentication login default none R1_config#aaa authentication enable default enable R1_config#enable password 0 cisco R1_config#line vty 0 4 R1_config_line#login authentication default CHAP认证单向认证,密码可以不一致 R2_config#aaa authentication ppp test local R2_config#username R2 password 0 123456 R2_config_s0/2#enc ppp R2_config_s0/2#ppp authentication chap test R2_config_s0/2#ppp chap hostname R1 R1_config#aaa authentication ppp test local R1_config#username R1 password 0 123456 R1_config_s0/1#enc ppp R1_config_s0/1#ppp authentication chap test R1_config_s0/1#ppp chap hostname R2
DCN配置命令
1. 基本配置: 开启SSH服务:debug ssh-server 设置特权模式密码:enable password [8]
神州数码交换机基本配置
神州数码交换机基本配置 恢复交换机的出厂设置 命令:set default 功能:恢复交换机的出厂设置。 命令模式:特权用户配置模式。 使用指南:恢复交换机的出厂设置,即用户对交换机做的所有配置都消失,用户重新启动交换机后,出现的提示与交换机首次上电一样。 注意:配置本命令后,必须执行write 命令,进行配置保留后重启交换机即可使交换机恢复到出厂设置。 举例: Switch#set default Are you sure? [Y/N] = y Switch#write Switch#reload 进入交换机的Setup配置模式 命令:setup 功能:进入交换机的Setup配置模式。 命令模式:特权用户配置模式。 使用指南:在Setup配置模式下用户可进行IP地址、Web 服务等的配置。 举例: Switch#setup Setup Configuration ---System Configuration Dialog--- At any point you may enter Ctrl+C to exit. Default settings are in square brackets [ ]. If you don't want to change the default settings, you can input enter. Continue with configuration dialog? [y/n]:y Please select language [0]:English [1]:中文 Selection(0|1) [0]:0 Configure menu [0]:Config hostname [1]:Config interface-Vlan1 [2]:Config telnet-server [3]:Config web-server [4]:Config SNMP [5]:Exit setup configuration without saving [6]:Exit setup configuration after saving
神州数码交换机配置
神州数码交换机配置基本命令 交换机基本状态: hostname> ;用户模式 hostname# ;特权模式 hostname(config)# ;全局配置模式 hostname(config-if)# ;接口状态 交换机口令设置: switch>enable ;进入特权模式 switch#config terminal ;进入全局配置模式 switch(config)#hostname ;设置交换机的主机名 switch(config)#enable secret xxx ;设置特权加密口令 switch(config)#enable password xxa ;设置特权非密口令 switch(config)#line console 0 ;进入控制台口 switch(config-line)#line vty 0 4 ;进入虚拟终端 switch(config-line)#login ;允许登录 switch(config-line)#password xx ;设置登录口令xx switch#exit ;返回命令 交换机VLAN设置: switch#vlan database ;进入VLAN设置 switch(vlan)#vlan 2 ;建VLAN 2 switch(vlan)#no vlan 2 ;删vlan 2 switch(config)#int f0/1 ;进入端口1 switch(config-if)#switchport access vlan 2 ;当前端口加入vlan 2 switch(config-if)#switchport mode trunk ;设置为干线 switch(config-if)#switchport trunk allowed vlan 1,2 ;设置允许的vlan switch(config-if)#switchport trunk encap dot1q ;设置vlan 中继switch(config)#vtp domain ;设置发vtp域名 switch(config)#vtp password ;设置发vtp密码 switch(config)#vtp mode server ;设置发vtp模式 switch(config)#vtp mode client ;设置发vtp模式 交换机设置IP地址: switch(config)#interface vlan 1 ;进入vlan 1 switch(config-if)#ip address ;设置IP地址 switch(config)#ip default-gateway ;设置默认网关 switch#dir Flash: ;查看闪存 交换机显示命令: switch#write ;保存配置信息 switch#show vtp ;查看vtp配置信息 switch#show run ;查看当前配置信息 switch#show vlan ;查看vlan配置信息 switch#show interface ;查看端口信息 switch#show int f0/0 ;查看指定端口信息 完了最最要的一步。要记得保存设置俄,
神州数码路由器配置相关命令
一、路由器工作模式: 用户模式:Router> 特权模式:Router # 全局配置模式:Router (config)# 接口配置模式:Router (config-if)# 路由配置模式:Router(config-router)# Line配置模式:Router(config-line)# 二、路由器口令设置: Router>enable;进入特权模式 Router#configterminal;进入全局配置模式 Router(config)#hostname xxx;设置路由器的主机名 Router(config)#enable secret level 15 0 xxx ;设置特权明文加密口令xxx Router (config)#enable password xxx;设置特权非密口令 Router(config)#line console 0;进入控制台口 Router(config-line)#line vty 0 4;进入虚拟终端 Router(config-line)#login;允许登录 Router(config-line)#password xx ;设置登录口令xx Router#exit;返回命令 三、路由器VLAN设置: 配置WAN接口 选择接口:Router(config)#i nterface s0/0/0 配置IP地址Router(config-if)#ip address 192.168.10.1 255.255.255.0 设置时钟频率:Router(config-if)#clock rate 64000(另一端无需配置)启用端口:Router(config-if)#no shutdown 四、路由协议设置: 静态路由:Router(config)#ip route network 目标网络网络掩码下一跳IP Router(config)#ip route 192.168.1.0 255.255.255.0 10.1.1.1 默认路由:Router(config)#ip route 0.0.0.0 0.0.0.0 10.1.1.1
神州数码路由配置
一:RIP路由协议 1.RIP的工作原理: (1)采用的协议类型:RIP采用的协议类型为距离矢量路由协议,主要是以跳数做为度量值。 (2)路由表的行成:使用相同RIP协议之间路由器以广播形式发送路由表信息,相邻的路由器学习后经过周期时间后再发送给相邻的路由器,从而网络中所有使用相同RIP协议的路由器之间可以相互学习到整个网络的所有网段,这个状态称之为收检。网络收检后路由器为了维护路由表,并且及时发现网络拓扑的改变,仍每隔一段时间发送路由更新信息。 (3)RIP的更新时间:默认每隔30s从每个启动RIP协议的接口不断发送路由更新信息。它采用的协议类型为UDP 端口号为520 (4)水平分割:就是为了防止环路的产生,主要原理是从一个接口学习到的路由信息不再从这个接口发出去。 2.RIP使用的版本: (1)RIP v1: 有类路由协议 广播发送路由信息 不支持部连续子网。 不支持长掩码 不能够禁用路由汇总 (2)RIP v2: 无类路由协议 组播方式发送路由信息 支持长掩码 支持部连续子网 可以禁止路由汇总 3.RIP配置命令: Router(config)#router rip /启用RIP进程 Router(config-router)#version 2 /RIP版本号为RIP v2 Router(config-router)#no auto-summary /禁止路由汇总 Router(config-router)#network 网段 /发布网络号 Router#show ip protocols /查看路由协议 二:OSPF路由协议 1.OSPF路由协议概述:OSPF是链路状态路由协议,OSPF将自治系统分割多个小的区域,OSPF的路由器只在区域内学习完整的链路状态信息,不必要了解自治系统内所有的链路状态。设置OPPF协议的路由器之间相互建立邻接关系,互相传递链路状态信息,从而了解整个网络的拓扑结构,在链路状态信息中,包含路由器的各个链路,这些链路与哪个路由器相连,连接的路径成本等信息。在链路状态路由协议收敛后,同域中所有路由器都可以了解本区域完整的链路信息。
神州数码配置命令
Telnet远程Shell管理 ?设置交换机IP地址 –Switch(config)#interface vlan 1 –Switch(config-If-Vlan1)#ip address 10.1.1.1 255.255.255.0 –Switch(config-If-Vlan1)#no shutdown ?交换机设置Telnet授权用户和口令;若交换机没有设置授权Telnet用户,则任何用户都无法进入交换机的CLI配置界面。 –Switch(config)#telnet-user test password 0 test HTTP远程图形管理 ?设置交换机IP地址 –Switch(config)#interface vlan 1 –Switch(config-If-Vlan1)#ip address 10.1.1.1 255.255.255.0 –Switch(config-If-Vlan1)#no shutdown ?交换机启动HTTP Server功能 –Switch(config)#ip http server ?交换机设置Web授权用户和口令;若交换机没有设置授权Web用户,则任何用户都无法进入交换机的Web配置界面。 –Switch(config)#web-user test password 0 test SSH配置 ?Switch(Config)#ssh-user test password 0 test ?Switch(Config)#ssh-server enable VLAN的基本配置 ?划分VLAN 100和VLAN 200,并加入端口; –Switch(Config)#vlan 100 –Switch(Config-Vlan100)#switchport interface e0/0/1-5 –Switch(Config)#vlan 200 –Switch(Config-Vlan200)#switchport interface e0/0/6-10 ?配置0/0/24端口为级联端口 –Switch(Config)#interface ethernet 0/0/24 –Switch(Config-ethernet0/0/24)#switchport mode trunk –switchport trunk allowed vlan 100;200 –/#Trunk端口缺省允许通过所有VLAN;用户可以通过上述命令设置哪些VLAN 的流量可以通过Trunk口,没有包含的VLAN流量则被禁止。 ?察看配置:show vlan 利用三层交换机实现VLAN间路由 ?为VLAN接口设置IP地址; –Switch(Config)#interface vlan 100 –Switch(Config-If-Vlan100)#ip address 192.168.1.1 255.255.255.0 –Switch(Config)#interface vlan 200 –Switch(Config-If-Vlan200)#ip address 192.168.2.1 255.255.255.0
神州数码 交换机 Vlan配置命令
VLAN配置命令 8.2.2.1 vlan 命令:vlan [vlan-id] no vlan [vlan-id] 功能:创建vlan 并且进入vlan 配置模式,在vlan 模式中,用户可以配置vlan 名称和为该vlan 分配交换机端口;本命令的no 操作为删除指定的vlan。 参数:[vlan-id]为要创建/删除的vlan 的vid,取值范围为1~4094。 命令模式:全局配置模式 缺省情况:交换机缺省只有vlan1。 使用指南:vlan1 为交换机的缺省vlan,用户不能配置和删除vlan1。允许配置vlan的总共数量为4094 个。另需要提醒的是不能使用本命令删除通过gvrp 学习到的动态vlan。 举例:创建vlan100,并且进入vlan100 的配置模式。 switch (config)#vlan 100 switch (config-vlan100)# 8.2.2.2 name 命令:name [vlan-name] no name 功能:为vlan 指定名称,vlan 的名称是对该vlan 一个描述性字符串;本命令的no 操作为删除vlan 的名称。 参数:[vlan-name]为指定的vlan 名称字符串。 命令模式:vlan 配置模式 缺省情况:vlan 缺省名称为vlanxxx,其中xxx 为vid。 使用指南:交换机提供为不同的vlan 指定名称的功能,有助于用户记忆vlan,方便管理。 举例:为vlan100 指定名称为testvlan。
switch (config-vlan100)#name testvlan 8.2.2.3 switchport access vlan 命令:switchport access vlan [vlan-id] no switchport access vlan 功能:将当前access 端口加入到指定vlan;本命令no 操作为将当前端口从vlan 里删除。 参数:[vlan-id]为当前端口要加入的vlan vid,取值范围为1~4094。 命令模式:接口配置模式 缺省情况:所有端口默认属于vlan1。 使用指南:只有属于access mode 的端口才能加入到指定的vlan 中,并且access 端口同时只能加入到一个vlan 里去。 举例:设置某access 端口加入vlan100。 switch (config)#interface ethernet 0/0/8 switch (config-ethernet0/0/8)#switchport mode access switch (config-ethernet0/0/8)#switchport access vlan 100 switch (config-ethernet0/0/8)#exit 8.2.2.4 switchport interface 命令:switchport interface [interface-list] no switchport interface [interface-list] 功能:给vlan 分配以太网端口的命令;本命令的no 操作为删除指定vlan 内的一个或一组端口。 参数:[interface-list] 要添加或者删除的端口的列表,支持”;””-”,如:ethernet 0/0/1;2;5或ethernet 0/0/ 1-6;8。 命令模式:vlan 配置模式 缺省情况:新建立的vlan 缺省不包含任何端口。 使用指南:access 端口为普通端口,可以加入vlan,但同时只允许加入一个vlan。
神州数码交换机配置命令
交换机基本状态: hostname> ;用户模式 hostname# ;特权模式 hostname(config)# ;全局配置模式 hostname(config-if)# ;接口状态 交换机口令设置: switch>enable ;进入特权模式 switch#config terminal ;进入全局配置模式 switch(config)#hostname ;设置交换机的主机名 switch(config)#enable secret xxx ;设置特权加密口令 switch(config)#enable password xxa ;设置特权非密口令 switch(config)#line console 0 ;进入控制台口 switch(config-line)#line vty 0 4 ;进入虚拟终端 switch(config-line)#login ;允许登录 switch(config-line)#password xx ;设置登录口令xx switch#exit ;返回命令 交换机VLAN设置: switch#vlan database ;进入VLAN设置 switch(vlan)#vlan 2 ;建VLAN 2 switch(vlan)#no vlan 2 ;删vlan 2 switch(config)#int f0/1 ;进入端口1 switch(config-if)#switchport access vlan 2 ;当前端口加入vlan 2 switch(config-if)#switchport mode trunk ;设置为干线 switch(config-if)#switchport trunk allowed vlan 1,2 ;设置允许的vlan switch(config-if)#switchport trunk encap dot1q ;设置vlan 中继switch(config)#vtp domain ;设置发vtp域名 switch(config)#vtp password ;设置发vtp密码 switch(config)#vtp mode server ;设置发vtp模式 switch(config)#vtp mode client ;设置发vtp模式 交换机设置IP地址: switch(config)#interface vlan 1 ;进入vlan 1 switch(config-if)#ip address ;设置IP地址 switch(config)#ip default-gateway ;设置默认网关 switch#dir Flash: ;查看闪存 交换机显示命令: switch#write ;保存配置信息 switch#show vtp ;查看vtp配置信息
神州数码Bootrom下的升级配置
实验十、交换机BootROM下的升级配置 一、 实验目的 1、了解什么时候采用BootROM升级; 2、了解怎样使用BootROM升级交换机。 二、 应用环境 当交换机的系统文件遭到破坏时,已经无法进入正常的CLI界面进行操作(譬如:对交换机升级不成功的时候),可以进入交换机BootROM方式对交换机重新升级或还原文件。 三、 实验设备 1、DCS-3926S交换机1台 2、PC机1台、tftp server 1台(1台PC也可以,既作为调试机又作为tftp服务器) 3、Console线1根 4、直通网线1根 四、 实验拓扑 五、 实验要求 1、按照拓扑图连接网络; 2、PC和交换机的24口用网线相连; 3、交换机的管理IP为192.168.1.100/24 4、PC网卡的IP地址为192.168.1.101/24; 六、 实验步骤 第一步:配置TFTP服务器
第二步:进入BootROM方式 在交换机启动的过程中,按住“ctrl+b”键,直到交换机进入BootROM监控模式。操 作显示如下: DCS-3926S Management Switch Copyright (c) 2001-2003 by Digital China Networks Limited. All rights reserved. Testing RAM... 33,554,432 RAM OK. Loading BootROM... Starting BootRom... 109.13 BogoMIPS Version: 1.2.0 Creation date: Jun 22 2004, 15:47:10 Attached TCP/IP interface to sc0. [Boot]: 第三步:设置交换机IP地址和升级方式。 在BootROM模式下,执行命令setconfig,设置本机在BootROM模式下的IP地址、掩 码、服务器的IP地址、掩码及选择TFTP或者FTP的升级方式。如设置本机地址为 192.168.1.100/24,PC地址为192.168.1.101/24,选择TFTP升级方式,配置如下: [Boot]: setconfig Host IP Address: [192.168.10.22] 192.168.1.100 !该地址是交换机地址 Server IP Address: [192.168.10.151] 192.168.1.101 !该地址是服务器地址 FTP(1) or TFTP(2): [1] 2 Network interface configure OK.
神州数码路由交换配置命令(全)
路由 ssh aaa authentication login ssh local aaa authentication enable default enable enable password 0 123456 username admin password 0 123456 ip sshd enable ip sshd auth-method ssh ip sshd auth-retries 5 ip sshd timeout 60 TELNET R1_config#aaa authentication login default local R1_config#aaa authentication enable default enable R1_config#enable password 0 ruijie R1_config#line vty 0 4 R1_config_line#login authentication default R1_config_line#password 0 cisco 方法2, 不需要经过3A认证R1_config#aaa authentication login default none R1_config#aaa authentication enable default enable R1_config#enable password 0 cisco R1_config#line vty 0 4 R1_config_line#login authentication default CHAP认证单向认证,密码可以不一致 R2_config#aaa authentication ppp test local R2_config#username R2 password 0 123456 R2_config_s0/2#enc ppp R2_config_s0/2#ppp authentication chap test R2_config_s0/2#ppp chap hostname R1 R1_config#aaa authentication ppp test local R1_config#username R1 password 0 123456 R1_config_s0/1#enc ppp R1_config_s0/1#ppp authentication chap test R1_config_s0/1#ppp chap hostname R2 pap认证双向认证,密码要求一致R2_config#aaa authentication ppp test local R2_config#username R2 password 0 123456 R2_config_s0/2#enc ppp R2_config_s0/2#ppp
神州数码3950交换机基本管理命令
目录 第1章交换机基本配置命令 ...................................................... 1-1 1.1 基本配置命令...................................................................................... 1-1 1.1.1 authentication line ..................................................................................1-1 1.1.2 banner ......................................................................................................1-1 1.1.3 boot img ...................................................................................................1-2 1.1.4 boot startup-config .................................................................................1-2 1.1.5 clock set...................................................................................................1-2 1.1.6 config........................................................................................................1-3 1.1.7 debug ssh-server ....................................................................................1-3 1.1.8 disable......................................................................................................1-3 1.1.9 enable.......................................................................................................1-4 1.1.10 enable password...................................................................................1-4 1.1.11 end ..........................................................................................................1-4 1.1.12 exec-timeout..........................................................................................1-5 1.1.13 exit ..........................................................................................................1-5 1.1.14 help.........................................................................................................1-5 1.1.15 hostname ...............................................................................................1-6 1.1.16 ip host.....................................................................................................1-6 1.1.17 ipv6 host.................................................................................................1-6 1.1.18 ip http server .........................................................................................1-7 1.1.19 language.................................................................................................1-7 1.1.20 login........................................................................................................1-7 1.1.21 password................................................................................................1-8 1.1.22 privilege..................................................................................................1-8 1.1.23 reload......................................................................................................1-9 1.1.24 service password-encryption ..............................................................1-9 1.1.25 service terminal-length.........................................................................1-9 1.1.26 sysContact...........................................................................................1-10 1.1.27 sysLocation .........................................................................................1-10 1.1.28 set default ............................................................................................1-10 1.1.29 setup..................................................................................................... 1-11 1.1.30 show clock........................................................................................... 1-11 1.1.31 show cpu usage .................................................................................. 1-11 1.1.32 show cpu utilization............................................................................ 1-11 1.1.33 show memory usage ..........................................................................1-12 1.1.34 show privilege .....................................................................................1-12 1.1.35 show privilege mode LINE .................................................................1-12 1.1.36 show tcam usage ................................................................................1-13 1.1.37 show temperature ...............................................................................1-13