CV DEMO 1.2
NOVA电化学工作站使用说明

Autolab电化学工作站和NOVA软件使用操作流程Cyclic Voltammetry循环伏安测量一、基本原理循环伏安方法是利用线性电位扫描方法研究电化学体系的常用方法(简称CV)。
CV方法控制参数有:恒电位仪方式控制(control potential)、恒电位仪自动重新启动(auto restart option)、起点扫描电位(start potential)、终点扫描电位(end potential)、扫描高电位(upper potential)、扫描低电位(Low potential)、起点电位极化时间(start time)、终点电位极化时间(hold time)、电们扫描斜率(slew rate)、电位扫描循环周数(cycles)、每个循环内的采样次数(samples/cycle),溶液电阻(IR)补偿、阴极电流量程(cathodic current)、阳极电流量程(anodic current)。
循环伏安法是一种常用的电化学研究方法。
该法控制电极电势以不同的速率,随时间以三角波形一次或多次反复扫描,电势范围是使电极上能交替发生还原和氧化反应,并记录电流-电势曲线。
根据曲线形状可以判断电极反应的可逆程度,中间体、相界吸附或新相形成的可能性,以及偶联化学反应的性质等。
常用来测量电极反应参数,判断其控制步骤和反应机理,并观察整个电势扫描范围内可发生哪些反应,及其性质如何。
循环伏安法在电极上施加线性扫描电压,当到达某设定的终止电压后,再反向回扫至某设定的起始电压,若溶液中存在氧化态O,电极上将发生还原反应,反向回扫时,电极上生成的还原态R将发生氧化反应:从循环伏安图可确定氧化峰峰电流i pa和还原峰电流i pc,氧化峰峰电位值和还原峰峰电位值。
二、循环伏安法(CV)的基本操作2.1先打开电化学工作站电源,然后开启计算机,运行桌面的快捷方式(或:开始——程序——Autolab——Nova 1.5),系统进入主界面。
控制器编程软件说明书
CP Customer Center China希贝动力工具中国客户中心上海市南京西路819号中创大厦1108室20041电话: +86 (021) 6215 3587 传真: +86 (021) 6258 7038CVIPC2000操作手册CP Customer Center China希贝动力工具中国客户中心上海市南京西路819号中创大厦1108室20041电话: +86 (021) 6215 3587 传真: +86 (021) 6258 7038目录表1简介1.1传输方式和命令方式1.2 “点到点”连接和“多点”连接1.3 安装1.3.1 硬件和软件要求1.3.2 CVIPC 软件保护1.3.3 安装1.3.4 升级控制器软件1.3.5 卸载1.3.6升级CVIPC 软件1.4起动程序2.创建一个站点2.1 创建2.2 复制一个站点CP Customer Center China希贝动力工具中国客户中心上海市南京西路819号中创大厦1108室20041电话: +86 (021) 6215 3587 传真: +86 (021) 6258 70382.3 删除一个站点3.参数3.1 控制器3.1.1串口RSA和RSBRSA口RSB 口3.1.2 连接以太网3.1.3 外设报告输出条形码标签打印机遥控显示3.2 笔记本3.3 拧紧轴3.4 拧紧周期3.4.1加一个周期3.4.2加一个相3.4.3删除3.4.4 复制CP Customer Center China希贝动力工具中国客户中心上海市南京西路819号中创大厦1108室20041电话: +86 (021) 6215 3587 传真: +86 (021) 6258 70383.4.5 粘贴3.4.6灵敏度系数3.4.7 主要参数3.4.8 相类型3.4.9指令3.4.9.1 寻帽相3.4.9.2 快速旋转相3.4.9.3 最终拧紧相3.4.9.4 反转相3.4.9.5 拧紧结果不合格时所采取的动作相3.4.9.6 用残余扭矩法的相3.4.9.7 同步等候相3.4.9.8 跳转相3.4.10 拧紧轴清单3.5 曲线4 结果4.1 拧紧4.1.1显示4.1.2 打印以PC4格式的详情报告码CP Customer Center China希贝动力工具中国客户中心上海市南京西路819号中创大厦1108室20041电话: +86 (021) 6215 3587 传真: +86 (021) 6258 7038以32位(0 或1)型式的二进制报告码。
opencv for c# 开发文档

OpenCV for Unity 1.2.3iOS & Android supportWin & Mac Standalone support(if Unity4,Pro only)Support for preview in the Editor(if Unity4,Pro only)Work with Unity Free & ProSystem RequirementsBuild Win Standalone & Preview Editor : Windows7 or laterBuild Mac Standalone & Preview Editor : OSX 10.8 or laterOpenCV for Unity is an Assets Plugin for using OpenCV from within Unity.●Since this package is a clone of OpenCV Java, you can use as it is all the APIReference OpenCV Java 2.4.11 (link). (“org.opencv.android” and “SURF and SIFT of org.opencv.features2d” are excluded)●You can image processing in real-time by using the WebCamTexture capabilities ofUnity. (real-time face detection works smoothly in iPhone 5)●Provides a method to interconversion of Unity's Texture2D and OpenCV's Mat.●Includes many classes from OpenCVForUnity, and implements IDisposable. Youcan manage the resources with the "using" statement.Please download Demo Application for Android and watch Setup Tutorial Video(Unity4 Unity5).API Reference OpenCV for UnitySampleCode using OpenCV for Unity is available.●MarkerBased AR Sample●FaceTracker Sample●Voforia with OpenCV for Unity Sample●Kinect with OpenCV for Unity SampleIf you want to try the Beta7 Version of “OpenCV for Untiy” based on “OpenCV3.0.0”, unzip the OpenCVForUntiy3.0.0-beta7.zip, please replace the “OpenC VForUnity” folder.“OpenCV for Untiy” based on“OpenCV3.0.0” support Unity5.not support Unity4.Version changes1.2.3 [Common] Add Beta7 Version of “OpenCV for Untiy” based on “OpenCV3.0.0”. [Common]Add WrapPerspectiveSample, HandPoseEstimationSample, MultiObjectTrackingBasedOnColorSample.1.2.2 [iOS]Move “OpenCVForUnity/ iOSforXcode/opencv2.framework” to “OpenCVForUnity/Plugins/iOS/”folder. [iOS]Fix WebCamTexture bug of SampleScene in Unity5.2.1.2.1 [Common] Add Beta5 Version of “OpenCV for Untiy” based on “OpenCV3.0.0”(Add Linux support). [Common]Rewrite SampleScene.1.2.0 [Common]Add Utils. getGraphicsDeviceType(). [Common]Add SampleScene Setup Tutorial Video for Unity5.1.1.9 [Common]Add CamShiftSample.(Object Tracking) [Common]Add OpenCVForUnityMenuItem.cs.( This script set plugin import settings automatically from MenuItem.)1.1.8 [iOS] Fix problem when working with Metaio(UnityAppController problem). [iOS]Change file name fr om “OpenCVForUnity/Plugins/iOS/MyAppController.mm” to “OpenCVForUnity/Plugins/iOS/OpenCVForUnityAppController.mm”.[Common]Add [System.Serializable] to basic class. [iOS]Move “OpenCVForUnity/ iOSforXcode/iOS_BuildPostprocessor.cs” to “OpenCVForUnity/Editor”folder. [Common] Add Beta2 Version of “OpenCV for Untiy” based on “OpenCV3.0.0”(support Unity5).1.1.7 [Common] Update to OpenCV2.4.11. [Common] Add Beta Version of “OpenCV for Untiy” based on “OpenCV3.0.0”(support Unity5).1.1.6 [Common]Fix FaceRecognizer.cs(Compile Error had happened only in the case of Unity4 Non Pro License).1.1.5 [Common]Add Beta Version of “OpenCV for Untiy” based on “OpenCV3.0.0-rc1”(support Unity5).[Android]Fix Utils.getFilePath(). [Common]Add WebCamTextureAsyncDetectFaceSample. [iOS]Change folder name from “OpenCVForUnity/iOS for Xcode/” to “OpenCVForUnity/iOSfor Xcode/”.Add iOS_BuildPostprocessor.cs.1.1.4 [Common]Add FaceRecognizer subclass. [Common]AddFaceRecognizerSampleScene. [Common]Fix SampleScene.1.1.3 [Common]Fix SampleScene. [Common] Change Property of Platform Dependent Compilation from UNITY_IPHONE to UNITY_IOS.1.1.2 [Common]Fix the direction of rotation of the mat that is converted from WebCamTexture.1.1.1 [Common]Add OpticalFlowSampleScene.[Common]Fix SampleScene. [Common] Fix function name of CvANN_MLP_TrainParams class.1.1.0 [Common]Divide asset for Unity4 and Unity5.1.0.9 [Common]Support for Unity5.1.0.8 [Common]Update to OpenCV2.4.101.0.7 [iOS]Support for arm64 build target.(Unity 4.6.1p3 or higher) [Common]Add Constructor VideoCapture(string filename). [Common]Add Method copyToMat(),copyFromMat().1.0.6 [Android]Support for x86 build target.(Unity 4.6 or higher)1.0.5 [Common] Bug fixes SampleScene.1.0.4[Common]Add Method matToTexture2D( Mat mat, Texture2D texture2D, Color32[] bufferColors = null).1.0.3 [Common]Support for preview in the Editor.(Pro only) [Common]Support for Win & Mac Standalone.(Pro only) [Android]Change of location of the file that you want to use for Utils.getFilePath().Changed to use“Aseets/StreamingAssets/” folder. [iOS] Add the file that you want to use for Utils.getFilePath() to Xcode project is no longer required.Changed to use“Aseets/StreamingAssets/” folder.1.0.2 [iOS]fix library(libjpeg,libpng) version coflicts.1.0.1 Initial versionIn Unity4 and Unity5 the different files to be imported.When you update the project that you made in Unity4 to Unity5, please import again this asset in Unity5.Quick setup procedure to run the sample scene(Setup Tutorial Video Unity4Unity5)1.If Unity4, Move “OpenCVForUnity/Plugins/”folder to“Assets/”folder.2.If Unity5,Select MenuItem[Tools/OpenCV for Unity/Set Plugin Import Settings].3.Move “OpenCVForUnity/StreamingAssets/”folder to “Assets/”folder.4.Please set [PlayerSettings]-[Resolution and Presentation]-[Orientation]-[DefaultOrientation : Landscape Left] when you build the sample scene.5.Add all of the “***.unity” in the “OpenCVForUnity” folder to [Build Settings] –[Scene In Build].※Inspector Setting of “opencv2.framework” and “opencvforunity.bundle”might have been reset at the time of import. In that case, re-setup is required.Screenshot after the setupUnity4Unity5Android Setup ProcedureUnity4●Copy from “OpenCV ForUnity/Plugins/Android/” to “Assets/Plugin s/Android/”folder.( libnative_camera_r*.*.*.so is only required when using the VideoCapture.)Unity5●“OpenCVForUnity/Plugins/Android/opencvforunity.jar”–Select platformAndroid in Inspector.●“OpenCVForUnity/Plugins/libs/armeabi-v7a/*.so” –Select platform Androidand CPU ARMv7 in Inspector. ( libnative_camera_r*.*.*.so is only required when using the VideoCapture.)●“OpenCVForUnity/Plugins/libs/x86/*.so” – Select platform Android and CPUx86 in Inspector.( libnative_camera_r*.*.*.so is only required when using the VideoCapture.)Put the file that you want to use for Utils.getFilePath() in the “Aseets/StreamingAssets/”folder. (haarcascade_frontalface_alt.xml etc is forOpenCVForUnitySample.scene. Please copy only when necessary.)iOS Setup ProcedureUnity4●Copy from “OpenCVForUnity/Plugins/iOS/” to “Assets/Plugin s/iOS/” folder.●Link “OpenCVForUnity/Plugins/iOS/opencv2.framework” to Xcode project. (inXcode project. Build Phases > Link Binary with Libraries > Add opencv2.framework . recommend to use PostprocessBuildPlayer.)Unity5●“Op enCVForUnity/Plugins/iOS/libopencvforunity.a” – Select platform iOS inInspector.●“OpenCVForUnity/Plugins/iOS/opencv2.framework” – Select platform iOS inInspector.●Put the file that you want to use for Utils.getFilePath() in the“Aseets/StreamingAssets/”folder. (haarcascade_frontalface_alt.xml etc is for OpenCVForUnitySample.scene. Please copy only when necessary.)Win Standalone Setup ProcedureUnity4●Copy from “OpenCVForUnity/Plugins/x86/” to “Assets/Plugins/x86/” folder.●Copy from “OpenCVForUnity/Plugins/x86_64/”to “Assets/Plugins/x86_64/”folder.Unity5●“OpenCVForUnity/Plugins/x86/opencvforunity.dll” –Select platformEditor,Standalone and CPU x86 and OS Windows in Inspector.●“OpenCVForUnity/Plugins/x86_64/opencvforunity.dll” –Select platformEditor,Standalone and CPU x86_64 and OS Windows in Inspector.●Put the file that you want to use for Utils.getFilePath() in the“Aseets/StreamingAssets/”.(haarcascade_frontalface_alt.xml etc is for OpenCVForUnitySample.scene. Please copy only when necessary.)●If you use the “VideoCapture(string filename)”, require setup.1)Download "OpenCV for Windows Version2.4.11"(/downloads.html).2)Set Path to "opencv_ffmpeg2411.dll"if 32bit, "C:¥opencv¥build¥x86¥vc10¥bin¥".if 64bit, "C:¥opencv¥build¥x64¥vc10¥bin¥".Mac Standalone Setup ProcedureUnity4●Copy from “OpenCVForUnity/Plugins/opencvforunity.bundle” to“Assets/Plugins/” folder.Unity5●“OpenCVForUnity/Plugins/opencvforunity.bundle” –Select platformEditor,Standalone and CPU x86_64 and OS OSX in Inspector.●Put the file that you want to use for Utils.getFilePath() in the“Aseets/StreamingAssets/”.(haarcascade_frontalface_alt.xml etc is for OpenCVForUnitySample.scene. Please copy only when necessary.)Q & AQ1.“DllNotFoundException: opencvforunity” is displayed on the console when run the sample scene.A1.Plugin does not seem to be loaded correctly. Please check the setup procedure.Q2.“ArgumentException: The output Mat object has to be of the same size” is displayed on the console when run the sample scene.A2.After having set up Plugin, Plugin may work well when you reboot Unity.Q3."Level 'Texture2DtoMatSample' (-1) could not be loaded because it has not been added to the build settings." is displayed on the console when run the sample scene.A3.Please Add all of the “***.unity” in the “OpenCVForUnity” folder to [Build Settings] – [Scene In Build].Q4.In DetectFaceSample or WebCamTextureDetectFaceSample, red rectangle is not displayed around face.A4.you might have failed to read the "haarcascade_frontalface_alt.xml".Please confirm whether there is ”OpenCVForUnity/StreamingAssets”folder at the right position.Q5.Support Web platform?A5.Since the Unity Web Player does not support the native plugin, "OpenCV for Unity" does not support "WebPlayer Platform".Q6.Support WindowsStoreApps8.1 & WindowsPhone8.1.A6.If you want to try the Beta Version of “OpenCV for Untiy” based on “OpenCV3.0.0”(Support WindowsStoreApps8.1 & WindowsPhone8.1), unzip the OpenCVForUntiy3.0.0-beta.zip, please replace the “OpenCVForUnity” folder.“OpenCV for Untiy” based on “OpenCV3.0.0” s upport Unity5.not support Unity4.IMPORTANT: READ BEFORE DOWNLOADING, COPYING, INSTALLING OR USING.By downloading, copying, installing or using the software you agree to this license.If you do not agree to this license, do not download, install,copy or use the software.License AgreementFor Open Source Computer Vision LibraryCopyright (C) 2000-2008, Intel Corporation, all rights reserved.Copyright (C) 2008-2011, Willow Garage Inc., all rights reserved.Third party copyrights are property of their respective owners.Redistribution and use in source and binary forms, with or without modification,are permitted provided that the following conditions are met:* Redistributions of source code must retain the above copyright notice,this list of conditions and the following disclaimer.* Redistributions in binary form must reproduce the above copyright notice,this list of conditions and the following disclaimer in the documentationand/or other materials provided with the distribution.* The name of the copyright holders may not be used to endorse or promote products derived from this software without specific prior written permission.This software is provided by the copyright holders and contributors "as is" andany express or implied warranties, including, but not limited to, the implied warranties of merchantability and fitness for a particular purpose are disclaimed.In no event shall the Intel Corporation or contributors be liable for any direct, indirect, incidental, special, exemplary, or consequential damages(including, but not limited to, procurement of substitute goods or services;loss of use, data, or profits; or business interruption) however causedand on any theory of liability, whether in contract, strict liability,or tort (including negligence or otherwise) arising in any way out ofthe use of this software, even if advised of the possibility of such damage.。
视频图像处理算法opencv在esp32及esp32s3上面的移植
opencv在esp32及esp32s3上面的移植1Opencv简介OpenCV是一个基于Apache2.0许可(开源)发行的跨平台计算机视觉和机器学习软件库,可以运行在Linux、Windows、Android和Mac OS操作系统上它轻量级而且高效——由一系列C 函数和少量C++ 类构成,同时提供了Python、Ruby、MATLAB等语言的接口,实现了图像处理和计算机视觉方面的很多通用算法。
这就使我们在esp32上实现OpenCV,进行图像处理以及计算机视觉成为了现实。
2Esp32s3简介ESP32-S3 和ESP32 一样是一款同时支持WIFI和蓝牙功能,可以说是专为物联网而生的一款Soc,应用领域贯穿移动设备、可穿戴电子设备、智能家居等,在2,4GHz 频带支持20MHz和40MHz频宽,和以往ESP32 不一样的是,蓝牙除了支持BLE以外,目前支持Bluetooth 5 和Bluetooth mesh,更多的GPIO口使其能控制的外设达到更多,全速USB OTG支持直接通过USB协议与芯片进行通信。
最主要的是esp32s3具有双核的cpu。
在图像处理方面有着先天的优势。
Core0通常使用作为wifi数据传输的处理。
Core1进行视觉处理进程的运行。
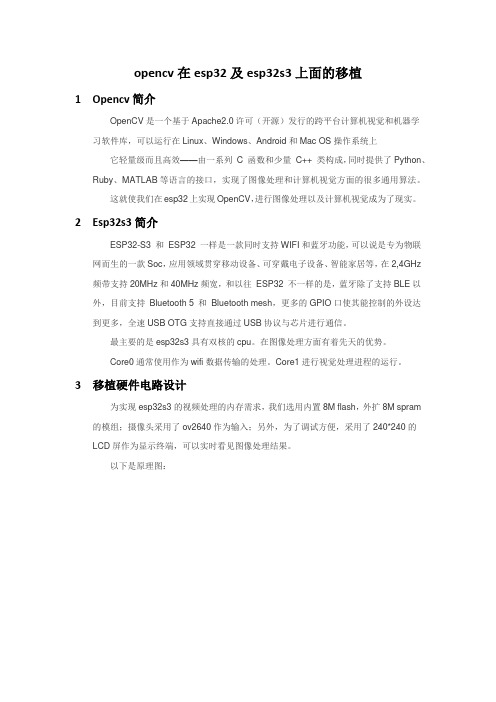
3移植硬件电路设计为实现esp32s3的视频处理的内存需求,我们选用内置8M flash,外扩8M spram 的模组;摄像头采用了ov2640作为输入;另外,为了调试方便,采用了240*240的LCD屏作为显示终端,可以实时看见图像处理结果。
以下是原理图:整体系统效果如下:反面的摄像头以及补光灯:此开发板可以在某宝上面搜索esp32s3 opencv。
4Demo软件效果一、Opencv中的目标拾取代码。
通常,我们在图像处理的时候,需要对采集照片进行灰度处理,然后,对照片进行二值化处理。
进而进行目标拾取。
使用的函数为:Mat inputImage(fb->height, fb->width, CV_8UC2, fb->buf);// rgb565 is 2 channels of 8-bit unsignedcvtColor(inputImage, inputImage, COLOR_BGR5652GRAY);threshold(inputImage, inputImage, 128, 255, THRESH_BINARY);轻松就会得到目标物体:效果如下:开发板中提供demo的源代码,可以使用esp-idf进行编译运行。
ICD植入术及并发症讲解

放置电极
• 心室电极
– 尽可能放置于右室心尖部
• 心房电极
– 尽可能可以放于右心耳右房外侧壁, 避免远场感知
• 用分析仪检测有无远场R波过感知(FFRW)
– 通过心房EGM,监测有无FFRW – FFRW应符合一致性或不存在原则
ICD电极定位
除颤电极,钢丝塑性进瓣要大弯度,右室舒张进入 除颤电极头端可以考虑放的深一些,RV COIL会磨损三尖瓣
头静脉切开:并发症最少 锁骨下静脉穿刺:目前最常用的方法
ICD植入左侧,穿刺在左侧
(颈内静脉切开、颈外静脉切开、腋静脉穿刺或切开)
术前准备-穿刺鞘及建议
撕开鞘 - 7 Fr – 6948, 6949
Safe sheaths 7 Fr – 6948, 6949
- 9 Fr - 6944 & 6947
肌间沟
成功植入的五个关键步骤
准备好植入所需的设备(包括体外除颤器),患者管 理与起搏器管理。
放置电极及测量电极的阻抗、感知和起搏阈值 连接ICD与电极,用程控仪测量P波和R波的振幅及
电极阻抗,以确保室颤感知 进行DFT测试 最后完成ICD参数的设置,填写植入单和临时担保卡
ICD电极植入途径
低温环境下ICD 短效期产品
–电容器充电时间
– 充电时间<15s,11s
初始询问时Quick Look
进行充电测试
? 你预期的充电时间是多少? ? 充电后必须dump?
预程控 ICD
• 设置时间 • EGM 来源 • 心室感知灵敏度设为1.2mV • VF Detection 设为“OFF” • 仅打开VF治疗参数
6943
6945
6947 & 6944 标示
4-7节串联锂电池自动均衡及保护电路方案说明V1.2

4-7节串联锂电池自动均衡及保护电路方案说明V1.0 2008.08 ○C2008Burnon International Limited 4-7节串联锂电池自动均衡及保护电路方案说明V1.02008.08○C 2008Burnon International Inc. Page 2 概述基于锂电池安全性能的要求,本保护电路采用美国intersil 电池组专用管理芯片ISL9208、Microchip MCU PIC16F690、IR MOSFTE ,通过I 2C 通信控制,对4-7节串联锂离子、聚合物锂电池包进行管理。
采用上位机(PC )实时监控,方便生产、检测。
主要特点体现在对电池组的:1:过充电保护 (充电过高电压保护、充电过电流保护)2:过放电保护 (放电过低电压保护、放电过电流保护、放电短路保护) 3:电池组温度异常保护(电池组温度过低,关闭电池组充放电状态。
电池组温度过高,关闭电池组充放电状态。
) 4:休眠保护 (电池电压过低关闭电池组输出) 5:电池组自动均衡(本保护电路的特点)简要说明:电池组的单个电池之间由于电压、容量、内阻存在差异,在充放电 过程中最终会导致电池电压存在差异。
而保护电路是通过检测单个电池的电压来 进行保护,保护电路检测到其中某个电池电压过高关闭充电状态,保护电路检 测到其中某个电池电压过低关闭放电状态。
为了使电池组发挥最大性能,因此 本电路引入电池组在充电过程中电压进行自动均衡。
特性1、适用范围相关电池组参数可通过ISP 在线编程接口及外部设备更改。
2、 用途: 适用于4-7节串联锂离子电池组、聚合物锂电池组。
本DEMO 板可根据客户的需要,通过外编程更改有关参数,也可适用于4-7节串联磷酸铁锂电池组。
3、特点 3-1 针对各节电池的高精度电压检测功能4-7节串联锂电池自动均衡及保护电路方案说明V1.0 2008.08Page 3 © 2008 Burnon International Inc.3-2 充电及均衡参数 序号 项目 详细内容标准1耐高压元件充电器最高电压必须小于标准值18V/4CELL ;23V/5CELL ;27.5V/6CELL ;32V/7CELL2 恒流恒压充电 (充电器参数)恒压电压CV 16.8V/4CELL ;21V/5CELL ;25.2V/6CELL ;29.6V/7CELL恒流电流CC 小于3.5A 3充电过流保护过流保护电流 4A ±20% 延迟时间0.5S 4 均衡 均衡基准电压差 30mV均衡以最低电池电压为基准,误差超 过30mV 的电池都进行均衡均衡电流100mA 3-3 输出参数 序号 项目详细内容标准1输出电压 最小输出电压 11V/4CELL;14V/5CELL;16.8V/6CELL; 19.6V/7CELL最大输出电压 16.8V/4CELL ;21V/5CELL ;25.2V/6CELL; 29.6V/7CELL2 输出电流 放电电流<15A 放电过流保护 (一次保护)保护电流 20A ±20% 保护延迟时间 1S保护解除条件断开负载,自恢复短路保护 (二次保护)保护条件 外部电路短路 保护电流 40A ±20% 保护延迟时间200us4-7节串联锂电池自动均衡及保护电路方案说明V1.02008.08○C 2008Burnon International Inc. Page 4 保护解除条件断开负载,自恢复3-4 充放电电池温度监测 序号 项目 详细内容 标准1充电状态监测电池组温度 正常充电摄氏-20℃——50℃ 充电保护大于50℃ 充电恢复小于40℃2放电状态监测电池组温度 正常放电摄氏-20℃——75℃ 放电保护大于75℃ 放电恢复小于60℃3-5 休眠及PCB 功耗 序号 项目详细内容标准1 工作状态 (充放电状态) PCB 板功耗 小于3.8mA2休眠状态 条件:1:电池电压范围2.5V -4.2V 2:无充放电状态PCB 板功耗EB+对GND :小于30uA EB-对GND :小于60uA 休眠延迟时间 120S休眠解除条件 充电放电放电维持电流 大于50mA4-7节串联锂电池自动均衡及保护电路方案说明V1.0 2008.08Page 5 © 2008 Burnon International Inc.接口规范:4节串联(拨码开关一位置1、另一位置2)5节串联(拨码开关一位置1、另一位置ON )4-7节串联锂电池自动均衡及保护电路方案说明V1.02008.08○C 2008Burnon International Inc. Page 66节串联(拨码开关一位置ON 、另一位置2)7节串联(拨码开关一位置ON 、另一位置ON )4-7节串联锂电池自动均衡及保护电路方案说明V1.0 2008.08Page 7 © 2008 Burnon International Inc.使用说明1、 放置DEMO 板的区域必须与金属等导电物体隔离,并预留一定空间。
EMGUCV基础
第一章Emgu Cv简介:Emgu CV 是.NET 平台下对OpenCV 图像处理库的封装。
也就是OpenCV的.NET 版。
它运行在.NET 兼容的编程语言下调用OpenCV 的函数,如C#、VB、VC++等。
同时这个封装库可以在Mono 下编译和在Linux / Mac OS X 上运行。
Emgu Cv的优势在于.net非常完美的界面,给用户操作带来非常直观的感觉。
Emgu Cv每个版本都有修改一部分函数,在兼容旧版本下做的不是很好。
本书主要采用VS2013+EmguCv3.0版本,希望读者也采用相同的版本进行学习,从而避免一些版本兼容上的问题。
在国内并不流行Emgu Cv,因此关于Emgu Cv的资料比较少,从而导致了新手学习起来比较费劲,同时使更多想去学习Emgu Cv的人放弃学习,这样的一个恶性循环。
Emgu Cv安装和配置:Emgu Cv的安装还算比较简单,这边采用Emgu Cv3.0版本进行安装解析。
第一步:下载EmguCv3.0在官网https:///projects/emgucv/files/emgucv/进入界面选择3.0.0版本进行下载,如图1.1所示。
(写作时间为2016年4月,因此3.1版本也已经发布。
这边边通过对某一个版本的学习,在去了解其它版本的也是非常简单的。
)图1.1 Emgu Cv安装下载列表点击3.0.0进入下载界面,如图1.2所示。
图1.2 EmguCv3.0.0下载界面前两者是带有Cuda加速的Emgu CV,后两者则为没有带Cuda加速的Emgu Cv。
读者可以查看电脑是否支持Cuda加速进行选择。
这边笔者下载第二个。
第二部:安装EmguCv下载完成之后,如图1.3所示。
双击安装包进行提取文件,如图1.4所示,安装Emgu Cv的过程和安装其它软件的过程基本一致。
图1.3 EmguCv安装程序图1.4 提取EmguCv文件提取完成之后,如图1.5所示,得到EmguCv文件。
广播剧新人CV调教教程(转)
这里推荐一个雪碧制作的针对翻唱歌曲制作的CE教程:
read.phptid=177679
3、 硬件和软件的连接
3、尽量消除环境噪音。不要在录音时开风扇、空调一类的电器;不要有明显的人说话的声音作为背景;不要把手机开在旁边,它会突然响起或者震动什么的;不要使用滚轮鼠标一边拉台词一边录,这样肯定会把奇怪的“卡拉卡拉”声录进去……
4、消除电脑噪音。录音的时候尽量不要使用其他软件,关掉QQ。尤其不能在SKYPE的保持状态下录音,绝对会增大噪音,有时还可能录入其他人的谈话声!
把你的麦克风插到电脑的插口上,开始调试。在开始菜单—控制面板—音频、语音和音频设备—声音和音频设备—语声—录音中按照系统提示等操作(如果你用的是 WINDOWS的话)
确认没有问题后,调整你的录音音量。双击任务栏右下角的小喇叭(如果没有依然在控制面板里可以调出来),选项—属性—录音,全部打上勾,确定。在麦克风一项上打勾,并调整适当的音量。打开录音软件,试着录音看看。如果发现波形太小,还在这个窗口中,选项—高级控制,在增益上打上钩,再试着录录看。
4、搞清楚自己究竟在录什么。做CV要有一种做CV的自觉——什么样的剧要用什么样的感觉来演。生活类的的就要自然,古风的就要能“端”得起来、文艺得起来,动漫类的就要够有张力、够夸张。虽说“每个人有每个人的风格”,但是风格决不是一成不变的哦~~
5、条件允许的情况下,多和自己的搭档、监督对戏。因为录音都是自己对着电脑完成的,很难有入戏的感觉,所以多多对戏能够陪养出一种“演戏”的感觉,避免“读剧本”悲剧的发生。而且也可以在对戏中纠正自己理解和语气表达上的错误和不足,比交了一次又一次作业要高效得多。(对戏建议使用软件SKYPE,请自行到 上了解、下载、学习使用)
OpenCV图片和视频数据的读取与存储
OpenCV读取图片文件读取图像文件,使用的imread()。
imread()函数返回的是Mat对象,如果读取函数文件失败,会返回一个空矩阵(常量cv::Mat::data变量的值是NULL)。
Mat imread(const string& filename, int flags=1 )filename:是被读取或者保存的图像文件名;flag:参数值有三种情况:flag>0,该函数返回3通道图像,如果磁盘上的图像文件是单通道的灰度图像,则会被强制转为3通道;flag=0,该函数返回单通道图像,如果磁盘的图像文件是多通道图像,则会被强制转为单通道; flag<0,则函数不对图像进行通道转换。
imread()函数支持多种文件格式,且该函数是根据图像文件的内容来确定文件格式,而不是根据文件的扩展名来确定。
支持的图像格式:bmp、dib、jpg、jpeg、jpe、png、pbm、pgm、ppm、sr、ras、tiff、tif、exr、jp2。
(需要对应的库支持,开发使用的库要编译时添加进去,然后编译生成opencv库)OpenCV存储图片文件保存图像文件,使用的imwrite()。
imwrite()函数返回的是bool。
bool imwrite(const string& filename, InputArray image,const vector<int>& params=vector<int>())filename是存成指定的文件名,注意格式是由指定的文件扩展名确定。
PNG-是无损压缩格式,推荐使用。
BMP-格式是无损格式,但是一般不进行压缩,文件尺寸非常大;JPEG-格式的文件娇小,但是JPEG是有损压缩,会丢失一些信息。
并不是所有的 Mat 对象都可以存为图像文件,目前支持的格式只有8U类型的单通道和3通道(颜色顺序为 BGR)矩阵;如果需要要保存16U格式图像,只能使用PNG、JPEG 2000和TIFF格式。
CV必会若干常识
.前言广播剧是运用声音来勾勒出画面的声学艺术。
在如今信息化的时代,借助网络等传播媒介使得广播剧这一传统的艺术形式又重新焕发活力。
在这个个性发展几乎不受什么客观因素限制的时代,许多广播剧爱好者纷纷萌发了自己也想尝试着制作广播剧的想法。
如今广播剧网络社团如雨后春笋般涌现,极大地满足了广大广播剧爱好者想要制作广播剧的愿望。
然而,在实际制作过程中吗,我们发现许多想要参与制作广播剧的新人缺乏一定的配音常识,或者是想要作为一名优秀的配音人员必备的条件。
为此,我们特地网罗了一些作为CV新人必须要了解的常识性知识,进行适当的编排汇总,以期望能够成为新人们通往配音大道上的一盏方向灯。
最后真诚的祝愿每一位怀揣着做剧梦的新人都能梦想成真,做出自己满意的作品。
由于编者时间、水平有限,若出现学术性错误以及遗漏的重要知识点,欢迎广大行内者予以斧正。
紫舞恒音社团编写整理组目录1、CV的由来2、制作广播剧的一般流程及各职位职能作用3、CV怎么进行配音训练4、CV的录制设备要求5、CV录制干音的相关要求6、CV PIA戏与剧本的关系7、附录:广播剧制作术语第一章CV的由来声优(日语:声优,せいゆう),是“主に声だけで出演する俳优”的缩写,是日本人对配音演员的称呼。
对于爱好者来说,在剧集中,人物的声音是日本演员的称声优,其他的称配音演员。
“优”在日语中是“演员”“表演者”的意思。
追根溯源这个意思还是来自于中文,在我国古代就称梨园中的戏子为优伶。
声优,顾名思义,是用声音来表演的人,即我们日常所说的配音演员,罗马音是seiyuu,英语中称为CV(Voice Character),也称为CAST。
第二章广播剧的制作的一般流程及各职位职能作用第一节广播剧制作的一般流程1)前期工作1.1)调研1.2) 选材1.3) 制作周期确定1.4) 剧组搭建2)制作期2.1)staff招募2.1.1) 编剧2.1.2) 后期2.1.3) 导演2.1.4) 美工2.1.5) 宣传2.1.6) 翻唱+填词3)剧本撰写2.2.1) 剧本大纲与人设2.2.2) 剧本初稿撰写2.2.3) 剧本修订及定2.3)Cast招募及录音2.3.1) CV招募2.3.2) CV收音2.3.3) 导演PIA音及反音2.3.4) 导演剪音2.4)后期制作2.4.1)素材准备2.4.2) 后期制作2.4.3) PIA后期2.4.4) DEMO及最终发布2.5)ED制作2.5.1) 选曲2.5.2) 填词2.5.3) 翻唱2.6) 美术与宣传2.6.1) 海报选样2.6.2) 美工制作2.6.3) 宣传样式设计2.6.4) 宣传编码与发布第二节主要工作人员各职位职能作用策划:策划主要负责发起一个广播剧的制作提案,并全程负责监督广播剧的整体制作流程,包括定制策划案,剧本审核,招募,找合作人员,定音,督促各合作人员的工作,和所有参与制作的人员进行及时的沟通,有效掌握广播剧的制作环节,并对中间发生的各种情况做出及时的处理,掌控广播剧制作进度。
- 1、下载文档前请自行甄别文档内容的完整性,平台不提供额外的编辑、内容补充、找答案等附加服务。
- 2、"仅部分预览"的文档,不可在线预览部分如存在完整性等问题,可反馈申请退款(可完整预览的文档不适用该条件!)。
- 3、如文档侵犯您的权益,请联系客服反馈,我们会尽快为您处理(人工客服工作时间:9:00-18:30)。
NAME
Mobile:
Mail address:
Address:
Achievements ∙Completed 50+ on-site support or training per year in Far East market.
∙Created machines and kits of Asia models
∙Passed CCC, KTL and BSMI Certification
∙Organized annual international sales and technical conference.
∙Arranged exhibitions
Experience: Italy*****Shanghai Office Shanghai 2008-Present Regional Service Manager (Far East Market)
∙Conducted full service solutions in the areas of quotation, on-site training, remote service support and logistics in overseas market
∙Led technical team on after sales service and provide before sales support in mainland market
∙Visit clients regularly to receive and deal with customers’ complaints and suggestions.
∙Collaborated with R&D department from HQ to localize products and cooperated with Q&I department to achieve related certification 2006-2008Technical Manager (Chinese Mainland Market)
∙Supervised technicians from distributors, regularly train them and provide remote service support
∙Advised and trained sales staff from distributors in the area of machine presentation, demonstration and market strategy
∙Worked with market department from HQ to design and arrange exhibitions
2005~2006After Sales Service Specialist (Chinese Mainland Market)
∙Served remote assistance and service support on site
∙Translated technical documents and brochures
∙Arranged showroom and storerooms
General***** Equipment CO, LTD Shanghai 2003-2005Application Engineer
∙Designed working plan
∙Offered technical support on site
∙Assisted marketing department to complete bidding documents
Skill&Trainings
∙Abundant experience on training and service support both technical and sales side,
∙Strong skill on cooperating with foreign nationals by working with global colleagues and clients.
∙Confidence on extending and maintaining dealers’ network
∙In-depth understanding of sales promotion and market strategy
∙Yearly training in the area of service skills, products knowledge and market strategy in Italian or Singapore.
∙Yearly mechanical, electronic and programmed training in shanghai by service manager from HQ.
∙One and half year English training in E.F (English First)-from Level 8th to Level 13th
Education:
1999-2003SHANGHAI UNIVERSITY OF*****
Shanghai Bachelor of engineering。