HQAV智能无线终端产品说明书
HQAV智能无线终端产品说明书

HQ6006A智能无线终端产品使用说明书封面背景请沿用原来的版本!制作时请打样提交华强公司确认!HQ6006A智能无线终端产品使用说明书(适合于V31/V35/V36/V37/V52/V53等系列HQ6006A智能无线终端)V3.0.1-By HQITI产品简介欢迎您成为华强GPS大家庭一员!恭喜您成为华强GPS智能无线终端产品的用户,我们非常感谢您选择了本款GPS产品。
HQ6006A智能无线终端是深圳华强信息产业有限公司自主研发生产的新一代高科技产品;通过本产品利用全球卫星定位导航系统(GPS)、电子地图(GIS)、移动通信网络(GSM / GPRS / CDMA)、计算机通信及自动控制等技术能提供您更加优质的卫星定位、移动通信、远程控制、信息传输等产品功能。
知识产权申明本手册中所描述的华强GPS产品,可能包括存储在半导体存储器或其他媒体中的具有深圳华强信息产业有限公司和第三方版权的软件。
中国和其他国家的法律保护深圳华强信息产业有限公司和第三方软件供应商对版权软件的专营权,其中包括经销、复制具有版权的软件。
因此,在法律规定的范围内,不允许以任何方式对任何具有深圳华强信息产业有限公司版权的软件进行修改、反设计、经销或复制。
此外,购买深圳华强信息产业有限公司产品并不意味着直接或间接地承认买方拥有深圳华强信息产业有限公司与任何第三方软件供应商所拥有的版权、专利权和专利使用权,但产品销售法规定的普通产品,不具有专有权的产品和具有免费特许权的产品除外。
如下标识归属深圳华强信息产业有限公司所有,任何个人和组织在没有获得授权的情况下不得随意使用或篡改:※如本手册所述内容与您的GPS智能无线终端不符,请以智能无线终端为准。
※深圳华强信息产业有限公司拥有本手册的最终解释权。
※深圳华强信息产业有限公司保留修改技术规则而不事先通知的权利。
※深圳华强信息产业有限公司保留修改本手册内容的权利,恕不另行通知。
?2000-2007,深圳华强信息产业有限公司版权所有。
Hytera数字手持终端BD352i使用说明书
DIGITAL PORTABLE RADIO数字手持终端BD352i OWNER’S MANUALBD352i使用说明书Welcome to the world of Hytera and thank you for purchasing this product.This manual includes a description of the functions and step-by-step procedures for use.It also includes a troubleshooting guide.To avoid bodily injury or property loss caused by incorrect operation,please carefully read the Safety Information Booklet before use.This manual is applicable to the following product:BD352i Digital Portable RadioCopyright InformationHytera is the trademark or registered trademark of Hytera Communications Corporation Limited(the Company)in the People's Republic of China(PRC) and/or other countries or areas.The Company retains the ownership of its trademarks and product names.All other trademarks and/or product names that may be used in this manual are properties of their respective owners. The product described in this manual may include the Company's computer programs stored in memory or other ws in PRC and/or other countries or areas protect the exclusive rights of the Company with respect to its computer programs.The purchase of this product shall not be deemed to grant,either directly or by implication,any rights to the purchaser regarding the Company's computer programs.The Company's computer programs may not be copied,modified,distributed,decompiled,or reverse-engineered in any manner without the prior written consent of the Company. DisclaimerThe Company endeavors to achieve the accuracy and completeness of this manual,but no warranty of accuracy or reliability is given.All the specifications and designs are subject to change without notice due to continuous technological development.No part of this manual may be copied,modified,translated,or distributed in any manner without the prior written consent of the Company.We do not guarantee,for any particular purpose,the accuracy,validity, timeliness,legitimacy or completeness of the third-party products and contents involved in this manual.If you have any suggestions or would like to receive more information, please visit our website at:.FCC StatementThis equipment has been tested and found to comply with the limits for a Class B digital device,pursuant to part15of FCC Rules.These limits are designed to provide reasonable protection against harmful interference in a residential installation.This equipment generates and can radiate radio frequency energy.If not installed and used in accordance with the instructions,it may cause harmful interference to radio communications. However,there is no guarantee that interference will not occur in a particular installation.Verification of harmful interference by this equipment to radio or television reception can be determined by turning it off and then on.The user is encouraged to try to correct the interference by one or more of the following measures:·Reorient or relocate the receiving antenna.Increase the separation between the equipment and receiver.·Connect the equipment into an outlet on a different circuit to that of the receiver's outlet.·Consult the dealer or an experienced radio/TV technician for help. Operation is subject to the following two conditions:·This device may not cause harmful interference.·This device must accept any interference received,including interference that may cause undesired operation.Note:Changes or modifications to this unit not expressly approved by the party responsible for compliance could void the user's authority to operate the equipment.Compliance with RF Exposure Standards Hytera's portable radio complies with the following RF energy exposure standards and guidelines:·United States Federal Communications Commission,Code of Federal Regulations;47CFR§1.1307,1.1310and2.1093.·American National Standards Institute(ANSI)/Institute of Electrical and Electronic Engineers(IEEE)C95.1:2005;Canada RSS102Issue5 March2015.·Institute of Electrical and Electronic Engineers(IEEE)C95.1:2005 EditionRF Exposure Compliance and Control Guidelines and Operating InstructionsTo control your exposure and ensure compliance with the occupational/controlled environmental exposure limits,always adhere to the following procedures.Guidelines:·Do not remove the RF Exposure Label from the device.·User awareness instructions should accompany device when transferred to other users.·Do not use this device if the operational requirements described herein are not met.Operating Instructions:·Transmit no more than the rated duty factor of50%of the time.To transmit(talk),push the Push-To-Talk(PTT)button.To receive calls, release the PTT button.Transmitting50%of the time,or less,isimportant because the radio generates measurable RF energy only when transmitting(in terms of measuring for standards compliance).·Keep the radio unit at least2.5cm away from the face.Keeping the radio at the proper distance is important as RF exposure decreases with distance from the antenna.The antenna should be kept away from the face and eyes.·When worn on the body,always place the radio in a Hytera-approved holder,holster,case,or body harness or by use of the correct clip for this e of non-approved accessories may result in exposure levels which exceed the FCC's occupational/controlled environmental RF exposure limits.·Use of non-approved antennas,batteries,and accessories causes the radio to exceed the FCC RF exposure guidelines.·Contact your local dealer for the product's optional accessories.IC StatementThe device has been tested and complies with SAR limits,users can obtain Canadian information on RF exposure and complianceAprès examen de ce matériel aux conformitéaux limites DAS et/ou aux limites d’intensitéde champ RF,les utilisateurs peuvent sur l’exposition aux radiofréquences et la conformitéand compliance d’acquérir les informations correspondantesThis device complies with Industry Canada license-exempt RSS standard(s). Operation is subject to the following two conditions:·This device may not cause harmful interference.·This device must accept any interference received,including interference that may cause undesired operation.Le présent appareil est conforme aux CNR d'Industrie Canada applicables aux appareils radio exempts de licence.L'exploitation est autorisée aux deux conditions suivantes:(1)l'appareil ne doit pas produire de brouillage, et(2)l'utilisateur de l'appareil doit accepter tout brouillage radioélectrique subi,même si le brouillage est susceptible d'en compromettre le fonctionnementEU Regulatory ConformanceAs certified by the qualified laboratory,the product is in compliance with the essential requirements and other relevant provisions of the following directives:1999/5/EC or2014/53/EU,2006/66/EC,2011/65/EU,and 2012/19/EU.Please note that the above information is applicable to EU countries only.ContentsPacking List 2Product Overview3ProductControls 3LCD Icons 4LED Indications 4Before Use4Attaching the Antenna 4Attaching the Battery 4Attaching the Belt Clip5Attaching the Audio Accessories 5Charging the Battery5Checking the Battery Power 5Basic Operations 6Call Services6Call on Digital Channel6Callon Analog Channel (Without Signaling)6Optional Features 7Troubleshooting 9Care and CleaningProductCare 11ProductCleaning 11Optional Accessories1111ContentsPlease unpack carefully and check that all items listed below are received.If any item is missing or damaged,please contact your dealer.Item Quantity(PCS)Item Quantity(PCS) Radio1Belt Clip1 Battery1Strap1 Power Adapter1Documentation Kit1 Antenna1//Check whether the frequency band marked on the antenna label matches that on the radio label.If not,please contact your dealer.Product ControlsYou can request your dealer to program your radio to use the SK as the shortcut to a radio feature.LCDIconsLED IndicationsLED Indicator Radio StatusFlashes green Being turned on.Glows green Receiving.Glows redTransmitting.Flashes orange slowlyScanning.GlowsorangeCall hang time:No voice is being transmitted or received on the channel during a call.Within such a period,you can press and hold the PTT key and speak.Attaching the Antenna1.Place the antenna in its receptacle.2.Rotate the antenna clockwise until hand tight.Do not hold the radio by the antenna,as it may reduce the radio performance and life span of theantenna.Attaching the Battery1.Slide the battery latch to the unlock position,and remove the battery cover.2.Align the battery contacts with the contacts in the battery compartment,and press the battery into place.3.Insert the protrusions at the top of the battery cover into the radio,and press the cover into place.4.Slide the battery latch to the lock position.To remove the battery,make sure the radio is turned off,remove the battery cover,and lift the bottom of the battery.Attaching the Belt Clipe a Phillips screwdriver to turn the screws counterclockwise on the back of the radio and remove them.2.Align the screw holes on the belt clip with those on the back of the radio.3.Put the screws back in place,and use the Phillips screwdriver to turn them clockwise until hand tight.Attaching the Audio Accessories1.Open the accessory connector cover.2.Plug the accessory into the accessory connector.3.Rotate the accessory plug clockwise into place.Charging the Battery·Use the charger specified by Hytera to charge the battery.·Read the Safety Information Booklet before charging.The battery delivered with the radio is uncharged.To ensure optimum performance,fully charge the battery before initial use.It is recommended that your radio remain powered off during charging.To charge the battery,do as follows:1.Insert the USB connector of the power adapter into the USB port of the radio.2.Plug the power adapter into a power outlet,and then switch the power out-let onChecking the Battery PowerTo check the current battery power,press and hold the Battery Power Indicator key preprogrammed by your dealer.The following table lists battery power indications.The icon indicates thatthe battery runs low.In this case,please recharge or replace the batteryLED Indicator Alert Tone Battery Power Glows green Three beepsGlows orange Two beepsGlows red One beepFlashes red Low battery toneIf you want to…Then…Turn on/off the radio Press the On-Off key. Increase the volume Press the Volume Up key. Decrease the volume Press the Volume Down key. Select a channel Rotate the Channel Selector knob.Call on Digital ChannelYou can initiate a call to or receive acall from the private or group contactpreset for a digital channel.Initiating a Call1.Select the required channel.2.Hold the radio vertically2.5to5cm from your mouth.3.Press and hold the PTT key,and thenspeak into the microphone.The radio displays for an outgoing group call and for an outgoing private call.Receiving and Responding to a CallWhen receiving a call,you can listen to it without any operation.The radio displays for an incoming group call and for an incoming private call.You can press and hold the PTT key and speak within the preset time period.Call on Analog Channel(Without Signaling) You can initial a call to or receive calls from all other users on an analog channel.The operations are the same as those on a digital channel.The following features need to be programmed by your dealer.Please contact your dealer for detailed operations. Type Feature DescriptionGeneral Feature Zone Allows you to select a zone.The radio supports up to16zones,with a maximum of256channels per zone.Power Level Allows you to switch the transmit power level between high and low.Scan Allows the radio to scan all channels in the scan list preset for the current channel and stay on a channel with activities. Emergency Alarm Allows you to initiate an emergency alarm or call to ask for help in case of emergencies.Busy Channel Lockout Prevents the radio from transmitting on a busy channel.Time-out Timer(TOT)Terminates transmission when the preset time period expires.Keypad LockAllows the keypad to be locked automatically when the radio does not detect any activity or operation within the presetperiod.Battery SaveAllows the radio to automatically enter the battery save mode when it does not detect any activity or operation within thepreset period.Digital Feature All Call Allows you to initiate a call to all users on a digital channel.One Touch Call Allows you to press one key to call the predefined private or group contact. TDMA Direct Mode Allows the radio to operate on a channel with two time slots.Type Feature DescriptionAnalog Feature Squelch Off Allows the radio's speaker to always keep unmuted.Squelch Off Momentary Allows the radio's speaker to keep unmuted when you press and hold the preprogrammed key. Squelch Level Allows you to adjust the squelch threshold required for the radio to unmute.Monitor Allows the radio to monitor activities on the channel.Scrambler Allows you to encrypt the transmitted voice to prevent eavesdropping.CTCSS/CDCSS Allows you to prevent unwanted calls on the same frequency.Phenomena Analysis SolutionYou are unable to hear anyone because of too much noise and hiss.You may be too far away from other members.Move towards other members.You may be located in an unfavorable position.Forexample,your communication may be blocked by highbuildings or blocked in an underground area.Move to an open and flat area,and restart the radio and trycontacting again.It could be the result of external disturbance(such aselectromagnetic interference).Stay away from equipment that may cause interference.The OLED does notdisplay any information.The OLED may fail to function temporarily.Restart the radio.If the above solutions cannot fix your problems, or you may have some other queries, please contact us or your local dealer for more technical support.To guarantee optimal performance as well as a long service life of the product,please follow these tips.Product Care·Do not pierce or scrape the product.·Keep the product far away from substances that can corrode the circuitry.·Do not hold the product by the antenna or earpiece cable.·Close the accessory connector cover when no accessory is in use.Product CleaningTurn off the product and remove the battery before cleaning.·Clean up the dust and fine particles on the products surface and charging piece with a clean and dry lint-free cloth or a brush regularly ·Use neutral cleanser and a non-woven fabric to clean the keys,knobs and front case after long-time use.Do not use chemical preparations such as stain removers,alcohol,sprays or oil preparations,so as to avoid surface case damage.·Make sure the product is completely dry before use.Use the accessories specified by Hytera only;otherwise,the Company will not be liable for any loss or damage arising out of the use of any unauthorised accessories.Contact your local dealer for the optional accessories used with the product.非常感谢您对我们产品的青睐!本手册旨在让您快速掌握终端的使用。
雅马哈 AVR-X4700H 网络AV接收机操作说明书

AVR-X4700H INTEGRATED NETWORK AV RECEIVER 操作说明书附件10安装电池11遥控器的操作范围11特点12高音效12高性能15简易操作19部件名称与功能20前面板20显示屏24后面板26遥控器30连接方法扬声器安装34连接扬声器42连接扬声器之前42扬声器配置和“放大器分配”设置46连接5.1声道扬声器48连接7.1声道扬声器49连接9.1声道扬声器53连接11.1声道扬声器61连接7.1声道扬声器:前置扬声器的双功放连接67连接7.1声道扬声器:第二对前置扬声器68连接多区域扬声器69连接电视机74连接1 : 配备了HDMI端子并兼容ARC(Audio Return Channel)/ eARC(Enhanced Audio Return Channel)的电视机75连接2 : 配备了HDMI端子且不兼容ARC(Audio Return Channel)/ eARC(Enhanced Audio Return Channel)的电视机76连接3 : 未配备HDMI端子的电视机77连接播放设备78连接机顶盒(卫星调谐器/有线电视)79连接DVD播放机或蓝光碟片播放机80连接兼容8K的播放机设备81连接摄像机或游戏机82连接电唱机83将USB存储设备连接至USB端口84连接FM/AM天线85连接至家庭网络(LAN)87有线LAN87无线局域网88连接外部控制设备89 REMOTE CONTROL插孔89 TRIGGER OUT 插口90连接电源线91播放基本操作93开启电源93选择输入源93调节音量94暂时关闭声音(静音)94播放DVD播放机/蓝光碟片播放机94播放USB存储设备95播放储存在USB存储设备上的文件96在蓝牙设备上收听音乐99从蓝牙设备播放音乐100与其他蓝牙设备配对102从蓝牙设备重新连接至本机103在蓝牙耳机上收听音频104在蓝牙耳机上收听音频105重新连接至蓝牙耳机106断开蓝牙耳机106收听FM/AM广播107收听FM/AM广播108通过输入频率来进行调谐(直接调谐)109更改调谐模式(调谐模式)110自动调谐到电台并进行预设(自动预设记忆)110预设当前广播电台(预设记忆)111收听预设电台111指定预设广播电台的名称(预设名称)112跳过预设的广播电台(跳过预设)113取消跳过预设114收听网络电台115收听网络电台116播放存储在计算机或NAS中的文件117播放存储在计算机或NAS中的文件118获取 HEOS App121 HEOS账户122从流媒体音乐服务播放123在多个房间聆听相同的音乐126 AirPlay功能130从iPhone、iPod touch或iPad播放歌曲131从iTunes播放歌曲131在多个同步设备上播放iPhone、iPod touch或 iPad上的曲目 (AirPlay 2)132 QPlay功能133在本机上播放QQ音乐曲目133便捷功能134添加到HEOS最爱收藏135播放HEOS最爱收藏135删除HEOS最爱收藏136调节各声道的音量以与输入源相符(声道电平调节)137调节音调(音调)138音频播放过程中播放所需视频(视频选择)139根据您的观看环境调节图片质量(画面模式)140在所有区域中播放相同的音乐(所有区域立体声)141变更扬声器设置以匹配收听环境(扬声器预设)142选择声音模式143选择声音模式144直通播放145纯直通播放146自动环绕播放146声音模式类型介绍147可为每个输入信号选择的声音模式152 HDMI控制功能158设置步骤158智能菜单功能159睡眠定时器功能161使用睡眠定时器162快速选择附加功能163调用设置164更改设定165面板锁定功能166禁用所有键的按键操作166禁用除VOLUME之外的所有按键操作166取消面板锁定功能167远程锁定功能168禁用遥控器的感应窗功能168启用遥控感应窗功能168网络控制功能169通过网络控制对本机进行控制169在ZONE2(区域2)/ZONE3(区域3)(另一房间)中播放171连接区域171 ZONE2 (区域2) / ZONE3 (区域3)播放177设置菜单图179菜单操作183音频184中置电平调节184低音炮音量调节184低音同步185环绕参数185 Restorer192音频延迟193音量194 Audyssey®195图形 EQ198视频200画质调整200 HDMI设置202输出设置207分量视频输出211屏幕显示211屏幕保护212 4K/8K信号格式213 HDCP设置214 TV格式215输入216输入分配216源重命名219隐藏源219输入源电平220扬声器221 Audyssey®设置221扬声器的设定步骤(Audyssey®设置)223出错信息229检索Audyssey®设置设定231手动设置232放大器分配232扬声器配置240距离245电平246交叉247低音248前置扬声器249双声道回放249扬声器预设252网络253信息253连接253 Wi-Fi设置254设置256网络控制258友好名称258诊断259 AirPlay259 HEOS账户260您尚未登录260您已经登录260常规261语言261 ECO261蓝牙发射器265区域2设置 / 区域3设置266区域重命名268快速选择名称268触发器输出1 / 触发器输出2269前显示屏269固件270信息273使用率数据275保存和读取275设置锁定276重置276通过遥控器操作外部设备277注册预设代码278操作设备281初始化注册的预设代码284指定使用遥控器的操作区域284重设遥控器284提示提示286故障诊断288电源无法开启 / 电源关闭289使用遥控器无法执行操作290本机显示屏不显示内容290不发出声音291所需声音没有发出292声音中断或出现噪音295电视机上不显示视频296菜单屏幕不显示在电视机上298电视机上所显示菜单画面和操作内容的颜色与正常时不同298 AirPlay无法播放299USB存储设备无法播放300无法播放蓝牙设备301网络电台无法播放303计算机或NAS上的音乐文件无法播放304无法播放各种在线服务305 HDMI控制功能无效305无法连接至无线LAN网络306使用HDMI ZONE2时,设备无法正确运行307更新/升级错误消息308恢复出厂设置309恢复网络设置310保修和修理311附录关于HDMI312视频转换功能316播放USB存储设备318播放蓝牙设备319播放保存在计算机或NAS中的文件320播放网络收音机321个人记忆附加功能321最新功能记忆321术语解释322商标信息332规格335索引341感谢您选购本款Denon产品。
HAME 华美S1使用说明书、快速安装指南

1、产品硬件接口示意图硬件接口说明:硬件接端口标识 详细功能说明 口开关 R 开机C 移动电源功能:通过CHARGE 端口给各种数码产品进行充电关机DATA接联通、移动、电信3G 无线上网卡;接iPhone 进行流量分享;接U 盘、移动硬盘进行视频、音频、图片共享;接iPhone、iPad、智能手机、平板电脑等数码产品进行充电CHARGE 对手机、iPad、iPhone、平板电脑等各种数码产品进行充电 USB 端口DC 连接电源适配器,给S1充电短按1秒:手动进行拨号连接或者断开连接 △长按5秒:恢复出厂设置短按1秒:切换上网方式(智能->WIFI->3G->ADSL->动态->静态) 模式转换 按钮▽长按5秒:网口的WAN/LAN 模式切换 WAN 口:插入网线连接到猫、路由器 网口RJ45LAN 口:插入网线连接到电脑2、 屏幕显示说明3、 电脑无线连接到S1的操作说明---以XP 系统为例(1) 在电脑桌面“网络连接”属性中选择“无线网络连接”,按照图中所示,将计算机Internet协议设置为“自动获取IP 地址”。
(2) 在电脑桌面右下角将会出现图标,点击鼠标右键,在出现的提示框中选择:查看可用的无线网络。
(3) 在弹出的网络列表中选择需要进行连接的无线网络:HAME_S1_xxxx,点击“连接”按钮,并输入WIFI密码。
WIFI密码位置:S1的电池腔内标贴上(如图)(4) 当界面显示“已连接上”时,表示电脑已经成功加入此无线网络。
4、对手机、平板电脑等数码产品充电操作说明(移动电源)(1) 关机充电:将开关推至C档,将数码产品的充电线接到“CHARGE”端口,对iPad、iPhone、Android等智能手机进行充电。
(2) 开机充电:将开关推至R档,将数码产品的充电线接到“CHARGE”端口。
此时“DATA”端口可以接3G无线上网卡、iPhone,边上网边对其他设备进行充电。
EDiMAX EW-7317UHg高功指向性 说明书

EW-7317UHg802.11b/g 6dBi高功率指向性USB無線網路卡中文使用手冊Version: 1.1 (August, 2007)警告聲明本設備已通過測試並符合 FCC 規則第 15 部分有關數位裝置的規定。
這些限制的主要目的是在保護商業區中運作此種設備時,提供合理程度的保護,避免有害干擾。
本設備會產生、使用並放射射頻能源,若不按指示手冊安裝和使用,會對無線通訊造成有害干擾。
在住宅區中運作本設備亦可能造成有害干擾,在這種情況下,使用者會被要求採用以下一種或多種方法來改善干擾的情形:1. 調整接收天線的方向或移動其位置。
2. 將設備與接收天線的距離增加。
3. 諮詢經銷商或有經驗的無線電/電視技術員的協助。
FCC 聲明這個設備遵照FCC 規則第15節,操作程序受限於以下二個條件:(1) 這個設備不能導致有害的干擾。
(2) 這個設備必須可接受任一種干擾,包括可能導致非預期操作的干擾。
FCC輻射暴露聲明:本設備完全符合美國聯邦通訊委員會針對非控制環境所提出之輻射暴露限制。
用戶必須遵照所有滿足射頻暴露符合性之特殊操作說明,在正常操作時並距離該機器20公分以上。
本發射器所使用之天線在同一地點不得存在有其他天線或發射器或是與之合併操作。
CE標誌警告:本機器屬於Class B產品,適用於家用環境中,由於本產品可能會產生無線電干擾,因此用戶需採取適當防範措施。
R&TTE 符合性聲明本設備遵照2000年4月8日開始生效的1999/5/EC歐洲經濟共同體針對電信終端設備和衛星地面電臺設備之整合及互相承認(R&TTE) 所決議的所有要求。
安全性本設備之設計已針對安裝和使用上的安全性施以最大重視。
然而, 仍需對電擊和靜電的危險給予特別留意。
歐洲地區 EU Countries Intended for Use本機器的ETSI版本可以用於下列國家,澳洲、比利時、丹麥、芬蘭、法國、德國、希臘、愛爾蘭、義大利、盧森堡、荷蘭、西班牙、葡萄牙、瑞典及聯合王國之家庭及一般辦公室內。
无线AV使用说明
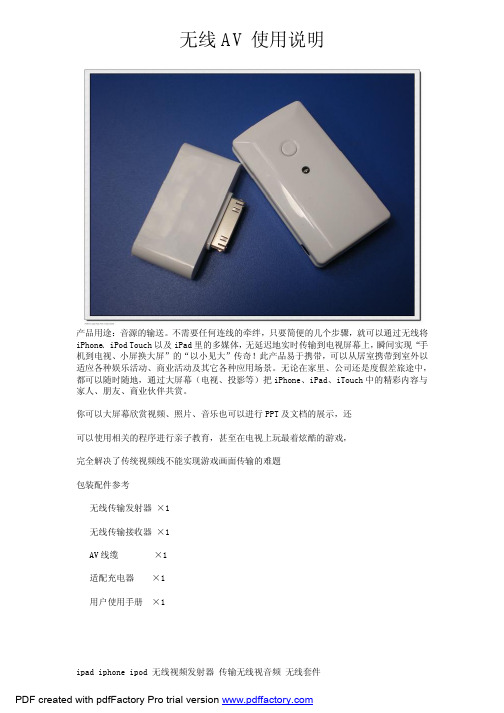
无线AV使用说明产品用途:音源的输送。
不需要任何连线的牵绊,只要简便的几个步骤,就可以通过无线将iPhone、iPod Touch以及iPad里的多媒体,无延迟地实时传输到电视屏幕上,瞬间实现“手机到电视、小屏换大屏”的“以小见大”传奇!此产品易于携带,可以从居室携带到室外以适应各种娱乐活动、商业活动及其它各种应用场景。
无论在家里、公司还是度假差旅途中,都可以随时随地,通过大屏幕(电视、投影等)把iPhone、iPad、iTouch中的精彩内容与家人、朋友、商业伙伴共赏。
你可以大屏幕欣赏视频、照片、音乐也可以进行PPT及文档的展示,还可以使用相关的程序进行亲子教育,甚至在电视上玩最着炫酷的游戏,完全解决了传统视频线不能实现游戏画面传输的难题包装配件参考无线传输发射器×1无线传输接收器×1AV线缆×1适配充电器×1用户使用手册×1ipad iphone ipod无线视频发射器传输无线视音频无线套件无线AV视频输出1。
支持ipad1/ipad2/iphone/ipod无线输出AV视频音频信号到电视。
2。
支持ipad1/ipad2/iphone/ipod无线输出照片到电视上3。
无线传输距离>10米4。
在2.4GHz频段的无线传输。
5。
支持无线双通道选择。
6。
ipad1/ipad2/iphone/ipod直接代电。
7。
发射器功耗<150mW8。
接收器的功耗<500MW9。
AV(CVBS)信号包含图像,音频L和-R的音频信号。
10.支持ipad1/ipad2/iphone/ipod在线视频输出到电视(必须是越狱)本产品适用于:iPhone全系列:iPhone4、4siPhone3GS、iPhone3G、iPhone一代iPad、iPad2iPad3一.将无线发射端插入IPOD/IPHONE/IPAD/等苹果带视频输出的产品上。
发射器上的LED 指示灯亮。
华为EC5805无线上网终端使用说明
器,都会影响 E5 的使用性能或导致危险,违反 E5 的保修条款以及国家关于通信终端 产品的相关规定。 方法 2:通过连接计算机充电 使用配套的数据线将 E5 和计算机连接起来。
10
通过 Wi-Fi 接入因特网
说明:默认情况下,E5 已按运营商需求对管理参数完成预置,您可以按如下步骤快速 接入因特网。如何配置管理参数,请参见管理网页的帮助信息。
第 1 步:开启 E5 第 2 步:建立 Wi-Fi 连接 第 3 步:接入因特网 1.开启 E5
长按电源开关键直到指示灯全亮,开启 E5。 说明:长按电源开关键直到指示灯全灭,关闭 E5。
11
2.建立 Wi-Fi 连接(以安装 Windows® XP 的计算机为例)
1. 确保 E5 的 Wi-Fi/WPS 指示灯绿色常
17
建立 WPS 连接
如果与 E5 连接的客户端设备支持 WPS,则网络密钥可以自动生成,不用手动输入。 WPS 连接的操作步骤如下。 1. 开启 E5。 2. 开启与 E5 连接的客户端设备。 3. 激活 E5 的 WPS。 说明:Wi-Fi 被激活后,长按 Wi-Fi/WPS 键,直到 Wi-Fi/WPS 指示灯先熄灭,再绿色闪 烁,此时,WPS 被激活。 4. 激活客户端设备的 WPS。 说明: 客户端设备的具体操作,请参见客户端设 备的用户指导。
4
指示灯
指示灯 Wi-Fi/WPS
指示灯
电源指示灯
信号指示灯
状态
z 灯灭:Wi-Fi/WPS 未被激活。 z 绿色常亮:Wi-Fi 被激活。 z 绿色闪烁:WPS 被激活。 z 红色闪烁:电池电量太低需要马上充电,否则 E5 会自动关
机。 z 红色常亮:电池电量较弱。 z 绿色闪烁:电池正在充电。 z 绿色常亮:电池电量充足。 z 红色常亮:UIM 卡不在位或故障,或 PIN 码校验失败,或无
广州安网通信技术有限公司 无线网桥(CPE)WAP-1204W 产品手册说明书
无线网桥(CPE)产品手册广州安网通信技术有限公司版权声明安网通信@2020安网通信版权所有,并保留对本手册及本声明的一切权利。
未得到安网通信的书面许可,任何人不得已任何方式或形式对本手册内的任何部分进行复制、摘录、备份、修改、传播、翻译成其他语言、将其全部或部分用于商业用途。
免责声明本手册内容依据现有信息制作,由于产品版本升级或其他原因,其内容有可能变更。
安网通信保留在没有任何通知或者提示的情况下对手册内容进行修改的权利。
本手册仅作为使用指导,安网通信在编写本手册时已尽力保证其内容准确可靠,但并不确保手册内容完全没有错误或遗漏,本手册中的所有信息也不构成任何明示或暗示的担保。
无线网桥(CPE)WAP-1204W产品手册(适用于WAP-1209W)一、产品介绍WAP-1204W是一款工作在2.4G频段、支持802.11N技术的高性能企业级网桥产品。
独特的数码管配对技术,无需电脑配置,轻松完成点对点、点对多点(8点以内)设备的配对。
百兆网络接口,2.4G802.11N MIMO技术无线处理速度最高可达300Mbps。
供电方式灵活,支持24V PoE网线供电及12V1A DC本地供电,网线供电距离可达50-70米(与网线材质有关)。
采用室外IP65防风、防雨、防尘、防晒防护等级外壳设计,轻松适应户外各种恶劣环境。
内置5dBi双极化板状天线,安装简单快捷。
具有高性能、高增益、高接收灵敏度、高带宽等特点,大大增强了无线传输性能及稳定性,主要适用电梯监控等场所。
二、产品特性超高性价比的硬件配置企业级的主控芯片,工业级电路设计,支持IEEE802.11b/g/n协议,可提供300Mbps无线接入速度以及100Mbps以太网交换处理速度。
优秀的抗高低温设计,充分保障用户网络数据在极限环境能够实时、长期、稳定、高效能地传输,提升用户体验。
强大的无线覆盖能力采用高功率和高接收灵敏度的电路设计,大大增强了无线传输的距离,提高无线传输的性能和稳定性。
智能无线数据日志解决方案产品规格书说明书
Contents:Product Specifications .................................................................................................................Installing Wizard Software...........................................................................................................Installing ing the Signal Sensor ...............................................................................................................Example of Network Layout .........................................................................................................Installing Loggers ........................................................................................................................Installing Repeaters .....................................................................................................................Modifying Logger Setup ..............................................................................................................Modifying Logger/Repeater Network Structure ............................................................................Setup Screen Definitions ..............................................................................................................Uninstallation ............................................................................................................................Software Overview ....................................................................................................................Software User Guide..................................................................................................................Accessories ................................................................................................................................Troubleshooting .........................................................................................................................Calibration .................................................................................................................................Warranty ...................................................................................................................................IMPORTANT PLEASE READ : Before you begin installation, have the Receiver, Logger(s)and any Repeater(s) at the base computer where you plan to install the Wizard Software and Receiver. DO NOT turn on any of the Wizard devices until instructed in the startup instructions.Installing Wizard SoftwareInsert CD – CD installation file opens “Welcome” window opens. Click on NEXT“Destination Folder” window opens. Accept Defaults. Click NEXT “Ready to install” windows opens click “Install”Program begins installation – View progress bar.Installation complete. Click FINISH.Software is now installed and the Dickson Wireless icon is on your desktop.Do not open the software until all of Receiver is installed is complete.Install ReceiverReceivers and Repeaters look very similar. Make sure you are installing theReceiver. Check the serial number on the back of the unit, it should start with WR.Insert 2 AA batteries (included with instrument) into battery compartment on back of unit.Plug in AC adapter to Receiver.Connect USB cable to Receiver and available USB port on PC Turn on Receiver via toggle switch on the bottom of the Receiver case (slide to the left). When turned on the Green LED will blink, Red once LED will remain solid.After a few seconds, the Welcome to Found New Hardware Wizard window will pop up.Select “Install New Hardware Automatically”. Click on NEXT Software will begin search.Hardware Installation window will pop up. Click on CONTINUE ANYWAY Completing New Found Hardware window opens. Click on FINISHSignal SensorSave time and possible lost data by using the Signal Sensor before installing Loggers/Repeaters.Once the Receiver has been installed, go to each designated logger location, with the Signal Sensor, to determine if the logger signal strength will be strong enough to reach the Receiver. (See Signal Sensor Operating Instructions below.)The display will indicate if the Receiver can be found and how strong the signal strength is.If two or less bars show or if the signal strength changesfrequently a Repeater will be required to ensure consistent communication of the Logger to the Receiver.Repeat for all logger placement locations.If it has been determined that a Repeater(s) is required, install the Repeater(s) first and link each logger to its designated Repeater when installing.1.2.3.4.5.6.7.8.1.2.3.4.5.6.7.8.9.10.1.2.3.4.5.6.Unit Type:RCV = Receiver; RPT = Repeatera robust system.The Signal Sensor is ideal for determining if the target Logger location is within range of the Receiver or Repeater.Operation:a. Hold down the on button on your signal sensor for 3 seconds to turn on and move to thelocation where you wish to place the logger or repeater. The Signal Sensor will tell you if it canthe target location is good. If a repeater or receiver can not be located, move closer to knownrepeater or receiver locations until one is found.Network Layout ExampleOnly one receiver on base PCLoggers 215A, 458G, 321M, & 785K are close enough to communicate directly with the receiverLogger 385X needs to forward its signal through repeater 269H in order to reach the receiverLogger 862T needs to forward its signal through 2 repeaters (245O & 125L) to reach the receiverNote: Repeater 125L can forward a signal from multiple loggers and other repeaters7.8.9.1.2.3.4.5.633BRepeater125L527WBelow is a diagram detailing a wireless network set-up and how it appears under the Structure menu optionReceiver789Q862TInsert 2 standard AA batteries (included with instrument) into battery compartment on back of unit.Open Wizard software by clicking on the Dickson Wizard icon on your desktop.a. Look at the lower LEFT corner of the Main window. “Connected” should show. This indicates that the software has recognized the Receiver. If “Connected” does not show, wait for the software and receiver to initialize before installing loggers. “Connected” should display within 60 seconds. Installation of loggers can begin.b. If “Receiver not found” shows in the lower RIGHT, check all receiver connections and make sure the receiver was installed per the instructions. Go to page 5 to Uninstall receiver and software. After uninstall is complete, install the system again1.2.Install Loggersj. Transmission Frequency: Select 5, 10 or 15 minutes (tells the Loggers how frequently to send the data to the receiverk. Alarm Temp/Humidity: Set min and max alarm conditions for logger if desired. l. Alarm Delay: If desired an alarm delay of up to 999 minutes can be set.Once screen is complete, click on “Save Changes & Start”.the bottom of the logger (slide switch to the right - Red LED will blink) and click on the OK button. Note: The logger must be turned on before OK is clicked or the logger will not install. Wizard software will search for logger and tell you when it has been installed.Signal Sensor is recommended for proper location of Loggers and Repeaters. See Signal Sensor.NOTE: If the logger will not install (Logger Not Found) please do the following: a. Did the LED flash Red when the logger was turned on? i. NO: Replace the batteries and try again ii. YES: Try the steps below again. a. Stay in Logger Setup screen.b. Double check Unit ID. Should match last 4 digits of serial number.c. Turn the logger off (LED’s should not be lit).d. Click on SAVE CHANGES AND START button.e. Wait for the pop up “Turn on Logger and click OK”.f. Turn on logger and make sure the Red LED flashes. If the Red LED does not flash, please replace batteries.g. Click OK on the pop up window.h. The logger should install. If it does not the batteries might be low on power. Replace batteries and try again.5.6.7.8.9.d e fgh ijk lkla b c The Logger/Repeater installation screen requires the following information (go to page 6 for detailed descriptions of logger setup fields):a. Connect Via: Tells the logger where to send its signal. Leave on Receiverb. Unit Type: Logger = Sensorc. Setting Way: leave at neard. Unit ID: Last 4 digits of serial number (can be alpha and/or numeric).e. Name: Any name you wish to give a logger: Alpha/ numeric field 15 characters.f. placed: Alpha/numeric field 15 characters.g. Status: Activeh. Push to Start:i. No: Logger will automatically start logging once logger is setup.ii. Yes: Will delay logging till push to start button on Logger is pressed. Logger Status Screen will display “no data” until Push-to-Start button is pressed and Logger sends signal based on Transmission Frequency)i. and 15 minutes in 1 second intervals. Sample Rate can not exceed Transmission Frequency4.Installing RepeatersIf a logger is found to be out of range by the Signal Sensor, will be more than 100 feet from the receiver, or if there are several signal obstacles between the receiver and logger, a repeater can be installed between the receiver and logger.Insert two AA batteries (included with instrument) into battery compartment on back of unit.Plug in AC adapter to Repeater.From the Wizard Logger Status Screen click on SETUP and ADD Logger.The Repeater installation screen is the same as thelogger installation screen but only requires the following information (go to page 5 for detailed descriptions of logger setup fields):a. Unit Type: Select Repeaterb. Unit ID: 4 character alpha/numeric ID number on back of logger case.c. Name: Any name you wish to give a logger: Alpha/ numeric field 15 characters.d. Location: Location description of where logger is to be placed: Alpha/numeric field 15 characters.e. Status: ActiveOnce screen is complete, click on SAVE CHANGES AND START button.on the bottom of the case (slide switch to the left). Green LED will blink, Red LED will remain solid. Click on the OK button.Wizard software will search for the repeater and tell you when it has been installed.The Repeater now shows up in the Wizard logger table and can be placed at the desired logging location.If the Repeater did not install, make sure the Repeater was turned on before the OK button was pressed and that the Logger ID matches the last 4 characters of the serial number.1.2.3.4.5.6.7.8.9.10.a bc d eModify Logger/Repeater Network Once a Repeater has been installed existing loggers can be modified to send data to the receiver via the repeater.The Logger/Repeater must be brought to the base PC.From the Status Screen Setup Screen, double click on Logger to edit The Edit Logger window will pop up.Change Setting Way to Near Change Logger Status to Inactive Save Changes and turn off logger/repeater Open Edit Logger window again for same logger Change Setting Way to NearChange Connect Via from Receiver to the target Repeater Change Logger status to active Click on SAVE CHANGES AND STARTA window will pop up “Turn on Logger and click OK” turn on logger and press OK.Note: More than one repeater can be linked together to extended the range of the network.Setup Screen DefinitionsConnect Via : Allows you to tell the logger where to send its signal to. If you are using repeaters, you can tell the logger to send its data to a specific repeater or directly to the receiver.Unit Type : Tells the software if a repeater or logger is being installed.Setting Way : Near (recommended) - the Logger or Repeater is next to the PC during setup or edit so that you can turn the unit on within a few seconds of being instructed by the Wizard software; Far – the logger/receiver has been placed in the logging location and is not next to the PC. Setup and “no data” while waiting for communication from the Logger or Receiver.Unit ID : A 4 digit alpha numeric ID# on the back of the Logger : Any name you wish to give the device to help identify it.Location : Where the device should be placed.Temp Loggers : All devices will either read temperature in F or C. This can be changed under Tools/System Settings.Status : This should read Active for any newly installed device. Change a device to Inactive when it is taken out of service.Push to Start : Loggers only. Setup logger, but delay logging until the device is placed in logging location and the start button on the back of the unit has been pressed..Sample Rate : Loggers only. User can determine in minutes & seconds how frequently samples aretaken. Sample rate can range from 30 seconds to 15 minutes in 1 second intervals.Transmission Frequency : Loggers only. Tells the logger how frequently to send logged data.Next Calibration Date : Loggers only. Due date of next calibration.Alarm Temperature/Humidity : Set Min and Max alarm limits for each sensor.Alarm Delay : Loggers only: Delays alarm notification in minutes.1.2.3.4.5.6.7.8.9.10.11.1.2.3.4.5.6.7.8.9.10.11.12.13.14.UninstallationLoggers and Repeaters can not be uninstalled from the Wizard Software. If a Logger is returned for calibration or a Logger or Repeater is taken out of service, Edit the affected unit and change Logger Status to InActive.The Receiver can be uninstalled and reinstalled without affecting existing network status or saved logged data.a. Uninstalling Receiver (receiver must be on and connected via USB): i. Start, Control Panel, System, Hardware, Device Manager ii. Click on Ports (COM & LPT)(3)iii. Opens to reveal Dickson Wireless Receiver iv. Right Click – Uninstallv. If you want to reinstall the Receiver, follow steps in section 2 above.The Software can be uninstalled and reinstalled with out affecting installed Loggers and Repeaters (the Receiver should be uninstalled and reinstalled along with the software. Saved logged data will not be affected.a. Uninstall Softwarei. Start, Control Panel, Add or Remove Programsii. Click on Dickson Wireless and Click on Change/Removeiii. An uninstall utility will pop up. Select Uninstall – follow commandsSoftware SummaryWizard Software is user friendly and feature packed. (see page 5 for detailed description)Logger Status Screen:a. View all installed loggers and repeatersb. Alarm Conditions for: Low Battery, Min/Max Alarm, Calibration Due, Lost Transmissionc. Displays: Current/Min/Max Readings, Active Status, Battery Level and Calibration Due Dated. Right Click on any logger in the table to view logged data in a Graph, Table or Edit logger setup Graph Mode:a. Allows for multiple loggers to be viewed on one graph.b. Multiple graphs can be opened and viewed at the same time.c. Easy export to Excel, save as .jpg or print.d. Quick reference of summary data.Table Mode:a. Multiple tables can be opened and viewed at the same time.b. Easy export to Excel Structure Screen:a. View relationship between Receiver, Repeaters and Loggers Setup:a. View all installed Loggers and Repeatersb. Edit Logger Setupc. Add new Loggers/Repeaters1.2.3.1.2.3.4.5.SoftwareStatus Screena. View real time status of all Loggers and Repeaters.b. Right click on any Logger to view logged data in a Graph, Table or Edit Logger setupc. Data included in the table: i. Name: Name of Loggerii. Location: Location of Logger/Repeatera logger or repeater are lost. Will display “no data” if logger is waiting for push-to-start or setup with Setting Way of Far and unit has not yet made first transmission. iv. Current Temp/RH: Most current reading displayedv. or since Min/Max was reset. Out of range conditions will show in red.vi. Reset Min/Max: Min/Max readings can be reset by clicking on the box in the column.batteries should be changed.viii. Calibration Due Date: The calibration due date is 6 months from the last date of calibration. An item due for calibration will display the due date in red. The Calibration Due Date can be modified in the Logger/Repeater Edit screen.ix. Status: All units should show as Active unless taken out of service and made InActive by the user.on the box will temporarily clear the alarm until the next transmission. d. Alarm Conditions: i. Lost Transmission ii. Low Battery iii. Calibration Due iv. High/Low Alarme. Sort table by clicking on any column header.f. Alarm Conditions automatically move to the top of the table.1.Logger Setup Screen:a. View a setup summary of all Loggers and Repeatersb. Double click on any Logger or Repeater to Edit Setupc. Add Logger button brings up Add a New Logger windowAdd a New Logger Window:a. Add/Edit a Logger or Repeaterb. Summary of Fields:i. Connect Via: Allows you to tell the logger where to send its signal to. If you are using repeaters, you can tell the logger to send its data to a specific repeater or directly to the receiver.ii. Unit Type: Tells the software if a repeater or logger is being installed.iii. Setting Way: Near (recommended) - the Logger or Repeater is next to the PC during setup or edit so that you can turn the unit on within a few seconds of being instructed by the Wizard software; Far – the logger/receiver has been placed in the logging location and is not next to the PC. Setup andrecognition of the logger/receiver will take longer in these cases. The Logger Status screen will display “no data” while waiting for communication from the Logger or Receiver.iv. Unit ID: A 4 digit alpha numeric ID# on the back of the Logger case.v. Name: Any name you wish to give the device to help identify it.vi. Location: Where the device should be placed.vii. Temp Loggers: All devices will either read temperature in F or C. This can be changed under Tools/System Settings.2.3.location.x. Sample Rate: Loggers only. User can determine in minutes & seconds how frequently samples are taken. Sample Rate can range from 30 seconds to 15 minutes in 1 second intervals. The Sample Rate selected can not exceed the Transmission Frequency selected. For example a Sample Rate of 7 minutes can not have a Transmission Frequency of 5 minutes. Must select 10 minutes.xi. Transmission Frequency: Loggers only. Tells the logger how frequently to send logged data. User can select intervals of 5, 10 or 15 minutesxiii. Alarm Temperature/Humidity: Set Min and Max alarm limits for each sensor.xiv. Alarm Delay: Loggers only: Delays alarm notification in minutes. Alarm starts after transmission.Structure:a. This screen displays the relationship of all Loggers and Repeaters to the Receiver. Tools/Dataset Backup:a. A copy of the database (all logged data) can be stored in another location – recommended.4.5.Tools/System Settings:a. Changes temperature units between F or Cb. Creates a log file of all Wizard activity. This feature takes up a lot of memory and is notrecommended unless required by the user.Alarm Pop-Up appears when unit is out of range or communications have been lost.6.7.Graph:NOTE: Graphed data does not update with most current readings. Real time data can be viewed in the Status Screen.a. View logged data in a graph by right clicking on any logger on the Status Screen andselecting Graph.b. A column of all loggers will appear on the left side of the screen. Multiple loggers can be viewedon the same graph:i. Select each logger while holding the CNTL key. Click on Open to see selected logger on thesame graph.c.open graphs.d. Zoom: Zoom In/Out, UnZoom and Zoom by Date. The logged data can also be dragged fromright to left to scroll back and forth through time.8.e. All open graphs can be viewed at the same time in tile view.f. Graph titles, font type, Axis scales, and Line and Point styles can be customized for a graph.g. A single graph or multiple graphs can be saved as: .jpg or Excel files.h. Graph(s) can also be exported directly to Excel.i. Graph(s) can be printed.j. All loggers open in graph view can be viewed as a table.Tables:a. View logged data in a table by right clicking on any logger on the Status Screen and selecting Tableb. a table at one time, but multiple tables can be opened at the same time.c. The tabular data does not update as new logged data is received from the logger, but the Logger summary table to the right does.d. All open tables can be viewed at the same time in tile view.e. Tabular data can be saved as an Excel filef. All open tables can be viewed in graph viewFCC IDThis device complies with part 15 of the FCC Rules. Operation is subject to the following two conditions: (1) This device may not cause harmful interference, and (2) this device must accept any interference received, including interference that may cause undesired operation .9.WarrantyDickson warrants that the products it sells will be free from defects in material and workmanship under normal use and service for a period of twelve months after delivery. In the event of a claim under this warranty, the product or part must be returned to the factory for repair or replacement (shipping pre-paid) with a Return Authorization Number (see Return Information above). It will be repaired at Dickson’s option foregoing warranty and remedy are exclusive and in lieu of all other warranties either expressed or implied. Dickson shall not be liable for consequential or incidental damages resulting from failure or malfunction of buyer, or subject to misuse or neglect.Factory Service & ReturnsContact the factory (630-543-3747) for a Return Authorization (RA) Number before returning anyinstrument. The model number, serial number and a purchase order number will be requested before an RA number is issued.Carefully repack the instrument, label the outside of the box with the RA# and return the instrument (freight pre-paid) to Dickson.All instruments that do not have the RA# clearly marked on the outside of the box will be refused. When returning instruments for credit, please include all accessories in shipment.Calibration/Freight charges are non-refundable.NOTE: Dickson shall not be liable for consequential or incidental damages resulting from failure or malfunction of its products.Customer SatisfactionDickson takes pride in providing you, the customer, with the highest quality instrumentation. We welcome the opportunity to help you in any way possible. Whether it be a question or a new idea in documentation, the Dickson Company would like to hear your response. Please call our Customer Service Department at 1-800-323-2448 or (630) 543-3747 (in Illinois).Software Return PolicyIMPORTANT returns for replacement of defective disks and CDs only.•••。
智能终端操作手册
智能终端操作手册咨询热线:96599●欢迎您使用智能终端手册目录一、简介 (1)二、注意事项 (1)三、安装指南 (2)3.1 设备接口说明: (2)3.2 设备连接示意图 (3)3.3 智能卡使用说明 (3)3.4 遥控器使用说明 (4)3.4.1.按键说明 (4)3.4.2 学习型遥控器的学习方法: (6)四、产品功能介绍 (7)4.1电视直播 (8)4.2互动电视 (13)4.3 TV生活 (13)4.4 Net影院 (16)4.5 视频通讯 (19)4.6 应用天地 (21)4.7 我的电视 (22)五、故障现象及排除 (26)六、安广分公司的营业厅 (28)七、清单 (29)一、简介安广智能终端致力于打造智能数字生活。
提供丰富的内容,舒适的用户体验。
高清直播:提供高清直播服务,在客厅享受高清影院。
TV生活:在这里可以体验到把商店搬回家的感觉,足不出户的逛各大商店、4S店,以及提供便户的查询服务。
Net影院:海量的电影,电视剧、动漫,综艺;聚合互联网丰富的内容,为您提供高清家庭影院般的享受。
可视电话:与亲朋好友面对面的交流,及时分享家的感觉。
应用天地:各种应用与游戏应有尽有,打造数字娱乐的生活。
内置WIFI:为家庭提供无线网络服务。
互动电视:想看就看,想点就点,海量高清片库。
二、注意事项●插入或拔出电源线时,勿用湿手。
●勿将重物放于电源线上或放置于本机上。
智能卡保护为防止造成智能卡损坏以及可能出现解密不正常的情况,请注意下列事项。
●开启智能终端电源前,请先插好智能卡。
●智能终端在工作状态下,请勿插拔智能卡。
安全放置●勿将本机放置于有强烈机械振动、多尘和潮湿的地方●勿将本机靠近热源或者使用保温材料包裹;●机体四周应有足够的空隙,以便通风散热。
其它事项●若长时间不用或机体破裂时,请拔掉电源插座。
●清洁之前请从插座上拔掉电源插头,用干布清洁外表面,勿将液体、喷雾剂或其它物品流入机内,否则可能发生严重损害。
- 1、下载文档前请自行甄别文档内容的完整性,平台不提供额外的编辑、内容补充、找答案等附加服务。
- 2、"仅部分预览"的文档,不可在线预览部分如存在完整性等问题,可反馈申请退款(可完整预览的文档不适用该条件!)。
- 3、如文档侵犯您的权益,请联系客服反馈,我们会尽快为您处理(人工客服工作时间:9:00-18:30)。
HQ6006A智能无线终端
产品使用说明书
封面背景请沿用原来的版本!
制作时请打样提交华强公司确认!
HQ6006A智能无线终端产品使用说明书
(适合于V31/V35/V36/V37/V52/V53等系列HQ6006A智能无线终端)
V3.0.1-Build-By HQITI
产品简介
欢迎您成为华强GPS大家庭一员!
恭喜您成为华强GPS智能无线终端产品的用户,我们非常感谢您选择了本款GPS 产品。
HQ6006A智能无线终端是深圳华强信息产业有限公司自主研发生产的新一代高科技产品;通过本产品利用全球卫星定位导航系统(GPS)、电子地图(GIS)、移动通信网络(GSM / GPRS / CDMA)、计算机通信及自动控制等技术能提供您更加优质的卫星定位、移动通信、远程控制、信息传输等产品功能。
知识产权申明
本手册中所描述的华强GPS产品,可能包括存储在半导体存储器或其他媒体中的具有深圳华强信息产业有限公司和第三方版权的软件。
中国和其他国家的法律保护深圳华强信息产业有限公司和第三方软件供应商对版权软件的专营权,其中包括经销、复制具有版权的软件。
因此,在法律规定的范围内,不允许以任何方式对任何具有深圳华强信息产业有限公司版权的软件进行修改、反设计、经销或复制。
此外,购买深圳华强信息产业有限公司产品并不意味着直接或间接地承认买方拥有深圳华强信息产业有限公司与任何第三方软件供应商所拥有的版权、专利权和专利使
用权,但产品销售法规定的普通产品,不具有专有权的产品和具有免费特许权的产品除外。
如下标识归属深圳华强信息产业有限公司所有,任何个人和组织在没有获得授权的情况下不得随意使用或篡改:
※如本手册所述内容与您的GPS智能无线终端不符,请以智能无线终端为准。
※深圳华强信息产业有限公司拥有本手册的最终解释权。
※深圳华强信息产业有限公司保留修改技术规则而不事先通知的权利。
※深圳华强信息产业有限公司保留修改本手册内容的权利,恕不另行通知。
2000-2007,深圳华强信息产业有限公司版权所有。
公司网址:全国统一客服电话:400-886-1199
注意事项
1、用户安装设备前请仔细阅读本说明书。
2、安装设备前请先插入SIM或UIM卡,否则设备无法正常工作。
3、请先确认所有设备和连线连接正确后再接主机电源。
切勿在主机上电的情况下安装或拆卸。
如发现有遗漏线或误接,请先切断电源,否则容易损坏设备。
4、建议在指定的安装地点安装本设备,如在使用过程中发现异常,请立即到指定维修点维修。
在非指定安装点或维修点安装、维修,造成的设备损坏不在产品保修范
围内。
5、本设备为无线通讯设备,可能因为无线通讯网络人为屏蔽或覆盖范围盲区而导致的通讯不正常。
6、本设备为无线通讯设备,进入加油站或危险品等场所时请切断主机电源。
7、本设备工作电压为9V-32V,请在工作电压范围内使用。
8、为了避免电磁干扰或配置不兼容,请您在贴有通知的场所按规定停止使用设备。
9、请您务必关注设备的正常工作状态。
技术规格
主要配件注:具体产品型号及配置以客户选购为准(一)“社会型”主要配件包括:主机、手柄(二)“调度型”主要配件包括:主机、LCD (三)“简易型”主要配件包括:主机
(四)其他可选配件:道路检测器、图像采集器、速度传感器等
(五)连线方式:(具体参见附录中的产品接线图)
手柄(LCD)、道路检测器:与“可控电源数据总线”相连。
手柄的话音线(四芯线):通过转接线与“手柄话音线”相连。
免提喇叭:与“免提喇叭”线相连。
免提麦克:与“免提麦克风”线相连。
图像采集器:与“摄像头”线相连。
速度传感器:与“速度传感器”线相连。
主要功能
序
号
功能项说明
服务中心
号码设置功能利用中心下发指令,可以进行服务中心号码设置,也可以直接操作手柄进行服务中心号码设置。
终端标识
号码设置
利用中心下发指令,可以进行本机号码设置,也可以直
对于手柄来说,网络运营商名称最长不超过14个字节;
对于LCD来说,网络运营商名称最长不超过24个字节。
利用中心下发指令,可以设置:“速度上限值”、“关ACC 进入省电时间”等参数。
如当车辆行使速度超过该“速度上限值”时,终端会主动向中心发送超速提示信息;
如当ACC关后,终端默认的是30分钟后进入省电状态,此时间可以由中心下发设置修改“关ACC进入省电时间”参数指令进行修改,当设置为“0”时终端将不进入省电状态。
利用中心下发指令,可以控制“登录信息上传”、“脱网信息上传”、“DTMF提示信息上传”功能的开与关。
如当终端已经打开了“登录信息上传”功能时,当
利用中心下发指令,可以控制终端如下工作状态:
A:终端无条件重启,取消一切非正常提示及车辆状态。
B:重设为出厂前设置并重启。
C:在ACC关的情况下,下发此指令可以关掉通讯模块、定位模块、总线电源。
当ACC再开的时候终端会打开通讯模块、定位模块、总线电源。
中心下发上述A、B、C三种指令,终端收到指令后会执行对应的三种工作状态。
利用中心下发指令,可以通过终端对车辆进行锁车控制:A:锁定车辆油路或电路
B:恢复车辆油路或电路
中心下发上述A指令时,终端会掐断车辆的油路或电路;下发B指令时,终端又会接通车辆的油路或电路。
利用中心下发指令,可以设置终端TCP/IP通信的参数:A:服务器IP地址、本地端口号、服务器端口号;
B:拨号用户名、拨号密码、拨号号码;
C:是否进入/推出TCP工作状态以及进入该状态的时间。
通过TCP数据传输功能,可以实现终端和中心之间进行大数据量和快速数据传输。
紧急求助提示:用户按下紧急求助按钮持续3秒以上,终端主动上传紧急求助信息。
非正常使用提示:当终端需要密码输入的时候,3次输入密码错误或者90秒未输入密码,终端则会主动
指终端主机可以外接图像拍摄采集器,并通过连接图像
采集器可获得拍摄环境的图片,并通过移动通信网络上
传到中心。
一台终端支持单个或多个图像采集器,最多支持4
路图像采集器连接。
图片的上传方式可通过中心进行设置:“实时上传”
或者“终端自动上传”,“终端自动上传”图片的拍
摄触发条件可通过中心远程设置。
客户协议为准!
产品外接线连接图
注:以下接线图仅供安装人员参考,实际产品安装时必须在厂家授权的专业安装人
员指导下进行,否则厂家不承担任何因安装不正确导致的后果。
1.主机示意图:
2.连接线出口连线头示意图:
3.线材连接说明:
A.6芯电源连接线(长线):。