DYSON吸尘器使用说明
吸尘器操作规程
吸尘器操作规程一、概述吸尘器是一种常用的清洁工具,用于清理地面上的灰尘和杂物。
为了确保吸尘器的正常使用和安全操作,制定本操作规程。
二、操作准备1. 确保吸尘器处于关闭状态,插头未插入电源插座。
2. 检查吸尘器的滤网和吸尘袋是否清洁,如有需要,进行清理或更换。
3. 检查吸尘器的电源线是否完好无损,无裸露电线或断裂现象。
三、操作步骤1. 将吸尘器插头插入电源插座。
2. 打开吸尘器的电源开关,确保电源指示灯亮起。
3. 手握吸尘器把手,将吸尘器头部放置在需要清理的地面上。
4. 按下吸尘器的开关按钮,启动吸尘器。
根据需要,可以调节吸力大小。
5. 将吸尘器头部移动到需要清理的区域,沿着直线或曲线运动,确保吸尘器头部与地面充分接触。
6. 当清理完成后,松开开关按钮,关闭吸尘器。
7. 拔出吸尘器插头,断开电源。
四、注意事项1. 使用吸尘器前,应确保地面上没有大块的杂物,以免损坏吸尘器。
2. 长时间使用吸尘器时,应定期检查吸尘袋是否已满,及时清理或更换。
3. 使用吸尘器时,应避免将电源线拉扯过度,以免损坏电源线。
4. 吸尘器不适用于吸湿的地面或液体,以免发生电击事故。
5. 使用吸尘器时,应注意周围的安全,避免碰撞或触碰到其他物体。
五、维护保养1. 每次使用后,应将吸尘器清洁干净,包括滤网和吸尘袋。
2. 定期检查吸尘器的电源线和插头,如有损坏应及时更换。
3. 定期检查吸尘器的滤网和吸尘袋,如有损坏或堵塞应及时更换。
4. 吸尘器长时间不使用时,应存放在干燥通风的地方,避免受潮或积尘。
六、紧急情况处理1. 如发生吸尘器起火或冒烟的情况,应立即切断电源,并使用灭火器或其他灭火工具进行扑灭。
如无法扑灭,请立即报警并撤离现场。
2. 如发生吸尘器触电的情况,应立即切断电源,并使用绝缘工具或干燥物体将触电部位与人员分离。
如伤者无意识或呼吸困难,请立即进行心肺复苏或呼吸道通畅处理,并立即就医。
以上是吸尘器操作规程的详细内容,希望能对您的工作有所帮助。
戴森PH07遥控器说明
戴森PH07遥控器说明
进入手机,找到“万能遥控器”,并点击。
在万能遥控器首页,点击左上角“+”。
进入“红外遥控器”页面后,点击“风扇”。
在“选择风扇品牌”页面,点击右侧品牌首字母“D”可以快速定位到首字母为“D”的页面(或向上滑屏来查找)。
找到“戴森”后,点击它。
在“添加风扇遥控器”页面,点击电源按钮图标,之后根据提示来操作即可轻松地添加上戴森电风遥控器,并显示在首页上。
遥控器添加好后,就像平时用遥控器一样来控制风扇了。
END注意事项手机需要有红外功能,且安装有万能遥控器。
1、使用戴森吸尘器前,应仔细看一遍说明书,然后对照说明书检查一下它的各种附件是否齐全,再按说明书上的步骤和方法将吸尘器各部分安装好。
每次连续使用时间尽量不要超过2小时,以免电机过热而烧毁。
2、启动前,先核对一下电源的电压和频率,如果戴森吸尘器带有地线,应接地。
还应检查机体上的集层过滤袋,看框格是否放平放妥,机体上应该关紧的门、搭扣或盖是否关好、盖严和搭紧,检查确认无误后才可启用。
3、使用戴森吸尘器前,应将被清扫场所中较大的脏物、纸片等除去,以免吸入管内堵塞进风口或尘道。
使用戴森吸尘器时,应注意不要吸进易燃物(如沾有汤油的尘团、火柴头、未熄灭的烟头、易燃药粉等)、潮湿泥土、污水、金属屑等等,以防损坏机器。
4、戴森吸尘器的外观清洁比较容易,一般只需要用蘸有肥皂水的软布擦拭即可,但是千万不能用有机溶剂清洗,以免其外观塑料开裂、褪色或者掉漆,当然也不可以用钢丝球等硬物清洁,以免给机体造成损害。
戴森v10使用方法
戴森v10使用方法戴森V10是一款功能强大的无线手持吸尘器,可以有效地清洁家居环境。
下面我将为您详细介绍戴森V10的使用方法。
首先,让我们从戴森V10的组装开始。
打开包装箱,您会得到一个主机、一个电动地刷头、一个电池、一个吸尘刷、一个小型刷头、一个延长软管、一个充电座以及一些附件。
将各个部件从包装中取出,确保所有零件完整无损。
接下来,让我们将电池插入主机。
在主机底部的电池插口处,将电池轻轻插入至底部直到听到插头插入位的“咔嚓”声。
确保电池牢固地插入,以免在使用过程中松动。
然后,您可以根据具体的清洁需求选择合适的吸头。
电动地刷头适用于地板的清洁,而小型刷头适用于家具表面及狭窄区域的清洁。
使用吸尘刷可以清理键盘、书架等容易积尘的地方。
在开始清洁之前,确保电池已经充满电。
将充电座插入电源插座,并将主机放置在充电座上,待电池充电指示灯变绿表示充电完成。
充满电的电池可以支持最高长达60分钟的工作时间。
现在,您可以开始使用戴森V10进行清洁了。
按下主机手柄上的开关按钮,即可启动吸尘器。
主机有三个档位可供选择:强劲模式、标准模式和经济模式。
对于较脏或大面积的清洁,可以选择强劲模式;而对于一般的清洁任务,标准模式已经足够。
此外,经济模式适用于清洁时间较长的情况,可以延长电池的使用时间。
在使用过程中,您可以使用延长软管将主机连接至各类延伸管或刷头,以便更方便地清洁高处或狭窄的区域。
延长软管具有柔韧性,可以自由弯折,使您可以轻松地吸尘到任何您希望清洁的地方。
当清洁结束后,可以再次按下主机手柄上的开关按钮,将吸尘器关闭。
将主机放置在充电座上,确保电池充满电,以备下次使用。
除了以上的基本使用方法外,戴森V10还具有一些其他的使用技巧和注意事项。
例如,定期清洗过滤器可以保证吸尘器的吸力和性能。
根据使用频率,建议每隔三个月或更频繁地拆下滤芯并清洗,清洗后要确保滤芯完全干透后再安装回主机。
另外,为了保证长时间的使用寿命,建议不要将戴森V10用于湿地清洁,避免吸入大块的湿垃圾或液体。
DYSON吸尘器使用说明

初次开箱,可以直接使用。
等到电用完了,机器就不能工作。
插上电源充电小时,充电的时候机器亮蓝灯,充满了灯就熄灭了。
充满电请立即拔掉插头,避免安全隐患。
如果超过3个月以上不使用吸尘器,请把电池拆下来,在阴凉通风处保存(只要拧开螺丝,电池就能取下)。
机器有大、小?两档吸力。
请按机器背后圆形MAX按键调节吸力,DC62按住红色开机键的时候按max按键调节吸力,大吸力最多工作6分钟,小吸力工作20分钟左右。
垃圾满了,按红色按键倒出垃圾。
注意垃圾桶不能水洗,机器也不能吸水。
机器进水会导致机器报废不能使用,请特别注意。
机器内部有一个紫色圆柱形hepa滤网,上面有水龙头标志,这个滤网每3个月清洗一次。
洗好以后一定要晾干,需要晾24个小时。
晾干以后放入机器,可以重复使用。
吸地面的炭纤维涡轮吸头不能水洗。
如果滚轮上缠了头发,可以拿一元硬币,根据吸头上的指示转开,取出滚轮清理。
戴森吸尘器说明书
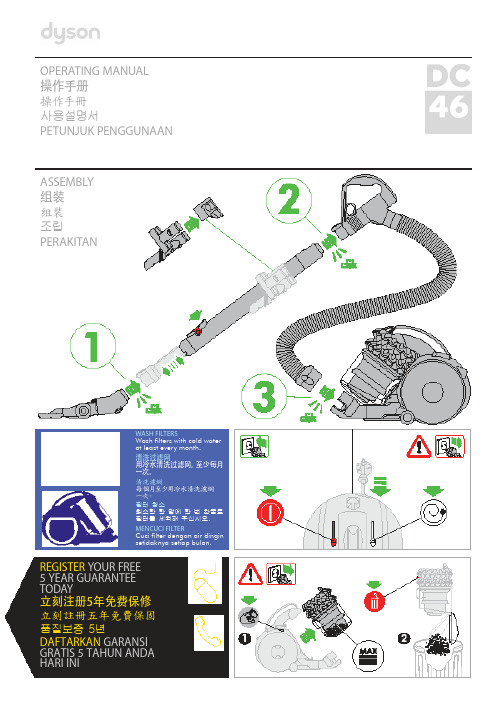
OPERATING MANUAL操作手册操作手冊사용설명서PETUNJUK PENGGUNAANASSEMBLY组装組裝조립PERAKITANWASH FILTERS清洗过滤网清洗濾網필터 청소MENCUCI FILTERREGISTER YOUR FREE5 YEAR GUARANTEE TODAY立刻注册5年免费保修立刻註冊五年免費保固품질보증 5년DAFTARKAN GARANSI GRATIS 5 TAHUN ANDA HARI INIDYSON CUSTOMER CARETHANK YOU FOR CHOOSING TO BUY A DYSON APPLIANCEAfter registering your free 5 year guarantee, your Dyson appliance will be covered for parts and labour for5 years from the date of purchase, subject to the terms of the guarantee.If you have any questions about your Dyson appliance, call the Dyson Helpline with your serial number and details of where/when you bought the appliance.Most questions can be solved over the phone by one of our trained Dyson Helpline staff.Alternatively visit for online help, general tips and useful information about Dyson.戴森客户服务感谢您选择购买戴森产品登记获取 5 年免费保修后,您的戴森产品自购买之日起,将享受 5 年的零件和人工保修服务,但须符合保修条款的规定。
Dyson V15 Detect Cordless Vacuum, Black说明书
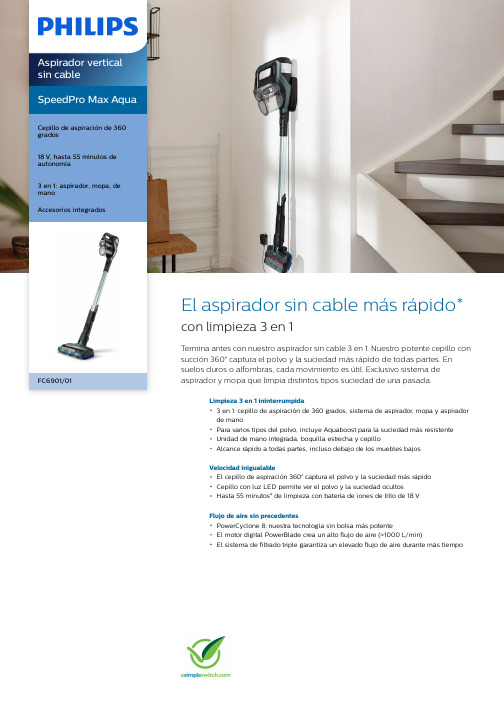
SpeedPro Max AquaCepillo de aspiración de 360 grados18 V, hasta 55 minutos de autonomía3 en 1: aspirador, mopa, de manoAccesorios integradosFC6901/01El aspirador sin cable más rápido* con limpieza 3 en 1Termina antes con nuestro aspirador sin cable 3 en 1. Nuestro potente cepillo con succión 360° captura el polvo y la suciedad más rápido de todas partes. En suelos duros o alfombras, cada movimiento es útil. Exclusivo sistema de aspirador y mopa que limpia distintos tipos suciedad de una pasada.Limpieza 3 en 1 ininterrumpida3 en 1: cepillo de aspiración de 360 grados, sistema de aspirador, mopa y aspiradorde manoPara varios tipos del polvo, incluye Aquaboost para la suciedad más resistenteUnidad de mano integrada, boquilla estrecha y cepilloAlcance rápido a todas partes, incluso debajo de los muebles bajosVelocidad inigualableEl cepillo de aspiración 360° captura el polvo y la suciedad más rápidoCepillo con luz LED permite ver el polvo y la suciedad ocultosHasta 55 minutos* de limpieza con batería de iones de litio de 18 VFlujo de aire sin precedentesPowerCyclone 8: nuestra tecnología sin bolsa más potenteEl motor digital PowerBlade crea un alto flujo de aire (>1000 L/min)El sistema de filtrado triple garantiza un elevado flujo de aire durante más tiempoDestacadosCepillo de aspiración de 360 gradosEl cepillo de aspiración 360° captura el polvo y la suciedad más rápidoHasta 55 minutos de funcionamientoLas baterías de iones de litio de 18 V de alto rendimiento proporcionan hasta 55 minutos de autonomía en el modo ECO, 23 minutos en el modo normal y 17 minutos en el modo Turbo antes de tener que recargarlas.Motor digital PowerBladePowerBlade es un motor digital diseñado para crear un alto flujo de aire sin precedentes (>1000 l/min) que produce una succión de360° en el cepillo. Regístrate en en los 3 meses posteriores a la compra paradisfrutar de una garantía de motor gratuita de 5años.Sistema de aspiración y limpieza en húmedoEl exclusivo sistema de aspiración y limpieza en húmedo controla la liberación de agua para mantener la humedad óptima para todo tipode suelos duros durante la limpieza. Lasalmohadillas de microfibra se pueden lavar a mano o en la lavadora.Alcance rápido a todas partesSpeedPro Max es flexible y fácil de cubeta para el polvo está en la parte superior, lo que ofrece un ángulo más bajo e incluso se queda completamente plana en el suelo para limpiar debajo de los muebles bajos.Tecnología PowerCyclone 8Tecnología PowerCyclone 8: nuestra mejortecnología de aspiración sin bolsa ahora en un aspirador vertical inalámbrico, para mantener una succión más potente durante más tiempo.Accesorios integradosLos accesorios son fáciles de usar con un solo clic. Su unidad extraíble de mano hace que SpeedPro Max sea como dos aspiradores en uno. El cepillo se encuentra incorporado al tubo para estar siempre a mano.Cepillo con luz LEDEl polvo, las pelusas, los pelos y las migas son más fáciles de detectar y eliminar con los indicadores LED de la boquilla de SpeedPro Max. El cepillo con luz LED permite ver incluso la suciedad oculta.Sistema de filtrado tripleEl sistema de filtrado triple devuelve solo el aire limpio al motor, lo que garantiza unelevado flujo de aire durante más tiempoDistintivo verde de PhilipsLos productos de bajo consumo de Philips pueden reducir los costes, el consumoenergético y las emisiones de CO2. ¿Cómo?Ofrecen una mejora medioambiental significativa en una o varias de las áreas ecológicas centrales de Philips: consumo eficiente, embalaje, sustancias peligrosas,peso, reciclaje y deshecho y durabilidad.EspecificacionesRendimientoTipo de pila: Iones de litioVoltaje de la pila: 18 VTiempo de carga: 5 hora(s)Tiempo de funcionamiento: 55 minuto(s) Tiempo de funcionamiento (turbo):17 minuto(s)Nivel de potencia acústica: 84 dB Cobertura de superficie por depósito: 60 m²Flujo de aire (máx.): 1000 l/min UsoCapacidad del depósito de agua limpia (máx.):0,28 LDetergentes que se pueden utilizar:detergente diluido o solo aguaDiseñoColor: Azul gasolinaFiltradoCapacidad de polvo: 0,6 LFiltro del motor: Filtro lavableCepillos y accesoriosAccesorios incluidos: Adaptador de CA,Almohadilla de microfibra, Cepillo integradoCepillo adicional: Cepillo de aspiración de 360gradosCepillo estándar: Aspirador y mopaDesarrollo sostenibleEmbalaje: > 90 % de materiales recicladosManual del usuario: Papel 100 % recicladoPeso y dimensionesPeso del producto: 2,654 kg* Comparado con los 10 aspiradores verticales sin cablelíderes en ventas de más de 300 euros en Alemania en2017, usando la prueba de limpieza de suelos duros consuciedad gruesa desarrollada por Philips y basado enla norma internacional IEC60312-1. Enero de 2018.* Con sistema de aspiración y limpieza en húmedo© 2021 Koninklijke Philips N.V. Todos los derechos reservados.Las especificaciones están sujetas a cambios sin previo aviso. Las marcas registradas son propiedad de Koninklijke Philips N.V. o de sus propietarios respectivos.Fecha de emisión2021‑04‑21Versión: 6.0.1EAN: 08 71010 38438 94 。
地贝 G22 无线真空吸尘器 英文使用说明书
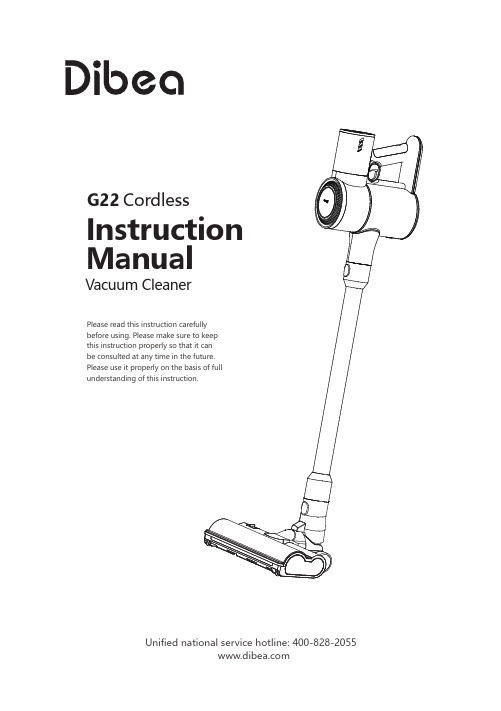
G22CordlessVacuum CleanerInstruction Manual Please read this instruction carefullybefore using. Please make sure to keepthis instruction properly so that it canbe consulted at any time in the future.Please use it properly on the basis of fullunderstanding of this Unified national service hotline: 400-828-2055Thank you for purchasing a household cleaning appliance from the Dibea brand. Dibea adheres to the corporate philosophy of " create good products wholeheartedly" and is committed to bringing users more high-quality and high-performance household appliances.To facilitate your use, please read this instruction manual carefully to understand how to operate this product safely and correctly, and to obtain the desired results from it.This manual includes the latest information as of the printing deadline, and our company is fully responsible for revising, interpreting, and explaining this manual. Our company's strategy is to continuously modify the product, so we reserve the right to change the product after the manual is printed without prior notice.If you have any questions or suggestions about our products during use, please call our service hotline at 400-828-2055. We will be dedicated to serving you!Safety use guide ....................................................................................1-2 Introduction to product components ............................................................3-4 Instructions for use (5)① Installation of the floor brush (5)② Removal of the roller brush ………………………………………………………………6-7③ Use of accessories (8)④ Charging (9)⑤ Battery replacement (10)⑥ Cleaning the dust bin .......................................................................................10-12 Common Malfunctions and Technical Specifications (13)Table of Hazardous Substances in Product (14)After-sales Service …………………………………………………………………………………………15-16Note: Please read the instructions carefully before formal use and keep the instruction manual for future reference.Do not use outdoors in rainy weatherWarning: Safety precautions are essential when using any home appliances, including but not limited to preventing hazards such as fire, electrical short circuit, personal injury, etc.1.Please store the machine in a dry indoor area and keep it away from children.2.Children over 10 years old and individuals with physical or mental disabilities must be supervised when using the machine.3.Do not allow children under 10 years old to come into contact with the machine. Keep them away when using and maintaining the machine.e the recommended accessories included in the package. Improper use or use of non-matching accessories may cause harm to the machine and to individuals.5.Take extra caution when cleaning stairs.6.Keep the machine away from hot surfaces.7.Always keep the air intake clear and away from items such as fuzz and cloth that could clog the machine.1.Please use the batteries and charger provided in the package. Using a charger with different specifications may cause risks.2.Please do not modify the charger in any way.3.Before use, please check for any signs of damage or aging on the power cord of the charger. A damaged or tangled charger cord increases the risk of fire and short circuits.4.Please handle the power cord of the charger properly.5.Please avoid pulling the charger by the charging cable to prevent damage to the charging cable.6.Please do not pull the charger by the charging cable to remove it. Please plug and unplug the charger properly.7.Please do not store the charger by winding the charging cable around it.8.The charging cable must be kept away from heat, hot objects, or sharp objects.9.Do not replace the charging cable by yourself. If the charging cable is damaged, please contact customer service for a replacement.10.Please do not touch the charger or the entire machine with wet hands.11.Please do not store the machine outdoors or charge it outdoors.12.When cleaning and maintaining the machine, make sure that the charger has been removed from the charging plug.1.This product uses a lithium battery. Do not burn or expose it to high temperatures.2.Please use original batteries. Using the wrong type of battery may cause danger.3.The battery should not be disassembled, hit, crushed, or thrown into a fire. If serious swelling occurs, please stop using it.4.Do not disassemble or collide with the battery to avoid leakage of liquid inside the battery.5.Do not short-circuit the battery's metal contacts, which can cause a short circuit danger, and avoid burns or other personal injuries caused by the battery overheating.6.Please dispose of the battery properly according to local regulations.※ In order to reduce burns, fires, electric shocks, or any other injuries, please follow the above rules.1.Before use, please carefully inspect the product for any damage or abnormalities.2.Do not use the product if any part is damaged or defective.3.Please contact a professional after-sales or qualified repair organization to perform repairs in accordance with relevant safety regulations. Repairs performed by non-professionals may result in danger.4.Do not modify the product in any way to avoid causing personal injury.5.Please use replacement parts or spare parts provided or recommended by the manufacturer.1.This vacuum cleaner is a dry vacuum cleaner.2.This vacuum cleaner does not have waterproof function, do not vacuum water or damp waste.3.This vacuum cleaner cannot vacuum any burning or smoking waste.4.Please strictly follow the instructions for use.5.Do not use this product on cement roads, asphalt roads, and other rough surfaces.6.This vacuum cleaner is for household use only and should not be used in factories or commercial places.7.Do not use it to vacuum construction debris and heavy metal dust.Warnings:1. Please do not use water, solvent or polishing agent to clean thesurface of the appliance; Please clean with dry cloth;2. It is forbidden to soak the vacuum cleaner in water or use amachine to clean it.High/low gearbuttonBatter y releasebuttonOn/off buttonDust cupFloor brush latchFloor brushDisplay screen Aluminium tube latchAluminium tube1、 As shown in the figure, align the electric floor brush interface with the aluminium tube interface, and then gently push it. After hearing a "click", the installation is completed (when disassembling, just press and hold the latch button, and pull it down and away).2、 As shown in the figure, align the aluminium tube joint with the main body interface, and then gently push it. After hearing a "click", the installation is completed (when disassembling, just press and hold the latch button, and pull it down and away).4、 Clean sweeping brush High/low gear buttonLift the illustrated handle at the left end of the roller brush to remove the brush and1、Triangular Brush: Insert the triangular brush directly into the interface of the main unit.2、Flat Brush: Align the interface of the flat brush with the interface of the vacuum cleanerMethod 1: hanging rack Method 2: Storage rack2)Indicator light1、Green LED 1 flashing, charging/undervoltage2、If the green LED1 is always on and LED2 light flashes, it indicates charging3、If the green LED1 and LED2 are always on and LED3 light flashes, it indicates charging4、If the green LED1, LED2 and LED3 are always on, it indicates full power1)As shown in the figure, press the bottom cover button of the dust cup, and the bottom cover is suspended to expose the cyclone coneLED3LED2LED1ⅤPress the battery release buttonPull out battery to Insert the battery2) As shown in the figure, rotate the cyclone cone, and then pull it down to take out the cyclone cone3)As shown in the figure, rotate the HEPA, and then pull it upwards to take it out6)Install the HEPA according to the direction shown in the figure7)Install the cyclone cone in the direction shown in the figure8)Rotate the bottom cover of the dust bucket as shown in the figure, and hear a "click" to indicate that it is in placecreate good products wholeheartedlyCommon Machine Malfunctions and Solutions1)Before using the vacuum cleaner, please remove large and sharp objects to prevent the machine from being damaged by collision. Do not use this product to suck up flammable materials or liquids such as gasoline, cigarettes, alcohol, etc.2)When using the vacuum cleaner, please keep a safe distance from heating or hot objects such as radiators, cigarette butts, etc.3)When replacing the filter, do not overturn the machine to prevent liquid or dust from falling into the motor, which may cause malfunctions and hazards.※Common Machine Malfunctions and Solutions※Product parameters※Precautionscreate good products wholeheartedly※ Please dispose of the battery safely with following steps:Hazardous substances in the table below follow the "SJ/T 11364-2014 Requirements for Identification of Restricted Use of Hazardous Substances in Electronic and Electrical Products".Component Name○○○○×××××○○○○○○○○○○×○○○○○×○○○○○×○○○○○○○○○○The following table is prepared according to the Administrative Measures for the Use Limitation of Hazardous Substances in Electronic and Electrical ProductsHazardous Substances1)If the battery provided contains materials harmful to the environment, the battery must be removed before the product being disposed of;2)The product must be powered off when removing the battery;3)The waste battery shall be disposed safely and properly, and shall not be dumped into fire, water or soil.If the waste battery touches one’s skin or clothing, please rinse with clean water to avoid skin discomfort, and take prompt medical treatment from hospital.Lead (Pb) and its compoundsMercury (Hg) and its compoundsCadmium (Cd) and its compoundsHexavalent chromium (Cr(VI)) and its compoundsPolybrominated Biphenyls (PBB) Polybrominated Diphenyl Ethers(PBDE)Circuit board assembly ElectricalComponents Power CordBatteryMetal partsPlastic parts Accessories: indicates that the content of the harmful substance in all homogeneous materials of this component is below the limit requirements specified in “GB/T 26572 current valid version”.: indicates that the content of the hazardous substance in at least one homogeneousmaterial of the component exceeds the limit requirements specified in GB/T 26572current valid version, and there is no developed alternative in the industry at present, which complies with the environmental requirements of European Union RoHS Directive.○×Table of Hazardous Substances in ProductThis card contains detailed maintenance records and instructions for your reference in case of normal maintenance, repairs, or returns. Therefore, please keep this card safe and secure.Products".Under the following circumstances, Dibea will not be able to provide free warranty services for your machine during the warranty period:1)Damage or malfunctions caused by improper use, lack of maintenance, or other improper usage not in accordance with the instructions provided in the user manual;2)Normal wear and tear or damage to consumable parts, such as brushes, filters, and cleaning brushes;3)Damage caused by human factors or irresistible factors;4) Warranty period exceeding three packages, invalid proof of purchase such as warranty cards or invoices, or warranty card and invoice information does not match;5) Damage or malfunction caused by using Dibea products for any purposes other than normal household use;6) Damage or malfunction caused by the use of non-Dibea original accessories or parts, or repairs or modifications by non-Dibea service centers;7) Shortened battery discharge time due to battery aging or use;8) Other malfunctions and damage caused by issues not related to the product's design, manufacturing, or quality.Warranty CardWarranty ExclusionsWarranty Notice1)Starting from the purchase date, the whole machine (excluding battery, motor, and accessories), charging dock, and power adapter are covered under a 2-year warranty, while vulnerable parts (motor, battery) are covered under a 1-year warranty, and consumables (roller brush, filter, cleaning brush) are covered under a 3-month warranty. Free gifts are not covered under the warranty;2)Please keep your purchase invoice and relevant documents properly as they serve as important proof for warranty services. The warranty only applies to products purchased and used within the Chinese mainland (excluding Hong Kong, Macau, and Taiwan);3)If the product malfunctions during the warranty period and cannot be resolved by following the troubleshooting instructions in the manual, please contact our nationwide customer service hotline at 400-828-2055.4) We provide lifetime repair services for our products, but customers will be responsible for repair fees, material fees, and transportation costs if the warranty period has expired.Dear user:In order to ensure the after-sales warranty and exchange of the machine, it is recommended that you keep the packaging box for at least 30 days from the date of receipt! If your machine needs to be sent back to the factory, please follow the steps below.※ Important ReminderPreparing for shipment:Please call the customer service number at 400-828-2055 to register your information and complete the warranty card along with the machine for the return to the factory. About mailing items:Note: The important basis for warranty service is the purchase invoice and related vouchers. When repairing, the warranty basis needs to be provided. When returning the product, please send back the entire machine (including the host, accessories, and gifts), invoice, and purchase voucher together.Warranty CardYour Name:Contact Phone Number:Contact Address:Repair Date Description of Fault /Reason for FaultUsedEquipmentCompletion Dateof RepairSignature of RepairPersonnelPurchase Date:Product Model: Machine Serial Number: Invoice Number: Order Number:Suzhou Dibea Electrical Technology Co., Ltd. Address: No.19 Fuli Road, Wuzhong District, Suzhou, Jiangsu, China。
Dyson V12 SV12 无线吸尘器用户手册说明书
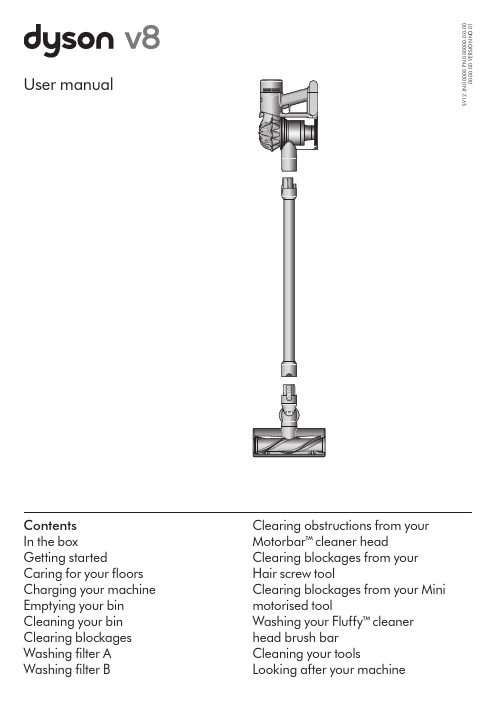
Clearing blockages Washing filter A Washing filter B head brush bar Cleaning your tools Looking after your machineMotorbar™ c leaner head De-tangling vanes automatically clearwrapped hair from thebrush bar as you clean.In the boxYour machine will come with one or more of these cleaner heads – not all will be included.Vacuum cleaner ChargerCharges your vacuum with or without a dock.Wall dockThe Dyson cordless vacuum drops into the wall-mounted charging dock, ready for your next clean.WandCrevice toolEngineered for precise cleaning around tricky edges and into hard-to-reach narrow spaces.Two tools in one – wide nozzle and brush, for quick switching between cleaning and dusting tasks around your home or car.Combination toolHair screw tool Anti-tangle conical brush bar spirals hair off and into the bin. Motor-driven cleaning for smaller spaces.Some tools may not be included.You can buy additional tools at .au or Fluffy™ c leaner headSoft woven nylon removes large debris, while anti-static carbon fibre filaments extract fine dust from hard floors.Soft dusting brush Enclosed in a skirt of soft nylon bristles for gentle, vacuum-assisted dusting of delicate objects and surfaces.Fabric and mattress toolRemoves dust, dirt and allergens from mattresses and upholstery.Mini motorised tool Motorised brush bar, concentrated in asmaller head to remove stubborn dirt from mattresses, upholstery and stairs.Stubborn dirt brush Stiff nylon bristlesdislodge ground-in dirt from coarse carpets, high traffic areas and car interiors.Extension hose Adds up to 61cm offlexible reach to any tool attachment, to clean up high or down low in your home or car.Main body showing the handle and bin attached.A brush bar located inside the cleaner head and asuction control slider located on the front.A rectangular dock that needs to be fixed to a wall with screws.The charger is a onepiece unit with the plug,connector end and cable.The narrow connector end at the top, this connects to the bin and the wider end at the bottom that connects to the cleaner head or tool.A long tool with an angled end.This tool has a combination of brush head and crevice tool together in one unit. The brush head slides down the crevice tool when needed.A small cleaner head with an angled body housing the motor and an electrical connector to attach to the wand or directly to the machine.A soft fluffy brush bar housed within the cleaner head. There is an electrical connecter end that can attach to the end of the wand or directly to the machine.Pliable bristles and felt bumper strip on a narrow, tapered tool.A wide, triangular shaped nozzle.A small cleaner head with a body housing the motor and an electrical connector to attach to the wand or directly to the machine.A short nozzle with stiff bristles on the underside.A flexible hose engineered from tough wire and durable plastic.Bends and locks at different angles. Fits any compatible tool for effective cleaning in hard-to-reach high areas of your home.Up-top adaptorGetting startedPull trigger to start cleaningTwo power modesToggle between Powerful mode – for longer suction – and MAX mode, for stronger suction. Just hold down the trigger and slide the control back and forth.Switch accessories quicklyThe quick-release tools click into place, and release in moments by simply depressing the release switch.Clean awkward spacesRemove the wand and connect yourchosen tool directly to the inlet pipeto use the vacuum as a handheld.clickclickMotorbar™ c leaner headDe-tangling vanesautomatically clearwrapped hair from thebrush bar as you clean.Pointers to demonstratethat the tools can beconnected directly to themain body or to the endof the wand.Diagram showing theconnection of the wandonto the main body,with the wand releasebutton aligned with thetop of the main body.The power mode button is located on the top of the machine between the bin and filter. Slide to the left for powerful cleaning and to the right for max mode.A brush bar located inside thecleaner head and a suctioncontrol slider located on the front.Caring for your floorsCheck that the underside of the cleaner head or tool is clean and free from any objects that may cause damage.Before vacuuming your flooring, rugs, and carpets, check the manufacturer’s recommended cleaning instructions.The brush bar on your machine can damage certain flooring. Some rug materials may fuzz if a rotating brush bar is used when vacuuming. If this happens, we recommend vacuuming without the motorised floor tool and consulting with your flooring manufacturer.Battery LEDsCharging LEDsDuring use, high charge.Charging, low charge.Charging, medium charge.Charging, nearly full.Fully charged.Battery fault.Charger fault.During use, medium charge.During use, low charge.Empty.5 hrs125 hrsclickCharging your machineFully charge your machine before your first use. Connect to charger either directly or in the dock.A full charge will take approximately 5 hours. While your battery is charging, the LEDs will flash with the current level of charge. These lights will turn off once your machine is fully charged.clikclik1clikclickOne light flashing alter-nately red and blue.Two flashing blue lights on the side of the battery. No lights illuminated on the side of the battery.Three flashing blue lights on the side of the battery. One flashing blue light on the side of the battery.One flashing red LED.All LEDs lit with a solid blue light Two LEDs lit with a solid blue light One LED lit with a solid blue light One blue LED flashing.The LED lights are located on the side of the battery unit.The charger connected from the power supply using the wall dock.Insert the charging cable into the charging point at the back of the vacuum, at the bottom of the handle. Plug the cable into a wall socket to begin charging.clikclikclikclikEmpty as soon as the dirt reaches the MAX level – don’t overfill. Using your machine when the dirt is above the MAX line may affect the performance and require more frequent filter washing.Close the binPush down on the cyclone until it slides into position.Push the bin base upwards until it closes securely.Cover your bin tightly in a dustproof bag while you empty. Remove the bin carefully, seal the bag tightly and dispose.Remove the wand from your machine.Hold your machine over the bin and pull the bin release catch upwards. The cyclone will slide up and the bin base will open.Release the dirtMinimise dust contactclikclik clickThe bin release catch is located on the top of the cyclone where it joins the main body of your machine.The MAX mark on the bin of the machine, showing that the dirt should not be filled over the Max mark when the machine is at the angle of normal use.Empty your bin as soon as the dirt reaches the MAX mark.You may need to clean the filter more often if you use your machine with a full bin.Remove the wand from your machine.Hold your machine over a bin and pull the bin release catch upwards. The cyclone will slide up and the bin base will open.Empty your binPull the bin release catch upwards. The cyclone will slide up and the bin base will open.Locate the cyclone release button behind the cyclone and push to remove the cyclone from your machine.Remove the cyclonePull back on the red catch located on the base, slide the bin down and pull it off your machine.Remove the binWipe your bin with a damp, lint-free cloth. Don’t put the bin in a dishwasher or use detergents, polishes or air fresheners.Make sure the bin is completely dry before replacing.Clean the binAlign the tabs on the bin with the grooves on the main body and slide it upwards until it clicks into place.Replace the binSlide the cyclone into the grooves of the main body and push down until it is in position.Push the bin base up until it clicks firmly shut.Replace the cycloneClearing blockagesDisconnect your machine from the charger before looking for blockages. Be careful not to touch the trigger and be aware of sharp objects.Leave your machine to cool down before looking for blockages.Don't use your machine when looking for blockages as this could cause injury.Your machine is fitted with an automatic cut-out. If any part of it is blocked, your machine’s motor will pulse and won’t function until the blockage has been cleared.Lift the filter out of the top of the cyclone.Tap to remove excess dust and debris.Align the arrow on the top of the filter with the bin release button.Push down to fit securely in place.Wash your filterDry your filterRefit your filterRemove your filterLeave your filter to dry for at least 24 hours in a well-ventilated, warm place. Do not dry your filter in a tumble-dryer or near a naked flame.Important: your filter must be completely dry before you put it back into the machine. Your machine could be damaged if used with a damp filter.Hold the open end of the filter under a running tap, until the water runs clear.Turn the filter upside down and tap it to remove excess water.Run water over the outside of the filter until the water runs clear.Squeeze and twist with both hands to make sure the excess water is removed.Twist off your filterWash your filterShake out the waterTwist your filter anti-clockwise and pull it away from your machine.Place your filter on your machine, aligned in the open position. Twist clockwise until it clicks securely into position.Dry your filterLeave your filter to dry for at least 24 hours in a well-ventilated, warm place. Do not dry your filter in a tumble-dryer or near a naked flame.Important: your filter must be completely dry before you put it back into the machine. Your machine could be damaged if used with a damp filter.Replace your filterWash the inside of the filter under cold, running water, rotating the filter to make sure all the inside is clean.Repeat until the water runs clear.Empty the filter and shake firmly to remove excess water.Keep shaking it until there’s no water coming from the filter.Place your filter, with the open end facing up, to dry.The filter is placed under the tap with theMotorbar TM cleaner head may not be included in box.Clearing obstructions from your Motorbar™ c leaner headRemove the cover and brush barLook for obstructionsRe–assemble Hair screw toolHair screw tool tool may not be included in box.Your Hair screw tool doesn't have a washable brush bar. To maintain optimum performance, check your brush bar regularly and clear any obstructions.Make sure your machine is disconnected from the charger and take care not to touch the trigger.head cover.Hair screw tool.polishes or air fresheners.position.position.plate back into place.Replace your brush barLook for obstructionsRemove your brush barPush the end cap back on to your brush bar and slide it back into the cleaner head.Turn the end cap into the locked position.Your cleaner head isn't washable and should only be wiped over with a damp lint-free cloth.Don’t put any part of your machine in a dishwasher or use detergents, polishes or air e a coin to unlock the end cap.Twist the end cap and remove it from your brush bar. Don’t wash the end cap.Slide your brush bar out of the cleaner head.11232123312Clear any debris from your brush bar.Check inside the cleaner head and remove any debris or blockages.Your Mini motorised tool and brush bar aren’t washable. Wipe over with a damp lint-free cloth.Mini Motorised tool may not be included in box.Your Mini motorised tool doesn’t have a washable brush bar. To maintain optimum performance, check your brush bar regularly and clear any obstructions.Make sure your machine is disconnected from the charger and take care not to touch the trigger.Replace your brush barRemove your brush barWash and dry your brush barDon’t put any part of your machine in a dishwasher or use detergents, polishes or air fresheners.Press the cleaner head release button on the end of the wand. Place the cleaner head upside down.Push the end cap up fully and pull the brush bar out of the cleaner head.Remove the end cap from the brush bar. Don't wash the end cap.Before replacing, check that your brush bar is completely dry.Reattach the end cap to your brush bar.the closed position.Washing your Fluffy™ cleaner head brush barFluffy TM cleaner head may not be included in box.Your Fluffy™ c performance, check and wash your brush bar regularly.to touch the trigger.or dirt.of the brush bar to squeeze out the water.Stand your brush bar upright, with the closed end at the top. Leave to dry completely for at least 24 hours.Cleaning your toolsDon’t put any part of your machine in a dishwasher or use detergents, polishes or air fresheners.Wipe with a damp, lint-free cloth, without touching the connector end.Make sure your tools are completely dry before using.Looking after your machineTo always get the best performance from your machine, it’s important to clean it regularly and check for blockages.Look after your machineLook after your batteryYour serial numbersYou can register your machine using the serial number found on the bottom of your machine.If your machine is dusty, wipe with a damp lint-free cloth.Check for blockages in the cleaner head, tools and main body of your machine.Wash your filter regularly and leave to dry completely.Don’t use detergents or polishes to clean your machine.You can find your serial numbers on your machine, battery and charger. Use your serial number to register.For more information and support videos for your machine go online: .au or To get the best performance and life from your battery, use Powerful suction mode.Your machine won’t operate or charge if the ambient temperature is below 5°C (41°F). This is designed to protect both the motor and battery.。
- 1、下载文档前请自行甄别文档内容的完整性,平台不提供额外的编辑、内容补充、找答案等附加服务。
- 2、"仅部分预览"的文档,不可在线预览部分如存在完整性等问题,可反馈申请退款(可完整预览的文档不适用该条件!)。
- 3、如文档侵犯您的权益,请联系客服反馈,我们会尽快为您处理(人工客服工作时间:9:00-18:30)。
初次开箱,可以直接使用。
等到电用完了,机器就不能工作。
插上电源充电小时,充电的时候机器亮蓝灯,充满了灯就熄灭了。
充满电请立即拔掉插头,避免安全隐患。
如果超过3个月以上不使用吸尘器,请把电池拆下来,在阴凉通风处保存(只要拧开螺丝,电池就能取下)。
机器有大、小两档吸力。
请按机器背后圆形MAX按键调节吸力,DC62按住红色开机键的时候按max按键调节吸力,大吸力最多工作6分钟,小吸力工作20分钟左右。
垃圾满了,按红色按键倒出垃圾。
注意垃圾桶不能水洗,机器也不能吸水。
机器进水会导致机器报废不能使用,请特别注意。
机器内部有一个紫色圆柱形hepa滤网,上面有水龙头标志,这个滤网每3个月清洗一次。
洗好以后一定要晾干,需要晾24个小时。
晾干以后放入机器,可以重复使用。
吸地面的炭纤维涡轮吸头不能水洗。
如果滚轮上缠了头发,可以拿一元硬币,根据吸头上的指示转开,取出滚轮清理。
1。