第01章 fluent简单算例21
fluent经典算例

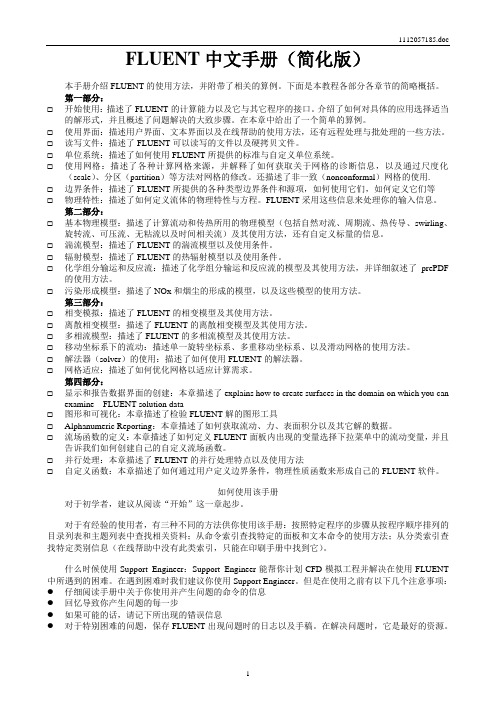
fluent经典算例Tutorial:Modeling a Single-Channel,Counter-Flow Polymer Electrolyte Membrane(PEM)Fuel CellIntroductionThe purpose of this tutorial is to provide guidelines and recommendations for using the PEM Fuel Cell add-on module available in FLUENT.This tutorial demonstrates how to do the following:Build and generate a mesh for a single-channel PEM fuel cell.Assign zone names and types that are required in the FLUENT PEM fuel cell add-onmodule.Import the mesh into FLUENT,set up the case,and run the calculations.Postprocess the results.PrerequisitesThis tutorial assumes you are familiar with both the GAMBIT and FLUENT interfaces and that you have a good understanding of the basic setup and solution procedures.Details of most steps will not be shown explicitly.If you have not used FLUENT before,it would be helpful to?rst refer to the FLUENT6.3 User’s Guide and theFLUENT6.3Tutorial Guide.You can also refer to the GAMBIT User’s Guide,GAMBIT Tutorial Guide,and GAMBIT Modeling Guide.Problem DescriptionA schematic description of a single,straight-channel,counter-?ow PEM fuel cell is shown inFigure1.The dimensions of the fuel cell are2.4×2.88×125mm in the x,y,and z directions, respectively.This model represents a repeating channel of a larger counter-?ow PEM fuel cell.The cross-sectional area of the membrane electrode assemblyis2.4×125=300mm2.All the zones as marked in Figure1(with exception of the optional cooling channel)must be de?ned as separate zones within GAMBIT.Note that there can be multiples of each zone.For example,there can be multiple cathode gas di?usion layers,each with di?erent material properties.In FLUENT6.3,all continuum zones must be of the?uid type except for the current collectors which may be either solid or? uid.For simplicity,it is recommended that you make the current collectors solid continuum zones.Modeling a Single-Channel,Counter-Flow Polymer Electrolyte Membrane(PEM)Fuel CellFigure1:PEM Fuel Cell ZonesFor details about the FLUENT PEMFC model,refer to o f FLUENT6.3Fuel Cell ModulesManual.Note:If you would like to bypass all GAMBIT steps and proceed to the FLUENT portion of the tutorial,skip to Step. Preparation in GAMBIT1.Create a folder called pem-single-channel to contain the?les generated in thistutorial.2.Start GAMBIT and specify this folder as the working folder.To simplify the geometry construction and meshing steps,a journal?le,pem-single-channel.jou is provided.This?le contains GAMBIT instructions which will create the geometry and gen-erate the mesh.It is recommended that you step through the journal?le to understand eachof the steps and recognize the assigned zone boundary types pertinent to fuel cell problems.Geometry Creation and Mesh GenerationStep1:Geometry Creation1.Create a rectangular face primitive in the xy plane.Operation?→Geometry?→Face?→Create Real Rectangular Face(a)Enter2.4for Width and1.2for Height.Modeling a Single-Channel,Counter-Flow Polymer Electrolyte Membrane(PEM)Fuel Cell(b)Select+X+Y for Direction,(c)Click Apply and close the Create Real Rectangular Face panel.2.Create another face by sweeping the uppermost edge by0.21units in the y-direction.Operation?→Geometry?→Face?→Sweep Edges3.Create another face by sweeping the uppermost edge by0.012units in the y-direction.4.Create another face by sweeping the uppermost edge by0.036units in the y-direction.5.Create another face by sweeping the uppermost edge by0.012units in the y-direction.6.Create another face by sweeping the uppermost edge by0.21units in the y-direction.7.Create another face by sweeping the uppermost edge by1.2units in the y-direction.8.Create a rectangular face with dimensions(x,y)=(0.8,0.6).Use+x+y for the di-rection(so that the global coordinate system origin is in the lower left corner of theface).9.Move the newly created face using a vector of(0.8,0.6,0).Operation?→Geometry?→Face?→Move/Copy Faces10.Copy the face by1.08units in the y-direction.11.Split the lowermost face with the face you just created.Operation?→Geometry?→Face?→Split Face12.Similarly,split the uppermost face with its internal face.The resulting mesh should appear as shown in Figure2.Step2:Mesh Generation(Manual)1.Mesh the edges as shown in Figure2.The numbers of cells along each edge are indicated below.The geometry and mesh are symmetric about its horizontal midplane.Operation?→Mesh?→Edge?→Mesh Edges2.Mesh the nine faces using the Quad Submap scheme.Operation?→Mesh?→Face?→Mesh Faces3.Create an edge by sweeping any one of the vertices by125units in the positive z direction.Operation?→Geometry?→Edge?→Sweep VerticesModeling a Single-Channel,Counter-Flow Polymer Electrolyte Membrane(PEM)Fuel CellFigure2:Edge and Face Mesh(a)Select Vector for Path and click the De?ne button.(b)Enable Magnitude and enter125.(c)Select Positive for Z from the Direction list.(d)Click Apply in the Vector De?nition form.(e)Click Apply and close the Sweep Vertices form.4.Mesh the newly created edge using a double-sided graded edge mesh that consists of 60elements.(a)Enable Double sided.(b)Enter1.1for Ratio1and Ratio2.(c)Click Apply and close the Mesh Edges form.5.Create volumes by sweeping the nine faces along the newly created edge. Operation?→Geometry?→Volume?→Sweep Faces(a)Enable With Mesh.(b)Click Apply and close the Sweep Faces form.The volume mesh is as shown in Figure3.Modeling a Single-Channel,Counter-Flow Polymer Electrolyte Membrane(PEM)Fuel CellFigure3:Volume MeshStep3:Zone Assignments and Mesh ExportFLUENT’s PEM fuel cell add-on module requires that boundary and continuum zones berigorously de?ned.Care should be taken in order to have a logical system of naming eachzone to represent each of the regions shown in Figure1.At a minimum,the boundary zones that are required include the following:Inlet and outlet zones for the anode gas channel.Inlet and outlet zones for the cathode gas channel.Surfaces representing anode and cathode terminals.Optional boundary zones that could be de?ned include any voltage jump surfaces,interiorow surfaces,or non-conformal interfaces that are required.The following continuum zones are also required:Flow channels for anode-and cathode-sideuids.Anode and cathode current collectors.Anode and cathode gas diusion layers.Anode and cathode catalyst layers.Electrolyte membrane.The inlets should all be assigned the boundary zone type MASS FLOW INLET and outletsshould be assigned the PRESSURE OUTLET type.The terminals are the regions where thevoltage(or current?ux density)is known.Normally,the anode is grounded(V=0)andModeling a Single-Channel,Counter-Flow Polymer Electrolyte Membrane(PEM)Fuel Cell the cathode terminal is at a?xed potential that is less than the open-circuit potential.Bothof the terminals should be assigned the WALL boundary type.Voltage jump zones can optionally be placed between the various components(such asbetween the gas di?usion layer and the current collector).Faces which represent?uid/solidinterfaces must be of type WALL.Additional interior zones may be de?ned for purposes of post-processing.If such interiorzones are de?ned,they should have no e?ect on the solution.FLUENT’s PEM add-on module supports the use of non-conformal grid interfaces.In such cases,it is recommended that the INTERFACE boundary type be used halfway between the membrane continuum zone,and that the mesh on opposite sides of the interface have similar size,aspect ratio,and orientation.In such cases,the membrane will consist of two uid zones.1.Assign boundary zones according to the de?nitions listed in Table1.Operation?→Zones?→Specify Boundary TypesTable1:Boundary Zone AssignmentsAnode-side inlet(z=125,upper)inlet-a MASS FLOW INLETCathode-side inlet(z=0,lower)inlet-c MASS FLOW INLETAnode-side outlet(z=0,upper)outlet-a PRESSURE OUTLETCathode-side outlet(z=125,lower)outlet-c PRESSURE OUTLETAnode terminal(y=2.88)wall-terminal-a WALLCathode terminal(y=0)wall-terminal-c WALLAnode-side?ow channel walls wall-ch-a WALLCathode-side?ow channel walls wall-ch-c WALLFuel cell ends wall-ends WALLAnode-side di?usion layer walls wall-gdl-a WALLCathode-side di?usion layer boundaries wall-gdl-c WALLLateral boundaries of the fuel cell wall-sides WALL2.Assign continuum zones according to the de?nitions listed in Table2.Refer to Figure1 when selecting which volumes to assign to each zone.Operation?→Zones?→Specify Continuum TypesModeling a Single-Channel,Counter-Flow Polymer Electrolyte Membrane(PEM)Fuel Cell Table2:Continuum Zone AssignmentsAnode-side catalyst layer catalyst-a FLUIDCathode-side catalyst layer catalyst-c FLUIDAnode-side?ow channel channel-a FLUIDCathode-side?ow channel channel-c FLUIDAnode-side gas di?usion layer gdl-a FLUIDCathode-side gas di?usion layer gdl-c FLUIDElectrolyte membrane membrane FLUIDAnode current collector current-a SOLIDCathode current collector current-c SOLID3.Export the mesh?le as pem-single-channel.msh.Setup and Solution in FLUENTFLUENT’s PEM Fuel Cell(PEMFC)model is provided as an add-on module with thestandard FLUENT licensed software.A special license is required in order to use thismodel.The module is installed as part of the standard FLUENT installation in the folder/addons/fuelcells2.2within the FLUENT installation folder.The PEMFC model con-sists of a user-de?ned function(UDF)library and a compiled Scheme library which can beloaded using a text user interface(TUI)command.trtitlePreparation1.Copy the mesh?le pem-single-channel.msh.gz to your working folder.If you worked through the GAMBIT portion of this tutorial,an uncompressed versionof this?le will already be in place.2.Start the3DDP(3ddp)version of FLUENT.!If you wish to solve this case in parallel,you will need to set up and save the case?le in serial mode?rst.Once this is done,you can start a parallel FLUENTsession and proceed with the calculations.Step1:Grid1.Read the mesh?le,pem-single-channel.msh.gz.File?→Read?→Case...FLUENT will perform various checks on the mesh and will report the progress in theconsole window.Make sure that the reported minimum volume is a positive number.2.Check the grid.Grid?→CheckA grid check should always be performed in order to verify the integrity of the meshle.Specically,you should verify that the minimum cell volume is a positive value.Modeling a Single-Channel,Counter-Flow Polymer Electrolyte Membrane(PEM)Fuel Cell3.Since the mesh was created in units of millimeters,it must be scaled.Grid?→Scale...(a)Select mm from the Grid Was Created In drop-down list.(b)Click the Change Length Units button.(c)Click Scale.(d)Verify that the value of Zmax is125mm and close the Scale Grid panel.Step2:Models1.To load the PEMFC model using the text user interface,enter the following commandin the console:/define/models/addon-module3This command will load a Scheme library which contains the PEM model GUI anda UDF library.Upon successful execution,the following message will be displayed inthe console:Addon Module:fuelcells2.2...loaded!2.Calculate the surface area of the membrane for post-processing.In this case,the membrane area is equal to the surface area of the cathode terminal. This surface is named wall-terminal-c.Report?→Projected Areas...(a)Select Y from the Projection Direction group box.(b)Select wall-terminal-c from the Surfaces list.(c)Click Compute.The projected area reported is0.0003m2.(d)Close the Projected Surface Areas panel.3.Change the Solution Zones for user-de?ned scalars2and3to all zones.De?ne?→User-De?ned?→Scalars...This is an optional step which allows UDS-2and UDS-3to be postprocessed on bothuid and solid zones.4.Con?gure the PEM model.De?ne?→Models?→PEMFC...(a)Click the Anode tab.Modeling a Single-Channel,Counter-Flow Polymer Electrolyte Membrane(PEM)Fuel Cell i.Select Current Collector in the Anode Zone Type group box and select current-a from the Zone(s)selection list.ii.Select Flow Channel in the Anode Zone Type group box and select channel-afrom the Zone(s)selection list.iii.Select Di?usion Layer in the Anode Zone Type group box and select gdl-a fromthe Zone(s)selection list.iv.Select Catalyst Layer in the Anode Zone Type group box and select catalyst-afrom the Zone(s)selection list.(b)Click the Membrane tab.i.Select membrane from the Membrane Zone(s)selection list.(c)Click the Cathode tab.i.Select Current Collector in the Cathode Zone Type group box and selectcurrent-c from the Zone(s)selection list.ii.Select Flow Channel in the Cathode Zone Type and select channel-c from theZone(s)selection list.iii.Select Di?usion Layer in the Cathode Zone Type and select gdl-c from theZone(s)selection list.iv.Select Catalyst Layer in the Cathode Zone Type and select catalyst-c from theZone(s)selection list.(d)Click the Reports tab.i.Specify the value of Membrane-Electrode-Assembly Projected Area to0.0003m2. Recall that this value was obtained earlier in the tutorial.ii.Select wall-terminal-a from the Anode selection list and select wall-terminal-cfrom the Cathode selection list.(e)Click OK to close the PEM panel.FLUENT reports in the console that the energy equation has been enabled auto-matically.For convenience,the PEMFC model also automatically enables species transport and creates default materials.Step3:MaterialsRetain the default settings for the materials.Step4:Operating ConditionsDe?ne?→Operating Conditions...1.Set the Operating Pressure to200000pascal.2.Click OK to close the Operating Conditions panel.Modeling a Single-Channel,Counter-Flow Polymer Electrolyte Membrane(PEM)Fuel Cell Step5:Boundary ConditionsDe?ne?→Boundary Conditions...There are several zones which must be speci?ed in the boundary conditions panel.These are the anode and cathode voltage terminals,as well as the inlets and outlets.1.Set boundary conditions for the anode voltage terminal,wall-terminal-a.At this surface,the voltage is grounded and the temperature is constant.(a)Click the Thermal tab and enter353K for Temperature.(b)Click the UDS tab.i.Select Speci?ed Value from the Electric Potential drop-down list User-De?nedScalar Boundary Condition group box.ii.Enter0for Electric Potential in the User-De?ned Scalar Boundary Value groupbox.This boundary condition represents a grounded terminal.(c)Click OK to close the Wall panel.2.Set boundary conditions for the cathode voltage terminal,wall-terminal-c.At this surface,the voltage is maintained at a constant,positive value.(a)Click the Thermal tab and enter353K for Temperature.(b)Click the UDS tab.i.Select Speci?ed Value from the Electric Potential drop-down list User-De?nedScalar Boundary Condition group box.ii.Enter0.75for Electric Potential in the User-De?ned Scalar Boundary Valuegroup box.This boundary condition represents a terminal operating at0.75Volts.iii.Click OK to close the Wall panel.To calculate an IV polarization curve,you should vary the Electric Potential forthe cathode,starting from a voltage near the open circuit voltage and gradually decreasing it,converging the solution each time you change the value.3.Set boundary conditions for the anode gas?ow inlet,inlet-a.At this inlet,a humidi?ed hydrogen stream enters the fuel cell.No liquid enters the channel.(a)Enter6.0e-7kg/s for Mass Flow Rate and0for Supersonic/Initial Gauge Pressure.(b)Click the Thermal tab and enter353K for Temperature.(c)Click the Species tab and set the mass fractions of h2,o2and h2o to0.8,0.0,and0.2,respectively.(d)Click the UDS tab and select Speci?ed Value from the Water Saturation drop-down list in the User-De?ned Scalar Boundary Condition group box.Modeling a Single-Channel,Counter-Flow Polymer Electrolyte Membrane(PEM)Fuel Cell(e)Enter0for Water Saturation in the User-De?ned Scalar Boundary Value group box.(f)Click OK to close the Mass-Flow Inlet panel.4.Set boundary conditions for the cathode gas?ow inlet,inlet-c.At this inlet,a humidi?ed air stream enters the fuel cell.No liquid enters the channel.(a)Enter5.0e-6kg/s for Mass Flow Rate.(b)Click the Thermal tab and enter353K for Total Temperature.(c)Click the Species tab and set the mass fractions of h2,o2and h2o to0.0,0.2,and0.1,respectively.(d)Click the UDS tab and select Speci?ed Value from the Water Saturation drop-down list in the User De?ned Scalar Boundary Condition group box.(e)Enter0for Water Saturation in the User-De?ned Scalar Boundary Value group box.(f)Click OK to close the Mass-Flow Inlet panel.5.Set boundary conditions for the anode gas?ow outlet,outlet-a.(a)Click the Thermal tab and enter353K for Back?ow Total Temperature.(b)Click OK to close the Pressure Outlet panel.6.To set boundary conditions for the cathode gas?ow outlet,copy the boundary con-ditions from outlet-a to outlet-c7.Close the Boundary Conditions panel.Step6:Solution ControlsThe default solver settings are not su?cient to obtain a converged solution.Therefore,the following modi?cations must be made.1.Set the under-relaxation factor for Pressure to0.7,Momentum to0.3,Protonic Po-tential to0.95,and Water Content to0.95.Solve?→Controls?→Solution...2.Modify the multigrid settings.Solve?→Controls?→Multigrid...(a)Select F-Cycle from the Cycle Type drop-down lists for all equations.You will need to scroll down to set all equations.(b)Enter0.001for Termination Restriction for h2,o2,h2o,and Water Saturation.(c)Select BCGSTAB from the Stabilization Method drop-down list for h2,o2,h2o,Water Saturation,Electric Potential and Protonic Potential.(d)Enter0.0001for Termination Restriction for Electric Potential and Protonic Po-tential.(e)Increase the value of Max Cycles to50in the Algebraic Multigrid Controls group box.Modeling a Single-Channel,Counter-Flow Polymer Electrolyte Membrane(PEM)Fuel Cell(f)Click OK to close the Multigrid Controls panel.3.Enable the plotting of residuals.Solve?→Monitors?→Residual...Note:The PEMFC model automatically disables convergence checking for all equa-tions.4.Initialize the solution.Solve?→Initialize?→Initialize...(a)Set Temperature to353K.(b)Click Apply.(c)Click Init and close the Solution Initialization panel.5.Save the case and data?les as pem-single-channel.cas.gz andpem-single-channel.dat.gz.File?→Write?→Case&Data...!If you want to run the calculations in parallel,exit FLUENT and start a parallel session at this point.Open the case and data? les you saved in the previousstep and proceed.6.Request200iterations.The solution residuals will drop to acceptable values.Solve?→Iterate...The solution residual plot should resemble that shown in Figure4.The average currentdensity is displayed in the console at the end of each iteration.At the end of the calculations,the current density is reported as approximately0.324A/cm2.Step7:Postprocessing1.Create surfaces for postprocessing.Surface?→Iso-Surface...(a)Select Grid...and Z-Coordinate from the Surface of Constant drop-down lists.(b)Click Compute.(c)Enter62.5for Iso-Values(mm).(d)Enter plane-xy for New Surface Name.(e)Click Create.(f)Similarly,create another surface along the length of the fuel cell.This surfaceshould be a surface of constant X-Coordinate,with a value /doc/d88704d349649b6648d74700.html this surface plane-yz.(g)Close the Iso-Surface panel.Modeling a Single-Channel,Counter-Flow Polymer Electrolyte Membrane(PEM)Fuel CellFigure4:Residual Plot2.Create custom vectors for display.Display?→Vectors...(a)Click the Custom Vectors...button to open the Custom Vectors panel.i.Enter current-?ux-density for Vector Name.ii.Select User De?ned Memory...and X Current Flux Density from the X Com-ponent drop-down lists.iii.Select User De?ned Memory...and Y Current Flux Density from the Y Com-ponent drop-down lists.iv.Select User De?ned Memory...and Z Current Flux Density from the Z Com-ponent drop-down lists.v.Click De?ne and close the Custom Vectors panel.(b)Select current-?ux-density from the Vectors of drop-down list.(c)Select?lled-arrow from the Style drop-down list.(d)Click the Vector Options...button to open the Vector Options panel.i.Enter0.5for Scale Head.ii.Click Apply and close the Vector Options panel.(e)Select User-De?ned Memory and Current Flux Density Magnitude from the Colorby drop-down lists.(f)Enable Draw Grid from the Options list to open the Grid Display panel.i.Deselect all surfaces except plane-xy from the Surfaces selection list.Modeling a Single-Channel,Counter-Flow Polymer Electrolyte Membrane(PEM)Fuel CellFigure5:Current Flux at a Cross-Section Midway Down the Length of the PEM Channel ii.Ensure that Edges is enabled from the Options list and Feature is selectedfrom the Edge Type list.iii.Click Display and close the Grid Display panel.(g)Select plane-xy in the Surfaces selection list.(h)Click Display and close the Vectors panel.3.Auto-?t the display to the graphics window by pressing Ctrl-A on the keyboard./doc/d88704d349649b6648d74700.html pare your results with those shown in Figure5.Note:The maximum current density occurs in the regions between the channels and also that the plot units are A/m2.5.Plot contours of hydrogen mass fraction along the surface plane-yzDisplay?→Contours...(a)Enable Filled and Draw Grid from the Options list.(b)Select plane-yz from the Surfaces selection list in the Grid Display panel.(c)Click Display and close the Grid Display panel.(d)Restore the right view.Display?→View...i.Select right from the Views selection list.ii.Click Apply and close the Views panel.The display updates to the right-hand view.Modeling a Single-Channel,Counter-Flow Polymer Electrolyte Membrane(PEM)Fuel CellFigure6:Contours of Hydrogen Mass Fraction Along the Channel Length(e)Select plane-yz from the Surfaces selection list.(f)Select Species...and Mass fraction of h2from the Contours of drop-down lists.(g)Click Display.The resulting display is di?cult to visualize since the aspect ratio of the channelis large.You can change the way FLUENT displays data using the following steps:Display?→Scene...i.Select all entries from the Names selection list.ii.Click the Transform...button to open the Transformations panel.iii.Set Z to0.1in the Scale group box.iv.Click Apply and close the Transformations panel.The graphics display will be scaled accordingly.(h)Auto-?t the image to the window by pressing Ctrl-A in the graphics window.(i)Compare your result with that shown in Figure6.The?ow in the anode(upper)channel is from left to right.Note that the hydrogenmass fraction decreases in the direction of?ow.This is due to water being pulled through the membrane along with hydrogen as it is consumed in the fuel cell.6.Plot contours of oxygen mass fraction along the surface plane-yzDisplay?→Contours...(a)Follow the same procedure to generate the oxygen mass fraction contour plotthat you used to generate the hydrogen mass fraction contours.Modeling a Single-Channel,Counter-Flow Polymer Electrolyte Membrane(PEM)Fuel CellFigure7:Contours of Oxygen Mass Fraction Along the Channel Length(b)Compare your result with that shown in Figure7.The?ow in the cathode(lower) channel is from right to left.As expected,the oxygen mass fraction decreases inthe direction of?ow.7.Verify that global conservation of mass is observed.This will be done using a few text user interface(TUI)commands and basic electrochemistry concepts.(a)Compute the net oxygen consumption.Enter the TUI command:/report/species-mass-flowIf you have read a data?le instead of performing iterations,you must performat least one iteration in order to populate this data from the solver.The output is as follows:zone22(inlet-a):(4.8e-0701.2e-07)zone21(inlet-c):(01e-065e-07)zone20(outlet-a):(-4.6958153e-07-8.9805489e-11-2.8157297e-07)zone19(outlet-c):(-2.6251551e-10-9.1930928e-07-4.2904232e-07)zone53(wall-ch-a-shadow):(000)zone15(wall-ch-c):(000)zone29(wall-ends:029):(000)zone30(wall-ends:030):(000)zone31(wall-ends:031):(000)zone32(wall-ends:032):(000)zone33(wall-ends:033):(000)Modeling a Single-Channel,Counter-Flow Polymer Electrolyte Membrane(PEM)Fuel Cell zone51(wall-gdl-a-shadow):(000) zone11(wall-gdl-c):(000)zone1(wall-sides:001):(000)zone23(wall-sides:023):(000)zone25(wall-sides:025):(000)zone26(wall-sides:026):(000)zone27(wall-sides:027):(000)net species-mass-flow:(1.0155954e-088.0600915e-08-9.061529e-08)To interpret the output,each line can be read aszone num(zone-name):(˙m1˙m2...˙m n)where the subscripts1,2,...,nrefer to each species being calculated.Here,we are considering three species,namely h2,o2and h2o.Therefore,the second value in each list is the calculatedoxygen mass?ow rate in kilograms per second.In addition,a negative numberindicates?ow out of the domain from that boundary.From the last line,the netoxygen consumed is8.06×10?8kg/s.The molecular weight of oxygen is31.9988kg/kmol.Also,since the valence of a diatomic oxygen molecule is4,there are4kmol of electrons released per kmol of oxygen.Finally Faraday’s constant is9.6485×107C/kmol-electrons.Thus,the total release of electrons(which isequivalent to the current in Amperes),isI=˙mv FM=(8.06×10?8)(4.0)(9.6485×10⁷)31.9988=0.972A(1)The total current is obtained by integrating the current density over the surface of the terminal.This integral value can be calculated in several ways.One way is to multiply the membrane area by the reported current density.This givesI=(0.0003)(0.3241)(100)2=0.972A(2) Alternatively,you can integrate the user memory Y Current Flux Density(the y-component of current density)over the terminal surface.This integration yields an accurate result since the y-direction is normal to the terminal.To do this, use the Surface Integrals panel.Report?→Surface Integrals...i.Select Report Type from the Integral drop-down list.ii.Select User De?ned Memory...and Y Current Flux Density from the Field Variable drop-down lists.iii.Select wall-terminal-a from the Surfaces selection list and click Compute.The absolute value of the number reported is approximately0.972A.We have electrochemical balance in the calculations. iv.Close the Surface Integrals panel.Modeling a Single-Channel,Counter-Flow Polymer Electrolyte Membrane(PEM)Fuel CellSummaryIn this tutorial,you learned how to set up and model a single-channel PEM fuel cell.Themodel provides detailed information on the distribution of current and voltage on all theelectrically conducting regions,along with species and current?ux density distributionthroughout the fuel cell.。
(完整版)《FLUENT中文手册(简化版)》
FLUENT中文手册(简化版)本手册介绍FLUENT的使用方法,并附带了相关的算例。
下面是本教程各部分各章节的简略概括。
第一部分:☐开始使用:描述了FLUENT的计算能力以及它与其它程序的接口。
介绍了如何对具体的应用选择适当的解形式,并且概述了问题解决的大致步骤。
在本章中给出了一个简单的算例。
☐使用界面:描述用户界面、文本界面以及在线帮助的使用方法,还有远程处理与批处理的一些方法。
☐读写文件:描述了FLUENT可以读写的文件以及硬拷贝文件。
☐单位系统:描述了如何使用FLUENT所提供的标准与自定义单位系统。
☐使用网格:描述了各种计算网格来源,并解释了如何获取关于网格的诊断信息,以及通过尺度化(scale)、分区(partition)等方法对网格的修改。
还描述了非一致(nonconformal)网格的使用.☐边界条件:描述了FLUENT所提供的各种类型边界条件和源项,如何使用它们,如何定义它们等☐物理特性:描述了如何定义流体的物理特性与方程。
FLUENT采用这些信息来处理你的输入信息。
第二部分:☐基本物理模型:描述了计算流动和传热所用的物理模型(包括自然对流、周期流、热传导、swirling、旋转流、可压流、无粘流以及时间相关流)及其使用方法,还有自定义标量的信息。
☐湍流模型:描述了FLUENT的湍流模型以及使用条件。
☐辐射模型:描述了FLUENT的热辐射模型以及使用条件。
☐化学组分输运和反应流:描述了化学组分输运和反应流的模型及其使用方法,并详细叙述了prePDF 的使用方法。
☐污染形成模型:描述了NOx和烟尘的形成的模型,以及这些模型的使用方法。
第三部分:☐相变模拟:描述了FLUENT的相变模型及其使用方法。
☐离散相变模型:描述了FLUENT的离散相变模型及其使用方法。
☐多相流模型:描述了FLUENT的多相流模型及其使用方法。
☐移动坐标系下的流动:描述单一旋转坐标系、多重移动坐标系、以及滑动网格的使用方法。
FLUENTHELP算例精选中文版(一)

在学习此向导之前,假设用户还没有使用 Fluent 的经验,不过,已经学习 过用户指南第一章中的简单算例,并且熟悉 Fluent 的界面及其指南中的规约。
问题描述
问题如图 1-1 所示。一股温度为 26℃的冷流体流入大管道,在弯管处与另 一股温度为 40℃热流体混合。管道的长度单位为英寸,而流体的属性和边界条 件则使用国际单位。入口管道的雷诺数为 2.03×10⁵,因此,选择湍流流动模型。
Fluent 的信息反馈窗口会显示如下信息: Grid Check
Domain Extents: x-coordinate: min (m) = 0.000000e+00, max (m) = 6.400001e+01 y-coordinate: min (m) = -4.538534e+00, max (m) = 6.400000e+01
2. 启动 Fluent,选择 2D 求解器。
—─ 5 —─
《数值计算与工程仿真》专刊—FLUENT HELP 算例精选中文版(一)
第 1 步:与网格相关的操作
1. 读取网格文件 elbow.msh。 File Read Case...
a) 在 Files 项中点击选中 elbow.msh,然后点击 OK 完成操作。 注意:
当 Fluent 读取网格文件的同时,信息会不断显示在反馈窗口内,报告网格 转化的过程。当读取网格文件完毕,Fluent 的反馈窗口会显示一共读取了 918 个三角形的流体单元,以及许多带着不同分区标识符的边界面。
2. 网格检查。 Grid Check
—─ 6 —─
《数值计算与工程仿真》专刊—FLUENT HELP 算例精选中文版(一)
(完整版)《FLUENT中文手册(简化版)》
FLUENT中文手册(简化版)本手册介绍FLUENT的使用方法,并附带了相关的算例。
下面是本教程各部分各章节的简略概括。
第一部分:☐开始使用:描述了FLUENT的计算能力以及它与其它程序的接口。
介绍了如何对具体的应用选择适当的解形式,并且概述了问题解决的大致步骤。
在本章中给出了一个简单的算例。
☐使用界面:描述用户界面、文本界面以及在线帮助的使用方法,还有远程处理与批处理的一些方法。
☐读写文件:描述了FLUENT可以读写的文件以及硬拷贝文件。
☐单位系统:描述了如何使用FLUENT所提供的标准与自定义单位系统。
☐使用网格:描述了各种计算网格来源,并解释了如何获取关于网格的诊断信息,以及通过尺度化(scale)、分区(partition)等方法对网格的修改。
还描述了非一致(nonconformal)网格的使用.☐边界条件:描述了FLUENT所提供的各种类型边界条件和源项,如何使用它们,如何定义它们等☐物理特性:描述了如何定义流体的物理特性与方程。
FLUENT采用这些信息来处理你的输入信息。
第二部分:☐基本物理模型:描述了计算流动和传热所用的物理模型(包括自然对流、周期流、热传导、swirling、旋转流、可压流、无粘流以及时间相关流)及其使用方法,还有自定义标量的信息。
☐湍流模型:描述了FLUENT的湍流模型以及使用条件。
☐辐射模型:描述了FLUENT的热辐射模型以及使用条件。
☐化学组分输运和反应流:描述了化学组分输运和反应流的模型及其使用方法,并详细叙述了prePDF 的使用方法。
☐污染形成模型:描述了NOx和烟尘的形成的模型,以及这些模型的使用方法。
第三部分:☐相变模拟:描述了FLUENT的相变模型及其使用方法。
☐离散相变模型:描述了FLUENT的离散相变模型及其使用方法。
☐多相流模型:描述了FLUENT的多相流模型及其使用方法。
☐移动坐标系下的流动:描述单一旋转坐标系、多重移动坐标系、以及滑动网格的使用方法。
Fluent全攻略(含目录)

FLUENT全攻略流体中文网倾情奉献 雷锋精神永放光芒!2005年3月5日版权声明本书乃周华站长、孙为民、徐丽、宋剑的个人工作成果,仅供流体中文网网友下载交流之用,请下载后24小时内删除。
本网对书中内容不承担任何法律责任,请谨慎使用!祝大家身体健康,万事如意!2005年3月5日星期六 纪年学习雷锋四十二周年《FLUENT全攻略》目录第一章 FLUENT 软件介绍1.1 FLUENT软件概述 (1)1.2 软件安装与启动 (4)1.3 FLUENT用户手册 (7)1.4 FLUENT 文件读入与输出 (16)1.5 FLUENT 中的单位制 (28)1.6 FLUENT 的计算策略 (31)1.7 FLUENT 的计算方式 (32)1.8 例题:方腔流动计算 (34)1.9 本章小结 (47)第二章 FLUENT 的计算步骤2.1 问题概述 (48)2.2 处理网格 (49)2.3 计算模型 (52)2.4 定义材料性质 (54)2.5 定义边界条件 (55)2.6 求解过程 (58)2.7 显示计算结果 (62)2.8 启用二阶精度离散格式 (67)2.9 调整网格 (70)2.10 总结 (77)第三章 GAMBIT 网格划分基础3.1 对连续场的离散化处理 (78)3.2 网格生成技术 (79)3.3 复杂外形网格生成 (82)3.4 用GAMBIT 生成网格的步骤 (83)3.5 GAMBIT 的图形用户界面 (85)3.6 GAMBIT 菜单命令 (86)3.7 用GAMBIT 创建基本二维几何模型 (88)3.8 二维网格划分 (96)3.9 定义二维网格区域类型 (103)3.10 网格文件保存和输出 (104)3.11 三维建模 (105)3.12 CAD/CAE 接口 (121)第四章 FLUENT对网格文件的操作4.1 网格的拓扑结构 (128)4.2 网格划分的要求 (140)4.3 载入网格 (142)4.4 非正则网格 (150)4.5 检查网格 (155)4.6 报告网格的统计数据 (158)4.7 修改网格 (161)4.8 将网格分区用于并行计算 (179)第五章 适应性网格技术5.1 使用适应性网格 (193)5.2 网格适应过程 (196)5.3 边界适应 (203)5.4 梯度适应 (207)5.5 各向同性适应 (211)5.6 区域适应 (214)5.7 体积适应 (218)5.8 y+和y*适应 (221)5.9 管理适应记录 (224)5.10 适应性控制 (229)5.11 用光滑和交换的方式改善网格 (231)第六章 求解技术6.1 数值格式回顾 (237)6.2 离散化 (240)6.3 多重网格法 (242)6.4 使用求解器的基本步骤 (243)6.5 选择离散格式 (244)6.6 选择压强-速度关联算法 (246)6.7 设置亚松弛因子 (247)6.8 改变库朗数 (247)6.9 引入FAS 多重网格 (248)6.10 设置求解极限 (249)6.11 初始化 (250)6.12 流场求解 (253)6.13 监视计算收敛过程 (258)6.14 用动画显示解 (264)6.15 在计算过程中执行命令 (266)6.16 收敛性和稳定性 (268)第七章 FLUENT的物理模型7.1 基本流动模型 (271)7.2 湍流模型 (274)7.3 活动变形区域中的流动计算 (278)7.4 化学反应模型 (289)7.5 燃烧模型 (298)7.6 PDF 输运模型 (303)7.7 弥散相模型 (306)7.8 多相流模型 (316)7.9 固化与熔化模型 (324)7.10 气动噪声模型 (326)7.11 热交换模型 (331)7.12 本章小结 (342)第八章 边界条件8.1 边界条件问题回顾 (343)8.2 流动的入口和出口 (347)8.3 压强入口边界条件 (352)8.4 速度入口边界条件 (358)8.5 质量流入口边界条件 (362)8.6 通风入口边界条件 (366)8.7 进气风扇边界条件 (368)8.8 压强出口边界条件 (369)8.9 压强远场边界条件 (373)8.10 出流边界条件 (375)8.11 通风出口边界条件 (377)8.12 排气风扇边界条件 (378)8.13 壁面边界条件 (379)8.14 对称边界条件 (394)8.15 周期性边界条件 (395)8.16 轴边界条件 (398)8.17 流体条件 (399)8.18 固体条件 (401)8.19 多孔介质条件 (402)8.20 风扇边界条件 (415)8.21 散热器边界条件 (419)8.22 多孔跃升边界条件 (422)8.23 无反射边界条件 (423)8.24 用户自定义风扇模型 (424)8.25 换热器模型 (430)8.26 边界型函数 (440)8.27 将变量的值设为固定值 (445)8.28 定义质量、动量、能量和其他源项 (446)第九章 材料性质9.1 物性参数设定简介 (448)9.2 密度 (459)9.3 粘度 (463)9.4 导热系数 (470)9.5 比热 (477)9.6 辐射特性 (478)9.7 质量扩散系数 (481)9.8 其他物性参数 (485)9.9 操作压强 (487)9.10 真实气体模型 (489)第十章 移动与变形区域流动计算10.1 移动区域模拟方法概述 (500)10.2 旋转坐标系中的流场计算 (500)10.3 MRF 模型 (506)10.4 混合面模型 (509)10.5 滑动网格模型 (514)10.6 动网格模型 (520)第十一章 为数据显示、报告创建表面11.1 应用表面 (538)11.2 区域表面 (539)11.3 分块表面 (539)11.4 点表面 (541)11.5 线和耙表面 (542)11.6 平面 (544)11.7 二次曲线表面 (547)11.8 等值面 (548)11.9 折叠表面 (548)11.10 改变表面形状 (550)11.11 分组、改名、删除表面 (551)第十二章 图形及可视化技术12.1 生成基本图形 (553)12.2 调整图形显示方式 (572)12.3 控制鼠标功能 (576)12.4 修改观察方式 (577)12.5 构建场景 (579)12.6 动画技术 (581)12.7 柱状图与XY插值曲线 (583)第十三章 计算报告13.1 边界通量的计算 (591)13.2 边界上作用力的计算 (593)13.3 计算投影面积 (595)13.4 表面积分 (596)13.5 体积分 (601)13.6 柱状图报告 (603)13.7 参考值设定 (604)13.8 关于算例设置的摘要报告 (607)第十四章 TECPLOT 简介14.1 TECPLOT 基本功能 (609)14.2 TECPLOT 数据格式 (614)14.3 TECPLOT 读入FLUENT 文件 (624)14.4 TECPLOT 绘图环境设置 (626)第十五章 TECPLOT 实战15.1 绘制XY 曲线 (634)15.2 绘制矢量图 (637)15.3 绘制等值线图 (639)15.4 绘制流线图 (643)15.5 绘制散点图 (646)15.6 绘制三维流场剖面图 (648)第十六章 场函数定义16.1 节点和单元的值 (655)16.2 速度报告选项 (656)16.3 定制场函数 (657)第十七章 并行处理17.1 并行处理简介 (661)17.2 启动求解器的并行版本 (662)17.3 使用并行的工作站网络 (664)17.4 检查并改进并行计算性能 (668)第十八章 用户自定义函数18.1 概论 (671)18.2 写用户定义函数(UDF) (674)18.3 通译和编译及连接用户定义函数(UDF) (733)18.4 用户定义函数(UDF)举例 (786)FLUENT6.1全攻略第一篇FLUENT基础知识第一章 FLUENT软件介绍 FLUENT软件是目前市场上最流行的CFD软件,它在美国的市场占有率达到60%。
FLUENT_计算步骤

2.6.5 监视收敛过程 图2-16 是计算进行到第60 步时残差曲线的 走势。因为没有普适的收敛判断标准,所 以在观察残差曲线时,不要仅仅监视残差 曲线下降的数量级,最好同时能够监视相 关流场变量的变化情况。
图2-16 残差监视器
简单地说,可以用三种方法判断计算是否已经收敛: (1)观察残差曲线。
图2-7 粘性模型面板
2.3.3 启用能量方程计算 执行下列菜单操作,打开Energy(能量)面板,并激活 能量计算,如图2-8 所示: Define->Models->Energy...
图2-8 能量方程面板
2.4 定义材料性质
创建一种新的物质,命名为water(水),并设置相关参数。 首先执行下列菜单操作,打开Materials(材料)面板,如图2-9 所示 : Define -> Materials... 在Name中键入材料名称water,然后设定水的各种物理性质,其中 Density为1000kg/m3, Cp为4216J/kg-K,thermal conductivity为 0.677W/m-K,viscosity为8x10-4kg/m-s。最后点击Change/Create 按钮完成创建过程。在FLUENT 提示是否用新的材料数据覆盖air 的 数据时,点击NO 按钮予以否认。 实际上FLUENT 的材料性质数据库中已经存在水的数据,因此也可 以简单地将相关数据直接从Database(数据库)中调入,如果个别 数据与前面的数据有出入,可以直接在面板上进行修改。 设置完毕后,关闭Materials(材料)面板。
2.2.3 光顺并转换网格 执行下列菜单操作,打开Smooth/Swap(网格光 顺和转换)面板: Grid -> Smooth/Swap... 光顺网格可以提高网格质量,提高计算精度。在 启动光顺/转换网格面板后,点击Smooth(光顺 )按钮,然后再点击Swap(转换)按钮,控制 台上将报告被转换网格的数量。反复点击 Smooth(光顺)按钮和Swap(转换)按钮,直 到报告中被转换(Swap)的网格数量降低为零 ,则网格光顺处理过程结束。
fluent中文简明教程
第一章Fluent 软件的介绍 fluent 软件的组成:软件功能介绍:GAMBIT专用的CFD 前置处理器(几何/网格生成)Fluent4.5 基于结构化网格的通用CFD 求解器Fluent6.0 基于非结构化网格的通用CFD 求解器Fidap 基于有限元方法的通用CFD 求解器Polyflow 针对粘弹性流动的专用CFD 求解器Mixsim 针对搅拌混合问题的专用CFD 软件Icepak 专用的热控分析CFD 软件软件安装步骤:前处 理 gambit 软件Fluent6.0 Fluent5.5&4.5 Fidap Polyflow Mixsim Icepack 通用软件专用软件step 1: 首先安装exceed软件,推荐是exceed6.2版本,再装exceed3d,按提示步骤完成即可,提问设定密码等,可忽略或随便填写。
step 2: 点击gambit文件夹的setup.exe,按步骤安装;step 3: FLUENT和GAMBIT需要把相应license.dat文件拷贝到FLUENT.INC/license目录下;step 4:安装完之后,把x:\FLUENT.INC\ntbin\ntx86\gambit.exe命令符拖到桌面(x为安装的盘符);step 5: 点击fluent源文件夹的setup.exe,按步骤安装;step 6: 从程序里找到fluent应用程序,发到桌面上。
注:安装可能出现的几个问题:1.出错信息“unable find/open license.dat",第三步没执行;2.gambit在使用过程中出现非正常退出时可能会产生*.lok文件,下次使用不能打开该工作文件时,进入x:\FLUENT.INC\ntbin\ntx86\,把*.lok文件删除即可;3.安装好FLUENT和GAMBIT最好设置一下用户默认路径,推荐设置办法,在非系统分区建一个目录,如d:\usersa)win2k用户在控制面板-用户和密码-高级-高级,在使用fluent用户的配置文件修改本地路径为d:\users,重起到该用户运行命令提示符,检查用户路径是否修改;b)xp用户,把命令提示符发送到桌面快捷方式,右键单击命令提示符快捷方式在快捷方式-起始位置加入D:\users,重起检查。
fluent算例-船舶航行
见图3.7
图3.7
3.8流场初始化
见图3.8
图3.8
3.9定义初始空气区域
见图3.9
图3.9
3.10查看船体的初始湿面积
见图3.10
图3.10
软件默认船体宽为1,所以初始时刻船体的湿面积计算方法:
3.11设置残差监视器以及升、阻力监视器
3.12求解计算
首先进行500个时间间隔的迭代计算,每个时间间隔为0.001秒,共0.5秒的时间,设置每个时间间隔最多迭代50次。因为不确定求解至收敛所需时间,所以计算结果不断增加时间间隔数目,最后总共进行了27002个时间间隔的迭代计算(由于第一次计算的残差监视曲线和升、阻力监视曲线的图像忘记保存,这里附图为第二次计算的曲线,两次计算过程的性质类似,残差曲线见图3.11,升力曲线见图3.12,阻力曲线见图3.13)(由于计算量较大,最后时间没有把握好,望老师谅解)
见图1.1
分析
(1)这应该是一个三维流动问题,为简化计算,采用二维模型。即假设船体无限宽,忽略船体侧面对流动的影响。
(2)这是一个紊流流动问题,由于船体结构较复杂,必然引起紊流流动。
(3)这是一个气、液两相流问题,船体上部为空气,下部为水。船舶在航行过程中必然引起水与空气之间的相互作用,并产生波浪。
6.2计算成果图
a)水气分布云图6.2
图6.2
b)压力分布云图6.3
图6.3
c)速度分布矢量图6.4
图6.4
6.3计算结果分析
船体动升力 ,比预计少了 少了14.324KN,还需要进一步调整水线。
七、第二次调整水线
此时
水线再上升0.079,即水线变为1.201,船体的排水体积变为
Fluent_操作手册
Fluent_操作⼿册第01章fluent简单算例21FLUENT是⽤于模拟具有复杂外形的流体流动以及热传导的计算机程序。
对于⼤梯度区域,如⾃由剪切层和边界层,为了⾮常准确的预测流动,⾃适应⽹格是⾮常有⽤的。
FLUENT解算器有如下模拟能⼒:●⽤⾮结构⾃适应⽹格模拟2D或者3D流场,它所使⽤的⾮结构⽹格主要有三⾓形/五边形、四边形/五边形,或者混合⽹格,其中混合⽹格有棱柱形和⾦字塔形。
(⼀致⽹格和悬挂节点⽹格都可以)●不可压或可压流动●定常状态或者过渡分析●⽆粘,层流和湍流●⽜顿流或者⾮⽜顿流●对流热传导,包括⾃然对流和强迫对流●耦合热传导和对流●辐射热传导模型●惯性(静⽌)坐标系⾮惯性(旋转)坐标系模型●多重运动参考框架,包括滑动⽹格界⾯和rotor/stator interaction modeling的混合界⾯●化学组分混合和反应,包括燃烧⼦模型和表⾯沉积反应模型●热,质量,动量,湍流和化学组分的控制体源●粒⼦,液滴和⽓泡的离散相的拉格朗⽇轨迹的计算,包括了和连续相的耦合●多孔流动●⼀维风扇/热交换模型●两相流,包括⽓⽳现象●复杂外形的⾃由表⾯流动上述各功能使得FLUENT具有⼴泛的应⽤,主要有以下⼏个⽅⾯●Process and process equipment applications●油/⽓能量的产⽣和环境应⽤●航天和涡轮机械的应⽤●汽车⼯业的应⽤●热交换应⽤●电⼦/HV AC/应⽤●材料处理应⽤●建筑设计和⽕灾研究总⽽⾔之,对于模拟复杂流场结构的不可压缩/可压缩流动来说,FLUENT是很理想的软件。
当你决定使FLUENT解决某⼀问题时,⾸先要考虑如下⼏点问题:定义模型⽬标:从CFD模型中需要得到什么样的结果?从模型中需要得到什么样的精度;选择计算模型:你将如何隔绝所需要模拟的物理系统,计算区域的起点和终点是什么?在模型的边界处使⽤什么样的边界条件?⼆维问题还是三维问题?什么样的⽹格拓扑结构适合解决问题?物理模型的选取:⽆粘,层流还湍流?定常还是⾮定常?可压流还是不可压流?是否需要应⽤其它的物理模型?确定解的程序:问题可否简化?是否使⽤缺省的解的格式与参数值?采⽤哪种解格式可以加速收敛?使⽤多重⽹格计算机的内存是否够⽤?得到收敛解需要多久的时间?在使⽤CFD分析之前详细考虑这些问题,对你的模拟来说是很有意义的。
01-第一篇 FLUENT 基础知识
FLUENT6.1全攻略第一篇 FLUENT基础知识第一章 FLUENT软件介绍FLUENT软件是目前市场上最流行的CFD软件,它在美国的市场占有率达到60%。
在我们进行的网上调查中发现,FLUENT在中国也是得到最广泛使用的CFD软件。
因此,我们将在这本书中为大家全面介绍FLUENT的相关知识,希望能让您的CFD分析工作变得轻松起来。
用数值方法模拟一个流场包括网格划分、选择计算方法、选择物理模型、设定边界条件、设定材料属性和对计算结果进行后处理几大部分。
本章将概要地介绍FLUENT软件的以下几个方面:(1)FLUENT软件的基本特点。
(2)FLUENT、GAMBIT、TECPLOT和EXCEED的安装和运行。
(3)FLUENT的用户界面。
(4)FLUENT如何读入和输出文件。
(5)FLUENT中使用的单位制。
(6)如何规划计算过程。
(5)FLUENT的基本算法。
1.1FLUENT软件概述1.1.1网格划分技术在使用商用CFD软件的工作中,大约有80%的时间是花费在网格划分上的,可以说网格划分能力的高低是决定工作效率的主要因素之一。
FLUENT软件采用非结构网格与适应性网格相结合的方式进行网格划分。
与结构化网格和分块结构网格相比,非结构网格划分便于处理复杂外形的网格划分,而适应性网格则便于计算流场参数变化剧烈、梯度很大的流动,同时这种划分方式也便于网格的细化或粗化,使得网格划分更加灵活、简便。
FLUENT划分网格的途径有两种:一种是用FLUENT提供的专用网格软件GAMBIT 进行网格划分,另一种则是由其他的CAD软件完成造型工作,再导入GAMBIT中生成网1FLUENT6.1全攻略格。
还可以用其他网格生成软件生成与FLUENT兼容的网格用于FLUENT计算。
可以用于造型工作的CAD软件包括I-DEAS、Pro/E、SolidWorks、Solidedge等。
除了GAMBIT 外,可以生成FLUENT网格的网格软件还有ICEMCFD、GridGen等等。
- 1、下载文档前请自行甄别文档内容的完整性,平台不提供额外的编辑、内容补充、找答案等附加服务。
- 2、"仅部分预览"的文档,不可在线预览部分如存在完整性等问题,可反馈申请退款(可完整预览的文档不适用该条件!)。
- 3、如文档侵犯您的权益,请联系客服反馈,我们会尽快为您处理(人工客服工作时间:9:00-18:30)。
第一章开始赵玉新(国防科技大学航天学院)注意:此文只用于流体力学的教学和科学研究,如若涉及到版权问题请于本人联系。
本章对FLUENT做了大致的介绍,其中包括:FLUENT的计算能力,解决问题时的指导,选择解的形式。
为了便于理解,我们在本章演示了一个简单的例子,该例子的网格文件在安装光盘中已准备好。
引言FLUENT是用于模拟具有复杂外形的流体流动以及热传导的计算机程序。
它提供了完全的网格灵活性,你可以使用非结构网格,例如二维三角形或四边形网格、三维四面体/六面体/金字塔形网格来解决具有复杂外形的流动。
甚至可以用混合型非结构网格。
它允许你根据解的具体情况对网格进行修改(细化/粗化)。
对于大梯度区域,如自由剪切层和边界层,为了非常准确的预测流动,自适应网格是非常有用的。
与结构网格和块结构网格相比,这一特点很明显地减少了产生“好”网格所需要的时间。
对于给定精度,解适应细化方法使网格细化方法变得很简单,并且减少了计算量。
其原因在于:网格细化仅限于那些需要更多网格的解域。
FLUENT是用C语言写的,因此具有很大的灵活性与能力。
因此,动态内存分配,高效数据结构,灵活的解控制都是可能的。
除此之外,为了高效的执行,交互的控制,以及灵活的适应各种机器与操作系统,FLUENT使用client/server结构,因此它允许同时在用户桌面工作站和强有力的服务器上分离地运行程序。
在FLUENT中,解的计算与显示可以通过交互界面,菜单界面来完成。
用户界面是通过Scheme语言及LISP dialect写就的。
高级用户可以通过写菜单宏及菜单函数自定义及优化界面。
程序结构该FLUENT光盘包括:FLUENT解算器;prePDF,模拟PDF燃烧的程序;GAMBIT, 几何图形模拟以及网格生成的预处理程序;TGrid, 可以从已有边界网格中生成体网格的附加前处理程序;filters (translators)从CAD/CAE软件如:ANSYS,I-DEAS,NASTRAN,PATRAN 等的文件中输入面网格或者体网格。
图一所示为以上各部分的组织结构。
注意:在Fluent 使用手册中"grid" 和"mesh"是具有相同所指的两个单词图一:基本程序结构我们可以用GAMBIT产生所需的几何结构以及网格(如想了解得更多可以参考GAMBIT的帮助文件,具体的帮助文件在本光盘中有,也可以在互联网上找到),也可以在已知边界网格(由GAMBIT或者第三方CAD/CAE软件产生的)中用Tgrid产生三角网格,四面体网格或者混合网格,详情请见Tgrid用户手册。
也可能用其他软件产生FLUENT所需要的网格,比如ANSYS(Swanson Analysis Systems, Inc.)、I-DEAS (SDRC);或者MSC/ARIES,MSC/PATRAN以及MSC/NASTRAN (都是MacNeal-Schwendler公司的软件)。
与其他CAD/CAE 软件的界面可能根据用户的需要酌情发展,但是大多数CAD/CAE软件都可以产生上述格式的网格。
一旦网格被读入FLUENT,剩下的任务就是使用解算器进行计算了。
其中包括,边界条件的设定,流体物性的设定,解的执行,网格的优化,结果的查看与后处理。
PreBFC和GeoMesh是FLUENT前处理器的名字,在使用GAMBIT之前将会用到它们。
对于那些还在使用这两个软件的人来说,在本手册中,你可以参考preBFC和GeoMesh的详细介绍。
本程序的能力FLUENT解算器有如下模拟能力:●用非结构自适应网格模拟2D或者3D流场,它所使用的非结构网格主要有三角形/五边形、四边形/五边形,或者混合网格,其中混合网格有棱柱形和金字塔形。
(一致网格和悬挂节点网格都可以)●不可压或可压流动●定常状态或者过渡分析●无粘,层流和湍流●牛顿流或者非牛顿流●对流热传导,包括自然对流和强迫对流●耦合热传导和对流●辐射热传导模型●惯性(静止)坐标系非惯性(旋转)坐标系模型●多重运动参考框架,包括滑动网格界面和rotor/stator interaction modeling的混合界面●化学组分混合和反应,包括燃烧子模型和表面沉积反应模型●热,质量,动量,湍流和化学组分的控制体源●粒子,液滴和气泡的离散相的拉格朗日轨迹的计算,包括了和连续相的耦合●多孔流动●一维风扇/热交换模型●两相流,包括气穴现象●复杂外形的自由表面流动上述各功能使得FLUENT具有广泛的应用,主要有以下几个方面●Process and process equipment applications●油/气能量的产生和环境应用●航天和涡轮机械的应用●汽车工业的应用●热交换应用●电子/HV AC/应用●材料处理应用●建筑设计和火灾研究总而言之,对于模拟复杂流场结构的不可压缩/可压缩流动来说,FLUENT是很理想的软件。
对于不同的流动领域和模型,FLUENT公司还提供了其它几种解算器,其中包括NEKTON,FIDAP、POL YFLOW、IcePak以及MixSim。
FLUENT使用概述FLUENT采用非结构网格以缩短产生网格所需要的时间,简化了几何外形的模拟以及网格产生过程。
和传统的多块结构网格相比,它可以模拟具有更为复杂几何结构的流场,并且具有使网格适应流场的特点。
FLUENT也能够使用适体网格,块结构网格(比如:FLUENT 4和许多其它的CFD结算器的网格)。
FLUENT可以在2D流动中处理三角形网格和四边形网格,在3D流动中可以处理四面体网格,六边形网格,金字塔网格以及楔形网格(或者上述网格的混合)。
这种灵活处理网格的特点使我们在选择网格类型时,可以确定最适合特定应用的网格拓扑结构。
在流场的大梯度区域,我们可以适应各种类型的网格。
但是你必须在解算器之外首先产生初始网格,初始网格可以使用GAMBIT、Tgrid或者某一具有网格读入转换器的CAD系统。
计划你的CFD分析当你决定使FLUENT解决某一问题时,首先要考虑如下几点问题:定义模型目标:从CFD模型中需要得到什么样的结果?从模型中需要得到什么样的精度;选择计算模型:你将如何隔绝所需要模拟的物理系统,计算区域的起点和终点是什么?在模型的边界处使用什么样的边界条件?二维问题还是三维问题?什么样的网格拓扑结构适合解决问题?物理模型的选取:无粘,层流还湍流?定常还是非定常?可压流还是不可压流?是否需要应用其它的物理模型?确定解的程序:问题可否简化?是否使用缺省的解的格式与参数值?采用哪种解格式可以加速收敛?使用多重网格计算机的内存是否够用?得到收敛解需要多久的时间?在使用CFD分析之前详细考虑这些问题,对你的模拟来说是很有意义的。
当你计划一个CFD工程时,请利用提供给FLUENT使用者的技术支持。
.解决问题的步骤确定所解决问题的特征之后,你需要以下几个基本的步骤来解决问题:1.创建网格.2.运行合适的解算器:2D、3D、2DDP、3DDP。
3.输入网格4.检查网格5.选择解的格式6.选择需要解的基本方程:层流还是湍流(无粘)、化学组分还是化学反应、热传导模型等7.确定所需要的附加模型:风扇,热交换,多孔介质等。
8..指定材料物理性质8.指定边界条件9.调节解的控制参数10.初始化流场11.计算解12.检查结果13.保存结果14.必要的话,细化网格,改变数值和物理模型。
第一步需要几何结构的模型以及网格生成。
你可以使用GAMBIT或者一个分离的CAD 系统产生几何结构模型及网格。
也可以用Tgrid从已有的面网格中产生体网格。
你也可以从相关的CAD软件包生成体网格,然后读入到Tgrid或者FLUENT (详情参阅网格输入一章)。
至于创建几何图形生成网格的详细信息清查月相关软件使用手册第二步,启动FLUENT解算器后面将会介绍第三到十四步详细操作,下面的表告诉了我们哪一步需要什么软件启动FLUENTUNIX和Windows NT启动FLUENT的方式是不同的,详细参阅相关介绍。
不同的安装过程也是为了使FLUENT能够正确启动而设定的。
单精度和双精度解算器在所有计算机操作系统上FLUENT都包含这两个解算器。
大多数情况下,单精度解算器高效准确,但是对于某些问题使用双精度解算器更合适。
下面举几个例子:如果几何图形长度尺度相差太多(比如细长管道),描述节点坐标时单精度网格计算就不合适了;如果几何图形是由很多层小直径管道包围而成(比如:汽车的集管)平均压力不大,但是局部区域压力却可能相当大(因为你只能设定一个全局参考压力位置),此时采用双精度解算器来计算压差就很有必要了。
对于包括很大热传导比率和(或)高比率网格的成对问题,如果使用单精度解算器便无法有效实现边界信息的传递,从而导致收敛性和(或)精度下降在UNIX系统启动FLUENT有如下几个启动方法:●在命令行启动适当的版本;●在命令行启动,但是不指定版本,然后在面板上选择适当的版本;在命令行启动,但是不指定版本,然后读入case文件(或者case文件和数据文件)来启动适当的版本。
命令行启动适当版本:可以指定维度和精度:fluent 2d运行二维单精度版本;相应的fluent 3d;fluent 2ddp;fluent 3ddp都分别运行相应的版本。
并行版本的启动请参阅相关的并行版本启动方法在此不予介绍。
在解算器的面板中指定版本Figure 1:启动时的控制台窗口在版本提示中健入2d、3d、2ddp或者3ddp启动相应版本。
如果是在图形用户界面(GUI)中启动适当的版本,请选择File/Run...菜单,然后将会出现如下图所示的菜单,这样你就可以选择合适的版本了(你也可以在这个面板上启动远程机器上的FLUENT或者并行版本,详细的内容请参阅相关主题Figure 2: FLUENT可以在选择结算器的面板上启动适当的版本在面板上启动解算器一般遵循如下方法:1. 开关3D选项指定3D还是2D解算器2. 开关双精度选项启动双精度或者单精度解算器3. 点击Run按钮如果可执行程序不在你的搜索目录下,你可以在点击Run之前指定完全的文件名。
读Case文件指定解算器版本:启动时如果未指定版本(在命令行输入fluent),将会出现前面所看到的控制台窗口,在File/Read/Case.. 或者File/Read/Case & Data..菜单中择适当的case文件或者data文件,我们就可以启动适当的版本了。
(详细内容型参阅“读写case和data文件”部分)。
当然也可以在版本的文本菜单中用read-case或者read-case-data命令。
File/Read/Case & Data...菜单或者read-case-data命令中读入的case和data文件具有相同的名字,而且扩展名分别为.cas 和.dat.。