狙击手:幽灵战士2瞄准镜分划板使用方法
Leatherwood Hi-Lux 狙击 rifle 中间眼距 rifle 瞄准器说明书

™Leatherwood® / Hi-Lux™OpticsRIFLESCOPE INSTRUCTIONSContact Information:Website: or TechnicalSupport:************************************ DistributorAndDealerSalesOnly:******************************Hi-Lux, Inc.3135 Kashiwa StreetTorrance, CA 90505, U.S.A.Tel: (310) 257-8142, Fax:(310) 257-8096©2014 Hi-Lux, Inc.CONGRATULATIONS! You have just purchased one of our LER Scout Rifle Intermediate eye relief scope. It is one of the best scopes built today. The Leatherwood® / Hi-Lux™Optics LER is a 1” tube conventional scope. This scope is the answer to those special scooping situations that require rifle optics with an extended eye relief. Designed to give full view of the target when placed 8 to 14 inches ahead of the shooter’s eye, LER scope is ideal for installing on a scout rifle, lever-action rifles with top ejection and muzzleloaders with a side hammerlock that interferes with mounting a scope in the normal position.While made popular through the 1980s by gun writer Jeff Cooper, Scout Rifles have been around for decades - in a variety of short and fast handling bolt-action, semi-auto and even lever-action models that can deliver a high rate of fire, and which can be quickly reloaded - yet still offer a dependable degree of accuracy. Scout rifle shooters looking to fully tap that capability are turning to low magnification scopes mounted forward of the receiver.This scope has been specifically designed for being mounted in just this fashion. Depending on the magnification setting, the workable eye relief of this scope is approximately 8 to 14 inches, which puts it mounted in front of the receiver. With the LER Scout magnification turned down to the lowest 2x setting, a hunter following wounded game can hold the rifle in the ready position, and when the target suddenly appears at close range, just snapping the rifle up to the shoulder will generally put the reticle on the target. A rifle in a popular caliber such as .308 Winchester can still deliver the accuracy and performance needed for shots out to and past 200 yards –and the LER Scout offers the higher magnification often needed to precisely place those longer range shots. This scope is built with a high tensile strength one-piece aluminum tube and the lenses have been fully multi-coated to insure a clear, bright and sharp sight picture. No short cuts have been taken in the production of Leatherwood® / Hi-Lux™scopes. All glass lenses are meticulously polished to photographic quality for exceptional clarity and light gathering capability, which is especially critical during the low light hunting conditions of daybreak and dusk. Shooters can choose between a standard fine duplex reticle or a heavy 3-post with crosshairs and Scout Rifle .308 BDC reticle. The 1/4" click windage and elevation adjustment is crisp and positive.All Leatherwood®/Hi-Lux™scopes feature DiamondTuff™fully multi-coated lenses. The rugged new All Terrain Riflescope(ATR) design and construction makes this scope Waterproof – Fogproof – Shockproof – Recoilproof.Here is a riflescope that's built to take on anything that Mother Nature can dish out. With your Leatherwood®/Hi-Lux™riflescope, you get Quality, Precision and Rug gedness at a price that doesn’t break your budget. The LER Series scope is built to meet the wants and needs of American shooters.TABLE OF CONTENTSSection 1. SPECIFICATIONS AND BASIC DEFINITIONS Page 4 Section 2. EYEPIECE FOCUSING Page 4 Section 3. MOUNTING Page 5 Section 4. PRE-ZEROING Page 5 Section 5. ZEROING Page 6 Section 6. RETICLES IN USE Page 7 Section 7. MAINTAINING YOUR RIFLESCOPE Page 8 Section 8. LIMITED LIFETIME WARRANTY Page 9SECTION 1: SPECIFICATIONS AND BASIC DEFINITIONS(1) SPECIFICATIONS:Remarks:All air-glass surfaces are fully multi-coated using special technology to maximize light transmission. The click adjustment for both Elevation and Windage is ¼ MOA.(2) BASIC DEFINITIONS:A. E.P.LOCK RING;B. LEVER;C. ELEVATION AND WINDAGE ADJUSTMENT KNOBS;D. OBJECTIVE LENS;E. POWER CHANGE RING;F. EYEPIECE;SECTION 2: EYEPIECE FOCUSINGHold the scope about ten or twelve inches from your eye and look through the eyepiece at a featureless flatly lit bright area such as a wall or open sky.If the reticle is not sharply definedinstantly, you need to change thescope ’s focus to suite your individualeyesight. Loosen the E.P.Lock Ring(A) (turn clockwise), and turn theEyepiece (F) counter-clockwise orclockwise until you are comfortablewith the focus. Then tighten (turncounter-clockwise) the Lock Ring (A) snugly. Tighten the finger tight only. Do not use the tools to tighten.WARNING: NEVER LOOK AT THE SUN WITH THIS PRODUCT, OR EVEN THE NAKED EYE. YOU COULD PERMANENTLY DAMAGE YOUR EYES. SECTION 3: MOUNTINGTo achieve the best accuracy from your rifle, the scope must be mounted properly. You should use a high-quality mount with bases designed to fit your particular rifle. To mount the scope:A. The scope should be mounted as low as possible withouttouching either the barrel or the receiver.B. Before tightening the mount rings, look through the scope inyour normal shooting position. Adjust the scope (either forwardor backward) until you find the furthest point forward (to ensuremaximum eye relief) that allows you to see a full field of view.C. Rotate the scope in the rings until the reticle pattern isperpendicular to the bore and the elevation turret is on top.D. Then tighten the mounting screws.WARNING: AVOID OVER-TIGHTENING THE RINGS. THIS CAN DAMAGE THE SCOPE, AFFECTING PERFORMANCE OR RENDERING IT INOPERABLE. THERE SHOULD BE A SLIGHT EVEN GAP BETWEEN THE TOP AND BOTTOM HALVES OF THE RINGS.SECTION 4: PRE-ZEROINGPre-zero sighting can be done either manually, or with a bore-sighting device. To bore sight manually,A. It is necessary to be able to see through the bore from the breechend. In the case of a bolt action, this usually means removing thebolt.B. Set the variable-power scope to low power.C. With the firearm in a rested position, remove the caps from thewindage and elevation screws.D. Look through the bore and center the target in the bore and adjustthe windage and elevation screws to position the reticle on the centerof the target.E. For the Windage adjustment, turn the windage adjustment screwclockwise to move the point of impact left and counterclockwise tomove the point of impact right as the arrow on the turret indicates.F. In the same manner, adjust the Elevation by turning the elevationadjustment screw clockwise to lower the point of impact andcounterclockwise to raise the point of the impact. **If a largeamount of adjustment is required to align the reticle, makeapproximately one-half of the windage correction, then approximatelyone-half of the required elevation correction.G. Finish by applying the balance of windage and elevation correction. If you can’t see through the bore then it will be necessary to use some type of bore-sighting device. When using a bore-sighting device, follow the instructions provided with the device.NOTE:If you’re mounting system allows for adjustment of the scope, the gross adjustments should be made in the mount and then the final adjustments made with the scope’s internal adjustment system. SECTION 5: ZEROINGDANGER: IF A BORE SIGHTING COLLIMATOR OR ANY OTHER BORE OBSTRUCTING DEVICE WAS USED; IT MUST BE REMOVED BEFORE PROCEEDING. AN OBSTRUCTION CAN CAUSE SERIOUS DAMAGE TO THE GUN AND POSSIBLE PERSONAL INJURY TO YOU AND OTHERS NEARBY.The zero range will depend on your hunting conditions.A. In general, if most of your shots will be at short range, zero-in at 100yards. For long-range shooting at big game, most experiencedshooters zero-in about three inches high at 100 yards.B. Set variable-power scopes to the highest power.C. From a rested position, fire three rounds at the target.D. Observe the center of the points of impact on the target and adjustthe windage and elevation screws as needed to bring the point ofaim to the desired relationship to the points of impact. The point ofimpact moves in the direction indicated on the adjustment knob andby the amount indicated.E. Repeat as necessary.F. Once the zeroing of the rifle is completed, youcan re-index the zero marking. You just implyloosen the two knob screws (3) and use a pin topush the pinhole (1) to rotate the index markingplate and align the “0” on the plate with the zeromark (2). Then you can tighten the two knobscrews to hold the plate in place and put thewindage and elevation caps back on to protectyour zero from moving.Each click of the adjustment changes bullet impact at 100 yards by ¼” as the amount indicated on the windage and elevation adjustments. The adjustments are calibrated in Minutes of Angle (MOA). One minute of angle is very close to 1 inch at 100 yards. To calculate the click value at distances other than 100 yards, use the following formula: divide the distance (number of yards) by 100. Then multiply this number by the click value stated on the windage and elevation adjustments. This will tell you the actual click value of the scope at that distance. For Example: your range is 200 yards. Divide 200 by 100 and that equals 2. Multiply the ¼ minute indicated on the adjustments by 2 and the adjustment at 200 yards is ½ inch per click. For 400 yards, you would multiply ¼ by 4 and that would give 1 inch per click and so on. WARNING: ALL SHOOTING SHOULD BE DONE AT AN APPROVED RANGE, OR SAFE AREA. EYE AND EAR PROTECTION IS RECOMMENDED.SECTION 6: RETICLES IN USE(1) Fine Duplex Reticle:The fine center crosshairs provide a precise aiming point. You can use thethinner portion of the reticle to estimate the range.You just frame a known size of a target at aknown range, so you can find out how many MOAthe end-to-end distance of the thinner portion ofthe reticle posts (both vertical and horizontal) willsubtend. Different magnifications or differencemodels may have different results. You just haveto memorize it for your own reference.(2) Crosshairs with Scout Rifle .308 BDC reticle Item No. :LER27X32BDCWe have developed a LER27X32BDC scout riflescope for the .308 caliber.The new reticle 3-post with crosshairs and BDC linereticle is designed for the .308 Scout Rifle. Therifleman should zero the rifle for 200 yards on thecentral crosshair. All the BCD lines should be usedunder magnification 7. The first BDC line down is 3MOA from the center, which will provide a 300 yard aiming point. The second BDC line down from the center is 6 MOA. This will provide a 400 yard aiming point. The third BDC line down from the center is 10 MOA. This will provide a 500 yard aiming point. The top of the vertical heavy post is 15 MOA from the center. This will provide the 600 yard aiming point. While the aiming points for each range may not be exact, they will be very close with either a 150 grain or 168 grain bullet at the 2550 fps velocities measured using a short barrel Ruger Scout. The rifleman should test and verify what each BDC line represents to you exactly with your load and your rifle.SECTION 7: MAINTAINING YOUR RIFLESCOPEYour scope, though amazingly tough, is a precision instrument that deserves reasonable and cautious care. For normal maintenance:A. Do not attempt to disassemble or clean the scope internally.B. The external optical surfaces should occasionally by wiped clear withthe lens cloth provided or an optical quality lens paper.C. Keep the protective lens covers in place when the scope is not inuse.D. Remove any external dirt or sand with a soft brush so as to avoidscratching the finish.E. Wipe the scope with a damp cloth, followed by a dry cloth.F. Then go over the metal portions of the scope with a silicon treadedcloth in order to protect the scope against corrosion.G. Store the scope in a moisture-free environment.H. Avoid storing the scope in the hot place, such as the passengercompartments of a vehicle on hot days. The high temperatures couldadversely affect the lubricants and sealants. A vehicle’s trunk, a guncabinet or a closet are the preferred storage locations.I. Never leave the scope where direct sunlight can enter either theobjective or the eyepiece lens. Damage may result from theconcentration of the sun’s rays (burning glass effect).WARNING: UNNECESSARY RUBBING OR USE OF A COARSE CLOTH MAY CAUSE PERMANENT DAMAGE TO LENS COATINGS.SECTION 8: LIMITED LIFETIME WARRANTYHi-Lux, Inc.warranties its products against defects arising from faulty workmanship, or materials, for the lifetime of the original purchaser. Any attempt to alter, dismantle or change the standard specifications of the products, will make this warranty null and void. This warranty is made to the original purchaser of the goods including all international sales, and applies only to the products purchased through our authorized distributors or dealers. The international warranty is subject to approval from our authorized distributor or us directly. Warranty obligation is limited to the repair or replacement of any product returned to Hi-Lux, Inc., which is determined by the manufacturer to have defects arising from faulty workmanship, or materials that adversely affect the satisfactory operation of the product. It should be noted that on items containing an etched glass reticle that the occasional appearance of some small particles is common and not a warrantable repair. We only have a one-year warranty for the electronic components that are contained on the products. Hi-Lux, Inc.reserves the right to request proof of purchase and purchase date. To guarantee warranty service, the enclosed warranty form must be completed and returned within ten (10) days of purchase to establish all warranty rights between you, the original purchaser, and Hi-Lux, Inc. We assume no liability for any incidental or consequential damages, or incidental expenses. Some states do not allow the exclusion or limitation of incidental or consequential damages, so the above limitations or exclusion may not apply to you. No warranties are made, or are authorized to be made, other than those expressly contained herein. To file a claim under this warranty, please contact the Customer Service Department of Hi-Lux, Inc.at (310) 257-8142 to obtain a Return Authorization number (RA number). After receiving your RA number, please mark the number on the outside of the package; enclose the defective item with a brief explanation of the problem. Please be sure to include your name, address and phone number. Failure to obtain a RA number may result in either refusal upon delivery, or lengthy delays for warranty repairs and service required for the item returned to us. All returns are to be shipped prepaid direct to Hi-Lux, Inc. including a check or money order in the amount of $15 to cover postage and handling.Attn.: Warranty & Service Dept.Hi-Lux , Inc.3135 Kashiwa StreetTorrance, CA 90505Tel: (310) 257-8142, Fax: (310) 257-8096E-Mail: ************************Website: In the event of a non-warranty repair, you will receive an estimate prior to any work being done. This warranty gives you specific legal rights and you may have other rights, which vary from state to state. As defined by federal law, this is a limited warranty.We lead the way。
瞄准镜 使用方法

瞄准镜使用方法
1. 确认瞄准镜的位置:瞄准镜通常固定在枪支的上部,但也有些具有侧面安装的特殊设计。
在枪支安装好瞄准镜后,需要确认它的位置是否正确,并需要正确的装配和固定。
2. 调整瞄准镜的焦距:大多数瞄准镜都具备调焦功能,可以调整瞄准镜的焦距,使得模糊的图像更加清晰,以便更好地观察目标。
3. 调整瞄准镜的高度:调整瞄准镜的高度意味着调整瞄准线与枪管重合的位置。
这通常通过调整瞄准镜底座上的螺丝或旋钮来实现,直到瞄准线与枪管成为一条直线。
4. 调整瞄准镜的水平线:瞄准镜的水平线需要调整,以使瞄准线与目标间的水平距离适当。
在目标被完全瞄准后,需要根据需要上调或下调瞄准线。
5. 训练:瞄准镜只有在正确使用时才能发挥作用。
因此,需要不断地训练和磨练技巧,以获得最佳的射击效果。
Aimpoint Acro P-2 瞄准镜使用说明书

Acro P-2™User manual1 PRESENTATIONAimpoint® red dot sights are designed for the ”twoeyes open” method which greatly enhances situational awareness and target acquisition. Thanks to the optical design the red dot follows the movement of the user’s eye while remaining fixed on target, eliminating any need for centering.1.1 Technical specificationOptical systemMagnification1X Eye relief Unlimited Clear aperture15 mm (0.6 in)15 mm (0.6 in)Dot size 2.5 MOA1 / 3.5 MOA NVD2 compatible Yes Optical coating Anti-reflex (AR) coating Adjustments 1 click = 2 cm at 100 m == 0.7 in at 100 ydsAdjustment range (windage and elevation)±1 m at 100 m ±1 yds at 100 ydsDot intensity settings 10 settings manually adjusted with push-buttons. Setting 1-4 for use with NVD and setting 5-10 for use in daylight.Dot color Red Signature No forward optical signaturefrom the dot beyond 10 metersPower sourceBattery type CR2032 (3.0 V) Lithium Battery life3 50,000 h at daylight setting 6.Size (L × W × H)Sight47 mm × 33 mm × 31 mm(1.9 in × 1.3 in × 1.2 in)WeightSight (incl. battery)61 g (2.2 oz)Height of optical axisSight withintegrated mount14 mm(0.55 in)MaterialsSight housing High strength aluminum, blackto dark gray,non-glare finish Environmental specificationTemperature range (operation)-45 °C to +71 °C (-50 °F to +160 °F)Temperature range (storage)-51 °C to +71 °C (-60 °F to +160 °F)Submersible35 m / 115 ft1 MOA: Minute Of Angle, 1 MOA ≈ 30 mm at 100 m or ≈ 1” at 100 yds2 NVD: Night Vision Device3 Battery life: Values valid at room temperature for a quality batteryc Insert battery (2) with the positive end (+) toward thebattery cap (3) as seen in Fig. 1.CAUTION: Check that the o-ring on the battery cap (3) is in position and in good condition to ensure there is no water leakage into the battery compartment.d Tighten the battery cap (3) with the Aimpoint tool (8B).When resistance is encountered, proceed to tighten until the battery cap (3) is fully tightened.NOTE: For long term storage of the sight, remove the battery.2.2 Turn ON / OFF and adjust red dot intensity • Press or to turn the sight ON.NOTE: The sight will always turn ON at setting 7 of 10.• Hold to turn the sight OFF.• Press or to adjust red dot intensity. NOTE: Intensity setting 1-4 are intended for use with NVD and intensity setting 5-10 for use in daylight.2.3 Install the sightT o install the sight to an interface compatible with the integrated mount shown in Fig. 1, follow the described procedure:a Loosen the screw (5) using the Torx T10 of the Aimpointtool (8D) and clamp the locking bar (4) around thedovetail interface.b With the recoil stop positioned in a recess, pushthe sight forward (toward muzzle) and tighten thescrew (5).c Tighten the screw (5) until a light resistance isencountered. Proceed with another 1/4 to 1/2 turn until fully tightened (MAX. 3 Nm / 2.2 ft·lb).d Retighten the screw (5) after initial firing to ensure thesight is securely fastened.CAUTION: Do not overtighten.2.4 ZeroingCAUTION: Do not continue to adjust windage and elevation screws (6) (7) if you encounter resistance.a Adjust the intensity to a comfortable setting for the reddot to contrast clearly against the target.b Use the Torx T10 of the Aimpoint tool (8D) to turn theadjustment screws (6) (7).c Windage adjustments (see Fig. 3):• Turn windage adjustment screw (6) counterclockwise to move point of impact to the right (R).• Turn windage screw (6) clockwise to move point ofimpact to the left.d Elevation adjustments (see Fig. 4):• Turn elevation adjustment screw (7)counterclockwise to move point of impact up (U).• Turn elevation adjustment screw (7) clockwise tomove point of impact down.e Confirm zeroing by firing at least three shots at a zeroingtarget. Check points of impact to confirm accuracy andrepeat zeroing procedure if required.f Ensure the sight is securely installed on the weapon andretighten the screw for the locking bar (5) if neccessary.3 EXTREME CONDITIONS• Extreme heat (moist or dry): no special procedures required.• Extreme cold: extreme cold might shorten battery life.• Salt air: no special procedures required.• Sea spray, water, mud and snow: ensure the battery cap (3) is tightened before exposing the sight to seaspray, mud, snow or before submerging the sight inwater. Clean lenses with lens paper/cloth and wipe the sight dry as soon as possible after exposure to water, sea spray, mud or snow.• Dust storms and sand storms: no special procedures required.• High altitudes: no special procedures required. CAUTION: Never clean the lenses with fingers. Use lens paper/cloth. If lens paper/cloth is not available:• To clear away debris (sand, grass etc.): blow away the dirt or rinse with clear water.• To clean lenses: fog the lenses or rinse with clear water and clean them with a soft piece of cloth.4 TROUBLESHOOTINGThe red dot does not appear or has disappeared Make sure contact surfaces in the battery compartment are clean and verify that a working battery (CR2032)is installed correctly according to 2.1. If the sight is malfunctioning, notify local dealer/armourer.The sight is impossible to zeroIf an adjustment screw (6) or (7) is at its limit, check the alignment of mount and barrel. If point of impact is moving, check if the sight is securely installed on the weapon and check weapon rail (or carry handle) stability.© 2021, 2022 Aimpoint AB. [16445-2]Aimpoint AB Jägershillgatan 15SE- 213 75 Malmö, Sweden Phone: +46 (0)40 671 50 20Fax: +46 (0)40 21 92 38e-mail:**************** Aimpoint Inc.7309 Gateway Court Manassas, VA 20109, USA Phone: +1 703-263-9795Fax: +1 703-263-9463e-mail:*****************。
瞄准镜使用方法
瞄准镜使用方法瞄准镜是枪械的重要配件,它能够帮助射手更准确地瞄准目标。
正确地使用瞄准镜不仅可以提高射击的准确性,还能够保证射手的安全。
下面,我们将介绍瞄准镜的使用方法,希望能够对您有所帮助。
首先,使用瞄准镜前,需要确保瞄准镜已经正确安装在枪械上。
安装瞄准镜时,需要注意将其固定在合适的位置,确保不会出现松动或者偏移。
安装完成后,需要对瞄准镜进行调整,以确保其与枪械的瞄准线保持一致。
接下来,需要对瞄准镜进行调零。
调零是指将瞄准镜的准星与枪械的瞄准线对齐,以确保射击时准星指向的地方就是子弹射击的地方。
调零的具体方法是通过调整瞄准镜上的调节旋钮,使准星在射击目标时完全对准目标。
在进行调零时,需要选择一个稳定的射击距离,通常是50米或者100米。
通过不断射击并调整瞄准镜,直到准星完全对准目标。
调零完成后,需要进行实际射击测试,以验证瞄准镜的准确性。
在进行测试时,需要选择不同的射击距离和不同的环境条件,以确保瞄准镜在各种情况下都能够准确瞄准目标。
通过测试,可以进一步调整瞄准镜,以达到最佳的射击效果。
除了以上的基本使用方法外,还需要注意保养和清洁瞄准镜。
定期清洁瞄准镜的镜片和调节旋钮,以确保其始终保持清晰的视野和准确的调节。
在使用过程中,还需要避免碰撞或者摔落,以免损坏瞄准镜。
总之,正确地使用瞄准镜对于射手来说至关重要。
通过正确的安装、调零和测试,可以确保瞄准镜始终保持准确性,提高射击的准确性。
同时,定期的保养和清洁也能够延长瞄准镜的使用寿命。
希望以上介绍的瞄准镜使用方法能够对您有所帮助,祝您射击准确,安全第一!。
狙击手瞄准技巧之瞄准器的弹道调节方法详解
狙击手瞄准技巧之瞄准器的弹道调节方法详解刚刚开始接触光学瞄准镜的时候要对它的结构和原理进行了解,并且还要知道如何调节瞄准器。
光学瞄准镜是利用光学成像的原理来让玩家瞄准目标物体的,在使用的时候需要有光线,或者周边有可以作为光源的物体存在。
玩瞄准镜的时候大多是使用在射击工具上的,但我们使用射击工具射击时需要进行弹道调节,将十字分划和弹着点对准,这样才能保证射击的准确。
瞄准器的中间位置上有两个调节钮,一个是高低调节一个左右调节,另外也可以叫做方向手轮和高低手轮。
通过这两个调节工具可以进行弹着点的上下左右移动。
利用高低调节和左右调节来调节弹着点,实际上是在调节十字分划的位置。
高低调节钮旁边标记的是UP,左右调节钮旁边标记的是L。
如果反时针拧动高低调节钮,弹着点会上升,如果逆时针扭动则会下降。
如果反时针拧动上下调节钮,弹着点会向左移动,如果顺时针拧动则会向右移动。
记住这个移动的规律就能够熟练的使用弹道调节钮了。
在每一次调节的时候调节钮会发出咔嚓的声音,如果声音清脆就表示调节到位。
在调节弹道调节的时候要注意每次使用完都要将此处的护盖盖上,以免灰尘水汽进入损伤瞄具内部结构。
调节的时候要结合两个调节钮一起使用,不能只使用高低调节钮或者只使用左右调节钮。
什么样的光学瞄准镜是最好的在购买瞄准镜的时候我们都想要买到一个最好的,但是什么样的瞄准镜是最好的呢?在购买的时候我们只要保证自己买到的是质量好的,并且适合自己使用的就行。
最开始瞄准镜是用在军事作战中,是军工厂统一生产的。
所以军工厂在生产瞄具上面具有丰富的经验,生产出来的瞄准镜是最好的。
但是现在市面上出售的瞄具很多都是民用瞄具,不是军工厂生产,不过完全可以满足我们的日常使用,而且制作技术也非常的好,生产的瞄具的质量都有保障。
我们在购买的时候根本不用纠结是不是军工厂生产的。
从制作工艺上来看军工厂的瞄具最好,从瞄具的类型上来看适合自己使用的瞄具是最好的。
目前瞄准镜的类型有很多,有不可以调节倍数的定倍镜,也有可以调节倍数的变倍镜,还有用于夜晚使用的夜视镜。
狙击手:幽灵战士2瞄准镜分划板使用方法
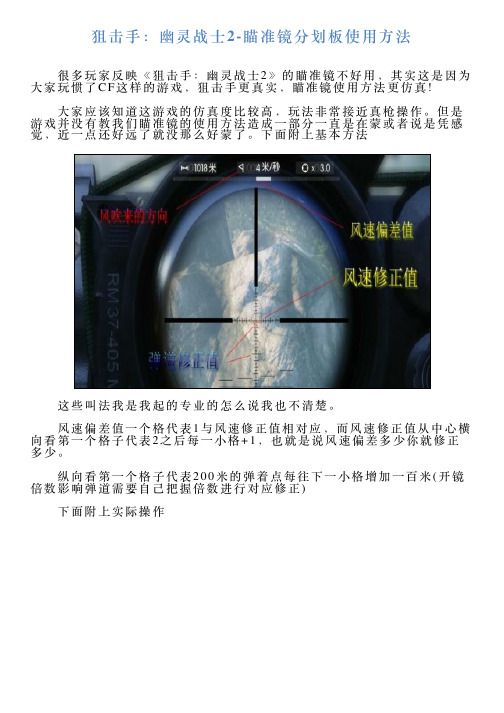
狙击⼿:幽灵战⼠2-瞄准镜分划板使⽤⽅法
很多玩家反映《狙击⼿:幽灵战⼠2》的瞄准镜不好⽤,其实这是因为⼤家玩惯了C F这样的游戏,狙击⼿更真实,瞄准镜使⽤⽅法更仿真!
⼤家应该知道这游戏的仿真度⽐较⾼,玩法⾮常接近真枪操作。
但是游戏并没有教我们瞄准镜的使⽤⽅法造成⼀部分⼀直是在蒙或者说是凭感觉,近⼀点还好远了就没那么好蒙了。
下⾯附上基本⽅法
这些叫法我是我起的专业的怎么说我也不清楚。
风速偏差值⼀个格代表1与风速修正值相对应,⽽风速修正值从中⼼横向看第⼀个格⼦代表2之后每⼀⼩格+1,也就是说风速偏差多少你就修正多少。
纵向看第⼀个格⼦代表200⽶的弹着点每往下⼀⼩格增加⼀百⽶(开镜倍数影响弹道需要⾃⼰把握倍数进⾏对应修正)
下⾯附上实际操作
由于修风的格⼦第⼀格就是2⽽风偏值是1.5所以修正多少需要⾃⼰估计⼀下跟着感觉⾛(⽬标距离是895⽶图没截上距离显⽰)
真枪不会帮你测距的下⾯附上真枪分划板使⽤⽅法
再附上国产88式狙击的分划板
中间横线是测距横线和对应距离弹着点(测距横线参照⽬标肩宽约0.5⽶)
p s:⼀名真正的狙击⼿只有快速准确的判定⽬标距离才能打准,但是敌⼈躲在掩体后⾯怎么判定距离呢?所以说优秀的狙击⼿还必须精通⽤其他参照物来判定距离⽐如汽车·~电线杆~建主(已知参照物⾼度或长度)等物体进⾏判距
逗游⽹——中国2亿游戏⽤户⼀致选择的”⼀站式“游戏服务平台。
瞄准镜的使用技巧
瞄准镜的使用技巧瞄准镜是射击运动中的重要器材之一,它能够帮助射手更准确地瞄准目标并提高射击的精准度。
下面是一些瞄准镜使用技巧:第一,调节放大倍数。
瞄准镜通常有不同的放大倍数,可以通过调整放大倍数来适应不同的射击距离。
在较近的距离上,可以选择低倍数放大,使目标更清晰,而在较远的距离上,则可以选择高倍数放大来更好地观察目标。
第二,调节对焦和目镜。
瞄准镜有一个目镜和一个物镜,通过调节这两个镜片来实现对焦。
首先,通过调节目镜,使其呈现清晰的图像。
然后,通过调节物镜,使其对准目标并使其清晰可见。
这样可以确保射手能够看清目标并更好地瞄准。
第三,调整瞄准镜的位置。
瞄准镜通常有调节高度和侧向的功能,可以根据个人需要进行微调。
射手应该通过移动瞄准镜的位置来找到适合自己的视觉角度,这样可以更好地看清目标并准确瞄准。
第四,掌握交叉线的使用。
瞄准镜上的交叉线被用来对准目标,射手需要熟练掌握交叉线的使用。
在对准目标时,应该将交叉线准确对准目标的中心,这样才能确保射击的精准度。
此外,在有些瞄准镜上,交叉线可能具有不同的样式和颜色,射手可以按照自己的喜好选择合适的交叉线。
第五,保持稳定的射击姿势。
稳定的射击姿势是射手能够准确瞄准目标的前提。
使用瞄准镜时,射手应该通过稳定的姿势和呼吸控制来保持瞄准的稳定。
射手应该将肩膀、臀部和脚稳固地放置在正确的位置,使得身体能够承受射击的冲击力,从而确保瞄准的准确性。
总的来说,瞄准镜的使用是射击运动中不可忽视的一环。
通过掌握调节放大倍数、对焦和位置、交叉线的使用以及保持稳定的射击姿势等技巧,射手可以更好地利用瞄准镜来提高射击的精准度。
不断的实操和练习,才能真正成为一个熟练的瞄准镜使用者。
《狙击手:幽灵战士2》最高难度狙击技巧Sniper-GhostWarrior2-游戏攻略

《狙击手:幽灵战士2》最高难度狙击技巧Sniper:GhostWarrior2
更多《狙击手:幽灵战士2》最高难度狙击技巧Sniper:GhostWarrior2
相关信息请点击这里获得类别:游戏攻略
类目:第一人称射击
以标准枪为例,一格大约就是100米,按照距离比例瞄准,风向一米就秒X轴一格,同一水平就是这么简单,敌人位置比你高的时候稍微往下距离的10分一格,你比敌人高的时候同理,以开始救人质那关为例,在高处狙击点打800米处的敌人要往上抬高的几乎9格的位置,在水平位置狙击100~300米的敌人对应也就是抬高1/2/3格,所以我个人认为垂直的修正大概就是距离X(百米)乘以0.1格。
本文章由贵州颖宏商贸有限公司/收集整理。
- 1、下载文档前请自行甄别文档内容的完整性,平台不提供额外的编辑、内容补充、找答案等附加服务。
- 2、"仅部分预览"的文档,不可在线预览部分如存在完整性等问题,可反馈申请退款(可完整预览的文档不适用该条件!)。
- 3、如文档侵犯您的权益,请联系客服反馈,我们会尽快为您处理(人工客服工作时间:9:00-18:30)。
狙击⼿:幽灵战⼠2-瞄准镜分划板使⽤⽅法
很多玩家反映《狙击⼿:幽灵战⼠2》的瞄准镜不好⽤,其实这是因为⼤家玩惯了C F这样的游戏,狙击⼿更真实,瞄准镜使⽤⽅法更仿真!
⼤家应该知道这游戏的仿真度⽐较⾼,玩法⾮常接近真枪操作。
但是游戏并没有教我们瞄准镜的使⽤⽅法造成⼀部分⼀直是在蒙或者说是凭感觉,近⼀点还好远了就没那么好蒙了。
下⾯附上基本⽅法
这些叫法我是我起的专业的怎么说我也不清楚。
风速偏差值⼀个格代表1与风速修正值相对应,⽽风速修正值从中⼼横向看第⼀个格⼦代表2之后每⼀⼩格+1,也就是说风速偏差多少你就修正多少。
纵向看第⼀个格⼦代表200⽶的弹着点每往下⼀⼩格增加⼀百⽶(开镜倍数影响弹道需要⾃⼰把握倍数进⾏对应修正)
下⾯附上实际操作
由于修风的格⼦第⼀格就是2⽽风偏值是1.5所以修正多少需要⾃⼰估计⼀下跟着感觉⾛(⽬标距离是895⽶图没截上距离显⽰)
真枪不会帮你测距的下⾯附上真枪分划板使⽤⽅法
再附上国产88式狙击的分划板
中间横线是测距横线和对应距离弹着点(测距横线参照⽬标肩宽约0.5⽶)
p s:⼀名真正的狙击⼿只有快速准确的判定⽬标距离才能打准,但是敌⼈躲在掩体后⾯怎么判定距离呢?所以说优秀的狙击⼿还必须精通⽤其他参照物来判定距离⽐如汽车·~电线杆~建主(已知参照物⾼度或长度)等物体进⾏判距
逗游⽹——中国2亿游戏⽤户⼀致选择的”⼀站式“游戏服务平台。