小飞象4.0说明书
适用雅迪TDT1291Z冠能小飞象使用说明
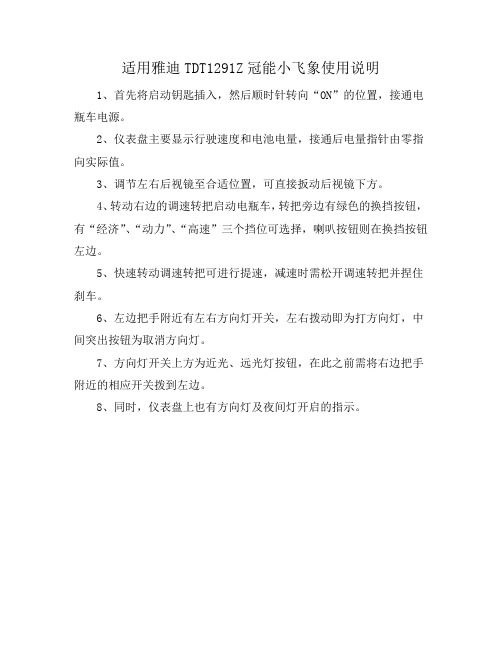
适用雅迪TDT1291Z冠能小飞象使用说明
1、首先将启动钥匙插入,然后顺时针转向“ON”的位置,接通电瓶车电源。
2、仪表盘主要显示行驶速度和电池电量,接通后电量指针由零指向实际值。
3、调节左右后视镜至合适位置,可直接扳动后视镜下方。
4、转动右边的调速转把启动电瓶车,转把旁边有绿色的换挡按钮,有“经济”、“动力”、“高速”三个挡位可选择,喇叭按钮则在换挡按钮左边。
5、快速转动调速转把可进行提速,减速时需松开调速转把并捏住刹车。
6、左边把手附近有左右方向灯开关,左右拨动即为打方向灯,中间突出按钮为取消方向灯。
7、方向灯开关上方为近光、远光灯按钮,在此之前需将右边把手附近的相应开关拨到左边。
8、同时,仪表盘上也有方向灯及夜间灯开启的指示。
Atlas Copco 400 Series CD T4F 肺气囊机说明书
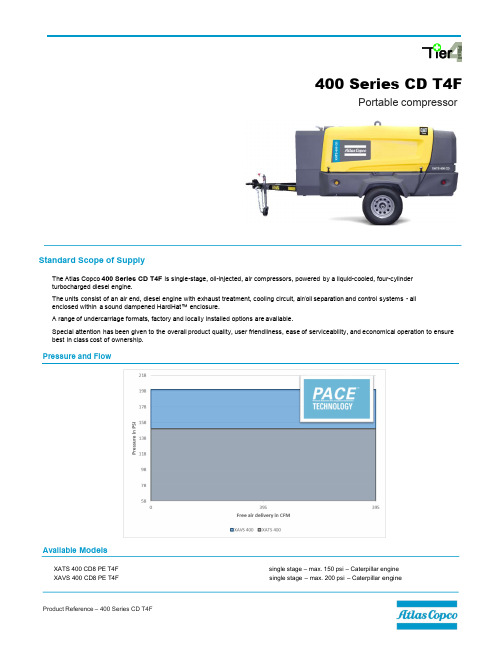
400 Series CD T4FPortable compressorStandard Scope of SupplyThe Atlas Copco 400 Series CD T4F is single-stage, oil-injected, air compressors, powered by a liquid-cooled, four-cylinder turbocharged diesel engine.The units consist of an air end, diesel engine with exhaust treatment, cooling circuit, air/oil separation and control systems - all enclosed within a sound dampened HardHat™ enclosure.A range of undercarriage formats, factory and locally installed options are available.Special attention has been given to the overall product quality, user friendliness, ease of serviceability, and economical operation to ensure best in class cost of ownership.Pressure and FlowAvailable ModelsXATS 400 CD8 PE T4F single stage – max. 150 psi – Caterpillar engine XAVS 400 CD8 PE T4F single stage – max. 200 psi – Caterpillar engi neCaterpillar T4F engine Meets all current T4F emission regulations.Integrated exhaust aftertreatment makes T4F integration easyExtended warranty available through Caterpillar dealerAtlas Copco Controller XC2003 PACEPressure Adjusted through Cognitive Electronics Proven controller for easy operation and diagnostics of the compressor and engine.Allows operator to view compressor parameters including:Pressure setting, reading engine codes, two programmable service timers, all temperatures and pressures of compressor, fuel levels and consumptions, and load/unload compressor.Cold Weather Package Improved cold weather starting, includes synthetic compressoroil &Spillage Free Containment Frame(Standard XAVS, Optional XATS)Protects environment, avoids costly clean up liabilityLow Fuel Shutdown Reduces downtime on site when operator runs out of fuel asthere is no longer a need to “re-prime” the fuel systemHeavy Duty Single Axle Trailer w/ 15" tires Well balanced for safer towing or moving around siteHigh ground clearance for rough site and road conditionsHardHat TM heavy duty ¼” polyethelene enclosure Dent and UV ResistantKeeps looking new for longer and adds to resale valueClick here to watch our HardHat video onlineAftercooler, water separator w/ filters (Standard XAVS) Provides cool, dry, clean air for applications where instrument quality air is required.Optional Features BenefitsSpecial color doors (white only) Alternative to standard yellow door color schemeTechnical Data1 According to ISO 1217 ed.3 1996 annex D2 Measured in accordance with ISO 2151 under free field conditions @ 7m distance3 Consult Atlas Copco for proper de-rating instructions for operation beyond ambient limitations4 According to DIN 72311Support mountedWeight (Wet - Ready-to-operate)XATS 400 CD8 PE T4FXAVS 400 CD8 PE T4F Trailer mounted lb (Kg) 4620 (2095) Support mounted lb (Kg) 4528 (2053)DimensionsXATS 400 CD8 PE T4FXAVS 400 CD8 PE T4F Trailer mounted (Inches) L x W x H 158 ¾ x 72 x 77 ¾ Support mounted (Inches) L x W x H 113 x 72 x 72Caterpillar C4.4 T4F turbo charged four-cylinder, liquid-cooled diesel engine provides ample power to operate the compressor continuously at full-load.Meets all US EPA and Environment Canada exhaust legislations with Final Tier 4 compliance.US EPA engine family is “HPKXL04.4MT1” and rated at 148hp at 2200 rpm, in accordance to SAE Standard for the XATS 400 CD8 PE T4F. US EPA engine family is “HPKXL04.4MT1” and rated at 148hp at 2200 rpm, in accordance to SAE Standard for the XAVS 400 CD8 PE T4F.Engine starting capacity at 14°F (-10°C) without the addition of cold start options. Cold start options are available up to -4°F (-20°C).The 52Gal (192L) fuel tank enables operation for over 8 hours at full load and comes standard with a low fuel shutdown at 5%.Emissions TreatmentCaterpillar C4.4 T4F engine after treatment consists of a Diesel Oxidization Catalyst (DOC) and Selective Catalytic Reduction (SCR).Electrical SystemThe 400 Series CD T4F is equipped with a 12 Volt negative ground electrical starting syste m .InstrumentationThe instrument control panel is located on the back, curbside of the compressor canopy with easy access.Standard instrument package includes fully diagnostic ECU controller with large 3.5” display. The intuitive Atlas Copco XC2003 controller is easy to operate with all functions conveniently at your fingertips. The controller also manages the engine ECU operating system, and a number of safety warnings, shut downs on various parameters (listed below) and full digital pressure control with PACE.XC2003 Controller Functionality:Displayed while running - Hours - Fuel level - RPM - Outlet pressure Operational Buttons- Start and stop of the unit - View measurements, settings and alarms - Multi position cursor to navigate menus - PACE digital pressure controlCompressor measurements displayed- Running hours - Fuel level - Clock - Battery voltage - Running hours - Regulating pressure - Emergency stop count - Average fuel consumption - Minor/major service counters in hours and daysEngine measurements displayed- Fuel consumption per hour tally - Engine coolant temperature - Engine oil pressure - Engine RPMWarnings and Shutdowns- High temperature engine coolant - High temperature compressor oil - Engine oil pressure - Low fuel level - Low coolantAlarms- View current & historical alarms present- History of last 20 alarms and events with timeand date stamps- DM1 & DM2: View current engine codes(SPN/FMI)Settings- Reset service timers - Diagnostics for engine ECU - Language settings - Unit of measure changes - Electronic pressure adjustment (PACE ) - Presetting two (high/low) pressure settingBodywor kHardHat™: Our HardHat™ version comes standard with dual wall, ¼” thick, Polyethylene material providing superior corrosion, and UV protection against fading and discoloration. As well as unmatched dent and damage resistance. The canopy is sound attenuated to meet the most current legal noise requirements. A clamshell style hood offers easy service access to all co mponents. Undercarriage & FrameThe 400 Series CD T4F compressors are available with two undercarriage alternatives, providing utmost flexibility in installation or towing require m ents.Single axle trailer setup with:DOT approved light packageAdjustable height pintle hitch (3” lunette)5,200 lbs torsional axle15” Rims w/ ST225/75D15 8 Ply Tires (weight rating 2,540 lbs @ 65psi)Electric trailer brakes as standard (with 7 pin flat blade connector)750lbs jack leg stand, with wheelSupport mo unted version, on steel frame, less undercarriage is availableFactory Options AvailableSkid mountedLoose Ball Couplings 2” or 2-5/16” and Loose Bulldog 2” couplingOSHA ¾” valveAftercooler & Water Separator (optional XATS only)Aftercooler & Water Separator & DD/PD coalescing & high efficiency filters (Standard XAVS, optional XATS only)Special color canopy doorsLojack anti-theft deviceManufacturing & Environmental StandardsThe 400 Series CD T4F are manufactured following stringent ISO 9001 regulations, and a fully implemented Environmental Management System fulfilling ISO 14001 require m ents.Attention has been given to ensure minimum negative impact to the environ ment.The 400 Series CD T4F meets all current EPA and Environment Canada exhaust and noise emission dir ectives.Supplied Do cu men t ationThe unit is delivered with documentation regarding:Hard copies of the Atlas Copco Operators Safety and Instruction Manual, Caterpillar Engine Operators Manual, as well as electronic copies, available upon request.Warranty Registration card for Caterpillar Engine and Atlas Copco Compressor (Units must be registered upon receipt).Test certificate for air delivery pressure and capacity, acc. ISO 1217 (Upon request only).Certificate for air/oil separator vessel and safety valve approval, ASME (Upon request only).Warranty Co verag eCaterpillar Engine: Caterpillar Diesel engines are warranted to be free from defects with regard to materials and workmanship for the period of twelve (12) months from the date of initial startup without limitation in running hours or for the period of thirty six (36) months from the date of initial startup prior to the accumulation of 4000 running hours.Atlas Copco Compressor: Warrantied to be free from defects with regard to material and workmanship for the period of eighteen (18) months from date of shipment from the factory, or twelve (12) months from date of initial start-up, whichever occurs first, withoutlimitation of running hours.Air compressor element assemblies used in Atlas Copco portable air compressors, is warranted to be free from defects with regard to materials and workmanship for the period of thirty (30) months from date of shipment from the factory, or twenty four (24) months from date of initial start up, whichever occurs first, without limitation of running hours. Atlas Copco service kits including parts and oils (PAR Oil’s) must be used to maintain warranty. Failure to register warranty upon initial start-up may cause warranty claim delays or rejection of claims.。
蜂鸟Analyzer X4系列可汗针多气体检测仪手册说明书

USER AND MAINTENANCE MANUAL SAA VERSIONWarnings and Cautions Contacting Honeywell AnalyticsWARNINGS AND CAUTIONS• Substitution of any components may impair intrinsic safety.se only approved memory cards, part # 2566-0435, which are available from HoneywellCrocodile ClipFrontBottomRightLeftBattery Holder13. Alarm Level 1 IconAlarm Level 2 Icon(for flammable and toxic) 14. Zero Calibration Icon Span Calibration Icon The LCD display has a backlight that will operate automatically whenever an alarm occurs, and also whenever any button is pressed. To turn on the backlight while staying in the measuring mode in a low light area, press the UP or DOWN button once.1314When “no” is selected, the recorded STEL and TWA values will be used as initial STEL and TWA values for the current session. When “YES” is selected, the STEL and TWA values will be cleared.2-1-3. CHECKING THE MEMORY CARDThe detector will check the memory card in the memory card slot. When a properly formatted FAT16 memory card with a data full condition is detected, a “Data Fu” message will be displayed followed by a “Delete no” prompt. (When a properly formatted FAT16 memory card is not full of data, the “Data Fu” message and the “Delete no” prompt willnot be displayed).Press the UP or DOWN buttons to scroll to “no” or “YES” and press theselect.When “no” is selected, the detector keeps the current data file and the Data Logging iconwill not be displayed in the measuring mode which indicates that no data is being logged. When “Yes” is selected, the detector deletes the current data file and creates a new filefor data logging. The Data Logging icon will be displayed in the measuring mode whichThe Data Logging icon will not be displayed in the measuringmode which indicates that no data is being logged.2-1-4. POWER-UP SELF-TESTThe detector will beep and perform a power-up Self-Test. If the detector passes the Self-Test, the Test Pass icon is displayed. If the Test Fail icon is displayed and the Test Pass icon blinks with 1 beep and 1 flash every 5 seconds, then the detector has failed the Self-Test (See Section 3-1 Performing a Self-Test).2-1-5. CHECKING THE CALIBRATION DUE DATEThe detector checks the calibration due date stored in the detector after the Power-UpSelf-Test. When the number of days remaining until calibration is due reaches zero, a "CAL2-2. TURNING THE DETECTOR OFFTo turn off the detector, press and hold theA countdown will be displayed for 5 seconds, and then the detector will beep and turn off.• D isplay the level 1 (flammable and toxic low, O2 excess) and level 2 (flammable and toxic high, O2 deficiency) alarm set points• Display the STEL and TWA alarm set points (for CO & H2S only)Level 1Level 2STEL TWA*Examples shown for default settings of each gas for the MiniMAX4 series.Test Pass Test FailSelf-Test Result Display Audible AlarmPass NoneFail 1 beepevery 5 secondsAdditionally, the detector will periodically check its batteries, electronic circuit and sensors. If it passes, the Test Pass icon will be displayed. If it fails, the Test Fail icon will be displayed and the Test Pass icon will blink with 1 beep and 1 flash every 5 seconds. Note: If the Self-Test has failed, repeat the Self-Test. If a second failure occurs, contact3-3. GAS ALARMSThe detector has two levels of instantaneous gas alarms, of which the level 2 (flammable and toxic high, O2 deficiency) alarm is more urgent than the level 1 (flammable and toxic low, O2 excess) alarm for flammable and toxic. The Oimportant. It also has a 15-minute STEL alarm and an 8-hour TWA alarm for the carbon monoxide and hydrogen sulfide sensors.Note: STEL (Short Term Exposure Limit) and TWA (Time-Weighted Average) comply with relevant agency standards.If an alarm occurs, the icons blink and relevant alarm level icons, (Level 1 for flammable and toxic, and O2 excess), (Level 2 for flammable and toxic), (O(STEL), or (TWA) will be displayed according to the alarm level for the gas type in question.* Examples shown for default settings of each gas for the MiniMAX4 series.Note: In latching alarm mode, once an alarm occurs, the audible, visual and vibrating alarms continue to operate even after the atmospheric hazard has cleared. By pressing the ON/OFF button, the alarm will be cleared (after the atmospheric hazard has cleared). Any subsequent alarm will reactivate the audible, visual and vibrating alarms.it is not already on. The exposure status can be scrolled through in the order of( ), Low Peak ( ), ( ), and ( ), followed byDate, and Current Time by pressing the UP button or in reverse order by pressing the High PeakLow PeakSTELTWA* Examples shown for the status review for the MiniMAX4 seriesis low and needs replacing by generating a beep and flashing the alarm LED once every 5 seconds. Also, the Test Fail icon will be displayed and the Low Battery icon and Test Pass icon will blink alternately. When the battery is finally exhausted, the Test Fail icon and Low Battery icon will blink simultaneously with seven beeps and “bAttEry oFF” will be displayed. Pressing the ON/OFFif card is installed. When a properly formatted blank memory card is detected, the Data Logging icon will be displayed in the measuring mode which indicates that data is beingWhen the memory card becomes full in the measuring mode,the detector will stop data logging and the Data Logging icon will blink which indicates that no data is being logged.Note: The detector cannot format the memory card.Warning: The detector ignores the write-protect feature of the SD memory card.Warning: When the Data Logging icon is either blinking or not displayed, it indicates that no data is being logged.To install or remove the memory card, see Section 6-2 Installing or Removing the Memory Card.4. CALIBRATIONWhen “no” is selected, the calibration will be aborted. When “YES” is selected, the calibration will be performed.• When the ZERO calibration has been completed successfully for all sensors, the Test Pass icon will blink for 5 seconds.• I f the ZERO calibration fails for one or more sensors, the detector will give a single beep and a single flash and both the Test Pass icon and Test Fail icon will blink for 5 seconds.• If the ZERO calibration fails for all sensors, the detector will give a single beep and a single flash and only the Test Fail icon will blink for 5 seconds.All Pass Some Pass/Fail All FailNote: If any sensor has failed, repeat the ZERO calibration ensuring that the detector is in fresh air. If a second failure occurs, contact Honeywell Analytics or their agent.Warning: Under proper calibration procedures, repetitive calibration failures could indicate that the sensor is either approaching its end of life, or it has been seriously contaminated, or both.4-3. SPAN CALIBRATION (FOR FLAMMABLE AND TOXIC SENSORS ONLY) Calibrate the detector at least every 6 months (CH4, CO, H S), depending on use and exposure to contaminants. User can perform the SPAN calibration with 4 gases at the same time or with a single gas. When SPAN calibration is performed with a single gas,ON/OFFValveGas TubeFlow Adaptor Carry out the ZERO calibration procedure as described in Section 4-2 Zero Calibration(Span Calibration for Oxygen).nly if the ZERO calibration is successful can a SPAN calibration be performed.t the end of the ZERO calibration procedure, the ON/OFF button must be pressed and held continuously for 5 seconds in order to proceed to SPAN calibration while the Test Pass icon is still blinking. If pass code protection is activated proceed to Section 4-3-1 Pass Code Input, otherwise proceed to Section 4-3-2 Span Gas Information.f no actions are performed at the end of the zero calibration the detector will return to4-3-1. PASS CODE INPUTIf the Pass Code Protection feature has been activated, the detector prompts the user to Press the UP or DOWNand hold the UP orON/OFF button to enter the pass code.Note: If the user fails to input the correct pass code 3 times consecutively, the detector will return to measuring mode.Note: For lost pass code, contact Honeywell Analytics or their agent.Only the gas label and SPAN gas concentration of the flammable and/or toxic sensor(s) that passed the ZERO calibration will be shown on the LCD display.4-3-3. SPAN GAS SETTINGThe SPAN gas information will be displayed.• T he span gas concentration can be changed by pressing theseconds during the display of the span gas information.• T he user can adjust the value with theSelect Exp Gas Change Concentrationfrom 50 to 40 %LEL4-3-4. GAS SEARCH AND COUNTDOWNFor SPAN calibration, apply the gas to the detector when the SPAN Calibration icon blinks. The detector will monitor sensor signals for supplied gas.Gas SearchingThe detector detects gas and executes SPAN calibrationNote: If no gas is detected within 30 seconds, the detector will give a single beep and a single flash, indicate an error “Err” for all gases on the LCD display, blink the Test Fail iconfor 5 seconds, and then exit calibration mode.No gas detected4-3-5. SPAN CALIBRATION RESULTIf one or more gases are detected, the detector will display the SPAN calibration results after the countdown.• W hen the SPAN calibration has been completed successfully for all sensors, the Test Pass icon will blink for 5 seconds.f the SPAN calibration has failed for some sensor(s), the detector will give a single beep and a single flash and indicate an error “Err” for the gas type in question on the LCD display. Both the Test Pass icon and the Test Fail icon will blink for 5 seconds.f the SPAN calibration has failed for all sensors, the detector will give a single beep and a single flash and indicate an error “Err” for all gases on the LCD display. The Test Fail icon will blink for 5 seconds.Note: If the span calibration fails, the calibration of failed sensor(s) will remain as it was beforeAll Pass Some Pass/Fail All FailAfter SPAN calibration, the detector saves the successful SPAN calibration value(s) and exits SPAN calibration mode unless the ON/OFF button is pressed and held within 5 seconds. If the ON/OFF button is pressed and held for 5 seconds while the Test Pass icon and/or Test Fail icon are still blinking (depending on the calibration result), the detector will save successful SPAN calibration value(s) and repeat the SPAN calibration procedure.for 3 seconds to enter the set-up mode. The detector will generate a single beep, display the icon, generate a beep, and then enter the set-up mode. If the Pass Code Protection feature has been activated, the detector prompts the user to enter the pass code. (See Section 4-3-1 Pass Code Input.)Note: If the user fails to input the correct pass code 3 times consecutively, the detector will return to measuring mode5-2. CHANGING THE DETECTOR SETThe set-up mode menu structure is shown in Appendix A (A-3, A-4, A-5, and A-6).In set-up mode, pressing theON/OFF button selects the function, so that the displayed value or status may be changed.Turn 90Note: Periodically inspect the battery holder terminal contacts for build up of dirt. Remove any debris using soft cloth and industrial alcohol.Card SlotMemory CardNote: The data contacts side faces upwards6-3. CLEANINGWarning: Do not use solvents, soap, polishes and any product containing silicon compounds to clean the detector as these can cause damage to the sensors.• Clean the exterior of the detector with a clean damp cloth.• Clean the sensor grilles with a soft brush.< UP >to increaseor < DOWN >to decrease the value---------------------< ON/OFF >Fail (all)Fail (some)Zero Cal.Success (all)Set Span Gas Concentration Span Gas Information Span GasSearch SpanCalibration20 seconds countdownwith zero calibration icon blinkingwait for 10 seconds< ON/OFF > for 5 secondswhile " " is blinking for 5 secondsspan gas search for up to 30 seconds 60 seconds countdownwith span calibration icon blinkingCalibrationFoundFail (all)Fail (some)Success (all)Search Span Calibrationspan gas searchfor up to 30 seconds 60 seconds countdownwith span calibration icon blinkingDetectedFailSpan Cal.Success < Continued from SpanGas Information>Setting O 2 Excess/Alarm 1 Setting Alarm 1Set O 2 Defi-ciency/Alarm 2O 2 Deficiency/Alarm 2 Setting Set STEL Alarm STEL Alarm Setting TWA Alarm Setting Set TWA Alarm < UP > or < DOWN >< UP > or < DOWN >< UP > or < DOWN >< UP > or < DOWN >< UP > or < DOWN >Signals< UP > or < DOWNPass CodeSetting< UP > or < DOWN >Interval< UP > or < DOWN Date Setting< UP > or < DOWN< UP > or < DOWN >LEL / VolSetting< UP > or < DOWN > Correction Factor Setting< UP > or < DOWN > Cal Due DateSetting< UP > or < DOWNUser ID NoSetting< UP > or < DOWN(on / off) (on / off)UP > or < DOWN >。
Series 4 自动烤箱商品说明书

Series 4, Built-in oven, 60 x 60 cm,BlackHBS573BB0BIncluded accessories2 x combination grid, 1 x universal pan, 2 x Universal pan, slim size Optional accessoriesHEZ317000 Pizza pan, enamelled, HEZ327000 Pizza stone,HEZ333001 Lid for professional pan, HEZ530000 Half tray,HEZ531000 Baking tray, enamelled, HEZ531010 Baking tray,non-stick ceramic coated, HEZ532000 Multipurpose pan, enamelled, HEZ532010 Universal pan, non-stick ceramic coated, HEZ533000 Professional pan, enamelled, HEZ538000 1fold telescopic rail, level independent, HEZ629070 Air Fry & Grill tray, HEZ633001 Lid for professional pan, enamelled, HEZ633070 Professional pan, enamelled, HEZ634000 Baking and roasting grid (standard),HEZ636000 Glass pan, HEZ638000 Full ext rails, level independent, HEZ660050 Cover Strip, HEZ664000 Baking and roasting grid (steam), HEZ915003 Glass roasting dish, 5,4 L, HEZG0AS00 Connecting cable 3m The built-in oven with AutoPilot: automatically prepares perfect dishes.• 3D Hotair: even heat distribution for perfect results on up to three levels.• AutoPilot 10: every dish is a perfect success thanks to 10 pre-set automatic programmes.• Red LED display control: easy-to-use thanks to clear time display.• Pop-out controls: Make the front of the oven easy to clean and give it a sleek look.• Pyrolytic self-cleaning: Automatically cleans the oven, just wipe out the ash.Technical DataBuilt-in / Free-standing: ...........................................................Built-in Integrated Cleaning system: ..................................................Pyrolytic Min. required niche size for installation (HxWxD): 585-595 x 560-568 x 550 mmDimensions: ........................................................595 x 594 x 548 mm Dimensions of the packed product (HxWxD): .....675 x 690 x 670 mm Control Panel Material: ..............................................................Glass Door Material: ............................................................................Glass Net weight: ..............................................................................38.9 kg Usable volume (of cavity) - cavity 1: ..............................................71 l Cooking method: Full width grill, Hotair gentle, Hot Air, Conventional heat, Hot air grillingFirst cavity material: ..................................................................Other Oven control: ......................................................................electronic Number of interior lights: .. (1)Length electrical supply cord: ..............................................120.0 cm EAN code: (4242005285297)Number of cavities (2010/30/EC): (1)Energy efficiency rating: ....................................................................A Energy consumption per cycle conventional (2010/30/EC): ........0.99 kWh/cycleEnergy consumption per cycle forced air convection (2010/30/EC):0.81 kWh/cycleEnergy efficiency index (2010/30/EC): .....................................95.3 % Connection rating: ..................................................................2990 W Fuse protection: ...........................................................................13 A Voltage: ...............................................................................220-240 V Frequency: ...........................................................................50; 60 Hz Plug type: .....................no plug (electrical connection by electrician) Included accessories: .....2 x combination grid, 1 x universal pan, 2 x Universal pan, slim sizeSeries 4, Built-in oven, 60 x 60 cm,BlackHBS573BB0BThe built-in oven with AutoPilot: automatically prepares perfect dishes.Design- LED-display control (red)- Rotary dial, Retractable control dials, round- 5 shelf positions- Straight bar handleFeatures- Electronic clock timer- Heating-up indicator- AutoPilot Automatic start- Electronic door lock- Control panel lock Automatic safety switch off- AutoPilot, 10- Automatic programmes- Interior halogen light, Light on/off when oven door opened/closed - Integral cooling fanCleaning- Pyrolytic self-cleaning function- Full glass inner doorProgrammes/functions- Oven with 5 cooking functions: heating methods: 3D Hotair, conventional top and bottom heat, Hotair grilling, full width variable grill, Hotair gentle- Fast pre-heating function- Temperature range 50 °C - 275 °CAccessories- 2 x combination grid, 1 x universal pan, 2 x Universal pan, slim size Technical information- Energy efficiency rating (acc. EU Nr. 65/2014): A- Energy consumption per cycle in conventional mode:0.99 kWh- Energy consumption per cycle in fan-forced convection mode:0.81 kWh- Number of cavities: Main cavity Heat source: electrical Cavity volume:71 litre capacity- Total connected load electric: 2.99 KW- 120 cm Cable length- Nominal voltage: 220 - 240 V- Appliance dimension (hxwxd): 595 mm x 594 mm x 548 mm- Niche dimension (hxwxd): 585 mm - 595 mm x 560 mm - 568 mm x 550 mm- Please refer to the dimensions provided in the installation manualSeries 4, Built-in oven, 60 x 60 cm,BlackHBS573BB0B。
2019-2021MY Ranger FX4 皮贴工具包说明书

NO PART OF THIS DOCUMENT MAY BE REPRODUCED WITHOUT PRIOR AGREEMENT AND WRITTEN PERMISSION OFFORD PERFORMANCE PARTS © Ford Motor Company 2020NO PART OF THIS DOCUMENT MAY BE REPRODUCED WITHOUT PRIOR AGREEMENT AND WRITTEN PERMISSION OFFORD PERFORMANCE PARTS © Ford Motor Company 2020Kit contents:Special Tool(s) / General Equipment Description Quantity FX4 Skid Plate 1 Bolts 4NO PART OF THIS DOCUMENT MAY BE REPRODUCED WITHOUT PRIOR AGREEMENT AND WRITTEN PERMISSION OFFORD PERFORMANCE PARTS © Ford Motor Company 2020RemovalNOTE: Removal steps in this procedure may contain installation details.1. With the vehicle in NEUTRAL, position it on a hoist.Stay in Neutral ModeNOTE: Always put your vehicle in Stay in Neutral mode when entering an automatic car wash. Failure to do this could result in vehicle damage not covered by warranty.Stay in Neutral mode allows your vehicle to stay in Neutral when you exit your vehicle. Your vehicle must be stationary to enter this mode.To enter Stay in Neutral mode -•Move the transmission selector to Neutral (N).• A message will appear in your information display screen prompting you to press the Manual (M) button.•Press the Manual (M) button again to enter Stay in Neutral mode.• A message will appear in your information display screen when your vehicle has entered Stay in Neutral mode.•To exit Stay in Neutral mode, apply the brake and select a different gear.Front Frame Jacking PointsWARNING: When jacking or lifting the vehicle, block all wheels remaining on the ground. Set the parking brake if the rear wheels will remain on the ground. These actions help prevent unintended vehicle movement. Failure to follow these instructions may result in serious personal injury.WARNING: Never get underneath a vehicle that is supported only by a jack. The jack could unintentionally lower. Always support vehicle with floor stands. Failure to follow these instructions may result in serious personal injury.WARNING: Only raise the vehicle when positioned on a hard, level surface. Attempting to raise the vehicle on an uneven or soft surface may result in vehicle slipping or falling from the jack or jackstand. Failure to follow this instruction may result in serious personal injury.WARNING: Turn off (disable) the power running boards (if equipped) before jacking, lifting or placing any object under the vehicle. Never place your hand between the power running board and the vehicle. Extended power running boards will retract when doors are closed. Failure to follow these instructions may result in serious personal injury.WARNING: Front jacking point could be identified by an arrow marking on the vehicle frame. Raising a vehicle in any other location may result in vehicle shifting or falling. Failure to follow this instruction may result in serious personal injury.NO PART OF THIS DOCUMENT MAY BE REPRODUCED WITHOUT PRIOR AGREEMENT AND WRITTEN PERMISSION OFFORD PERFORMANCE PARTS © Ford Motor Company 2020NOTE: SuperCrew Cab 2WD shown, others similar.NOTE: LH side shown, RH side similar.Only the specified jacking points may be used for jacking and supporting the vehicle.NO PART OF THIS DOCUMENT MAY BE REPRODUCED WITHOUT PRIOR AGREEMENT AND WRITTEN PERMISSION OFFORD PERFORMANCE PARTS © Ford Motor Company 2020Jacking Points – RearNOTICE: Do not use the differential housing as a lift point. Leaks or damage to the rear axle cover and adjoining differential housing surface may occur if a floor jack or any lifting device is allowed to contact the cover at any point where the cover joins the housing.Only the specified jacking points may be used for jacking and supporting the vehicle.The rear jacking points are located on the rear axle.NO PART OF THIS DOCUMENT MAY BE REPRODUCED WITHOUT PRIOR AGREEMENT AND WRITTEN PERMISSION OFFORD PERFORMANCE PARTS © Ford Motor Company 2020Lifting Points – Front and RearNOTE: 4WD shown, RWD similar.WARNING: Position the hoist lift arms as shown in the illustration. Incorrect positioning could result in vehicle slipping or falling from the hoist. Failure to follow this instruction may result in serious personal injury.Only the specified jacking points may be used for jacking and supporting the vehicle.NOTICE: The jack provided with the vehicle is intended to be used in an emergency for changing a deflated tire. To avoid damage to the vehicle, never use the jack to hoist the vehicle for any other purpose.NOTICE: Do not attempt to use jack pressure on either the front bumper or the rear bumper on any vehicle. Damage to bumper covers will occur.NOTICE: Place blocks underneath the lifting points if a two-column hoist is used.NOTICE: Damage to the suspension, exhaust or steering linkage components may occur if care is not exercised when positioning the hoist adapters prior to lifting the vehicle.NOTICE: To prevent possible damage to the underbody, do not drive the vehicle onto the drive-on lift without first checking for possible interference.NOTICE: When raising a vehicle on a two-column hoist, use care when positioning the vehicle so that the hoisting forks do not interfere with suspension components, mounting brackets or stabilizer mounting brackets, if equipped. In addition, use care in hoist positioning to avoid possible damage to the axle or rear cover.NO PART OF THIS DOCUMENT MAY BE REPRODUCED WITHOUT PRIOR AGREEMENT AND WRITTEN PERMISSION OFFORD PERFORMANCE PARTS © Ford Motor Company 20202. NOTE: Vehicles come with an undershield or a skid plate.Remove the bolts and the engine front undershield.Torque: 22 lb.ft (30 Nm)NO PART OF THIS DOCUMENT MAY BE REPRODUCED WITHOUT PRIOR AGREEMENT AND WRITTEN PERMISSION OFFORD PERFORMANCE PARTS © Ford Motor Company 20203. NOTE: Vehicles come with an undershield or a skid plate.Remove the bolts and the skid plate.Torque: 22 lb.ft (30 Nm)Installation1. To install, reverse the removal procedure.。
Philips GoGEAR MP4播放器 Azure 4 GB 的说明说明书

Philips GoGEAR MP4 player with FullSound™Azure4 GB*SA5AZU04WFSuperior sound experiencewith Bluetooth for wireless music enjoymentStep out with GoGEAR Azure and enjoy superb sound. The player comes with Bluetooth for wireless connections to audio devices. It also features a bright and clear display for easy navigation, and long play time for extended enjoyment.Superb quality sound•FullSound™ to bring your MP3 music to life•APE, FLAC, MP3 and WMA lossless code for precise sound Complements your life•Bluetooth for wireless connection to audio devices•5.6-cm (2.2") full colour screen for fantastic video quality •Up to 35-hour music or 6-hour video playback•FM radio with RDS and 20 presets for more music options Easy and intuitive•Folder view to organise and view media files as you do on your PC •Songbird: one simple program for managing musicHighlightsFullSound™Philips' innovative FullSound technologyfaithfully restores sonic details to compressed MP3 music, dramatically enriching andenhancing it, so you can experience CD music without any distortion. Based on an audio post-processing algorithm, FullSoundcombines Philips' renowned expertise in music reproduction with the power of the latest generation Digital Signal Processor (DSP). The result is fuller bass with more depth and impact, boosted voice and instrument clarity, and rich detail. Rediscover your compressed MP3 music in true-to-life sound that will touch your soul and move your feet.APE, FLAC, MP3 and WMA supportGet your songs on your GoGEAR player and enjoy precision sound in its entirety, with noloss in clarity or detail. The latest audiocompression technologies can reduce file sizes by up to ten times. They do this without lowering sound quality, and save the compressed files in formats like MP3 and WMA. Your GoGEAR can play APE, FLAC, MP3 and WMA files with lossless codecsupport, offering quality audio and handing you the world of digital music. You can nowdownload songs or rip your CDs, and transfer them to your GoGEAR for endless enjoyment on the go.5.6-cm (2.2") full colour display5.6-cm (2.2") full colour screen for fantastic video qualityFolder viewFolder view is an optional directory view of the GoGear player that lets you view all the files on your player as if it were a computer. Once you select Folder view, opening any supported file (i.e. music, pictures or videos) is as easy as selecting the file and hitting Play.SongbirdSongbird: one simple program for managing music35-hour music/6-hour videoUp to 35-hour music or 6-hour video playback.FM radio with RDS/20 presetsRDS (Radio Data System) is a communications protocol standard that allows digitalinformation to be transmitted over FM radio broadcasts. RDS-enabled FM radio receivers can display useful information including station identity, programme details and song title and artist etc. You can store a desired station as a preset channel on your GoGear player at any time. With the ability to store 20 preset radio stations, you can quickly access your favourite radio station without having to tune thefrequencies manually each time.Issue date 2019-06-06 Version: 5.0.312 NC: 8670 001 01513 EAN: 08 71258 16821 49© 2019 Koninklijke Philips N.V.All Rights reserved.Specifications are subject to change without notice. Trademarks are the property of Koninklijke Philips N.V. or their respective owners.SpecificationsPicture/Display•Backlight•Type:LCD•Diagonal screen size (cm): 5.6 cm•Diagonal screen size (inch): 2.2 inch •Resolution: 320 x 240 pixelsSound•Sound Enhancement: FullSound•Equalizer customisable•Equalizer settings: Balanced, Bright, Clear, Powerful, Warm•Channel separation: 45 dB•Frequency response: 20 - 18 k Hz•Output power (RMS): 2 x 2.1 mW•Signal to noise ratio: > 84 dBAudio Playback•Compression format: MP3, WAV, WMA, APE, FLAC•ID3 Tag support: Song title, artist, album•MP3 bit rates: 8-320 kbps and VBR•MP3 sample rates: 16, 32, 48, 11.025, 22.050, 8 kHz •WMA bit rates: 5-320 kbps•WMA sample rates: 8, 11.025, 16, 22.050, 32, 44.1, 48 kHz•Digital Rights Management: NoVideo Playback•WMV9: 320 x 240, 30 fps, 512 kbpsStill Picture Playback•Picture Compression Format: JPEG, BMP, PNG •SlideshowAudio Capturing•Built-in microphone: mono•Voice recording: Yes, in WAVTuner/Reception/Transmission•Tuner Bands: FM•Station presets: 20•RDS: Programme Type, Station Information, Station Name•FM radio recording: Yes, in WAVStorage Media•Built-in memory type: NAND Flash•Built-in memory (RAM): 4 GB•Music memory capacity, MP3: Up to 1000 tracks*•Mass storage class compliant•Mass Trans. Protocol CompliantConnectivity•Bluetooth•Bluetooth version: 2.1+EDR•Bluetooth profiles: A2DP, AVRCP, File transferprofile•Headphones: 3.5 mm•USB: USB 2.0Convenience•Keypad lock: Yes, option key•Superscroll•Firmware upgradeable•Battery charging indication: On user interface•Charge and play: when connected to a PC•Customisable volume limit•Dedicated volume controls: No•Volume controlAccessories•Headphones•Quick start guide•USB cableSystem Requirements•USB: Free USB port•PC OS: Windows XP (SP3)/Windows Vista/Windows 7Power•Battery Type:LI-Polymer•Rechargeable: Yes, via USB•Battery Capacity: 350 mAh•Play time on internal battery: Up to 35 hours musicplayback or 6 hours video playbackDimensions•Packaging type: D-box•D-box dimensions (WxDxH): 90 x 30 x 150 mm•Product dimensions (WxDxH):51.0 x 10.0 x 93.5 mm•Product weight: 0.065 kgSoftware•Device manager: to restore and upgradePartners•Audible*Storage capacity based on 4 minutes per song and 64 kbps WMA or128 kbps MP3 encoding.*1 GB = 1 billion bytes; available storage capacity will be less.*Actual transfer speed may vary based on your operating system andsoftware configuration.*Rechargeable batteries have a limited number of charge cycles andmay eventually need to be replaced. Battery life and number ofcharge cycles vary by use and settings.。
牛奶冻 Bevati MF 6440 XL 3 umbspeak说明书
_______________________________________G H3Please read this instruction manual thoroughly before using this appliance! Follow all safety instructions in order to avoid damages due to improper use!Keep the instruction manual for future refer-ence. Should this appliance be given to a third party, then this instruction manual must also be handed over.7This appliance is intended for private domestic use only and is not suitable for professional–catering purposes. It should not be used for commercial purposes.7Do not use the appliance for anything other than its intended use. The milk frother is de-signed for frothing and heating milk. Do not use the milk frother to heat any other liquids and tinned, jarred or bottled food.7Never use the appliance in or near to com-bustible, inflammable places and materials.7Do not use the appliance outdoors or in the bathroom.4ENGLISH7Check if the mains voltage on the rating label corresponds to your local mains supply. Theonly way to disconnect the appliance from the mains is to pull out the plug.7For additional protection, this applianceshould be connected to a residual current protection switch with no more than 30 mA. Please contact an electrician for advice.7Do not immerse the appliance, base, power cord or power plug in water or in other liquidsand do not clean parts in the dishwasher.7Disconnect the power plug after using the ap-pliance, before cleaning the appliance, be-fore leaving the room or if a fault occurs.7Do not disconnect the plug by pulling on the cord.7Do not wrap the power cord around the ap-pliance.7Do not squeeze or bend the power cord and do not rub it on sharp edges in order to pre-vent any damage. Keep the power cord away from hot surfaces and open flames.5ENGLISH7Do not use an extension cord with the appli-ance.7Never use the appliance if the power cord or the appliance is damaged.7If the supply cord gets damaged, it shouldbe replaced by the manufacturer or its au-thorized service or another equally qualified technician in order to prevent a possible dan-gerous situation.7Our GRUNDIG Household Appliances meet applicable safety standards; if the applianceor power cord is damaged, it must be repaired or replaced by a service centre to avoid any dangers. Faulty or unqualified repair work may cause danger and risks to the user.7Do not dismantle the appliance under anycircumstances. No warranty claims are ac-cepted for damage caused by improper han-dling.6ENGLISH7This appliance can be used by children (aged from 8 years) and persons with re d uced physi-cal, sensory or mental capabilities or lack of experience and knowledge if they have been given supervision or instruction concerning uti-lisation of the delete appliance in a safe way and if they understand the hazards involved. Chil d ren shall not play with the appliance. Clean i ng and user maintenance shall not be made by children without supervision.7Do not leave the appliance unattended aslong as it is in use. Extreme caution is advised when the appliance is being used near chil-dren and people with limited physical, sen-sory or mental capabilities.7Before using the appliance for the first time, clean all parts carefully which come into con-tact with milk. Please see full details in the “Cleaning and Care” section.7Dry the appliance and all accessories before connecting it to mains supply and before at-taching any parts.7ENGLISH7Never operate or place any part of this ap-pliance on or near hot surfaces such as a gasburner, electric burner or heated oven.7Operate the appliance with delivered parts only.7Operate the appliance with its original base. Do not use the base for any other purpose.7Do not use the appliance with damp or wet hands.7Do not touch rotating parts, there is a risk of injury.7Always use the appliance on a stable, flat, clean and dry surface.7Make sure that there is no danger that the power cord could be accidentally pulled outthat someone could trip over it when the ap-pliance is in use.7The appliance has to be positioned in such a way that the plug is always accessible.8ENGLISH7Make sure that when using the milk frother, the lid always remains closed properly.7Do not fill the milk frother below the minimum level indicator.7Never operate the appliance without any milk inside it.7Do not stick any foreign objects on the appli-ance.7Milk may overflow if the filling capacity is ex-ceeded.7Do not insert any objects and/or fingers in the appliance apertures.7Always first place the reservoir onto the base and then plug the socket into the wall outlet.7Scalding may occur if the lid is removed dur-ing the cooking.ENGLISH910ENGLISH ATAGLANCE_______________________Dear Customer,Congratulations to the purchase of your new GRUNDIG Milk Frother MF 6440 XL.Read the following user notes care-fully to ensure full enjoyment of your quality GRUNDIGproduct for many years to come.Aresponsibleapproach!GRUNDIG focuses on contractually agreed social work-ing conditions with fair wages for both internal employees and suppliers. We also attach great importance to the efficient use of raw materials with continuous waste reduction of several tonnes of plastic every year. Furthermore, all our accessories are available for at least 5 years.For a future worth living.For a good reason. Grundig.ControlsandpartsSee the figure on page 3.Transparent LidSpoutJugFrothing & HeatingFrothingPower BaseStir attachment Whisk attachmentWhisk/StirFunctions Max capacities Completion time Frothing coldmilk250 ml65 sec.Frothing &Heating250 ml110-130 sec.Heating (with asmall amount offroth)500 ml150-170 sec.Note7Fill with minimum 100ml milk.ATAGLANCE_______________________11ENGLISHPreparation1C lean the milk frother well be-fore first use. For details please read the "Cleaning and care" section.Operation1O2I nsert the attachment of your choise.– Whisk attachment for3F ill the jug with milk (attend the max. /min. capacities above for reference).Notes7745on the power base sure that it isan upright and stable position.6Insert the plug into the wall sock-et.7P ushthe forand heatingfor frothing.–The indicator light of the 8A fter the frothing or heatingofor flashes9Disconnect the plug from the wall socket.10T11Oremoving it. Pouror foam by usingNote7L et the milk frother cool down between each heating process.7U se whole milk (fat content3.0%) for best results.7M ilk heats to approximately 65+/-5°C. This is the ideal temperature to ensure the best flavor.12ENGLISH13ENGLISH CleaningandcareCaution7Never use petrol, solvents or abrasive cleaners or hard brushes to clean the appliance.71T urn the appliance off and dis-connect it from the wall socket.2L et the appliance cool downcompletely.3the from thejug and 5C lean the inner walls with soapy water and a non–abrasive cloth. Then wipe them dry with a soft cloth.Note 7Before using the appliance after cleaning, dry all parts carefully using a soft towel.Storage7If you do not plan to use the ap-pliance for a long period of time, please store it carefully.7Store the whisk and stir attach-ment directly with the appliance. The second attachment can be stored in the bracket at the lid.7Make sure the appliance is un-plugged and completely dry.7Store the appliance in a cool, dry place.7Make sure the appliance is kept out of the reach of children.14ENGLISHEnvironmentalnoteThis product has been made from high–quality parts and materials which can be re–used and whichare suitable for recycling.Therefore, do not dis-pose of the product with normal household waste at the end of its service life. Take it to acollection point for the recycling of electrical and electronic applianc-es. This advice is indicated by this symbol on the product, in the in-struction manual and on the pack-aging.Please consult your local authorities to find out where the nearest collec-tion point is.Help protect the environment by re-cycling used products.Technicaldata2011/65/EU.Powersupply:220–240 V ~, 50 Hz Power:650 WTechnical and design modifica-tions reserved.Grundig Intermedia GmbH Beuthener Strasse 41D–90471 Nürnberg 72011 9097 100 15/03。
fluoromax-4使用手册
FluoroMax-4使用手册目录1 FluoroMax-4介绍 (1)2 开关机-校准 (2)2.1 开关机 (2)2.2 校准(推荐校准周期一月/次) (2)3 功能 (5)3.1.1 发射谱(Emission) (6)3.1.2 激发谱(Excitation) (8)3.1.3 同步谱(synchronous) (9)3.2 Kinetics (10)3.3 3D (11)3.4 Single Point (12)3.5 Anisotropy (13)3.5.1 vs Emission (13)3.5.3 vs Time (15)3.6 Phos (16)3.6.1 Decay by Delay (17)3.6.2 Decay by window (18)3.6.2 Emission and Excitation (19)1 FluoroMax-4介绍FluoroMax-4(以下简称FM-4)是一款全自动,一体化荧光光谱仪。
所有实验数据输出都可以通过连接的电脑输出。
配套的操作软件为FluorEsscence。
一台完整的FM-4主要由:1)光源[150W无臭氧氙灯光源];2)激发单色仪;3)参比检测器[R];4)样品池;5)发射单色仪;6)信号检测器[R]。
2 开关机-校准2.1 开关机开机- 打开FluoroMax-4电源开关(在仪器右侧面),电源键拨到“0”表示关机,“1”表示开机- 电脑开机- 点击桌面FluorEssence软件- 点击仪器会自动建立端口通讯,初始化关机- 关闭FluorEssence,电脑- 关闭FluoroMax-4电源开关建议开机后仪器预热30分钟为宜。
一天内勿频繁开关机操作。
例如早上开机,下午需要继续实验,中午可不关机。
一天实验结束后,再关机。
2.2 校准(推荐校准周期一月/次)使用仪器前须对设备进行校准,保证得到测量数据准确。
校准步骤如下:a 激发端波长校准选择“Spectra”“excitation”使用“Monos”(发射波长350nm,狭缝1nm,发射扫描范围200-600nm,步进1nm)选择“Detectors”(输出信号R)输出信号为氙灯的光谱图,对照最高峰位在467nmb 发射端波长校准(使用建议电阻率在18.3MΩ的纯净水)选择“Spectra ”“emission”在“Monos”界面输入参数(激发波长350nm,狭缝5nm,激发扫描范围365-450nm,步进0.5nm)“Detectors”积分时间0.1s,输出信号“S”。
Atlas Copco 螺絮機 產品說明書说明书
THE VERSATILITY RANGE Products for every site. Options for everyone. 385-1350 cfm (10-35 bar)VERSATILITY MADE SIMPLEFOCUSSED ON CUSTOMER V ALUEWithin Portable Energy we have a forward-thinking philosophy. Forward-thinking is all about anticipating and exceeding your future needs: from product design, energy requirements and all aspects ofservice – looking ahead and staying ahead is the only way we can ensure we are your long term partner.We have developed our Versatility range in-line with that philosophy. T his is what you can expect from the range:Simple ServiceThis range provides exceptional access to all the service andmaintenance points. Less time spent on maintenance and less downtime significantly improves utilization and availabilitySimple, Intuitive ControllerWe have developed a simple, intuitive interface to ensure that yourcompressor is dialled up to give you the performance you need. We putyou in complete control.Optimal SizeThe range’s perfectly balanced size is a result of innovative engineering.These machines are specifically designed so that they are easy to maneuver both on and off-site, even on rough terrain.Full Shift Fuel AutonomyThis range features improved fuel autonomy. T he compressors arespecially designed to run a full shift without the need to refuel. Less fuel is consumed, which saves time and money, contributing to a low total cost of operations.T ough PerformerAll our compressors are tested both in lab and field conditions to ensure optimal performance. T his range is designed to withstand the toughest working conditions. It has a standard operating temperature range of -10°C to +50°C and a strong undercarriage. T he canopy has been treated with extra corrosion protection, ensuring a longer lifetime and higher resale value.Strategic Engine ChoiceWe have chosen an engine that matches your needs. Reliability in tough conditions is a must and that is what this engine delivers. We have also chosen an engine that has global field support, and back up, for complete peace of mind.Our compressed air range from 385-1350 cfm is simply known as the Versatility range. T his range covers hundreds of applications across the world. We provide you with a compressor that can handle a multitude of applications in an efficient way.When we focus on efficiency within this range, it’s all about the strategic triangle of size, flow and fuel efficiency. Excelling in one of these areas is wasted excellence if you cannot provide the other two.Therefore, our promise to you is an industry leading range of optimized size-to-flow compressors, which have unparalleled levels of fuel efficiency and autonomy.This range is also designed to withstand the toughest working conditions. T hey have a standard operating temperature range of -10°C to +50°C and a strong undercarriage. T he range’s robust nature guarantees reliable operation. T he design, controller and modularity put you in control. T his range is all about you!ENGINECHOICELOWERCAPITAL INVESTMENTINCREASEDUTILIZATIONFUEL SAVINGSCOMPACTSIZEOne machinecovers multiple applicationsBoth efficiency and autonomyWith maximum flowStrategic choiceto maximize efficiency and serviceSimple service and long service intervalsF l o wS i z eE ffic i e n c ySELECTION GUIDE20243616128TECHNICAL DATAThese compressors are built to perform in any given condition or environment.The range combines light weight with small dimensions, making it easy to maneuver on site. T ogether with its user friendly controller, these compressors are allabout serving your needs.● = Suitable○ = Best choiceP r e s s u r e b a r (e )Flow cfmLOWERCAPITAL INVESTMENTINCREASEDUTILIZATIONFUEL SAVINGSOne machinecovers multiple applicationsBoth efficiency and autonomySimple service and long service intervalsTECHNICAL DATATECHNICAL DATACOMPRESSORSup to 1350 CFMLOWERCAPITAL INVESTMENTINCREASEDUTILIZATIONFUELSAVINGSOne machinecovers multiple applicationsBoth efficiency and autonomySimple service and long service intervals2958 1040 00 - © 2017 A t l a s C o p c o P o r t a b l e E n e r g y A l l r i g h t s r e s e r v e d .® A t l a s C o p c o i s a r e g i s t e r e d t r a d e m a r k o f A t l a s C o p c o A BPhotos and illustrations contained herein might depict products with optional and/or extra components which are not included with the standard version of the product and, therefore, are not included in a purchase COMMITTED T O SUST PORTABLE ENERGY SOLUTIONS PORTFOLIOPORTABLE • 1,6-13,9 kVAMOBILE• 9-1250* kVAINDUSTRIAL • 10-1250* kVAGENERATORSAIR COMPRESSORSREADY TO GO • 1-5 m³/min • 7-12 barVERSATILITY • 7-22 m³/min • 7-20 barPRODUCTIVITY PARTNER• 19-64 m³/min • 10-35 barDEWATERING PUMPSELECTRICSUBMERSIBLE • 275-16.500 l/min• 833-9833 l/minLIGHT TOWERSLEDMETAL HALIDESOLAR*Multiple configurations available to produce power for any size application.Diesel and electric options available.CENTRIFUGAL DIESEL DRIVEN SMALL PORTABLE • 210-2500 l/minPortfolio and options available can change depending on the market.。
电动喂食车说明书_V100
编号:_________________版本:_________________水貂电动喂食车EWS-250型使用说明书ZYmachine_V1.002014-1-18E-mail:xiaocheyf@ 14-6-19版权声明潍坊中宇科技公司保留对此文件修改之权利且不另行通知。
潍坊中宇科技公司所提供之信息相信为正确且可靠之信息,但并不保证本文件中绝无错误。
请于向潍坊中宇科技公司提出订单前,自行确定所使用之相关技术文件及规格为最新之版本。
若因贵公司使用本公司之文件或产品,而涉及第三人之专利或著作权等智能财产权之应用及配合时,则应由贵公司负责取得同意及授权,本公司仅单纯贩售产品,上述关于同意及授权, 非属本公司应为保证之责任。
修订记录毛皮动物喂食车简介(电动)EWS型全自动饲料投放车是本公司的研究成果,重点支持中小养殖户的规模化发展,她博采众长,吸收国外先进技术,主要用于水貂、貉、狐、猪等动物日常饲料投喂的专用机械。
该机采用国际上先进的电子控制技术,将复杂的功能全部交由电脑完成,操作员无需培训,十分钟即可学会使用。
该机保留了必要的6种人机对话窗口:1、设定饲料量;2、自动、手动模式;4、前进、后退;5、正转、反转;6、出料速度设定。
该机行走采用电机+调速器结构。
先进的电子控制分料技术,分料电脑控制系统设有人机对话窗口,多种可选喂料程序,傻瓜式操作,方便设定饲料量。
分料机构分料全过程电脑控制,饲料量预先设置,可恒量投料亦可差异化投料,避免了浪费。
该机外形尺寸1.55x0.6x1.1米,座椅可以折叠,座椅折叠后整车尺寸变为1.25x0.6x1.1米,是目前国内可驾驶车辆中最窄和最短的。
转弯半径1.2米。
只要养殖场主道超过1.1米宽,笼道0.8米,就可以很轻松实现转弯进出。
此车能实现4种功能:1、连续定量喂食(喂水貂)。
2、手动定量喂食。
3、手动非定量喂食(喂狐狸、貉、猪)。
4、清洗功能。
目录I.规格参数 (5)A. 主要功能 (5)B. 基本参数 (5)C. 图片 (6)II.使用说明 (7)A. 使用前要检查项目 (7)B. 电脑板的使用: (7)C. 各种开关的使用: (8)D. 行走控制 (8)E. 电池 (8)III.保养 (9)A. 车辆保养 (9)B. 打料泵保养 (9)IV.故障修理 (10)A. 行走故障 (10)B. 喂食故障 (10)C. 电脑板故障 (10)I.规格参数A.主要功能1、前轮导向,后轮差速双驱;2、有8种存储模式,分别存储喂食量和速度数据;电脑控制精确定量、定时出料;3、手动开关,拇指控制每次出料量的多少,按的时间长出料多,时间短出料少。
- 1、下载文档前请自行甄别文档内容的完整性,平台不提供额外的编辑、内容补充、找答案等附加服务。
- 2、"仅部分预览"的文档,不可在线预览部分如存在完整性等问题,可反馈申请退款(可完整预览的文档不适用该条件!)。
- 3、如文档侵犯您的权益,请联系客服反馈,我们会尽快为您处理(人工客服工作时间:9:00-18:30)。
小飞象4、0说明书
一、电池安装
1、打开电池舱盖。
2、将4个电量充足的5号AA电池或者2S锂电池装入电池仓内,确保电池上的金属端子与电池仓内的金属端子相接。
3、盖好电池舱盖。
二、对码
接收机对码,按一秒指示灯快闪表示进入对码模式,接收机自动寻找最近的遥控器信号,对码成功后指示灯常亮。
三、LED灯
车用普通舵机控制方向模式蓝色灯常亮,混控坦克模式控制方向红色灯常亮,低压报警指示灯慢闪,进入二级菜单设置模式指示灯快闪。
四、遥控器扩展
可拓展FPV车手机支架及遥控器提手。
五、进入设置
1、手轮向后拧到最大,同时扣机向后扣到最大,给遥控器通电开机,松开手轮和扣机,按下3通按键,面板指示灯会快闪,表示进入设置模式。
2、方向手轮向前后转动的大小行程表示单边舵机行程量设置,油门扣机向前后扣动的大小行程表示前进后退单边行程量设置,行程设置好后扣机和手轮回到中点位置,如不需要继续设置3通和4通行程量,可在手轮和扣机在中点位置静止3秒后按下3通道按键确认设置,设置成功后面板指示灯会常亮,进入正常使用模式。