浮动静态路由配置教程
28313配置浮动静态路由

28/31/3配置浮动静态路由wangyang 发表于 2006-10-19 10:28:03试验说明:在本试验中要配置浮动静态路由。
要求在2台路由器上启动RIP协议,这样R1就有两条到达10.0.0.0网络的路由。
试验要求要有一条到10.0.0.0网络的静态路由,但却要优先选用RIP,在RIP失效的情况下才启动静态路由,这就需要使用浮动静态路由。
************************************************************************************试验配置:现在R2和R1上启动RIP协议r2#sh run!interface Ethernet0ip address 10.0.0.11 255.0.0.0 secondaryip address 10.0.0.1 255.0.0.0!interface Serial0ip address 192.168.1.2 255.255.255.0!router ripnetwork 10.0.0.0network 192.168.1.0!**************************************r1#sh run!interface Ethernet0ip address 192.168.3.2 255.255.255.0 secondaryip address 192.168.3.1 255.255.255.0!interface Serial0ip address 192.168.1.1 255.255.255.0clockrate 64000!interface Serial1ip address 192.168.2.1 255.255.255.0clockrate 64000!router ripnetwork 192.168.1.0network 192.168.3.0 /先不用RIP宣告192.168.2.0网络!***************************************r3#sh runinterface Ethernet0ip address 10.0.0.2 255.0.0.0!interface Serial1ip address 192.168.2.2 255.255.255.0!ip classlessip route 192.168.3.0 255.255.255.0 192.168.2.1no ip http server!************************************************************* *************************************************************试验验证:r1#pingProtocol [ip]:Target IP address: 192.168.1.2Repeat count [5]:Datagram size [100]:Timeout in seconds [2]:Extended commands [n]: ySource address or interface: 192.168.3.2Type of service [0]:Set DF bit in IP header? [no]:Validate reply data? [no]:Data pattern [0xABCD]:Loose, Strict, Record, Timestamp, Verbose[none]:Sweep range of sizes [n]:Type escape sequence to abort.Sending 5, 100-byte ICMP Echos to 192.168.1.2, timeout is 2 seconds: !!!!!Success rate is 100 percent (5/5), round-trip min/avg/max = 32/32/32 msr1#pingProtocol [ip]:Target IP address: 192.168.2.2Repeat count [5]:Datagram size [100]:Timeout in seconds [2]:Extended commands [n]: ySource address or interface: 192.168.3.2Type of service [0]:Set DF bit in IP header? [no]:Validate reply data? [no]:Data pattern [0xABCD]:Loose, Strict, Record, Timestamp, Verbose[none]:Sweep range of sizes [n]:Type escape sequence to abort.Sending 5, 100-byte ICMP Echos to 192.168.2.2, timeout is 2 seconds: !!!!!Success rate is 100 percent (5/5), round-trip min/avg/max = 28/31/32 ms ********************************************************************* **r1#sh ip routeGateway of last resort is not setR 10.0.0.0/8 [120/1] via 192.168.1.2, 00:00:21, Serial0C 192.168.1.0/24 is directly connected, Serial0C 192.168.2.0/24 is directly connected, Serial1C 192.168.3.0/24 is directly connected, Ethernet0**************************************************************r1(config)#ip route 10.0.0.0 255.0.0.0 192.168.2.2r1#sh ip routeGateway of last resort is not setS 10.0.0.0/8 [1/0] via 192.168.2.2C 192.168.1.0/24 is directly connected, Serial0C 192.168.2.0/24 is directly connected, Serial1C 192.168.3.0/24 is directly connected, Ethernet0通过路由表我们看到,在配置了静态路由后,静态路由被选用,而RIP被忽略,这是因为静态路由的管理距离1小于RIP的120。
静态路由和静态浮动路由

作业:1、配置静态路由分析:源-192.168.1.1;目的:172.16.1.1过程:1)Branch配置了静态路由2)HQ有直连到达server3)server有默认网关指向HQ4)HQ有直连到达192.168.1.15)到达Branch实验步骤:1)Branch上配置e0/1接口IP 192.168.1.1 255.255.255.0Branch(config)#int e0/1Branch(config-if)#no shuBranch(config-if)#ip address 192.168.1.1 255.255.255.02)HQ上配置e0/1接口IP 192.168.1.2 255.255.255.0hq(config)#int e0/1hq(config-if)#no shuhq(config-if)#ip address 192.168.1.2 255.255.255.03)HQ上配置e0/0接口IP 172.16.1.254 255.255.255.0hq(config)#int e0/0hq(config-if)#no shuhq(config-if)#ip address 172.16.1.254 255.255.255.04)Server上配置e0/0接口IP 172.16.1.1 255.255.255.0server(config)#int e0/0server(config-if)#no shuserver(config-if)#ip address 172.16.1.1 255.255.255.05)Server上关闭路由功能,并设置网关172.16.1.254server(config)#no ip routingserver(config)#ip default-gateway 172.16.1.2546)Branch到HQ有直连的路由,但是到server没有,故配置一条静态路由:Branch(config)#ip route 172.16.1.0 255.255.255.0 e0/1 192.168.1.2测试:Branch#ping 172.16.1.1Type escape sequence to abort.Sending 5, 100-byte ICMP Echos to 172.16.1.1, timeout is 2 seconds:.!!!!Success rate is 80 percent (4/5), round-trip min/avg/max = 1/1/1 ms//数据包通了2、配置静态默认路由分析:数据包有来有回才会通,pc1去往Branch有直连路由(网关),去往server有一条静态路由,所以数据包去往server没问题;server有到达HQ的直连路由(网关),但HQ上没有去往pc1的路由,那么配置1条路由(静态默认路由):1)配置pc1e0/1口的ip地址PC1(config)#int e0/1PC1(config-if)#no shPC1(config-if)#ip address 10.1.10.254 255.255.255.02)将pc1的路由功能关闭,并设置网关PC1(config)#no ip routingPC1(config)#ip default-gateway 10.1.10.2543)HQ上配置静态默认路由hq(config)#ip route 0.0.0.0 0.0.0.0 e0/1 192.168.1.1测试,可以通信了PC1#ping 172.16.1.1Type escape sequence to abort.Sending 5, 100-byte ICMP Echos to 172.16.1.1, timeout is 2 seconds:.!!!!Success rate is 80 percent (4/5), round-trip min/avg/max = 1/1/1 ms3、试试静态浮动路由(默认路由的)1)开启HQ上s1/0接口,配置iphq(config)#int s1/0hq(config-if)#no shuhq(config-if)#ip address 202.100.1.2 255.255.255.02)开启Branch上的s1/0接口,配置ipBranch(config)#int s1/0Branch(config-if)#no shuBranch(config-if)#ip address 202.100.1.1 255.255.255.03)在HQ上实施浮动路由:hq(config)#ip route 0.0.0.00.0.0.0 s1/0 10(管理距离设置为10,设置串口上路由为次要的路由选择)此时再show只有一条路由hq#show ip rou staS* 0.0.0.0/0 is directly connected, Ethernet0/14)在server上测试,可以看到数据是走以太口上的路由走的,因为以太网上的路由管理距离较小,所以优先从这里传输;server#traceroute 10.1.10.100 numericType escape sequence to abort.Tracing the route to 10.1.10.100VRF info: (vrf in name/id, vrf out name/id)1 172.16.1.254 0 msec 0 msec 0 msec2 192.168.1.1 0 msec 0 msec 0 msec3 10.1.10.100 1 msec * 0 msec5)关掉以太口上的这条默认路由(需要关闭Branch和HQ上的e0/1接口),再次测试,发现数据是从浮动路由上传输的了:server#traceroute 10.1.10.100 numericType escape sequence to abort.Tracing the route to 10.1.10.100VRF info: (vrf in name/id, vrf out name/id)1 172.16.1.254 6 msec 0 msec 0 msec2 202.100.1.1 9 msec 12 msec 10 msec3 10.1.10.100 10 msec * 10 msecserver#。
实验一 静态ECMP和浮动静态路由配置
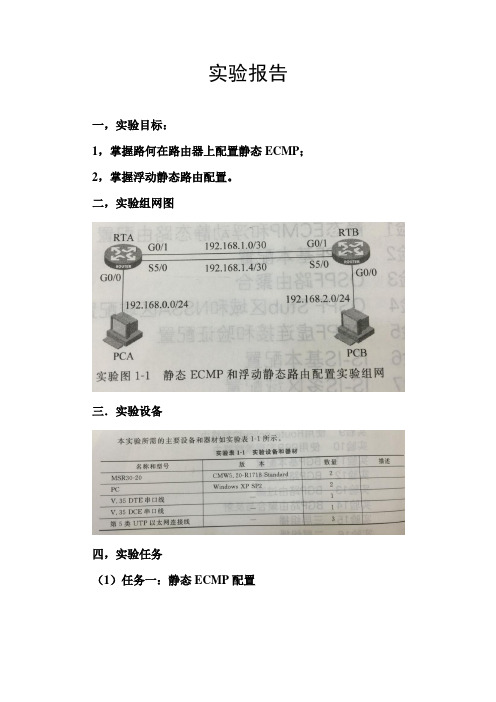
实验报告
一,实验目标:
1,掌握路何在路由器上配置静态ECMP;2,掌握浮动静态路由配置。
二,实验组网图
三.实验设备
四,实验任务
(1)任务一:静态ECMP配置
(2)任务二:浮动静态路由配置
五,实验总结
在实验原理图可以看出实验一是一个简单的配置静态路由实验,由管理员手工配置,无开销,适合简单的扩普结构网络,合理配置可以减少路由表选项数量,节省路由表空间,加快路由匹配速度,缺点是无法根据网络扩扑变化而改变,网络故障必须由管理员去维护。
实验二则是配置浮动静态路由,适合于备份链路是低宽带链路的场合,当备份链路是较高宽带链路的场合时,则用动态路由来备份另
一动态路由。
思科Cisco路由器配置——浮动静态路由配置实验详解
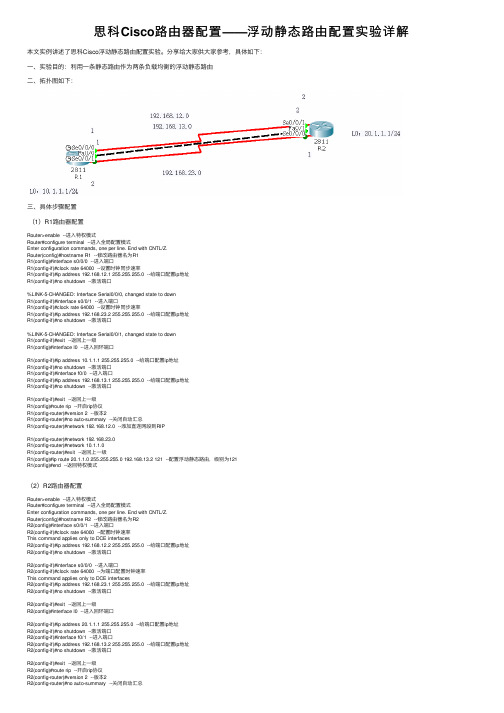
思科Cisco路由器配置——浮动静态路由配置实验详解本⽂实例讲述了思科Cisco浮动静态路由配置实验。
分享给⼤家供⼤家参考,具体如下:⼀、实验⽬的:利⽤⼀条静态路由作为两条负载均衡的浮动静态路由⼆、拓扑图如下:三、具体步骤配置(1)R1路由器配置Router>enable --进⼊特权模式Router#configure terminal --进⼊全局配置模式Enter configuration commands, one per line. End with CNTL/Z.Router(config)#hostname R1 --修改路由器名为R1R1(config)#interface s0/0/0 --进⼊端⼝R1(config-if)#clock rate 64000 --设置时钟同步速率R1(config-if)#ip address 192.168.12.1 255.255.255.0 --给端⼝配置ip地址R1(config-if)#no shutdown --激活端⼝%LINK-5-CHANGED: Interface Serial0/0/0, changed state to downR1(config-if)#interface s0/0/1 --进⼊端⼝R1(config-if)#clock rate 64000 --设置时钟同步速率R1(config-if)#ip address 192.168.23.2 255.255.255.0 --给端⼝配置ip地址R1(config-if)#no shutdown --激活端⼝%LINK-5-CHANGED: Interface Serial0/0/1, changed state to downR1(config-if)#exit --返回上⼀级R1(config)#interface l0 --进⼊回环端⼝R1(config-if)#ip address 10.1.1.1 255.255.255.0 --给端⼝配置ip地址R1(config-if)#no shutdown --激活端⼝R1(config-if)#interface f0/0 --进⼊端⼝R1(config-if)#ip address 192.168.13.1 255.255.255.0 --给端⼝配置ip地址R1(config-if)#no shutdown --激活端⼝R1(config-if)#exit --返回上⼀级R1(config)#route rip --开启rip协议R1(config-router)#version 2 --版本2R1(config-router)#no auto-summary --关闭⾃动汇总R1(config-router)#network 192.168.12.0 --添加直连⽹段到RIPR1(config-router)#network 192.168.23.0R1(config-router)#network 10.1.1.0R1(config-router)#exit --返回上⼀级R1(config)#ip route 20.1.1.0 255.255.255.0 192.168.13.2 121 --配置浮动静态路由,级别为121R1(config)#end --返回特权模式(2)R2路由器配置Router>enable --进⼊特权模式Router#configure terminal --进⼊全局配置模式Enter configuration commands, one per line. End with CNTL/Z.Router(config)#hostname R2 --修改路由器名为R2R2(config)#interface s0/0/1 --进⼊端⼝R2(config-if)#clock rate 64000 --配置时钟速率This command applies only to DCE interfacesR2(config-if)#ip address 192.168.12.2 255.255.255.0 --给端⼝配置ip地址R2(config-if)#no shutdown --激活端⼝R2(config-if)#interface s0/0/0 --进⼊端⼝R2(config-if)#clock rate 64000 --为端⼝配置时钟速率This command applies only to DCE interfacesR2(config-if)#ip address 192.168.23.1 255.255.255.0 --给端⼝配置ip地址R2(config-if)#no shutdown --激活端⼝R2(config-if)#exit --返回上⼀级R2(config)#interface l0 --进⼊回环端⼝R2(config-if)#ip address 20.1.1.1 255.255.255.0 --给端⼝配置ip地址R2(config-if)#no shutdown --激活端⼝R2(config-if)#interface f0/1 --进⼊端⼝R2(config-if)#ip address 192.168.13.2 255.255.255.0 --给端⼝配置ip地址R2(config-if)#no shutdown --激活端⼝R2(config-if)#exit --返回上⼀级R2(config)#route rip --开启rip协议R2(config-router)#version 2 --版本2R2(config-router)#no auto-summary --关闭⾃动汇总R2(config-router)#network 192.168.12.0 --添加直连⽹段到RIPR2(config-router)#network 192.168.23.0R2(config-router)#network 20.1.1.0R2(config-router)#exit --返回上⼀级R2(config)#ip route 10.1.1.0 255.255.255.0 192.168.13.1 121 --配置浮动静态路由,级别为121 R2(config)#end --返回特权模式四、验证1、分别查看R1与R2路由表信息(1)R1路由表信息(2)R2路由表信息2、断开两条负载均衡路径(12.0与23.0⽹段)并查看路由表信息(1)R1路由表信息(2)R2路由表信息解释:当两条负载均衡路径断掉,这条浮动的静态路由就会出现。
如何配置浮动静态路由

[SwitchC] ip route-static 172.16.100.0 24 10.10.10.1 [SwitchC] ip route-static 172.16.100.0 24 10.10.20.1
பைடு நூலகம்
如何配置浮动静态路由(2)
针对这个场景,如果用户希望SwitchC去往172.16.100.0/24 的流量先走SwitchA,当SwitchA宕机或SwitchC - SwitchA之间 的链路出现故障时, SwitchC能够自动将流量切换到SwitchB。 这个需求如何实现呢? 这里我们就可以使用到浮动静态路由的概念。我们已经知 道使用ip route-static命令可以为设备添加静态路由,在默认 情况下,这条命令所添加的静态路由其优先级为60,这个 静态路由的优先级事实上是可以自定义的,数值越小优先 级越高。 例如,在SwitchC上配置修改为: [SwitchC] ip route-static 172.16.100.0 24 10.10.10.1 //静态路由默认优先级为60 [SwitchC] ip route-static 172.16.100.0 24 10.10.20.1 preference 80 //这条路由的优先级被设置为80 我们为SwitchC添加了两条静态路由,目的网络都是172.16.100.0/24 ,下一跳为10.10.10.1的静态路由优先 级为默认的60,下一跳为10.10.20.1的静态路由,优先级为80。这两条路由会进行优先级的比较,优先级高 的路由将最终被放进路由表并作为数据转发的依据,另一条优先级为80的路由,则“潜藏”起来,并不出 现在路由表中。 设备上演示…………
如何配置浮动静态路由(1)
浮动静态路由主要应用在企业网络双出口或者双上行的 场景中。 如右图所示,对于SwitchC及其下挂的网络来说,要去往 172.16.100.0/24网络,通过SwitchA及SwitchB都可达。那么 如果在SwitchC上,我们分别配置静态路由: [SwitchC] ip route-static 172.16.100.0 24 10.10.10.1 [SwitchC] ip route-static 172.16.100.0 24 10.10.20.1 设备上演示…… 这样一来,由于这两条路由都是去往同一个目的地,分别 采用不同的下一跳IP,同时这两条路由具备相同的优先级, 以及相同的开销),因此最终这两条去往172.16.100.0/24 网络的路由被同时装载进了SwitchC的路由表。这种现象我 们称为路由的等价负载均衡。最终结果是, SwitchC转发去 往172.16.100.0/24网络的流量,采用负载分担方式经过 SwitchA和SwitchB转发。
配置静态路由实现负载均衡,以及浮动路由的配置
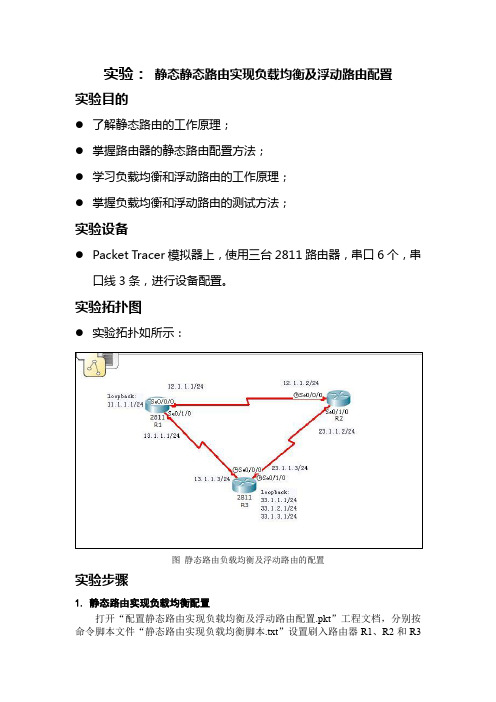
实验:静态静态路由实现负载均衡及浮动路由配置实验目的●了解静态路由的工作原理;●掌握路由器的静态路由配置方法;●学习负载均衡和浮动路由的工作原理;●掌握负载均衡和浮动路由的测试方法;实验设备●Packet Tracer模拟器上,使用三台2811路由器,串口6个,串口线3条,进行设备配置。
实验拓扑图●实验拓扑如所示:图静态路由负载均衡及浮动路由的配置实验步骤1.静态路由实现负载均衡配置打开“配置静态路由实现负载均衡及浮动路由配置.pkt”工程文档,分别按命令脚本文件“静态路由实现负载均衡脚本.txt”设置刷入路由器R1、R2和R3的配置脚本,然后分别查看R1、R2和R3的路由表项,再在R1路由器的特权模式下,开启ICMP数据包监听(debug ip icmp命令),从R1路由器去ping23.1.1.2地址,根据返回的数据包状态,判断负载均衡是否生效及其工作原理。
具体路由器配置命令脚本如下://R1路由器:enconf tint s0/0/0ip add 12.1.1.1 255.255.255.0clock r 64000no shutexitint s0/1/0ip add 13.1.1.1 255.255.255.0clock r 64000no shutexitint loopback 1ip add 11.1.1.1 255.255.255.0no shutexitip route 23.1.1.0 255.255.255.0 12.1.1.2ip route 23.1.1.0 255.255.255.0 13.1.1.3exit//R2路由器:enconf tint s0/0/0ip add 12.1.1.2 255.255.255.0clock r 64000no shutexitint s0/1/0ip add 23.1.1.2 255.255.255.0clock r 64000no shutexitip route 13.1.1.0 255.255.255.0 23.1.1.3exit//R3路由器:enint s0/0/0ip add 13.1.1.2 255.255.255.0clock r 64000no shutexitint s0/1/0ip add 23.1.1.3 255.255.255.0clock r 64000no shutexitint loopback 1ip add 33.1.1.1 255.255.255.0no shutexitint loopback 2ip add 33.1.2.1 255.255.255.0no shutexitint loopback 3ip add 33.1.3.1 255.255.255.0no shutexitip route 12.1.1.0 255.255.255.0 23.1.1.2exit当数据有多条可选链路前往同一目的网段时,可以通过配置静态路由负载均衡,使得数据的传输均等地分配到多条链路上,从而实现数据分流,减轻单条链路负载的效果,而当其中一条分流链路失效时,其他链路正常传输数据,在一定程度上也起到了链路冗余的作用。
《网络系统集成》浮动静态路由
《网络系统集成》浮动静态路由2011-05-16 23:33:22| 分类:系统集成阅读91 评论0 字号:大中小订阅一、实验目的1、学习管理距离的配置;2、理解冗余线路中路由的控制与管理,学习配置浮动静态路由表。
二、实验环境规划和网络拓扑结构1、实验环境规划两个路由器两端有两个网络192.168.1.0/24和172.16.1.0/24,在两个路由器之间设置两条链路。
2、实验拓扑图三、实验步骤1、使用PT放置两台2621XM;分别关闭电源,安装WIC-1T模块,打开电源;连接串行线路。
2、配置两台路由器的端口地址和环回端口。
R1上的配置Router>enRouter#conf tEnter configuration commands, one per line. End with CNTL/Z.Router(config)#hostname R1R1(config)#int lo0 配置环回端口%LINK-5-CHANGED: Interface Loopback0, changed state to up %LINEPROTO-5-UPDOWN: Line protocol on Interface Loopback0, changed state toupR1(config-if)#ip addr 192.168.1.1 255.255.255.0 环回端口地址R1(config-if)#exitR1(config)#int s0/0 配置线路1R1(config-if)#ip addr 172.16.16.5 255.255.255.252 线路1端口地址R1(config-if)#no shut%LINK-5-CHANGED: Interface Serial0/0, changed state to downR1(config-if)#exitR1(config)#int f0/0 配置线路2R1(config-if)#ip addr 172.16.16.1 255.255.255.252 线路2端口地址R1(config-if)#exitR1(config-if)#no shut%LINK-5-CHANGED: Interface FastEthernet0/0, changed state to upR1(config-if)#R2上的配置Router>enRouter#conf tEnter configuration commands, one per line. End with CNTL/Z.Router(config)#hostname R2R2(config)#int lo0%LINK-5-CHANGED: Interface Loopback0, changed state to up %LINEPROTO-5-UPDOWN: Line protocol on Interface Loopback0, changed state toupR2(config-if)#ip addr 172.16.1.1 255.255.255.0R2(config-if)#exitR2(config)#int s0/0R2(config-if)#clock ra 64000R2(config-if)#ip addr 172.16.16.6 255.255.255.252R2(config-if)#no sh%LINK-5-CHANGED: Interface Serial0/0, changed state to upR2(config-if)#%LINEPROTO-5-UPDOWN: Line protocol on Interface Serial0/0, changed state toupR2(config-if)#int f0/0R2(config-if)#ip addr 172.16.16.2 255.255.255.252R2(config-if)#no sh%LINK-5-CHANGED: Interface FastEthernet0/0, changed state to upR2(config-if)#3、在两个路由器上分别配置两条链路的路由,但是不改变管理距离R1上的配置R1(config)#ip route 172.16.1.0 255.255.255.0 172.16.16.2R1(config)#ip route 172.16.1.0 255.255.255.0 172.16.16.6R1(config)#R2上的配置R2(config)#ip route 192.168.1.0 255.255.255.0 172.16.16.1R2(config)#ip route 192.168.1.0 255.255.255.0 172.16.16.5R2(config)#4、查看此时的路由表R1#show ip route………………172.16.0.0/24 is subnetted, 1 subnetsS 172.16.1.0 [1/0] via 192.168.16.2[1/0] via 192.168.16.6 这里同时存在两条静态路由同时工作,默认的管理距离都为1C 192.168.1.0/24 is directly connected, Loopback0192.168.16.0/30 is subnetted, 2 subnetsC 192.168.16.0 is directly connected, FastEthernet0/0C 192.168.16.4 is directly connected, Serial0/0R2#show ip route………………172.16.0.0/24 is subnetted, 1 subnetsC 172.16.1.0 is directly connected, Loopback0S 192.168.1.0/24 [1/0] via 192.168.16.1[1/0] via 192.168.16.5192.168.16.0/30 is subnetted, 2 subnetsC 192.168.16.0 is directly connected, FastEthernet0/0C 192.168.16.4 is directly connected, Serial0/05、将链路1的管理距离改为100R1(config)#ip route 172.16.1.0 255.255.255.0 192.168.16.2 100R2(config)#ip route 192.168.1.0 255.255.255.0 192.168.16.1 1006、查看此时的路由表,可以看到只有链路2的路由可以使用。
W3L200010 静态ECMP和浮动静态路由配置 教师参考
实验1 静态ECMP和浮动静态路由配置实验实验任务一:静态ECMP配置在本实验任务中,学员需要在路由器上配置静态ECMP,再验证等值路由的负载分担和备份功能。
通过本实验任务,学员应该能够掌握静态等值路由的配置和应用场合。
步骤一:建立物理连接按照实验任务一:进行连接,并检查设备的软件版本及配置信息,确保各设备软件版本符合要求,所有配置为初始状态。
如果配置不符合要求,请在用户模式下擦除设备中的配置文件,然后重启设备以使系统采用缺省的配置参数进行初始化。
以上步骤可能会用到以下命令:<RTA> display version<RTA> reset saved-configuration<RTA> reboot步骤二:IP地址配置表1-1任务一IP地址列表按表1-1所示在PC及路由器上配置IP地址。
步骤三:静态等值路由配置在RTA上配置目的地址为192.168.2.0/24的二条静态路由,下一跳分别指向RTB的S5/0接口和G0/1接口;在RTB上配置目的地址为192.168.0.0/24的二条静态路由,下一跳分别指向RTA的S5/0接口和G0/1接口。
请在下面填入配置RTA的命令:[RTA] ip route-static 192.168.2.0 255.255.255.0 192.168.1.2[RTA] ip route-static 192.168.2.0 255.255.255.0 192.168.1.6请在下面填入配置RTB的命令:[RTB] ip route-static 192.168.0.0 255.255.255.0 192.168.1.1[RTB] ip route-static 192.168.0.0 255.255.255.0 192.168.1.5配置完成后,查看RTA和RTB的路由表。
RTA路由表中的等值路由是:______192.168.2.0/24______________________________________________RTB路由表中的等值路由是:______192.168.0.0/24______________________________________________步骤四:等值路由的备份功能验证在PCA上用Ping –t 192.168.2.2命令来测试到PCB的可达性。
任务3.3 静态路由汇总及浮动路由配置
动路由配置Ø路由汇总Ø路由负载分担Ø路由备份•如果网络中的业务网段较多,那么针对每个网段都配置静态路由,会造成路由表项太多,增加了匹配延时。
•静态路由不能适应网络拓扑变化,一旦设备或链路出现故障,相关联的通信必然中断。
•本次任务使用路由汇总和浮动路由两项优化技术,分别解决业务网段数量多和静态路由动态适应网络拓扑变化的问题。
Ø基本概念:将若干条明细路由汇总成一条路由,这条路由称为汇总路由。
•汇总路由的网络范围一定要包含各明细路由的网络范围,否则会造成部分网段无法通信。
•通过路由汇总可以减少路由条目,降低路由查询对设备的消耗。
•路由汇总计算的方法是CIDR,即无类域间路由。
•路由汇总有效实施依赖IP地址的合理规划。
•静态路由、动态路由均可进行路由汇总。
示例中R2连接8个连续子网172.16.0.0/24-172.16.7.0/24 ,配置静态路由,使R1能够访问这8个子网。
可以添加下列8条明细路由来实现:[R1]ip route-static 172.16.0.0 24 10.1.0.2[R1]ip route-static 172.16.1.0 24 10.1.0.2[R1]ip route-static 172.16.2.0 24 10.1.0.2[R1]ip route-static 172.16.3.0 24 10.1.0.2[R1]ip route-static 172.16.4.0 24 10.1.0.2[R1]ip route-static 172.16.5.0 24 10.1.0.2[R1]ip route-static 172.16.6.0 24 10.1.0.2[R1]ip route-static 172.16.7.0 24 10.1.0.2也可以添加1条汇总路由来实现:[R1]ip route-static 172.16.0.0 21 10.1.0.2Ø路由汇总计算:基于CIDR思想,采用可变子网掩码,屏蔽A、B、C主类网络的限定。
IPV6 浮动静态路由1
配置IPV6 浮动静态路由r1 配置router>enrouter#conf trouter(config)#host r1r1(config)#ena sec 123r1(config)#no ip domain-lookupr1(config)#ban mot #Welcome to r1#r1(config)#line vty 0 4r1(config-line)#no loginr1(config-line)#line con 0r1(config-line)#no exec-timer1(config-line)#ipv6 unicast-routingr1(config)#ipv6 cefr1(config-if)#int lo0r1(config-if)#des test ipr1(config-if)#ipv6 add fec0:0:0:3::1/128r1(config-if)#int f 0/0r1(config-if)#des link to r2r1(config-if)#ipv6 add fec0:0:0:1::/64 eui-64 r1(config-if)#no shutr1(config-if)#int f 1/0r1(config-if)#des link to r2 for backr1(config-if)#ipv6 add fec0:0:0:2::/64 eui-64 r1(config-if)#no shutr1(config-if)#exitr1(config)#ipv6 route fec0:0:0:4::/64fec0::1:c800:2ff:fe14:0r1(config)#ipv6 route fec0:0:0:5::/64fec0::1:c800:2ff:fe14:0r1(config)#ipv6 route fec0:0:0:6::/64fec0::1:c800:2ff:fe14:0r1(config)#ipv6 route fec0:0:0:4::/64fec0::2:c800:2ff:fe14:1c 50r1(config)#ipv6 route fec0:0:0:5::/64fec0::2:c800:2ff:fe14:1c 50r1(config)#ipv6 route fec0:0:0:6::/64fec0::2:c800:2ff:fe14:1c 50r1(config)#endr1#r2 配置router>enrouter#conf trouter(config)#host r2r2(config)#ena sec 123r2(config)#no ip domain-lookupr2(config)#ban mot #Welcome to r2#r2(config)#line vty 0 4r2(config-line)#no loginr2(config-line)#line con 0r2(config-line)#no exec-timer2(config-line)#ipv6 unicast-routingr2(config)#ipv6 cefr2(config-if)#int lo0r2(config-if)#des test ipr2(config-if)#ipv6 add fec0:0:0:4::1/128r2(config-if)#int f 0/0r2(config-if)#des link to r1r2(config-if)#ipv6 add fec0:0:0:1::/64 eui-64 r2(config-if)#no shutr2(config-if)#int f 1/0r2(config-if)#des link to r1 for backr2(config-if)#ipv6 add fec0:0:0:2::/64 eui-64 r2(config-if)#no shutr2(config-if)#int f 2/0r2(config-if)#des link to r3r2(config-if)#ipv6 add fec0::5:c800:2ff:fe14:38 r2(config-if)#no shutr2(config-if)#exitr2(config)#ipv6 route fec0:0:0:3::/64fec0::1:c800:2ff:fec8:0r2(config)#ipv6 route fec0:0:0:6::/64fec0::5:c800:5ff:fea4:0r2(config)#ipv6 route fec0:0:0:3::/64fec0::2:c800:2ff:fec8:1c 50r2(config)#endr2#r3 配置router>enrouter#conf trouter(config)#host r3r3(config)#ena sec 123r3(config)#no ip domain-lookupr3(config)#ban mot #Welcome to r3#r3(config)#line vty 0 4r3(config-line)#no loginr3(config-line)#line con 0r3(config-line)#no exec-timer3(config-line)#ipv6 unicast-routingr3(config)#ipv6 cefr3(config-if)#int lo0r3(config-if)#des test ipr3(config-if)#ipv6 add fec0:0:0:6::1/128r3(config-if)#int f 0/0r3(config-if)#des link to r2r3(config-if)#ipv6 add fec0:0:0:5::/64 eui-64 r3(config-if)#no shutr3(config-if)#exitr3(config)#ipv6 route fec0:0:0:1::/64fec0::5:c800:2ff:fe14:38r3(config)#ipv6 route fec0:0:0:2::/64fec0::5:c800:2ff:fe14:38r3(config)#ipv6 route fec0:0:0:3::/64fec0::5:c800:2ff:fe14:38r3(config)#ipv6 route fec0:0:0:4::/64fec0::5:c800:2ff:fe14:38r3(config)#endr3#Weclome to r1r1>show runPassword:r1#show runBuilding configuration...Current configuration : 1197 bytesversion 12.3service timestamps debug datetime msecservice timestamps log datetime msecno service password-encryptionhostname r1boot-start-markerboot-end-markerenable secret 5 $1$ZJdq$sXB/we0Xn5mXCf6njEMcL1 no aaa new-modelip subnet-zerono ip domain lookupip cefipv6 unicast-routingipv6 cefinterface Loopback0description test ipno ip addressipv6 address FEC0:0:0:3::1/128interface FastEthernet0/0description link to r2no ip addressduplex halfipv6 address FEC0:0:0:1::/64 eui-64interface FastEthernet1/0description link to r2 for backno ip addressduplex halfipv6 address FEC0:0:0:2::/64 eui-64ip classlessno ip http serveripv6 route FEC0:0:0:4::/64 FEC0::2:C800:2FF:FE14:1C 50 ipv6 route FEC0:0:0:4::/64 FEC0::1:C800:2FF:FE14:0ipv6 route FEC0:0:0:5::/64 FEC0::2:C800:2FF:FE14:1C 50 ipv6 route FEC0:0:0:5::/64 FEC0::1:C800:2FF:FE14:0ipv6 route FEC0:0:0:6::/64 FEC0::2:C800:2FF:FE14:1C 50 ipv6 route FEC0:0:0:6::/64 FEC0::1:C800:2FF:FE14:0 gatekeepershutdownbanner motd ^CWeclome to r1^Cline con 0exec-timeout 0 0stopbits 1line aux 0stopbits 1line vty 0 4no loginendr1#show ipv6 routeIPv6 Routing Table - 10 entriesCodes: C - Connected, L - Local, S - Static, R - RIP, B - BGPU - Per-user Static routeI1 - ISIS L1, I2 - ISIS L2, IA - ISIS interarea, IS - ISIS summaryO - OSPF intra, OI - OSPF inter, OE1 - OSPF ext 1, OE2 - OSPF ext 2ON1 - OSPF NSSA ext 1, ON2 - OSPF NSSA ext 2L FE80::/10 [0/0]via ::, Null0C FEC0:0:0:1::/64 [0/0]via ::, FastEthernet0/0L FEC0::1:C800:2FF:FEC8:0/128 [0/0]via ::, FastEthernet0/0C FEC0:0:0:2::/64 [0/0]via ::, FastEthernet1/0L FEC0::2:C800:2FF:FEC8:1C/128 [0/0] via ::, FastEthernet1/0LC FEC0:0:0:3::1/128 [0/0]via ::, Loopback0S FEC0:0:0:4::/64 [1/0]via FEC0::1:C800:2FF:FE14:0S FEC0:0:0:5::/64 [1/0]via FEC0::1:C800:2FF:FE14:0S FEC0:0:0:6::/64 [1/0]via FEC0::1:C800:2FF:FE14:0L FF00::/8 [0/0]via ::, Null0r1#telnet fec0::1:c800:2ff:fe14:0Trying FEC0::1:C800:2FF:FE14:0 ... Open Welcome to r2r2>enPassword:r2#show runBuilding configuration...Current configuration : 1153 bytesversion 12.3service timestamps debug datetime msecservice timestamps log datetime msecno service password-encryptionhostname r2boot-start-markerboot-end-markerenable secret 5 $1$gNIo$TyIsx2FDaXRAMbJkkiwgm0 no aaa new-modelip subnet-zerono ip domain lookupip cefipv6 unicast-routingipv6 cefinterface Loopback0description test ipno ip addressipv6 address FEC0:0:0:4::1/128interface FastEthernet0/0description link to r1no ip addressduplex halfipv6 address FEC0:0:0:1::/64 eui-64interface FastEthernet1/0description link to r1 for backno ip addressduplex halfipv6 address FEC0:0:0:2::/64 eui-64interface FastEthernet2/0description link to r3no ip addressduplex halfipv6 address FEC0:0:0:5::/64 eui-64ip classlessno ip http serveripv6 route FEC0:0:0:3::/64 FEC0::2:C800:2FF:FEC8:1C 50 ipv6 route FEC0:0:0:3::/64 FEC0::1:C800:2FF:FEC8:0ipv6 route FEC0:0:0:6::/64 FEC0::5:C800:5FF:FEA4:0 gatekeepershutdownbanner motd ^CWelcome to r2^Cline con 0exec-timeout 0 0stopbits 1line aux 0stopbits 1line vty 0 4no loginendr2#show ipv6 routeIPv6 Routing Table - 11 entriesCodes: C - Connected, L - Local, S - Static, R - RIP, B - BGPU - Per-user Static routeI1 - ISIS L1, I2 - ISIS L2, IA - ISIS interarea, IS - ISIS summaryO - OSPF intra, OI - OSPF inter, OE1 - OSPF ext 1, OE2 - OSPF ext 2ON1 - OSPF NSSA ext 1, ON2 - OSPF NSSA ext 2L FE80::/10 [0/0]via ::, Null0C FEC0:0:0:1::/64 [0/0]via ::, FastEthernet0/0L FEC0::1:C800:2FF:FE14:0/128 [0/0]via ::, FastEthernet0/0C FEC0:0:0:2::/64 [0/0]via ::, FastEthernet1/0L FEC0::2:C800:2FF:FE14:1C/128 [0/0] via ::, FastEthernet1/0S FEC0:0:0:3::/64 [1/0]via FEC0::1:C800:2FF:FEC8:0LC FEC0:0:0:4::1/128 [0/0]via ::, Loopback0C FEC0:0:0:5::/64 [0/0]via ::, FastEthernet2/0L FEC0::5:C800:2FF:FE14:38/128 [0/0] via ::, FastEthernet2/0S FEC0:0:0:6::/64 [1/0]via FEC0::5:C800:5FF:FEA4:0L FF00::/8 [0/0]via ::, Null0r2#telnet fec0::5:c800:5ff:fea4:0Trying FEC0::5:C800:5FF:FEA4:0 ... Open Welcome to r3r3>enPassword:r3#show runBuilding configuration...Current configuration : 1026 bytesversion 12.3service timestamps debug datetime msecservice timestamps log datetime msecno service password-encryptionhostname r3boot-start-markerboot-end-markerenable secret 5 $1$BaqM$DhvX6kzvNAUr7C7pnyQ0l1 no aaa new-modelip subnet-zerono ip domain lookupip cefipv6 unicast-routingipv6 cefinterface Loopback0description test ipno ip addressipv6 address FEC0:0:0:6::/128interface FastEthernet0/0description link to r2no ip addressduplex halfipv6 address FEC0:0:0:5::/64 eui-64interface FastEthernet1/0no ip addressshutdownduplex halfip classlessno ip http serveripv6 route FEC0:0:0:1::/64 FEC0::5:C800:2FF:FE14:38 ipv6 route FEC0:0:0:2::/64 FEC0::5:C800:2FF:FE14:38 ipv6 route FEC0:0:0:3::/64 FEC0::5:C800:2FF:FE14:38 ipv6 route FEC0:0:0:4::/64 FEC0::5:C800:2FF:FE14:38 gatekeepershutdownbanner motd ^CWelcome to r3^Cline con 0exec-timeout 0 0stopbits 1line aux 0stopbits 1line vty 0 4no loginendr3#show ipv6 routeIPv6 Routing Table - 9 entriesCodes: C - Connected, L - Local, S - Static, R - RIP, B - BGPU - Per-user Static routeI1 - ISIS L1, I2 - ISIS L2, IA - ISIS interarea, IS - ISIS summaryO - OSPF intra, OI - OSPF inter, OE1 - OSPF ext 1, OE2 - OSPF ext 2ON1 - OSPF NSSA ext 1, ON2 - OSPF NSSA ext 2L FE80::/10 [0/0]via ::, Null0S FEC0:0:0:1::/64 [1/0]via FEC0::5:C800:2FF:FE14:38S FEC0:0:0:2::/64 [1/0]via FEC0::5:C800:2FF:FE14:38S FEC0:0:0:3::/64 [1/0]via FEC0::5:C800:2FF:FE14:38S FEC0:0:0:4::/64 [1/0]via FEC0::5:C800:2FF:FE14:38C FEC0:0:0:5::/64 [0/0]via ::, FastEthernet0/0L FEC0::5:C800:5FF:FEA4:0/128 [0/0]via ::, FastEthernet0/0LC FEC0:0:0:6::/128 [0/0]via ::, Loopback0L FF00::/8 [0/0]via ::, Null0r3#模拟fec0::1/64链路断开r1#show ipv6 routeIPv6 Routing Table - 8 entriesCodes: C - Connected, L - Local, S - Static, R - RIP, B - BGPU - Per-user Static routeI1 - ISIS L1, I2 - ISIS L2, IA - ISIS interarea, IS - ISIS summaryO - OSPF intra, OI - OSPF inter, OE1 - OSPF ext 1, OE2 - OSPF ext 2ON1 - OSPF NSSA ext 1, ON2 - OSPF NSSA ext 2L FE80::/10 [0/0]via ::, Null0C FEC0:0:0:2::/64 [0/0]via ::, FastEthernet1/0L FEC0::2:C800:2FF:FEC8:1C/128 [0/0]via ::, FastEthernet1/0LC FEC0:0:0:3::1/128 [0/0]via ::, Loopback0S FEC0:0:0:4::/64 [50/0]via FEC0::2:C800:2FF:FE14:1CS FEC0:0:0:5::/64 [50/0]via FEC0::2:C800:2FF:FE14:1CS FEC0:0:0:6::/64 [50/0]via FEC0::2:C800:2FF:FE14:1CL FF00::/8 [0/0]via ::, Null0r1#telnet fec0::2:c800:2ff:fe14:1cTrying FEC0::2:C800:2FF:FE14:1C ... OpenWelcome to r2r2>enPassword:r2#show ipv6 routeIPv6 Routing Table - 9 entriesCodes: C - Connected, L - Local, S - Static, R - RIP, B - BGPU - Per-user Static routeI1 - ISIS L1, I2 - ISIS L2, IA - ISIS interarea, IS - ISIS summaryO - OSPF intra, OI - OSPF inter, OE1 - OSPF ext 1, OE2 - OSPF ext 2ON1 - OSPF NSSA ext 1, ON2 - OSPF NSSA ext 2L FE80::/10 [0/0]via ::, Null0C FEC0:0:0:2::/64 [0/0]via ::, FastEthernet1/0L FEC0::2:C800:2FF:FE14:1C/128 [0/0]via ::, FastEthernet1/0S FEC0:0:0:3::/64 [50/0]via FEC0::2:C800:2FF:FEC8:1CLC FEC0:0:0:4::1/128 [0/0]via ::, Loopback0C FEC0:0:0:5::/64 [0/0]via ::, FastEthernet2/0L FEC0::5:C800:2FF:FE14:38/128 [0/0]via ::, FastEthernet2/0S FEC0:0:0:6::/64 [1/0]via FEC0::5:C800:5FF:FEA4:0L FF00::/8 [0/0]via ::, Null0r2#telnet fec0::5:c800:5ff:fea4:0Trying FEC0::5:C800:5FF:FEA4:0 ... OpenWelcome to r3r3>enPassword:r3#show ipv6 routeIPv6 Routing Table - 9 entriesCodes: C - Connected, L - Local, S - Static, R - RIP, B - BGPU - Per-user Static routeI1 - ISIS L1, I2 - ISIS L2, IA - ISIS interarea, IS - ISIS summaryO - OSPF intra, OI - OSPF inter, OE1 - OSPF ext 1, OE2 - OSPF ext 2ON1 - OSPF NSSA ext 1, ON2 - OSPF NSSA ext 2L FE80::/10 [0/0]via ::, Null0S FEC0:0:0:1::/64 [1/0]via FEC0::5:C800:2FF:FE14:38S FEC0:0:0:2::/64 [1/0]via FEC0::5:C800:2FF:FE14:38S FEC0:0:0:3::/64 [1/0]via FEC0::5:C800:2FF:FE14:38S FEC0:0:0:4::/64 [1/0]via FEC0::5:C800:2FF:FE14:38C FEC0:0:0:5::/64 [0/0]via ::, FastEthernet0/0L FEC0::5:C800:5FF:FEA4:0/128 [0/0]via ::, FastEthernet0/0LC FEC0:0:0:6::/128 [0/0]via ::, Loopback0L FF00::/8 [0/0]via ::, Null0r3#第 21 页。
- 1、下载文档前请自行甄别文档内容的完整性,平台不提供额外的编辑、内容补充、找答案等附加服务。
- 2、"仅部分预览"的文档,不可在线预览部分如存在完整性等问题,可反馈申请退款(可完整预览的文档不适用该条件!)。
- 3、如文档侵犯您的权益,请联系客服反馈,我们会尽快为您处理(人工客服工作时间:9:00-18:30)。
浮动静态路由配置教程
本文为大家讲解浮动静态路由配置,欢迎大家阅读借鉴。
所谓浮动静态路由(floating static route)是指对同一个目的网络,配置下一跳不同,且优先级不同的多条静态路由。
正常情况下,只有优先级最高的静态路由起作用。
当优先级最高的静态路由失效时,次优静态路由被启用,以此保障目的网络总是可达,提高网络可用性。
在路径故障的情况下,浮动静态路由在收到路径故障信息后,设备首先删除出错的软硬件转发表项,接着启用次优先路由,并重设软硬件转发表项。
时间大致在10ms到100ms量级。
【说明】静态路由的优先级是通过其管理距离(Administrative Distance,AD)来指定的,所以在此先要了解各种路由在的管理距离。
具体如下(值越小优先级越高):
直接互连:0
静态路由:1
EIGRP汇总路由:5
外部BGP路由:20
内部EIGRP路由:90
IGRP路由:100
OSPF路由:110
IS-IS路由:115
RIP路由:120
外部EIGRP路由:170
内部BGP路由:200
浮动路由:可变
浮动静态路由的配置与上节介绍的静态路由的配置方法完全一样,只不过要使用上节介绍的"ip route"命令中的可选项参数distance,以指定备用的浮动静态路由与默认的静态路由有不同的管理距离,或者说是有不同的优先级。
当然,事实上,它不仅会与静态路由的优先级进行比较,还会与动态路由的优先级进行比较,当接口上同时配置了
静态路由、浮动静态路由和动态路由,且静态路由无效时,浮动静态路由并不一定会生效,这还要看它所配置的优先级是否高于所配置的对应类型的动态路由优先级。
要注意的是,默认的静态路由也可以配置为浮动的,只要在后面加上管理距离即可。
如默认的静态路由为ip route 0.0.0.0 0.0.0.0 s0,对应的浮动静态路由可以为ip route 0.0.0.0 0.0.0.0 s1 250。
图7-3是一个浮动静态路由配置示例。
在R1路由器上配置了两条静态路由到R2所连接的网络172.31.10.0/24。
示例中各路由器接口配置如下(在图中也已标出):
R1路由器的s3/0接口IP地址为192.168.10.1/30;
R1路由器的s3/2接口IP地址为10.10.10.1/30;
R1路由器的s3/3接口IP地址为192.168.20.1/30;
R2路由器的s0接口IP地址为10.10.10.2/30;
R2路由器的s1接口IP地址为192.168.20.2/30;
R2路由器的e0接口IP地址为172.31.10.2/24。
在R1上的两条静态路由(其中一条为浮动静态路由)配置如下所示:ip route 172.31.10.0 255.255.255.0 10.10.10.2
!---这是主要静态路由。
ip route 172.31.10.0 255.255.255.0 192.168.20.2 250
!---这是浮动静态路由,优先级为250,明显低于静态路由的1
【注意】浮动路由只有当主要静态路由失效后才可以通过"ip route"命令在路由表中见到。
而且这还要注意到静态路的可递归性,特别是默认的静态路可能会影响主静态路由的失效,即使所配置的接口是关闭的。
这时我们可以通过指定主静态路由的出口,就可以避免这种现象发生。
这将在下节专门以示例介绍。