内窥镜使用说明书
奥林巴斯光纤内窥镜标准系列说明书

OLYMPUS FIBERSCOPESStandard RangeOlympus Fiberscopes - Standard range - 6, 8 and 11mm diameter Flexible fiberscopes allow remote visual inspection to be carried out in areas where the route to the area of interest includes negotiating a series of bends or where the length of instrument required is outside the limits of a rigid borescope.The construction of an Olympus fiberscope is a specialized process, requiring a combination of advanced optical and mechanical technologies, resulting in a finished product with many highperformance design features:Interchangeable optical tip adaptors . The focus of the optical system is fixed, however, each inspection has different requirements with regard to depth of field and direction of view. For this reason, all standard model fiberscopes have interchangeable optical tip adaptors to provideversatility and are available in direct or side viewing configuration - just select the tip adaptor most suitable for the application. Separately, a diopter focus compensates for the individual s eyesight.Image size. The Olympus image size is larger than most other fiberscopes. Due to the optical quality, the image of an Olympus fiberscope can be magnifed and maintain a high resolution image.Tapered Flexibility. This feature provides graduated flexibility along the length of the insertion tube, making the insertion tube more flexible towards the distal end.Four layer insertion tube. The construction of the insertion tube (the part of the instrument inserted into the application area) is especially important to ensure reliability and durability, but without compromising flexibility. Olympus have excelled in this area, creating a design of four individual layers which together protect the internal components and provide fluid resistance.Four-way angulation. All models feature four-way angulation of the distal end, which aids insertion and maneuverability and helps to steer the tip towards the inspection area.The Series 5 range of industrial fiberscopes is available in a variety of diameters and workinglengths. All instruments feature an eyepiece which allows compatibility with a range of CCTV and Photographic adaptors so that the image normally seen through the eyepiece can be recorded for future reference and reporting./Olympus-IF2D5-12-Borescope.aspxTo buy, sell, rent or trade-in this product please click on the link below:Temperature:Insertion tube (in air): -10 to 80°C (14 to 176°F)Complete instrument (in air): -10 to 50°C (14 to 122°F)Pressure:Insertion tube at 10 to 30°C: 1 to 1.3 bar absoluteFluid resistance:The insertion tube can be immersed for short periods, and control body wiped with, the following chemicals: Water, 5% salt water, machine oil and light oilSmall DiameterOlympus Fiberscopes - Small diameter - 0.6, 2.4 and 4.1mm diameterIn some applications, the entry port size to the area of interest can be restricted and inserting a scope can be extremely difficult. This will often necessitate using an instrument of smaller diameter than conventional models.The Olympus range of small diameter fiberscopes is designed for these applications and are available in diameters 0.6, 2.4 and 4.1mm (0.02, 0.09 and 0.16") and lengths of up to 1.5m (4.9 ). All instruments feature a high resolution coherent fiberoptic bundle for image transmission and a separate channel of non-coherent fibers for illuminating the inspection area. To aid insertion and maneuverability once inside the entry port, all instruments feature a strong, reliable insertion tube construction and in the case of the 2.4mm and 4.1mm, two-way angulation helps steer the tip towards the target area. Additionally, 4.1mm diameter models have the Olympus Tapered Flexibility insertion tube design, which means that the insertion tube becomes gradually more flexible towards the distal end - a feature not normally associated with small diameter instruments. All instruments have ocular focus to ensure that the individual operator s eyesight is accommodated and can be attached to CCTV and photographic equipment to allow the images to be permanently recorded. To illuminate the inspection area, any one of the Olympus light sources can be used.The tables below show the models available and their specifications:Model Name Diameter Length TaperedFlexibilityAngulationDirection ofViewField ofViewDepth of Field Eyepiece styleIF6PD4-60.64mm(0.02")490mm(19.3")No No Direct58°1-50mm (0.03-2.0")32mmIF6PD4-110.64mm(0.02")990mm(39.0")No No Direct58°1-50mm (0.03-2.0")32mmIF2D5-6 2.4mm(0.09")600mm(23.6")No120° Up/Down Direct75°2-50mm (0.08-2.0")32mmIF2D5-12 2.4mm(0.09")1170mm(46.06")No120° Up/Down Direct75°2-50mm (0.08-2.0")32mmIF4D5-7 4.1mm(0.16")700mm(27.6")Yes120° Up/Down Direct65°5-60mm (0.2-2.4")OES StyleIF4D5-15 4.1mm(0.16")1500mm(59.0")Yes120° Up/Down Direct65°5-60mm (0.2-2.4")OES StyleIF4S5-7 4.1mm(0.16")700mm(27.6")Yes120° Up/Down Side (90°)60°4-40mm (0.16-1.6")OES StyleIF4S5-15 4.1mm(0.16")1500mm(59.0")Yes120° Up/Down Side (90°)60°4-40mm (0.16-1.6")OES StyleEnvironmental Specification:IF6PD4IF2D5IF4D5 / IF4S5 Temperature:Insertion tube (in air) Complete Instrument (in air)0 to 40°C(32 to 104°F)10 to 30°C(32 to 86°F)-10 to 80°C(14 to 176°F)-10 to 50°C(14 to 122°F)-10 to 80°C(14 to 176°F)-10 to 50°C(14 to 122°F)Pressure:Insertion tube at10-30°C1 to 1.3 bar absolute 1 to 1.3 bar absolute 1 to 1.3 bar absolute Fluid Resistance:The insertion tube can be immersed for short periods, and control body wiped with:Water Water Water5% salt watermachine oillight oilSpecial Feature FiberscopesThere are some RVI applications that cannot be satisfied by a standardmodel fiberscope. Olympus has always been at the forefront ofapplication solutions, and when a situation arises where a standardinstrument will not provide the desired results, then Olympus hasresponded with advice on optimal instrument use in that application.This occasionally results in the introduction of a special instrumentdesigned to meet that specific requirement - these are therefore knownas special feature fiberscopes. This is not to say, however, that theycannot be used in other applications. The information below describeseach model, together with its design application, but the specificationmay well suit a particular inspection you need to undertake.IF5D4X1-14:At 5.0mm (0.19") diameter and 1200mm (47") working length, thisinstrument was initially developed and approved for the Pratt &Whitney PT6 engine, but has since become used for the inspection ofmany small engines and fine diameter pipework. It features two-wayangulation, and interchangeable optical tip adaptors, allowing direct orside view, both supplied as standard with the instrument.IF7D3X3-26 / IF7D3X3-32:This 7.3mm (0.29") diameter instrument has been approved for use onthe F100 and JT-9D aircraft engines and features an internal channelfor introducing a working tool or guide hook into the inspection areato aid navigation around the engine. It features four-way angulation(130° up, down, left and right) and the optical system is set to a 66°field of view, fixed focus (depth of field 8mm to infinity).IF8D3X2-23:The JT-8D engine inspection can be particularly difficult and is mosteffectively undertaken using an instrument in conjunction with a guidetube. TheIF8D3X2-23 fiberscope has been designed for this inspection and has been specified with an 80° field of view and a unique angulation range - 185°up, 105° down, left and right. This is then used with the MD-999 guide tube to achieve angulation in eight different directions.Visit the Guide Tube section of the product information to see details of theMD-999.IF8D4X2-10:This instrument has been purpose-designed for use within the automotive industry, with an 8.5mm (0.33") diameter and 770mm (30") working length. It is a general diagnostic tool for trouble-shooting as well as analysis of specific problems. Typical areas of use include intake and exhaust valves, cylinders, transmission systems and areas within the chassis. Unlike other fiberscopes of this diameter, the IF8D4X2-10 has a 32mm diameter eyepiece, which allows it to be connected to the standard range of accessories associated with rigid borescopes.IF13D3-60:At 6050mm (19 ) length, the IF13D3-60 is the longest industrial fiberscope in production today. It is specifically designed for the visual inspection of plant such as pipes, boilers and heat exchangers, where the area of interest is some distance from the access point. It has four-way angulation of the distal end and is compatible with a wide range of 11mm diameter interchangeable optical tipadaptors, providing the user with a variety of fields of view and depth of field characteristics.Visit the Ultra-Long Videoscopes section for information on alternative long instruments.UV (Ultra Violet) FiberscopeGlass fibers used in borescopes and standard specification fiberscopes attenuate UV light and can only therefore be used to view the fluorescing images, not to transmit UV illumination. In order to transmit ultra-violet illumination and view the images with one instrument, a special feature fiberscope is required.The IF11D4-20UV fiberscope is available with or without an internal channel and features a quartz fiber bundle for effective ultra-violet illumination. The 11.3mm (0.44") diameter instrument is available in two lengths - 2.0m or 3.0m (6.6 or 9.8 ) and ,where specified, the internal channel can be used to introduce the dye and processing fluid necessary in this application.Please note that the UV fiberscope is only available as a special production item and is therefore subject to a longer delivery lead time.Olympus offers a special high power UV light source for use with this fiberscope for dye penetrant inspections.。
深圳市锐丽视 eheV2-USB-Splus 超短内窥镜 说明书
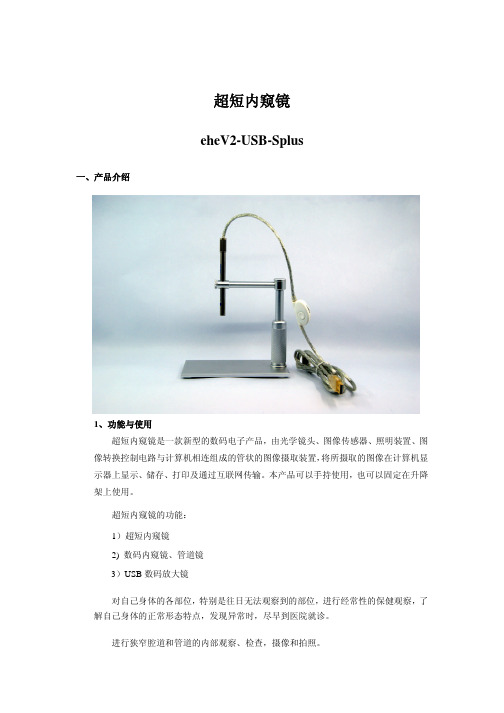
超短内窥镜eheV2-USB-Splus一、产品介绍1、功能与使用超短内窥镜是一款新型的数码电子产品,由光学镜头、图像传感器、照明装置、图像转换控制电路与计算机相连组成的管状的图像摄取装置,将所摄取的图像在计算机显示器上显示、储存、打印及通过互联网传输。
本产品可以手持使用,也可以固定在升降架上使用。
超短内窥镜的功能:1)超短内窥镜2)数码内窥镜、管道镜3)USB数码放大镜对自己身体的各部位,特别是往日无法观察到的部位,进行经常性的保健观察,了解自己身体的正常形态特点,发现异常时,尽早到医院就诊。
进行狭窄腔道和管道的内部观察、检查,摄像和拍照。
当作为USB数码放大镜使用时,可以放大观察诸如邮票、钱币、古玩、昆虫、电路、机械、织物、食物、饰物等等,还可以帮助低视力患者进行放大阅读。
2、适用操作系统Windows XP、Vista、7操作系统或MAC10.4.2–10.6.2。
数码窥镜的外观如上图。
数码窥镜的顶端设置有6个高亮度LED用于照明。
光学镜头和图像传感器在手柄的内部。
手柄后端连接有USB线,用于与计算机连接。
USB线上设置有线控器,用于调整LED的亮度和进行拍照操作。
3、技术规格1)Sensor:采用高品质CMOS传感器,200万象素。
2)分辨率:1600X12003)适应接口:USB2.0。
4)显示帧率:30帧/秒(CIF,VGA)。
5)调焦距离:5毫米至无穷远。
6)放大倍数:1倍至200倍连续调节。
7)外观尺寸:长度110毫米,直径8毫米8)包装重量:750克二、产品装箱清单名称数量超短内窥镜1挖耳勺1反光镜1定焦套1铝合金升降支架1光盘(内附使用说明书和应用软件)1四、安装与使用随机软件:ehe.exe随机软件ehe.exe提供摄像、拍照和录影等多项功能。
右图是软件图标。
软件在随机光盘内,使用时将其拷贝至桌面即可。
不使用随机软件,在“我的电脑“下点击摄像机图标也可以使用本产品。
1、调焦旋转摄像笔后端的调焦器进行调焦。
内窥镜设备操作手册

内窥镜设备操作手册一、引言内窥镜设备是一种常用的医疗工具,用于进行各种内脏器官的观察和治疗。
正确操作内窥镜设备对于医生和患者来说都至关重要。
本手册旨在提供内窥镜设备的操作指南,以确保使用者能够正确且安全地操作设备。
二、设备准备1. 清洁设备:在使用内窥镜设备之前,确保设备已完全清洁消毒,以避免交叉感染。
2. 工作环境准备:确保操作环境符合操作要求,如照明充足、工作区域整洁,并配备所需的消毒剂和清洁工具。
三、内窥镜操作步骤1. 穿戴个人防护装备:在进行内窥镜操作前,工作人员应穿戴手套、口罩、护目镜等个人防护装备,以保护自己和患者的安全。
2. 检查设备完整性:在使用内窥镜设备之前,应对设备进行全面检查,确保各部件完好无损。
3. 连接设备:根据设备说明书,将内窥镜设备与相关的监控器、光源等设备相连接,并进行必要的校准。
4. 术前准备:将患者安置在舒适的位置,并进行术前准备工作,如消毒、局麻等。
5. 内窥镜插入:将内窥镜缓慢插入患者体内,同时观察监控器上的映像,确保插入的角度和深度适当。
6. 观察与操作:在内窥镜插入后,根据需要观察和操作患者的内脏器官。
在此过程中,需要熟练掌握操作杆、灌注器、吸引器等工具的使用方法。
7. 结束操作:在操作完成后,缓慢将内窥镜取出,并确保设备上没有任何残留物。
随后,将设备进行清洁和消毒,并妥善存放。
四、注意事项1. 安全操作:操作内窥镜设备时,要确保动作轻柔、谨慎,避免对患者造成伤害。
遵守消毒和清洁要求,减少交叉感染的风险。
2. 设备维护:经常检查设备状况,确保各部件正常工作。
定期维护和保养设备,如更换灯泡、清洁光导系统等。
3. 患者安全:在操作过程中,要时刻关注患者的安全状况,如呼吸、心跳等。
在发现异常情况时,应及时采取措施,确保患者的生命安全。
4. 法律责任:操作内窥镜设备需要具备相关的资质和技能,操作人员应遵守相关法律法规,确保操作的合法性和准确性。
五、结论内窥镜设备的操作对于医疗工作者来说是一项技术活,需要熟练掌握操作步骤和注意事项。
WF200内窥镜使用说明书

WF200内窥镜使用说明书内窥镜是用于人体及动物内脏的内窥镜。
可以清楚的观察病变组织和器官,特别是内脏器官,因此有“透视医生”之称。
有了内窥镜,医生就可以很方便地看到组织的内部结构及病变情况。
内窥镜主要有内窥镜和无影灯两种类型。
• 1.通过连接头,将内窥镜的两个镜头对准被测物体,观察图像并打开相应按键,此时该内窥镜就会工作在指定角度上。
注意:此时如果被测部位有液体或血渍,请立即取出,以免因液体或血渍污染图像。
如果您需要取出被测物体,请将镜头对准物体,然后将镜头打开,使图像在直视(垂直)上。
由于镜头内安装有一部微型计算机,因此镜头与物体成45度角,然后将该计算机插入连接头中插入被测物体中,随后将连接到摄像头上。
这样就可以实现连接(垂直)与被测目标(水平)拍摄图像。
如果你使用内窥镜成像系统中的光学系统,则将此系统设置为自动或手动模式;如果你使用普通电子内窥镜成像系统(与光学系统相同),则应先检查你设置的镜头焦距是否正确,如焦距不正确,则可调整连接头和镜头的角度以使焦距正确;在此基础上可调节视频录制和视频回放设置(此设置用于记录内窥镜的工作时自动或手动模式);亦可设置镜头中的镜头高度调节(可选择)以使图像始终清晰(有时甚至无暗部)。
• 2.进入人体观察后,按照正常顺序向内(即从左至右)观察病灶部位颜色依次为红、黄、蓝、绿等,这时该内窥镜将自动进入相应的区域进行观察。
在观察中如遇到人体器官部位有红色时,先向左向右观察,完后再向右观察。
如果有蓝色或绿色病灶,则向左向右观察,如观察后没有蓝色或绿色病灶,则向右观察。
同时将摄像头调至手动模式,此时按下快门按钮即可在屏幕上显示该区域内的图像或画面中显示该区域内颜色变化图。
如有红色或绿色病灶,则按下快门按钮;如无红色或绿色病灶,则按下快门按钮。
• 3.当内窥镜从上到下进入病变区域时,观察到的画面会出现红色条带,此时可将红色条带向外旋转。
旋转的时候红色条带会出现红色的“L”形标志。
内窥镜使用说明书(v4.6)

目录第一部分:内窥镜工作站的运行环境,特点及安装方法一、内窥镜工作站软件的运行境 (3)二、软件的特点 (3)三、软件安装方法 (5)四、软件运行 (5)第二部分:软件功能按钮介绍与教程一.软件主窗口 (6)二、程序操作区各按钮功能1、建新病历 (6)2、保存病历 (6)3、采集图片 (6)4、图像处理窗口 (7)5、冻结 (9)6、生成报告 (9)7、系统设置 (12)7-1、报告格式设置 (12)7-2、报告格式编辑窗口 (13)7-3、伪彩设置 (17)7-4、系统设置 (18)7-5、术语设置 (19)8、病历管理窗口 (20)8-1、备份功能 (21)8-2、查询功能区 (22)8-3、排序功能区 (23)8-4、设置功能区 (24)8-5、病历操作控制区 (25)2-8-1、打开病历 (25)2-8-2、删除病历 (25)2-8-3、工作量统计 (25)9、退出系统 (26)10、诊断图库 (26)11、视频动态回放功能区 (27)12、亮度、对比度和饱和度调整 (28)13、全屏显示 (28)三、病人主要信息输入区功能窗口 (28)1、选择内容设置窗口 (28)第一部分内窥镜工作站的运行环境、特点及安装方法一.软件的运行环境.Microsoft Windows98/2000/XP操作系统.MMX奔腾II级PC;32MB以上内存.3000MB可用硬盘空间.支持24-bit(真彩色),显示器分辨率为1024*768.支持直接写屏显卡.CD-ROM驱动器.医疗专用视频采集卡.720dpi分辨率以上的彩色喷墨打印机二.软件的特点我们在开发过程中从用户使用的角度出发,设计了方便简精的界面风格,多功能全方位的实时编辑,安全可靠的运行环境,使您的操作倍感流畅、轻松、快捷!以下是本软件的部分特点:■方便快捷的病历内容输入在填写病历资料时,很多内容相对固定,变化不大。
对于检查所见和诊断结果,我们为您内置了比较常用的模板,您只需根据提示选择即可。
数码内窥镜使用说明书

2/4
Created with SmartPrinter trail version
N004 硬件安装及使用
1. 移动内窥镜至观测物合适位置。 2. 旋转内窥镜线上旋钮调节光源到合适照度。 3. 旋转内窥镜尾部旋钮调节至图象清晰。 疑难解答
为使您能尽情享受使用 明书。
数码内窥镜学习或观察的乐趣,敬请详阅本使用说
目次 导言........................................... ........................ ................................................. ............................1 目次........................................... ........................ ................................................. ............................1 产品规格........................................... ........................ .................................................................... 2 系统需求....................... ......................................................................................................... ....... 2 安全警告及注意事项................... ................................................................................................. 2 部件............................... ...... ......... ................................................................................................ 3 硬件安装及使用...... ................................................................................. .............. ...... ...............3 疑难解答....... .. ............................................................................................................................. 4 认证…. ....... ................... .......................................................... ....................................................4 免责声明............. .. .............................. ......................................................................................... 4
内窥镜使用说明书

内窥镜使用说明书摘要:1.内窥镜简介2.内窥镜的组成部分3.内窥镜的使用方法4.内窥镜的维护与保养5.安全注意事项正文:一、内窥镜简介内窥镜是一种用于观察人体内部器官的医疗器械,通过将微型摄像头插入人体内部,医生可以清晰地观察到患者体内的情况,从而准确地诊断和治疗疾病。
内窥镜在临床应用中具有广泛的用途,如消化系统、呼吸系统、泌尿系统等。
二、内窥镜的组成部分内窥镜主要由以下几部分组成:1.镜头:用于捕捉图像的微型摄像头。
2.镜身:连接镜头和光源的部分,用于引导光线和传递图像。
3.光源:为内窥镜提供照明,帮助医生观察内部情况。
4.控制器:用于控制内窥镜的移动和图像捕捉。
5.显示器:用于显示内窥镜捕捉到的图像,方便医生观察和诊断。
三、内窥镜的使用方法1.在使用内窥镜前,医生需要对患者进行充分的术前准备,包括清洗、消毒等。
2.将内窥镜的镜头插入患者的口腔、鼻孔或切口,小心地送入待观察的器官。
3.打开光源,调整亮度,使医生能够清晰地观察到内部情况。
4.通过控制器调整内窥镜的角度和位置,以便医生从不同角度观察器官。
5.医生根据观察到的病情,进行相应的诊断和治疗。
6.使用完毕后,小心地取出内窥镜,避免对患者造成损伤。
四、内窥镜的维护与保养1.使用后及时清洗内窥镜,去除表面污垢和细菌。
2.对镜头进行特别护理,避免磨损和刮伤。
3.存储时,将内窥镜放在干燥、通风的地方,避免阳光直射和潮湿环境。
4.定期检查内窥镜的性能,确保其正常工作。
五、安全注意事项1.使用内窥镜前,医生应充分了解患者的病情,确保内窥镜检查的适应症。
2.操作内窥镜时,医生应掌握正确的技巧,避免对患者造成不必要的损伤。
3.使用过程中,注意观察患者的生命体征,如出现异常情况,应立即停止使用。
工业内窥镜使用详细说明书
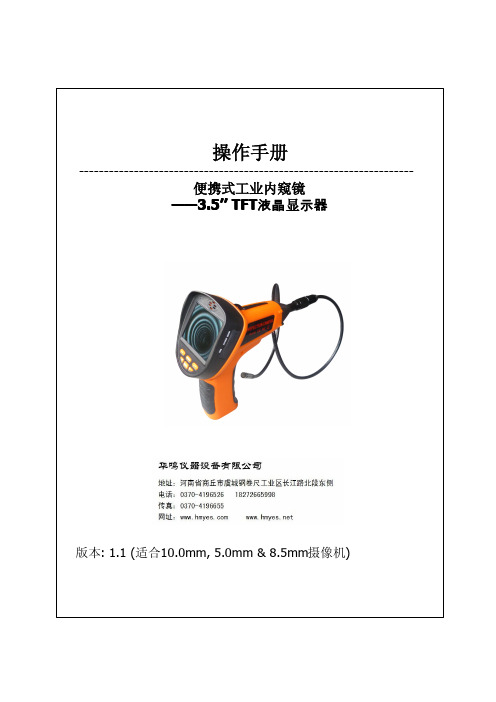
适合10.0mm, 5.0mm & 8.5mm摄像机便携式工业内窥镜操作电源开/关1.滑动开关打开内窥镜。
2.动态图像显示在显示屏上,电源开启。
后滑动开关调节LED灯亮度。
3.再滑动开关关闭内窥镜。
滑动开关LED灯开/关滑动开关到 “ON”打开LED灯滑动开关到 “OFF” 关闭LED灯电池寿命内窥镜关闭或无法开启时,请立即更换电池。
8LED摄像机滑动开关调节LED摄像机插入/拔出电池警告:只可使用碱电池。
更换电池前请阅读以下说明。
1.松开把手底侧螺丝,把电池盖拉下来,可插入或移除电池。
2.拿出电池筒,按指示说明插入4只AA电池。
3.按电池筒上的箭头指示插入电池筒到把手里。
4.关闭电池盖。
6软管安装1.把盖子拉到内窥镜后面.卡位2.对准连接器卡位3.拉过盖子旋紧到内窥镜上警告:•连接软管到内窥镜上时勿强力拽拉或旋转•为减少损坏风险,佩戴安全护目镜或侧护眼镜•更换配件或做任何调整前取出电池配件安装三个配件 (小镜子,钩子,磁铁) 如图片方式安装. 滑动配件底端,安装固定在镜头处。
7有幕会出现提示,拍照模式和照片预览,拍照或停止,按键拍照时屏幕显示键。
按键选择上一张或下一张图片。
要进行或停止录像并录音,按键预览摄像模式,按在摄像时,图标闪烁。
键转换预览模式和回放模式。
用键选择上一条或下一条录像,然后按键开始摄像。
回放时指示焦。
预览模式下用户有四种菜单选择。
通过按钮选择想要选预览模式下按菜单键进入到拍照设1,照片按一次快门键只拍一张照片。
按菜单键选择照片1,按键退出。
按一次快门键3张图片。
按菜单键选中照片,按览屏上,有指示图标键。
按菜单键选择摄像功能,退出按退出按选择摄像或摄像剪辑MENU从照片模式转换到摄像模式。
在完成状态下再按键,屏幕返回到录像模式预览。
返回到主菜单窗口转换录像模式到拍照模式。
此部分是便携式工业内窥镜的高级设照片质量为控制照片质量,选择高级设置JPEG文件JPEG文件JPEG文件录像解码器:MJPG)录像解码器: MJPG)15过按键选择您置,按选择退出按。