zimbra 8.6.0 安装部署手册V1.0.0
菜鸟安装zimbra教程
菜鸟安装zimbra教程菜鸟安装zimbra教程最近转载了很多乱七八糟linux和Zimbra的文章,有点装逼的嫌疑,说实话着实无奈,为了以后找到有用资料方便就放到自己空间里来了,顺便共享给大家。
说到这gai si 的Zimbra,从去年暑假一直折腾折腾,折腾到懒得搞了,寒假抱着必死的决心背水一战,总算把Zimbra安装好了,激动ing。
皇天不负有心人啊.....哦,牢骚就到此,为了广大菜鸟方便安装ZImbra,今天我就自己贡献下我原创的无脑版安装,下面我们开始菜鸟安装Zimbra之旅。
o(∩_∩)o首先,我的linux版本是fedora 11,官网/doc/3a12428370.html,有提供zcs(Zimbra Collaboration Suite)安装这里是地址/doc/3a12428370.html,/downloads/当然下载版本是fedora 11 32位的那个..冰淋(以下自称小冰吧)我之前就是因为版本不同导致安装错误很多,所以版本一定要和自己的linux对上号。
^_^标志下:OS:fedora 11 ZCS :fedora 11 (32位)好了,接下去是安装操作系统,什么RAID 的别管他,自己分不好就默认安装,再不行就覆盖原来linux系统总之默认就行了,当然选择安装软件时候最好点[现在制定] 把bind那个服务器安装上,这个很重要!找不到的同学可以看我后面怎么安装。
安装的时候,计算机名用这个叫“mail”最好用这个,要是后面出问题我可不管哦- -!ok~安装过程就这样好了,其他不懂的就默认,别自己乱搞。
好了,现在系统启动了,要建立个新用户,自己取吧,我就叫“webmail”,好,进入linux操作系统了。
:-)现在呢要做几个事,下载好zcs,安装好bind,这里讲下bind的安装,放入你的光盘,先打开终端,输入su[webmail@mail ~]$ su密码:输入你root的密码登录root账户成功[root@mail webmail]#(好吧,我知道连这都不懂的不是菜鸟,是小白)打开光盘目录:[root@mail webmail]# cd /media/Fedora\ 11\ i386\ DVD/Packages/[root@mail Packages]#好了让我们搜索下bind在哪里[root@mail Packages]# find . -name 'bind*'./bind-9.6.1-0.3.b1.fc11.i586.rpm./bind-chroot-9.6.1-0.3.b1.fc11.i586.rpm./bind-libs-9.6.1-0.3.b1.fc11.i586.rpm./bind-utils-9.6.1-0.3.b1.fc11.i586.rpm[root@mail Packages]#啊,看到了那个第一个就是bind,让我们安装下[root@mail Packages]# rpm -ivh bind-9.6.1-0.3.b1.fc11.i586.rpmwarning: bind-9.6.1-0.3.b1.fc11.i586.rpm: Header V3 RSA/SHA256 signature: NOKEY, key ID d22e77f2Preparing...########################################### [100%] package bind-32:9.6.1-0.3.b1.fc11.i586 is already installed啊,因为小冰已经安装过了,所以他提示package bind-32:9.6.1-0.3.b1.fc11.i586 is already installed没安装的同学可能会碰到这样的问题,bindxxxxx is needed by bind-9.6.1-0.3.b1.fc11.i586.rpm这简单,你就搜下这个什么bindxxxxxx然后把它安装上就ok了,这个过程叫解决依赖关系,可能会要装3~4个额外的依赖包好了bind安装好了,我们看下这个bind服务器是不是再运行了呢。
Zimbra系统安装过程

目录目录 (1)Zimbra系统的安装过程 (2)前言、系统架构及DNS (2)一、安装环境 (4)1.1操作系统 (4)2.1 Zimbra版本 (5)3.1需要安装的软件包 (5)4.1修改文件 (5)二、安装Zimbra LDAP,实现主从复制 (5)1.1安装一个主的LDAP,两个从的LDAP (5)2.1安装第一个从的LDAP (11)3.1安装第二个从的LDAP (16)三、安装Zimbra MailStore (21)1.1安装 (21)2.1安装 (32)3.1安装其他邮箱服务器 (42)四、安装zimbra MTA (43)1.1安装mta01 (43)2.1安装mta02 (48)五、安装proxy (48)1.1安装 (48)六、归档组件及服务器的安装 (54)1.1安装zimbra-archiving组件 (54)2.1在其他服务器上安装zimbra-archiving组件 (58)3.1在上执行以下命令 (59)4.1在上执行以下命令 (59)5.1安装archive01服务器 (59)七、安装LVS (68)1.1安装ipvsadm (68)2.1负载服务器 (69)3.1 mta服务器 (70)4.1测试 (70)Zimbra系统的安装过程前言、系统架构及DNS1、系统架构vCPU vRAM vDISK OS IP1:DNS 1 512M 20G Centos 5.6 192.168.13.20 2:LVS 1 512M 20G Centos 5.6 192.168.13.21 3:ldap-master 2 1G 50G Centos 6.3 192.168.13.32 4:ldap-replica 2 1G 50G Centos 6.3 192.168.13.33 5:mail (jetty, mysql) 2 1G 50G Centos 6.3 192.168.13.30 6:mail-archive 2 1G 50G Centos 6.3 192.168.13.31 7:proxy (nginx),mta 2 1G 50G Centos 6.3 192.168.13.34 8:proxy (nginx),mta 2 1G 50G Centos 6.3 192.168.13.35 9:Zimbra-VIP 192.168.13.242、安装DNS# yum install bind3、配置DNS# vi /etc/named.conf输入以下内容:options {directory "/var/named";pid-file "/var/named/named.pid";forwarders { 202.101.224.67; 202.101.224.68; };allow-query { any; };};zone "." IN {type hint;file "named.root";};zone "0.0.127.in-addr-arpa" IN {type master;file "named.local";allow-update { none; };};zone "" IN {type master;file "";allow-update { none; };};zone "13.168.192.in-addr-arpa" IN {type master;file "named.13.168.192";allow-update { none; };};# cp /usr/share/doc/bind-9.3.6/sample/var/named/named.root /var/named/ # vi /var/named/named.local输入以下内容:$TTL 3h0.0.127.in-addr.arpa. IN SOA . admin@. (1 ; Serial3h ; Refresh after 3 hours1h ; Retry after 1 hours1w ; Expire after 1 week1h ) ; Negative caching TTL of 1 hour1.0.0.127.in-addr.arpa. IN PTR localhost.# vi /var/named/输入以下内容:$TTL 3h. IN SOA . admin@. (1 ; Serial3h ; Refresh after 3 hours1h ; Retry after 1 hours1w ; Expire after 1 week1h ) ; Negative caching TTL of 1 hour . IN NS .. IN MX 10 mail. IN A 192.168.13.20www IN A 192.168.13.24mail IN A 192.168.13.24zldapmaster IN A 192.168.13.32zldapreplica IN A 192.168.13.33zproxymta01 IN A 192.168.13.34zproxymta02 IN A 192.168.13.35zmailstore IN A 192.168.13.30zmailstore-archive IN A 192.168.13.31# vi /var/named/named.13.168.192输入以下内容:$TTL 3h13.168.192.in-addr.arpa. IN SOA . admin@. (1 ; Serial3h ; Refresh after 3 hours1h ; Retry after 1 hours1w ; Expire after 1 week1h ) ; Negative caching TTL of 1 hour 13.168.192.in-addr.arpa. IN NS .226.1.168.192.in-addr.arpa. IN PTR .4、启动DNS# /usr/sbin/named -g &注:-g显示启动时的日志,一边分析启动过程出现错误的原因。
Zimbra邮件系统安装配置
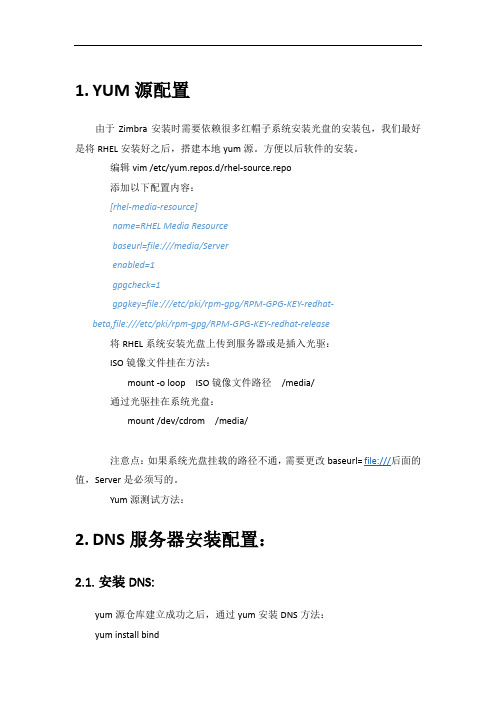
1.YUM源配置由于Zimbra安装时需要依赖很多红帽子系统安装光盘的安装包,我们最好是将RHEL安装好之后,搭建本地yum源。
方便以后软件的安装。
编辑vim /etc/yum.repos.d/rhel-source.repo添加以下配置内容:[rhel-media-resource]name=RHEL Media Resourcebaseurl=file:///media/Serverenabled=1gpgcheck=1gpgkey=file:///etc/pki/rpm-gpg/RPM-GPG-KEY-redhat-beta,file:///etc/pki/rpm-gpg/RPM-GPG-KEY-redhat-release将RHEL系统安装光盘上传到服务器或是插入光驱:ISO镜像文件挂在方法:mount -o loop ISO镜像文件路径/media/通过光驱挂在系统光盘:mount /dev/cdrom /media/注意点:如果系统光盘挂载的路径不通,需要更改baseurl= file:///后面的值,Server是必须写的。
Yum源测试方法:2.DNS服务器安装配置:2.1.安装DNS:yum源仓库建立成功之后,通过yum安装DNS方法:yum install bind根据提示输入Y,确定安装或证书验证。
2.2.配置DNS由于我们没有安装bind-chroot,Bind的所有配置文件都在/etc/下面,区域文件都在/var/named下面。
2.2.1.修改DNS配置文件编辑/etc/named.conf删除以下两行:listen-on port 53 { 127.0.0.1; };listen-on-v6 port 53 { ::1; };修改以下配置:allow-query { localhost; };修改成allow-query { any; };2.2.2.添加区域配置:添加区域配置:在/etc/named.rfc1912.zones添加域名的区域配置:内容如下:zone "" IN {type master;file ".zone";};将/var/named/下的named.localhost文件复制一份,文件名更改为.zone。
ThingsPro Gateway v2.6.0 安装文件的中文名称说明书
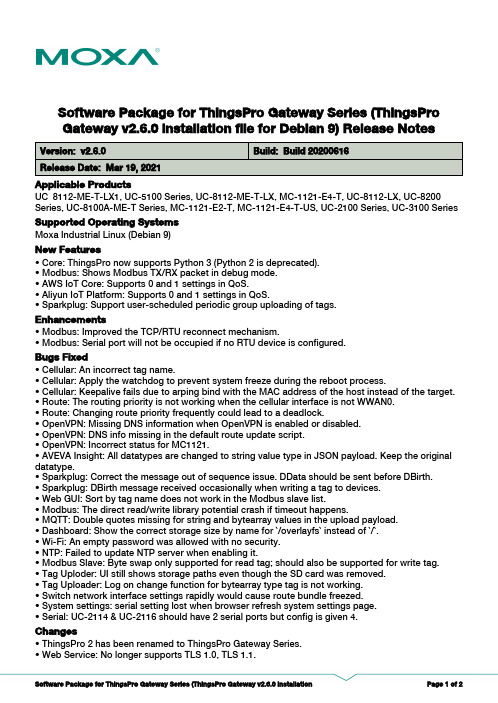
Software Package for ThingsPro Gateway Series (ThingsProGateway v2.6.0 installation file for Debian 9) Release Notes Supported Operating SystemsChangesApplicable ProductsBugs Fixed• Modbus: Improved the TCP/RTU reconnect mechanism.• Modbus: Serial port will not be occupied if no RTU device is configured.• Cellular: An incorrect tag name.• Cellular: Apply the watchdog to prevent system freeze during the reboot process.• Cellular: Keepalive fails due to arping bind with the MAC address of the host instead of the target.• Route: The routing priority is not working when the cellular interface is not WWAN0.• Route: Changing route priority frequently could lead to a deadlock.• OpenVPN: Missing DNS information when OpenVPN is enabled or disabled.• OpenVPN: DNS info missing in the default route update script.• OpenVPN: Incorrect status for MC1121.• AVEVA Insight: All datatypes are changed to string value type in JSON payload. Keep the original datatype.• Sparkplug: Correct the message out of sequence issue. DData should be sent before DBirth.• Sparkplug: DBirth message received occasionally when writing a tag to devices.• Web GUI: Sort by tag name does not work in the Modbus slave list.• Modbus: The direct read/write library potential crash if timeout happens.• MQTT: Double quotes missing for string and bytearray values in the upload payload.• Dashboard: Show the correct storage size by name for `/overlayfs` instead of `/`.• Wi-Fi: An empty password was allowed with no security.• NTP: Failed to update NTP server when enabling it.• Modbus Slave: Byte swap only supported for read tag; should also be supported for write tag.• Tag Uploder: UI still shows storage paths even though the SD card was removed.• Tag Uploader: Log on change function for bytearray type tag is not working.• Switch network interface settings rapidly would cause route bundle freezed.• System settings: serial setting lost when browser refresh system settings page.• Serial: UC-2114 & UC-2116 should have 2 serial ports but config is given 4.EnhancementsMoxa Industrial Linux (Debian 9)UC_8112-ME-T-LX1, UC-5100 Series, UC-8112-ME-T-LX, MC-1121-E4-T, UC-8112-LX, UC-8200Series, UC-8100A-ME-T Series, MC-1121-E2-T, MC-1121-E4-T-US, UC-2100 Series, UC-3100 Series • Core: ThingsPro now supports Python 3 (Python 2 is deprecated).• Modbus: Shows Modbus TX/RX packet in debug mode.• AWS IoT Core: Supports 0 and 1 settings in QoS.• Aliyun IoT Platform: Supports 0 and 1 settings in QoS.• Sparkplug: Support user-scheduled periodic group uploading of tags.New Features• ThingsPro 2 has been renamed to ThingsPro Gateway Series.• Web Service: No longer supports TLS 1.0, TLS 1.1.Notes• Modbus: Auto restart now uses systemd service.• Web GUI: Removed Wonderware connection status because it is based on HTTPS.• Web GUI: “Wonderware Online” renamed to “AVEVA Insight".• AVEVA Insight: Retry meta-data upload every 5 seconds upon failure.• Azure: Data can be grouped by upload interval and current upload timestamp appended to the payload.• Azure: Updated to SDK 2019-04-11.• AWS IoT Core: Updated to SDK v3.0.1.• Aliyun IoT Platform: Updated to SDK v3.0.1.N/A。
IBM Cognos 8 软件开发工具版 8.4.1 安装与配置指南说明书
IBM Cognos8Software Development KitVersion8.4.1Installation and Configuration GuideProduct InformationThis document applies to IBM Cognos8Version8.4.1and may also apply to subsequent releases.To check for newer versions of this document, visit the IBM Cognos Information Centers(/infocenter/cogic/v1r0m0/index.jsp).CopyrightLicensed Materials-Property of IBM©Copyright IBM Corp.2005,2009.US Government Users Restricted Rights–Use,duplication or disclosure restricted by GSA ADP Schedule Contract with IBM Corp.IBM,the IBM logo,,and Cognos are trademarks or registered trademarks of International Business Machines Corp.,in many jurisdictions worldwide.Other product and service names might be trademarks of IBM or other companies.A current list of IBM trademarks is available on the Web at /legal/copytrade.shtml.Microsoft,Windows,Windows NT,and the Windows logo are trademarks of Microsoft Corporation in the United States,other countries,or both. Linux is a registered trademark of Linus Torvalds in the United States,other countries,or both.UNIX is a registered trademark of The Open Group in the United States and other countries.Table of ContentsIntroduction5Installing and Configuring the SDK7Upgrading the SDK Software7Install the SDK8Configuring the SDK10Uninstall the SDK11Index13Licensed Materials–Property of IBM©Copyright IBM Corp.2005,2009.3Table of Contents4Software Development KitIntroductionThis document is intended for use with IBM Cognos 8software development kit (SDK).The SDK is a collection of cross-platform Web services,libraries,programming interfaces,and related APIs that you can use to access the full functionality of IBM Cognos 8.For more information,see the SDK Developer Guide .The IBM Cognos 8software development kit includes the IBM Cognos 8Mashup Service,which allows you to develop applications that expose IBM Cognos 8outputs,such as reports and analyses,as Web services (both SOAP and REST).You can also use the Mashup Service to create applications that use a structured view of IBM Cognos 8outputs as input.This document provides instructions for installing the SDK package from the IBM Cognos 8Software Development Kit CD.AudienceTo use this guide,you should have basic Windows,UNIX,and Linux administration skills.Related DocumentationOur documentation includes user guides,getting started guides,new features guides,readmes,and other materials to meet the needs of our varied audience.The following documents contain related information and may be referred to in this document.Note :For online users of this document,a Web page such as The page cannot be found may appear when clicking individual links in the following table.Documents are made available for your par-ticular installation and translation configuration.If a link is unavailable,you can access the document on the IBM Cognos Resource Center (/software/data/support/cognos_crc.html ).DescriptionDocument Installing,upgrading,configuring,and testing IBM Cognos 8,changing application servers,and setting up samplesIBM Cognos 8Installation and Configuration Guide Managing IBM Cognos 8processes and imple-menting custom reporting solutions by using acollection of cross-platform Web services,librar-ies,and programming interfaces provided withthe IBM Cognos 8SDKIBM Cognos 8Software Development KitDeveloper Guide Managing servers,security,reports,and portalservices;and setting up the samples,customizingthe user interface and troubleshooting IBM Cognos 8Administration and Security GuideLicensed Materials –Property of IBM5©Copyright IBM Corp.2005,2009.IntroductionDocumentDescriptionDeveloping applications with the IBM Cognos IBM Cognos8Mashup Service Developer Guide8Mashup Service that exposes IBM Cognos8BI outputs,such as reports and analyses,as Webservices(both SOAP and REST).Finding InformationProduct documentation is available in online help from the Help menu or button in IBM Cognosproducts.To find the most current product documentation,including all localized documentation andknowledge base materials,access the IBM Cognos Resource Center(/software/data/support/cognos_crc.html).You can also read PDF versions of the product readme files and installation guides directly fromIBM Cognos product CDs.Using Quick ToursQuick tours are short online tutorials that illustrate key features in IBM Cognos product components.To view a quick tour,start IBM Cognos Connection and click the Quick Tour link in the lower-right corner of the Welcome page.Getting HelpFor more information about using this product or for technical assistance,visit the IBM CognosResource Center(/software/data/support/cognos_crc.html).This site providesinformation on support,professional services,and education.Printing Copyright MaterialYou can print selected pages,a section,or the whole book.You are granted a non-exclusive,non-transferable license to use,copy,and reproduce the copyright materials,in printed or electronicformat,solely for the purpose of operating,maintaining,and providing internal training on IBMCognos software.6Software Development KitInstalling and Configuring the SDKAfter you install and configure IBM Cognos8,install and configure the IBM Cognos8softwaredevelopment kit(SDK)to enable developers and system integrators to extend the value of the coresolution of IBM Cognos8capabilities.This is achieved with the integration of external applicationsand environments and the development of custom unique capabilities.The IBM Cognos8SDK CD contains●the SDK software,including Web services,libraries,programming interfaces,and related APIs●the SDK Developer Guide●the Mashup Service Developer Guide●the Framework Manager script player●the Framework Manager modeling SDK●SDK samples●Mashup Service samplesYou must use the same versions of the IBM Cognos8software development kit(SDK)and IBMCognos8and Framework Manager.The process for installing the IBM Cognos8software development kit includes:❑Install the SDK(p.8).❑Configure the SDK(p.10).Upgrading the SDK SoftwareWhen you upgrade from an older version of the IBM Cognos8Software Development Kit,ensurethat you upgrade to the same version of IBM Cognos8and Framework Manager.If you have SDK applications that rely on a previous version of the report specifications,you cannotuse Framework Manager to publish your model without losing backward compatibility.For more information about upgrading IBM Cognos8and Framework Manager,see the IBMCognos8Installation and Configuration Guide.For information about changes that may affect the product during or after an upgrade,see therelease notes and upgrade sections of the IBM Cognos8Software Development Kit Installationand Configuration Guide.IBM Cognos8automatically upgrades the content store.If you upgrade from ReportNet,you must make some changes to your SDK program for it tofunction with the IBM Cognos8version of the WSDL file.Some methods,classes,and propertieshave been deprecated in IBM Cognos8.Deprecated features continue to function as before,but Licensed Materials–Property of IBM©Copyright IBM Corp.2005,2009.7Installing and Configuring the SDKwill be removed in future releases.Some other methods,classes,and properties are obsolete,andhave been removed from the IBM Cognos8SDK.For information about changes to methods,classes,properties,and enumeration sets,see the ReleaseNotes appendixes in the IBM Cognos8SDK Developer Guide.New report specifications have been added in IBM Cognos8.If you run a report that was createdin ReportNet or in a previous version of IBM Cognos8,it is automatically upgraded to the newIBM Cognos8format.After a report is upgraded to the new format,it cannot be returned to theReportNet or older IBM Cognos8format.Because of the potential for users to upgrade reportspecifications that SDK applications may depend on,we recommend that you set access permissionson those reports to limit user access.For more information about setting access permissions,seethe IBM Cognos8Administration and Security Guide.If you have SDK applications that create,modify,or save report specifications,do not upgrade yourreport specifications when you install the new version of IBM Cognos8.You must first updateyour SDK applications to comply with the IBM Cognos8report specifications schema.Otherwise,your SDK applications may not be able to access the upgraded report specifications.For informationabout upgrading report specifications,see the IBM Cognos8SDK Developer Guide.We recommend that you do not upgrade your report specifications if you are unsure about whetheryou have SDK applications that create,modify,or save report specifications.Contact your SDKadministrator for more information about your SDK applications.Install the SDKInstall the SDK files from the IBM Cognos8SDK CD on every computer where SDK applicationsare developed,and in the same installation location as IBM Cognos8.The IBM Cognos8SDK and some IBM Cognos8server components are available for installationon64-bit systems.Before you install the IBM Cognos8SDK on a64-bit system,check the Readmefor late-breaking information about where to install the components.You can view an up-to-date list of environments supported by IBM Cognos products,such asoperating systems,patches,browsers,web servers,directory servers,and database servers on theIBM Cognos Resource Center(/software/data/support/cognos_crc.html).It isimportant to note that the Linux operating system is available in a number of distributions andsupports a number of hardware platforms.Ensure that the Linux distribution and hardware com-bination you are using is a supported combination.It is important to apply all required operating system patches and to use only the versions of third-party software that are supported for an IBM Cognos product.Otherwise,your product may notwork properly.The IBM Cognos8SDK must be installed on a computer where IBM Cognos8is already installed.For information about deploying SDK applications,see IBM Cognos8SDK Getting Started.For more information about installing IBM Cognos8components,see the IBM Cognos8Installationand Configuration Guide.Before you install the IBM Cognos8SDK,ensure that IBM Cognos8BI components are installed. 8Software Development KitInstalling and Configuring the SDKIf you plan to use the Excel plug-in demo,you must have MSINET.OCX installed in the System32 sub-folder of your Windows folder.Steps for UNIX or Linux1.Mount the IBM Cognos8product disk or go to the directory where the installation files weredownloaded and extracted.Important:If you are installing on HP-UX,mount the IBM Cognos8SDK CD with Rock Ridge file extensions and do the following:●Add the pfs_mount directory in your path.For example,PATH=/usr/sbin/:$PATHexport PATH●To start the required NFS daemons and run the daemons in the background,typebg pfs_mountd and then type bg pfsd●To mount the drive,typepfs_mount-t rrip<device><mount_dir>-o xlat=unixFor example,pfs_mount/dev/dsk/c0t2d0/cdrom-o xlat=unixYou can now install or copy files as a non-root user using an IBM Cognos CD from this drive.●When the installation is complete,type pfs_umount/cdrom and kill the pfsd and pfs_mountddaemons to unmount the CD.2.Go to the directory that is appropriate for your operating system and start the installation:●If you use X Windows,type./issetup●Otherwise,you must run an unattended installation.For more information,see the IBMCognos8Business Intelligence Installation and Configuration Guide.3.In the Welcome page,select the language to use for the installation,and click Next.4.Follow the instructions to copy the required files to the same location where you installed IBMCognos8components.5.In the Finish page of the installation wizard:●If you want to view the transfer log or the summary-error log,click the appropriate Viewbutton.●If you want to see the readme file,select the View the Readme check box.Installation and Configuration Guide9Installing and Configuring the SDK6.Click Finish.Steps for Windows1.Insert the IBM Cognos8product disk or go to the directory where the installation files weredownloaded and extracted.The installation wizard starts automatically from the product disk.2.If the Welcome page does not appear,go to the operating system directory and double-clickthe issetup.exe file.3.Select the language to use for the installation,and click Next.4.Follow the instructions to copy the required files to the same location where you installed IBMCognos8components and Framework Manager.5.In the Finish page of the installation wizard:●If you want to view the transfer log or the summary-error log,click the appropriate Viewbutton.●If you want to see the readme file,select the View the Readme checkbox.6.Click Finish.You can access the SDK documentation using the shortcut in the Start menu.Configuring the SDKTo use the SDK,you must perform some configuration and set-up tasks.To configure the SDK,follow this process:❑If you want to run the Framework Manager script player from outside the bin directory,con-figure the FM_INI_FILE_PATH environment variable as a system variable on Windows.Theenvironment variable must point to the cognos8_location\configuration\fm.ini directory.❑To allow the browsing or import of system objects such as tables,views,synonyms,stored procedures,or functions from a relational database in Framework Manager,edit the entry forImportDatabaseSystemObjects in your fm.ini file.By default,ImportDatabaseSystemObjects is set to ers can see only the user tablesin the import and expression editor dialog boxes.To allow browsing or import of systemobjects,set the preference to TRUE.❑Set up the samples for IBM Cognos8and Framework Manager.For more information,see the Installation and Configuration Guide.❑Set up IBM Cognos8to use the SDK code samples.For more information,see the SDK Developer Guide.❑Set up IBM Cognos8to use the Mashup Service samples.10Software Development KitInstalling and Configuring the SDK For more information,see the Mashup Service Developer Guide.Uninstall the SDKUninstall the SDK if you no longer require IBM Cognos8or if you are upgrading the IBM Cognos8software.Steps for UNIX or Linux1.If the console attached to your computer does not support a Java-based graphical user interface,determine the process identification(pid)of the IBM Cognos8process by typing the followingcommand:ps-ef|grep cogbootstrapservice2.Stop the IBM Cognos8process:●If you run XWindows,start IBM Cognos Configuration,and from the Actions menu,clickStop.●If you do not run XWindows,type:kill-TERM pid3.To uninstall IBM Cognos8,go to the c8_location/uninstall directory and type the appropriatecommand:./uninst-u4.Follow the prompts to begin the uninstallation.5.When you are prompted to select the packages you want to uninstall,click the check box forIBM Cognos8Software Development Kit and then click Next.6.Continue following the prompts to complete the uninstallation.7.Delete all temporary Internet files.Steps for Windows1.From the Start menu,click Programs,IBM Cognos8,Uninstall IBM Cognos8.The Uninstall wizard appears.Tip:IBM Cognos8is the default name of the Program Folder that is created during theinstallation.If you chose another name,go to that folder to find the program.2.Follow the prompts to begin the uninstallation.3.When you are prompted to select the packages you want to uninstall,click the check box forIBM Cognos8Software Development Kit and then click Next.4.Continue following the prompts to complete the uninstallation.The Cognos_uninst_log.htm file records the activities that the Uninstall wizard performs whileuninstalling files.Installation and Configuration Guide11Installing and Configuring the SDKTip:To find the log file,look in the Temp directory.5.Delete all temporary Internet files.For more information,see your Web browser documentation.Uninstalling does not remove any files that changed since the installation,such as configurationand user data files.Your installation location remains on your computer,and you retain thesefiles until you delete them manually.12Software Development KitIndexAaudience of document,5Cconfiguring the SDK,10IIBM Cognos Resource Center,6installing the SDK,8Qquick toursusing,6SSDKconfiguring,10installing,8upgrading,7UUNIXinstalling the SDK,8upgrading the SDK software,7WWindowsinstalling the SDK,8Licensed Materials–Property of IBM©Copyright IBM Corp.2005,2009.13。
Genebre 2848 2850 控制器安装 操作 维护手册说明书
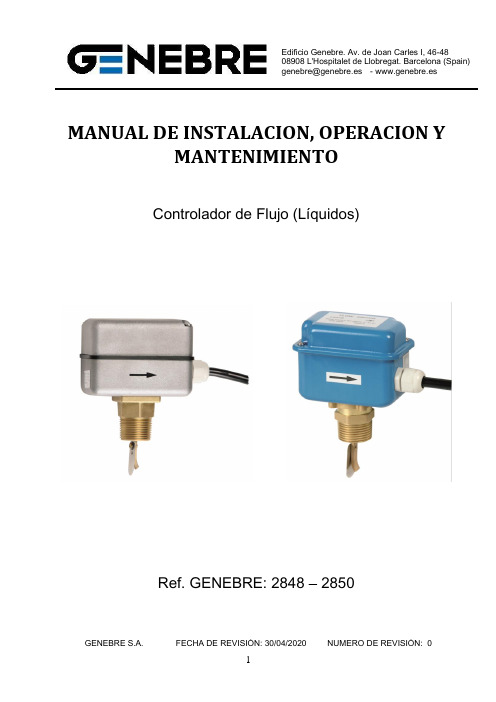
- www.genebre.es MANUAL DE INSTALACION, OPERACION YMANTENIMIENTOControlador de Flujo (Líquidos)Ref. GENEBRE: 2848 – 2850INSTRUCCIONES PARA LA INSTALACIÓN, OPERACION Y MANTENIMIENTO1. Descripción de Producto (3)2. Datos y Características Técnicas (3)3. Instrucciones de Seguridad (4)4. Condiciones de Transporte y Almacenamiento (4)5. Verificaciones Preliminares (5)6. Instalación6.1 Ajuste del caudal (5)6.2 Diagrama de conexión (6)7. Mantenimiento (7)1. Descripción de Producto.Dispositivo de seguridad para la detección y transmisión a distancia de la falta de caudal de todos los líquidos no corrosivos, tales como agua, aceite, etc.1. Protección de bombas contra el descenso o ausencia de caudal.2. Control secuencial de actuación de bombas.3. Arranque automático de bombas auxiliares y máquinas.4. Actuación sobre sistemas de alarma o señalización.5. Desconexión de equipos de proceso con refrigeración por agua, cuando el flujoqueda interrumpido.6. Apaga los quemadores cuando falla el suministro de aire en el serpentín decalentamiento.7. Desconecta máquinas, herramientas si falla el caudal de aceite de refrigeración 2. Datos y Características técnicas1. Conexión: 1" rosca macho ISO7/1(EN 10226-1)2. Apto para tuberías de 1" a 8".3. Presión máxima de trabajo: 10 bar.4. Temperatura máxima del fluido: 110ºC.5. Temperatura de almacenamiento: -20ºC - 80ºC.6. Tensión / intensidad nominal: 250VAC / 10A.7. Índice de protección: IP64 (Ref. 2848) e IP54 (Ref.2850).8. Caja en aleación de aluminio galvanizado (Ref.2848), acero pintado (Ref.2850).9. Racor en latón.10. Lengüetas en acero inoxidable.11. Fuelle paleta en aleación cobre zinc.12. Tornillo regulación, tornillo fijación y muelle resorte en acero.13. Aplicable a sistemas de fluido frío/ caliente.3. Instrucciones de SeguridadEl alcance de este manual es permitir a los usuarios, técnicamente capacitados, instalar, poner en marcha, operar e inspeccionar el Controlador de Flujo.El personal cualificado debe estar bien familiarizado con todos los avisos y advertencias descritos en estas instrucciones. La no observación de los avisos y advertencias puede ocasionar serias lesiones personales y daños materiales.4. Condiciones de Transporte y Almacenamiento• Todos los productos son expedidos desde las instalaciones de Genebre, S.A. en embalaje adecuado para evitar golpes en los mismos.• NO golpear los equipos contra muros, suelos y otros aparatos. Se pueden causar severos daños en el mismo o en sus componentes.• Almacenar en lugares secos y bien ventilados, cubiertos de las inclemencias atmosféricas. Evitar apoyarlos directamente en el suelo. Utilizar pallets, estanterías o bases de madera.• Genebre, S.A. recomienda revisar visualmente los posibles daños causados durante el transporte y almacenamiento.Ciertas partes del dispositivo están sometidas a tensiones y corrientes eléctricas que pueden ser letales (RIESGO ELECTRICO).Los trabajos en el sistema o equipamiento eléctrico solo deben ser realizados por técnicos cualificados o por personal especialmente instruido bajo el control y supervisión de estos técnicos, de acuerdo con las normas y directivas de seguridad, así como otras legislaciones nacionales aplicables.Un uso negligente puede causar graves daños en las válvulas, instalaciones y personas, así como en el propio equipo. Bajo ninguna circunstancia se podrá modificar o alterar componente o parte del dispositivo. Dichas modificaciones o alteraciones invalidan automáticamente el uso designado del mismo.5. Verificaciones Preliminares•Verifique que las características del producto corresponden con las características requeridas antes de proceder a la instalación y puesta en marcha. Estos datos se encuentran en la placa de características.AVISO MUY IMPORTANTE: Seguir paso a paso estas instrucciones paraevitar averías en el equipo.Deben observarse las instrucciones de SEGURIDAD del capitulo 3. Los trabajos en el sistema o equipamiento eléctrico solo deben ser realizados portécnicos cualificados.6. InstalaciónAntes de realizar el montaje se recomienda prever y reservar espacio para facilitar el acceso al equipo durante las operaciones de montaje, cableado y mantenimiento1. Montar en tuberías de retorno.2. Montar en tuberías horizontales.3. Mantenga una cierta distancia de las fuentes de turbulencias (codos, válvulas,bombas, etc.) a fin de garantizar flujo de trabajo constante. La distancia mínimarecomendada es igual a 5 veces del diámetro de la tubería6.1 Ajuste del CaudalEl máximo caudal se obtiene aflojando el tornillo indicado en el croquis. El controlador de flujo viene de fábrica con el tornillo apretado al máximo (caudal mínimo). La siguiente tabla muestra el rango de caudales en función del tamaño de la tubería y de la paleta instalada.DIMENSIONES CAUDAL CON EL TORNILLOENROSCADO (MUELLEDESTENSADO(m3/h)CAUDAL CON EL TORNILLODESENROSCADO (MUELLETENSADO AL MÁXIMO)(m3/h)“ ” TUBERÍA “L” PALETA(mm)ACCIONAPALANCARETORNAPALANCAACCIONAPALANCARETORNAPALANCA1" 34 (1) 1.1 0.5 2.0 1.6 11/4" 34 (1) 1.2 0.7 2.6 2.0 11/2" 57 (2) 1.6 1.0 3.3 2.6 2" 57 (2) 3.2 2.2 6.6 6.1 21/2" 88 (3) 4.2 3.2 8.0 7.0 3" 88 (3) 6.3 4.7 12.0 11.0 4" 88 (3) 8.5 6.0 18.0 17.0 5" 167 (4) 13.1 9.0 27.0 25.0 6" 167 (4) 17.2 12.0 33.0 31.0 8" 167 (4) 47 39.0 94.0 91.06.2 Diagrama de conexiónMarrón + Azul: es normalmente abierto (los contactos conectarán ante la acción). Marrón COM.Azul N.O.Amarillo y verdeMarrón + Negro: es normalmente cerrado (los contactos desconectarán ante la acción). Marrón COM.Negro N.C.Amarillo y verde7. MantenimientoSi bien estos equipos están libres de mantenimiento se recomienda realizar inspecciones con frecuencia, estas deben incluir:•Verificarla conexión eléctrica y especialmente del conector de protección (Tierra), asegurar que el aislamiento eléctrico es correcto.•Asegurar que todos los tornillos están presentes y están firmemente apretados.。
自动化构建部署安装手册

自动化构建部署安装手册2017年07月目录1. 编写目的 (6)2. 版本要求 (6)3. 准备工作 (6)4. 安装部署 (6)4.1.安装JDK (6)4.1.1. 版本说明 (6)4.1.2. 安装步骤 (6)4.1.3. 环境配置 (7)4.1.4. 测试JDK (7)4.2.安装MAVEN (8)4.3.安装TOMCAT (8)4.3.1. 版本说明 (8)4.3.2. 安装步骤 (8)4.3.3. 测试tomcat (9)4.3.4. 启动与停止 (9)4.3.5. 环境配置 (10)4.3.6. 设置随机启动 (10)4.4.安装JENKENS (12)4.4.1. 版本说明 (12)4.4.2. 下载安装包并部署 (13)4.4.3. 配置jenkins环境变量 (13)4.4.4. 获取管理员密码 (13)4.4.5. 配置管理员信息 (15)4.4.6. 安装插件 (15)4.4.7. 全局设置 (16)4.4.8. 系统设置 (17)4.4.9. 邮箱通知配置 (18)4.4.10. 用户权限配置 (29)4.5.安装SONAR Q UBE (30)4.5.1. 版本说明 (30)4.5.2. 下载安装包 (30)4.5.3. 安装中文包 (30)4.5.4. 创建数据库 (30)4.5.5. 修改配置文件 (30)4.5.6. 服务启动停止 (31)4.5.7. 测试 (32)4.6.安装S ONAR Q UBE S CANNER (32)4.6.1. 版本说明 (32)4.6.2. 下载安装包 (32)4.6.3. 配置scanner (32)4.6.4. Jenkins配置Scanner (32)4.6.5. 安装sonarQube插件 (33)5. 创建项目 (35)5.1.项目基本情况 (35)5.2.源码管理 (35)5.3.构建触发器 (36)5.4.构建环境配置 (38)5.5.配置SONAR Q UBE (38)5.6.编译环境配置 (41)5.7.指定打包类型 (41)5.8.容器远程部署 (42)5.9.SSH远程部署 (43)1.编写目的实现项目代码自动化构建、打包、发布、测试、部署。
Zimbra 邮件系统安装手册 V1.1(鸿华锐科技)

开源的全ssassin
反垃圾邮件过滤器
Amavisd-new
在 MTA 和内容过滤器之间提供接口
深圳市鸿华锐科技有限公司
第6页
Tel:0755-88855786 89806658 Fax:0755-89810769 82912756
5.1 zimbra 垃圾邮件过滤方案............................................ 19
5.1.1 zimbra 垃圾邮件过滤(1)提高本域权值,提高特定域名权值 ......................... 19 5.1.2. zimbra 垃圾邮件过滤(2)白名单,黑名单 ......................................... 20 5.1.3. zimbra 垃圾邮件过滤(3)关键字过滤............................................ 20 5.1.4. zimbra 垃圾邮件过滤(4)使用 rbl 列表配置 ...................................... 21
1.1 Zimbra 简介 ......................................................... 5 1.2 zimbra 体系结构 ..................................................... 6
1.2.1 Zimbra 包含的组件 .............................................................. 6 1.2.2 Zimbra 软件包 .................................................................. 7 1.2.3 磁盘结构 ....................................................................... 8
- 1、下载文档前请自行甄别文档内容的完整性,平台不提供额外的编辑、内容补充、找答案等附加服务。
- 2、"仅部分预览"的文档,不可在线预览部分如存在完整性等问题,可反馈申请退款(可完整预览的文档不适用该条件!)。
- 3、如文档侵犯您的权益,请联系客服反馈,我们会尽快为您处理(人工客服工作时间:9:00-18:30)。
Linux下安装Zimbra 8.6.0 协同办公套件(邮件系统)1Zimbra简介Zimbra是一家提供专业的电子邮件软件开发供应商,主要提供ZimbraDesktop邮件管理软件。
2007年9月,Zimbra被雅虎收购。
雅虎用3.50亿美元收购电子邮件软件提供商Zimbra。
Zimbra提供的品牌电子邮件软件包含日历和移动功能以及离线工作功能。
这家公司拥有200个教育行业、商业和互联网服务提供商合作伙伴,其中包括Comcast公司。
该公司向大约900万用户提供品牌的电子邮件服务。
Zimbra与众不同的特点是其“Zimlet“网络服务提供了更多的电子邮件功能。
例如,人们可以简单地用鼠标点击电子邮件程序中的航班信息以检查航班的状况。
用户还可以在电子邮件中跟踪FedEx公司的投递情况并且获得地图、股票和其它信息。
ZIMBRA公司目前通过自己的开放平台向用户提供电邮、日程管理程序和联系人管理工具。
Zimbra开放平台可让用户定制功能并将自己与其他网络服务连接起来。
通过较低价格和更灵活的服务方式,Zimbra从微软上海Exchange电邮平台手中夺得了客户。
Zimbra与众不同的特点是其“Zimlet”网络服务提供了更多的电子邮件功能。
例如,人们可以简单地用鼠标点击电子邮件程序中的航班信息以检查航班的状况。
用户还可以在电子邮件中跟踪FedEx公司的投递情况并且获得地图、股票和其它信息。
Zimbra的核心产品是Zimbra协作套件(Zimbra Collaboration Suite,简称ZCS)。
除了它的核心功能是电子邮件和日程安排服务器,当然还包括许多其它的功能,就象是下一代的微软Exchange。
在电子邮件和日程安排之外,它还提供文档存储和编辑、即时消息以及一个利用获奖技术开发的全功能的管理控制台。
ZCS同时也提供移动设备的支持,以及与部署于Windows、Linux或apple操作系统中的桌面程序的同步功能。
2核心功能电子邮件服务它打破传统电子邮件的限制,提供集成的信息和协作办公,以提高工作效率,通过自动整理的邮箱、标签以及对话视图,zimbra让电子邮件易于管理,提供即时信息、共享日历以及快捷的文档创作和协作功能,改变由他人协作的方式,使用zimbra可以在任何地点从任意计算机访问自己的账户,而无论使用的是windows、apple还是linux操作系统,zimbra还可以与blackberry、iphone等手持设备同步,即使在路上也能时刻掌握最新资讯,zimbra可以作为个人电子邮件操作系统,也可以用于整个组织。
既可以本地部署,也可以部署在托管服务器上。
电子邮件具体功能:1、收件箱、邮件、搜索(inbox, mail&search)2、插件(mashups)3、日历(calendar)4、文档协作(document collaboration)5、即时消息、任务、公文包(im,task,briefcase)6、zimbra桌面(zimbra desktop)7、与outlook或apple同步(outlook&apple sync)8、移动访问(zimbra mobile)Zimbra协作套件(Zimbra Collaboration Suite)2.1版本介绍ZCS共有三个版本可供选择:⏹ZCS开源版(免费)⏹ZCS 网络版(Network Edition)⏹ZCS 租用版,由合作伙伴提供2.2安装环境系统环境:CentOS 6.5 x86_64Zimbra版本:zimbra 8.6.01.zimbra官网:/ 进入官网下载开源版本,下载地址为:/downloads/zimbra-collaboration-open-source2.zimbra不支持32位系统安装,请使用64位系统;3.zimbra在安装时要检测MX,所以要在之前配置好dns MX解析;4.安装会安装到/opt目录,请确保/opt目录有足够空间3安装前准备1.关闭selinux,编辑/etc/selinux/configSELINUX=disabled2.开放防火墙端口,编辑/etc/sysconfig/iptables-A INPUT -m state --state NEW -m tcp -p tcp --dport 80 -j ACCEPT-A INPUT -m state --state NEW -m tcp -p tcp --dport 443 -j ACCEPT-A INPUT -m state --state NEW -m tcp -p tcp --dport 7071 -j ACCEPT-A INPUT -m state --state NEW -m tcp -p tcp --dport 8087 -j ACCEPT-A INPUT -m state --state NEW -m tcp -p tcp --dport 8080 -j ACCEPT-A INPUT -m state --state NEW -m tcp -p tcp --dport 8443 -j ACCEPT-A INPUT -m state --state NEW -m tcp -p tcp --dport 25 -j ACCEPT-A INPUT -m state --state NEW -m tcp -p tcp --dport 110 -j ACCEPT-A INPUT -m state --state NEW -m tcp -p tcp --dport 143 -j ACCEPT-A INPUT -m state --state NEW -m tcp -p tcp --dport 993 -j ACCEPT-A INPUT -m state --state NEW -m tcp -p tcp --dport 995 -j ACCEPT3.配置主机名,编辑/etc/sysconfig/networkHOSTNAME=4.配置hosts,编辑/etc/hosts172.16.12.10 5.关闭sendmail或postfix服务,避免25端口被占用/etc/init.d/sendmail stopchkconfig sendmail off/etc/init.d/postfix stopchkconfig postfix off6.重启服务器,确保所有配置生效# reboot4开始安装4.1安装dnsmasq1.安装dnsmasq# yum install dnsmasq bind-utils4.2配置dnsmasq# cp /etc/dnsmasq.conf /etc/dnsmasq.conf.bak添加以下到/etc/dnsmasq.confno-resolvserver=127.0.0.1domain=mx-host=,,5添加以下到/etc/resolv.confnameserver 127.0.0.1启动dnsmasq# /etc/init.d/dnsmasq start4.3测试[root@mail ~]# dig MX测试成功。
5安装zimbra5.1解压[root@mail ~]# tar -zxvf zcs-8.6.0_GA_1153.RHEL6_64.20141215151155.tgz [root@mail ~]# cd zcs-8.6.0_GA_1153.RHEL6_64.20141215151155[****************.0_GA_1153.RHEL6_64.20141215151155]#ls5.2运行安装脚本# ./install.sh到此处填写y,继续Do you agree with the terms of the software license agreement? [N] y 到下面发现少包:Checking for prerequisites...FOUND: NPTLMISSING: ncFOUND: sudo-1.8.6p3-12FOUND: libidn-1.18-2FOUND: gmp-4.3.1-7FOUND: libaio-0.3.107-10FOUND: libstdc++-4.4.7-4FOUND: unzip-6.0-1Checking for suggested prerequisites...FOUND: perl-5.10.1FOUND: sysstatFOUND: sqlite###ERROR###One or more prerequisite packages are missing.Please install them before running this installer.Installation cancelled.安装缺失的包nc:# yum -y install nc再次运行安装脚本,安装日志如下:[****************.0_GA_1153.RHEL6_64.20141215151155]#./install.shOperations logged to /tmp/install.log.24207Checking for existing installation...zimbra-ldap...NOT FOUNDzimbra-logger...NOT FOUNDzimbra-mta...NOT FOUNDzimbra-dnscache...NOT FOUNDzimbra-snmp...NOT FOUNDzimbra-store...NOT FOUNDzimbra-apache...NOT FOUNDzimbra-spell...NOT FOUNDzimbra-convertd...NOT FOUNDzimbra-memcached...NOT FOUNDzimbra-proxy...NOT FOUNDzimbra-archiving...NOT FOUNDzimbra-core...NOT FOUNDPLEASE READ THIS AGREEMENT CAREFULLY BEFORE USING THE SOFTWARE.ZIMBRA, INC. ("ZIMBRA") WILL ONLY LICENSE THIS SOFTWARE TO YOU IF YOUFIRST ACCEPT THE TERMS OF THIS AGREEMENT. BY DOWNLOADING OR INSTALLINGTHE SOFTWARE, OR USING THE PRODUCT, YOU ARE CONSENTING TO BE BOUND BYTHIS AGREEMENT. IF YOU DO NOT AGREE TO ALL OF THE TERMS OF THISAGREEMENT, THEN DO NOT DOWNLOAD, INSTALL OR USE THE PRODUCT.License Terms for the Zimbra Collaboration Suite:/license/zimbra-public-eula-2-5.htmlDo you agree with the terms of the software license agreement? [N] yChecking for prerequisites...FOUND: NPTLFOUND: nc-1.84-22FOUND: sudo-1.8.6p3-12FOUND: libidn-1.18-2FOUND: gmp-4.3.1-7FOUND: libaio-0.3.107-10FOUND: libstdc++-4.4.7-4FOUND: unzip-6.0-1Checking for suggested prerequisites...FOUND: perl-5.10.1FOUND: sysstatFOUND: sqlitePrerequisite check complete.Checking for installable packagesFound zimbra-coreFound zimbra-ldapFound zimbra-loggerFound zimbra-mtaFound zimbra-dnscacheFound zimbra-snmpFound zimbra-storeFound zimbra-apacheFound zimbra-spellFound zimbra-memcachedFound zimbra-proxy5.2.1选择安装组件Select the packages to installInstall zimbra-ldap [Y] yInstall zimbra-logger [Y] yInstall zimbra-mta [Y] yInstall zimbra-dnscache [Y] nInstall zimbra-snmp [Y] yInstall zimbra-store [Y] yInstall zimbra-apache [Y] nInstall zimbra-spell [Y] nInstall zimbra-memcached [Y] nInstall zimbra-proxy [Y] nChecking required space for zimbra-coreChecking space for zimbra-storeChecking required packages for zimbra-storezimbra-store package check complete.5.2.2确认组件Installing:zimbra-corezimbra-ldapzimbra-loggerzimbra-mtazimbra-snmpzimbra-storeThe system will be modified. Continue? [N] yRemoving /opt/zimbraRemoving zimbra crontab entry...done.Cleaning up zimbra init scripts...done.Cleaning up /etc/ld.so.conf...done.Cleaning up /etc/prelink.conf...done.Cleaning up /etc/security/limits.conf...done.Finished removing Zimbra Collaboration Server.Installing packageszimbra-core......zimbra-core-8.6.0_GA_1153.RHEL6_64-20141215151155.x86_64.rp m...donezimbra-ldap......zimbra-ldap-8.6.0_GA_1153.RHEL6_64-20141215151155.x86_64.rp m...donezimbra-logger......zimbra-logger-8.6.0_GA_1153.RHEL6_64-20141215151155.x86_6 4.rpm...donezimbra-mta......zimbra-mta-8.6.0_GA_1153.RHEL6_64-20141215151155.x86_64.rp m...donezimbra-snmp......zimbra-snmp-8.6.0_GA_1153.RHEL6_64-20141215151155.x86_64. rpm...donezimbra-store......zimbra-store-8.6.0_GA_1153.RHEL6_64-20141215151155.x86_64.r pm...doneOperations logged to /tmp/zmsetup03182015-130657.logInstalling LDAP configuration database...done.Setting defaults...DNS ERROR resolving MX for It is suggested that the domain name have an MX record configured in DNS Change domain name? [Yes] yes(此处未开启DNS服务)新开窗口开启:[root@mail ~]# /etc/init.d/dnsmasq startStarting dnsmasq:[root@mail ~]#5.2.3配置域名DNS ERROR resolving MX for It is suggested that the domain name have an MX record configured in DNS Re-Enter domain name? [Yes]Create domain: [] MX: (172.16.176.200)Interface: 172.16.176.200Interface: 127.0.0.1Interface: ::1done.Checking for port conflictsMain menu5.2.4设置密码1) Common Configuration:2) zimbra-ldap: Enabled3) zimbra-logger: Enabled4) zimbra-mta: Enabled5) zimbra-snmp: Enabled6) zimbra-store: Enabled+Create Admin User: yes+Admin user to create: ************** ******* +Admin Password UNSET+Anti-virus quarantine user: **********************************+Enable automated spam training: yes+Spam training user: **********************+Non-spam(Ham) training user: ***********************+SMTP host: +Web server HTTP port: 80+Web server HTTPS port: 443+Web server mode: https+IMAP server port: 143+IMAP server SSL port: 993+POP server port: 110+POP server SSL port: 995+Use spell check server: no+Configure for use with mail proxy: FALSE+Configure for use with web proxy: FALSE+Enable version update checks: TRUE+Enable version update notifications: TRUE+Version update notification email: **************+Version update source email: **************+Install mailstore (service webapp): yes+Install UI (zimbra,zimbraAdmin webapps): yes7) Default Class of Service Configuration:s) Save config to filex) Expand menuq) QuitAddress unconfigured (**) items (? - help) 6Store configuration1) Status: Enabled2) Create Admin User: yes3) Admin user to create: **************** 4) Admin Password UNSET5) Anti-virus quarantine user: **********************************6) Enable automated spam training: yes7) Spam training user: **********************8) Non-spam(Ham) training user: ***********************9) SMTP host: 10) Web server HTTP port: 8011) Web server HTTPS port: 44312) Web server mode: https13) IMAP server port: 14314) IMAP server SSL port: 99315) POP server port: 11016) POP server SSL port: 99517) Use spell check server: no18) Configure for use with mail proxy: FALSE19) Configure for use with web proxy: FALSE20) Enable version update checks: TRUE21) Enable version update notifications: TRUE22) Version update notification email: **************23) Version update source email: **************24) Install mailstore (service webapp): yes25) Install UI (zimbra,zimbraAdmin webapps): yesSelect, or 'r' for previous menu [r] 4*************************(min6characters):[6lPewCyc]*^*^-yoyoadm Store configuration1) Status: Enabled2) Create Admin User: yes3) Admin user to create: **************4) Admin Password set5) Anti-virus quarantine user: **********************************6) Enable automated spam training: yes7) Spam training user: **********************8) Non-spam(Ham) training user: ***********************9) SMTP host: 10) Web server HTTP port: 8011) Web server HTTPS port: 44312) Web server mode: https13) IMAP server port: 14314) IMAP server SSL port: 99315) POP server port: 11016) POP server SSL port: 99517) Use spell check server: no18) Configure for use with mail proxy: FALSE19) Configure for use with web proxy: FALSE20) Enable version update checks: TRUE21) Enable version update notifications: TRUE22) Version update notification email: **************23) Version update source email: **************24) Install mailstore (service webapp): yes25) Install UI (zimbra,zimbraAdmin webapps): yesSelect, or 'r' for previous menu [r]r(返回上一页)Main menu1) Common Configuration:2) zimbra-ldap: Enabled3) zimbra-logger: Enabled4) zimbra-mta: Enabled5) zimbra-snmp: Enabled6) zimbra-store: Enabled7) Default Class of Service Configuration:s) Save config to filex) Expand menuq) Quit*** CONFIGURATION COMPLETE - press 'a' to applySelect from menu, or press 'a' to apply config (? - help) a(应用配置)Save configuration data to a file? [Yes]yesSaving config in /opt/zimbra/config.5031...done. 回车The system will be modified - continue? [No] yes5.2.5安装过程Setting local config values...done.Initializing core config...Setting up CA...done.Deploying CA to /opt/zimbra/conf/ca ...done.Creating SSL zimbra-store certificate...done.Creating new zimbra-ldap SSL certificate...done.Creating new zimbra-mta SSL certificate...done.Installing mailboxd SSL certificates...done.Installing MTA SSL certificates...done.Installing LDAP SSL certificate...done.Initializing ldap...done.Setting replication password...done.Setting Postfix password...done.Setting amavis password...done.Setting nginx password...done.Setting BES searcher password...done.Creating server entry for ...done.Setting Zimbra IP Mode...done.Saving CA in ldap ..Setting replication password...done.Setting Postfix password...done.Setting amavis password...done.Setting nginx password...done.Setting BES searcher password...done.Creating server entry for ...done.Setting Zimbra IP Mode...done.Saving CA in ldap ...done.Saving SSL Certificate in ldap ...done.Setting service ports on ...done.Setting zimbraFeatureTasksEnabled=TRUE...done.Setting zimbraFeatureBriefcasesEnabled=TRUE...done.Setting TimeZone Preference...done.Initializing mta config...done.Setting services on ...done.Adding to zimbraMailHostPool in default COS...done. Creating domain ...done.Setting default domain name...done.Creating domain ...already exists.Creating admin account **************...Creating root alias...done.Creating postmaster alias...done.**********************************...done.***********************************...done.**********************************************...done. Setting spam training and Anti-virus quarantine accounts...done. Initializing store sql database...done.Setting zimbraSmtpHostname for ...done. Configuring SNMP...done.Setting up syslog.conf...done.Starting servers...done.Installing common zimlets...com_zimbra_phone...done.com_zimbra_bulkprovision...done.com_zimbra_webex...done.com_zimbra_adminversioncheck...done.com_zimbra_email...done.com_zimbra_viewmail...done.com_zimbra_tooltip...done.com_zimbra_attachmail...done.com_zimbra_mailarchive...done.com_zimbra_clientuploader...done.com_zimbra_ymemoticons...done.com_zimbra_proxy_config...done.com_zimbra_attachcontacts...done.com_zimbra_url...done.com_zimbra_cert_manager...done.com_zimbra_srchhighlighter...done.com_zimbra_date...done.Finished installing common zimlets.Restarting mailboxd...done.Creating galsync account for default domain...done.You have the option of notifying Zimbra of your installation.This helps us to track the uptake of the Zimbra Collaboration Server.The only information that will be transmitted is:The VERSION of zcs installed (8.6.0_GA_1153_RHEL6_64)TheADMINEMAILADDRESScreated(**************)5.2.6完成安装Notify Zimbra of your installation? [Yes] yesNotifying Zimbra of installation via /cgi-bin/notify.cgi?VER=8.6.0_GA_1153_RHEL6_64&MAIL =**************ERROR: Notification failedSetting up zimbra crontab...done.Moving /tmp/zmsetup03182015-131557.log to /opt/zimbra/logConfiguration complete - press return to exit 5.2.7验证测试https://:70716Zimbra管理启动,停止,重启,状态:# su - zimbra$ zmcontrol start$ zmcontrol stop$ zmcontrol restart$ zmcontrol status第21页。