汽车儿童安全椅设计说明书
kidfix xp sict中文说明书
危险:不得没有座套的情况下使用儿童座椅
拆座套
1、把车辆头枕调到最高 2、解开靠背背后的19号盖沟。
您可以使用儿童安全座椅如下:
在行进的方向
3、取下盖子的顶部并向前折叠到座椅表面。 4、解开靠背前面的19号盖沟。 5、从座椅表面拉出座套。
在行进的反方向
用2点式安全带 用3点式安全带
拆卸头枕罩
6、解开靠背背后的20号盖沟。 7、解开靠背前面的19号盖沟 8、朝03方向脱下罩罩。
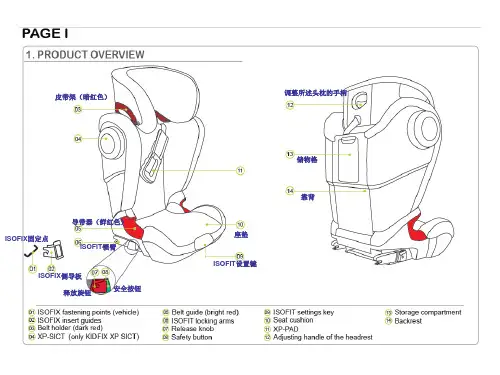
皮带架(暗红色)
调整所述头枕的手柄
储物格
靠背
导带器(鲜红色)IX侧导板 释放旋钮 安全按钮 座垫
证明
我们很高兴看到我们的KIDFIX XP/ KIDFIX XP SICT可以放心 地陪你的孩子通过在其生命的新阶段。
为了正确地保护你的孩子,KIDFIX XP/ KIDFIX XP SICTmust总是被用来和这些指示说明进行安装。 BRITAXRÖMER 儿童安全座椅 检测及认证 按照ECE* R44/04
1、每次都要检查iso卡扣锁臂和08是否完全绿色 2、斜安全带和腰带在亮红色的05里面,斜安全 带上部应在头枕上暗洪的03里。 3、XP-PAD11和XP-SICT04正确安装和使用 4、肩带紧而没有扭曲,
儿童安全座椅的设计,测试和认证依据 欧洲标准的儿童安全 装备(欧洲经委会的要求 R第44/03)。审批E的印章(在一 个圆圈)和批准文号是 位于橙色认证标签(贴纸上的儿童安 全座椅)上。 这些指令使用下文所述的下列符号: 如果你做任何修改此项批准将失效 对儿童安全座 椅。只有制造商被允许 进行修改的儿童安全座椅。
洗涤请遵守洗涤标签上的说明:
按相反的顺序把套套和罩罩装上
拆卸及出售
7、安全注意事项
汽车儿童安全座椅设计及创新说明书
镇江高专ZHENJIANG COLLEGE毕业设计(论文)汽车儿童安全座椅设计及创新Child safety car seat design and innovation系名:(四号宋体)专业班级:(四号宋体)学生姓名:(四号宋体)学号:(四号宋体)指导教师姓名:(四号宋体)指导教师职称:(四号宋体)年月摘要为了保证儿童乘车安全以及满足人的各个方面的物质需求,儿童汽车安全座椅作为新的事物正在不断地接近人们的生活,人们也会越来越重视儿童安全座椅的造型、安全和舒适性,同时也希望中国儿童也能像外国儿童一样享受乘车安全的幸福保障。
随着人们生活水平的快速增长,私家车的数量越来越多儿童家用汽车乘车安全来说,还存在着很大的隐患。
如果孩子在车内一人独坐,当紧急刹车时,他就会像子弹一样撞向前方,从而导致重伤或死亡。
即使孩子被家长抱在怀中,家长根本无力也无法及时给孩子提供保护。
因为儿童骨骼脆弱、反应慢、支撑力量小,无法成功地化解成人能够化解的各种小危险,这也是儿童在乘车中更容易遭受伤害的原因。
所以儿童家用汽车座椅不容忽视。
根据欧美等发达国家的经验,汽车儿童安全座椅可以在儿童乘车过程中为他们提供相应的保护。
汽车儿童安全座椅是一种能够通过固定到汽车座椅上,在儿童乘车过程中能够使他们获得足够的保护的儿童安全防护系统。
[4]西方发达国家、日本、韩国和香港等发达地区的汽车儿童安全座椅使用率已经超过了80%,这归功于他们有着合适的关于汽车儿童安全座椅的法律法规。
但是我国在这方面的立法还处于空白阶段,国内的家长对于汽车儿童安全座椅还很陌生。
尽管汽车保有量的持续增长,但是国内汽车儿童安全座椅的普及却没有跟上。
关键词:汽车;儿童;安全;座椅;保护;伤害AbstractTo ensure the child restraint and meet the material needs of the people in all aspects of child car seats as new things are constantly close to people's lives, people will be more emphasis on child safety seat styling, safety and comfort , while also hope that Chinese children can enjoy the happiness guarantee the safety car as foreign children the same.With the rapidly growing number of people's living standards, more and more private car family car ride safe for children, there is also a big risk. If the child is a person sitting alone in the car when the emergency brakes, he would like a bullet hit the front, causing serious injury or death. Even if the child in his arms by their parents, the parents simply can not afford to give their children a timely protection. Because children's bone fragility, slow response, small support force, can not be successfully resolved a variety of small adults can defuse the danger, which is the children in the car are more vulnerable to injury reasons. So child car seats should not be overlooked home.According to the experience in Europe and America and other developed countries, child car safety seats can provide appropriate protection for their children during the ride. Car child safety seat is a through fixed to the car seat, child restraint in the process so that they can get adequate protection of child safety protection system. [4] Western countries, child car safety seat usage in Japan, South Korea and Hong Kong and other developed regions has exceeded 80%, thanks to the right they have on car child safety seat laws and regulations. But our legislation in this area is still in a blank stage, the domestic parents for child car safety seats are still unfamiliar. Although the amount of car ownership continues to grow, but the domestic automobile child safety seats popularity has not kept pace. Keywords: automobile; children; safety; seat; protection; damage目录摘要 (II)Abstract ................................................................................................................................... I II 第1章绪论. (1)1.1国外研究现状 (1)1.2国内研究现状 (1)1.3课题研究的主要内容 (1)第2章市场调研 (2)2.1儿童安全座椅分析 (2)2.1.1安全带的设计 (2)2.1.2头枕设计 (2)2.1.3扶手设计 (2)2.1.4色彩设计 (3)2.1.5材料设计 (3)2.2 构思与定位 (3)2.3改进想法 (3)2.4 方案的论证与评价 (5)第3章产品功能结构分析 (6)3.1确定初步结构 (6)3.2产品整体结构分析 (6)3.3 确定产品原型 (6)第4章汽车儿童安全座椅零部件设计 (7)4.1 坐垫部分设计 (7)4.2 靠背部分设计 (7)4.3 整体总装设计 (8)第5章汽车儿童安全座椅尺寸分析 (10)5.1 汽车儿童安全座椅的适用对象 (10)5.2人机尺寸分析 (10)第6章绘制产品工程图样 (12)总结 (13)参考文献 (14)致谢 (15)第1章绪论第1章绪论1.1国外研究现状在二十世纪初真正七十年代瑞典的教授作者Bertil根据关于“吉米号”飞船座位设计有美国议员•和制造全球第一的汽车安全座椅。
特殊需求儿童汽车座椅安全系统说明书

CARROT 3 - CHILD RESTRAINT SYSTEM For Children with Special Needs Instruction ManualWARNING!Read all instructionsbefore using thisrestraint system.CARROT 3 CHILD RESTRAINT SYSTEMThe Carrot 3 is designed to provide additional support for children who have di culty sitting correctly in conventional car seats. Always consult your doctor to make sure that this restraint system is suitable for your child.Your child’s safety is very important to us. To ensure that your restraint system is installed correctly, please read all the instructions in this manual before use.Table of ContentsWARNINGS. . . . . . . . . . . . . . . . . . . . . . . . . . . . . . . . . . . . . . . . . . . . . . . . . . . . . . . 1SAFETY INFORMATION. . . . . . . . . . . . . . . . . . . . . . . . . . . . . . . . . . . . . . . . . . 3Important Notes . . . . . . . . . . . . . . . . . . . . . . . . . . . . . . . . . . . . . . . . . . . . . . . . . . 3Certi cation. . . . . . . . . . . . . . . . . . . . . . . . . . . . . . . . . . . . . . . . . . . . . . . . . . . . . . 4FEATURES. . . . . . . . . . . . . . . . . . . . . . . . . . . . . . . . . . . . . . . . . . . . . . . . . . . . . . . . 6INSTALLATION . . . . . . . . . . . . . . . . . . . . . . . . . . . . . . . . . . . . . . . . . . . . . . . . . . . 8LATCH Installation. . . . . . . . . . . . . . . . . . . . . . . . . . . . . . . . . . . . . . . . . . . . . . . . 8Using LATCH Top Tether Strap. . . . . . . . . . . . . . . . . . . . . . . . . . . . . . . . . . . . . 9Aircraft Installation. . . . . . . . . . . . . . . . . . . . . . . . . . . . . . . . . . . . . . . . . . . . . . . . 9HEAD SUPPORT. . . . . . . . . . . . . . . . . . . . . . . . . . . . . . . . . . . . . . . . . . . . . . . . . . 10Head Support Depth Adjustment. . . . . . . . . . . . . . . . . . . . . . . . . . . . . . . . . . 10Head Support Contour Adjustment. . . . . . . . . . . . . . . . . . . . . . . . . . . . . . . . 10Head Pillow Adjustment. . . . . . . . . . . . . . . . . . . . . . . . . . . . . . . . . . . . . . . . . . . 10SHOULDER SUPPORT. . . . . . . . . . . . . . . . . . . . . . . . . . . . . . . . . . . . . . . . . . . . 11Harness Strap Adjustment. . . . . . . . . . . . . . . . . . . . . . . . . . . . . . . . . . . . . . . . . 11Seatbelt Length Adjustment. . . . . . . . . . . . . . . . . . . . . . . . . . . . . . . . . . . . . . 11Shoulder Strap Comfort Pad. . . . . . . . . . . . . . . . . . . . . . . . . . . . . . . . . . . . . . . 12Shoulder Protector Wing. . . . . . . . . . . . . . . . . . . . . . . . . . . . . . . . . . . . . . . . . . 12Shoulder Protector Wing Installation. . . . . . . . . . . . . . . . . . . . . . . . . . . . . . . 13iTable of ContentsCHEST SUPPORT. . . . . . . . . . . . . . . . . . . . . . . . . . . . . . . . . . . . . . . . . . . . . . . . 14 Chest Support Pad Adjustment . . . . . . . . . . . . . . . . . . . . . . . . . . . . . . . . . . . 14 Harness Buckle - Fastening / Releasing . . . . . . . . . . . . . . . . . . . . . . . . . . . . 14 LATERAL SUPPORT. . . . . . . . . . . . . . . . . . . . . . . . . . . . . . . . . . . . . . . . . . . . . . 15 Lateral Support Adjustment. . . . . . . . . . . . . . . . . . . . . . . . . . . . . . . . . . . . . . . 15 BACKREST . . . . . . . . . . . . . . . . . . . . . . . . . . . . . . . . . . . . . . . . . . . . . . . . . . . . . . . 16 Backrest Height Adjustment. . . . . . . . . . . . . . . . . . . . . . . . . . . . . . . . . . . . . . . 16 Backrest Extensions. . . . . . . . . . . . . . . . . . . . . . . . . . . . . . . . . . . . . . . . . . . . . . . 16 SEAT . . . . . . . . . . . . . . . . . . . . . . . . . . . . . . . . . . . . . . . . . . . . . . . . . . . . . . . . . . . . . 17Seat Length Adjustment . . . . . . . . . . . . . . . . . . . . . . . . . . . . . . . . . . . . . . . . . . 17Seat Extensions. . . . . . . . . . . . . . . . . . . . . . . . . . . . . . . . . . . . . . . . . . . . . . . . . . . 17 Rodded Seat Extension - Long. . . . . . . . . . . . . . . . . . . . . . . . . . . . . . . . . . . . . 18 Rodded Seat Extension - Short . . . . . . . . . . . . . . . . . . . . . . . . . . . . . . . . . . . . 18 Pommel. . . . . . . . . . . . . . . . . . . . . . . . . . . . . . . . . . . . . . . . . . . . . . . . . . . . . . . . . . 18 Pommel Attachment. . . . . . . . . . . . . . . . . . . . . . . . . . . . . . . . . . . . . . . . . . . . . . 18Seat Depth Adjustment. . . . . . . . . . . . . . . . . . . . . . . . . . . . . . . . . . . . . . . . . . . 19 Footrest Adjustment (Small / Medium / Large) . . . . . . . . . . . . . . . . . . . . . 19 Support Tray . . . . . . . . . . . . . . . . . . . . . . . . . . . . . . . . . . . . . . . . . . . . . . . . . . . . . 19 Wedge Cushion. . . . . . . . . . . . . . . . . . . . . . . . . . . . . . . . . . . . . . . . . . . . . . . . . . . 19Pads and Cushions . . . . . . . . . . . . . . . . . . . . . . . . . . . . . . . . . . . . . . . . . . . . . . . 20 Securing Your Child. . . . . . . . . . . . . . . . . . . . . . . . . . . . . . . . . . . . . . . . . . . . . . . 21 CARE AND MAINTENANCE. . . . . . . . . . . . . . . . . . . . . . . . . . . . . . . . . . . . . . 23 Upholstery, Cushions, Pillow & Pads. . . . . . . . . . . . . . . . . . . . . . . . . . . . . . . 23 Harness Buckle. . . . . . . . . . . . . . . . . . . . . . . . . . . . . . . . . . . . . . . . . . . . . . . . . . . 23 Harness & Straps . . . . . . . . . . . . . . . . . . . . . . . . . . . . . . . . . . . . . . . . . . . . . . . . . 23 WARRANTY. . . . . . . . . . . . . . . . . . . . . . . . . . . . . . . . . . . . . . . . . . . . . . . . . . . . . . 24 Consumer Information Record. . . . . . . . . . . . . . . . . . . . . . . . . . . . . . . . . . . . . 24 Warranty. . . . . . . . . . . . . . . . . . . . . . . . . . . . . . . . . . . . . . . . . . . . . . . . Back Cover Warranty Limitations. . . . . . . . . . . . . . . . . . . . . . . . . . . . . . . . . . . . . Back Cover Limitation of Damages. . . . . . . . . . . . . . . . . . . . . . . . . . . . . . . . . . . Back Coverii• Failure to follow all instructions and product labels can result in death or serious injury in acrash. Carefully read and understand all instructions on this child restraint and in the writteninstructions.• Use only with children who weigh between 30 and 108 pounds (mass between 13.6 and 49 kg) and whose height is between 37 and 60 inches (94 and 152 cm).• Use only in a forward-facing position.• Use restraint ONLY with forward-facing vehicle seats. Do not use restraint with side-facing,rear-facing or flip-down vehicle seats.• According to accident statistics, the National Highway Traffic Safety Administration recommends the vehicle’s rear seat is the safest location for a properly installed child restraint system.• Do not use a child restraint in the front seat of the vehicle unless the passenger air bag is turned off. Death or serious injury can occur. Refer to your vehicle owner’s manual for instruction, warnings, and precautions.• Adjust the harnesses and belts for a comfortable and snug fit around your child. There should not be any slack or twist in the straps, and the straps should not press on the child’s skin or push the child’s body into an unnatural position.• Never leave a child unattended in the vehicle even if they are secured in the child restraint.• Secure this restraint to the vehicle’s seat with the upper top tether strap and lower anchor straps (LATCH).• Use this child restraint only with vehicles with lap shoulder 3-point safety belts approved by FMVSS 209.• Rigid items & plastic parts of the restraint system must be located and installed so they do not become trapped by a movable seat or in a door of the vehicle.WARNING !DEATH or SERIOUS INJURY can occur1• Discontinue use of your child restraint if it has been involved in ANY type of accident. Itmay no longer be effective and should be replaced immediately.• This child seat must not be used in the home, in boats, or other non-certified applications.• Always keep this child restraint secured in the vehicle, even when not in use. In anaccident, an unsecured child restraint system may injure other occupants.• Do not use the child restraint in a vehicle with passenger air bags unless the air bags are turned off. Death or serious injury can occur. Refer to your vehicle’s owner’s manual forinstructions, warnings and precautions.• When using this child restraint in a vehicle with side air bags, refer to your vehicle’sowner’s manual for instructions, warnings and precautions.• This restraint must not be used without the upholstery cover.• The child restraint upholstery cover should only be replaced with one recommendedby the manufacturer.• Follow all instructions on this child restraint and in the written instruction manuallocated in the pocket behind the unit.• Never use the adjustment straps to lift or carry this restraint. This can damage themechanism and the webbing.• Do not remove the harness and straps from the child seat. Never remove the bucklesand/or the buckle clasps from the harness or the straps.• The primary protection for occupants of a vehicle in a collision is the body of the vehicle itself; a child restraint will not protect a child when a vehicle is seriously impacted. However, correctly installed, a child restraint will substantially improve chances for survival in most crashes. Make sure all users fully understand the correct ways to usethis child restraint in a vehicle.Register your child restraint with the manufacturer.WARNING !DEATH or SERIOUS INJURY can occur2Safety Information· This child restraint system conforms to U.S. Federal Motor VehicleSafety Standard FMVSS 213.· This restraint is certi ed for use in motor vehicles and aircrafts.· Register this restraint with the manufacturer.Important NotesCorrectly set up and install the child restraint before using. Before each use, verify it is securely installed to the vehicle seat and the harness is properly adjusted around child.• Adjust harness to fit securely around the clothes the child is wearing. Remove bulky coats and/or jackets before putting child in restraint system.• Cover child restraint when vehicle is parked in direct sunlight. Parts of the restraint could become hot and cause injury to a child.• Store restraint in a safe place when not in use. Avoid placing heavy objects on top of it.• Never leave children alone in a vehicle, even for a short time.• Do not attempt to disassemble any part of the child restraint or change the way its harness or vehicle’s seat belts are used, except as described in this manual.• Do not leave loose objects, e.g. books, bags, etc., in the back of a vehicle. In the event of a sudden stop, loose objects will keep moving, potentially causing serious injuries.• Make sure vehicle seats that fold forward are securely locked in their open position.An unsecured vehicle seat back could prevent the restraint from protecting thechild completely.• Do not use anything to raise child seat off vehicle seat except as described in this manual. In an accident, the child restraint may not adequately protect the child.• Do not allow children to play with this or any child restraint system.• This child seat is recommended to be used in the upright position.Certi cationThis child restraint system conforms to U.S. Federal Motor Vehicle Safety StandardFMVSS 213 and European Safety Standard ECE R44/04.3Safety Informationbelt pathbelt path4loosen loosentightentightenreclineSafety Information 5Features: Carrot 3 Standard ModelSeat Depth9.8”11.2”11.8”13.2”13.8”15.2”Measurements shown are with the extensions added. * Extensions not included withstandard model.with 2” extensions with 4” extensions6Shoulder Strap Comfort PadsBody Balance Pads SupportChest Pad Support Height AdjusterLATCH ConnectorHarness YokeBackrestTop Tether StrapHead SupportVehicle’s Belt PathHead PillowMeasurements shown are with the extensions added. * Extensions not included with standard model.Features: Carrot 3 Standard ModelSeat Depth9.8”10.8”11.8”12.813.8”15.2”with 6” + 2“ extensions with 2” extensions with 6” + 4“ extensions with 4” extensionswith 6” extensions7HarnessComfort Seat CushionLap Belt GuideBackrestAdjustment KnobInstruction Guide (inside)Storage PocketShoulder Width Adjustment ButtonShoulder Protector Wings (Optional Accessory)Top Tether Strap(Optional Accessory)InstallationLATCH InstallationThis child restraint system is recommended for use in a vehicle with LATCH anchors. Verify that your vehicle is equipped with LATCH anchors.Lower Anchor Straps Installation: 1. Press and hold the rst LATCH adjuster release button, then pull the LATCH strap to full length. Repeat for the remaining LATCH connector (Fig. A). 2. Place the child restraint forward-facing on the vehicle seat.3. Attach one LATCH connector to its adjacent vehicle LATCH anchor (Fig. B).a. An audible click con rms attachmentb. Ensure that the LATCH strap is not twisted. 4. Attach the remaining LATCH connector to itsadjacent vehicle LATCH anchor.a. An audible click con rms attachmentb. Ensure that the LATCH strap is not twisted. 5. Push the child restraint into the vehicle seat whilepulling each LATCH strap tight (Fig. C).NOTE:If an audible click is not heard when connecting either LATCH connector, the LATCH strap may be twisted, or there may be debris in the LATCH connector. Correct either situation before continuing with the installation process.IMPORTANT:Ensure the LATCH strap does not fold into the LATCH adjusterwhile tightening.Fig. AFig. B Fig. C8L ower A nchor and T ethers for CH ildrenInstallationUSING LATCH Top Tether StrapIf your vehicle is equipped with LATCH Top Tether Anchor points, you can use the Top Tether Strap to attach the Head Support.NOTE:All vehicles manufactured since September 1, 2002 areequipped with tether anchors located behind the rear seats. 1. Consult your vehicle owner’s manual to locate the tether anchor points.2. Pull and fully extend the top tether strap (Fig. A or B).3. Locate the hook on the strap and loosely attach the tether strap to the anchor point.4. Pull the tether strap to remove ALL slack (Fig. B).5. Make sure the tether strap is taut and that child seatis properly secured.NOTE:The child restraint is secure when it cannot be moved front-to-back or side-to-side more than 1 inch (2.5 cm) at the belt path. If the child restraint is not secure, repeat the installation process or use an alternate seating location.Fig. A (Car)Fig. B (Van)9FunctionsHead Support Depth AdjustmentThe Head Support can be adjusted forward or backward by 0.6” (1.5 cm) increments to provide a better t and added protection for the occupant (Fig. A).To Adjust: Remove screws on each side of the head support with a Phillips screwdriver. Move the head support to selected position, and reinsert screws (Figs. B & C).Head Support Contour AdjustmentHead Pillow AdjustmentThe Head Pillow provides added comfort and positioning.To reposition: Grasp the head pillow and pull it away from the head support. Place the head pillow where desired and press down to a x Velcro.Head SupportFig. AFig. BFig. C(Use holes 1,2 or 3 on both sides)10Functions Harness Strap AdjustmentThe Harness Strap comfortably positions the child in place.strap (Fig. A).(Red), while pulling the shoulder harness strap (Fig. B).loosening the harness strap.4. Replace webbing (strap) utilizing the lower loop. Before replacing, fold the webbing loop inward so the attachment area is not covered by the strap (Fig. B).5. Reattach knob. It is very important to make sure that the back’s tube is in between the seat’s tube and gray plastic cover before reassembling (Fig. C).Shoulder SupportShoulder Harness Strap (B)Red leverFig. BFig. C11FunctionsShoulder Strap Comfort PadThe shoulder strap comfort pad can be moved by readjustingthe Velcro attached to the back of the Head Support.outward to the desired position. (Fig. A).IMPORTANT :As your child grows and the Shoulder Protector Wingis utilized, you may need to adjust the length of theHarness Strap (see page 13).12FunctionsShoulder Protector Wing Installation1. Detach straps from shoulder strap harness bracket. Remove straps and padded covers from chair (Fig. A & B).2. Press and hold height adjustment buttons, and remove head support (Fig. C & D).3. Remove 2 screws located on the rods (Fig. E)4. Insert head support rods into the shoulder wing rods, and press together (Fig. F).5. Align the holes located on the rods, insert 2 screws and tighten. (Fig. G).7. Attach shoulder wings/head support to the base unit (Fig. H).8. Re-thread shoulder straps and padded covers, and reconnectto the shoulder strap harness bracket.Fig. AFig. BFig. CFig. DFig. FFig. G Fig. H13FunctionsChest Support2. Release: Hold the harness buckle with one hand. With the other hand, press the release button and remove both clasps from the buckle (Fig. D).Yellow leverFig. CFig. DFig. B14FunctionsLateral SupportLateral Support Adjustment (OPTIONAL ACCESSORY)Lateral supports are used to maintain midline positioning of the trunk.To adjust:1. Unfasten the Velcro and the zipper on the back upholstery.2. Pull back the upholstery. (Fig. A)3. Loosen 2 screws with a 7/64” Allen Wrench. (Fig. B)4. Slide lateral to desired height and width. (Fig. C)5. Retighten the screws. (Fig. D)6. Repeat steps 2 - 5 on opposite side.7. Secure the upholstery.Fig. A Fig. B(Fig. C)Fig. D 15FunctionsIMPO R TANT: · Height of the shoulder harness strap moves with the height of the backrest. · The Shoulder Harness Strap must be at or above the child’s shoulders, and parallel to the ground. · The Shoulder Harness Strap is for positioning only, and not designed to support occupant in a crash.Backrest Height AdjustmentThe height of the backrest can be adjusted as the child grows.To adjust: Pull and hold the black “D” shaped ring at the top of the backrest to release lock. While pulling the release strap, move backrest to desired height and let go of release strap. To fully engage the lock, slightly move backrest until it “clicks” into place. Note: The seat belt may need to be lengthened. To lengthen the seat belt, remove the retaining screw and gray plastic cover on each side of the restraint system. Pull seat and back apart, and adjust strap to desired length. Slightly tuck the loop on the strap to prevent strap from interfering with the retaining screw.Reinstall the strap, align the silver bars of seat & back, replace gray plastic cover, and reinsert screws.Backrest Extensions - 2” or 4” (OPTIONAL ACCESSORY)Backrest Extensions are designed to ll the spaceexposed between the backrest and the seat when you extend the backrest.To add an extension, snap the Backrest Extension(s) onto exposed rods.Backrest16Backrest Extensions snaps into place by pushing.FunctionsWhen the child is sitting with knees bent, the total seat length should be slightly shorter than the length from the pelvis, to the rear of the knee.Seat Length Adjustment – 2” or 4”Release lock by pulling the black “D” shaped ring - Seat Depth Release Strap on the front of the child restraint, and while pulling the strap, adjust the position of the rodded seat extension.Seat17Seat Extension snaps into place when used with the Rodded Seat ExtensionSeat Extension snaps into place when used with the with FootrestsFunctionsRodded Seat Extension - LongAllows the legs to be stretched out and comfortably supported.FunctionsSeat Depth AdjustmentThe seat depth can be adjusted a maximum of 1.4” (3.5 cm) by moving the location of the Seat Depth Adjustment Knob. To change the seat depth; remove the adjustment knob, reposi-Footrest Length Adjustment: Using a ½” wrench, loosen bolts on the bottom of the side support tubes, move footplate to desired position and tighten. Repeat on opposite side.Support Tray (OPTIONAL ACCESSORY)The Support Tray (Upper Extremity Support Surface) provides added support for the upper body. It attaches with Velcro located on the side of the restraint.Wedge Cushion (OPTIONAL ACCESSORY)The wedge changes the seat-to-back angle by raising the front of the restraint system. Place the wedge under the front of the Carrot 3 seat.Medium 12”-16”Large 14”-18”Small 10”-12”19Saet Depth Release LeverFunctionsPads and Cushions (STANDARD ACCESSORIES)The following Pads and Cushions are provided as standardaccessories, and easily attach / adjust with Velcro.Head PillowProvides comfort and lateral head support.Body Balance PadsUsed to balance / position the user.Hip PadsProvides proper positioning for balance, comfort and support.Comfort Seat CushionProvides additional comfort and prevents the child’s pelvis fromslipping forward. Comfort cushions are required for occupantsthat are 40 lbs or less.Head PillowComfort Seat Cushion Hip Pads2021Securing Your Childbelt pathbelt pathbeltpath22Care and MaintenanceUpholstery Cover, Cushions, Pillows and PadsUpholstery Cover: SPONGE CLEAN using cold water & mild soap, and TOWEL DRY. Do not remove the upholstery cover. Contact the distributor for removal or replacement of the upholstery.Cushions, Pillow, and Pads: HAND WASH using cold water and mild soap. LINE DRY or LIE FLAT to prevent shrinkage. Do not bleach, machine wash, machine dry or iron, as this may damage fabrics. When damage to fabric occurs, it must be replaced. Periodical replacement is recommended.Harness BuckleThe child restraint, the harness buckle needs to be periodically checked for performance.If a positive click is not heard when using the harness buckle, it must be replaced.Harness and StrapsDo not take apart or attempt to take apart the harness and the straps from the child seat. If reassembled incorrectly, the child restraint may not perform as intended. Never remove the buckles and/or the buckle clasps from the harness or the straps. They cannot be reattached after removal.23WarrantyFor your convenience, record all the information about your child restraint below. Refer to the Serial Number & Manufactured Date Label for all information:Product Model: CARROT 3 CHILD RESTRAINT SYSTEM Name:Street Address:City: State:Zip Code: Country:Phone Number:Email Address:Lot Number:Serial Number: CT3 -Manufactured Date:Date of Purchase:Distributor:24WarrantyLIMITED FIVE-YEAR WARRANTYThis product is warranted against defective materials and workmanship for ve years from the date of original purchase. Proof of purchase is required.To make a claim under this warranty, contact the authorized distributor or the retailer from whom you purchased this product. Proof of purchase is required.WARRANTY LIMITATIONSThis warranty does not include damages which arise from negligence, minor use not in accordance with the product instruction.The use of non-CARROT 3 covers, inserts, toys, accessories, or tightening devices is not approved. Their use could cause this child seat to fail Safety Standard FMVSS 213, or not to perform as intended in a crash. Their use automatically voids this warranty.LIMITATION OF DAMAGESThe warranty set forth above is exclusive and in lieu of all others, oral or written, express or implied. In no event will the manufacturer, the distributors, or the retailers selling this product, be liable for any damages, including incidental or consequential damages, arising out of the use or inability to use this product.。
汽车儿童安全椅设计说明书
目录1引言 (1)2国内外儿童汽车安全座椅的发展概况 (2)2.1儿童安全座椅的定义及使用原因 (2)2.1.1儿童安全座椅的定义 (2)2.1.2使用儿童安全座椅的原因 (2)2.2儿童安全座椅的发展 (2)2.2.1欧美等国家 (2)2.2.2中国 (3)3市场调研 (5)3.1儿童安全座椅分类 (5)3.2儿童安全座椅的选择及其安装 (5)3.2.1接口类型 (6)3.3用户调查问卷 (6)3.4调研总结 (8)4汽车儿童安全椅设计 (9)4.1设计定位 (9)4.1.1安全性设计原则 (9)4.1.2操纵方便原则 (9)4.1.3乘坐舒适原则 (9)4.2儿童汽车安全座椅人性化分析 (10)4.2.1安全带的设计 (10)4.2.2头枕设计 (10)4.2.3扶手设计 (11)4.2.4色彩设计 (11)4.2.5材料设计 (11)5方案设计与提案 (12)5.1设计对象的初步定位 (12)5.2设计内容 (12)5.2.1方案由来 (12)5.2.2造型与颜色 (12)5.2.3最后确定选取材料 (12)5.3设计草图 (13)5.4效果图 (14)5.4.1零件图 (14)5.4.2装配图 (16)5.4.3效果图 (17)5.4.4三视图 (18)5.4.5海报 (18)结束语 (19)参考文献 (20)致谢 (21)焦作大学机电工程学院毕业设计引言1引言随着人们生活水平的快速增长,私家车的数量越来越多,但是对于祖国的花朵,未来的希望——儿童家用汽车乘车安全来说,还存在着很大的隐患。
如果孩子在车内一人独坐,当紧急刹车时,他就会像子弹一样撞向前方,从而导致重伤或死亡。
即使孩子被家长抱在怀中,家长根本无力也无法及时给孩子提供保护。
因为儿童骨骼脆弱、反应慢、支撑力量小,无法成功地化解成人能够化解的各种小危险,这也是儿童在乘车中更容易遭受伤害的原因。
所以儿童家用汽车座椅不容忽视。
20世纪60年代初,欧洲人发明了汽车儿童安全座椅,事实证明,汽车儿童安全座椅能降低儿童所受到的伤害,,并且慢慢在全世界得到推广。
车辆工程毕业设计147威驰轿车驾驶员座椅设计说明书
目录摘要 (I)ABSARST....................................................................................................................................................... I I 第1章绪论 . (3)1.1概述 (3)1.2汽车座椅的研究内容和设计要求 (3)1.2.1研究内容 (3)1.2.2轿车座椅的设计要求 (3)1.3汽车座椅的作用和功用 (4)1.3.1汽车座椅的作用 (4)1.3.2汽车座椅的舒适性 (4)1.3.3汽车座椅的安全性 (5)1.4本章小结 (6)第2章汽车座椅的人机工程设计 (7)2.1座椅的人机工程学要求 (7)2.2座椅的结构参数 (7)2.3人体模板在车辆座椅设计中的应用 (7)2.4座椅布置 (8)2.5人体压力在座椅上的分布 (8)2.6座椅的静态舒适性设计 (8)2.7座椅的动态舒适性设计 (9)2.8本章小结 (9)第3章驾驶员座椅的结构设计 (10)3.1汽车座椅的结构和分类 (10)3.2汽车座椅的主要部件设计 (11)3.2.1靠背与座垫设计 (11)3.2.2头枕设计 (11)3.2.3座椅调节机构设计 (12)3.3本章小结 (15)第4章座椅部件设计 (16)4.1板簧的设计 (16)4.2高度调节支撑杆的工艺过程设计 (17)4.3销的工艺过程设计 (17)4.4齿板与调角器手柄的设计 (18)4.5滑轨的设计 (19)4.6本章小结 (20)第5章座椅骨架的强度校核 (21)5.1有限元算法在汽车座椅安全性研究中的应用 (21)5.2轿车座椅的强度要求 (22)5.2.1座椅的静强度 (22)5.2.2座椅的冲击强度 (23)5.2.3座椅的疲劳强度 (23)5.3确定需要分析的部件 (23)5.3.1结果分析 (27)结论 (27)参考文献 (28)致谢 (30)附录 (31)摘要随着汽车保有量的增加,汽车的舒适性和安全性越来越受到人们的重视。
椅子进入汽车的设计和分析说明书
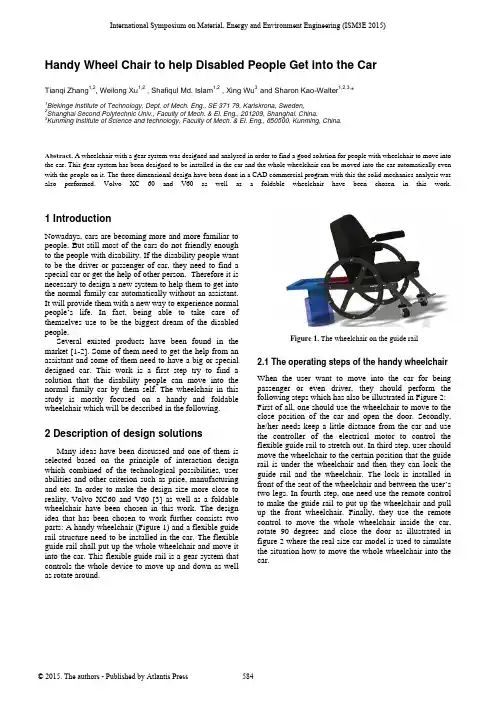
Handy Wheel Chair to help Disabled People Get into the CarTianqi Zhang1,2, Weilong Xu1,2 , Shafiqul Md. Islam1,2 , Xing Wu3 and Sharon Kao-Walter1,2,3,*1Blekinge Institute of Technology, Dept. of Mech. Eng., SE 371 79, Karlskrona, Sweden,2Shanghai Second Polytechnic Univ., Faculty of Mech. & El. Eng., 201209, Shanghai, China.3Kunming Institute of Science and technology, Faculty of Mech. & El. Eng., 650500, Kunming, China.Abstract. A wheelchair with a gear system was designed and analysed in order to find a good solution for people with wheelchair to move into the car. This gear system has been designed to be installed in the car and the whole wheelchair can be moved into the car automatically even with the people on it. The three dimensional design have been done in a CAD commercial program with this the solid mechanics analysis was also performed. Volvo XC 60 and V60 as well as a foldable wheelchair have been chosen in this work.1 IntroductionNowadays, cars are becoming more and more familiar to people. But still most of the cars do not friendly enough to the people with disability. If the disability people want to be the driver or passenger of car, they need to find a special car or get the help of other person. Therefore it is necessary to design a new system to help them to get into the normal family car automatically without an assistant. It will provide them with a new way to experience normal people’s life. In fact, being able to take care of themselves use to be the biggest dream of the disabled people.Several existed products have been found in the market [1-2]. Some of them need to get the help from an assistant and some of them need to have a big or special designed car. This work is a first step try to find a solution that the disability people can move into the normal family car by them self. The wheelchair in this study is mostly focused on a handy and foldable wheelchair which will be described in the following.2 Description of design solutionsMany ideas have been discussed and one of them is selected based on the principle of interaction design which combined of the technological possibilities, user abilities and other criterion such as price, manufacturing and etc. In order to make the design size more close to reality, Volvo XC60 and V60 [3] as well as a foldable wheelchair have been chosen in this work. The design idea that has been chosen to work further consists two parts: A handy wheelchair (Figure 1) and a flexible guide rail structure need to be installed in the car. The flexible guide rail shall put up the whole wheelchair and move it into the car. This flexible guide rail is a gear system that controls the whole device to move up and down as well as rotate around.Figure 1. The wheelchair on the guide rail2.1 The operating steps of the handy wheelchair When the user want to move into the car for being passenger or even driver, they should perform the following steps which has also be illustrated in Figure 2: First of all, one should use the wheelchair to move to the close position of the car and open the door. Secondly, he/her needs keep a little distance from the car and use the controller of the electrical motor to control the flexible guide rail to stretch out. In third step, user should move the wheelchair to the certain position that the guide rail is under the wheelchair and then they can lock the guide rail and the wheelchair. The lock is installed in front of the seat of the wheelchair and between the user’s two legs. In fourth step, one need use the remote control to make the guide rail to put up the wheelchair and pull up the front wheelchair. Finally, they use the remote control to move the whole wheelchair inside the car, rotate 90 degrees and close the door as illustrated in figure 2 where the real size car model is used to simulate the situation how to move the whole wheelchair into the car.International Symposium on Material, Energy and Environment Engineering (ISM3E 2015) © 2015. The authors - Published by Atlantis Press584Figure 2. Wheelchair in the car and faced to the driving directionOnce the person reaches his destination, it is time to move outside of the car. The steps are as follow :In the first step, the user should open the door with the remote control to rotate the guide rail 90 degrees and stretch outside the guide rails along with wheelchair. Secondly, user should restore the folded rear wheels into the normal shape (if the wheel is foldable) and push down the front wheels. In the third step, user needs to use remote control to make the guide rail to put down the wheelchair on the floor and unlock the wheelchair and guide rail. Using the remote control to restore the guide rail inside and closing the door as the final step.Through the explanation of the operating steps of the handy wheelchair system, it can be found that all steps can be finished by the user himself/ herself. Besides, the strength of users should be of the normal level. Otherwise, it will be hard for them to fold the rear wheels and pull up the front wheel.2.2. The operating steps of the wheelchair lock The structure that locking the wheelchair on the guide rail is an important part to ensure the safety of the users. Two different parts are designed to protect the wheelchair from falling down from the guide rail. As shown in figure 3, the user need to move the wheelchair towards the guide rail when the guide rail has been stretched out. After that, they will see the position of part B showing in the figure to ensure that they have been in the correct position. Next step is to make the user to use the remote controller to move up the guide rail to let the part Ainside the groove of the guide rail board.Figure 3. The status of the locked wheelchair to the guide railWhen the guide rail moves up, and make the part An inside the guide rail groove, the user of the wheelchair can move the wheelchair forward for a little distance to make the part B absolutely click into the wheelchair. At the same time, the part A will prevent from leaving the groove with the normal straight moving. Then the status of the wheelchair and the guide rail will become as shown in figure 3. Finally, the gravity of the users and the force from other side will help the wheelchair to lock on the guide rail.2.3. The gear systemA gear system is installed in the car, it is used to control the whole machine up and down, the guide rail out and in and the rotation of the wheelchair. The normal gear and two bevel gears are coaxial, and their rotary motion is controlled by electrical motor I (Figure 4). Besides, there is another electrical motor II to make rack do the straight movement, at the same time, the coaxial gears change their position. The electrical motors are powered by car battery, because the voltage is high enough and it isconvenient to use.Figure 4. The two electrical motors and the gear systemThe electrical control of the gear system have been designed by using the PLC technology. The details can be found in [4-5].3 The choice materialThe choice of the material of the designed system is an important point. It will influence whether the device is strength enough, the price and the weight. There are three requirements that:First of all, gear system shall be strong enough and stable enough for carrying the wheelchair or a supporting device (see figure 5). Secondly, heavy weight will cause more trouble to wheelchair users, so it is necessary to reduce the mass of the whole wheelchair. At the same time, it is also needed to ensure that the wheelchair and gear system is strong enough. Finally, if it is turned into the reality, the price of the material is also a field which needs to be thought about. For example, some composite material will meet the first two requirements perfectly, but it may cost much more. This unnecessary expense will add in the sum cost of the product, the product will585finally be a product with unreasonable price. Therefore, when the material is satisfied with first two requirements, the lower cost, the better. For example, Aluminium 6061 is the final material which is chosen for the main material of the wheelchair. Its features is found that aluminium 6061 has an ultimate tensile strength of at least 300 MPa and yield strength of at least 241 MPa. Therefore, Aluminum 6061 will be chosen in the following Finite Element Method calculation as well as the hand calculation in order to make sure that the whole wheelchair system strong enough for daily use.Figure 5. The wheelchair of Aluminium 6061 [6]4Strength analysis of the structureA commercial CAD and Solid mechanics program Inventor 2015 [7] has been used to do the simulation with the applied force of 1000 N (as the weight of one male adult) on the chair of the wheelchair in order to check the strength of the guide rail. This strength calculation is to confirm that when the person move into the car with the help of guild gear, this designed guild gear will be strong enough to support the whole force even with the repeated loading case as shown in figure 6.Figure 6. Stress analysis of the structure under repeated loading Furthermore, the fillet weld that connect the hydraulic system with the car has also been calculated in order to find the right a size. 5 Conclusion and further workAn idea to help the people with disability to move into afamily or personal car has been verified. The entire modelof a foldable wheelchair and a normal sized car have beenused in this study. A typical gear system has been appliedin this designed system which is installed in the car. Theoperating steps about how it works has been introducedand the strength of the system has also been analysedwith the help of Finite Element Method. The assemblingof the wheelchair with the gear system can be found inAppendix. Additionally, the electrical control is alsoadded as one part of the whole wheelchair system. In thefuture work, the wheelchair can be optimized to besmaller, lighter and cheaper and the electrical control andthe size of the wheelchair still has a large space toimprove.References[1]"Nissan NV200 Skåp.",http://www.nissan.se/SE/sv/vehicles/lcv/NV200_VAN.html?cid=psmppTlGcHO_dc#vehicles/lcv/NV200_VAN.[2]"Professional solutions | Auto adapt.",/en/pro/.[3]"Volvo XC60."/se/bilar/modeller/xc60.[4]Xiaoli Wu, Junqing Liu, Yingya Huang, Design andAnalysis of Man-machine System about Wheelchair(HoHai University, 2012).[5]Tianqi Zhang, Weilong Xu, Bachelor Thesis, Schoolof engineering, Department of MechanicalEngineering, Blekinge Institute of Technology,diva2:819460, 2015[6]"TiLite Aero Z, now available in the folding AeroX"./tiliteaeroznowavailableinthefoldingaeroxtoofreeshippingintheus.aspx[7] Inventor® Professional 3D CAD software, 2015AppendixAssemble of the wheelchair586。
宝宝安全椅型号为童鞋通UNDER 2息合格安全玩具说明书
21623221718120291DANGER DANGER DANGER DANGER DANGER DANGER DANGER DANGER DANGER AVERTISSEMENT AVERTISSEMENT AVERTISSEMENT DANGER AVERTISSEMENT DANGER DANGER DANGER PRUDENCE PRUDENCE DANGER DANGER DANGER DANGER DANGER AVERTISSEMENT PRUDENCE U lisez sur le siège arrière: Déplacez le siège avant su ffisamment en avant pour que les pieds de l’enfant ne puissent pas a eindre le dossier du siège avant, car cela est plus sûr.Les éléments rigides et les pièces en plasque du doivent être situés et installés de telle manière qu’ils ne puissent pas, dans les condi ons normales d’u lisa on de la voiture, se coincer dans un siège mobile ou dans une porte de la voiture. U lisez toujours le harnais à 5 points ② poursécuriser votre enfant.N’appliquez pas de lubri fiants sur votreSperber-Fix 61, ne le modi fiez pas d’une quelconque manière. Cela peut nuire gravement à sa capacité à protéger votre enfant.Veuillez ne pas exposer le siège enfant à lalumière directe du soleil. En cas de contact direct avec le soleil, le siège enfants ou certaines de ses pièces peuvent devenir très chaudes, ce qui peut nuire à l’enfant.Le siège-auto ne doit pas être orienté dans lesens contraire de la marche sur le siège de la voiture équipée d’un airbag ac vé. Un airbag ac vé peut causer des blessures graves à un enfant assis dans un siège-auto orienté dans le sens contraire de la marche.Le siège-auto doit être installé sur le siège de la voiture n’ayant pas d’airbag ou dont l’airbag a été désac vé. Les sièges du véhicule peuvent montrer des signes d’usure lors de l’u lisa on du siège enfant. Pour éviter cela, des protecteurs de siège-auto peuvent être u lisés.Assurez-vous que tous les passagers sont informés de la manière de libérer votre enfant en cas d'urgence.Assurez-vous que les bagages ou autres objets sont correctement fixés. Les bagages non sécurisés peuvent causer de graves blessures aux enfants et aux adultes en cas d’accident.N'ulisez pas de produits de ne oyage agressifs pouvant endommager la ma ère du siège enfant.AVOVA conseille de ne pas racheter ni de revendre les sièges pour enfants.Lorsque l’enfant mesure plus de 105 cm ou queles épaules de l’enfant dépassent la posi on la plus élevée de la ceintureà harnais, l’enfant doit s’asseoir sur un siège adapté aux enfants de plus grande taille.U lisez toujours l'Insert pour Jeunes Enfants ⑭ lorsque votre enfant n’a pas encore a eint 87 cm.AVOVA Sperber-Fix 61 a Sperber-Fix 61 été homologué pourles tailles comprises entre 61 cm et 105 cm, avec des connecteurs ISOFIX ④ et une jambe de force ⑨ dans les voitures.U lisez toujours la jambe de force pour installerle siège-auto avec les connecteurs ISOFIX. La jambe de force doit être fermement en contact avec le plancher de la voiture, sans que l’indica-teur ⑦ de la jambe de force n’a ffiche rouge. Il est compa ble avec les di fférentes posi onsuniverselles, veuillez lire le manuel de votre véhicule.Ne laissez jamais votre enfant sans surveillance dans le siège enfant.Le siège-auto doit toujours être sécurisé lorsqu’ilest dans la voiture à l’aide des points d’ancrage ISOFIX , même si vousne transportez pas d’enfant.Véri fiez régulièrement que toutes les pièces sont fonc onnelles et non endommagées.Veuillez vous débarrasser de votre siège en casde collision avec un véhicule et/ou de choch car le siège peut êtreendommagé, mais que les dommages peuvent ne pas être visibles.Merci d’avoir choisi le siège Sperber-Fix 61 d ’AVOVA pour garan r la sécurité de votre enfant. Le siège a été conçu, testé et cer fié selon les exigences des systèmes améliorés de retenue pour enfants (ECE R129)L’homologa on E (sceau) et le numéro d’homologa on se trouvent éque e (autocollant apposé sur le siège enfant). Le siège pour enfant est conçu pour un enfant ayant une taille de 61 à 105 cm et âgé de 3 mois – 4 ans. Il est important que vous lisiez ce manuel AVANT d'installer votre siège. Ce mode d’emploi doit être conservé dans la poche derrière le revêtement de la têère pour que les u lisateurs puissent le consulter à tout moment.INFORMATIONS DE SÉCURITÉ GÉNÉRALESINSTRUCTIONAVOVA Sperber-Fix 61 est homologué pour les tailles comprises entre 61 cm et 105 cm, dans le sens contraire de la marche, et de 76 à 105 cm, dans le sens de la marche.N’u lisez le siège-auto dans le sens contraire de la marche que lorsque votre enfant a une taille inférieure à 76 cm. Une fois que votre enfant a eint 76 cm, vous pouvez u liser le siège-auto à la fois dans le sens contraire de la marche et dans le sens de la marche.Les symboles suivants sont u lisés dans ce manuel d'u lisa on:Indique une situa on dangereuse qui, si elle n'est pas évitée, entraînera la mort ou des blessures graves. Indique une situa on dangereuse qui, si elle n'est pas évitée, pourrait entraîner la mort ou des blessures graves. Indique une situa on dangereuse qui, si elle n'est pas évitée, peut entraîner des blessures mineures ou modérées.AVOVA Sperber-Fix 61 ne peut être u liséque dans des voitures dont les sièges sont équipés de points d’ancrageISOFIX . Veuillez consulter la liste des types de voitures compa bles pour plus d’informa on.13. Bouton de réglage du harnais 14. l'Insert pour Jeunes Enfants 15. Coussinet thoracique 16. Bague de réglage de la têère 17. Coque du siège 18. Barre de détente19. Boucle de déverrouillage ISOFIX 20. Guide d’inser on ISOFIX21. Point d’ancrage ISOFIX (automobile)22. Base du siège23. Protec on intégrée contre les chocs latéraux212110 27263. Re rez le revêtement de la têère.4. Débouclez le harnais à 5 points ② .Re rez les coussinets thoraciques ⑮ et le coussinet d’entrejambe .1. La garane fournie avec AVOVA Sperber-Fix 61 est valable 2 ans à parirde la date d’achat. L’u lisa on du produit devrait se faire conformément à ce manuel u lisateur. Tout dommage dû à un non-respect des consignes comprises dans ce manuel annulera la garan e.GARANTIE5. Dégagez les crochets de la housse dusiège-auto des deux côtés. Re rez ensuite la housse de la coque du siège-auto .Veuillez remonter la housse du siège-auto dans l’ordre inverse.2627。
LG-4、LG-4K、LG-4M、LG-4L、LG-4P使用说明书
尊敬的用户:感谢您对英伦汽车的信任,选择了具有优良安全性、舒适性、动力性和经济性的英伦汽车,我们期待着以优质的产品和服务为您的工作和生活带来乐趣。
首次使用前请阅读并遵守本手册的内容,将帮助您更好的了解、使用英伦汽车,使您的新车在今后使用中技术状况良好,始终保持最佳性能。
您对您的车辆了解的越多,就越能享受到驾驶该车辆的安全性和趣味性。
若您在使用过程中发现一些问题,请就近与本公司授权的英伦品牌服务站联系,服务站将在保养、维修方面向您提供优质的服务,请您务必按本手册中的保养规定按期完成保养工作。
本手册提供了所有车型的相关信息,由于车型配置不同,本手册的说明与您所购车辆的实际配置可能会有差别,请以实际接收的车辆为准。
本手册属于整车的一个组成部分,出售或出借本车时,请将本手册转交给新车主。
本手册中的所有资料均为出版时的最新资料,今后如有改动,恕不另行通知。
祝您快乐人生,吉利相伴!浙江吉利控股集团汽车销售公司 2013年08月版权所有。
如未经吉利控股集团汽车销售公司书面同意,不得转载或复印本手册的任何内容。
安全和车辆损坏警告本使用说明书中,具有安全警告和车辆损坏警告,必须小心根据警告的内容来避免受伤或损坏的可能性。
不得擅自进行车辆改装,否则将会影响车辆的性能、安全和使用期限,甚至可能触犯政府法规,因改装引起的直接或间接车辆问题均不在保修范围之内。
本书中警示类型的表示和使用方法等说明如下:《车辆使用说明书》与《保修保养手册》是本公司与用户之间就有关产品的正确使用、质量保证责任、售后服务等方面的约定,请务必在使用本公司产品前认真阅读。
若您的汽车或零部件因为过度使用、不正确使用、不按规定的里程/时间间隔进行保养或擅自进行车辆改装而导致故障,您将丧失相应的索赔权利和保修权利。
本使用说明书中的93号无铅汽油适用于除北京地区以外区域,北京地区根据环保要求使用92号无铅汽油。
本 手 册 中 的 重 要 说 明安全符号当看到上图所示的安全标记时,则表示“禁止……”;“禁止这样做”或者“禁止让这种情况发生”。
Cozy N Safe Oxford Street Wolverhampton 车载宝宝座椅说明书
Group 0+/1/2/3 Car Seat(Birth to 36kg/ approx birth to 12 years)Thank you for purchasing this Group 0+/1/2/3 car seat. If you are not completely satisfied with the car seat or you would like to change any accessory or obtain any help about the car seat, you cancontact our customer services department.Storage of the User GuideIt is most important that these instructions remain with the car seat at all times.You can store these instructions in the manual pocket on the backof the seat.Please read this instruction manual carefully before use.1. Vital informa�on-READ NOW..................................................................3-42. Safety instruc�ons...................................................................................53. Using the child car seat in this way.........................................................54. Parts and interior equipment..................................................................65. Scope of use for children.........................................................................76. Height adjustment for head support and shoulder harness...................87. Using the buckle......................................................................................98. Unlocking the ISOFIX...............................................................................99. Adjus�ng the harness.............................................................................1010. Adjus�ng the backrest angle................................................................1011. Instruc�ons for seat rota�on................................................................1112. How to use the ISOFIX guides...............................................................1213. Instruc�ons for using the insert cushion...............................................1214. Installa�on of the child seat group 0+/1...............................................13-1715. Installa�on of the child seat group 1.....................................................18-2116. Installa�on of the child seat group 2/3..................................................21-2617. Removing the covers.............................................................................27-2918. Maintenance and cleaning.. (30)ContentsDIRECTIONGROUPMETHOD OF INSTALLATION TYPER ear w ar d 0+/1I S O F IX +T O P T E T H E R 1 I S O F IX +T O P T E T H E R F or w ar d UNI V E R S A L UNI V E R S A LF or w ar d 2/3I S O F IT +3-p oint s afet y b elt S EM I-UNI V E R S A LF or w ar d2/33-p oint s afet y b eltUNI V E R S A LNo�ce regarding Universal category (Group 0+/1/2/3)1. This is a “Universal” child restraint. It is approved to Regula�on No. 44, 04 series of amendments, for general use in vehicles and it will fit most, but not all car seats.2. A correct fit is likely if the vehicle manufacturer has declared in the vehicle handbook, that the vehicle is capable of accep�ng a “Universal” child restraint for this age group.3. This child restraint has been classified as “Universal” under more stringent condi�ons than those which applied to earlier designs which do not carry this no�ce.4. If in doubt, consult either the child restraint manufacturer or the retailer.No�ce regarding Semi-universal category (Group 2/3)This child restraint is classified for "(Restricted/Semi-universal)" use and is suitable for fixing into the seat posi�ons of the following cars:C AR FRONT REARO uter Centre Y e sY esNOR efer to v e h icle listSeat posi�ons in other cars may also be suitable to accept this child car seat. If in doubt, consult either the child car seat manufacturer or the retailer.Only suitable if the approved vehicles are fi�ed with 3 point with retractor safety-belts, approved to UN/ECE Regula�on No. 16 or other equivalent standards.firmly engaged.9. Do not use any load bearing contact points other than those described in the instruc�ons and marked on the child restraint, when in doubt, please contact thechild restraint manufacturer.10. Any luggage or other objects liable to cause injuries in the event of a collision should be properly secured.11. The rigid items and plas�c parts of a child restraint must be located and installed that they are not likely, during everyday use of the vehicle, to become trapped by a movable seat or in a door of the vehicle.12. To prevent the risk of a fall, your child should always be fastened into thechild car seat.13. It is dangerous to make any altera�ons or addi�ons to the device without the approval of the competent authority, and dangerous to not closely follow the installa�on instruc�ons provided by the child restraint manufacturer.14. This child safety seat is designed for children from 0kg to 36kg. Never overload the child safety seat with more than one child or with other loads.15. The child restraint must not be used without the covers.16. The seat cover should not be replaced with any covers, other than the one recommended by the manufacturer, because the cover cons�tutes as an integral partof the restraint performance.17. Before you adjust any movable or adjustable parts of your child safety seat, you must remove your child from the child safety seat.18. The child safety seat should be kept away from direct sunlight if the seat is not provided with a tex�le cover, otherwise it may be too hot for the child’s skin.19. Never use a second-hand product, as you can never be certain what was happenedto it.20. No�ce: Do not use in any configura�on that is not shown in the instruc�ons.21. Important! Before using the child car seat, please carefully read the vehicle manualfor more informa�on on the ISOFIX points.Check that the harness is Whilst driving, the seat23。
儿童座椅介绍及ISOFIX布置简介
图11
儿童座椅介绍及ISOFIX布置简介
两个固定支架的有效固定 区域必须是同轴,且轴线B必须 平行于Y轴,如图12所示。
从后座椅的设计H点 (SgRP)到通过固定支架轴线 A且平行于YOZ平面的平面C的 X方向距离为L2。
从CRF的Z点(见图8中所 有标注的Point Z)到平面B的 距离为L3。
Top Tether Hook的形状尺寸在ECE R14 附录9的图 3中有详细定义,如左图14所示,为了方便做儿童座椅上 部固定点的布置,可根据尺寸定义建立挂钩的3D模型, 如图15所示。
前或婴儿坐在座椅上头部高出座椅背的高度
以前,尽可能使用前朝向的座椅。这类座椅
用一根车上的成年安全带进行固定,儿童在
座椅上用儿童座椅自身的安全带进行固定,
这样可以轻松固定及取出座椅。
图1
2023/12/30
儿童座椅介绍及ISOFIX布置简介
• 第二类 Frontward-Facing Baby Seat
2023/12/30
儿童座椅介绍及ISOFIX布置简介
图2
• 第三类 Booster Seat
这类座椅适用于Ⅱ组规定的儿童,其型式 类似图3所示。同样Booster Seat前后排座椅 上都可以安装,但是放在后排的安全性高于 放在前面,尤其是前面乘员侧装有安全气囊 的话,不能安装在乘员侧座椅上,这类儿童 座椅用车上成年安全带将儿童跟座椅一起固 定在座椅上。这类座椅还有一个特点,就是 坐垫跟靠背通常是可以分离的,如果我们取 掉靠背的话,则变成第四类作用Booster Cushion。
2023/12/30
儿童座椅介绍及ISOFIX布置简介
2023/12/30
儿童座椅介绍及ISOFIX布置简介
- 1、下载文档前请自行甄别文档内容的完整性,平台不提供额外的编辑、内容补充、找答案等附加服务。
- 2、"仅部分预览"的文档,不可在线预览部分如存在完整性等问题,可反馈申请退款(可完整预览的文档不适用该条件!)。
- 3、如文档侵犯您的权益,请联系客服反馈,我们会尽快为您处理(人工客服工作时间:9:00-18:30)。
目录1引言 (1)2国内外儿童汽车安全座椅的发展概况 (2)2.1儿童安全座椅的定义及使用原因 (2)2.1.1儿童安全座椅的定义 (2)2.1.2使用儿童安全座椅的原因 (2)2.2儿童安全座椅的发展 (2)2.2.1欧美等国家 (2)2.2.2中国 (3)3市场调研 (5)3.1儿童安全座椅分类 (5)3.2儿童安全座椅的选择及其安装 (5)3.2.1接口类型 (6)3.3用户调查问卷 (6)3.4调研总结 (8)4汽车儿童安全椅设计 (9)4.1设计定位 (9)4.1.1安全性设计原则 (9)4.1.2操纵方便原则 (9)4.1.3乘坐舒适原则 (9)4.2儿童汽车安全座椅人性化分析 (10)4.2.1安全带的设计 (10)4.2.2头枕设计 (10)4.2.3扶手设计 (11)4.2.4色彩设计 (11)4.2.5材料设计 (11)5方案设计与提案 (12)5.1设计对象的初步定位 (12)5.2设计内容 (12)5.2.1方案由来 (12)5.2.2造型与颜色 (12)5.2.3最后确定选取材料 (12)5.3设计草图 (13)5.4效果图 (14)5.4.1零件图 (14)5.4.2装配图 (16)5.4.3效果图 (17)5.4.4三视图 (18)5.4.5海报 (18)结束语 (19)参考文献 (20)致谢 (21)焦作大学机电工程学院毕业设计引言1引言随着人们生活水平的快速增长,私家车的数量越来越多,但是对于祖国的花朵,未来的希望——儿童家用汽车乘车安全来说,还存在着很大的隐患。
如果孩子在车内一人独坐,当紧急刹车时,他就会像子弹一样撞向前方,从而导致重伤或死亡。
即使孩子被家长抱在怀中,家长根本无力也无法及时给孩子提供保护。
因为儿童骨骼脆弱、反应慢、支撑力量小,无法成功地化解成人能够化解的各种小危险,这也是儿童在乘车中更容易遭受伤害的原因。
所以儿童家用汽车座椅不容忽视。
20世纪60年代初,欧洲人发明了汽车儿童安全座椅,事实证明,汽车儿童安全座椅能降低儿童所受到的伤害,,并且慢慢在全世界得到推广。
进入21世纪,产品会越来越丰富,为了保证儿童乘车安全以及满足人的各个方面的物质需求,儿童汽车安全座椅作为新的事物正在不断地接近人们的生活,人们也会越来越重视儿童安全座椅的造型、安全和舒适性,同时也希望中国儿童也能像外国儿童一样享受乘车安全的幸福保障。
据国外权威机构研究结果表明,汽车使用儿童专用的安全装置可有效地将儿童受伤害的几率降低70%左右,伤亡的比例从11.5%减少至3.5%,其中儿童汽车安全座椅是最为关键的安全装备。
而我国儿童在乘车时使用儿童安全座椅的情况是非常少的。
儿童乘车安全问题出现,需要设计开发新型的儿童安全座椅,已经到了刻不容缓的地步。
2国内外儿童汽车安全座椅的发展概况2.1儿童安全座椅的定义及使用原因2.1.1儿童安全座椅的定义儿童安全座椅是一种系于汽车座位上,供儿童乘坐且具有束缚设备并能在发生车祸时,束缚着儿童以最大限度保障儿童安全的座椅。
欧洲强制性执行标准ECER44/03的定义是:能够固定到机动车辆上,带有卡口的安全带组件或柔性部件、调节机构、副件等组成的安全防护系统。
2.1.2使用儿童安全座椅的原因汽车上的安全措施如安全带、安全气囊几乎是依据成人的身材、体重设计的,若儿童系上安全带坐在前座,如儿童的身材、体重不同与成人,因此如果儿童使用专为成人而设计的安全措施,非但无法降低伤害相反的反而会增加儿童的伤害。
2.2儿童安全座椅的发展2.2.1欧美等国家第二次世界大战之后,汽车技术飞速发展,汽车成为主要的交通工具。
随之而来的交通安全问题也日益突出,各种乘车安全保护装置相继问世。
安全带、安全气囊作为汽车上最常见的保护装置,挽救过无数人的生命。
据统计,系安全带可减少46%的死亡可能和76%的重伤可能,在美国因此每年减少1万人的死亡。
安全带作为最传统的安全防护设备,是为成人设计的,对于儿童并不适用。
因为儿童的骨骼稚嫩,当汽车发生碰撞、速度迅速降低时身体会因巨大惯性向前猛冲,此时侧跨身体的成人安全带可能会造成儿童胸部肋骨骨折、窒息甚至颈骨折断的危险。
在20世纪70年代,为了保护儿童在乘车时的安全,欧洲人发明了儿童汽车安全座椅。
第一把儿童安全座椅的设计者是瑞典教授伯蒂尔・奥尔德曼,他的灵感来自美国“吉米尔”号宇航器上宇航员的座椅。
1972年VOLVO公司推出了第1种逆向儿童安全座椅,并正式将该项发明用于汽车。
80年代后,欧美等国相继出台相关的家用儿童乘车法规,以强制儿童乘车必须使用儿童汽车安全座椅,这就有力地保障和促进了儿童汽车安全座椅的发展。
现在欧洲的儿童座椅的普及就像骑摩托车需带头盔一样自然,它已经是儿童乘车的必备产品。
目前世界上主要有以下几大标准:欧洲ECER44103标准(欧洲经济委员会(ECE)就有关机动车上儿童乘客的安全防护系统的论证而颁布了第44号法令)、美国JPMA/ASTN、日本JIS等。
还有澳大利亚、台湾等也都相继颁布了相应的标准。
其中欧洲对儿童汽车安全座椅的要求最为严格,现在欧洲的儿童家用汽车安全座椅无论从结构还是造型上,都有很大的发展,并早已把儿童乘车安全问题列为重要的研究课题,并且已经设计生产出不同年龄儿童或体重的各种规格的汽车安全座椅。
欧美等国根据各国的不同情况,都制定了儿童安全座椅的检测方法。
各国都对座椅的动态性能有着严格的技术要求,对于检测实验中座椅的移动量也规定得十分明晰。
美国相关法规中,对座椅织物的耐磨强度、耐光强度,以及带微生物强度都提出了具体要求,与欧洲一样,进行盐雾试验,以考察抗腐蚀能力。
此外,欧洲还对儿童安全座椅的能量吸收性、抗翻滚能力、耐高温性以及安全带的调节和卷收功能有严格限制。
2.2.2中国随着私家车迅速增长,我国的儿童汽车安全座椅的设计、发展几乎等于零。
经常在如织的车流中看到如下的景象:从家用微型客车到豪华轿车,只要车中有儿童,总能在副驾驶的位置上看到孩子的身影,他们或是一人独坐或是由家长抱着。
看似其乐融融,温馨无比,但是却在客观上使孩子处于了危险的境地。
许多家长错误的认为,小孩乘车时,被大人抱着是最安全的,这是一种完全错误的认识和做法。
据VOLVO公司测试,如果汽车以40km/h速度行驶时,突然紧急制动,5.5kg重的婴儿会变成110kg的推力,家长根本无法保护孩子,小孩会像子弹一样在车内飞起碰撞引起重伤或死亡。
目前,在我国,汽车驾乘车所有安全装置都是按成人的身高和体重设计的,对儿童不仅不适用,相反还会对儿童使用产生危害。
例如:成人使用的安全带和气囊,婴儿根本不能用,儿童由于身高不够,安全带会被勒到脖子处,容易造成窒息,气囊不仅会崩坏儿童眼睛甚至会把孩子闷死,这样就忽视了儿童安全的问题。
所以,为了儿童的乘车安全,开发儿童家用汽车安全座椅还是非常有必要和有前景的。
3市场调研为了进一步了解儿童座椅及其市场需求,我们必须要了解用户的需求和要求,采取网上调查采集信息,为设计所用的同时也可供所需者为用。
3.1儿童安全座椅分类目前市场上儿童安全椅主要分为以下几类,其中包括:儿童安全座椅分不同年龄段,孩子需要按照自己的年龄段使用,更换座椅。
一般来讲,2岁以内的孩子使用0-4岁,9月-4岁的安全座椅会更加舒适,因为2个阶段的安全座椅一般会有3个以上的角度调节,特别是孩子车上睡觉的时候,可以把安全座椅靠背调节更加倾斜。
新生儿必须使用0岁起用的,0岁起用的安全座椅是具备反向安装设置的。
(补充:现在市场上最常见的还有0-18公斤,即0-4岁的安全座椅,还有个别的0-6岁的安全座椅)3.2儿童安全座椅的选择及其安装3.2.1接口类型欧洲标准的ISO FIX固定方式美国标准的LATCH固定方式安全带固定方式3.3用户调查问卷以下是我设计儿童座椅前做的网上调查问卷的内容:1、在生活中的什么场合最缺少儿童座椅?a 商场b 汽车c 餐厅d 卖场2、您觉得什么样材质的座椅比较适合儿童?a 布艺座椅b 皮质座椅c 塑料材质座椅3、在选购儿童座椅时什么因素是您考虑的重点?a 孩子的喜好b 实用性c 安全性4、你最想了解儿童座椅的哪些方面?a安装方法 b认证系统 c选购指南 d法律法规5、你对安全座椅国标有何看法?a非常期待 b有疑虑 c无所谓6、当前儿童座椅存在的问题?a椅的高度宽度及背部扶手尺寸不合理 b座面太硬c不够平稳倾角不合理 d不够美观7、在问题座椅设计应具有的原则和设计要点概括起来座椅设计原则有以下几项?a人体的主要重量由坐骨结节承担 b座椅的形式与尺寸应与功用有关 c座椅应使就坐者保持舒适坐姿,即满足人体测量学参数8、根据设计原则对座椅的哪几个尺寸进行研究?a座面高度、倾角、硬度 b座宽、座深 c靠背的高和宽d靠背与座面夹角 e扶手高度9、你认为哪种座椅能首先引起儿童的注意力?a色彩 b外形 c功能10、你知道车用儿童安全椅吗?a知道 b不知道11、儿童座椅接口类型?a欧洲标准的ISO FIX固定方式 b美国标准的LATCH固定方式c安全带固定方式12、如果你是私家车主,而且经常带孩子的话,会为自己的宝贝安装一个儿童安全座椅吗?a会 b不会 c正在考虑,但不知道买哪种合适13、国标实行后,你会购买并安装儿童座椅吗?a会 b不会 c难说14、你认为怎样判断一款安全椅的好坏?a价格越贵越好 b越轻便越好 c越重越好 d有无“ECE”标志15、您认为怎样才能让儿童安全座椅使用率更高?a宣传教育 b强制使用 c降低座椅价3.4调研总结通过调查发现,随着私家车越来越多,儿童乘车安全问题不容忽视,儿童汽车安全座椅已必不可少。
根据分析,此次儿童安全椅设计:首先,要符合儿童形体特点的人机工程学造型,完全配合不同年龄阶段儿童的生理特征,使其坐上去格外体贴舒适。
其次,应按照儿童心理学原则,采用适合的材料、图案和周边形状设计,给孩子们一种充实和被环绕的安全感。
第三,需要垫高十余公分的乘坐高度,使儿童视野更加开阔,增加儿童旅途乐趣。
安装要简单方便,即便是初次接触儿童安全座椅的父母,也能在几分钟的时间内轻易将其安装妥当,不用破坏汽车本身的装置;对此我设计了简单明确的搭扣和调节系带,让家长随时可以根据儿童生长特点进行调整,而且安全带设有自动警报系统,若安全带没有正确安装,将自动发出唧唧的警报声,非常方便。
座椅要做工精细,线形圆润光滑,不会损坏汽车本身的座椅。
焦作大学机电工程学院毕业设计汽车儿童安全椅设计4汽车儿童安全椅设计4.1设计定位好的创意和造型对产品功能的实现起着积极的促进作用。
从国外的儿童汽车安全座椅的设计理念出发,儿童家用汽车安全座椅的外型和功能都要从人性化的目的出发,都要符合安全和审美的功能,而不是盲目追求前卫和时尚。