Lenovo B490s B4450s使用 联想 官方 用户指南 说明书
联想电脑使用说明书

Corporate MarketsBefore you beginEnsure your browser is compatible. Check your current browser by going to the website: Supported browsers are:To attend and vote you must have your securityholder number and postcode.Appointed Proxy: Your proxy number will be provided by Link before the meeting.Please make sure you have this information before proceeding.Virtual Meeting Online Guide•Chrome – Version 44 & 45 and after •Firefox – 40.0.2 and after•Safari – OS X v10.9 & OS X v10.10 and after •Internet Explorer – 11 and up •Microsoft Edge – 92.0 and afterVirtual Meeting Online GuideStep 1Open your web browser and go to https://meetings.link Step 2Log in to the portal using your full name, mobile number, email address, and participant type.Please read and accept the terms and conditions clicking on the blue ‘Register and Watch button.On the left – a live webcast of the MeetingFull VotesTo submit a full vote on a resolution ensure you are in the‘Full Vote’ tab. Place your vote by clicking on the ‘For’, ‘Against’,or ‘Abstain’ voting buttons.Partial VotesTo submit a partial vote on a resolution ensure you are in the‘Partial Vote’ tab. You can enter the number of votes (for any or all)resolution/s. The total amount of votes that you are entitled to vote forwill be listed under each resolution. When you enter the numberof votes it will automatically tally how many votes you have left.Note: If you are submitting a partial vote and do not use all of your entitled votes, theun-voted portion will be submitted as No Instruction and therefore will not be counted.Once you have finished voting on the resolutions scroll down tothe bottom of the box and click on the ‘Submit Vote’ or‘Submit Partial Vote’ button.Note: You can close your voting card without submitting your vote at any time while voting remains open. Any votes you have already made will be saved for the next time you open up the voting card. The voting card will appear on the bottom left corner of the webpage. The message ‘Not yet submitted’ will appear at the bottom of the page.You can edit your voting card at any point while voting is open by clicking on ‘Edit Card’. This will reopen the voting card with any previous votes made.At the conclusion of the Meeting a red bar with a countdown timer will appear at the top of the Webcast and Slide windows advising the remaining voting time. Please make any changes and submit your voting cards.Once voting has been closed all submitted voting cards cannot be changed.2.How to ask a questionNote: Only verified S ecurityholders , Proxyholders and Company Representatives are eligible to ask questions.If you have yet to obtain a voting card, you will prompted to enter your securityholder number or proxy details before you can ask a question. To ask a question, click on the ‘Ask a Question’ button either at the top or bottom of the webpage.The ‘Ask a Question’ box will then pop up withtwo sections for completion.In the ‘Regarding’ section click on the drop down arrow and select the category/resolution for your question.Click in the ‘Question’ section and type your question and click on ‘Submit’.A ‘View Questions’ box will appear where you can view your questions at any point. Only you can see the questions you have asked.The Chairman will provide shareholders with areasonable opportunity to ask relevant questions or make relevant comments as each item of business is considered. Please note that where similarquestions are received from different shareholders, the Chairman will provide a single response, in orderto streamline the conduct of the AGM.3.DownloadsView relevant documentation in the Downloads section.4.Voting closingVoting will end 5 minutes after the close of the Meeting.At the conclusion of the Meeting a red bar with acountdown timer will appear at the top of the Webcast and Slide screens advising the remaining voting time. If you have not submitted your vote, you should do so now.Virtual Meeting Online Guidecontinued5. Optional questions and comments phone linea)Land line or mobile phoneb)The name and securityholder number of your holding/s c) T o obtain your unique PIN , please contact Link Market Services on 1800 990 363 (inside Australia) or +61 1800 990 363 (outsideAustralia) by Wednesday , 21 September 2022Joining the Meeting via PhoneStep 1From your land line or mobile device, call 1800 941 125 (inside Australia) or +61 2 9189 8865 (outside Australia)Step 2You will be greeted with a welcome message and provided with instructions on how to participate in the Meeting. Please listen to the instructions carefully.At the end of the welcome message you will be asked to provide your PIN by the moderator. This will verify you as a securityholder and allow you to ask a question or make a comment on the resolutions at the Meeting. Step 3Once the moderator has verified your details you will be placed into a waiting room where you will hear music playing.Step 4At the commencement of the Meeting, you will beadmitted to the Meeting where you will be able to listen to proceedings.Contact usAustraliaT +61 1800 990 363Asking a q uestion or making a commentStep 1When the Chairman calls for questions or comments on each item of business , press *1 on your keypad for the item of business that your questions or comments relates to. I f at any time you no longer wish to ask a question or make a comment, you can lower your hand by pressing *2 on your keypad.Step 2When it is time to ask your question or make your comment, the moderator will introduce you to the meeting. Your line will be unmuted and you will beprompted to speak. If you have also joined the Meeting online, please mute your laptop, desktop, tablet or mobile device before you speak to avoid technical difficulties for you and other shareholders .Step 3Your line will be muted once your question or comment has been asked / responded toWhat you will needFor shareholders or proxyholders who wish to ask their question or make their comment orally rather than via the online AGM platform, a questions and comments phone line will be available during the AGM。
联想 电脑 说明书
目录 i目录重要安全信息 (1)需要立即采取措施的情况 (1)安全通则 (2)选择工作环境 (12)附录A 有限保证/保修 (15)附录B 声明 (17)免责声明 (17)商标和版权 (17)附录C 有毒有害物质或元素声明................................................18ii 目录标志解释欢迎您使用联想产品。
本手册的用途在于帮助您正确地使用本产品,在第一次安装和使用本产品之前,请您务必先仔细阅读随机配送的所有资料,特别是本手册中安全信息及其他条款所提及的注意事项。
这会有助于您更好地使用本产品。
重要安全信息 1重要安全信息这些信息可以帮助您安全地使用台式计算机或笔记本电脑。
请遵循并保留计算机附带的所有信息。
本文档中的信息并不改变购买协议或 Lenovo™有限保证声明的条款。
客户的安全至关重要。
我们开发产品的目标是既安全又有效。
但个人计算机是电子设备。
电源线、电源适配器以及其他功能部件会引起潜在的安全危险,造成人身伤害或财产损失,在使用不当的情况下更是如此。
为减少这些危险,请按照产品随附的说明操作,遵守产品和操作说明中的所有警告并仔细阅读本文档中包含的信息。
严格按照本文档中包含的和随产品提供的信息操作有助于规避危险,建立一个更安全的计算机工作环境。
需要立即采取措施的情况因使用不当或疏忽可能会损坏产品。
有些产品的损坏情况相当严重,必须先由经过授权的维修人员检查(如有必要,则进行维修)才能重新使用。
与其他任何电子设备一样,开启产品时要特别小心。
在极少数情况下,可能会发现机器中散发出异味或者冒出烟雾或火花。
或者可能会听到类似爆裂、破裂或嘶嘶的声音。
这些情况可能只表示内部电子元件已经不安全或失控。
也可能表示存在安全隐患。
但是,请勿自行贸然采取措施或尝试诊2重要安全信息断这些情况。
请联系客户支持中心寻求进一步的指导。
请经常检查计算机及其组件是否有受损、磨损或危险迹象。
联想笔记本电脑使用说明书

敬告用户亲爱的用户:感谢您购买联想笔记本电脑!在您使用本产品前,请务必仔细阅读本使用说明书。
您能成为我们的用户,是我们莫大的荣幸。
为了使您尽快掌握联想笔记本的使用方法,我们特别为您编写了此说明书。
我们对产品说明书的编排力求全面而又简捷。
从中您可以获得有关本笔记本产品的系统配置、安装步骤、及操作系统的基本使用方法等方面的一些知识。
我们强烈建议您在使用本产品之前,务必先仔细阅读,这会有助于您更好地使用电脑。
如果您未按本说明书的要求操作电脑而由此引起的任何损失,联想(北京)有限公司将不承担责任。
我们已经尽我们最大的努力尽量避免人为的失误,以确保本说明书中所提供的信息是正确可靠的,但我们不能完全保证:不会有在印刷之前未曾发现或检查出的差错,以及那些我们无法控制的印刷、装订、分发等环节的疏漏,请您多加包涵!有时,我们为了提高部件及整机的性能和可靠性,可能会对产品的硬件或软件配置作了一些小的调整,这样有可能会导致机器的实际情况与说明书有某些不一致的地方,但这不会实质性地影响您对机器的使用,请您能够谅解。
为了保障您能够及时享受到联想公司为您提供的全方位售后服务(网站自助服务,E-mail专家诊台,电话咨询服务),请您及时注册您的个人信息和产品信息。
注册方式:登陆联想网站:,进入服务&支持,点击“用户登陆注册”即可完成注册.如果您在使用笔记本电脑过程中出现疑问或者问题,请拨打大客户支持专线:400-810-6666。
谢谢您的合作!联想(北京)有限公司郑重声明已在中国专利局和商标局注册。
本说明书使用的商标、商号及图标均属于联想(北京)有限公司或其授权人,并受中华人民共和国法律及国际条约保护。
本说明书提及的其他产品的注册商标归其相应公司所有。
本说明书仅适用于书中所介绍的联想笔记本电脑同型号产品的使用和使用条件及环境要求的说明,本说明书并不一定能够适用于其他型号和配置的联想笔记本电脑产品,联想也不保证本说明书能够适用于其他品牌的产品。
联想笔记本电脑安全使用指南说明书
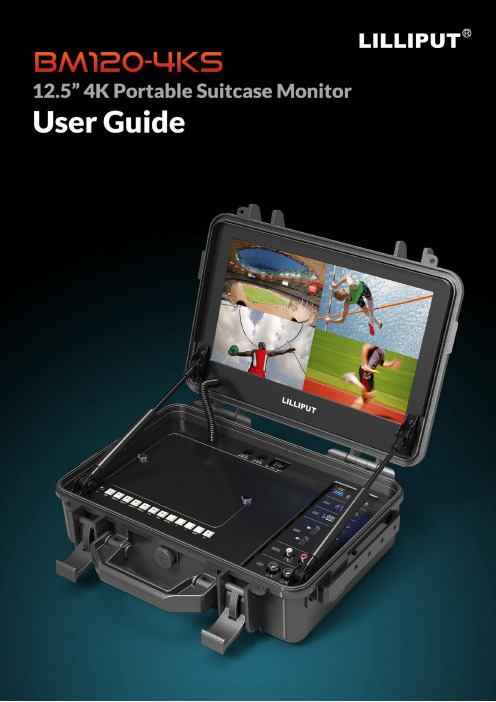
Important Safety Instructionscertified for international use. However, like all electronic equipment, the device should be usedwith care. Please read and follow the safety instructions to protect yourself from possible injury andto minimize the risk of damage to the unit.●Please do not place the display screen towards the ground to avoid scratching the LCD surface.●Please avoid heavy impact.●Please do not use chemical solutions to clean this product. Simply wipe with a soft cloth to keep clean of thesurface.●Please do not place on uneven surfaces.●Please do not store the monitor with sharp, metallic objects.●Please follow the instructions and trouble-shooting to adjust the product.●Internal adjustments or repairs must be performed by a qualified technician.●Please keep user guide for future reference.●Please unplug the power and remove the battery if long-term no-use, or thunder weather.Safety Disposal For Old Electronic EquipmentPlease do not regard the old electronic equipment as municipal waste and do not incinerate old electronic equipment. Instead please always follow local regulations and hand it over to the applicable collection stand for safe recycling. Ensure that these waste materials can be effectively disposed of and recycled to prevent ourenvironment and families from negative effects.IntroductionBM120-4KS is a precision broadcast monitor designed for the film and video shooting on any type of camera. Providing the superior picture quality, as well as a variety of professional assist functions, including 3D-Lut, HDR, Level Meter, Histogram, Peaking, Exposure, False Color, etc. It can help the photographer analyzing every detail of the picture and final capture the best side.FeaturesSupport multiple signal inputs 3G-SDI, HDMI, DVI and VGA.Multiple View Display supports quad view split from different input singles simultaneously.Ultra HD 4K screens containing 8.3 million pixel (3840×2160), so the resolution is four times that of Full HD. 3D LUT for Accurate Color Reproduction and Color space display(Native/Rec.709/User1~User3).Support to upload 3D LUT table via USB port.Equip HDR function.Image flip offers great convenience for user’s user to place the monitor with various mounting methods under different conditions. Users can view the monitor normally no matter what mounting angles.Perfect size for both suitcase and rack mount.WHDI wireless module for optionalCONTENTS1. Product Description (4)1-1. Front Panel (4)1.2 Rear Panel (5)1-2-1. Interfaces (5)2. Sun Shade Installation (6)3. MENU Settings (8)3-1. FN user definable shortcut buttons (8)3-2. / Buttons Operation (9)3-3. MENU Operation (9)3-3-1. Picture (9)3-3-2. Function (12)3-3-3. Display Mode (15)3-3-4. Display Settings (16)3-3-5. Select Region (17)3-3-6. Input (18)3-3-7. Audio (18)3-3-8. VGA (19)3-3-9. System (19)3-3-10. Information (21)4. Accessories (22)5. Parameters (23)6. Trouble Shooting (25)7. Appendix 1: 3D LUT of Loading Manual (26)8. Warranty (30)8-1. Repair Procedure and Terms (30)8-2. Free Repair Exclusions (30)1.P roduct Description 1-1. Front Panel1.2 Rear Panel1-2-1. Interfaces1. Earphone jack: 3.5mm earphone slot.2. SDI button: Signal switch to SDI mode when light on.3. Speaker4. HDMI 1 ~ 4 buttons: Signal switch to HDMI mode when light on.5. DVI button: Signal switch to DVI mode when light on.6. VGA button: Signal switch to VGA mode when light on.7. MENU button Press to enter menu.Press to enter option in the menu.14562 789101117181920218.◄ Left selection keySelect option in the menu. Decrease the option value.Before enter the menu, single press to activate volume, press again to decrease the volume.9. ► Right selection keySelect option in the menu. Increase the option value.10. EXIT button: To return or exit the menu function.11. FN: User definable shortcut button.Default: [Peaking]12. SDI input/output ports13. Audio L/R14. HDMI input port ×4HDMI 1 & HDMI 2: HDMI2.0, support 4K 60HzHDMI 3 & HDMI 4: HDMI1.4, support to 4K 30HzNote!Only HDMI 1 support HDR15. DVI input port16. VGA input port17. TALLY port18. USB port19. Power switch20. DC 12V/3A input21. DC 8V/1A output2. Sun Shade InstallationAs shown below after finished.3. MENU SettingsPlease check whether the device is connected well or not.3-1. FN user definable shortcut buttonsLong keep pressing FN buttons for 3-5 seconds to activate shortcut menu setting. Option selected will be highlighted as white. option will be highlighted as yellow, unavailable option will be highlighted as gray. Select option via " / " buttons. Then press "MENU" button to confirm to set as default option.Shortcut functions can be customized to meet user’s needs as following:NO Shortcut Menu when long press FN shortcut button1 Center Marker2 Safety Marker3 Aspect Marker4 Aspect5 Underscan6 Check Field7 Freeze8 Pixel to Pixel9 Peaking10 False Color11 Exposure (Only available under SDI mode)12 Histogram(Only available under SDI mode)13 Time Code (Only available under SDI mode)14 Display Mode15 Disp Mirror16 Color Space3-2./ Buttons OperationUnder non menu screen, press " / " buttons to activate volume bar, Use " / " buttons to select the option in the menu.3-3. MENU OperationWhen power on, press "MENU" on the device, the menu of function setting will display on the screen. Press " / " button to choose menu;Then press "MENU" button to confirm; Press "EXIT" button to return / exit menu.3-3-1. PicturePicture Brightness0~100Contrast0~100Saturation0~100Hue0~100Sharpness0~4Color Space Native/Rec.709/User1~User3HDR Off/Auto/HDR10 (Available only under “HDMI1”mode)BacklightModeStandard/Outdoor/UserBacklight 0~100 (Note: Available only under “User” mode)Temperature 9300/7500/6500/5800/UserRed Gain 0~256 (Note: Available only under “User”mode)Green Gain0~256Blue Gain0~256● BrightnessAdjust the general brightness of the LCD. For example, if it uses outside in bright conditions, increase the LCD brightness to make it easier to view.● ContrastIncrease or decrease the range between the bright and dark areas of the image. High contrast can reveal detail and depth in the image, and low contrast can make the image appear soft and flat.● SaturationAdjust the color intensity. Press " / " buttons to increase or decrease the color intensity.● HueIt means tint. Use this setting to choose the tint from 0 to 100.● SharpnessIncrease or decrease the sharpness of the image. When the sharpness of image is insufficient, the value of sharpness can be increased to make the image clearer.● Color SpaceSelects the color space from among [Native], [Rec.709] [User1~User3]:- Saturation/Hue/Color Temperature is only available under Native mode.- Select [AUTO] or [HDR10] mode under HDR function, the color space will be saved as Native mode automatically. It can be only changed to other color space mode by hand.- It supports to upload user-defined Lut table "User1~User3".- User-defined Lut table only support RGB format. If the format is not correct, please transform it to the correct format by using tool "Lut Converter" (See appendix 1 for details) and named as User1.cube, User2.cube orUser3.cube.- Copy the User-defined Lut table to flash disk and insert it to the device, the screen displays a prompt message to show whether to upgrade. Select upgrade, the device will be loading automatically in a black screen and then restart after finishing loading.- Requirements for flash diskFormat: FAT32Memory: <16GFile directory: root directoryMust be formatting before using it.- Please note that the responding time for loading user-defined Lut table will be a bit slower. Please wait patiently. - The device only supports loading one table at a time. If needs to load more than one tables, please load them one by one.● HDRSelect HDR from among [Off], [Auto], [HDR10].- HDR is only available under HDMI 1 signal input.- HDR under AUTO or DHR10 mode, and the input signal support HDR, the below function is disabled: Contrast, Brightness, Saturation, Hue, Sharpness, Color Space, BackLightColor Temperature- [Auto]Automatically recognize whether the input HDMI signal supports HDR. If it supports, the input signal shows as the HDR10 performance. If it doesn’t, HDR function is disabled. It’s suggested select [Auto] when use HDR function.- [HDR10]Do not recognize whether the input HDMI signal supports HDR, it will activate the HDR function enforcedly when input signal. If the input signal does not support the HDR function, the image displays abnormal color.● Backlight ModeSelect Backlight Mode from among [Standard], [Outdoor], [User].● BacklightIt is only available under [User] mode.● TemperatureAdjust the color temperature to make the image warmer (Yellow) or colder (Blue). Increase the value to make the image be warmer, decrease the value to make the image be colder. User can use this function to strengthen, weaken or balance the image color according requirements. The standard white light color temperature is 6500K.Note! ONLY available under "User" mode to adjust Color Gain.3-3-2. FunctionFunction Center Marker OFF/ ONSafety Marker OFF, 95%, 93%, 90%, 88%, 85%, 80% Aspect Marker OFF, Full, 17:9, 16:9, 4:3, 1.85:1, 2.35:1 Aspect Full ,17:9, 16:9, 4:3, 1.85:1, 2.35:1 Underscan OFF/ ONPixel To Pixel OFF/ ONCheck Filed OFF/ Red, Green, BlueFreeze OFF/ ONPeaking OFF/ ONPeaking color Red/Green/Blue/White Only available whenunder SDI Mode.Peaking level 0~100 Peaking level 0~100 False Color OFF/ ON Exposure OFF/ ONOnly available when under SDI ModeExposure level 0~100 Histogram OFF/ ON Time CodeOFF/ LTC/ VITC● Center MarkerSelect On, it will appear "+" marker on center of screen. ● Safety MarkerUse this setting to set off the safety marker or choose the one of the safety markers: [OFF], [95%], [93%], [90%], [88%], [85%], [80%]. ● Aspect MarkerDisplay the different aspect of the displayed image. [OFF], [Full], [17:9], [16:9], [4:3], [1.85:1], [2.35:1]. ● AspectSwitch aspect ratio setting among from [Full][17:9][16:9][4:3][1.85:1][2.35:1]. For example: In [Full] mode, images are scaled to fill the entire screen.In [4:3] mode, images are scaled up or down to fill the maximum 4:3 portion of the screen. In [16:9] mode, images are scaled to fill the entire screen if the device aspect is 16:9. ● UnderscanIf the image shows size error, use this setting to zoom in/out pictures automatically when receiving HDMI signals ● Pixel to PixelThe pixel to pixel is a monitor set to 1:1 pixel mapping with native fixed pixels, which avoids loss of sharpness due to scaling artifacts and normally avoids incorrect aspect ratio due to stretching.● Check FieldUse the check field modes for monitor calibration or to analyze individual color components of an image. The device preset in Blue, Green, and Red check field modes, only the selected color will be shown.● PeakingThe peaking is used to aid the camera operator in obtaining the sharpest possible picture. Select "On" to display colored outlines around sharp areas of the image.Note! Peaking color and level ONLY can be changed when under SDI mode.● False ColorThis monitor has a false color filter to aid in the setting of camera exposure. As the camera Iris is adjusted, elements of the image will change color based on the luminance or brightness values. This enables proper exposure to be achieved without the use of costly, complicated external equipment..● Exposure & Exposure LevelThe exposure feature helps the user achieve optimum exposure by displaying diagonal lines over areas of the image that exceed the setting exposure level. The exposure level can be set to 0~100.Note!ONLY available when under SDI mode.● HistogramThe histogram makes users view visually the exposure of whole and each RGM channels. It has the full contrast rang of video for easy color correction during post production. NOTE: Only available when under SDI mode.● Time CodeThe Time Code supports Longitudinal time code (LTC) and Vertical interval time code (VITC). The time code display on the monitor is synchronizing with that of Full HD camcorder’s. It displays the duration of the clips in hours: minutes: seconds: frames. It’s very useful for identifying specific frame in film and video production.Note! ONLY available when under SDI mode.3-3-3. Display ModeDisplay Mode 1P,2P LR,2P TB,2P PIP,4P● Display ModeThe monitor presets 1P, 2P LR, 2P TB, 2P PIP, 4P five display modes. This function can be work with Select Region function to meet user’s requirement. For example: In 1P mode, images are scaled to fill the entire screen. In 2P LR, display two different signals on the left and right sides.3-3-4. Display SettingsDisplay Setting Display Rotate0°, 90°, 180°, 270°Available when singledisplayDisplay Mirror OFF, L/R, U/D Available when dual displayon left and right.● Display RotateThis setting support to flip the image to 0°, 90°, 180°, 270° modes. It is only available when single display.● Display mirrorThis setting displays two different input signals to Light/Right or Up and Down, the user can choose it to view the images according to the requirement. It is only available when dual display on left and right.3-3-5. Select RegionSelect Region Unavailable Display mode 1PLeft Side/Right Side/Full Display mode 2P LRTop Side/Bottom Side/Full Display mode 2P TBMain/Sub/Full Display mode 2P PIP1P In/1P Out/2P In/2P Out/3PIn/3P Out/4P In/4P Out/4P fullDisplay mode 4PNote! This Menu is enabled for audio source selection. It is only available when under multi-picture and picture-in-picture mode. Activate the corresponding EN source to select the needed audio and picture under Audio Source function.3-3-6. InputInput Signal switch to region selected according to users’ needs. 3-3-7. AudioAudio Volume0~100Level Meter OFF/ON(NOTE: Only available when under SDI mode) Audio Source Analog/Digital region 1~4Digital region 2~4 is only available under multi-displays mode and must activate the corresponding Region under Select Region function at the same time.3-3-8. VGAVGA Auto AdjustH Position 0~100V Position 0~100ClockPhase0~100 3-3-9. SystemSystem Reset Press to confirm after selected. Menu Time10~60sOSD H Position 0~100 (To set menu display area) OSD V Position0~100 (To set menu display area) Language English, Chinese Transparency 0~255 (To set menu transparency) Color Calibration Off/OnRotate0°, 90°, 270°Border Width0~10Border Color R, G, B, W● ResetIf there is any problem unknown, press to confirm after selecting. The monitor will return to default set.● Menu TimeAdjust the OSD displaying time form 10 to 60s.● OSD H Position and OSD V PositionMove OSD horizontally or vertically.● LanguageSwitch between English and Chinese.● TransparencySet Menu transparency. Increase the value, the more transparent it will be.● OSD RotateFlip OSD to three modes.● Border Width and Border ColorUser can choose the border color among Red, Green, Blue, White. And adjust the thickness by using Border Width function. This setting is available when display in 2P LR, 2P TB, 2P PIP, 4P mode.The lines separate the different inputsignals means Border.3-3-10. InformationInformation To display current information.4. Accessories1.V-mount battery plate 1 piece2.Tally connector 1 piece3.Sunshade 1 pieceB drive disk 1 piece5.WHDI wireless module (optional) 1 pair6.12V 3A DC power adapter (optional) 1 piece5. ParametersDISPLAY Panel12.5"LCDPhysical Resolution3840x2160Aspect Ratio16:9Brightness400cd/m2(+/-10%@center) Contrast1500:1Viewing Angle170*/170"(H/V)INPUT 3G-SDI3G SDI(support up to1080p60Hz) HDMI HDMI2.0x2(support up to4K60Hz)HDMI1.4b ×2(support up to4K30Hz) DVI1VGA1Audio2(L/R)Tally1USB1OUTPUT3G-SDI3G SDI(support up to1080p60Hz) AUDIO Speaker1Ear Jack1POWER Input Voltage DC10-24VPower Consumption23W(12V)Battery Plate V-mount battery plate Power Output DC8VENVIRONMENT Operating Temperature0'C~50'CStorage Temperature-10'C~60'CDIMENSION Dimension(WD)356.8mm x309.8mm x122.1mm Weight 4.75kg6. Trouble Shooting1) Only black-and-white display.Check whether the color saturation is properly setup or not.2) Power on but no pictures.Check whether the cables of HDMI, VGA,DVI and 3G-SDI are correctly connected or not. Please use the standard power adapter coming with the product package. Improper power input may cause damage.3) Wrong or abnormal colors.Check whether the cables are correctly and properly connected or not. Broken or loose pins of the cables may cause a bad connection.4) When on the picture shows size error.Press “MENU → Function → Underscan” to zoom in/out pictures automatically when receiving HDMI signals 5) Other problems.Please press “MENU” button and choose “MENU → System → Reset → confirm”6) According to the ISP, the machine cannot function properly.ISP for program upgrades, non-professionals do not use. Please reboot your device if press accidentally!7) No Sound.Press HDMI button if no sound; if still unavailable, please contact the technician.8) No signal displayed when connecting with HDMI 1.Please long press HDMI 1 button for 3-5 seconds to activate HDMI signal.Note! Due to constant effort to improve products and product features, specifications may change without notice.7. Appendix 1: 3D LUT of Loading ManualBM-4KS supports 3DLUT to load the color calibration document and the User Log by using flash disk.● Format Requirement●LUT format:Type: .cube3D Size: 17x17x17Data Order: BGRTable Order: BGR●USB flash disk versionUSB: 2.0System: FAT32Size: <16G●Color calibration document: Rec709. cube●User Log: User1 ~User3.cube● LUT Format ConversionThe format of LUT should be transformed if it doesn’t meet Lilliput’s requirement. It can be transformed by using Lut Converter (V1.3.30).● Activate Lut ConverterOne individual Product ID for one computer. Please send the ID number to Lilliput to get an Enter Key. Then the computer gets the permission of Lilliput Lut Converter after inputting the Enter Key.● Enter the Lut Converter interface after input the Enter Key● Click Input File, then select *LUT● Click Output File, and then select the file name as required format.*Such as:Rec709.cube, 3D Size: 17, Data Order: RGB, Table Order: RGB.Note! The format which shown in Red Box above should be selected to RGB.● Click Generate Lut button to finish the transform.● USB Loading●The USB flash disk must be formatted before using to make sure that there are no other files in the root directory.●Copy needed files to the root directory of the USB flash drive. Please note that the system only supports updating one LUT table at a time. Therefore, only a single file to be loaded can be copied to the USB flash drive. If it needs to update more LUT tables, please delete other files in USB flash disk and repeat the above steps.●Power on the device, insert the corresponding video signal into any video signal interface, and switch the signal to the corresponding channel to make sure the device displays normally. (It doesn’t suggest that update the LUT table when there is no input signal as the device will enter the power saving mode in such situation.)●Insert the flash disk into the USB interface on the device and wait for about 5 seconds. It will pop-up prompt box "Load Rec709.cube" after detecting the flash disk. Operate by using press "MENU", "", "", "EXIT" on the front of device. Click "YES" to load, and click "NO" or press "EXIT" to exit. The device displays a black screen after confirmed the loading, and it will update the corresponding LUT table back-stage according to the name of the updated LUT. The device will be restarted automatically after completed. The whole updating process takes about6 seconds according to the updated LUT name.●Please activate and set up the updated LUT table under the menu after restart. It doesn’t need to be reset if the current updated LUT has been selected before updating.●Please note it only calibrates the color for Rec709 mode and upload it to the device in the factory. User1~User3 is grayed out and disabled in the menu. After loading the user LUT table, the corresponding button will be shown as blue and able to be use, shown as the following figure.Before loading After loading[在此处键入]8. Warranty8-1. Repair Procedure and Terms8-1-1. Those products bought from Lilliput, we promise to provide one (1) year free repair service. Lilliput warrants its products against defects (excluding physical damage to the product) in materials and workmanship under normal use for a period of one (1) year from the date of delivery. Beyond the warranty period such services shall be charged at the then prevailing rates in Lilliput’s price list.8-1-2. It is possible that you may need to return products to Lilliput for servicing or troubleshooting. Before you send any product to Lilliput, you must e-mail us, telephone us or fax us and wait for a Return Material Authorization (RMA) form to be sent to ually within two business days, your RMA request will be reviewed and we will contact you with the results. If approved, a RMA number will be e-mailed to you.Customers should deliver the defective products to our appointed service center within 15 days from when you receive the RMA number. For our best receipt, the defective products should be properly packed.Letting us know the packaging details, as well as sender and delivery date.Note!Returned products MUST be subject to the following operations, otherwise, Lilliput has theright to reject.●RMA number must be clearly written on the shipping boxes.●Returned products must be delivered within 15 days from when we send out the RMA number.●Returned items must be in accordance with the RMA form.●Malfunction or damage caused by improper packaging during transportation.8-1-3. Transportation cost which includes shipping charges, duties, insurance, taxes and any other charges for returned products to our repair center is the responsibility of the purchaser. After our verification that the returned product matches our warranty terms and conditions, Lilliput will repair the defective product free of charge, and also bear the resend transportation charge. If the delivered product is confirmed out of warranty, our customer service center will inform the customers. Then, you may decide to pay for the repair items or not.8-2. Free Repair Exclusions●Warranty labels of products or accessories are removed or alteration.●There is no Lilliput RMA number of the returned products.●Operated and maintained in any manner inconsistent with the manual terms and conditions.●Malfunction or damage resulting from repairs or alterations made by parties other than Lilliput or anauthorized distributor.●Malfunction or damage caused by forces of nature (for example, earthquake, fire, flood, lighting strike,War, etc).●Any damages caused by accidents, any unreasonable use or neglect, deterioration, mishandling or failure ofmaintenance (for example, damages caused in transit).●Beyond one (1) year warranty period.30Thank You for Using Lilliput BM120-4KS。
联想使用说明书

6
第 1 章 了解您的计算机
设定热键模式
默认情况下,按特定的热键可使用热键功能。不过,可以在 BIOS 设置程序中 停用热键模式。若要停用热键模式: 1 2 关闭电脑。 按 Novo 按钮,并选择 BIOS Setup (BIOS 设置) 。
3
在 BIOS 设置程序中,打开 Configuration(配置)菜单,然后将 HotKey Mode (热键模式)的设置从 Enabled (启用)改变为 Disabled (停 用) 。
: 设为静音 / 取消静音。 : 降低音量。 : 调高音量。 : 关闭当前活动的窗口。 : 刷新桌面或当前活动的窗口。 : 启用 / 禁用触控板。
: : : : : :
启用 / 禁用飞行模式。 显示所有当前活动的应用程序。 打开 / 关闭 LCD 显示屏的背 光灯。 在计算机和外接设备之间切 换显示。 降低显示屏亮度。 提高显示屏亮度。
7
第 1 章 了解您的计算机
4
打开 Exit (退出) 菜单, 并选择 Exit Saving Changes (退出并保存改变) 。
ㅢж⡾ 2014 ᒪ 4 ᴾ © ⡾ᵹᡶᴿ ᵜ䈤᰾ҖѝⲴ䈤᰾઼ᢰᵟؑ䘲⭘Ҿԕл㚄ᜣׯᩪᔿ䇑㇇ᵪ˄ਖᴹ䈤᰾䲔ཆ˅˖ ᵰශ Lenovo G40-30 Lenovo G40-45 Lenovo G40-70 Lenovo G40-70m Lenovo G40-75m Lenovo G50-30 Lenovo G50-45 Lenovo G50-70 Lenovo G50-70m Lenovo G50-75m Lenovo Z40-70 Lenovo Z40-75 Lenovo Z50-70 Lenovo Z50-75 ᵰශ 20417, 80FY 20374, 80E1 20369, 80DX 20422, 80G3 80HF 20418, 80G0 20375, 80E3 20351, 80DY 20423, 80G4 80HG 20366, 80E6 20360, 80DW 20354, 80E7 20356, 80EC
联想昭阳笔记本电脑使用说明书-推荐下载

联想昭阳笔记本电脑使用说明书 1.1.1 前部视图 1 LCD 卡钩 6 键盘 2 显示屏 7 触控板 3 电源按钮 8 触控板按钮 4 快捷按钮 9 设备状态指示灯 5 状态指示灯 1.LCD 卡钩 LCD 卡钩用于合上 LCD 屏时,将显示屏固定在笔记本电脑上. 若要打开显示屏,请向右推卡钩并抬起显示屏.关上显示屏时, 卡钩 会嵌入卡钩槽内,将 LCD 屏固定. 2.显示屏 显示屏是 14.1" TFT/XGA 液晶显示屏. 3.电源按钮 按此按钮可以打开计算机的电源. 4.快捷按钮 :NOVO 键,关机状态下用于开机并进入"移动伴侣"程序;在 轻松移动 源自联想昭阳 2 联想昭阳笔记本电脑使用说明书 Windows XP 操作系统下,出厂设置为运行联想用户使用指
联想昭阳笔记本电脑使用说明书 第一章 轻松入门 本说明书提供了您所使用的笔记本电脑的硬件和软件信息. 您应该阅读全文,特别是,如果您最近才对笔记本电脑产生兴 趣或仅 仅是一位初学者的话.如果在您第一次阅读后有不懂的地方, 请不必 担心.将本说明书放在计算机旁,边用边学. 无论您的水平如何,请注意被标记的警告和安全信息.同时请 注 意前言中的安全信息. 注意:1. 在使用本机的时候,严禁在开机时对本机的各种部件 进 行插拔(USB 设备和 PCMCIA 设备除外). 2. 该机型采用较多新器件,请用户严格按照说明书安装驱 动程序,以获取最佳使用效果. 1.1 了解您的笔记本电脑 联想昭阳 A500 笔记本电脑集精巧设计和强大计算能力于一 身, 扩展能力强大,是您办公,休闲,娱乐的好伙伴. 轻松移动 源自联想昭阳 1
对全部高中资料试卷电气设备,在安装过程中以及安装结束后进行高中资料试卷调整试验;通电检查所有设备高中资料电试力卷保相护互装作置用调与试相技互术关,系电通,力1根保过据护管生高线产中0不工资仅艺料可高试以中卷解资配决料置吊试技顶卷术层要是配求指置,机不对组规电在范气进高设行中备继资进电料行保试空护卷载高问与中题带资2负料2,荷试而下卷且高总可中体保资配障料置2试时32卷,3各调需类控要管试在路验最习;大题对限到设度位备内。进来在行确管调保路整机敷使组设其高过在中程正资1常料中工试,况卷要下安加与全强过,看度并25工且52作尽22下可护都能1关可地于以缩管正小路常故高工障中作高资;中料对资试于料卷继试连电卷接保破管护坏口进范处行围理整,高核或中对者资定对料值某试,些卷审异弯核常扁与高度校中固对资定图料盒纸试位,卷置编工.写况保复进护杂行层设自防备动腐与处跨装理接置,地高尤线中其弯资要曲料避半试免径卷错标调误高试高等方中,案资要,料求编试技5写、卷术重电保交要气护底设设装。备备置管4高调、动线中试电作敷资高气,设料中课并技3试资件且、术卷料中拒管试试调绝路包验卷试动敷含方技作设线案术,技槽以来术、及避管系免架统不等启必多动要项方高方案中式;资,对料为整试解套卷决启突高动然中过停语程机文中。电高因气中此课资,件料电中试力管卷高壁电中薄气资、设料接备试口进卷不行保严调护等试装问工置题作调,并试合且技理进术利行,用过要管关求线运电敷行力设高保技中护术资装。料置线试做缆卷到敷技准设术确原指灵则导活:。。在对对分于于线调差盒试动处过保,程护当中装不高置同中高电资中压料资回试料路卷试交技卷叉术调时问试,题技应,术采作是用为指金调发属试电隔人机板员一进,变行需压隔要器开在组处事在理前发;掌生同握内一图部线纸故槽资障内料时,、,强设需电备要回制进路造行须厂外同家部时出电切具源断高高习中中题资资电料料源试试,卷卷线试切缆验除敷报从设告而完与采毕相用,关高要技中进术资行资料检料试查,卷和并主检且要测了保处解护理现装。场置设。备高中资料试卷布置情况与有关高中资料试卷电气系统接线等情况,然后根据规范与规程规定,制定设备调试高中资料试卷方案。
联想笔记本电脑用户手册说明书
● Although this product is designed and tested to comply with national electrical safety standard, there will be noise caused by the interference from other machines in rare cases. If this happens, please try to increase the distance from other machines.
1) Thick cement wall existence between transmit and receiver, which will cause serious signal loss for transmission.
2) Quite close to the refrigerator, microwave ovens or other fitments with large metal surface.
● Do not exposed to dripping or splashing. Do not place any container filled with liquid on the product (eg. vases ).
● Do not block or stick anything on the air vent of product ; Do not remove the cover or put objects just like steel pins Into the gap of the air vent to avoid electric shock ,
笔记本电脑使用说明书

本使用说明书提供了您所使用的笔记本电脑的硬件和软件信息。
由于笔记本电脑属于精密电子设备,在使用前您应该阅读全文。
特别是,如果您最近才对笔记本电脑产生兴趣或仅仅是一位初学者的话。
如果在您第一次阅读后有不懂的地方,请不必担心,将这本说明书放在计算机旁,边用边学。
1 USB PCMCIA 2 1.1 感谢您购买并使用联想昭阳天逸80 笔记本电脑。
该笔记本电脑集精巧的设计和强大的性能于一身,并能够连接多种不同外设进行扩展,是您办公、休闲、娱乐的好伙伴。
1.1.1 1 联想笔记本电脑使用说明书 1 LCD 开关 2 TFT 彩色液晶屏 3 电源按钮 4 快捷键按钮 5 键盘状态指示灯 6 键盘 7 触控板(TouchPad) 1 LCD 使用时,将屏钩向右推,然后向上轻推,即可打开显示屏。
2 TFT 本机采用 1 5. 4 英寸16: 10 TFT 彩色液晶显示屏,最高支持分辨率为 1 280*800, 32bit 彩色。
3 2 联想笔记本电脑使用说明书用于打开和关闭笔记本电脑的电源。
通过在系统的电源管理设置,在开机状态下按此键可以进入休眠/待机状态,或从休眠/待机状态中唤醒。
4-5 4 1 . Novo 键作为一键恢复键,用于开机进入“一键恢复”程序。
2.静音键开启和关闭静音功能 5. 1 .大写指示灯指示灯亮时表示大写启动 2.小键盘指示灯指示灯亮时表示小键盘启动 3.卷轴指示灯显示目前是否处于卷轴状态 6. 标准86 键键盘(内嵌数字键盘、功能键,与[Fn] 键组合,可以实现部分功能的快捷应用) ,详细介绍请参见使用键盘。
3 联想笔记本电脑使用说明书 7. TouchPad 相当于鼠标控制光标的移动,有两个按键相当于鼠标左右键,在安装其驱动程序后,还有一些增强功能, 详细介绍请参见使用触控板(Touch Pad)。
1.1.2 1 内置扬声器 2 音频接口 3 Audi o DJ 4 系统状态指示灯 5 无线网卡开关 1. 笔记本多媒体立体声扬声器,可输出清晰的立体声音频。
- 1、下载文档前请自行甄别文档内容的完整性,平台不提供额外的编辑、内容补充、找答案等附加服务。
- 2、"仅部分预览"的文档,不可在线预览部分如存在完整性等问题,可反馈申请退款(可完整预览的文档不适用该条件!)。
- 3、如文档侵犯您的权益,请联系客服反馈,我们会尽快为您处理(人工客服工作时间:9:00-18:30)。
商标..................................................................................................................... 31
i
第 1 章 认识您的计算机 正视图 ------------------------------------------------------------------------------------------------------------
功能键组合 使用功能键,可以立即改变操作功能。若要使用此功能,按住 Fn a ,然后 按其中一个功能键 b。
b
a
b
4
第 1 章 认识您的计算机
以下内容描述了每组功能键的功能。
Fn + Esc:
激活摄像头设置。
注释 : Windows 7:将打开摄像头和音频设置窗口。随后将开启摄像头预览。更改所需的摄像头和音
Lenovo B490s/B4450s
使用说明书
注释 • 使用本产品之前,请务必先阅读《联想安全及通用信息指南》。 • 本说明书中的某些说明可能假设您所使用的是 Windows® 7 or 8。如果您使
用的是其它版本的 Windows 操作系统,某些操作可能会稍有不同。如果您 使用的是其它操作系统,则某些操作可能不适用。 • 本说明书描述的是多数机型具备的通用功能,其中部分功能可能并不适用 于您的计算机,或者您的计算机可能包含本使用说明书中未提及的一些功 能。 • 如未另行标注,本说明书使用的插图机型为 Lenovo B490s。 • 本说明书中的插图可能与实际产品不同。请以实物为准。
注释 : 仅在 Windows 7 操作系统中支持 NVIDIA Optimus 显卡功能。
3
第 1 章 认识您的计算机
使用键盘 本计算机的标准键盘具有数字键和功能键,某些特定型号的键盘有单独的数 字键区。 数字键盘 此键盘有单独的数字小键盘。若要启用或禁用此数字键盘,按 Fn + F8 键。
第 3 章 联想一键恢复系统 ...................................................................................21 Windows 7 一键恢复系统 ........................................................................................21 Windows 8 一键恢复系统 ........................................................................................22
注释 : 通常情况下,Windows 检测到连接了新设备后,会自动安装驱动程序。但是,某些设 备可能需要您在连接之前先安装驱动程序。连接设备之前,请先查看设备制造商提供的 说明书。
温馨提示: 您可以随时访问联想官方网站()以获得快捷的网络支持服务: 点击页面左下方的“驱动下载专区”,根据提示输入您的主机编号,即可查询机器的配置、保修和相 应的驱动程序信息; 点击“维修网点”并选择您所在的城市,即可查询当地的服务网点信息以便于您送修计算机! 谢谢!
激活暂停功能。
Fn + End:
激活中断功能。
Fn + PgUp:
启用/禁用滚动锁定。
Fn + PgDn:
激活插入功能。
Fn + ↑ / ↓:
增加/降低显示屏亮度。
Fn + → / ← :
增加/降低音量。
5
第 1 章 认识您的计算机
左视图 -----------------------------------------------------------------------------------------------------------
第一版(2013年6月) © 版权所有 联想 2013。
目录
第 1 章 认识您的计算机.........................................................................................1 正视图............................................................................................................................ 1 左视图............................................................................................................................ 6 右视图..........................................................................................................................10 前视图..........................................................................................................................11 底视图..........................................................................................................................12
a
b
cd e
a Kensington 槽 b 通风口
此处连接安全锁 (未提供),有助于防止计算机被盗和被 他人擅自使用。 您可以在计算机上安装安全锁,有助于防止他人未经允许 而搬移计算机。关于安装安全锁的详细说明,请参阅所购 买安全锁的使用说明。
散发内部热量。
注释 : 确保所有通风口都通畅,否则计算机会因过热而导致故障。
Fn + F8:
启用或禁用数字小键盘。
Fn + F9:
开始/暂停播放 Windows Media Player。
Fn + F10:
停止播放 Windows Media Player。
Fn + F11:
跳至上一首曲目。
Fn + F12:
跳至下一首曲目。
Fn + PrtSc:
激活系统请求键。
Fn + Home:
支持录音功能。
e 记忆卡插槽
将记忆卡 (未提供)插入此处。
注释 : 有关详细信息,请参阅第 9 页的 “使用记忆卡 (未提供)”。
6
第 1 章 认识您的计算机
连接 USB 设备 将 USB 设备的 USB 插头 (A 型)插入计算机的 USB 端口,即可将其连接到 计算机。
首次将 USB 设备插入计算机上特定的 USB 端口时, Windows 将自动安装该 设备的驱动程序。安装驱动程序之后,将不再需要执行任何附加操作即可断 开或重新连接该设备。
c USB 端口
连接 USB 设备。
注释 : 有关详细信息,请参阅第 7 页的 “连接 USB 设备”。
d 组合音频插孔
连接至头戴式耳机 (带话筒)。
注释 : • 出厂默认状态下,组合音频插孔不支持连接通常的麦克风。 • 由于行业标准存在差异,在连接第三方头戴式耳机或头戴式耳机 (带话筒)时,可能无法
附录 A 产品特殊声明 ..........................................................................................29 “能源之星”型号信息...............................................................................................29
第 2 章 开始使用 Windows.................................................................................13 首次配置操作系统......................................................................................................13 操作系统界面..............................................................................................................13 节能方式......................................................................................................................16 连接至无线网络..........................................................................................................19 帮助和支持..................................................................................................................20