
交换机路由器的基本命令
交换机和路由器是网络中的关键设备,它们有不同的功能和配置命令。
下面是一些基本的命令,用于配置和管理交换机和路由器:
### 交换机基本命令:
1. 进入特权模式:
```
enable
```
2. 进入全局配置模式:
```
configure terminal
```
3. 为接口配置VLAN:
```
interface FastEthernet0/1
switchport mode access
switchport access vlan 10
```
4. 显示交换机端口状态:
```
show interfaces status
```
5. 为交换机配置IP地址:
```
interface Vlan1
ip address 192.168.1.1 255.255.255.0 ```
6. 保存配置:
```
copy running-config startup-config ```
### 路由器基本命令:
1. 进入特权模式:
```
enable
```
2. 进入全局配置模式:
```
configure terminal
```
3. 为接口配置IP地址:
```
interface GigabitEthernet0/0
ip address 192.168.1.1 255.255.255.0 ```
4. 启用路由协议(如静态路由):
```
ip route 0.0.0.0 0.0.0.0 192.168.1.254 ```
5. 查看路由表:
```
show ip route
```
6. 保存配置:
```
copy running-config startup-config
```
这些只是基本命令,实际的配置和管理可能会更加复杂,取决于网络需求和设备型号。
在实际应用中,您可能需要查阅特定设备的文档以获取更详细的命令和配置指南。
交换机路由器基本命令

准备工作:1)SecureCRT 软件(推荐使用8.0注册机版)2)console线一条,RS232转USB线一条(淘宝购买)RS232转USB线插在电脑上,打开设备管理(快捷键devmgmt.msc),就会有提示,用360驱动(或其他驱动软件)打上即可。
下图为驱动安装成功后的设备管理器界面(本人电脑系统为win10)。
注意:com口与电脑上USB口是对应的,接在另一个USB口,com口的序号会变化。
file:///C:/Users/Potter/AppData/Local/Temp/msohtmlclip1/01/clip_image 002.jpg3)电脑一台4)网络基础知识(OSI,IP,路由交换基础等)5)登陆设备 ( CLI命令行)设备-----Console—RS232-USB---电脑,打开SecureCRT软件file:///C:/Users/Potter/AppData/Local/Temp/msohtmlclip1/01/clip_image 004.jpg一,锐捷交换机 ( 和cisco命令类似)1,设备登陆Web登陆:192.168.1.1admin/adminConsole密码:默认为空,如果不行试试ruijie / admin2,系统基本配置!enable //进入用户模式,华为H3C无对应命令clockset 10:00:00 3 17 2017//clock set 小时:分:秒月日年!config//进入全局模式,对应华为H3C的sys hostname xx //修改设备名称!3,配置vlan!config//进入全局模式vlan 10name xxx//创建一个vlan,并命名vlan 20name xxxexit!no vlan 10 //删除一个vlan!int range gi 0/2-4sw mo ac//配置多个接口为access模式sw ac vl 10//配置多个接口加入vlan10exit!int range gi 0/5-8sw mo tr//配置多个接口为trunk模式sw tr al vl al//配置trunk模式下,接口允许所有vlan(1-4094)通过sw tr na vl 20//配置多个接口为trunk,并指定native vlan为20sw tr al vl remove xx //配置trunk模式下,接口不允许哪些vlan不通过sw tr al vl add xx//配置trunk模式下,接口添加哪些vlan允许通过exit!!sh vlan//查看 vlan 信息,包括 vlan id、名称、状态、包括的接口!sh int gi 0/2 sw//查看接口 Gi 0/2 的 vlan 状态!4,配置接口!configint gi 0/1des xx //给接口配置描述ip add 1.1.1.1 255.255.255.0//路由口配置IP地址,交换口无法直接配置no sh!int vlan 10des xx//给SVI接口配置描述ip add 172.16.10.1 255.255.255.0//创建SVI接口,一般为作为网关或管理地址!注意:SVI接口状态跟是否创建vlan,以及是否存在加入该vlan的up状态的接口。
华为路由器交换机常用命令

华为路由器交换机常用命令一、设备管理命令1.登录管理命令- ssh [ip地质] -p [端口号]:通过SSH协议登录设备。
- telnet [ip地质]:通过Telnet协议登录设备。
- logout:退出设备。
2.用户管理命令- display current-configuration:显示当前设备配置信息。
- save:保存当前配置。
- undo save:取消保存的配置。
- super:切换到超级用户模式。
- user-interface console 0:配置控制台终端的参数。
- user-interface vty 0 4:配置远程登录终端的参数。
3.设备操作命令- reboot:重启设备。
- reset saved-configuration:恢复出厂配置。
- display version:显示设备的硬件和软件版本信息。
- display device:显示设备的基本信息。
- display interface[接口名称]:显示指定接口信息。
- display ip routing-table:显示IP路由表信息。
二、网络配置命令1.IP配置命令- interface [接口名称]:进入指定接口。
- ip address [IP地质] [子网掩码]:配置接口IP地质。
- undo ip address:取消接口IP地质配置。
- ip route-static [目标网络] [子网掩码] [下一跳地质]:配置静态路由。
- undo ip route-static [目标网络] [子网掩码] [下一跳地质]:取消静态路由配置。
2.VLAN配置命令- vlan [VLAN ID]:创建指定VLAN。
- quit:退出VLAN配置模式。
- interface vlan [VLAN ID]:进入指定VLAN接口。
- ip address [IP地质] [子网掩码]:为VLAN接口配置IP地质。
交换机路由器基本命令大全
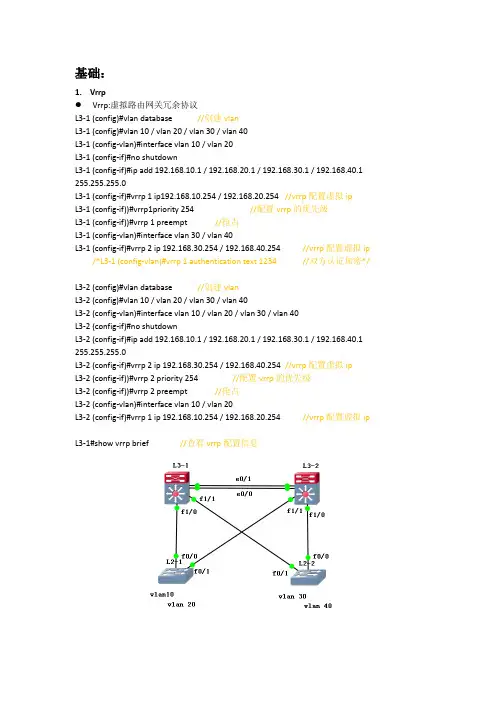
基础:1.VrrpVrrp:虚拟路由网关冗余协议L3-1 (config)#vlan database //创建vlanL3-1 (config)#vlan 10 / vlan 20 / vlan 30 / vlan 40L3-1 (config-vlan)#interface vlan 10 / vlan 20L3-1 (config-if)#no shutdownL3-1 (config-if)#ip add 192.168.10.1 / 192.168.20.1 / 192.168.30.1 / 192.168.40.1 255.255.255.0L3-1 (config-if)#vrrp 1 ip192.168.10.254 / 192.168.20.254 //vrrp配置虚拟ipL3-1 (config-if))#vrrp1priority 254 //配置vrrp的优先级L3-1 (config-if))#vrrp 1 preempt //抢占L3-1 (config-vlan)#interface vlan 30 / vlan 40L3-1 (config-if)#vrrp 2 ip 192.168.30.254 / 192.168.40.254 //vrrp配置虚拟ip /*L3-1 (config-vlan)#vrrp 1 authentication text 1234 //双方认证加密*/L3-2 (config)#vlan database //创建vlanL3-2 (config)#vlan 10 / vlan 20 / vlan 30 / vlan 40L3-2 (config-vlan)#interface vlan 10 / vlan 20 / vlan 30 / vlan 40L3-2 (config-if)#no shutdownL3-2 (config-if)#ip add 192.168.10.1 / 192.168.20.1 / 192.168.30.1 / 192.168.40.1 255.255.255.0L3-2 (config-if)#vrrp 2 ip 192.168.30.254 / 192.168.40.254 //vrrp配置虚拟ipL3-2 (config-if))#vrrp 2 priority 254 //配置vrrp的优先级L3-2 (config-if))#vrrp 2 preempt //抢占L3-2 (config-vlan)#interface vlan 10 / vlan 20L3-2 (config-if)#vrrp 1 ip 192.168.10.254 / 192.168.20.254 //vrrp配置虚拟ipL3-1#show vrrp brief //查看vrrp配置信息HsrpRouter (config)#interface fa0/1 ip 192.168.1.3 255.255.255.0 //进入端口配置ipRouter (config-if)#standby 2 //创建组Router (config-if)#standby 2 ip 192.168.1.254 //组添加ipRouter (config-if)#standby priority 200 //设置优先级,默认优先级100Router (config-if)#standby 2 preempt //抢占Router (config-if)#standby timers 3-10 //虚拟报文时间间隔Router (config-if)#standby 2 tranck fa0/0 //跟踪上行端口Router#show standby brief //查看热备份配置信息2.Mstp:多生成树协议Switch (config)#spanning-tree //启动生成树协议Switch (config)#spanning-tree mode mstp //设置生成树模式是mstpSwitch (config)#vlan 10Switch (config-vlan)#exitSwitch (config)#vlan 20Switch (config-vlan)#exitSwitch (config)#spanning-tree mst 1 priority 4096 //生成树组1的优先级设为4096 Switch (config)#spanning-tree mstconfigwration //进入生成树配置模式Switch (config)#instance 1 vlan 10,20 //把vlan10,20添加到组13.链路聚合L3-1 (config)#interface port-channel 1 //创建组L3-1 (config-if)#no shutdownL3-1(config-if)#switchport mode trunkL3-1(config-if)#interface fa1/13 //进入三层交换机间相连接口L3-1(config-if)#channel-group 1 mode on //添加到组中L3-1 (config-if)#switchport mode trunkL3-1 (config-if)#no shutdownL3-1 (config-if)#interface fa1/14L3-1 (config-if)#channel-group 1 mode onL3-1 (config-if)#switchport mode trunkL3-1 (config-if)#no shutdownL3-2(config)#interface port-channel 1 //创建组L3-2(config-if)#no shutdownL3-2(config-if)#switchport mode trunkL3-2(config-if)#interface fa1/13 //进入三层交换机间相连接口L3-2(config-if)#channel-group 1 mode on //添加到组中L3-2(config-if)#switchport mode trunkL3-2(config-if)#no shutdownL3-2(config-if)#interface fa1/14L3-2(config-if)#channel-group 1 mode onL3-2(config-if)#switchport mode trunkL3-2(config-if)#no shutdown4.VLAN(vtp)●Vtp(truch接口):Switch(config)#Vtpnamezjq //vtp命名zjqSwitch(config)#vtp password 123456 //设置vtp密码Switch(config)#vtp mode server(client) //vtp的模式设置为服务器或者客户端Switch(config)#interface FastEthernet0/1Switch(config)#switchport mode trunk //接口模式设置为trunk●配置vlanSwitch(config)#Vlan databaseSwitch(config)#Vlan 10 name xingzhengbuSwitch(config)#Switchport access vlan 10Switch(config)#Ip address 192.168.80.254 255.255.255.05.Tftp//打开tftp服务器,获取ip地址L2-1>enL2-1#copy startup-configtftp //Address of remote host []?172.16.25.0Destination filename [config.text]?zhangjq.txt6.telnet:远程登录Switch(config)#hostname silence //修改设备名称Switch(config)#intvlan 1Switch(config-if)#ip add 192.168.1.1 255.255.255.0 //设置管理交换机的IP地址Switch(config-if)#no shutdown //启用接口Switch(config)#enable secret 123456 //配置进入特权模式的密码为123456 Switch(config)#line vty 0 15//进入VTY端口,允许16台电脑同时远程登录Switch(config-line)#pass cisoco //设置Telnet的登录密码为ciscoSwitch(config-line)#login //允许Telnet登录7.管理VLAN扩展:1.路由引入(ospf)●静态路由配置(Static):要到达的网段Nwtwork:192.168.3.0/24设置下一跳Next Hop:192.168.1.2Router(config)#ip route 0.0.0.0 0.0.0.0 fa0/1●动态路由RIP:公布自己有的网段192.168.2.0/192.168.3.0OSPF:开放式最短路径协议Router(config)#router ospf 1 //启动OSPF协议,进程号Router(config)#network 192.168.1.0 0.0.0.255 area 0 //公布自己有的网段,划分区域Router(config)#do show iproute //查看路由表修改链路的开销1.Router(config-if)#bandwidth bamdwidth-kbps //修改接口的带宽参数2.Router(config-if)#ipospf cost “加数字”//命令则直接将链路开销设置为特定值并免除了计算过程2.DHCP的配置:动态主机配置协议L3-1(config)#vlan 10 //创建vlanL3-1(config-if)#intvlan 10L3-1(config-if)#ip add 192.168.10.1 255.255.255.0L3-1(config-if)#no shutdownL3-1 (config)#service dhcp //启动dhcpL3-1 (config)#ipdhcp pool <name> //建立地址池L3-1 (config)#network <network-number><mask> //动态分配ip的网段和MAC地址L3-1 (config)#default-router <ip-address> //为dhcp客户设置默认网关L2-1 (config)#interface fa0/0L2-1 (config-if)#sw mode trunkL2-1 (config-if)no shutdownL2-1 (config)#interface fa0/15L2-1 (config-if)#switchport mode accessL2-1 (config-if)#switchport access vlan 10 //绑定vlan 10L2-1 (config-if)no shutdownPC(config)#no ip routing //取消路由功能PC(config)#interface fa0/0PC(config-if)#ip add dhcpPC(config)#default gateway <ip-address>PC#show interface fa0/03.无线路由器AP>ap-mode fatAP>enAP#config tAP(config)#vlan 10AP(config-vlan)#exitAP(config)#service dhcpAP(config)#ipdhcp pool zhangjqAP(dhcp-config)#network 192.168.10.0 255.255.255.0AP(dhcp-config)#dns-server 10.20.5.1AP(dhcp-config)#default-router 192.168.10.254AP(dhcp-config)#interface gigabitEthernet0/1AP(config-if-GigabitEthernet 0/1)#encapsulation dot1Q 10 //封装vlan10AP(config-if-GigabitEthernet 0/1)#interface BVI 10AP(config-if-BVI 6)#ip add 192.168.10.254 255.255.255.0AP(config-if-BVI 6)#exitAP(config)#dot11 wlan10AP(dot11-wlan-config)#vlan10AP(dot11-wlan-config)#broadcast-ssidAP(dot11-wlan-config)#ssidzhangjqAP(dot11-wlan-config)#exitAP(config)#interface dot11radio 1/0AP(config-if-Dot11radio 1/0)#encaosulation dot1Q 10AP(config-if-Dot11radio 1/0)#mac-mode fatAP(config-if-Dot11radio 1/0)#channel 1AP(config-if-Dot11radio 1/0)#wlan-id 1AP(config-if-Dot11radio 1/0)#ip router 0.0.0.0 0.0.0.0 192.168.1.254AP(config)#intwlansec 10AP(config-if-wlansec 10)#security wpa enableAP(config-if-wlansec 10)#security wpa ciphers aes enableAP(config-if-wlansec 10)#4.ACL:访问控制列表标准控制列表:Router(config)#access-list 1 permit 192.168.2.0 0.0.0.255 //创建控制列表允许2网段可以访问,<1-99>标准访问控制列表;<100-199>扩展访问控制列表Router(config)#access-list 1 permit 192.168.1.0 0.0.0.255Router(config)#access-list 1 deny 192.168.0.0 0.0.0.255 //创建控制列表拒绝0网段可以访问,反向子网掩码Router(config)#interface se3/0 //进入se3/0Router(config-if)#ip access-group 1 out //把访问控制列表应用到接口Se3/0扩展控制列表:<才需要填写目标ip>Router(config)#access-list 101 permit ip 192.168.2.0 0.0.0.255 10.0.0.0 0.255.255.255 //创建控制列表允许源ip访问目标ip,能访问web和ping通Router(config)#access-list 101 permit tcp 192.168.1.0 0.0.0.255 10.0.0.0 0.255.255.255 eq www //创建控制列表允许源ip访问目标ip的80端口,能访问web不能ping通Router(config)#access-list 101 permit icmp 192.168.0.0 0.0.0.255 10.0.0.0 0.255.255.255 //创建控制列表允许源ip访问目标ipRouter(config)#interface se3/0Router(config-if)#ip access-group 101 outSe3/0●使用ACL保护路由安全Router(config)#access-list 1 permit 192.168.1.0 0.0.0.255Router(config)#line vty 0 15Router(config)#access-class 1 inRouter(config)#password hanlg5.NAT:地址转换●静态NAT(出口路由配置,私网地址转换成公网地址)Router(config)#ipnat inside source static【静态】私网ip公网(外)ip //内部网转换为外部网地址Router(config)#interface f0/1Router(config-if)#ipnat outside //绑定对外接口Router(config)#interface f0/2Router(config-if)#ipnat inside //绑定对内接口●动态NATRouter>enRouter#config tRouter(config)#access-list 10 permit 10.0.0.0 0.0.0.255Router(config)#ipnat pool zhangjq 131.107.0.1 131.107.0.6 netmask 255.255.255.0 Router(config)#ipnat inside source list 10 pool zhangjqRouter(config)#interface se0/0Router(config-if)#ipnat outsideRouter(config-if)#interface fa0/1Router(config-if)#ipnat insideRouter(config-if)#endRouter(config-if)#show ipnat translations●超载NAT(PAT)Router>enRouter#config tRouter(config)#access-list 10 permit 10.0.0.0 0.0.0.255Router(config)#ipnat pool zhangjq 131.107.0.1 131.107.0.1netmask 255.255.255.0 Router(config)#ipnat inside source list 10 pool zhangjqoverloadRouter(config)#interface se0/0Router(config-if)#ipnat outsideRouter(config-if)#interface fa0/1Router(config-if)#ipnat insideRouter(config-if)#endRouter(config-if)#show ipnat translations6.802.1xL2-1 (config)#aaa new-model //启动aaa服务L2-1 (config)#aaa authentication dot1x default group radius //认证802.1x,启用默认列表default,采用radius认证方式L2-1 (config)#dot1x authentication default //启用default列表应用L2-1 (config)#radius-server host 172.16.32.2 //配置radius服务器地址L2-1 (config)#radius-server key 123456 //设置交换机和服务器之间的密码L2-1 (config)#dot1x auth-mode chap //身份验证的加密方式改为chapL2-1 (config)#interface range fa0/1 - 22 //进入交换机的下行接口L2-1 (config-if)#dot1x port-control auto //在端口启用802.1x绑定vlanL2-1(config)#interface fa0/0L2-1(config)#switchport mode accessL2-1(config)#switchport access vlan10●打错Switch(config)#no ip domain-lookup●配置单臂路由Router(config)#inter fa0/0.10 //创建虚拟接口Router(config-subif)#encapsulation dot1Q 10 //封装(vlan)协议Router(config-subif)#ip address 192.168.1.1 255.255.255.0 //添加网关Router(config-subif)#no shutdown●路由引入Router(config-if)#default-information originate●回环路由(虚构一条路)Router(config)#int loopback 回环路由号Ip route 0.0.0.0 0.0.0.0 loopback 0●交换机端口安全配置Switch (config)#interface fastsernet0/1 //进入端口配置模式Switch (config-if)#speed 10 //设置端口速率为10Mbit/s,{10|100|auto}Switch (config-if)#duplex half //设置端口为半双工,{half|full|auto}Switch (config-if)#no shutdown //启用端口Switch (config-if)#switchport mode access //设置当前端口为access,交换机端口安全功能只能在access接口进行配置Switch (config-if)#switchport port-security //打开当前端口安全功能,默认关闭端口安全功能Switch (config-if)#switchportport-security maximum 10 //设置端口安全地址的最大个数,最大安全地址个数是128个Switch (config-if)#switchport port-security violation shutdown //配置处理违例的方式,默认处理方式为protectSwitch (config-if)#switchport port-security mac-address 0007.EC56.5906 //配置安全地址Switch (config-if)#endSwitch#show port-security interface fastethernet0/1 //查看0/1的端口安全配置信息,<Half-duplex,10Mb/s //已设置为半双工,10Mbit/s>Switch#show port-security //查看所有安全端口的统计信息●光电复用口L3-1 (config)#interface gi0/26L3-1 (config-GigabitEthernet 0/26) #medium-type fiberL3-2 (config)#interface gi0/26L3-2 (configGigabitEthernet 0/26)#medium-type fiber●防火墙设置步骤1.路由模式(安全)下设置2.接口IP地址设置3.路由(默认路由)4.安全策略、安全规则(nat、包过滤、ip映射、端口映射)端口映射:nat的一种,把内网端口转换成外网端口(内网的服务器ip加上端口号映射到外网ip地址)Ip映射:静态natNat:防火墙上做nat,就是要使内网用户可以访问外网QOS(服务质量)路由器的CBWFQ配置Router(config)#class-map http_ftp //创建一个分类表,并进入分类表模式Router(config-cmap)#match protocol httpRouter(config-cmap)#match protocol ftpRouter(config-cmap)#exitRouter(config)#policy-map zhangjq //创建一个策略表,并进入策略表模式Router(config-pmap)#class http_ftp //建立一个分类表,并进入策略分类表模式Router(config-pmap-c)#bandwidth 512Router(config-pmap-c)#exitRouter(config-pmap)#class class-defaultRouter(config-pmap-c)#endRouter(config)#interface fa0/1Router(config-if)#service-policy output zhangjq //在端口上应用一个策略表Router(config-if)#endRouter#show policy-mapIPSec配置R1(config)#ip route 0.0.0.0 0.0.0.0 10.1.1.1 //添加默认路由,设置下一条R1(config)#crypto isakmp policy 11 //设置IKE策略的优先级R1(config-isakmp)#encryption 3des //配置加密方式[des,3des,aes]R1(config-isakmp)#hash md5 //检验完整性,数字签名方法[md5,sha]R1(config-isakmp)#authentiaction pre-share //采用预共享密钥的认证方式R1(config)#crypto isakmp key passwd address 10.1.14.60 //协商的共享密码R1(config)#crypto ipsec transform-set one esp-3des esp-md5-hmac //配置转换集[ike配置参数转换成IPSec]R1(config)#access-list 101 permit ip 172.16.0.0 0.0.255.255 192.168.0.0 0.0.255.255//创建访问控制列表R1(config)#access-list 111 deny ip 192.168.10.0 0.0.0.255 192.168.20.0 0.0.0.255R1(config)#access-list 111 permit ip any anyR1(config)#ip nat inside source list 111 interface fa0/1R1(config)#cryptomap my 10 ipsec-isakmp //创建加密图my,序号10R1(config-crypto-map)#set peer 10.1.14.60 //标识对方路由器IP地址R1(config-crypto-map)#set transform-set one //启用转换集R1(config-crypto-map)#match address 101 //启用ACLR1(config-crypto-map)#interface FastEthernet0/0R1(config-if)#crypto map my //启用映射R1#show crypto isakmp sa //查看配置结果IKE配置配置映射Show crypto isakmpPpp:由被验方发起单向:被验证方:Route0r#config tRouter0(config)#interface Serial0/0/0Router0(config-if)#ip address 192.168.1.1 255.255.255.0 Router0(config-if)#no shutdownRouter0(config-if)#encapsulation pppRouter0(config-if)#ppp pap sent-username r0 password 123456验证方:Router1>enableRouter1#configure terminalRouter1(config)#interface Serial0/0/0Router1(config-if)#ip address 192.168.1.2 255.255.255.0 Router1(config-if)#no shutdownRouter1(config)#username r0 password 0 123456Router1(config-if)#encapsulation ppp双向:Router3>enRouter3#config tRouter3(config)#username r4 password 0 123456Router3(config)#int se2/0Router3(config-if)#encapsulation pppRouter3(config-if)#ppp pap sent-username r3 password 123456Router4>enRouter4#config tRouter4(config)#username r3 password 0 123456Router4(config)#int se3/0Router4(config-if)#encapsulation pppRouter4(config-if)#ppp pap sent-username r4 password 123456Chap(密码要求一致):chap是由验方发起,发送随机数报文查找数据库密码,随机数+密码返回验方单向:被验证方:Router>enableRouter#configure terminalRouter(config)#hostname R1R0(config)#interface Serial0/0/0R0(config-if)#no shutdownR0(config-if)#ip address 192.168.1.1 255.255.255.0R0(config-if)#encapsulation ppp //封装pppR0(config)#username R1 password 0 123456 //建立本地用户组验证方:Router>enableRouter#configure terminalRouter(config)#hostname R1R1(config)#interface Serial0/0/0R1(config-if)#no shutdownR1(config-if)#ip address 192.168.1.2 255.255.255.0R1(config-if)#encapsulation ppp //封装pppR1(config-if)#ppp authentication chapR1(config)#username R0 password 0 123456 //建立本地用户组双向:被验证方:Router>enableRouter#configure terminalRouter(config)#hostname R1R0(config)#interface Serial0/0/0R0(config-if)#no shutdownR0(config-if)#ip address 192.168.1.1 255.255.255.0R0(config-if)#encapsulation pppR1(config-if)#ppp authentication chapR0(config)#username R1 password 0 123456验证方:Router>enableRouter#configure terminalRouter(config)#hostname R1R1(config)#interface Serial0/0/0R1(config-if)#no shutdownR1(config-if)#ip address 192.168.1.2 255.255.255.0R1(config-if)#encapsulation pppR1(config-if)#ppp authentication chapR1(config)#username R0 password 0 123456Ospf ppp模式配置:Router0>enableRouter0#configure terminalRouter0(config)#interface Serial0/0/0Router0(config-if)#encapsulation pppRouter0(config-if)#ip ospf network point-to-point Router0(config-if)#no shutdownRouter0(config-if)#exitRouter0(config)#router ospf 1Router0(config-router)#net 10.1.1.0 0.0.0.255 area 0 Router0(config-router)#endRouter1>enableRouter1#configure terminalRouter1(config)#interface Serial0/0/0Router1(config-if)#no shutdownRouter1(config-if)#encapsulation pppRouter1(config-if)#ip ospf network point-to-point Router1(config-if)#no shutdownRouter1(config-if)#exitRouter1(config)#router ospf 1Router1(config-router)#network 20.1.1.0 0.0.0.255 area 0 Router1(config-router)#endRouter1#Show ip ospf neighbor帧中继Router3>enableRouter3#configure terminalRouter3(config)#interface Serial2/0Router3(config-if)#no shutdownRouter3(config-if)#encapsulation frame-relayRouter3(config-if)#frame-relay lmi-type ciscoRouter3(config-if)#exitRouter3(config)#int s2/0.1 point-to-pointRouter3(config-subif)#ip add 192.168.2.3 255.255.255.0 Router3(config-subif)#frame-relay interface-dlci 302 Router3(config)#int se2/0.2 point-to-pointRouter3(config-subif)#ip add 192.168.3.3 255.255.255.0 Router3(config-subif)#frame-relay interface-dlci 301Router1>enableRouter1#configure terminalRouter1(config)#interface Serial2/0Router1(config-if)#no shutdownRouter1(config-if)#encapsulation frame-relayRouter1(config-if)#frame-relay lmi-type ciscoRouter1(config-if)#exitRouter1(config)#int s2/0.1 point-to-pointRouter1(config-subif)#ip add 192.168.1.1 255.255.255.0 Router1(config-subif)#frame-relay interface-dlci 102 Router1(config)#int se2/0.2 point-to-pointRouter1(config-subif)#ip add 192.168.3.1 255.255.255.0 Router1(config-subif)#frame-relay interface-dlci 103Router2>enableRouter2#configure terminalRouter2(config)#interface Serial2/0Router2(config-if)#no shutdownRouter2(config-if)#encapsulation frame-relayRouter2(config-if)#frame-relay lmi-type ciscoRouter2(config-if)#exitRouter2(config)#int s2/0.1 point-to-pointRouter2(config-subif)#ip add 192.168.1.2 255.255.255.0Router2(config-subif)#frame-relay interface-dlci 201Router2(config)#int se2/0.2 point-to-pointRouter2(config-subif)#ip add 192.168.2.2 255.255.255.0Router2(config-subif)#frame-relay interface-dlci 203Dhcp:DHCP(Dynamic Host Configuration Protocol,动态主机配置协议),基于Client/Server工作模式,DHCP服务器为需要动态获取IP地址的客户端分配IP地址及网关、dns等其它参数开启dhcp服务R1(config)#service dhcp //开启dhcp功能配置dhcp地址池R1(dhcp-config)#network 192.168.1.0 255.255.255.0 //可以分配的地址范围192.168.1.1~192.168.1.254R1(dhcp-config)#dns-server 10.2.50.1 //配置DNSR1(dhcp-config)#default-router 192.168.1.1 //配置网关地址/*R1(config)#ip dhcp excluded-address 192.168.1.1 192.168.1.10//192.168.1.1~192.168.1.10不被dhcp分配*/静态路由就是手工配置的路由,使得数据包能够按照预定的路径传送到指定的目标网络R1(config)#ip route 192.168.2.0 255.255.255.0 192.168.3.2 //目标地址是192.168.2.0/24的数据包,转发给192.168.3.2R2(config)#ip route 192.168.1.0 255.255.255.0 192.168.3.1 //目标地址是192.168.1.0/24的数据包,转发给192.168.3.1R1#show ip route //查看路由R2#show ip route //查看路由RIP(Routing Information Protocol)路由协议采用距离向量算法,是一种距离向量协议。
思科交换机路由基本配置命令

思科交换机路由基本配置命令常用命令1.配置接口:interface {interface_type} {interface_number}2.配置IP地址:ip address {IP_address} {subnet_mask}3.配置默认网关:ip default-gateway {default_gateway_IP}4.开启接口:no shutdown5.配置路由协议:router {routing_protocol}6.配置路由器ID:router-id {router_ID}7.配置路由信息:network {network_address} {subnet_mask}8.配置静态路由:ip route {destination_network} {subnet_mask}{next-hop_IP}9.配置动态路由:router {routing_protocol} {network_address}10.保存配置:copy running-config startup-config注意:上述命令仅作为参考,具体配置应根据实际环境和设备型号进行调整。
下面是一些基本的 Cisco 交换机路由配置命令:1.配置 hostname: hostname <name>2.配置 IP 地址: interface <interface> 后进入接口模式,再输入 ipaddress <ip address> <subnet mask>3.配置默认路由: ip route 0.0.0.0 0.0.0.0 <next hop IP>4.启用路由协议: router <protocol> (例如: router rip)5.配置路由连接: network <network address> (例如: network192.168.1.0)6.查看路由表: show ip routeCisco 交换机路由配置步骤1.进入配置模式:configure terminal2.配置 IP 地址和子网掩码:interface [interface-name] ; ip address[ip-address] [subnet-mask]3.配置默认路由:ip route 0.0.0.0 0.0.0.0 [next-hop-IP-address]4.启用路由协议:router [protocol-name] (如:router ospf)5.配置路由协议参数: [protocol-name] [process-id] (如:ospf 1)6.配置路由连接:network [network-address] [wildcard-mask] area[area-id] (如:network 192.168.1.0 0.0.0.255 area 0)7.保存配置:copy running-config startup-config8.退出配置模式:exit。
思科交换机路由器命令大全
思科交换机路由器命令大全思科交换机和路由器命令大全本文档为思科交换机和路由器命令的最新最全范本,供参考使用。
以下是详细的命令列表,包括每个命令的说明和用法。
一、接口配置命令1、ip address:设置接口的IP地质示例:ip address 192.168.1.1 255.255.255:02、no shutdown:启用接口示例:no shutdown3、duplex:设置接口的双工模式示例:duplex auto4、speed:设置接口的速度示例:speed 1005、exit:退出接口配置模式示例:exit二、VLAN命令1、vlan database:进入VLAN数据库模式示例:vlan database2、vlan id name:创建VLAN并设置名称示例:vlan 10 name VLAN-103、vlan id:删除VLAN示例:no vlan 104、show vlan:显示VLAN信息示例:show vlan5、exit:退出VLAN数据库模式示例:exit三、路由命令1、ip route:设置静态路由示例:ip route 192.168.2:0 255.255.255:0 192.168.1.22、router rip:启用RIP路由协议示例:router rip3、network:将网络添加到RIP路由表中示例:network 10:0:0:04、redistribute:将静态路由或其他路由协议添加到RIP路由表中示例:redistribute static5、exit:退出路由配置模式示例:exit四、ACL命令1、access-list:创建标准或扩展ACL示例:access-list 10 permit 192.168.1:0 0:0:0.2552、ip access-group:应用ACL到接口示例:ip access-group 10 in3、show access-lists:显示ACL信息示例:show access-lists4、exit:退出ACL配置模式示例:exit五、SNMP命令1、snmp-server community:设置SNMP团体字符串示例:snmp-server community public RO2、snmp-server enable traps:启用SNMP陷阱示例:snmp-server enable traps3、snmp-server host:配置SNMP陷阱接收主机示例:snmp-server host 192.168.1.1004、exit:退出SNMP配置模式示例:exit六、SSH命令1、ip ssh version:设置SSH协议版本示例:ip ssh version 22、crypto key generate rsa:RSA密钥对示例:crypto key generate rsa3、username:创建新的本地用户示例:username admin privilege 15 password password1234、exit:退出SSH配置模式示例:exit七、其他命令1、show running-config:显示当前配置示例:show running-config2、copy running-config startup-config:将当前配置保存到启动配置中示例:copy running-config startup-config3、reload:重新启动设备示例:reload4、exit:退出CLI命令行模式示例:exit本文档涉及附件:1、无附件本文所涉及的法律名词及注释:1、ACL(Access Control List):访问控制列表,用于控制网络流量的进出。
华三华为交换机路由器配置常用命令
H3C交换机配置命令大全1、system-view 进入系统视图模式2、sysname 为设备命名3、display current-configuration 当前配置情况4、language-mode Chinese|English 中英文切换5、interface Ethernet 1/0/1 进入以太网端口视图6、port link-type Access|Trunk|Hybrid 设置端口访问模式7、undo shutdown 打开以太网端口8、shutdown 关闭以太网端口9、quit 退出当前视图模式10、vlan 10 创建VLAN 10并进入VLAN 10的视图模式11、port access vlan 10 在端口模式下将当前端口加入到vlan 10中12、port E1/0/2 to E1/0/5 在VLAN模式下将指定端口加入到当前vlan中13、port trunk permit vlan all 允许所有的vlan通过H3C路由器配置命令大全华为交换机常用配置实例H3C交换机路由器telnet和console口登录配置2009年11月09日星期一 10:00级别说明Level 名称命令参观ping、tracert、telnet1监控display、debugging2配置所有配置命令(管理级的命令除外)3管理文件系统命令、FTP命令、TFTP命令、XMODEM命令telnet仅用密码登录,管理员权限[Router]user-interface vty 0 4[Router-ui-vty0-4]user privilege level 3[Router-ui-vty0-4]set authentication password simple abctelnet仅用密码登录,非管理员权限[Router]super password level 3 simple super[Router]user-interface vty 0 4[Router-ui-vty0-4]user privilege level 1[Router-ui-vty0-4]set authentication password simple abctelnet使用路由器上配置的用户名密码登录,管理员权限[Router]local-user admin password simple admin[Router]local-user admin service-type telnet[Router]local-user admin level 3[Router]user-interface vty 0 4[Router-ui-vty0-4]authentication-mode localtelnet使用路由器上配置的用户名密码登录,非管理员权限[Router]super password level 3 simple super[Router]local-user manage password simple manage[Router]local-user manage service-type telnet[Router]local-user manage level 2 [Router]user-interface vty 0 4[Router-ui-vty0-4]authentication-mode local对console口设置密码,登录后使用管理员权限[Router]user-interface con 0[Router-ui-console0]user privilege level 3[Router-ui-console0]set authentication password simple abc对console口设置密码,登录后使用非管理员权限[Router]super password level 3 simple super[Router]user-interface con 0[Router-ui-console0]user privilege level 1[Router-ui-console0]set authentication password simple abc对console口设置用户名和密码,登录后使用管理员权限[Router]local-user admin password simple admin[Router]local-user admin service-type terminal[Router]local-user admin level 3[Router]user-interface con 0[Router-ui-console0]authentication-mode local对console口设置用户名和密码,登录后使用非管理员权限[Router]super password level 3 simple super[Router]local-user manage password simple manage[Router]local-user manage service-type terminal[Router]local-user manage level 2 [Router]user-interface con 0[Router-ui-console0]authentication-mode localsimple 是明文显示,cipher 是加密显示路由器不设置telnet登录配置时,用户无法通过telnet登录到路由器上[Router-ui-vty0-4]acl 2000 inbound可以通过acl的规则只允许符合条件的用户远程登录路由器华为路由器ospfnat。
华为路由器交换机配置命令大全
华为路由器交换机配置命令大全华为路由器交换机配置命令大全一、登录与认证命令1.Telnet 登录命令2.SSH 登录命令3.Console 登录命令4.用户认证命令二、设备管理命令1.设备信息查看命令2.设备参数配置命令3.设备重启命令4.设备保存配置命令三、接口配置命令1.查看接口状态命令2.配置接口描述命令3.配置接口IP地质命令4.配置接口MTU命令5.开启/关闭接口命令四、路由配置命令1.配置静态路由命令2.配置默认路由命令3.配置动态路由命令4.查看路由表命令5.清空路由表命令五、VLAN 配置命令1.配置VLAN命令2.配置端口VLAN命令3.配置VLAN接口命令六、交换机功能配置命令1.配置端口镜像命令2.配置链路聚合命令3.配置交换机端口安全命令4.配置交换机QoS命令七、安全配置命令1.配置访问控制列表命令2.配置NAT命令3.配置防火墙命令4.配置SSL VPN命令附录:附件:1.示例配置文件2.常见问题解答法律名词及注释:1.Telnet:一种远程登录协议,用于远程连接路由器或交换机进行管理和配置。
2.SSH:Secure Shell,一种用于远程登录的网络协议,提供安全的数据通信和用户认证方式。
3.Console:一种通过串口连接设备进行本地登录的方式。
4.VLAN:Virtual Local Area Network,虚拟局域网,将不同的物理分组划分到不同的逻辑分组中,实现逻辑分离。
5.MTU:Maximum Transmission Unit,最大传输单元,指数据链路层上一次发送的帧的最大长度。
6.NAT:Network Address Translation,网络地质转换,用于在私有网络和公共网络之间进行通信的转换技术。
7.QoS:Quality of Service,服务质量,用于在网络通信中对不同数据流进行优先级和带宽控制。
交换机路由器命令大全(结合配置实例)
交换机路由器命令大全(结合配置实例)交换机路由器命令大全(结合配置实例)交换机和路由器是计算机网络中常用的网络设备,用于实现数据包的转发和路由选择。
在实际应用中,我们需要使用命令来配置交换机和路由器的各项参数。
本文将给出交换机和路由器常用命令的大全,并结合实际配置示例进行说明。
一、交换机命令1. 查看交换机基本信息查看交换机型号、固件版本、序列号等基本信息:show version2. 配置交换机端口设置交换机接口的速率、全双工模式等参数:interface interface_namespeed speed_valueduplex {full | half}3. 查看交换机端口状态查看交换机端口的连接状态、速率、工作模式等信息:show interfaces status4. 配置交换机VLAN创建VLAN和端口关联,实现VLAN的隔离和管理:vlan vlan_idname vlan_nameinterface interface_name5. 查看交换机MAC表显示交换机学习到的MAC地址和对应的端口:show mac-address-table6. 配置交换机链路聚合将多个物理端口绑定为一个逻辑端口,提高带宽和冗余性:interface port-channel channel_numberdescription description_textswitchport mode trunk/access7. 交换机Spanning Tree配置配置交换机的Spanning Tree协议参数,避免网络环路:spanning-tree vlan vlan_idpriority priority_value二、路由器命令1. 查看路由表显示路由器的路由表,包括直连路由、静态路由和动态路由表项:show ip route2. 配置静态路由手动配置路由器的静态路由表,指定目的网络和下一跳信息:ip route destination_network subnet_mask next_hop_ip3. 配置路由器接口配置路由器的接口参数,包括IP地址、子网掩码、描述等:interface interface_nameip address ip_address subnet_maskdescription description_text4. 配置路由器OSPF协议配置路由器之间的OSPF动态路由协议,实现网络的动态路由选择:router ospf process_idnetwork network_address wildcard_mask area area_number5. 配置路由器ACL配置路由器的访问控制列表,用于控制数据包的流量:access-list access_list_number permit/deny source destination6. 配置路由器NAT配置路由器的网络地址转换功能,实现内网与外网的互通:interface interface_nameip nat inside/outside三、配置实例1. 配置交换机端口接口GigabitEthernet0/1配置为100Mbps全双工模式:interface GigabitEthernet0/1speed 100duplex full2. 配置交换机VLAN创建VLAN10,将接口GigabitEthernet0/1划分到VLAN10:vlan 10name VLAN10interface GigabitEthernet0/13. 配置路由器接口将接口GigabitEthernet0/0配置为192.168.1.1/24的IP地址:interface GigabitEthernet0/0ip address 192.168.1.1 255.255.255.0description LAN interface4. 配置静态路由配置路由器的静态路由表,将目的网络192.168.2.0/24指向下一跳192.168.1.2:ip route 192.168.2.0 255.255.255.0 192.168.1.25. 配置路由器ACL设置访问控制列表,允许源IP地址为192.168.1.0/24的流量通过:access-list 1 permit 192.168.1.0 0.0.0.2556. 配置路由器NAT设置路由器的NAT,将内部接口GigabitEthernet0/1地址转换为公网地址:interface GigabitEthernet0/1ip nat inside以上是交换机和路由器常用命令的大全以及配置实例。
华三交换机-路由器配置命令
华三交换机-路由器配置命令华三交换机-路由器配置命令第一章:登录华三交换机-路由器1. 使用浏览器登录:a. 打开浏览器;b. 在地址栏中输入交换机-路由器的IP地址;c. 输入正确的用户名和密码;d. 单击登录按钮。
2. 使用命令行登录:a. 打开命令提示符或终端窗口;b. 输入telnet或ssh命令,后跟交换机-路由器的IP地址;c. 输入正确的用户名和密码;d. 按下回车键登录。
第二章:基本配置1. 设置主机名:hostname [主机名]2. 设置登录密码:enable password [密码]3. 配置管理接口:interface [接口]ip address [IP地址] [子网掩码] 4. 配置默认网关:ip default-gateway [默认网关]第三章:VLAN(虚拟局域网)配置1. 创建VLAN:vlan [VLAN号]name [VLAN名称]2. 配置端口―VLAN关联:interface [端口]switchport mode accessswitchport access vlan [VLAN号] 3. 配置交换机端口为Trunk口:interface [端口]switchport mode trunk第四章:路由配置1. 静态路由配置:ip route [目标网络] [目标子网掩码] [下一跳IP地址] 2. OSPF(开放最短路径优先)配置:router ospf [进程号]network [网络地址] [通配符] area [区域号]3. BGP(边界网关协议)配置:router bgp [自治系统号]neighbor [对等体IP地址] remote-as [对等体自治系统号]第五章:安全配置1. 配置SSH(安全外壳协议):crypto key generate rsaip ssh server enable2. 配置访问控制列表(ACL):ip access-list [ACL名称]permit/deny [源IP地址] [目标IP地址] [协议]第六章:性能优化配置1. 配置端口速率限制:interface [端口]bandwidth [带宽]2. 配置端口链路聚合(LACP):interface port-channel [聚合组号]channel-group [组号] mode active3. 配置端口流量控制:interface [端口]storm-control [选项]附件:本文档涉及的附件可在[link]。
华为交换机和路由器基本安全登录配置命令
一、拿到一台新的华为设备,我们首先要进行本地配置,比如配置密码,开启远程控制,配置用户设置权限等。
系统默认是没有开启telnet远程的,很多配置是需要我们在本地配置中开启的。
下面我们讲解华为设备的安全登录设置。
注:我们使用的是华为ensp模拟器进行讲解。
1.1、不同网络设备的需求和工作模式互不相同,其具体配置方法也会有较大的不同。
但所有的交换机/路由器都有一些共同的部分,可以把这些部分作为基本的模板用于最初的配置。
配置图如下:1、在路由器AR1设置本地登录用户视图(console端口)登录密码<Huawei>system-view //进入系统视图[Huawei]user-interface console 0//进入用户视图[Huawei-ui-console0]authentication-mode password //配置用户视图密码,最长16位Please configure the login password (maximum length 16):wltx //输入密码wltx[Huawei-ui-console0]set authentication password cipher 123 //修改用户视图验证密码,可跟56位密文[Huawei-ui-console0]return //回到用户视图,如前面的是<Huawei>,说明回到了用户视图。
<Huawei>save//保存配置The current configuration will be written to the device.Are you sure to continue? (y/n)[n]:y //按y确认保存<Huawei>quit //退出Configuration console exit please press any key to log onLogin authenticationPassword: //再次登录用户视图需要输入密码此时登录则需要输入密码才能进入用户视图,如果要取消安全认证,则执行以下命令。