Postfix邮件系统(二)
Linux网络服务配置-Postfix邮件系统(二)

查询、收取新邮件
17/28
其他扩展设置2-1
通过别名设置邮件组
一般使用 /etc/aliases 文件 aliases文件的记录格式
• 别名: 地址1, 地址2, 地址3, ……
执行newaliases命令,以更新别名设置 1.指定查询表存放位置
[root@mail ~]# vi /etc/postfix/main.cf …… alias_maps = hash:/etc/aliases [root@mail ~] # postfix reload 2.配置别名查询表 [root@mail ~]# vi /etc/aliases postfix/postfix-script: refreshing the Postfix mail system …… student:zhangsan, lisi, mike, john teacher:vicky, tsengyia 3.更新别名数据库 [root@mail ~]# newaliases
8/28
测试SMTP发信认证2-2
测试SMTP发信认证——Outlook2007
通过”工具”“账户设置” “发送服务器”,勾选“我 的发送服务器(SMTP)要求验证”
使用SMTP认证
未使用SMTP认证
9/28
小结
请思考:
如何启用Postfix的SMTP认证功能? 配置参数smtpd_recipient_restrictions的功能是什么?
22/28
实验案例:配置Postfix扩展功能3-2
学员练习1
创建SASL配置文件,并启动saslauthd服务 添加Postfix对SMTP认证的支持,并测试
linux环境下postfix+dovecot+webmail安装配置详解
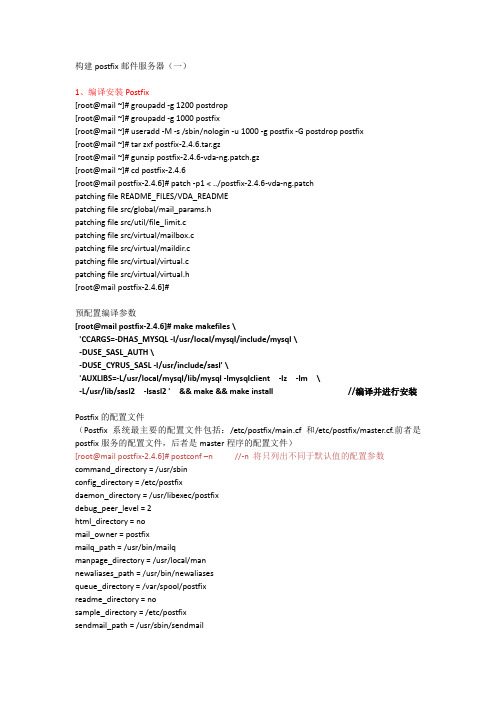
构建postfix邮件服务器(一)1、编译安装Postfix[root@mail ~]# groupadd -g 1200 postdrop[root@mail ~]# groupadd -g 1000 postfix[root@mail ~]# useradd -M -s /sbin/nologin -u 1000 -g postfix -G postdrop postfix[root@mail ~]# tar zxf postfix-2.4.6.tar.gz[root@mail ~]# gunzip postfix-2.4.6-vda-ng.patch.gz[root@mail ~]# cd postfix-2.4.6[root@mail postfix-2.4.6]# patch -p1 < ../postfix-2.4.6-vda-ng.patchpatching file README_FILES/VDA_READMEpatching file src/global/mail_params.hpatching file src/util/file_limit.cpatching file src/virtual/mailbox.cpatching file src/virtual/maildir.cpatching file src/virtual/virtual.cpatching file src/virtual/virtual.h[root@mail postfix-2.4.6]#预配置编译参数[root@mail postfix-2.4.6]# make makefiles \'CCARGS=-DHAS_MYSQL -I/usr/local/mysql/include/mysql \-DUSE_SASL_AUTH \-DUSE_CYRUS_SASL -I/usr/include/sasl' \'AUXLIBS=-L/usr/local/mysql/lib/mysql -lmysqlclient -lz -lm \-L/usr/lib/sasl2 -lsasl2 ' && make && make install //编译并进行安装Postfix的配置文件(Postfix系统最主要的配置文件包括:/etc/postfix/main.cf 和/etc/postfix/master.cf.前者是postfix服务的配置文件,后者是master程序的配置文件)[root@mail postfix-2.4.6]# postconf –n //-n 将只列出不同于默认值的配置参数command_directory = /usr/sbinconfig_directory = /etc/postfixdaemon_directory = /usr/libexec/postfixdebug_peer_level = 2html_directory = nomail_owner = postfixmailq_path = /usr/bin/mailqmanpage_directory = /usr/local/mannewaliases_path = /usr/bin/newaliasesqueue_directory = /var/spool/postfixreadme_directory = nosample_directory = /etc/postfixsendmail_path = /usr/sbin/sendmailsetgid_group = postdropunknown_local_recipient_reject_code = 550[root@mail postfix-2.4.6]#[root@mail postfix-2.4.6]# cd /etc/postfix/[root@mail postfix]# postconf -n > main2.cf[root@mail postfix]# mv main.cf main.cf.bak[root@mail postfix]# mv main2.cf main.cfPostfix的启动控制[root@mail postfix]# postfix startpostfix/postfix-script: starting the Postfix mail system[root@mail postfix]# netstat -anpt | grep :25tcp 0 0 0.0.0.0:25 0.0.0.0:* LISTEN 1995/master[root@mail postfix]# postfix check //若配置无误,不会反馈任何信息[root@mail postfix]# postfix reload //重新载入配置信息,而不需要重启Postfix服务postfix/postfix-script: refreshing the Postfix mail system[root@mail postfix]# postfix stoppostfix/postfix-script: stopping the Postfix mail system[root@mail postfix]#配置基于Postfix构建简单电子邮件系统:1、编辑main.cf文件,调整运行Postfix的基本参数[root@mail postfix]#vi main.cfinet_interfaces=192.168.1.199, 127.0.0.1 //设置postfix服务监听的IP地址,缺省为allmyhostname= //设置postfix服务器使用的主机名mydomain= //设置postfix服务器使用的邮件域myorigin=$mydomain //设置外发邮件时发件人地址中的邮件域名mydestination=$mydomain,$myhostname //设置可接收的邮件地址中的域名home_mailbox=Maildir/ //设置邮件存储位置和格式2、添加邮件用户的帐号[root@mail postfix]# groupadd mailusers[root@mail postfix]# useradd -g mailusers -s /sbin/nologin xiaowu[root@mail postfix]# useradd -g mailusers -s /sbin/nologin juncai[root@mail postfix]# passwd xiaowuChanging password for user xiaowu.New UNIX password:BAD PASSWORD: it is based on a dictionary wordRetype new UNIX password:passwd: all authentication tokens updated successfully.[root@mail postfix]# passwd juncaiChanging password for user juncai.New UNIX password:BAD PASSWORD: it is based on a dictionary wordRetype new UNIX password:passwd: all authentication tokens updated successfully.[root@mail postfix]##echo 12345 | passwd --stdin xiaowu //或这样赋予密码Changing password for user xiaowu.passwd: all authentication tokens updated successfully.3、SMTP发送邮件测试[root@mail postfix]# telnet localhost 25Trying 127.0.0.1...Connected to localhost.localdomain (127.0.0.1).Escape character is '^]'.220 ESMTP Postfixehlo 250 250-PIPELINING250-SIZE 10240000250-VRFY250-ETRN250-ENHANCEDSTATUSCODES250-8BITMIME250 DSNmail from:xiaowu@250 2.1.0 Okrcpt to:juncai@250 2.1.5 Okdata354 End data with <CR><LF>.<CR><LF>subject: A TEST MAILHELLO!This is a test mail !!!.250 2.0.0 Ok: queued as 229784E100quit221 2.0.0 ByeConnection closed by foreign host.#grep 229784E100 /var/log/messages //查找发信状态[root@mail postfix]# cat ~juncai/Maildir/new/Return-Path: <xiaowu@>X-Original-To: juncai@Delivered-To: juncai@Received: from localhost (localhost.localdomain [127.0.0.1])by (Postfix) with SMTP id 229784E100for <juncai@>; Thu, 17 Mar 2011 03:02:45 +0800 (CST)subject: A TEST MAILMessage-Id: <20110316190254.229784E100@>Date: Thu, 17 Mar 2011 03:02:45 +0800 (CST)From: xiaowu@To: undisclosed-recipients:;HELLO!This is a test mail !!![root@mail postfix]#构建Dovecot服务器1、编译安装Dovecot软件包[root@mail ~]#useradd –M –s /sbin/nologin dovecot[root@mail ~]#tar zxvf dovecot-1.1.4.tar.gz[root@mail ~]#cd dovecot-1.1.4[root@mail dovecot-1.1.4]# ./configure --sysconfdir=/etc --with-mysql && make && make install2、配置Dovecot的运行参数(1)建立dovecot.conf配置文件并进行简单设置[root@mail dovecot-1.1.4]# cp /etc/dovecot-example.conf /etc/dovecot.conf[root@mail dovecot-1.1.4]#vi /etc/dovecot.confssl_disable = yesprotocols = imap pop3disable_plaintext_auth = nomail_location = maildir:~/Maildir(2)创建PAM认证文件[root@mail dovecot-1.1.4]# vi /etc/pam.d/dovecotauth required pam_nologin.soauth include system-authaccount include system-authsession include system-auth3、启动Dovecot服务[root@mail ~]# /usr/local/sbin/dovecot -c /etc/dovecot.conf[root@mail ~]# netstat -anpt | grep dovecottcp 0 0 0.0.0.0:110 0.0.0.0:* LISTEN 3713/dovecottcp 0 0 0.0.0.0:143 0.0.0.0:* LISTEN 3713/dovecot[root@mail ~]#4、POP3接收邮件测试[root@mail ~]# telnet localhost 110Trying 127.0.0.1...Connected to localhost.localdomain (127.0.0.1).Escape character is '^]'.+OK Dovecot ready.user juncai+OKpass juncai+OK Logged in.list+OK 1 messages:1 511.retr 1+OK 511 octetsReturn-Path: <xiaowu@>X-Original-To: juncai@Delivered-To: juncai@Received: from localhost (localhost.localdomain [127.0.0.1])by (Postfix) with SMTP id 229784E100for <juncai@>; Thu, 17 Mar 2011 03:02:45 +0800 (CST) subject: A TEST MAILMessage-Id: <20110316190254.229784E100@>Date: Thu, 17 Mar 2011 03:02:45 +0800 (CST)From: xiaowu@To: undisclosed-recipients:;HELLO!This is a test mail !!!.quit+OK Logging out.Connection closed by foreign host.[root@mail ~]#WEBMAIL邮件界面SquirrelMail的工作流程1、依次安装squirrelmail程序包、中文语言包[root@mail ~]# tar jxvf squirrelmail-1.4.13.tar.bz2 -C /usr/local/apache2/htdocs /webmail[root@mail ~]# cd /usr/local/apache2/htdocs/webmail/[root@mail webmail]# tar jxvf ~/zh_CN-1.4.13-20071220.tar.bz22、创建及调整数据目录、附件目录[root@mail webmail]# mkdir -p attach data[root@mail webmail]# chown -R daemon:daemon attach/ data/ [root@mail webmail]# chmod 730 attach/3、建立config.php配置文件[root@mail webmail]# cp config/config_default.php config/config.php [root@mail webmail]# vi config/config.php$squirrelmail_default_language = 'zh_CN';'en_US' $default_charset = 'zh_CN.UTF-8'; 'iso-8859-1' $domain = '';$smtpServerAddress = 'localhost';$smtpPort = 25;$imapPort = 143;$imap_server_type = 'dovecot';$data_dir = '/usr/local/apache2/htdocs/webmail/data/'; $attachment_dir = '/usr/local/apache2/htdocs/webmail/attach/';4、重新启动httpd服务,并在浏览器中登录squirrelmail系统[root@mail webmail]# ../../bin/apachectl restart在该界面中可以完成发信、收信等电子邮件服务的基本操作。
Postfix queue(邮件队列) 管理

Postfix queue(邮件队列) 管理From time to time the mail queue may get filled up. This may be due to network problems or misconfiguration. For instance, if you botch (typo) the relayhost parameter, the mail will be undeliverable. The first thing to do is fix the problem, meaning get the network back online, or fix the configuration.1. try and deliver the mail from the queue(强制发送队列中的邮件):$ postfix flush or $ postqueue-f2. check mail queue size (查看队列大小):$mailq|wc-l3. list mails in queue (查看队列中的邮件):$ postqueue-por $ mailq4.put all deferred mail on hold so that no attempt is made to deliver it(暂缓发送队列中的问题邮件):$postsuper-hALL deferred5. release mail that was put on hold(解除暂缓发送): $postsuper-HALL deferred6. purge all deferred emails from the queue without delivering (删除队列中问题的邮件):$ postsuper-dALL deferred $find/var/spool/postfix/deferred-typef-execrm-vf{}\;tips:感谢大家的阅读,本文由我司收集整编。
postfix+dovecot详解

一、概述Postfix和Dovecot是两个常用的邮件服务器软件,用于在Linux系统上搭建邮件服务器。
Postfix是用于发送邮件的邮件传输代理(MTA),而Dovecot是用于接收邮件的邮件传输代理(MDA)。
本文将详细介绍Postfix和Dovecot的安装、配置和使用方法。
二、Postfix详解1. Postfix概述Postfix是一个开源的邮件传输代理软件,由Wietse Venema开发。
它在功能上类似于Sendm本人l,但相比Sendm本人l,Postfix更加安全、稳定、高效。
由于其可靠性和安全性,Postfix成为了Linux系统中最流行的邮件服务器之一。
2. Postfix安装在大多数Linux发行版中,Postfix都是作为软件仓库中的一个包进行分发的,可以通过包管理工具进行安装。
在Debian/Ubuntu系统中,可以使用以下命令进行安装:```sudo apt-get install postfix```在CentOS/RHEL系统中,可以使用以下命令进行安装:```sudo yum install postfix```3. Postfix配置Postfix的主要配置文件为`/etc/postfix/m本人n.cf`,在配置Postfix 之前,我们需要进行一些基础配置,如配置域名、配置邮件别名等。
然后可以编辑`/etc/postfix/m本人n.cf`文件,配置主机名、监听位置区域、邮件转发、反垃圾邮件措施、SSL加密等内容。
4. Postfix使用在Postfix配置完成之后,可以通过命令行工具来管理Postfix,如新建用户、发送邮件、查看邮件队列等。
也可以使用邮件客户端向Postfix服务器发送接收邮件。
三、Dovecot详解1. Dovecot概述Dovecot是一个开源的邮件传输代理软件,由来自芬兰的Dovecot开发团队开发。
它主要用于接收和存储邮件,为用户提供POP3和IMAP等接收邮件协议的支持。
第六章 构建Postfix邮件服务器(二)

MySQL
courier-authlib
支持数据库认证
10
配置虚拟用户支持 —— SMTP认证
1. 编译安装 courier-authlib 软件
下载源码包 courier-authlib-0.60.2.tar.bz2
官方站点:/
解包、配置、编译及安装
基于系统用户的SMTP认证
5
基于虚拟用户的邮件系统架构
其它MTA 发往本域的邮件 发送邮件 发往外域的邮件
3
Cyrus-SASL函数库 查询 Courier-authlib
收信
2
认证 Web发信
存储本域邮件
发信认证 Mailbox
4
收取邮件
通过mysql driver POP3 IMAP 进行收信认证
11
配置虚拟用户支持 —— SMTP认证
2. 修改主配置,authdaemonrc文件
建议只保留 authmysql 认证方式
[root@mail ~]# cd /usr/local/courier-authlib/etc/authlib/ [root@mail authlib]# vi authdaemonrc
4
虚拟用户配置案例
上一章已实现
Postfix支持系统用户 Dovecot支持系统用户 Squirrelmai Webmail
本章中将实现
Postfix支持虚拟用户 Dovecot支持虚拟用户 Extmail Webmail Extman Web后台管理 基于虚拟用户的SMTP认证 邮件地址过滤 邮件内容过滤 邮件防毒
复制 extman 软件包中docs子目录下的样例文件
virtual_gid_maps = static:1000
Postfix的工作原理

Postfix的⼯作原理传统的将所有功能都集中在同⼀个程序⾥,这种结构我们称之为“单体式设计”(monolithic).采⽤专职负责的策略,不同的功能分别交由不同的专门程序处理,这种结构称为“模块化设计”(modular)。
这些⾃成⼀格的专门程序,我们称之为组件(component)。
⼤多数组件都是以daemon 的形式存在,也就是常驻在系统内存⾥的连续动作的后台进程(background process)。
当Postfix被启动后,⾸先启动的是master daemon,它主导邮件的处理流程,同时也是其他组件的总管。
在处理邮件的过程中,master 会启动对应功能的组件来处理相关事宜,被master启动的组件,在完成交付的⼯作之后会⾃⾏结束;或者,如果组件的处理时间超过时限,或是⼯作量到达预定限度,组件也会⾃⾏结束。
master daemon会常驻在系统中,当管理员启动它时,它从main.cf和master.cf这两个配置⽂件取得启动参数。
Postfix内部收信、发信流程图整个处理流程分为三个阶段:接收邮件、将邮件排⼊队列、递送邮件。
每个阶段由⼀组独⽴的Postfix组件负责。
当⼀封邮件被收下并排⼊队列之后,队列管理器(Queue Manager)会启动适当的MDA,将邮件送到终点。
邮件如何进⼊Postfix系统邮件有四种渠道可以进⼊Postfix系统: 1、Postfix可接受来⾃本机系统的邮件(本机⽤户或⾃主进程提交的邮件)。
2、Postfix可接受⽹络传⼊的邮件(来⾃MUA或者其他MTA)。
3、已经被Postfix收下并交给MDA的邮件,被MDA传回到Postfix(通常是为了转寄到另⼀个地址)。
4、当Postfix⽆法将邮件寄到⽬的地时,⾃⼰会产⽣退信通知函。
邮件有可能在进⼊Postfix之前就被拒绝了,或者因为暂时性的故障(⽹络断线、远程服务器响应暂时性的错误等),同样的邮件可能会每隔⼀段时间就重复进⼊Postfix系统⼀次,重新递送。
Linux下的Postfix邮件服务器
Linux下的邮件服务器Postfix(一)在Linux下1、挂载光驱建立DNS服务器的MX记录:正向:反向:2、创建用户和密码:看一下邮箱邮件默认保存在这里:3、安装Postfix包,开启Postfix服务:4、关闭sendmail服务:5、编辑/etc/postfix/main.cf文件找到这几项修改其余不改:myhostname = 邮件主机的完整名称mydomain = 邮件主机域名myorigin = $mydomain(表示所有)设置发件人邮件地址的网域名inet_interfaces = all (表示监听所有端口)监听端口【把下面的inet_interfaces=localhost注释掉】mydestination = $myhostname, $mydomain(表示所有)指定接收邮件时收件人的域名mynetworks = 192.168.1.0/24, 127.0.0.0/8(192.168.1.0/24表示这个网段,127.0.0.0/8表示本地)设置可以为其转发邮件的网络relay_domains = $mydestination(表示所有)设置可以为其转发邮件的域名6、重新启动服务:7、验证:发信:#telnet 25 telnet到邮件服务器的25号端口helo 用helo或ehlo介绍自己(可以不写)mail from:li@ 发信人地址rcpt to:gen@ 收件人地址data 表示开始输入邮件正文Hello! 邮件正文.新起一行以“.”表示正文结束quit 退出telnet收信:Linux下的邮件服务器Postfix(二)windows下第三方软件在(一)的基础上作:1、安装软件包dovecot、perl-DBI和mysql:2、修改主配置文件/etc/dovecot.conf3、开启服务重启服务器:4、将windows的首选DNS指向写成DNS服务器IP:5、验证:安装一个收发邮件的软件,然后在用windows自带的邮件收发软件(开始---程序---Outlook Express)互相测试:Windows自带的:工具-----账户-----添加-----邮件------软件安装完后:开始----程序-----找到刚安装的收发邮件的软件Windows Live Mail点开发一封邮件试一下(抄送是同时发给谁):这里有可能被认为是垃圾邮件:再用另一种软件(pine)测试一下:在windows中安装这个软件(这个软件可以在Linux里用但要依赖很多包所以这里只在windows里试一下):再选几个OK或是就进入:点回车:选择S项:选中前四一项一项调(选中后双击可调,回车确定):到li中查看一下:设置Postfix服务器邮件转发和用户的别名在(一)(二)的基础上(这个大致写一下):1、编辑配置文件/etc/aliases文件的记录格式(在最下面添加)用户的别名(假名):用户的真名admin: root 邮件的别名(发给admin也就是发给root)group: user1,user2邮件的群发(发给group也就是发给user1、user2….. user1:root@邮件转发(将发给user1的邮件发给root用户)2、修改aliases文件后更新aliases.db文件postalias hash:/etc/aliases3、刷新服务器。
postfix 详解
深入理解postfixpostfix 可以在内存有限的系统上执行,而不会影响其它服务的效能,这是因为postfix 提供的内存管理功能非常有弹性,可以依据各种需求加以调整。
每封邮件用量限制当postfix 处理邮件时,必须将邮件暂存于邮件队列中,其中maildrop 和incoming 队列使用硬盘,而active 和deferred 则使用内存,每封暂存在队列中的邮件耗用多少内存是由邮件数据结构来决定,幸运的是这个数据结构的字段大小是可以微调的,透过这些微调就能决定postfix 的最大内存用量了!line_length_limit = 2048 从客户端接收待寄邮件时,每行最多2 KBheader_size_limit = 102400 每封邮件的标头大小不得超过100 KBextract_recipient_limit = 10240 每封邮件的收信人字段不得超过10 KBmessage_size_limit = 10240000 每封邮件(包含信封)的大小,不得超过10 MBqueue_minfree = 当内存剩下多少Bytes 时,才可以处理下一封邮件,预设是没有限制。
bounce_size_limit = 50000 警告信的大小限制为50 KB。
假设通通使用默认值,也就是所有参数都不设置,那么处理一封邮件须耗用10.05 MB,再加上postfix 模块程序的大小,总共约20 MB,这也就是postfix 运行的最小需求了!邮件数量限制当前述用量限制设置完毕后,接着我们还可以针对邮件队列一次要处理多少邮件作出限制,把每封邮件内存用量乘上邮件数量,就可以算出所需的内存总量,当内存足够时,我们当然希望尽可能多处理几封邮件来增进postfix 的效能。
qmgr_message_recipient_limit = 1000 这个参数之前介绍过了,除了用来控制dead 清单的大小外,也控制着处理中的邮件收信人总量,两者的预设限制都是1000。
postfix+dovecot+openwebmail企业邮件系统
添加下面的数据
[openwebmail]
## Thomas Chung
## 2008.05.29
name=Openwebmail for Fedora or Enterprise Linux
shell> tar zxvf dovecot-1.1.4.tar.gz
shell> cd dovecot-1.1.4
shell> ./configure --sysconfdir=/etc
shell> make
shell> make install
2、调整dovecot.conf配置文件
Service httpd start
12、测试登陆openwebmail
在IE里输入mail.***.com/cgi-bin/openwebmail/openwebmail.pl, 这个地址是不是很长,那么我们来点短点的
在 httpd的 配置文件中添加 下面 内容:
ScriptAlias /mail /var/www/cgi-bin/openwebmail/openwebmail.pl
这样在IE 中直接输入
13、修改openwebmail的中文支持
Vi /var/www/cgi-bin/openwebmail/etc/openwebmail.conf
Domainnames
Default_language zh_CM.GB2312
postfix+dovecot+roundcube webmail+postfixadmin搭建邮件系统
2.配置postfix
[root@mail ~]# vim /etc/postfix/main.cf
#基本配置
myhostname =
mydomain =
myorigin = $mydomain
inet_interfaces = all
mynetworks_style = host
virtual_mailbox_limit_maps = mysql:/etc/postfix/mysql_virtual_mailbox_limit_maps.cf
virtual_mailbox_limiபைடு நூலகம்_override = yes
virtual_maildir_limit_message = Sorry, this user has exceeded their disk space quota, please try again later.
virtual_uid_maps = static:2000
- 1、下载文档前请自行甄别文档内容的完整性,平台不提供额外的编辑、内容补充、找答案等附加服务。
- 2、"仅部分预览"的文档,不可在线预览部分如存在完整性等问题,可反馈申请退款(可完整预览的文档不适用该条件!)。
- 3、如文档侵犯您的权益,请联系客服反馈,我们会尽快为您处理(人工客服工作时间:9:00-18:30)。
• 创建SASL配置文件,并启动saslauthd服务 • 添加Postfix对SMTP认证的支持,并测试
40分钟完成
实验案例:配置Postfix扩展功能3-3
• 学员练习2
• 配置Web邮件系统 • 设置邮件群组
40分钟完成
测试SMTP发信认证2-1
• 测试带验证的SMTP发信功能
• 获得测试用帐号、密码的 BASE64 加密字串 • 通过 telnet 方式连接,并执行测试
telnet "xiaoqi" 25base64 [root@mail ~]# printf | openssl AUTH LOGIN Trying 173.16.16.2... eGlhb3Fp 334 VXNlcm5hbWU6 告知要进行认证登录 Connected to (173.16.16.2). [root@mail printf "123456" | openssl base64 eGlhb3Fp ~]# Escape character is '^]'. 输入加密的用户名字串 MTIzNDU2 334 UGFzc3dvcmQ6 220 ESMTP Postfix MTIzNDU2 EHLO 235 2.7.0 Authentication successful 输入加密的密码字串 …… 宣告客户机地址 250-PIPELINING Subject:SMTP AUTH TEST 250-SIZE This is 10240000 a test mail for SMTP AUTH. 250-VRFY . 表示支持SMTP认证 250-ETRN 250 2.0.0 Ok: queued as 475F493126D 250-AUTH LOGIN PLAIN QUIT
部署并配置SquirrelMail5-3
• 2.创建数据目录、附件目录
[root@mail ~]# cd /var/www/html/webmail/ [root@mail webmail]# mkdir -p data/ attach/ [root@mail webmail]# chown -R daemon:daemon data/ attach/ httpd服务的运行用户、组
Postfix邮件系统(二)
第十一章 Postfix邮件系统(二)
—— 理论部分
课程回顾
• • • •
MTA、MUA、MDA分别表示什么意思? postfix服务器的主要配置文件是什么? 如何启动postfix邮件服务系统? 接收邮件使用什么协议,端口号是多少?
技能展示
• 学会为Postfix设置SMTP认证 • 学会安装并使用Web邮件系统 • 了解邮件组、邮件大小及邮箱空间限制
默认字符集
部署并配置Squirrelmail5-5
• 4.访问Web邮箱系统
• 确认Web服务已经运行 • 通过浏览器访问/webmail/
使用Squirrelmail收发邮件2-1
• 1.编写、发送电子邮件
新建邮件
使用Squirrelmail收发邮件2-2
其他扩展设置2-2
• 邮件大小限制
• message_size_limit • 邮箱空间大小限制 • mailbox_size_limit
针对Mailbox邮箱、系统用户,缺省值为50MB • virtual_mailbox_limit n 针对使用虚拟用户的情况,缺省值为50MB • quota磁盘配额功能 n 针对使用Linux系统用户作为邮件账号的情况
部署并配置SquirrelMail5-4
• 3.创建主配置文件config.php
[root@mail webmail]# cp config/config_default.php config/config.php [root@mail webmail]# vi config/config.php <?php …… SMTP服务器地址 $domain = ''; $smtpServerAddress = 'localhost'; $smtpPort = 25; $imap_server_type = 'dovecot'; 数据目录位置 $imapPort = 143; 附件目录位置 $data_dir = '/var/www/html/webmail/data/'; $attachment_dir = '/var/www/html/webmail/attach/'; $squirrelmail_default_language = 'zh_CN'; $default_charset = 'zh_CN.UTF-8'; 界面语言
pwcheck_method: saslauthd [root@mail ~]# /etc/init.d/saslauthd start 启动 saslauthd: [确定] [root@mail ~]# chkconfig --level 35 saslauthd on
设置验证方式
SMTP发信认证3-3
• 2.收取、查阅电子邮件
查询、收取新邮件
其他扩展设置2-1
• 通过别名设置邮件组
• 一般使用 /etc/aliases 文件 • aliases文件的记录格式
别名: 地址1, 地址2, 地址3, …… • 执行newaliases命令,以更新别名设置 1.指定查询表存放位置
n
[root@mail ~]# vi /etc/postfix/main.cf …… alias_maps = hash:/etc/aliases [root@mail ~] # postfix reload 2.配置别名查询表 [root@mail ~]# vi /etc/aliases postfix/postfix-script: refreshing the Postfix mail system …… student:zhangsan, lisi, mike, john teacher:vicky, tsengyia 3.更新别名数据库 [root@mail ~]# newaliases
[root@mail ~]# tar zxf squirrelmail-1.4.22.tar.gz -C /var/www/html/ [root@mail ~]# tar zxf zh_CN-1.4.22-20110425.tar.gz -C /var/www/html/squirrelmail-1.4.22/ [root@mail ~]# mv /var/www/html/squirrelmail-1.4.22/ /var/www/html/webmail
• 结合Cyrus SASL软件来实现 • Simple Authentication and Security Layer
SMTP发信认证3-2
• 1.设置Cyrus SASL函数库,并启动saslauthd服
务 • 建立SMTP 认证配置文件smtpd.conf [root@mail ~]# vi /usr/lib/sasl2/smtpd.conf
—— 上机部分
实验案例:配置Postfix扩展功能3-1
• 需求描述
• 设置SMTP发信认证 • 使用Squirrelmail构建Web邮件系统 • 设置邮件组,实现邮件群发功能 实现思路 • 设置SMTP发信认证 • 添置Web邮件系统 • 设置邮件群组
实验案例:配置Postfix扩展功能3-2
测试SMTP发信认证2-2
• 测试SMTP发信认证——Outlook2007
• 通过”工具”“账户设置” “发送服务器”,勾选“我
的发送服务器(SMTP)要求验证”
使用SБайду номын сангаасTP认证
未使用SMTP认证
小结
• 请思考:
• 如何启用Postfix的SMTP认证功能? • 配置参数smtpd_recipient_restrictions的功能是什么?
部署并配置SquirrelMail5-1
• SquirrelMail工作流程
部署并配置SquirrelMail5-2
• 1. 编译部署squirrelmail程序套件
• 下载源码包
n
官方站点: n 网页程序包:squirrelmail-1.4.13.tar.bz2 n 中文语言包:zh_CN-1.4.13-20071220.tar.bz2 • 将SquirrelMail部署到网站目录
• 2、添加SMTP认证支持,并重载服务
[root@mail ~]# vi /etc/postfix/main.cf 启用SMTP认证 …… smtpd_sasl_auth_enable = yes smtpd_sasl_security_options = noanonymous mynetworks = 127.0.0.1 禁止匿名使用SMTP服务 smtpd_recipient_restrictions = permit_mynetworks, permit_sasl_authenticated, 设置收件人过滤规则 reject_unauth_destination [root@mail ~]# postfix reload
本章结构
启用SMTP发信认证 设置SMTP发信认证 验证SMTP发信认证 部署并配置Squirrelmail Postfix邮件系统(二) 构建Web邮件系统 使用Squirrelmail收发邮件
通过别名设置邮件组
其他扩展设置 邮件大小及邮箱空间限制
SMTP发信认证3-1
• SMTP用户认证流程
n
本章总结
启用SMTP发信认证 设置SMTP发信认证 验证SMTP发信认证 部署并配置Squirrelmail Postfix邮件系统(二) 构建Web邮件系统 使用Squirrelmail收发邮件