ARM下载说明
中标麒麟桌面操作系统软件(ARM64 版)V7.0 用户手册说明书
中标麒麟桌面操作系统软件(ARM64版)V7.0用户手册中标软件有限公司2020年01月目录第1章系统简介 (6)1.1系统运行环境 (6)1.2开始菜单 (6)第2章系统配置 (9)2.1系统桌面及版本信息 (9)2.2控制面板简介 (9)2.3显卡配置 (11)2.3.1 显示器分辨率设置 (11)2.3.2 屏幕保护设置 (11)2.4网络配置 (12)2.4.1 高级配置 (13)2.5打印机配置 (17)2.5.1 添加本地打印机 (17)2.5.2 添加网络打印机 (18)2.5.3 共享打印机 (20)2.6用户和组管理 (23)2.7输入法设置 (24)2.7.1显示输入法快捷键 (25)2.7.2添加输入法 (25)2.7.3其他个性化设置 (26)第3章办公 (28)3.1文档查看器 (28)第4章奔图 (29)4.1奔图扫描应用软件 (29)第5章互联网 (30)5.1360安全浏览器 (30)5.2F IREFOX浏览器 (31)5.3FTP客户端 (31)5.4邮件客户端 (34)5.5远程桌面连接 (35)第6章影音 (38)6.1多媒体播放器 (38)6.2茄子 (39)6.3录音机 (40)6.4声音 (40)6.5音乐播放器 (42)第7章附件 (44)7.1备忘录 (44)7.2光盘刻录器 (45)7.3归档管理器 (47)7.4计算器 (49)7.5记事本 (49)7.6密码与密钥 (50)7.7命令提示符 (51)7.8屏幕截图 (52)7.9扫描易 (53)7.10星际译王 (55)7.11资源管理器 (56)7.12字符映射表 (57)第8章金山办公 (59)8.1WPS表格 (59)8.2WPS文字 (59)8.3WPS演示 (60)第9章数科OFD (61)第10章编程 (62)第11章图形 (63)11.1MATE颜色选择 (63)11.2图像查看器 (63)11.3图像处理程序 (64)第12章系统工具 (66)12.1备份还原 (66)12.2磁盘管理 (69)12.3磁盘使用情况分析器 (69)12.4打印机 (71)12.4.1 添加本地打印机 (71)12.4.2 添加网络打印机 (72)12.4.3 共享打印机 (74)12.5防火墙 (76)12.6键盘快捷键 (77)12.7删除软件 (78)12.8文件共享 (79)12.9系统更新 (80)12.10系统信息 (81)12.12语言 (82)12.13指纹登录 (83)12.14中标麒麟软件中心 (84)第13章游戏 (86)13.1俄罗斯方块 (86)13.2国际象棋 (87)13.3黑白棋 (88)13.4扫雷 (90)13.5数独 (91)13.6纸牌游戏 (92)第14章系统安装 (93)中标麒麟最终用户使用许可协议 (98)中标麒麟操作系统软件隐私政策声明 (102)附录:常见问题及处理方法(FAQ) (108)第1章系统简介中标麒麟桌面操作系统软件(ARM64版)V7.0(以下简称“中标麒麟桌面操作系统软件”)拥有全新设计的用户界面、统一的应用程序及工具入口、简单实用的各类软件,使整个操作系统更加高效、易用,再加上其良好的兼容性,必将给您带来前所未有的使用体验。
ARM仿真器-更新固件及常见问题-V1.04

ARM仿真器-更新固件及常见问题V1.04目录1.JTAG 模式及典型连接2.SWD 模式及典型连接3.关于2脚(NC)3.3V电源输出说明4.关于19脚5V Supply 供电说明5.如何判断丢失固件6.如何判断新老版本仿真器7.新版本仿真器丢失固件解决方法(擦除固件方法)8.老版本仿真器丢失固件解决方法(擦除固件方法)9.SAM-PROG v2.4软件下载固件方法(WINXP或WIN7 32位)10.sam-ba_2.14.exe软件下载固件方法(WIN7/WIN8)11.WIN7、WIN8安装驱动程序12.仿真器转接板原理图注意:必须操作第7(或8)项擦出固件才能用第9或10项软件下载固件1.JTAG 模式及典型连接2.SWD 模式及典型连接3.关于2脚(NC)3.3V电源输出说明默认不输出3.3V电源;但为了方便用户应用,如果用户一定要输出3.3V电源,请将仿真器壳子打开,把J3的跳线冒放到3.3V一端;注意:强烈建议用户不要这样用,因为这样会造成仿真器及目标板不稳定现象;这个3.3V输出电流不要超过300mA;4.关于19脚5V Supply 供电说明此端口输出5V最大300mA 的电流,如果目标板功耗较大时将无法为目标板供电,因为输出的是5V ,所以务必接入目标板电源芯片的输入端,千万不要接入CPU 的供电脚,可能会损坏芯片。
低版本驱动中没有此选项,可通过J‐Link Commander DOS 窗口中输入power on 回车,手动给目标板供电。
V4.88及以上驱动中需在Options ‐>Project Interface‐>Production 界面中Enable target power 处打勾开启此功能。
如图:5.如何判断丢失固件绿灯不亮了、红灯3秒闪烁一次以及电脑不识别设备都是丢失固件的现象;丢失固件偶尔出现,只要能方便重新烧写就可以,对于工程师来讲这个不是问题;6.如何判断新老版本仿真器:老版本:打开仿真器,左上角版本是:V1.00, 此版本只能打开仿真器按6项说明烧写固件,比较麻烦;新版本:仿真器底部贴有“QC”标志、打开仿真器左上角版本是:V1.02及以上;支持不打开仿真器烧写固件;按5项说明烧写固件;7.新版本仿真器丢失固件解决方法(擦除固件方法)用户再也不用打开仿真器盖子,用复杂的方法更新固件了。
【SoCVista】FreeARM下载测试说明
CPU下载测试说明1.代码结构说明1.1.简介ARM处理器是一种优秀的嵌入式处理器。
为了方便大家应用该款处理器进行SOC设计,特开发该款处理器的IP核,供大家调试使用。
本IP核以ARM7为模板,全面兼容ARM7的各项指令和中断,但不支持Thumb指令和协处理器指令。
由于ARM7并非哈佛结构,本核改造ARM7为哈佛结构,使得数据线和代码线分开,大大提高处理速度。
本核同样采用三级流水结构。
在xilinx的spartan-3e上综合后,频率高达37MHz。
它性能优异,描述简单,整个代码的有效行数只有1800行,在ASIC上的综合面积不超过3万门。
该核已在digilent的spartan-3e starter开发板下载成功。
现将整个流程整理成文档,供有兴趣的朋友参考使用。
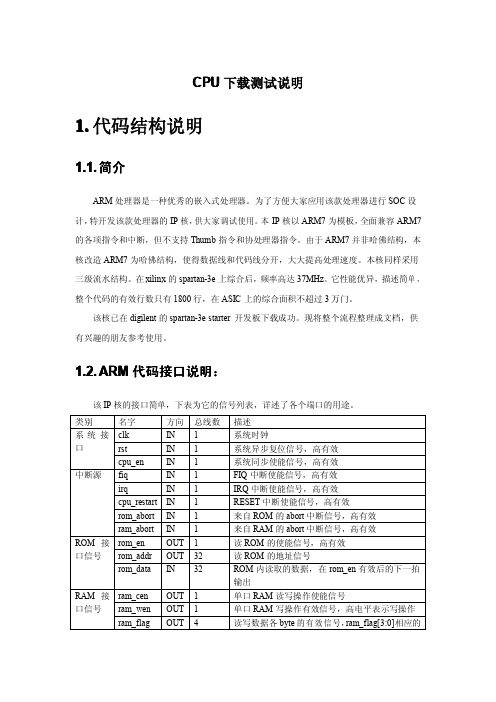
1.2.1.2.ARMARM代码接口说明:该IP核的接口简单,下表为它的信号列表,详述了各个端口的用途。
类别名字方向总线数描述系统接口clk IN1系统时钟rst IN1系统异步复位信号,高有效cpu_en IN1系统同步使能信号,高有效中断源fiq IN1FIQ中断使能信号,高有效irq IN1IRQ中断使能信号,高有效cpu_restart IN1RESET中断使能信号,高有效rom_abort IN1来自ROM的abort中断信号,高有效ram_abort IN1来自RAM的abort中断信号,高有效ROM接口信号rom_en OUT1读ROM的使能信号,高有效rom_addr OUT32读ROM的地址信号rom_data IN32ROM内读取的数据,在rom_en有效后的下一拍输出RAM接口信号ram_cen OUT1单口RAM读写操作使能信号ram_wen OUT1单口RAM写操作有效信号,高电平表示写操作ram_flag OUT4读写数据各byte的有效信号,ram_flag[3:0]相应的字节为高,表示该byte的读写有效ram_addr OUT32单口RAM读写地址ram_rdata IN32单口RAM读数据ram_wdata OUT32单口RAM写数据以上只是该核的通用部分,但是不能直接使用,原因是数据总线需要读取ROM内的数据。
ARM安装ROS2.0说明
sudo locale-gen en_US en_US.UTF-8 sudo update-locale LC_ALL=en_US.UTF-8 LANG=en_US.UTF-8
可以通过命令 locale 来查询环境是否正确 获取 ROS 代码
sudo sh -c 'echo "deb /ros/ubuntu `lsb_release -cs` main" > /etc/apt/sources.list.d/ros-latest.list' sudo apt-key adv --keyserver --recv-keys 421C365BD9FF1F717815A3895523BAEEB01FA116 获取 osrf sudo sh -c 'echo "deb /gazebo/ubuntu `lsb_release -cs` main" > /etc/apt/sources.list.d/gazebo-latest.list' sudo apt-key adv --keyserver --recv-keys D2486D2DD83DB69272AFE98867170598AF249743
安装编译器和相应软件 sudo apt-get update sudo apt-get install git wget sudo apt-get install build-essential cppcheck cmake libopencv-dev python-empy python3-dev python3-empy python3-nose python3-pip python3-setuptools python3-vcstool # dependencies for fastrtps sudo apt-get install libbቤተ መጻሕፍቲ ባይዱost-chrono-dev libboost-date-time-dev libboost-program-options-dev libboost-regex-dev libboost-system-dev libboost-thread-dev
Arm DS-5 Development Studio设置手册说明书

DA_10315-004 | January 26, 2022 Advance Information | Subject to ChangeApplication NoteDOCUMENT CHANGE HISTORYDA_10315-004Version Date Authors Description of Changev1.0 May 24, 2019 sgupta, jsachs Initial release.v2.0 April 2, 2020 sumitg Add details for Arm Development Studio.v3.0 January 29, 2021 sgupta, jsachs Steps updated from latest ARM DS software version and edited for clarity.v4.0 January 26, 2022 dwan, jsachs Public release.TABLE OF CONTENTSArm DS-5/Development Studio Setup (1)System Requirements (1)License Requirements (2)To install DS-5 (2)To install Arm DS (4)To configure DS-5 or Arm DS for Your SoC (9)To prepare the kernel configuration file (10)To set up a Cortex A57 debug connection (10)To set up the BPMP debug connection to the device (12)Arm® DSTREAM high-performance debug and trace enables powerful software debug and optimization of any hardware target based on an ARM processor. Developers can leverage the full debug and trace capabilities of Arm Development Studio on ARM architectures.For more information about Arm DSTREAM, see the product description on the Arm developer website.Up to the present, Arm DSTREAM software developers have used Arm DS-5 (DS-5 for short) for development and debugging purposes. ARM is now starting to migrate from Arm DS-5 to Arm Development Studio (Arm DS for short), an Eclipse plugin, for new development.This document describes both DS-5 and Arm DS.For more information about migrating to Arm Development Studio, see DS-5 to Arm Development Studio Migration Guide.This document covers both DS-5 and Arm DS.Installation and configuration are similar for the two products. Usage isthe same, so CPU preparation and setup are the same.For simplicity, this document has separate chapters on installation forDS-5 and Arm DS. A single chapter covers configuration for both. System RequirementsFor information about system requirements and dependencies, see the following pages: ④For DS-5: ARM DS-5 Getting Started Guide: System requirements④For Arm DS: Arm Development Studio Getting Started Guide Version 2020.1.License RequirementsARM licenses are ordinarily obtained by purchase from ARM.To use DS-5 you must have an ARMv8 license. For more information, see the Support section of the Arm developer website.Arm DS is available in several editions with different features and different licensing terms. Visit Compare Editions: Which edition is right for me? to see which edition is right for you and to apply for a license.The instructions in this document have been validated with Arm DSPlatinum Edition, the edition with the broadest range of features.To install DS-51.Download the current version of DS-5 from the Arm website:https:///tools-and-software/embedded/legacy-tools/ds-5-development-studio/downloads2.Enter this command to install DS-5:setup.exe3.Start Eclipse. For example, you might enter this command:<installpath>DS-5 v5.29.2\bin\eclipse.exeWhere <installpath> is the pathname of the directory where DS-5 was installed.4.Run Debug Hardware Update to update the firmware for DSTREAM, if necessary.From the menu bar, select Window; Show View; Other. (“Other” is at the end of the Show View menu, out of alphabetic order.) Eclipse opens the Show View dialog.Select Debug Hardware Firmware Installer, then click OK.Note: The firmware changes with each new version of DS-5. The DS-5software installed in a location that incorporates the release numberinto the pathname, for example:<installdir>\DS-5 v5.29.2\sw\debughw\firmware\ARM-RVI-4.34.0-13-base.dstream5.Run Arm License Manager to install the license.From the menu bar, select Help; Arm License Manager. The installer opens a View and edit licenses dialog.6.In the dialog’s Select the toolkit that you intend to use menu, select “DS-5 UltimateEdition.” Click Add License and enter the key for your ARMv8 license. Then click Close to close the dialog.7.Restart Eclipse and DS-5 by entering the pathname (if necessary) and program namein a terminal window, for example:<installpath>DS-5 v5.29.2\bin\eclipse.exeTo install Arm DS1.Download the Development Studio software from the Arm website and start theinstaller.2.Start the installer and select Platinum or Gold Edition. The Arm DS installer displaysthe Custom Setup dialog.3.Click Next. The installer displays the “Welcome” wizard page.4.Install drivers if the installer prompts you to do so.5.The installer displays a list of products you can install. Select the Arm DS IDE.6.The installer installs Arm DS, and the Eclipse IDE, if necessary. (Arm DS isimplemented as an Eclipse plugin.) If the installer automatically starts Arm License Manager and prompts you to enter license details, skip to step 7. If not, launch ArmLicense Manager manually. From the menu bar, select Help > Arm License Manager. The installer opens Arm License manager’s View and Edit Licenses dialog.7.Enter the license details and click Next. The installer installs DS-5.8.After installation, the DS-5 software opens automatically and checks the Arm website for updates. If updates are available, it displays the following dialog as it applies them.9.When updates (if any) are complete, you must determine the DSTREAM IP address.1.Return to the installer’s main menu.2.Select the Debug Hardware Configure IP view.3.Select Window > Show View > Debug Hardware Configure IP. The installerdisplays the Debug Hardware Configure IP dialog.4.Click Browse. The software detects the DSTREAM IP address and displays it. 10.Return to the main menu and select Windows > Show View. Eclipse opens the ShowView dialog.11.Select Debug Hardware Firmware Installer. The installer opens the Debug HardwareFirmware Installer dialog and detects the IP address and the required firmwareversion. (The default firmware version is included in the DS software, and is present at the installation location.)12.Restart the Eclipse IDE and DS software to use it for development and debugging. To configure DS-5 or Arm DS for Your SoC④For DS-5 on a T186 processor (NVIDIA® Jetson™ TX2 series):The T186.tar archive is required for using DS-5. It is is not required for using Arm Development Studio. Contact your NVIDIA support contact to obtain this file if you need to use DS-5.1.The T186.tar archive contains scripts and configuration files for the SoC. Copyit to:<installdir>\<version>\sw\debugger\configdb\Boards\nVIDIA\t186Where:―<installdir> is the directory in which the SoC scripts are to be installed.If you only will use Arm Development Studio, you may skip this step.2.Rebuild the database.From the menu bar, select Window > Preferences > DS-5 > ConfigurationDatabase. Then click the Rebuild database button.④For a T194 processor (NVIDIA® Jetson AGX Xavier™ series):No script is required. The installer detects the configuration automatically.Use the Platform Configuration Editor (PCE) view to create a platform configuration with the option “Automatic/simple platform detection” or “ConfigurationDatabase.” Instructions for using PCE are at Arm DS-5 Debugger User Guide:Creating a platform configuration.The PCE view enables you to create or modify debug configurations for connecting to your platform. You can specify your system’s debug topology by defining the connections between the various processors, CoreSight components, and the debug IP address of the platform.If you are using a T194 processor (Jetson AGX Xavier series), note the platformconfiguration name shown in the PCE view. You will need it later in the installation process.To prepare the kernel configuration fileEnsure that these kernel configuration macros are commented out in the kernel configuration file to disable CPU IDLE:CONFIG_CPU_IDLECONFIG_ARM_CPUIDLEAlternatively, you can disable CPU IDLE through a device tree node:cpuidle {status = "disabled";};To set up a Cortex A57 debug connection1.Set up the Arm® Cortex® A57 debug configuration required for connection to thedevice.From the menu bar, select Run > Debug Configuration. The installer opens theConfigure, manage, and run installations dialog, which displays a list ofconfiguration types and configurations.2.Double click the configuration type DS-5 Debugger. The installer prompts you toenter a new configuration name. Enter an appropriate name, such asT186_A57_SMP, then click the Connection button.3.The dialog displays a collapsible tree of targets and subtypes. Select the target to bedebugged.●For a T186 processor (Jetson TX2 series), select nVIDIA > T186 > Bare MetalDebug > Cortex-A57x6 SMP.●For a T194 processor (Jetson Xavier NX and Jetson AGX Xavier series), selectT194 > platform name > Bare Metal Debug > V8_2-Genericx8 Multi-Cluster SMP, where platform name is the platform name shown in the PCE view.4.Click the Base Metal Debug… Browse button. The installer opens a ConnectionBrowser dialog which lists connections available to this target. Select the connection you want to use, then click Select. The installer closes the Connection Browserdialog.The installer automatically configures the DSTREAM IP address or USB ID,depending on the connection method and the type of cable that connects the Jetson device to the host.For T194 devices (Jetson Xavier NX and Jetson AGX Xavier series),the next step is optional.5.Click the Debugger tab:6.Under Run Control, select Connect only.7.Click Apply, then Debug.To set up the BPMP debug connection to the device1.Select the Debug view.From the menu bar, select Window > Open Perspective > Other > DS-5 Debug. 2.Set up the BPMP debug configuration required for connection to the device.From the menu bar, select Run > Debug Configuration. The installer opens theConfigure, manage, and run installations dialog as shown in the section To set up a Cortex A57 debug connection. This dialog displays a list of configuration types and configurations.3.Double click the configuration type DS-5 Debugger. The installer prompts you toenter a new configuration name. Enter an appropriate name, such as t186_bpmp.Then click the Connection button.4.The dialog displays a collapsible tree of targets and subtypes. Select the target to bedebugged by selecting nVIDIA > T186 > Bare Metal Debug > Debug Cortex-R5_0. 5.Click the Base Metal Debug… Browse button. The installer opens a ConnectionBrowser dialog, which lists connections available to this target. Select the connection you want to use, then click Select. The installer closes the Connection Browserdialog.The installer automatically configures the DSTREAM IP address or USB ID,depending on the connection method and the type of cable that connects the Jetson device to the host.6.Click the Debugger tab. The installer displays that tab, shown in To set up a CortexA57 debug connection, above.7.Under Run Control, select Connect only.8.Check the check box Execute debugger commands to disable auto memory verify.9.Copy this line into the Execute debugger commands box:memory 0 0xffffffff rw nocache noverify10.Click Apply.NoticeALL NVIDIA DESIGN SPECIFICATIONS, REFERENCE BOARDS, FILES, DRAWINGS, DIAGNOSTICS, LISTS, AND OTHER DOCUMENTS (TOGETHER AND SEPARATELY, "MATERIALS") ARE BEING PROVIDED "AS IS." NVIDIA MAKES NO WARRANTIES, EXPRESS, IMPLIED, STATUTORY, OR OTHERWISE WITH RESPECT TO THE MATERIALS, AND ALL EXPRESS OR IMPLIED CONDITIONS, REPRESENTATIONS AND WARRANTIES, INCLUDING ANY IMPLIED WARRANTY OR CONDITION OF TITLE, MERCHANTABILITY, SATISFACTORY QUALITY, FITNESS FOR A PARTICULAR PURPOSE AND NON-INFRINGEMENT, ARE HEREBY EXCLUDED TO THE MAXIMUM EXTENT PERMITTED BY LAW. Information furnished is believed to be accurate and reliable. However, NVIDIA Corporation assumes no responsibility for the consequences of use of such information or for any infringement of patents or other rights of third parties that may result from its use. No license is granted by implication or otherwise under any patent or patent rights of NVIDIA Corporation. Specifications mentioned in this publication are subject to change without notice. This publication supersedes and replaces all information previously supplied. NVIDIA Corporation products are not authorized for use as critical components in life support devices or systems without express written approval of NVIDIA Corporation.TrademarksNVIDIA, the NVIDIA logo, Jetson, Jetson Xavier, and Jetson AGX Xavier are trademarks or registered trademarks of NVIDIA Corporation in the United States and other countries.ARM or Arm and Cortex are registered trademarks of ARM Limited.Other company and product names may be trademarks of the respective companies with which they are associated.Copyright© 2019-2022 NVIDIA CORPORATION and AFFILIATES. All rights reserved.。
STM32程序3种下载方式说明
下面介绍U-Link、J-Link和ISP下载STM32程序的配置方法,以MDK3.24为例,也可以使用MDK3.80或者更高版本的MDK,过程类似。
此文档仅供学习和交流使用。
STM32程序U-Link下载说明(1)ULink下载工具如图1所示。
图1 ULink下载工具(2)双击MDK安装文件图标进行安装,在后续出现的窗口中依次点击Next按钮,直到安装完成(默认安装路径是C:\Keil,建议换个路径名,比如C:\Keil MDK324文件目录下,以防止与51单片机开发环境冲突)。
安装好后,未输入License的MDK,在开发时会有代码量的限制。
(3)输入License:选择File菜单下的License Management子菜单,如图2所示。
图2 File菜单下的License Management子菜单(4)将License序列号拷贝到License Management中的New License ID Code(LIC)中,点击ADD LIC完成,如图3所示。
图3 输入License序列号(5)运行序列号生成程序,打开破解补丁:(部分杀毒软件可能会将这个文件误报为病毒文件,这时不必理会杀毒软件的警告,并将这个文件设为信任文件或者直接关掉杀毒软件),运行压缩包中程序,按图4所示配置,将Target下拉选项选中“arm”。
图4 输入CID,获得序列号将Keil软件“License Management”对话框中的Computer CID中的内容:拷贝到此程序的CID中:,然后点击按钮,获得序列号。
(6)将生成的序列号拷贝到“License Management”对话框的LIC区域中:然后,点击“Add LIC”,出现图5所示的内容,点击“Close”关闭对话框。
图5 添加LIC序列号(7)将文件夹Bin目录中的3个文件“UL2ARM_RDI.dll”、“UL2ARM_ULINK1.dll”、“UL2CM3_ULINK1.dll”拷贝到MDK安装目录下的\ARM\Bin目录中。
ARM Cortex-R5 系列处理器安全文档包说明书
Functional Safety – How ARM® solutionsbenefit your designFunctional Safety - required in many marketsRailwayIndustrialMedicalAutomotiveARM ´s package to support your design▪ARM ® Cortex ®-R5 processor - safety document package ▪ARM ® Compiler – safety package for software development▪Qualification Kit▪Extended Maintenance ▪Functional Safety CertifiedCortex-R5 Safety Package •Safety Manual•Failure Modes and Effects Analysis •Development Interface Report Safety Package Cortex-R5 Safety Manual:•Introduction•Cortex-R5 safety lifecycle•Cortex-R5 safety architecture•Cortex-R5 configuration options•Cortex-R5 fault detection and control mechanisms •Cortex-R5 assumptions of use•Cortex-R5 safety analysis results•Appendix - ECC tables•Appendix - Measures for systematic fault avoidance •Appendix - Lock-step initialization sequence•T otal contents approx.150 pagesARM® Cortex®-R5 Processor - Safety Document Package▪Compiler Safety Package for software development in safety markets▪Industrial control, automotive, medical, transportation, military and others▪The Safety Package comes with DS-5 Ultimate and Keil MDK-Professional ▪For more info please visit▪/solutions/safety-critical/ ▪/safety/Functional Safety Certified• TÜV SÜD certification • ISO 26262 (ASILD) • IEC 61508 (SIL3)Qualification Kit• Development process docs • Safety manual • Defect report • T est report Extended Maintenance• Five year commitment • T echnical support • Critical defect fixes ARM ® Compiler - Safety PackageARM ® Compiler - Qualification Kit - toolchain justificationARM Compiler Safety Manual :•Description of the•high level safety-related faults that the ARM Compiler can generate.•communication between the tools, which shows how faults might propagate.•Mitigation strategies that can be followed •to prevent or work-around faults.•for identification of specific behaviours of the ARM Compiler that are unsafe if used incorrectly.•T otal contents approx. 120 pagesQualification KitARM Complier Qualification Kit•Safety Manual•Development Process •T est Report •Defect Report•Failure Modes and Effects Analysis •Release HistoryARM® Compiler - Extended Maintenance ( EM )▪ARM Compiler 5.04 is a stable branch with regularly scheduled maintenance releases.▪New critical defects are back-ported to EM branch.▪ARM Compiler 5.04 is the first EM branch, followed by ARM Compiler 5.06 in 2015.▪ARM Compiler 5.04 will be maintained through 2015.▪ARM Compiler 5.06 will be maintained through 2020,▪longer term contracts may be available by special arrangement with ARM.▪ARM Compiler Qualification Kit aligns with EM branches.▪For every Extended Maintenance release, there will be a QK update.▪made available to registered users at ARM® Compiler - Functional Safety Certified ▪ARM Compiler 5.04u2 and future ARM Compiler 5.04 releases will be TÜV SÜD certified▪as meeting the toolchain requirements of ISO 26262 (through ASIL D) andIEC 61508 (through SIL 3),▪as being qualified for safety-related software development up to SIL3 (IEC 61508) or ASILD (ISO 26262) without further qualification activities,▪and will be licensed as part of MDK-Professional and DS-5 Ultimate package.Functional Safety – How ARM ® solutions benefit your designMCU / SOC specific safety documentationIPMCU / SOCSystematic fault considerations, safety architecture aspectsSystematic fault, random HW fault considerationsFunctional safety assessment of MCU / SOCARM Compiler Qualification Kit and toolchain certificateARMIP integratorEnd-user , e.g. Tier-1, OEMMDK: Features to Support Verification and Certification Debug & T race for Cortex-M▪Code Coverage▪Exception T race▪Event Viewer▪Code InstrumentationThank Y ou The trademarks featured in this presentation are registered and/or unregistered trademarks of ARM Limited (or its subsidiaries) in the EU and/or elsewhere. All rights reserved. Any other marks featured may be trademarks of their respective owners。
ARM开发板使用手册
ARM开发板使用手册PHILIP LPC2132ARM7TDMI第一章介绍LPC2132开发板是专门为arm 初学者开发的实验板,用户可以做基础的arm实验,也可以做基于ucos-ii的操作系统实验。
本系统的实验源代码全部开放,用户可以在此基础上开发产品,减少重复劳动。
由于LPC2132体积很小,并且功能强大,因此特别适合需要复杂智能控制的场合,其运行速度高于早期的80486计算机,而体积只有指甲大。
我们已经将LPC2132产品成功应用在干扰比较强的工业场合,经过6个月的运行,各项指标符合要求。
因此我们特别推荐这一款开发板作为ARM初学者入门。
由于此款开发板体积很小,非常适合直接应用在工业以及民用智能控制器的场合。
LPC2132 CPU介绍LPC2131/2132/2138 是基于一个支持实时仿真和跟踪的16/32 位ARM7TDMI-STM CPU,并带有32kB、64kB 和512kB 嵌入的高速Flash 存储器。
128 位宽度的存储器接口和独特的加速结构使32 位代码能够在最大时钟速率下运行。
对代码规模有严格控制的应用可使用16 位Thumb 模式将代码规模降低超过30%,而性能的损失却很小。
较小的封装和很低的功耗使LPC2131/2132/2138 特别适用于访问控制和POS 机等小型应用中;由于内置了宽范围的串行通信接口和8/16/32kB 的片内SRAM,它们也非常适合于通信网关、协议转换器、软件modem、语音识别、低端成像,为这些应用提供大规模的缓冲区和强大的处理功能。
多个32 位定时器、1个或2 个10 位8 路的ADC、10 位DAC、PWM 通道、47 个GPIO 以及多达9 个边沿或电平触发的外部中断使它们特别适用于工业控制应用以及医疗系统。
主要特性●●16/32 位ARM7TDMI-S 核,超小LQFP64 封装。
●●8/16/32kB 的片内静态RAM 和32/64/512kB 的片内Flash 程序存储器。
上海迅饶自动化科技有限公司 SMS2004-ARM X2SMS 使用手册说明书
X2SMS使用手册适用型号:SMS2004-ARM上海迅饶自动化科技有限公司目录1 前言 (1)1.1声明 (1)1.2 技术支持 (1)2 概述 (1)2.1功能描述 (1)2.2 硬件参数 (1)3 操作步骤 (2)3.1选择操作语言 (2)3.2选择监控模式 (3)3.3添加驱动 (4)3.4添加通道 (6)3.5添加设备 (7)3.6添加标签 (9)3.7设置用户手机信息 (13)3.8 X2SMSRunTime软网关运行时 (18)3.9上传工程到网关 (21)3.10网关参数设置 (22)3.11下载工程到PC (25)3.12软件授权 (26)3.13测试短信模块 (28)4WEB服务器 (29)4.1网页登陆 (30)4.2下载文件 (31)4.3用户管理 (32)4.4网口设置 (32)4.6固件信息 (33)4.7系统信息 (33)4.8通讯状态 (34)4.9 实时数据 (35)5 硬件短信猫连接 (38)6 USB 硬件狗 (39)7 SMS2004硬件网关说明 (39)8 常见问题说明 (42)8.1提示调用WEB服务器方法失败 (42)8.2 注意区别上传工程与下载工程 (43)1 前言1.1声明本手册属于上海迅饶自动化科技有限公司及授权许可者版权所有,保留一切权利,未经本公司书面许可,任何单位和个人不得擅自摘抄、复制本书内容的部分或全部。
由于产品版本升级或其他原因,本手册内容有可能变更。
上海迅饶自动化科技有限公司保留在没有任何通知或者提示的情况下对本手册的内容进行修改的权利。
本手册仅作为使用指导,本公司尽全力在本手册中提供准确的信息。
1.2 技术支持●技术支持邮箱:*********************●技术支持热线电话:************●网址:或2 概述2.1功能描述●X2SMS称作短信网关,和GPRS Modem(短信猫)硬件相结合,可以实现短信报警、短信通知、短信传输数据等功能。
ARM中的RORW与ZIDATA说明
一直以来关于ARM体系中所描述的RO,RW和ZI数据存在似是而非的明白得,这段时刻对其认真了解了一番,发觉了一些规律,明白得了一些以前书本上有的可是不睬解的东西,我想应该有很多人也有和我一样的困惑,因此将我的一些关于RO,RW和ZI的明白得写出来,希望能对大伙儿有所帮忙。
要了解RO,RW和ZI需要首先了解以下知识:ARM程序的组成此处所说的“ARM程序”是指在ARM系统中正在执行的程序,而非保存在ROM中的bin映像(image)文件,这一点清注意区别。
一个ARM程序包含3部分:RO,RW和ZIRO是程序中的指令和常量RW是程序中的已初始化变量ZI是程序中的未初始化的变量由以上3点说明可以理解为:RO就是readonly,RW就是read/write,ZI就是zeroARM映像文件的组成所谓ARM映像文件就是指烧录到ROM中的bin文件,也成为image文件。
以下用Image文件来称呼它。
Image文件包含了RO和RW数据。
之所以Image文件不包含ZI数据,是因为ZI数据都是0,没必要包含,只要程序运行之前将ZI数据所在的区域一律清零即可。
包含进去反而浪费存储空间。
Q:为什么Image中必须包含RO和RW?A:因为RO中的指令和常量以及RW中初始化过的变量是不能像ZI那样“无中生有”的。
ARM程序的执行过程从以上两点可以知道,烧录到ROM中的image文件与实际运行时的ARM程序之间并不是完全一样的。
因此就有必要了解ARM程序是如何从ROM中的image到达实际运行状态的。
实际上,RO中的指令至少应该有这样的功能:1. 将RW从ROM中搬到RAM中,因为RW是变量,变量不能存在ROM中。
序根据编译器给出的ZI地址及大小来将相应得RAM区域清零。
ZI中也是变量,同理:变量不能存在ROM 中在程序运行的最初阶段,RO中的指令完成了这两项工作后C程序才能正常访问变量。
否则只能运行不含变量的代码。
说了上面的可能还是有些迷糊,RO,RW和ZI到底是什么,下面我将给出几个例子,最直观的来说明RO,RW,ZI在C中是什么意思。
- 1、下载文档前请自行甄别文档内容的完整性,平台不提供额外的编辑、内容补充、找答案等附加服务。
- 2、"仅部分预览"的文档,不可在线预览部分如存在完整性等问题,可反馈申请退款(可完整预览的文档不适用该条件!)。
- 3、如文档侵犯您的权益,请联系客服反馈,我们会尽快为您处理(人工客服工作时间:9:00-18:30)。
STMF103C8 载说明
二步:烧录。
将板子与电脑用我们配备的usb 线(即供电线)连起来。
注意:除了这条线,千万不要接其
他线(如下载16 用的ISP 线)。
板上的硬件设置如图1 所示:
图 1
打开烧录软件:步骤2 安装单片机开发相关软件\烧录软件\PZISP 自动下载软件.exe
其界面如图 2 所示,我们要注意下面几点设置。
图2
注意:
1、如果不能自动下载程序,可以用手动复位的方法下载程序,按钮的操作方法:按下RSK
按钮不放用另外手指按下ISPK,然后,先松开RSTK 再松开ISPK 按钮。
完成后,点击
下载软件的"下载"按钮即可完成程序下载。
2、下载完成后要断开短路帽BOTT1 有些程序才能正常运行。