罗技K810简单测评
迷你蓝牙键盘带红外遥控器用户手册 KP-810-18BV 说明书

User ManualMini Bluetooth Keyboard with IR Remote Featuring Integrated Interactive Voice TechnologyModel:KP-810-18BVRev.1.01Basic info:1.1Overview:Bluetooth3.0keyboard remote integrates QWERTY layout,mouse touchpad,voice mode,microphone,headphone and learning infrared remote control.1.2Package:Mini Bluetooth Keyboard with IR RemoteUSB cable for recharging the unit*1User manual*11.3System requirement:--Windows/Google/Mac/Linux--Mac OS,iOS--Android4.0Smart Phone with HDMI/MHL HD out put port2.How to use2.1Function description of keyboard9.Front viewItem Function OperationMouse left Press to operate like left mouse key Mouse rightPress to operate like right mouse key BT Bluetooth reset Press topair keyboard and USB receiverCursorup,down left,right Press the four keys to move cursor up,down,left,and rightPage up Press to scroll page up Page downPress to scroll page downTouch PADMouse touch padSlide your finger on touch pad to movemouse cursorIndicator recharge indicator and go out when fully Recharged.LightupwhenfullyrechargedFlash when signal transited Light up when switch to Caps lock inputSound light2.2Composed keys:All composed keys must work with Fn,for example,if you want to activate “Home”,you have to press key “Fn”and key “9”together.Item Function OperationFn Work with other blue keys Press this key and other bluekey togetherChange operation directions Press“Esc”and“Fn”togetherPress to turn backlit on/off Press“F1”and“Fn”togetherVolume down Press“F2”and“Fn”togetherV olume up Press“F3”and“Fn”togetherMute Press“F4”and“Fn”togetherPrevious Press“F5”and“Fn”togetherStop Press“F6”and“Fn”togetherNext Press“F7”and“Fn”togetherReturn to main page Press“F8”and“Fn”togetherBack to previous page Press“F9”and“Fn”together Prtsc Print screen Press“F10”and“Fn”togetherDel Delete Press“”and“Fn”together Home Home Press“9”and“Fn”together F12F12Press“=”and“Fn”together F11F11Press“-”and“Fn”together End End Press“0”and“Fn”together Ins Insert Press“8”and“Fn”together Ctrl+Alt+Del Ctrl+Alt+Del Press Fn+Enter together2.3How to start:1)Turn unit on by switching power switch to“on“.2)charge your keyboard:when its LED flashes even no any operation on it,that means yourkeyboard is in low power capacity.Please charge it by suppliedcharging cable,connecting micro end of USB cable to yourkeyboard and the other end to usb port of computer,then led willlight be steady on,and go out when it is fully charged.3IR learning:To learn the original code from the other home appliance,take the TV remote as an example:3.1.There are two modes available:“AV”or“TV”.If you want to learn from the TV Remote,please press the TV key and the LED blue light will flash,and if A V,the LED orange light.3.2.Press key“set”for about2seconds until LED lights solid,whichmeans a learning mode.Then tap the key you want to copy andLED will flash one time and then light solid again,which means asearch and pairing state.3.3.Approach two emitting heads of both your TV remote and keyboardabout10mm,then press the original button on TV remote,and theLED of your tv remote blinks and code value of this button is being sent.3.4The LED of the keyboard blinks quickly for3times and lights solid,which means this round of learning process is successfully done.3.5Repeat3.2,3.3to program other infrared learning buttons.Pleas note that LED will go out and quit learning mode if nooperation within10seconds,which means an auto setting save.3.6.Press the“set”key to save and quit the learning mode at any time orat the end of learning process.4.Change operation directions:We may,or exactly,need to use the touchpad horizontally or vertically, you can make it by pressing the key Fn and then click the key“Esc”to change direction of cursor track.5.Voice:The device integrates interactive voice technology to support skype,QQ chatting,MSN real-time talking,Google Talking,wireless music and so on.Just hold the button to speak out.6.Pair Android4.0smart phone/tablet6.1First bluetooth pairing1).Turn on the Bluetooth voice keyboard,Hold BT button till thesecond LED flash.2)Navigate to activate bluetooth mode on your phone or tablet tosearch bluetooth signal around.When the icon“bluetoothiPazzPort”appears,click to connect.Sometimes,you may beasked to input a password(it will show on screen,such as3849).6.2Voice function:1)First voice pairingHold the voice button on the keyboard for about5Seconds,until two LED indicators flash alternately.Find and click the icon “iPazzPortvoice”on Smart phone/tablet to connect.When the fourth LED flashes quickly about3seconds and slows down,this connection is successful.2)Second voice connectionTurn on the keyboard and hold voice button for3seconds till the fourth LED lights.The fourth LED flashes quickly about3seconds and slows down,which means the connecting is successful.3)Turn off the Bluetooth voice function:hold the voice button for 3seconds till the fourth LED lights.6.3Pick up call/cut off call by remote keyboard:Having connected it with this bluetooth keyboard,you can click thesound button on the keyboard to answer the call,and click againto hang up the phone;and hold the sound button for2minutes toreject the phone.7WEEE Directive&Product DisposalAt the end of its serviceable life,this product should not be treated as household or general waste.It should be handed over to the applicable collection point for the recycling of electrical and electronic equipment,or returned to the supplier for disposalNotice to customersThis symbol on the battery indicates that the battery is to be collected separately.The following applies only to users in European countries.This battery should be separately collected at an appropriate collection point.Do not dispose of as household waste.For more information,contact the retailer or local authorities in charge of waste,management.8Caution:Changes or modifications not expressly approved by the party responsible for compliance could void the user's authority to operate the equipment. Compliance statement:Please keep this manual for instant and convenient reference.And please contact us on social platform iPazzPortfans,or at *********************for timely help if you have any question or any problem with our product.。
Logitech游戏设备指南说明书

Logitech®游戏软件活动...需要了解更多信息?新建配置文件快速入门分配命令至 G 键/按钮配置文件教程录制多按键宏疑难解答软件升级Logitech 支持网站Array本帮助中心提供游戏设备和音频设备的相关信息。
请注意:您的 Logitech 设备可能并不具备本帮助中心中的某些功能。
请参考设备附带的文档。
© 2013 Logitech。
保留所有权利。
罗技、罗技标志、Logitech 和其他罗技商标均归罗技所有,并或已注册。
所有其他商标均是其各自所有者的财产。
欢迎恭喜选用全新的 Logitech®游戏设备。
Logitech 设计和制造的个人界面产品使您可在数字世界中高效率地工作、娱乐、交流。
这些产品在人与计算机之间架起了一座桥梁,以直观的链接让您的数字世界成为自然感官的延伸。
所有设备都具备许许多多省时、直观、可定制的功能 - 您很快就会感叹以前没有这些设备时是怎样过来的。
Logitech 游戏设备究竟有何独到之处?首先,键盘和游戏手柄具备一系列可编程 G 键,可用以针对每个游戏创建一组有用的自定义命令,创建这些命令时甚至无需退出游戏(还可以向鼠标按钮分配可自定义的命令)。
部分设备模块配有媒体按钮,只需触摸按钮即可控制音乐与电影。
配合许多设备模块使用,让您可以密切关注邮件、游戏状态、媒体以及众多其他信息。
Logitech 游戏软件可为您的设备提供强大功能和智能操作,从而实现某些高级游戏功能,包括配置文件、多按键命令,以及 LCD 显示屏配置。
要发挥设备和 Logitech 游戏软件的最大潜力,请使用此帮助中心... 帮助中心可提供根据自身需要进行设备自定义的详细信息。
帮助中心还会说明如何为每个游戏设置配置文件,如何录制宏以及如何将宏分配给 G 键/按钮,以此充分挖掘您的游戏潜能。
Logitech 游戏设备搭配 Logitech 游戏软件... PC 游戏的终极控制终端。
8000Hz回报率小尺寸旗舰! 海盗船K70 RGB TKL机械键盘体验

8000Hz回报率小尺寸旗舰!海盗船K70 RGB TKL机械键盘体验作者:来源:《电脑报》2021年第14期海盗船K70系列是最近几年热度很高的键盘,可以说是海盗船的看家外设之一了,在此之前这款键盘经历了K70、K70 LUX以及K70 MK.2多个版本,现在我们又要迎来海盗船K70 RGB TKL,虽然体形比之前几款K70都要小,但性能提升很大,最高支持惊人的8000Hz回报率,还针对玩家的需求做出了一些优化调整,配置上很有看点。
海盗船K70 RGB TKL延续了K70经典的金属面板和整体造型,不过按键配列从104键变成了87键,长度更短更小巧,在此基础上保留了标志性的“额头”设计。
和其他追求修长外形的短键盘不同,它的正面造型看起来非常的方正,颇具海盗船风格,黑色阳极氧化铝合金面板配合金属拉丝工艺,视觉观感和手感都不错。
键帽方面这次更换了更受玩家欢迎的PBT材质键帽,采用了双色注塑工艺并且特意加强了按键表面的颗粒度,防滑、防汗效果出色,触摸手感个人十分满意。
键帽采用了高品质的闭口字符,字体宽大清晰,透光性很不错。
键轴为Cherry银轴,触发行程仅有1.2mm。
手感方面与红轴的差别不大,都是直上直下的线性手感,只是前段的按压压力比红轴略高,触发也更迅速。
另外一个可喜的变化是海盗船K70 RGB TKL采用了键线分离设计,搭配了一条1.8m长的编织线,接口的造型比较帅气,线材本身偏硬,但也比之前粗壮的连接线要柔软许多。
USB 接口旁增加了“竞技模式”开关,向外拨动开关即可切换为竞技模式,此时开关下方的红色指示灯亮起,所有键盘宏皆被禁用。
海盗船K70 RGB TKL支持最新的iCUE4驱动,软件界面比之前版本的颜值和科技感更强,进入键盘配置页面可以分别对按键映射、灯光以及设备性能进行设置。
按键和灯光设置选项丰富强大,易用性方面有所提升。
灯光效果一向都是海盗船的强项,透明银轴加上悬浮轴设计的亮度表现优秀,暗光环境下键盘四周的环绕灯效氛围感很强。
罗技 蓝牙炫光键盘 K810 设置指南说明书

Logitech® Bluetooth® Illuminated Keyboard K810 Setup Guide罗技® 蓝牙® 炫光键盘 K810设置指南Logitech Bluetooth Illuminated Keyboard K810English 3简体中文 13 /support232Logitech Bluetooth Illuminated Keyboard K810English 3Know your product1. Bluetooth® status lights2. Bluetooth keys3. Function keys4. Battery status light5. On/Off switch6. Bluetooth connect button7. Micro-USB port8. Micro-USB charging cableLogitech Bluetooth Illuminated Keyboard K8104 EnglishSet up your productPair your first device3. Press a Bluetooth key to assign your first device to that key:• The light above the selected key continues to blink blue. • The Bluetooth keyboard isdiscoverable for 15 minutes.Logitech Bluetooth Illuminated Keyboard K810English 54. Complete Bluetooth pairing on your device: Windows® 7 and 8: a. Go to Control Panel > Devices and Printers.b. Click “Add a device.”c. Choose “Logitech K810”from the device list.d. Click “Next,” and follow the on-screeninstructions.Apple iOS® (iPad® or iPhone®): a. In Settings, choose General > Bluetooth, and then turn on Bluetooth.b. Choose “Logitech K810” from the Devices menu. Android®a. In Settings, choose Wireless and network > Bluetooth settings,and then turn on Bluetooth.b. Choose “Logitech K810” from “Bluetooth devices.”Note: If your mobile device requests a PIN, enter the code using the Bluetooth keyboard andnot the virtual keyboard on your mobile device.The Bluetooth keyboard and your device are now paired. The light above the Bluetooth key you have selected turns blue for 30 seconds.For Windows, to customize the function keys and to specify backlight settings, download and install software at /support/k810.Logitech Bluetooth Illuminated Keyboard K8106 EnglishPair or reassign a Bluetooth key to another devicePair up to three compatible devices with the Bluetooth keyboard.1. Make sure the keyboard is on.2. Press the Bluetooth connect button. The lights above the Bluetooth keys rapidly blink blue.3. Press a Bluetooth key to assignyour device to that key. For example, if you already paired a device to Bluetooth key 1, press the Bluetooth key 2.• The light above the selected key continues to blink blue.• The keyboard is discoverable for 3 minutes.4. Go to “Pair your first device” and follow step 4 to complete Bluetooth pairing.Note: After you press the Bluetooth connect button, the lights above the Bluetooth keys blink blue. All three Bluetooth keys can be assigned or reassigned, and the Bluetooth keyboard isdiscoverable for 3 minutes.Logitech Bluetooth Illuminated Keyboard K810English 7Switching among paired devicesTo select a paired device:• Press the Bluetooth key (1, 2, or 3) associated with it.• The light above the selected key blinks blue, indicating the Bluetooth keyboard is connecting.• The light turns solid blue for 5 seconds, indicating the connection has been made.• For example, if a device is pairedwith the Bluetooth 2 key, press that key to use the device with the Bluetooth keyboard.Note: Only one device can be active at a time.Logitech Bluetooth Illuminated Keyboard K8108 EnglishCharge the batteriesA three-hour charge provides up to 10 days of use when you type about two hours a day with the backlight on, or about one year without backlight. You can use the Bluetooth keyboard while it charges.To check battery power and to charge the keyboard, do the following:Logitech Bluetooth Illuminated Keyboard K810English 9Visit Product CentralThere’s more information and support online for your product. Take a moment to visit Product Central to learn more about your new Bluetooth keyboard.Browse online articles for setup help,usage tips, or information about additional features. If your Bluetooth keyboard has optional software, learn about its benefits and how it can help you customize your product.Connect with other users in our Community Forums to get advice, ask questions, and share solutions.At Product Central, you’ll find a wide selection of content • Tutorials• Troubleshooting • Support community • Software downloads • Online documentation • Warranty information• Spare parts (when available)Go to /support/k810Logitech Bluetooth Illuminated Keyboard K81010 EnglishFunction and media keys1. Bluetooth keys 1, 2 and 3 Pair up to three compatible devices.2. Application switch Cycles through open apps.3. Decrease (F5) and Increase (F6) keyboard backlight intensity4. Play/Pause5. Mute6. Volume down7. Volume up8. Home9. Multifunction keyCalculator Windows onlyShow/Hide virtual keyboard iOS onlyF-keys: F1 to F12 To use in Windows, press and hold the Fn key, and then press an F-key. Customizable with optional software. See “Software for Windows.”Logitech Bluetooth Illuminated Keyboard K810English 11Software for WindowsDownload and install the Logitech Software for F-key functionality and customization; also specify backlight settings.Go to /support/k810Keyboard backlightKeyboard sensors detect your hands, turning the backlight on and off.The backlight adjusts automatically to the level of your room light. Bright light and low battery power cause the backlight to turn off, which helps conserve battery power. In bright light, the F5 and F6 keys are disabled.Automatic backlight control turns off when you use the F5 or F6 keys to adjust backlight intensity. You can restoreautomatic backlight control by turning the keyboard off then on. If the keyboard is idle for two hours or more, automatic backlight control is restored automatically.T roubleshootingKeyboard not working• Slide the On/Off switch to Off then to On.• If the Battery Status light flashes red, recharge the batteries. For more information, see “Charge the batteries.”• Go to Bluetooth settings on your device to check if “Logitech K810” is present. If it is, remove it. Then follow steps 2–4 in “Pair your first device” to redo Bluetooth pairing. If you’re using custom Bluetooth hardware and software, refer to your product documentation to resolve any Bluetooth issues.What do you think?Please take a minute to tell us. Thank you for purchasing our product./ithinkLogitech Bluetooth Illuminated Keyboard K81012 English1. On keyboard bottom, pry off coverand remove 4 screws.2. On keyboard top, pry off coversurrounding F-keys and remove5 screws.3. Separate top and bottom cases.4. Remove 5 screws securing circuit board.5. On bottom of circuit board,remove battery cable. Remove batteryfrom bottom case.6. Dispose of battery and productaccording to local laws.罗技 Bluetooth Illuminated Keyboard K810简体中文 13了解您的产品1. 蓝牙®状态指示灯2. 蓝牙键3. 功能键4. 电池状态指示灯5. 电源开关按钮6. 蓝牙连接按钮7. 微型 USB 端口8. 微型 USB 充电连接线罗技 Bluetooth Illuminated Keyboard K810设置您的产品与您的第一个设备配对14 简体中文罗技 Bluetooth Illuminated Keyboard K810简体中文 154. 在您的设备上完成蓝牙配对: Windows ® 7 和 8: a. 转到“控制面板” > “设备和打印机”。
罗技 G80-386 紧凑型无线键盘 使用说明书
關於其他產品的訊息、下載和更多服務請造訪
或
。
1 為了您的安全
吞嚥小部件會導致窒息 • 請將裝置存放在 歲以下兒童無法觸及之處。
固定安裝的可充電電池可能會引發火災 • 請勿以拆解、擠壓、加熱、點燃等方式損壞鍵盤。
代表「重複性勞損」。 是由於頻繁重複的小幅度運動造成的。為避免此種情況發生,建 議您: • 按照人體工學調整您的工作環境。 • 調整鍵盤和滑鼠的位置,使您的上臂和手腕在身體兩側自然伸 展。 • 縮短休息間隔,必要時進行伸展運動。 • 經常變換您的身體姿勢。
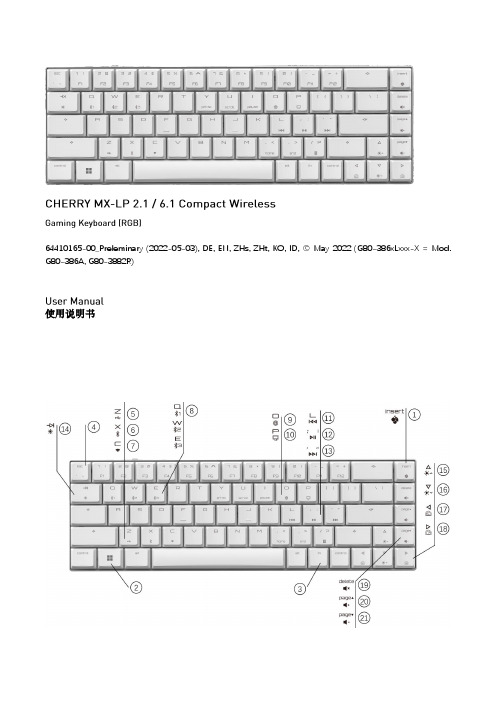
• 使用键盘背面的 开关打开设备电源。
通电后,所有按键的
灯都会显示白色 秒钟。
关闭设备:
• 断开
线缆并使用键盘背面的
开关关闭设备电源。
键盘在不使用超过 秒时进入睡眠模式,仅需消耗很小的电量。首 次按下任意按键时,键盘自动重启。
键盘在节能模式下仍会消耗电量。因此,如果长时间不使用或需要运 输时,应手动将其关闭。
9 将键盘重置为出厂设置
长按 和
键 秒,可将键盘重置为出厂默认设置。键盘上所
有按键的
灯显示白色 秒钟以确认重置。
在极少数需要硬复位的情况下,您可以将别针(或回形针)插入键盘 底部的小孔中,并按 秒钟。除了恢复出厂默认设置外,蓝牙配对 信息也会被清除。
10 清洁键盘
关闭键盘并断开
线缆。
使用微湿的布和温和的清洁剂(如洗碗液)清洁键盘。不要使用 苯、酒精、擦洗剂或研磨擦洗器等溶剂清洁键盘。防止液体溅入键 盘。
灯将亮红色。
4 切换连接方式
如果您已通过线缆、蓝牙和接收器建立了连接,则可以使用 相应按键在连接方式之间进行切换。
键和
请在按住 键的同时,按下列表中相应的按键。
JBL QUANTUM810 WIRELESS游戏耳机说明书

810WIRELESSO W N E R’S M A N U A LINTRODUCTION (1)WHAT’S IN THE BOX (2)PRODUCT OVERVIEW (3)Controls on headset (3)Controls on 2.4G USB wireless dongle (5)Controls on 3.5mm audio cable (5)GETTING STARTED (6)Charging your headset (6)Wearing your headset (7)Power on (8)First-time setup (for PC only) (8)USING YOUR HEADSET (10)With 3.5mm audio connection (10)With 2.4G wireless connection (11)With Bluetooth (secondary connection) (13)PRODUCT SPECIFICATIONS (15)TROUBLESHOOTING (16)LICENSE (18)Congratulations on your purchase! This manual includes information on the J BL QUANTUM810 WIRELESS gaming headset. We encourage you to take a few minutes to read this manual, which describes the product and includes step-by-step instructions to help you to set up and get started. Read and understand all the safety instructions before using your product.If you have any questions about this product or its operation, please contact your retailer or customer service, or visit us at 010*******0601 JBL QUANTUM810 WIRELESS headset02 USB charging cable (USB-A to USB-C)03 3.5mm audio cable04 2.4G USB wireless dongle05 QSG, warranty card and safety sheet06 Windshield foam for boom microphoneControls on headset01 ANC* / TalkThru** LED• Lights up when the ANC feature is enabled.• Flashes quickly when the TalkThru feature is enabled.02 button• Press briefly to turn ANC on or off.• Hold for more than 2 seconds to turn TalkThru on or off.03 / dial• Balances the chat volume in relation to the game audio volume.04 Volume +/- dial• Adjusts headset volume.05 Detachable windshield foam06 Mic mute / unmute LED• Lights up when the microphone is muted.07 button• Press to mute or unmute the microphone.• Hold for more than 5 seconds to turn the RGB light on or off.08 Charging LED• Indicates the charging and battery status.09 3.5mm audio jack10 USB-C port11 Voice focus boom microphone• Flip up to mute, or flip down to unmute the microphone.12 button• Hold for more than 2 seconds to enter Bluetooth pairing mode.13 slider• Slide upwards / downwards to power on / off the headset.• Slide upwards and hold for more than 5 seconds to enter 2.4G pairing mode.14 Status LED (Power / 2.4G / Bluetooth)15 RGB Lighting Zones16 Flat-fold ear cup* ANC (Active Noise Cancelling): Experience total immersion while gaming by suppressing the outside noise.** TalkThru: In TalkThru mode, you can hold natural conversations without removing your headset.020101 CONNECT button• Hold for more than 5 seconds to enter 2.4G wireless pairing mode.02 LED• Indicates the status of 2.4G wireless connection. Controls on 3.5mm audio cable01 slider•02 Volume dial•Charging your headsetBefore use, fully charge your headset through the supplied USB-A to USB-C charging cable.TIPS:• It takes approximately 3.5 hours to fully charge the headset.• You can also charge your headset through a USB-C to USB-C charging cable (not supplied).Wearing your headset1. Put the side marked L onto your left ear and the side marked R onto your right ear.2. Adjust the earpads and headband for a comfortable fit.3. Adjust the microphone as necessary.Power on• Slide the power switch upwards to power on the headset.• Slide downwards to power off.The status LED glows solid white upon powering on.First-time setup (for PC only)Download from /engine to gain full access to features on your J BL Quantum headset - from headset calibration to adjusting 3D audio to suit your hearing, from creating customized RGB lighting effects to determining how the boom microphone side-tone works.Software requirementsPlatform: Windows 10 (64 bit only) / Windows 11500MB of free hard drive space for installationTIP:• QuantumSURROUND and DTS Headphone:X V2.0 available on Windows only.Software installation required.1. Connect the headset to your PC via2.4G USB wireless connection (See “With 2.4Gwireless connection”).2. Go to “Sound Settings” -> “Sound Control Panel”.3. Under “Playback” highlight “JBL QUANTUM810 WIRELESS GAME” and select“Set Default” -> “Default Device”.4. Highlight “JBL QUANTUM810 WIRELESS CHAT“ and select “Set Default” ->“Default Communication Device”.5. Under “Recording” highlight “JBL QUANTUM810 WIRELESS CHAT” and select“Set Default” -> “Default Device”.6. In your chat application select “JBL Q UANTUM810 WIRELESS CHAT” as thedefault audio device.7. Follow the onscreen instructions to personalize your sound settings.With 3.5mm audio connection1. Connect the black connector to your headset.2. Connect the orange connector to the3.5mm headphone jack on your PC, Mac,mobile or gaming console device.Basic operationNOTE:• The mic mute / unmute LED, button, / dial and RGB Lighting Zones on the headset do not work in 3.5mm audio connection.With 2.4G wireless connection1. Plug the2.4G USB wireless dongle into a USB-A port on your PC, Mac, PS4/PS5 orNintendo Switch™.2. Power on the headset. It will pair and connect with the dongle automatically. Basic operationTo pair manually1. On the headset, slide the power switch upwards and hold for more than 5 secondsuntil the status LED flashes white.2. On the 2.4G USB wireless dongle, hold CONNECT for more than 5 seconds untilthe LED flashes white quickly.Both LEDs on the headset and dongle turn solid white after successful connection.TIPS:• The headset turns off automatically after 10 minutes of inactivity.• The LED enters connecting mode (flashing slowly) after disconnection from the headset.• Compatibility with all USB-A ports is not guaranteed.With Bluetooth (secondary connection)With this function, you can connect your mobile phone to the headset while playing games, without worrying about missing important calls.1. Hold on the headset for more than 2 seconds.The status LED flashes quickly (pairing).2. Enable Bluetooth on your mobile phone and choose “JBL Q UANTUM810WIRELESS” from “Devices”.The status LED flashes slowly (connecting), and then turns solid blue (connected).Control calls×1×2When there is an incoming call:• Press once to answer.• Press twice to reject.During a call:• Press once to hang up.TIP:• Use volume controls on your Bluetooth connected device to adjust volume.• Driver size: 50 mm Dynamic drivers• Frequency response (Passive): 20 Hz - 40 kHz• Frequency response (Active): 20 Hz - 20 kHz• Microphone frequency response: 100 Hz -10 kHz• Max input power: 30 mW• Sensitivity: 95 dB SPL @1 kHz / 1 mW• Maximum SPL: 93 dB• Microphone sensitivity: -38 dBV / Pa@1 kHz• Impedance: 32 ohm• 2.4G Wireless transmitter power: <13 dBm• 2.4G Wireless modulation: GFSK, π/4 DQPSK• 2.4G Wireless carrier frequency: 2400 MHz - 2483.5 MHz• Bluetooth transmitted power: <12 dBm• Bluetooth transmitted modulation: GFSK, π/4 DQPSK• Bluetooth frequency: 2400 MHz - 2483.5 MHz• Bluetooth profile version: A2DP 1.3, HFP 1.8• Bluetooth version: V5.2• Battery type: Li-ion battery (3.7 V / 1300 mAh)• Power supply: 5 V 2 A• Charging time: 3.5 hrs• Music play time with RGB lighting off: 43 hrs• Microphone pickup pattern: Unidirectional• Weight: 418 gNOTE:• Technical specifications are subject to change without prior notice.If you have problems using this product, check the following points before you request service.No power• The headset turns off automatically after 10 minutes of inactivity. Power on the headset again.• Recharge the headset (see “Charging your headset”).2.4G pairing failed between headset and 2.4G USB wireless dongle • Move the headset closer to the dongle. If the issue remains, pair the headset with the dongle again manually (see “To pair manually”).Bluetooth pairing failed• Make sure you have enabled Bluetooth feature on the device to be connected with the headset.• Move the device closer to the headset.• The headset is connected to another device through Bluetooth. Disconnect the other device, then repeat the pairing procedures. (see “With Bluetooth (secondary connection)”).No sound or poor sound• Make sure you have chosen JBL QUANTUM810 WIRELESS GAME as the default device in the game sound settings of your PC, Mac or gaming console device.• Adjust volume on your PC, Mac or gaming console device.• Check game chat balance on PC if you are only playing game or chat audio.• Check that ANC is enabled while TalkThru is disabled.• You may experience obvious sound quality degradation when using the headset near a USB 3.0 enabled device. This is not a malfunction. Use an extension USB dock instead to keep the dongle as far from the USB 3.0 port as possible.In 2.4G wireless connection:• Make sure the headset and 2.4G wireless dongle are paired and connected successfully.• The USB-A ports on some gaming console devices may be incompatible with JBL QUANTUM810 WIRELESS. This is not a malfunction.In 3.5mm audio connection:• Make sure the 3.5mm audio cable is connected securely.In Bluetooth connection:• The volume control on the headset does not work for the Bluetooth connected device. This is not a malfunction.• Keep away from sources of radio interference such as microwaves or wireless routers.My voice cannot be heard by my teammates• Make sure you have chosen JBL QUANTUM810 WIRELESS CHAT as the default device in the chat sound settings of your PC, Mac or gaming console device.• Make sure the microphone is not muted.I can’t hear myself when I’m talking• Enable sidetone via to hear yourself clearly over game audio. ANC/TalkThru will be disabled when sidetone is enabled.The Bluetooth® word mark and logos are registered trademarks owned by Bluetooth SIG, Inc. and any use of such marks by HARMAN International Industries, Incorporated is under license. Other trademarks and trade names are those of their respective owners.HP_JBL_Q810_OM_V2_EN。
SC-810 缝纫机 说明书

中 文重要安全事项此缝纫机在有的国家(设置场所)由于该国的安全规定而被禁止使用。
同时,技术服务也同样被禁止。
1. 使用此缝纫机时,必须遵守包括如下项目的基本安全措施。
2. 使用此缝纫机之前,请阅读本使用说明书在内的所有指示文件。
同时应将此使用说明书妥善保管,以便能够随时查阅。
3. 此缝纫机应与贵国的有关安全规定一起使用。
4. 使用此缝纫机和缝纫机动作中,所有的安全装置应安装到规定的位置。
没有安装规定的安全装置的缝纫机禁止使用。
5. 此缝纫机应由接受过培训的操作人员来操作。
6. 使用缝纫机时,建议戴安全防护眼镜。
7. 发生下列情况时,应立即关掉电源开关,或拔下电源线插头。
7-1 机针、弯针、分离器等穿线和更换旋梭时。
7-2 更换机针、压脚、针板、弯针、分离器、送布牙、护针器、支架、布导向器等时。
7-3 修理时。
7-4 工作场所无人了或离开工作场所时。
7-5 使用离合马达时,请等待马达完全停止之后再进行。
8. 缝纫机以及附属装置使用的机油、润滑脂等液体流入眼睛或沾到皮肤上时,或被误饮时,应立即清洗有关部分并去医院治疗。
9. 禁止用手触摸打开了缝纫机开关通电的零件或装置。
10. 有关缝纫机的修理、改造、调整应由受过专门训练的技术人员或专家来进行。
11. 一般的维修保养应由受过训练的人员来进行。
12. 有关缝纫机的电气方面的修理、维修应由有资格的电气技术人员或专家的监督和指导下进行。
13. 修理、保养有关空气、气缸等压缩空气的零件时,应切断空气压缩机供气源后再进行。
如有残留压缩空气时,应放掉压缩空气。
但,受过相当训练的技术人员或专家进行有关调整或确认动作时除外。
14. 缝纫机的使用期间应定期进行清扫。
15. 为了正常安全运转,应安装地线。
同时应在不受高频焊接机等强噪音源影响的环境下使用。
16. 电源插头应用具有电气专门知识的人来安装。
电源插头必须连接到接地插座上。
17. 缝纫机指定用途以外不能使用。
罗技G602鼠标游戏怎么样?性能评测!
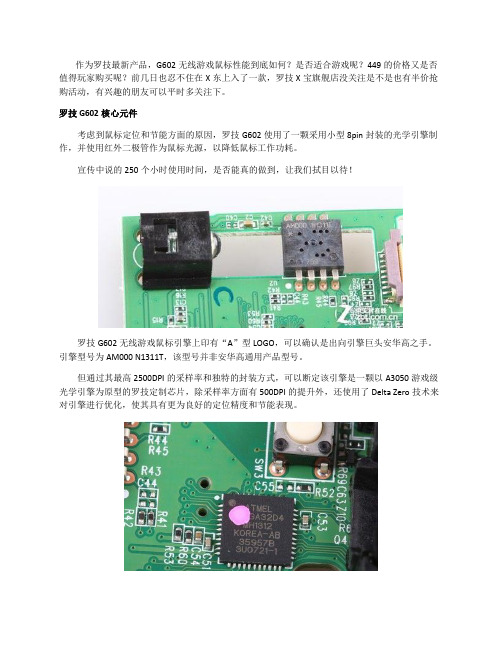
作为罗技最新产品,G602无线游戏鼠标性能到底如何?是否适合游戏呢?449的价格又是否值得玩家购买呢?前几日也忍不住在X东上入了一款,罗技X宝旗舰店没关注是不是也有半价抢购活动,有兴趣的朋友可以平时多关注下。
罗技G602核心元件考虑到鼠标定位和节能方面的原因,罗技G602使用了一颗采用小型8pin封装的光学引擎制作,并使用红外二极管作为鼠标光源,以降低鼠标工作功耗。
宣传中说的250个小时使用时间,是否能真的做到,让我们拭目以待!罗技G602无线游戏鼠标引擎上印有“A”型LOGO,可以确认是出向引擎巨头安华高之手。
引擎型号为AM000 N1311T,该型号并非安华高通用产品型号。
但通过其最高2500DPI的采样率和独特的封装方式,可以断定该引擎是一颗以A3050游戏级光学引擎为原型的罗技定制芯片,除采样率方面有500DPI的提升外,还使用了Delta Zero技术来对引擎进行优化,使其具有更为良好的定位精度和节能表现。
罗技G602无线游戏鼠标主控芯片使用爱特梅尔GA32单片机制作,该芯片具有16Mhz运行主频,内置32K板载存储空间,尽管性能并不出众,但满足G602无线鼠标数据输出处理仍是富富有余。
这也是罗技在G600鼠标之后,再次使用爱特梅尔单片机做为鼠标主控芯片。
罗技G602无线游戏鼠标核心设置用户通过驱动可以实现对11枚按键的自定义设置,DPI调节等等。
当用户选择使用计算机内的配置文件时,驱动会自动扫描电脑里的游戏,并为用户提供N多的配置文件选择,同时支持更多的按键自定义功能。
在DPI调节方面,鼠标支持250-2500以50为步进的调节。
罗技G602初试评测首先是一节电池确实感觉重量还能接受,虽然比G500S裸鼠貌似还重一些,但是鼠标侧翼拇指位的设计使得握持感更强,所以重量并没什么问题,更好掌握。
而游戏一段时间以后手掌稍许出汗,侧面磨砂部的手感就开始赞了。
(G500,G500S也是,干手有点滑,G500S上面涂层相对好一点,但是出汗以后握持感大大提高)原来的打滑感觉没有了。
- 1、下载文档前请自行甄别文档内容的完整性,平台不提供额外的编辑、内容补充、找答案等附加服务。
- 2、"仅部分预览"的文档,不可在线预览部分如存在完整性等问题,可反馈申请退款(可完整预览的文档不适用该条件!)。
- 3、如文档侵犯您的权益,请联系客服反馈,我们会尽快为您处理(人工客服工作时间:9:00-18:30)。
在个人拥有越来越多不同数码设备的时代下,一柄键盘为了满足对于多设备的需求,在这样的背景下诞生了罗技K810, 罗技K810 蓝牙背光键盘显示了罗技作为外设大厂一流的工业设计实力。
每一个角度,都赏心悦目;每一个细节,均精雕细琢。
正面以黑色为底,突显K810的背光功能。
左下角的标识说明是为windows8设计的。
(花了20天从美帝运过来,绕了半个地球,加上海关抽检,包装边角的磕碰也是可以理解的)
背面是一些功能简:包括可充电设计、多设备一键切换、人手距离感应和智能背光设计等
k810的外形尺寸为290.2*7.7*128.6mm,与普通的笔记本电脑键盘大小类似,功能键周围
采用了黑色的塑料材质,主键区采用银灰色的金属拉丝材质,整个键盘面看起来质感十足。
罗技K810的包装设计很简单,除了键盘,就是一个说明书盒子。
,
全英说明书、以及充电线,我很喜欢罗技这个理线夹,佷方便。
k810最上面一排的功能键,f1-f3为蓝牙设备切换键,F4为windows 8系统下的应用程序切换键,F5和F6为键盘的背光调节,F7到F10为多媒体键,F11则在android和iOS可作为Home键来试用,F11键则可以跳出虚拟键盘,F12可以自定义。
k810背面中间为产品logo,四周为橡胶垫脚,左侧为蓝牙适配键。
键盘侧面没有设计太多按键,只有一个电源键,键盘侧面为锲型设计,所以就没有单独加入支架。
k810采用了低剖面的按键设计,类似陶瓷烤漆键帽,触摸手感特别好,键程适中,回弹力度干脆。
不会造成太大的噪音,激光篆刻的标识在长时间使用后也不易掉色。
k810可一次接入三款蓝牙设备,通过三个蓝牙快捷键来进行即时的连接切换。
k810自带环境光感堪称黑科技,背光模式下有四级亮度可以调节,由于光线较为温和,在黑暗的环境下不会觉得刺眼。
用户手掌离开键盘时背光15秒自动关闭,当用户手掌靠近键盘后则会自动亮起,算是非常人性化的设计之一。
K810的电池是内置的,官方宣称按每天使用两个小时,背光条件下可以使用10天,关闭背光可以使用长达1年。
(ps:官方说的都是理想实验室里得出的结论,实际情况会稍差一些)
总结:
Logitech K810是我最喜欢的键盘之一,也是我用过手感最好的薄膜键盘,它让你享受击键的乐趣。
舒适的按键体验、轻薄的重量体积、可调节的背光、随意切换的多设备蓝牙连接,都让它成为了一款优秀的无线键盘。
如果你需要一款无线键盘,K810无疑值得拥有。