Apache Click 快速入门学习
F5 ASM 快速部署测试指南-V2

19
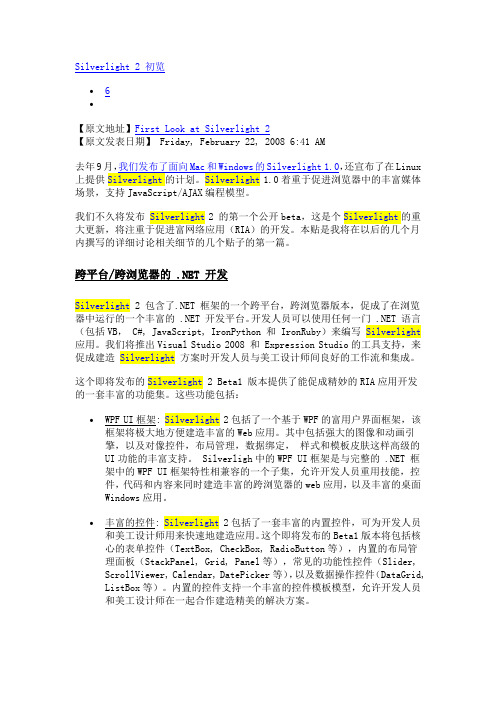
现在产生实际流量来完善policy的parameter部分
在对ASM的VS一顿海扁之后,我们看看ASM学习到了什么?
从上面的图标中我们可以看到,ASM学习到了9个parameter。
20
学习到的Parameters的详细内容
ASM学习到了9个parameters
Staging表示该parameter还是在learning 状态。
Regular expression:用表达式来规定所输入的 数据的值。
在Attack Signature配置部分,我们需要根据用户的需要或者实际的情况,把右边的global securiy policy settings中选择相应的attack signature并enable到该变量上。比如在这个 DEMO中,我们启用的SQL注入防护的attack signature,并处于enable状态,那么如 果用户请求中有针对该变量的SQL注入的攻击发生,那么会根据policy的状态, transparent or blocking,发出alarm 或者block该请求。
点击Apply policy后,将使用policy生效
Signature staging表 示命中攻击特征库的 攻击流量也会被 learning到,然后需 要手动来断定是否真 正的攻击
默认是Transparent模式,即流量只学习,不阻挡。而改为 blocking模式后,并点击Save及再一次apply policy后,才会生 效。
11
建立默认的policy的流程-3
在本配置步骤中,可根据后台WEB站点的情况,添加一些attack signature到默认的policy中去。(general database,various system, system independent是默认就有的,建议再加上 IIS,ASP,PHP,Apache,MySQL)
BES8.x快速入门手册

12.
常见问题处理................................................................................................................. 16 12.1. 12.2. 12.3. Web 应用乱码常见解决办法 ........................................................................ 16 WAS 上 EJB 迁移 .......................................................................................... 18 WEB 应用(war)部署不成功 .......................................................................... 19
BES 的管理架构和基本操作 .......................................................................................... 4 BES 安装说明 .................................................................................................................. 5 添加补丁........................................................................................................................... 6 产品激活........................................................................................................................... 6 公共配置文件、基础库部署 ........................................................................................... 7 数据源管理....................................................................................................................... 7 9.1. 9.2. 9.3. 数据库连接池管理 ................................................................................................... 7 JDBC 资源管理(JNDI) ............................................................................................. 8 JNDI 客户端配置 ..................................................................................................... 9
Vodafone Mobile Wi-Fi R209-Z 快速入门指南说明书

R209-Z1 Welcome2 Device overview3 Getting started5 Mobile Wi-Fi Web app6 Web app overview7 Current network panel8 Mobile Wi-Fi Monitor app9 Hints and tips 10 GlossaryWelcometo the world of mobile communications1Your Vodafone Mobile Wi-Fi creates a personal portable Wi-Fi network. Use it to share your secure mobile broadband internet connection with other Wi-Fi-enabled devices, such as computers, Apple ® iPhone, iPad or iPod touch, Android smartphones and tablets like the Samsung ® Galaxy Tab, or mobile gaming devices like Nintendo ® DSi.You can use battery, mains or USB to power your Vodafone Mobile Wi-Fi. This fl exibility makes it easy to position your Vodafone Mobile Wi-Fi to get the best mobile coverage.Your Vodafone Mobile Wi-Fi uses open source programs licensed under the GNU GPL (Version 2.0), BSD (Version 3.0), OpenSSL, Zlib/libpng, LGPL and Apache License.You can download the source code free of charge from: /r209-z for a period of three years from the distribution of this product.Copyright © ZTE 2014.All Rights ReservedYour Vodafone Mobile Wi-Fi is made exclusively for Vodafone by ZTE.No part of this guide may be reproduced or transmitted in any form or by any means without prior written consent of ZTE.WelcomeNoticeLicenses2LED indicators Power button WPS button Micro USB port SIM slot MicroSD card slotDevice overview456312Mobile broadband signalAmber - low Green - excellent Battery chargeGreen - OKGreen blinking - charging Red blinking - lowStandby - not chargingSMS text messagesBlue - unread SMSBlue blinking - SMS Inbox fullNo SMS3Step 1Insert your SIM, battery and optionally a MicroSD card.Step 2Plug your Vodafone Mobile Wi-Fi into the mains* or your computer to charge it while you are using it.GettingstartedRemove back coverInsert SIMInsert MicroSD cardInsert batteryReplace back coverTip:Charge your Mobile Wi-Fi fully (mains: 3.5 hours) before using it in battery mode.*Please only use the charger supplied with this device.4Step 3Press and hold the power button for 3 seconds to switch on your Vodafone Mobile Wi-Fi. It will begin connecting to the mobile broadband network.Step 4You may need to enter your PIN to unlock your SIM.Also, when your Vodafone Mobile Wi-Fi connects to the mobile network for the fi rst time, you may be asked to activate your SIM. Activation is not always necessary, so you may not see this.Step 5On your computer or device, select your Vodafone Mobile Wi-Fi network’s name (its ‘SSID’) from the list of available networks, click Connect and enter the secure Wi-Fi network key (the ‘WPA2 password’). The name and key are inside the back cover of your Vodafone Mobile Wi-Fi and also on a printed reminder card.Congratulations - you are connected to the internet via Vodafone Mobile Wi-Fi.Getting started5To check the status of your mobile broadband and Wi-Fi networks, manage SMS text messages or change the settings of your Mobile Wi-Fi, you can use the Vodafone Mobile Wi-Fi Web app:Connect to your Vodafone Mobile Wi-Fi via Wi-Fi or with a USB cable –If you installed your Vodafone Mobile Wi-Fi via USB, double-click the –Vodafone Mobile Wi-Fi icon that was created on your desktop Alternatively - and particularly if you did not install via USB - open –http://VodafoneMobile.wi fi or http://192.168.0.1 in your web browser.To use the Vodafone Mobile Wi-Fi Web app via a USB cable or via Wi-Fi, you need:A computer with at least Windows XP –® SP3, orAn Apple Mac with at least OS X –® 10.6 Snow Leopard.You can also manage your Vodafone Mobile Wi-Fi via its Wi-Fi network, but not via a USB cable, using:Linux or Windows –® 8 RT, oriPhone, iPad, iPod touch, or any other smartphone or tablet.–Mobile Wi-Fi Web appTip:Save the addresses for your Mobile Wi-Fi as favourites in your web browser.6Navigation tabs: Select Mobile Wi-Fi, Storage, SMS or Account view Navigation bar: Select an area within each viewCurrent network panel: Status of mobile broadband network, Wi-Fi network, battery and connected devices Content area: Content for current area Context help: Help for current areaLanguage selection: Defaults to browser languageLogin/Logout: For advanced settings. The default password is ‘admin’.Web app overview45673124536127The Current network panel appears on the right-hand side of every view in the Mobile Wi-Fi Web app, giving you a quick summary of the status of your Mobile Wi-Fi. Below it are additional panels for battery, Wi-Fi and the status of other devices sharing your Wi-Fi network.Current networkpanel8Mobile Wi-Fi Monitor appIf you have an Apple iOS ® or Android device, you can also check the status of your Mobile Wi-Fi using the Vodafone Mobile Wi-Fi Monitor app. Download the app from the iTunes or Google Play app stores.iPad / tabletiPhone / smartphoneHints and tips Wi-Fi securityPlease ensure that the Wi-Fi security settings meet your personal requirements. To change the admin password, open the Vodafone Mobile Wi-Fi Web app:– E nter ‘admin’ into the Password fi eld and click ‘Login’– S elect Router on the Navigation bar– S elect ‘Router Settings’ from the left-hand Menu bar.To change your Wi-Fi network name (SSID) and the key:– S elect Wi-Fi on the Navigation bar– S elect ‘Security’ from the left-hand Menu bar.Wireless Protected Setup (WPS)Pressing and holding the WPS button on your Vodafone Mobile Wi-Fi for 5 seconds will switch WPS on (all 3 LEDs flash simultaneously). You can then connect any WPS-enabled device without having to enter the network key. Further Support– S elect Help on the Navigation bar in the Vodafone Mobile Wi-Fi Web app– S elect ‘Support’ from the left-hand Menu.The Content area will show how to contact your mobile network operator.For a full user guide including further hints and tips, visit:/r209-z9GlossaryBearer Communication method used for data transport over the mobile network, eg. 3G Broadband, HSPA, 3G, etc.Home network The network of the mobile operator who provided your SIM.Roaming You can use your mobile device on any other mobile network that has a roaming agreement with your operator, whether in your country or abroad.SIM Your Subscriber Identity Module is the small plastic chip that you will have received together with your mobile contract. Your SIM has gold contactson one side.WPA2An alternative name for the Wi-Fi network key. On Macs with OS X this is called ‘WPA2 personal’.1011Notes。
Sliverlight教程
Silverlight 2 初览∙6∙【原文地址】First Look at Silverlight 2【原文发表日期】 Friday, February 22, 2008 6:41 AM去年9月,我们发布了面向Mac和Windows的Silverlight 1.0,还宣布了在Linux 上提供Silverlight的计划。
Silverlight1.0着重于促进浏览器中的丰富媒体场景,支持JavaScript/AJAX编程模型。
我们不久将发布Silverlight2 的第一个公开beta,这是个Silverlight的重大更新,将注重于促进富网络应用(RIA)的开发。
本贴是我将在以后的几个月内撰写的详细讨论相关细节的几个贴子的第一篇。
跨平台/跨浏览器的 .NET 开发Silverlight 2 包含了.NET 框架的一个跨平台,跨浏览器版本,促成了在浏览器中运行的一个丰富的 .NET 开发平台。
开发人员可以使用任何一门 .NET 语言(包括VB, C#, JavaScript, IronPython 和 IronRuby)来编写Silverlight 应用。
我们将推出Visual Studio 2008 和 Expression Studio的工具支持,来促成建造Silverlight方案时开发人员与美工设计师间良好的工作流和集成。
这个即将发布的Silverlight 2 Beta1 版本提供了能促成精妙的RIA应用开发的一套丰富的功能集。
这些功能包括:∙WPF UI框架: Silverlight2包括了一个基于WPF的富用户界面框架,该框架将极大地方便建造丰富的Web应用。
其中包括强大的图像和动画引擎,以及对像控件,布局管理,数据绑定,样式和模板皮肤这样高级的UI功能的丰富支持。
Silverligh中的WPF UI框架是与完整的 .NET 框架中的WPF UI框架特性相兼容的一个子集,允许开发人员重用技能,控件,代码和内容来同时建造丰富的跨浏览器的web应用,以及丰富的桌面Windows应用。
mule——精选推荐
muleMule⼊门⽂档零、前提在按照本⽂进⾏操作之前,假设您的系统已经具备以下前提:已经安装了Sun公司的JDK1.4或JDK5.0版本,推荐使⽤JDK5.0。
正确设置了JAVA_HOME环境变量到JDK⽬录(注意不是JRE⽬录)。
确保%JAVA_HOME%\bin路径在系统寻找路径中。
安装有Eclipse3.2或以上版本的开发环境。
安装有Apache Tomcat 5.0或以上版本,推荐使⽤5.5。
⽂档假设Tomcat的安装⽬录为%TOMCAT_HOME%。
⼀、下载与安装到Mule的官⽅⽹站(/doc/ce7750612.html/display/MULE/Download)上下载Mule 的最新稳定版,⽬前是1.3.3(/doc/ce7750612.html/ccount/click.php?id=17),也可以使⽤社区版的1.4.1(/doc/ce7750612.html/ccount/click.php?id=33)。
本⽂档以1.3.3版为例,1.4.1请参照⽂档⾃⾏修改。
下载后得到⼀个ZIP格式的压缩⽂件mule-1.3.3.zip,将该⽂件解压⾄任⼀⽬录,假设为C:\mule-1.3.3,本⽂档以环境变量MULE_HOME表⽰该⽬录。
⼆、运⾏Echo⽰例Mule⾃带了很多⽰例,从最简单的echo⽰例到⼀个⽐较完整的贷款中介服务loanbroker。
每个⽰例程序都分为ant和maven两个版本,它们分别位于%MULE_HOME%\examples\ant和%MULE_HOME%\examples\maven⽬录下。
⽂档将以ant版本为例说明如何运⾏echo⽰例。
1、到apache官⽅⽹站的ant项⽬下载页(/doc/ce7750612.html/bindownload.cgi)上下载ant1.7.0(/doc/ce7750612.html/ant/binaries/apache-ant-1.7.0-bin.zip),下载后将⽂件解压到任⼀⽬录(假设为C:\apache-ant-1.7.0,⽂档中表⽰为ANT_HOME环境变量)。
go语言学习路线图
2 LinuxShell
1.Linux下的目录结构 2.工作日程应用命令 3.Ubuntu下的软件安装和卸载 4.base shell 5.base shell脚本常规编程 6.base shell脚本实战
3 Linux开发与调试工具
1.堆,栈,静态区,代码区 2.init函数 3.goroutine 4.channel 5.Mutex/RWMutex 6.Waitgroup 7.Once 8.atomic
15 线程安全数据结构设计与实战
1.文件线程安全实战 2.并发大数据搜索实战
第三阶段----Go语言网络与服务器开发
1 网络协议与网路编程
1.OSI七层模型结构 2.TCP/IP 4层模型结构 3.B/S、C/S优缺点对比 4.常见网络协议格式 5.套接字;网络字节序 6.IP地址转换函数 7.编写TCP的C/S网络程序 8.UDP通信机制与模型 9.本地套接字 10.三次握手建立连接过程 11.四次挥手断开连接过程 12.滑动窗口概念 13.错误处理函数封装 14.TCP状态转换
15.2MSL概念 16.端口复用方法 17.半关闭 18.socket网络编程
2 Golang网络编程实战
1.socket客户端编程 2.socket服务端编程 3.案例:并发的时钟服务器 4.案例:并发的回显服务器 5.实战:高并发网络聊天室 6.实战:分布式排序 7.实战:文件传输 8.实战:文件夹传输
4 git
1.代码版本控制工具git的常用指令 2.git的团队开发组建 3.git代码仓库的创建与管理
5 分布式文件系统fastDFS
1.分布式概念 2.tracker、storage、client相关配置 3.fastDFS中go的api封装
SAP UI5 - 快速指南
SAP UI5 - 快速指南SAP UI5 - 概述SAP提供了各种工具,用户可以使用这些工具来增强其用户体验,以便为Web 业务应用程序创建丰富的用户界面。
最常见的支持工具包括-•主题设计师•NWBC和侧面板•FPM屏幕•SAP UI5开发工具使用SAP UI5创建的基于Web的应用程序可提供更一致的用户体验,并可在平板电脑,智能手机和笔记本电脑等设备上访问。
通过使用带有UI5的NetWeaver网关,您可以在用户界面和业务逻辑之间定义明确的分隔。
SAP UI5提供以下主要功能-•在代码和应用程序级别的可扩展性概念。
•能够为典型用例创建复杂的UI模式和预定义布局。
•模型- 视图- 控制器(MVC)和数据绑定方法。
•键盘交互支持和辅助功能。
•SAP UI5基于JavaScript,CSS和HTML5等开放标准。
•基于CSS的主题支持。
以下是在业务中使用SAP UI的优点:•它有助于提高生产力。
•增加用户适应。
•减少手动错误。
•降低培训成本。
•SAP系统的高性能。
•完美设计的API,可以很容易地消费。
SAP UI5─版本以下是最近推出的UI5版本的列表。
每个UI5都提供了来自以前版本的新功能和增强功能,平台支持,可用性增强等。
•SAP UI5 1.26•SAP UI5 1.28•SAP UI5 1.30•SAP UI5 1.32•SAP UI5 1.34•SAP UI5 1.36•SAP UI5 1.38和更多像SAP UI5 1.6版本方案SAP UI5使用3位版本号。
例如,SAPUI5 1.36.5。
这里,数字(1)指定主版本。
第二个数字(36)指定次要版本号。
第三个数字指定补丁版本号(5)。
在每个SAP UI5中,主版本和次版本以及修补程序版本都可用于标识修补程序。
SAP UI5与开放UI5SAP UI5和Open UI5,都提供了UI开发环境。
然而,它们在以下方面彼此不同-SAP UI5是SAP产品套件的一部分,不是单独的许可证。
delphi技巧-web编程
使用intraweb构建web数据库应用如今web程序设计已经是非常流行的技术了,如asp,jsp之类,delphi对于web程序设计的支持也是非常多的,如webbroker,websnap等等,但这些技术与传统的delphi编程有比较大的差别,尤其是websnap,要搞懂他的体系结构与编程是比较复杂的。
如果程序员能够以传统的方式编写web程序,那是一件非常有益的事情,一方面节省了大量的学习时间,而且可以快速的开发出强劲的程序。
如今,这种想法已经成为现实,delphi7中捆绑的intraweb就是我们想使用delphi开发web程序的人梦寐以求的工具。
Intraweb的设计理念就是让DELPHI/C++ Builder 使用者延用原有的Windows 应用程序设计概念来设计Web 应用程序,为了达到此目的,intraweb中使用一种他特定的form,并且设计一组与常见的delphi组件相似的web组件----iw组件,这样,你可以像在普通的form上使用普通组件一样,在intraweb的form上使用iw组件,包括属性和事件处理。
设计完成后,IntraWeb会将你所设计的画面转化为网页呈现出来,使用IntraWeb来开发Web 应用程序,你不需要懂得HTML、javascript、CSS 这些技术就可以轻易的建构出具有友好界面及强大功能的Web 应用程序。
而且也可以结合这些技术创建更加复杂功能和效果的程序。
最妙的是,采用Standard-alone Server模式(intraweb附带了一个webserver),开发时调试我们可以体验到他的方便与强大,而且可以把你开发的应用程序和这个webserver结合在一起形成一个独立的windows程序,在分发时就可以减少麻烦。
运行这个程序后,他就变成了一个web服务器,其它机器就可以通过http来访问这个程序。
这在小型的局域网内是非常方便的。
当然,intraweb也像websnap一样能创建ISAPI 或是Apache DSO 格式。
ext学习总结
1.Ext前台显示页面设计文件结构:WebRoot:app ---common、controller、model、stroe、view、app.jsCss---.cssData----.jsonLib---local、override、resources、ext-all.jsWEB-INF ----conf(配置文件)、lib(jre包)、web.xmlIndex.jsp页面设计:Define相当于创建一个类,creat相当于在类的基础之上创建一个对象Pannel显示的实际页面Model与数据库相对应的一个实例模型Stroe与数据库进行数据通讯Controller页面显示逻辑控制实现Add(),方法在容器组件内添加控件2.前台与后台数据交互页面与后台数据通信的桥梁,是view页面显示中的name属性的值。
与后台定义的成员变量保持一致,否则传值不成功。
前台与后台通信有同步和异步2种方式有session jsonExt.getCmp('jxgrid').getStore().load({params:{id:id}});//传递参数进行store加载Ext.getCmp('processImgBrowser').getStore().getProxy().extraParams = {'lplan.pid': type}; //前台向后台传参,把前台的参数type传递到后台的lplan.pid,其中extraParams是前台后台参数传递的媒介桥梁,type先放在extraParams中在赋值给lplan.pid。
注意:getCamp()内参数id要与store在同一级:示例me.processPanel = Ext.create('Ext.panel.Panel', {id: 'processPanel',width: '100%',height: 120,autoScroll: true,items: [{id: 'processImgBrowser',xtype: 'imgbrowser',itemId: 'processImgBrowser',store: me.processstore,cls: 'img-chooser-view'}]});3.智能电厂学习总结1>、文件下载window.open('export_download.action?fileName=' + file, '_self'); 在当前窗口打开一个新的窗口如下window.open()的基本语法:window.open(pageURL,name,parameters)其中:pageURL 为子窗口路径name 为子窗口句柄parameters 为窗口参数(各参数用逗号分隔)示例:<SCRIPT><!--window.open('page.html','newwindow','height=100,width=400,top=0,left=0,toolbar=no,menubar=no,scrol lbars=no, resizable=no,location=no, status=no')//写成一行--></SCRIPT>2>、后台接受前台数据Ext.getCmp('zxtree').getStore().getProxy().extraParams = {'zxTask.type': dbtype}; //把前台数据dbtype通过桥梁extraparams赋值给后台zxTask.type后台使用get方法接受前台页面属性信息时,使用ISO8859-1格式传输,接收道德数据中文乱码,需要转码,转码方法如下:fname = new String(this.getFileName().getBytes("ISO8859-1"),"utf-8"); //把接收到的this.getFileName(),转码为utf-8并赋值给fname。
2.AS入门教程
2.AS⼊门教程AndroidStudio本⽂是关于androidStudio的⼀些基础知识介绍Google官⽅的Android集成开发环境(IDE = Integrated Development Environment),Eclipse + Adt插件的代替者学习的必要性趋势:更好⽤,对⽐eclipse如下:安装下载:具体安装参考⽹上⽂献界⾯整体菜单 -File菜单 - Build快捷⼯具Project视窗-Structure视窗代码编辑区域代码编辑- 布局⽂件的多屏预览Android 监控Message建⽴HelloWorld项⽬重要概念As中强调应该把相关的⼯程放在同⼀个⼯作空间中Gradle相关概念Gradle是⼀个基于Apache Ant和Apache Maven概念的项⽬⾃动化建构⼯具。
它使⽤⼀种基于Groovy的特定领域语⾔来声明项⽬设置,⽽不是传统的XML。
当前其⽀持的语⾔限于Java、Groovy和Scala,计划未来将⽀持更多的语⾔。
编译过程Gradle相关⽂件重要project 中的 settings.gradle 说明project 中的build.gradle说明// 构建脚本buildscript {// 仓库repositories {// 中央仓库 https:///bintray/jcenter// 通过jar包的字符串包名,就可以下载到jar包了// 成熟的公司可能会有⾃⼰的仓库服务器,需要在此配置jcenter()}dependencies {// android gradle构建⼯具,⽤于处理module下的build.gradle⽂件,此版本与Gradle版本有配套关系,⽬前gradle已经到2.8了,但主要使⽤的是2.4classpath 'com.android.tools.build:gradle:1.3.0'// NOTE: Do not place your application dependencies here; they belong// in the individual module build.gradle files}}// 所有项⽬都依赖于jcenterallprojects {repositories {jcenter()}}// gradle在执⾏构建任务时的清理配置task clean(type: Delete) {delete rootProject.buildDir}module中的build.gradle详细说明// 表⽰这个项⽬编译完成后,是⼀个anrdoid应⽤程序apply plugin: 'com.android.application'// 表⽰这个项⽬编译完成后,是⼀个anrdoid的库//apply plugin: 'com.android.library'android {// 编译的sdk版本,见sdk\platformscompileSdkVersion 23// 构建⼯具的版本,见sdk\build-toolsbuildToolsVersion "23.0.1"defaultConfig {// 包名:⽤于在市场上区分应⽤的唯⼀性的标⽰applicationId "cn.itcast.as.helloworld"// 最⼩sdk版本、⽬标sdk版,原先是放在清单⽂件中的minSdkVersion 15targetSdkVersion 23// 应⽤程序的版本号,和版本码,原先是放在清单⽂件中的versionCode 1versionName "1.0"}// 构建类型buildTypes {// debug版默认有配置,没有写在这⾥// 发⾏版release {// 是否混淆minifyEnabled false// 混淆配置⽂件proguardFiles getDefaultProguardFile('proguard-android.txt'), 'proguard-rules.pro'}}}// 关键:项⽬的依赖dependencies {// 在项⽬中的libs中的所有的.jar结尾的⽂件,都是依赖compile fileTree(dir: 'libs', include: ['*.jar'])// 依赖于junit测试testCompile 'junit:junit:4.12'// 还依赖于appcompat-v7,23.1.0版本compile 'com.android.support:appcompat-v7:23.1.0'}其他⽂件和⽂件夹说明Project根⽬录module⽬录设置⽂件编码程序外观编辑区域外观logcat外观快捷键视窗快捷键代码补全快捷键⽅案修改 && 编辑快捷键活动模板后缀补全常⽤快捷键调试进⼊调试的两种⽅式以调试模式运⾏运⾏后调试需要注意运⾏的程序的代码应该与所看到的是同⼀份,不然点击提⽰会错位如何打断点代码左侧单击代码左侧单击时按着shift键断点类型断点类型导⼊module导⼊Eclipse项⽬File –> New –> Import Module导⼊AndroidStudio项⽬File –> New –> Import Module导⼊AARFile –> New –>New Module –> Import .jar/.aar package删除导⼊的Module当⽂件夹上显⽰了⼿机或柱状图图标,说明此⽂件夹是受保护的,⽆法被删除1. 取消保护打开Project Struecture。
- 1、下载文档前请自行甄别文档内容的完整性,平台不提供额外的编辑、内容补充、找答案等附加服务。
- 2、"仅部分预览"的文档,不可在线预览部分如存在完整性等问题,可反馈申请退款(可完整预览的文档不适用该条件!)。
- 3、如文档侵犯您的权益,请联系客服反馈,我们会尽快为您处理(人工客服工作时间:9:00-18:30)。
Apache Click 快速入门学习方向导数(方形导数牛敬效)neujx@2011年准备开发环境1、JDK 1.6.x 。
略2、Eclipse 3.x MyEclipse 。
略3、Tomcat 7.0.x 。
略4、Click 2.3.0从/网站下载最新的click包:/dyn/closer.cgi/click/click/2.3.0/click-2.3.0.zip下载click-2.3.0.zip后解压缩到一个目录以备后面使用。
配置开发工具Eclipse启动eclipse,配置基本参数。
在Eclipse窗口中,点开菜单“Window”—> “Preferences”:配置Java编译器,选择1.6版本:配置项目运行服务器,在Runtime Environments中添加Tomcat:按【Add】,选择Apache Tomcat v7.0:按【Next】,配置Tomcat:按【Browse】,选择Tomcat的安装目录:然后选择JRE为JDK1.6:按【Finish】返回。
按【OK】结束配置。
配置完成后可以看到,在Eclipse左侧的Project Explorer栏目出现了“Servers”项,点开可见Tomcat服务器出现在列表中。
建立第一个Click项目在Eclipse菜单栏,依次打开“File”—>“New”—>“Dynamic Web Project”:填写项目内容:项目名称Project name为“Click_Test”项目运行环境Targetruntime选择“ApacheTomcat v7.0”动态Web模块Dynamicweb module version选“3.0”配置Configuration缺省为“Default Configurationfor Apache Tomcat v7.0”按【Next】进入配置Java源程序和编译类存放目录:缺省不变,按【Next】进行Web配置:项目的内容根缺省为项目名称Click_Test,且内容目录缺省为WebContent:按【Finish】完成项目建立和配置。
新建项目Click_Test显示在左侧的Project Explorer栏目中,展开相关目录结构如下:列表显示的有些内容可能在下面的配置后自动消失或改变。
现在开始项目开发配置和应用编程实践。
建立和修改配置文件修改Web配置文件WebContent/WEB-INF/web.xml,替换为如下新内容:<?xml version="1.0"encoding="UTF-8"?><web-app><servlet><servlet-name>ClickServlet</servlet-name><servlet-class>org.apache.click.ClickServlet</servlet-class><load-on-startup>0</load-on-startup></servlet><servlet-mapping><servlet-name>ClickServlet</servlet-name><url-pattern>*.htm</url-pattern></servlet-mapping><welcome-file-list><welcome-file>redirect.html</welcome-file></welcome-file-list></web-app>web.xml配置文件定义了本项目由ClickServlet处理*.htm网页的请求,项目的首页是redirect.html。
建立Click配置文件WebContent/WEB-INF/click.xml:光标移到WebContent/WEB-INF栏目上,点右键依次选“New”—>“File”。
在New File窗口下,给出文件名File name为click.xml:按【Finish】结束,在编辑器窗口自动打开的click.xml中,输入如下内容:<?xml version="1.0" encoding="UTF-8"?><click-app charset="UTF-8"><pages package="pbc.zhs.test.page"/></click-app>click.xml配置文件定义了项目的java包的路径为pbc.zhs.test.page。
添加click包从下载并解压缩的click-2.3.0目录中,把dist子目录下的两个java包click-2.3.0.jar和click-extras-2.3.0.jar 复制到Eclipse当前项目的WebContent/WEB-INF/lib目录中:建立网页文件建立引导网页redirect.html(在web.xml中指定为项目的第一个网页):光标移到WebContent栏目上,点右键依次选“New”—>“File”。
对打开的New File窗口,在文件名称栏目File name输入网页名称为redirect.html:按【Finish】后,自动在编辑器窗口打开了该文件redirect.html,输入如下内容:<html><head><meta http-equiv="Refresh" content="0;URL=home.htm"></head></html>显然,该网页并没有显示任何内容,而是自动定向到home.htm网页去了。
现在按上面的方法来建立home.htm,这才是项目的真正主页。
home.htm的内容:<html><head><title>Home</title><link rel="stylesheet" type="text/css" href="style.css" title="Style"/> </head><body><div id="header"><span id="title">Click主页 </span></div><div id="container"><b>欢迎您!</b>这是项目的主页。
</div></body></html>建立网页属性定义文件CSS即Cascading Style Sheet,可译为“层叠样式表”或“级联样式表,用于定义Html格式文件的显示样式和属性,此处称为网页属性定义。
主页hom.htm引用了网页属性定义文件style.css,因此,再以同样的方法建立style.css,其内容如下:body {font-family: Arial;}#header {background-color: navy;}#title {color: white;font-size: 18px;font-weight: bolder;}#container {padding-top: 1em;padding-left: 1.5em;position: relative;z-index: 0;}h3.title {margin-top: 0em;margin-bottom: 1em;}建立网页处理类接着,需要为主页home.htm建立一个对应的Java处理类HomePage.java,即Java处理程序。
在Apache Click架构下,每个.htm的网页文件都要对应一个同名的Java类来处理该网页。
在项目的Java Resources/src上,点鼠标右键,依次选“New”—>“Class”:在New Java Class窗口,按如下输入栏目内容:按【Finish】结束。
在打开的编辑器中修改HomePage.java程序,把import Page;改为import org.apache.click.Page;保存所有文件的修改之后,一个最简单的项目已经建立完成。
现在可以运行该项目了。
把鼠标移到项目Click_Test上,点绿色的运行按钮,然后在Run As窗口选择Run on Server:接着选择事先配置好的Tomcat服务器:按【Finish】按钮后,Eclipse随之进行项目编译部署和tomcat启动操作,在Eclipse右下方的Console窗口有信息显示。
启动完成后,在编辑窗口调出项目主网页,显示如下:项目进化建立统一样式的网页框架为了保持项目各个网页有一致的界面,如统一的网页头、文字样式、表格形式等。
新建网页border-template.htm和Java类BorderPage.Java,方法同前面一样。
border-template.htm的内容如下:<html><head><title>Click示范项目 - $title</title><meta http-equiv="Content-Type" content="text/html; charset=UTF-8" /><link rel="stylesheet" type="text/css" href="$context/style.css"title="Style"/></head><body><div id="header"><span id="title">$title</span></div><div id="container">#parse($path)</div></body></html>BorderPage.java的内容:package pbc.zhs.test.page;import org.apache.click.Page;public class BorderPage extends Page {public String getTemplate() {return "/border-template.htm";}}修改原来HomePage.java的内容,HomePage继承自BorderPage,其内容为:package pbc.zhs.test.page;import org.apache.click.Page;public class HomePage extends BorderPage {public String title = "Click主页";}修改原来home.htm的内容,只需要保留网页的核心部分,其他格式引用自border-template.htm,因此简化后的内容只有一行:<b>欢迎您!</b>这是项目的主页。