EPSON机器人第三方相机方法
中文Epson机器人中文说明书

在工业机械手的可动范围内进行该工业机械手的检查、修理或者调整(适合教示的除外)或者对这些结果的确认(以下简称检查等)。(只针对工业机械手运转中的)或者在工业机械手的可动范围内,与进行符合工业机械手有关检查的劳动者一起,在工业机械手可动范围外进行的符合检查等的相关机器的操作业务。
「需要特别教育的劳动者是指进行教示等作业的人、与其协调进行作业的人、在动作范围内进行作业的人、进行保全维修作业的人」。而且,关于特别教育的实施,劳动大臣作了如下必要事项的告示。
注意
本操作说明书不能擅自复制,转载一部分内容或者全部内容.
本书所记载的内容,将来事先没有通知也有时会有变更.
关于本书的内容,万一有错误,如果您有注意到的地方,麻烦联系我们.
咨询
本教材,以及机器人使用的相关咨询,请按以下信息联系.
EPSON销售株式会社
FA机器营业课
〒160-8324
东京都新宿区西新宿6-24-1西新宿三井大厦
3.2设计资源管理器39
3.3状态窗口39
3.4状态栏40
3.5在线帮助41
3.6简单的程序作成和实行42
3.7机械手管理器43
第4章4.试校44
4.1控制面板44
4.2点动&试校46
点动控制46
点动方法49
点动50
TEACH模式50
点的试校方法50
变更内容的保存/删除51
4.3点的编集52
打开编辑用的点的文件52
Resume91
Quit91
任务管理器94
记忆卡I/O96
第12章12.设计方案管理98
12.1概要98
EPSON RC+7.0的设计方案98
为什么需要设计方案98
爱普生机器人软件编程操作培训-基础内容

1、程序操作
3)以太网通讯程序
1、程序操作
1、程序操作
1.13 矩阵使用程序(参看程序pallet_demo) 1)矩阵定义
1、程序操作
2)矩阵调用程序
1、程序操作
1.14 点文件操作及点位修改 1) 点位定义(一般用示教方式示教点位,直接指定时要注意点的属性,否则运动时容易撞机) P1 = XY(200, 100, -25, 0) '向点P1分配坐标 Pick = XY(300, 200, -45, 0) '向点pick位置分配坐标 P10 = Here '向当前位置分配某个点 P1=p2 ‘将点P2赋值给P1 2) 用点标签调用点位 For i = 0 To 10 Go pick Jump place Next i 3)用变量调用点位 For i = 0 To 10 Go P(i) Next i
1、程序操作
5、指定J1Flag和J2Flag点属性 在工作范围的某些点上,即使第一关节或第二关节旋转360 度,RS 系列也可以具有 相同的位置和方向。为了区分这些点,提供了J1Flag 和J2Flag 点的属性。这些标记 允许您为某个既定点的关节1 和关节2 指定一个位置范围。 若要在点分配语句中指定J1Flag,添加一个斜杠(/),其后是J1F0(-90<第一关节角 度<=270)或J1F1(-270<=第一关节角度<=-90 或270<第一关节角度<=450)。 P2 = XY (-175, -175, 0, 90) /J1F1 若要在点分配语句中指定J2Flag,添加一个斜杠 (/),其后是J2F0(-180<第二关节 角度<=180),J2F1(-360<第二关节角度<=-180 或180<第二关节角度<=360)。 P2 = XY (300, 175, 40, 90) /J2F1 J1Flag和J2Flag点属性 在机器人坐标系的原点,即使第一关节在旋转,RS 系列也可以具有相同的位置和方 向。为了区分这些点,提供了J1Ang 点的属性。 7)提取和设置点位 使用CX,CY,CZ,CU,CV,CW,CS 和CT 命令获得一个点的坐标,或对其进 行设置。 xcoord = CX(P1) P2 = XY(xcoord, 200, -20, 0) ycoord = CY(P*) ' 获取当前的Y位置坐标 CX(pick) = 25.5 CY(pick) = CY(pick) + 2.3
EPSON机器人通讯连接
EPSON通讯连接1. 介绍本文档旨在提供有关如何连接EPSON进行通讯的详细说明。
EPSON是一款先进的自动化设备,能够实现高效快速的工业操作。
通过本文档,您将学习到如何正确地连接EPSON和其他设备进行通讯操作。
2. 前提条件在连接EPSON之前,确保您已满足以下前提条件: - 安装了适配EPSON通讯的操作系统,如Windows或Linux - 对于网络通讯,确保网络连接正常并具备适当的权限3. 连接方式EPSON可以通过以下几种方式进行连接:3.1 串行连接使用串行连接时,通过串口将EPSON与其他设备连接起来。
您需要确定串口的类型和设置,并配置EPSON和其他设备以正确地进行通讯。
3.2 以太网连接通过以太网连接,可以将EPSON连接到您的计算机或局域网。
您需要正确设置IP地址和端口号,并确保网络连接稳定。
此外,还需要了解EPSON的网络通讯协议和命令格式。
4. 通讯协议EPSON支持多种通讯协议,如Modbus、Profinet等。
在连接EPSON之前,您需要了解目标设备所使用的通讯协议,并根据协议的要求进行配置。
5. 设置参数在连接EPSON之前,您需要设置一些参数,以确保通讯能够正常进行。
参数的设置包括但不限于以下内容:- 通讯速率:确保EPSON和目标设备的通讯速率一致- 数据格式:设置数据的位数、校验方式等参数- IP地址和端口号:对于以太网连接,设置EPSON的IP地址和端口号- 网络协议:根据目标设备的要求,选择合适的网络协议和命令格式6. 示例代码下面是一个简单的示例代码,展示了如何使用C++语言进行EPSON的通讯连接:```cppinclude <iostream>include <epson_robot.h> int mn() {EpsonRobot robot; robot.connect(\。
EPSON机器人第三方相机网络通信的数据拆分、组合

EPSON机器人第三方相机网络通信的数据拆分、组合这里假设每个数值间的分隔符为空格(X Y),多个点的数据格式为:"2324 3535 2434 6565 3533 6446 4643 7753"String S$(0), data$data$ = "2324 3535 2434 6565 3533 6446 4643 7753" '测试数据,使用时改成网络接收的数据Integer i, j, pot_cnt 'pot_cnt 接收到的中心点数ParseStr data$, S$(), " " '分离数据,以空格为分格符将数据拆到数组里pot_cnt = (UBound(S$()) + 1) / 2 '根据空格的数量计算中心点数Print "中心点个数", ":", pot_cntFor i = 0 To UBound(S$()) Step 2 '将分离出来的数据组合成机器人的点坐标P(100 + i) = XY(Val(S$(i)), Val(S$(i + 1)), 0, 0)'这里P(100 + i)后的点为内存点在"point.pts"里面看不到Print P(100 + i) '"val()"指令为字符转实数指令Next'…………………………………………………………For j = 0 To UBound(S$()) Step 2 '取出上面保存的数据P50 = P(100 + j)'P52 = VxTrans(0, P(100 + j)) '坐标转换P(100 + j) = XY(0, 0, 0, 0) '已经取出的点数据清零,避免误动作Print P50Print P(100 + j)'………………………………………………'…………………………………………Next''P52、pot_cnt 就是运动控制要的数值。
Epson LS6-B SCARA机器人说明书
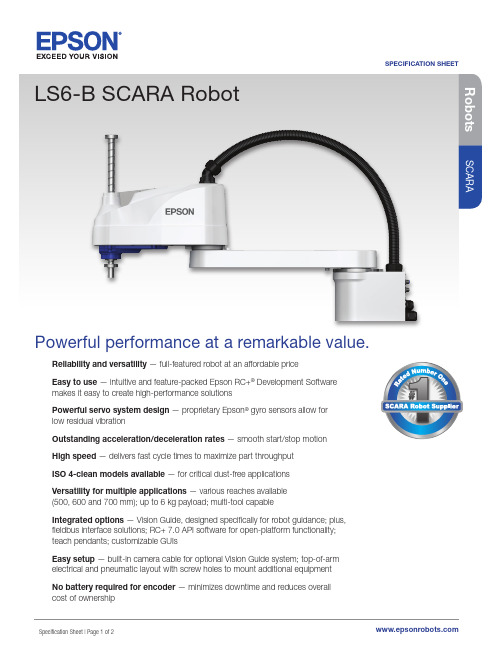
SPECIFICATION SHEETRobotsSCARASpecification Sheet | Page 1 of 2LS6-B SCARA RobotPowerful performance at a remarkable value.Reliability and versatility — full-featured robot at an affordable priceEasy to use — intuitive and feature-packed Epson RC+® Development Software makes it easy to create high-performance solutionsPowerful servo system design — proprietary Epson ® gyro sensors allow for low residual vibrationOutstanding acceleration/deceleration rates — smooth start/stop motion High speed — delivers fast cycle times to maximize part throughput ISO 4-clean models available — for critical dust-free applications Versatility for multiple applications — various reaches available (500, 600 and 700 mm); up to 6 kg payload; multi-tool capableIntegrated options — Vision Guide, designed specifically for robot guidance; plus, fieldbus interface solutions; RC+ 7.0 API software for open-platform functionality; teach pendants; customizable GUIsEasy setup — built-in camera cable for optional Vision Guide system; top-of-arm electrical and pneumatic layout with screw holes to mount additional equipment No battery required for encoder — minimizes downtime and reduces overallcost of ownershipSpecification Sheet | Page 2 of 2Specifications and terms are subject to change without notice. EPSON and Epson RC+ are registered trademarks, EPSON Exceed Your Vision is a registered logomark and Better Products for a Better Future are trademarks of Seiko EpsonCorporation. SmartWay is a registered trademark of the U.S. Environmental Protection Agency. All other product and brand names are trademarks and/or registered trademarks of their respective companies. Epson disclaims any and all rights in these marks. Copyright 2019 Epson America, Inc. Com-SS-Oct-13 CPD-57403 9/19Epson America, Inc.3840 Kilroy Airport Way, Long Beach, CA 90806Epson Canada Limited 185 Renfrew Drive, Markham, Ontario L3R 6G3 www.epson.caContact:1 Cycle time based on round-trip arch motion (300mm horizontal, 25mm vertical) with2 kg payload (path coordinates optimized for maximum speed).See the latest innovations from Epson Business Solutions at /forbusiness。
EPSON机器人第三方相机方法

EPSON机器人同第三方相机校准方法基本思路:1.相机通过以太网或RS232同机器人通信2.按机器人校正指令的要求获取、分离相机发送过来的信息3.使用校准指令准备工具:1.制作9宫图2.做作机器人工件坐标的校准工具(类似铅笔,装在Z轴或抓手上)一.机器人与相机通过以太网通信(TCP/IP)1.制作如下9宫图,该图的大小尽量占满相机的视野范围,但是不能太靠近边界,可用打印机打印,为获得更高精度加工类似的高精治具。
注:以上的数字为点的排列顺序,制作时可以省略,但是取点时一定要严格按照改顺序来取点。
2.相机必须具备两个功能:a.收到某个命令或输入点信号为校准模式b.收到某个命令或输入点信号为正常工作模式。
3.相机的单位必须为像素:相机按顺序获得9个圆的中心点的像素坐标,这9个点的坐标可以用特殊符号阁开(常用:”+”、”-”、””等,但是不能用”,”;这样用的目的是让机器人编程方便地把这些点的信息提取),然后发送给机器人。
如:p1+p2+……+p9二.机器人的TCP/IP通信1.TCP/IP参数设定:在菜单栏“工具”->“控制器设置”->“TCP/IP”->“端口”a.“IP地址”:相机的IP地址。
b.“TCP/IP地址”:相机TCP/IP通信的端口号。
c.“终端”:信息的结束符;相机、机器人双方必须设置一致。
d.“超时”:可以忽略。
2.程序示例(测试通信,有些地方没完善)Function tpcipOpenNet #201 As Client …以客户端方式打开TCP/IP端口Print " wating......"WaitNet #201 …等待TCP/IP端口打开Print "port have open"Print #201, “CC,21”…发送命令给相机指定工作模式,Print #201, “T1”…命令相机拍照并且返回结果…这里是KEYENCE的格式If ChkNet(201) > 0 Then …判断是否收到数据Wait 0.1Input #201, DA TA$ …收到数据后存到DATA$ If Len(data$) > 10 Then 这段命令为数据提取功能,但是不Integer ll 能通用,这里只是提供参考!!!For ll = 0 To 8s$ = Mid$(data$, ll * 12 + 1, 12)Xccd(ll) = V al(s$) …坐标分离思路:提取每个点后,用P=XY()指令转存到点文件里面去,如P21-P29Print Xccd(ll)Print DA TA$ElseIf ChkNet(201) = -3 Then …后面为通信异常处理CloseNet #201OpenNet #201 As ServerWaitNet #201EndIfFend三.校准,RC+5.4以后增加了支持第三方相机校准的功能,安装了对应的版本软件以后打开“SPEL+语言参考”里面有详细说明。
爱普生机器人原点校准方法
爱普生机器人原点校准方法首先,我们需要准备以下工具和材料:1.爱普生机器人2.计算机B数据线4.电源适配器接下来,按照以下步骤进行原点校准:步骤1:连接机器人和计算机使用USB数据线将机器人连接到计算机上。
确保连接稳定,并将机器人连接到电源适配器上进行供电。
步骤2:打开调试工具步骤3:选择机器人模式在调试工具中选择适当的机器人模式。
爱普生机器人通常提供多种模式,如教学模式、追随模式等。
根据需要选择正确的模式。
步骤4:选择校准模式在调试工具中选择原点校准模式。
这通常可以在调试工具的菜单栏或工具栏中找到。
步骤5:开始校准在校准模式下,根据调试工具的指引进行校准。
通常,校准包括机器人的动作、灵敏度、传感器等多个方面。
根据提示逐步进行校准,确保每一步都准确无误。
步骤6:保存校准结果在校准完成后,将校准结果保存到机器人的内存中。
这通常可以通过调试工具的保存功能来实现。
步骤7:测试校准结果完成校准后,将机器人从计算机中断开连接,并进行测试。
通过测试,可以确保机器人的动作和行为与期望一致。
以上便是爱普生机器人的原点校准方法。
通过以上步骤进行校准,可以确保机器人的动作准确可靠,提升其整体性能和使用体验。
同时,我们还要提醒几个注意事项:1.在进行原点校准时,确保机器人和计算机之间的连接稳定,以免校准过程中出现问题。
2.在校准过程中,仔细阅读和遵循调试工具的指引,确保操作正确。
3.在校准完成后,及时保存校准结果,并进行测试以验证校准效果。
希望以上内容对您有所帮助!。
EPSON机器人产品说明书
EPSON RC+ 7.0 SPEL +语言参考Rev.4 C1M218S4861FVer.7.5EPSON RC+ 7.0 (Ver.7.5) SPEL+语言参考Rev.4EPSON RC+ 7.0 (Ver.7.5)SPEL+语言参考Rev.4Copyright 2012-2021 SEIKO EPSON CORPORATION. All rights reserved. EPSON RC+ 7.0 (Ver.7.5) SPEL+ 语言参考 Rev.4i前言感谢您购买本公司的机器人产品。
本手册记载了正确使用 EPSON RC+7.0 软件所需的事项。
请阅读本手册及相关手册后正确使用系统。
阅读之后,请妥善保管,以便随时取阅。
本公司的产品均通过严格的测试和检查,以确保机器人系统的性能符合本公司的标准。
但是如果在超出本手册所描述的环境中使用本产品,则可能会影响产品的基本性能。
本手册阐述了本公司可以预见的危险和问题。
请务必遵守本手册中的安全注意事项,安全正确地使用机器人系统。
商标Microsoft、Windows、Windows 标识、Visual Basic、Visual C++ 为美国MicrosoftCorporation 在美国及其它国家的注册商标或商标。
Pentium为美国英特尔公司的商标。
其它公司名称、商标名称、产品名称均为各公司的注册商标或商标。
关于标记Microsoft® Windows® 8 Operating systemMicrosoft® Windows® 10 Operating system在整个手册中,Windows 8以及Windows 10分别指上述相应的操作系统。
在某些情况下,Windows泛指Windows 8和Windows 10。
注意事项禁止擅自复印或转载本手册的部分或全部内容。
本手册记载的内容将来可能会随时变更,恕不事先通告。
EPSON RC+ 7.0 LS系列机器人系统安全和安装说明
Robot Controller RC90Programming Software EPSON RC+ 7.0Manipulator LS series(LS3 / LS6 / LS20)Robot System Safety and Installation (RC90 / EPSON RC+ 7.0) Rev.11Robot System Safety and Installation(RC90 / EPSON RC+ 7.0)Rev.11Copyright 2013-2018 SEIKO EPSON CORPORATION. All rights reserved Safety and Installation (RC90 / EPSON RC+ 7.0) Rev.11 iii Safety and Installation (RC90 / EPSON RC+ 7.0) Rev.11FOREWORDThank you for purchasing our robot products.This manual contains the information necessary for the correct use of the robotsystem.Please carefully read this manual and other related manuals before installing therobot system.Keep this manual handy for easy access at all times.WARRANTYThe robot system and its optional parts are shipped to our customers only afterbeing subjected to the strictest quality controls, tests, and inspections to certify itscompliance with our high performance standards.Product malfunctions resulting from normal handling or operation will be repairedfree of charge during the normal warranty period. (Please ask your Regional SalesOffice for warranty period information.)However, customers will be charged for repairs in the following cases (even if theyoccur during the warranty period):1. Damage or malfunction caused by improper use which is not described inthe manual, or careless use.2. Malfunctions caused by customers’ unauthorized disassembly.3. Damage due to improper adjustments or unauthorized repair attempts.4. Damage caused by natural disasters such as earthquake, flood, etc.Warnings, Cautions, Usage:1. If the robot system associated equipment is used outside of the usageconditions and product specifications described in the manuals, thiswarranty is void.2. If you do not follow the WARNINGS and CAUTIONS in this manual, wecannot be responsible for any malfunction or accident, even if the result isinjury or death.3. We cannot foresee all possible dangers and consequences. Therefore, thismanual cannot warn the user of all possible hazards.Safety and Installation (RC90 / EPSON RC+ 7.0) Rev.11 iiiTRADEMARKSMicrosoft, Windows, and Windows logo are either registered trademarks ortrademarks of Microsoft Corporation in the United States and/or other countries.Other brand and product names are trademarks or registered trademarks of therespective holders.TRADEMARK NOTATION IN THIS MANUALMicrosoft® Windows® XP Operating systemMicrosoft® Windows® Vista Operating systemMicrosoft® Windows® 7 Operating systemMicrosoft® Windows® 8 Operating systemMicrosoft® Windows® 10 Operating systemThroughout this manual, Windows XP, Windows Vista, Windows 7, Windows 8,and Windows 10 refer to above respective operating systems. In some cases,Windows refers generically to Windows XP, Windows Vista, Windows 7,Windows 8, and Windows 10.NOTICENo part of this manual may be copied or reproduced without authorization.The contents of this manual are subject to change without notice.Please notify us if you should find any errors in this manual or if you have anycomments regarding its contents.MANUFACTURERSeiko Epson Corporation3-3-5 Owa, Suwa-shi, Nagano, 392-8502URL :/company/: http://www.epson.jp/prod/robots/Toyoshina PlantRobotics Solutions Operations Division6925 Toyoshina Tazawa,Azumino-shi, Nagano, 399-8285JapanTEL : +81-(0)263-72-1530FAX : +81-(0)263-72-1495iv Safety and Installation (RC90 / EPSON RC+ 7.0) Rev.11SUPPLIERSNorth & SouthAmerica Epson America, Inc.Factory Automation/Robotics 1650 Glenn Curtiss Street Carson, CA 90746USATEL : +1-562-290-5900 FAX : +1-562-290-5999E-MAIL :*****************.comEurope Epson Deutschland GmbHRobotic SolutionsOtto-Hahn-Str.4D-40670 MeerbuschGermanyTEL : +49-(0)-2159-538-1800FAX : +49-(0)-2159-538-3170E-MAIL :****************URL: : www.epson.de/robotsChina Epson (China) Co., Ltd.Factory Automation Division4F, Tower 1, China Central Place,81 Jianguo Road, Chaoyang District,Beijing, 100025, PRCTEL : +86-(0)-10-8522-1199FAX : +86-(0)-10-8522-1120Taiwan Epson Taiwan Technology & Trading Ltd.Factory Automation Division14F, No.7, Song Ren Road, Taipei 11073,Taiwan, ROCTEL : +886-(0)-2-8786-6688FAX : +886-(0)-2-8786-6677Safety and Installation (RC90 / EPSON RC+ 7.0) Rev.11 vKorea Epson Korea Co., Ltd.Marketing Team (Robot Business)27F DaeSung D-Polis A, 606Seobusaet-gil, Geumcheon-gu, Seoul, 153-803KoreaTEL : +82-(0)-2-3420-6692FAX : +82-(0)-2-558-4271Southeast Asia Epson Singapore Pte. Ltd.Factory Automation System1 HarbourFront Place, #03-02,HarbourFront Tower One,Singapore 098633TEL : +65-(0)-6586-5696FAX : +65-(0)-6271-3182India Epson India Pvt. Ltd.Sales & Marketing (Factory Automation)12th Floor, The Millenia, Tower A, No. 1,Murphy Road, Ulsoor, Bangalore,India 560008TEL : +91-80-3051-5000FAX : +91-80-3051-5005Japan Epson Sales Japan CorporationFactory Automation Systems Department29th floor, JR Shinjuku Miraina Tower, 4-1-6Shinjuku, Shinjuku-ku, Tokyo 160-8801JapanTEL :+81-(0)3-5919-5257FAX :+81-(0)3-5919-5402vi Safety and Installation (RC90 / EPSON RC+ 7.0) Rev.11Regarding battery disposalThe crossed out wheeled bin label that can be found on your product indicates that this product and incorporated batteries should not be disposed of via the normal household waste stream. To prevent possible harm to the environment or human health please separate this product and its batteries from other waste streams to ensure that it can be recycled in an environmentally sound manner. For more details on available collection facilities please contact your local government office or the retailer where you purchased this product. Use of the chemical symbols Pb, Cd or Hg indicates if these metals are used in the battery.This information only applies to customers in the European Union, according to DIRECTIVE 2006/66/EC OF THE EUROPEAN PARLIAMENT AND OF THE COUNCIL OF 6 September 2006 on batteries and accumulators and waste batteries and accumulators and repealing Directive 91/157/EEC and legislation transposing and implementing it into the various national legal systems.For other countries, please contact your local government to investigate the possibility of recycling your product.The battery removal/replacement procedure is described in the following manuals:Controller manual / Manipulator manual(Maintenance section)For California customers onlyThe lithium batteries in this product containPerchlorate Material - special handling may apply,See /hazardouswaste/perchlorate.Safety and Installation (RC90 / EPSON RC+ 7.0) Rev.11 viiviii Safety and Installation (RC90 / EPSON RC+ 7.0) Rev.11 Before Reading This ManualTP port of RC90 is for the Teach Pendant TP1 and TP2. Do not connectthe followings to TP port of RC90. Connecting to the followings may result in malfunction of the device since the pin assignments are different.OPTIONAL DEVICE dummy plugOperation Pendant OP500Operator Pendant OP500RCJog Pad JP500Teaching Pendant TP-3** seriesOperator Panel OP1For RC90, be sure to install the EPSON RC+7.0 to the development PC first, then connect the development PC and RC90 with the USB cable. If RC90 and the development PC are connected without installing the EPSON RC+7.0 to the development PC, [Add New Hardware Wizard] appears. If this wizard appears, click the <Cancel> button.Concerning the security support for the network connection:The network connecting function (Ethernet) on our products assumes the use in the local network such as the factory LAN network. Do not connect to the external network such as Internet.In addition, please take security measure such as for the virus from the network connection by installing the antivirus software .Security support for the USB memory:Make sure the USB memory is not infected with virus when connecting to the Controller. ☞NOTE ☞ NOTE ☞ NOTE ☞NOTEControl System ConfigurationThis manual explains with the following combinations of Controllers and software.Robot Controller RC90 with the following label attached .Label ControllerSoftwareRC90 EPSON RC+ 7.0Manual PDF for this robot system is available from EPSON RC+ 7.0 Ver. 7.0.2This option is not available for Robot Controller RC90 (EPSON RC+ 5.0) withoutthe label.☞NOTE☞NOTELS3-401* RC90 controller firmware Ver.7.0.2.0 or laterEPSON RC+ 7.0 Before Ver.7.0.1Ver.7.0.2 or later OKOK: Compatible All functions of the EPSON RC+ 7.0 and the Controller are available.: Compatible Connection is OK. We recommend using EPSON RC+7.0 Ver.7.0.2 or later.Manipulator serial No. : L6**00**** LS6-602* RC90 controller firmware Ver.7.0.2.0 or laterEPSON RC+ 7.0 Before Ver.7.0.1Ver.7.0.2 or later OKOK: Compatible All functions of the EPSON RC+ 7.0 and the Controller are available.: Compatible Connection is OK. We recommend using EPSON RC+7.0 Ver.7.0.2 or later.Manipulator serial No. : L6**01**** or later LS6-502*, LS6-602*, LS6-702* RC90 controller firmware Ver.7.1.6.* or laterEPSON RC+ 7.0 Before Ver.7.1.2Ver.7.1.3 or later OKOK: Compatible All functions of the EPSON RC+ 7.0 and the Controller are available.: Compatible Connection is OK. We recommend using EPSON RC+7.0 Ver.7.1.3 or later.LS20-804*, LS20-A04* RC90 controller firmware Ver.7.1.8.* or laterEPSON RC+ 7.0 Before Ver.7.1.3Ver.7.1.4 or later OKOK: Compatible All functions of the EPSON RC+ 7.0 and the Controller are available.: Compatible Connection is OK. We recommend using EPSON RC+7.0 Ver.7.1.4 or later.China RoHSThis sheet and environmental protection use period label are based on the regulationin China. These are not necessary to be concerned in other countries.产品中有害物质的名称及含量机器人型号名称LS3 LS6 LS20系列部件名称有害物质铅汞镉 六价铬多溴联苯多溴 二苯醚(Pb)(Hg)(Cd) (Cr(VI))(PBB)(PBDE)机器人× ○ ○ ○ ○ ○ 电机 (执行器单元、电机单元) × ○ ○ ○ ○ ○ 减速机单元 × ○ ○ ○ ○ ○ 电磁制动器 × ○ ○ ○ ○ ○ 同步皮带 ○ ○ ○ ○ ○ ○ 电池单元(电池、电池固定架、电池基板) × ○ ○ ○ ○ ○ 密封(密封填料、油封、密封脂、垫片、 O 型环) × ○ ○ ○ ○ ○ 润滑脂 ○ ○ ○ ○ ○ ○ 电缆(M/C 电缆、连接电缆) × ○ ○ ○ ○ ○ 散热片 ○ ○ ○ ○ ○ ○ LED 指示灯 ○ ○ ○ ○ ○ ○ 电路板 × ○ ○ ○ ○ ○ 外罩○ ○ ○ ○ ○ ○ 滚珠丝杠花键 ○ ○ ○ ○ ○ ○ 制动解除开关 × ○ ○ ○ ○ ○ 伸缩罩 ○ ○ ○ ○ ○ ○ 扎带○ ○ ○ ○ ○ ○ 气管接头 × ○ ○ ○ ○ ○ 选件相机安装板 ×○○○○○本表格依据SJ/T 11364的规定编制。
EPSON 机器人说明书
2 C onnect the emergency stop connector to theEMERGENCY port on the robot’s interface panel.3 CA ttaching a Power Adapterand Turning on the RobotThe power cable is already attached to the robot’s power supply. You must attach a power adapter plug to the other end of the power cable. See the example power adapter plugs below:220 V 110 VWarning: Wire the power cable only to a power adapter plug; never wire the power cable directly to a power panel or other hard-wired power supply. You must be able to unplug the cable from a power outlet for safe operation.Make sure the power line includes a two-pole, disconnect type, ground leakage circuit breaker or a circuit breaker in the AC power cable line with a rated current of 20 A or less. For wiring details and information on the robot’s power supply, see the online Epson Robot Manual .Caution: The robot does not have a power switch; once you plug it into a power outlet, the robot’s power is on.Warning: Improperly connecting the ground wire may cause afire or electric shock.3 A lign the mounting holes with the holes in your worksurface and secure the robot using the four M8×35 bolts.Note: Tighten the bolts to a torque of 32.0+/-1.6 N-m.C onnecting the USB Cableand Emergency StopCaution: Do not attach the power adapter or attempt to plug in the robot now; connect the USB cable and emergency stop first.You can install the emergency stop that came with the robot or install your own emergency stop that meets the safety requirements listed in the online Epson Robot Manual .1 T o connect an emergency stop, first do one of thefollowing:• If you are installing the emergency stop included withthe robot, rotate the stop button counterclockwise to release the button, or the robot cannot operate.• If you are installing your own emergency stop, wire it to the 25-pin D-Sub connector that came with your robot. Be sure to use the clamshell and strain relief during assembly. For wiring details, see the online Epson Robot Manual .4 E nter a test project name and click OK .5 O pen the Tools menu and select Robot Manager.6 W hen the control panel appears, click Reset to clear theemergency stop condition.7 M ake sure no one is standing near the robot, then selectMOTOR ON and select Yesto continue.The light on the end of the J3 axis turns on. Warning: When the J3 axis light is on, the robot can move at any time. To prevent injury, keep away from the robot before turning on the motor and whenever the light is on.8 C licktheicon to open the Command Window.9 I n the Command Window, enter the following command:>PULSE 0,0,0,0,0,02 P lug the robot’s power cable into a power outlet.The lights on the back of the robot flash for about 30seconds as the robot initializes.Initialization is finished when just the AUTO andPROGRAMlights flash alternately in a steady pattern.Now you can create a test project and test the robot using the Epson RC+ 7.0 software.Note: See the online Epson Safety and Installation Manual for details on using the Epson RC+ 7.0 software.1 O n your computer, double-click the EPSON RC+ 7.0 iconon your Windows desktop to start the Epson RC+ 7.0software.2 I n the Connection list, selectUSB.T he robot’s PROGRAM light starts flashing.3 O pen the Project menu and select New to create a testproject.10 P ress Return and close the Command Window.The robot moves to the zero position.11 S elect the Jog & Teach tab (1) and click the Continuousradio button (2).12 C lick one of the directional arrows to move the robot inthe indicated direction.13 W hen you finish testing, close the control panel windowand select File > Exit to exit the Epson RC+ 7.0 software.The robot is now ready to program and use. See the onlineEpson RC+ 7.0 User’s Guide to get started with programming.Where to Get HelpFor technical support, do one of the following:• Visit /customer-service anytime.• Call 1-866-ROBOTS1 (1-866-762-6781, U.S. only, toll free) or1-562-290-5900 (U.S. and elsewhere, toll or long distancecharges may apply), 6 am to 4:30 pm, Pacific Time, Mondaythrough Friday.TrainingTo help you get the most from your Epson product, Epsonoffers programming, maintenance, and vision classes. Visit/training for more information.EPSON is a registered trademark and EPSON Exceed Your Vision is a registered logomark ofSeiko Epson Corporation.Windows is a registered trademark of Microsoft Corporation in the United States and/or othercountries.General Notice: Other product names used herein are for identification purposes only and maybe trademarks of their respective owners. Epson disclaims any and all rights in those marks.This information is subject to change without notice.© 2019 Epson America, Inc., 4/19Printed in U.S.A. CPD-57301。
- 1、下载文档前请自行甄别文档内容的完整性,平台不提供额外的编辑、内容补充、找答案等附加服务。
- 2、"仅部分预览"的文档,不可在线预览部分如存在完整性等问题,可反馈申请退款(可完整预览的文档不适用该条件!)。
- 3、如文档侵犯您的权益,请联系客服反馈,我们会尽快为您处理(人工客服工作时间:9:00-18:30)。
EPSON机器人同第三方相机校准方法
基本思路:
1.相机通过以太网或RS232同机器人通信
2.按机器人校正指令的要求获取、分离相机发送过来的信息
3.使用校准指令
准备工具:
1.制作9宫图
2.做作机器人工件坐标的校准工具(类似铅笔,装在Z轴或抓手上)
一.机器人与相机通过以太网通信(TCP/IP)
1.制作如下9宫图,该图的大小尽量占满相机的视野范围,但是不能太靠近边界,可用打印机打印,为获得更高精度加工类似的高精治具。
注:以上的数字为点的排列顺序,制作时可以省略,但是取点时一定要严格按照改顺序来取点。
2.相机必须具备两个功能:a.收到某个命令或输入点信号为校准模式b.收到某个命令或输入点信号为正常工作模式。
3.相机的单位必须为像素:相机按顺序获得9个圆的中心点的像素坐标,这9个点的坐标可以用特殊符号阁开(常用:”+”、”-”、””等,但是不能用”,”;这样用的目的是让机器人编程方便地把这些点的信息提取),然后发送给机器人。
如:p1+p2+……+p9
二.机器人的TCP/IP通信
1.TCP/IP参数设定:
在菜单栏“工具”->“控制器设置”->“TCP/IP”->“端口”
a.“IP地址”:相机的IP地址。
b.“TCP/IP地址”:相机TCP/IP通信的端口号。
c.“终端”:信息的结束符;相机、机器人双方必须设置一致。
d.“超时”:可以忽略。
2.程序示例(测试通信,有些地方没完善)
Function tpcip
OpenNet #201 As Client …以客户端方式打开TCP/IP端口
Print " wating......"
WaitNet #201 …等待TCP/IP端口打开
Print "port have open"
Print #201, “CC,21”…发送命令给相机指定工作模式,
Print #201, “T1”…命令相机拍照并且返回结果
…这里是KEYENCE的格式
If ChkNet(201) > 0 Then …判断是否收到数据
Wait 0.1
Input #201, DA TA$ …收到数据后存到DATA$ If Len(data$) > 10 Then 这段命令为数据提取功能,但是不Integer ll 能通用,这里只是提供参考!!!
For ll = 0 To 8
s$ = Mid$(data$, ll * 12 + 1, 12)
Xccd(ll) = V al(s$) …坐标分离
思路:提取每个点后,用P=XY()指令转存到点文件里面去,如P21-P29
Print Xccd(ll)
Print DA TA$
ElseIf ChkNet(201) = -3 Then …后面为通信异常处理
CloseNet #201
OpenNet #201 As Server
WaitNet #201
EndIf
Fend
三.校准,RC+5.4以后增加了支持第三方相机校准的功能,安装了对应的版本软件以后打开“SPEL+语言参考”里面有详细说明。
指令包含:VxCalib, VxCalDelete, VxCalLoad, VxCalInfo, VxCalSave, VxTans这些命令。
1.使用:只要用VxCalib,VxTans两个命令就可以完成校准。
VxCalib:建立一个校准,指令的详细说明阅读手册;
根据相机的像素点和机器人的毫米点来校准。
假定通过上面程序已经获得
了9宫图的9个点的像素坐标,接下来也要按顺示教机器人的9宫图的圆
心点的坐标,也要按顺序保存如:P1-P9
注意:点坐标必须连续,使用TOOL:0,ARM:0
VxTans:将当前点通过已经建立的校准转换成机器人坐标。
参考手册上的例子:。