爱普生机器人软件安装及使用教程
EPSON RC700系列机器人系统安全和安装指南.pdf_1701924908.3317795说明
Robot Controller Control Unit RC700RC700-ADrive Unit RC700DURC700DU-A Programming Software EPSON RC+7.0 Manipulator G1 G3 G6 G10 G20 seriesRS series C4 C8 series N2 N6 seriesX5 seriesRobot System Safety and Installation (RC700 / EPSON RC+7.0) Rev.17Robot System Safety and Installation(RC700 / EPSON RC+7.0)Rev.17Copyright 2012-2018 SEIKO EPSON CORPORATION. All rights reserved. Safety and Installation (RC700 / EPSON RC+ 7.0) Rev.17 iFOREWORDThank you for purchasing our robot products.This manual contains the information necessary for the correct use of the robotsystem.Please carefully read this manual and other related manuals before installing therobot system.Keep this manual handy for easy access at all times.WARRANTYThe robot system and its optional parts are shipped to our customers only afterbeing subjected to the strictest quality controls, tests, and inspections to certify itscompliance with our high performance standards.Product malfunctions resulting from normal handling or operation will be repairedfree of charge during the normal warranty period. (Please ask your Regional SalesOffice for warranty period information.)However, customers will be charged for repairs in the following cases (even if theyoccur during the warranty period):1. Damage or malfunction caused by improper use which is not described inthe manual, or careless use.2. Malfunctions caused by customers’ unauthorized disassembly.3. Damage due to improper adjustments or unauthorized repair attempts.4. Damage caused by natural disasters such as earthquake, flood, etc.Warnings, Cautions, Usage:1. If the robot system associated equipment is used outside of the usageconditions and product specifications described in the manuals, thiswarranty is void.2. If you do not follow the WARNINGS and CAUTIONS in this manual, wecannot be responsible for any malfunction or accident, even if the result isinjury or death.3. We cannot foresee all possible dangers and consequences. Therefore, thismanual cannot warn the user of all possible hazards.ii Safety and Installation (RC700 / EPSON RC+ 7.0) Rev.17TRADEMARKSMicrosoft, Windows, and Windows logo are either registered trademarks ortrademarks of Microsoft Corporation in the United States and/or other countries.Other brand and product names are trademarks or registered trademarks of therespective holders.TRADEMARK NOTATION IN THIS MANUALMicrosoft® Windows® 7 Operating systemMicrosoft® Windows® 8 Operating systemMicrosoft® Windows® 10 Operating systemThroughout this manual, Windows 7, Windows 8, and Windows 10 refer to aboverespective operating systems. In some cases, Windows refers generically toWindows 7, Windows 8, and Windows 10.NOTICENo part of this manual may be copied or reproduced without authorization.The contents of this manual are subject to change without notice.Please notify us if you should find any errors in this manual or if you have anycomments regarding its contents.MANUFACTURERSeiko Epson Corporation3-3-5 Owa, Suwa-shi, Nagano, 392-8502URL :/company/: http://www.epson.jp/prod/robots/Toyoshina PlantRobotics Solutions Operations Division6925 Toyoshina Tazawa,Azumino-shi, Nagano, 399-8285JapanTEL : +81-(0)263-72-1530FAX : +81-(0)263-72-1495Safety and Installation (RC700 / EPSON RC+ 7.0) Rev.17 iiiSUPPLIERSNorth & South America Epson America, Inc.Factory Automation/Robotics 18300 Central AvenueCarson, CA 90746USATEL : +1-562-290-5900FAX : +1-562-290-5999E-MAIL :*****************.comEurope Epson Deutschland GmbHRobotic SolutionsOtto-Hahn-Str.4D-40670 MeerbuschGermanyTEL : +49-(0)-2159-538-1800FAX : +49-(0)-2159-538-3170E-MAIL :****************URL: : www.epson.de/robotsChina Epson (China) Co., Ltd.Factory Automation Division4F, Tower 1, China Central Place,81 Jianguo Road, Chaoyang District,Beijing, 100025, PRCTEL : +86-(0)-10-8522-1199FAX : +86-(0)-10-8522-1120Taiwan Epson Taiwan Technology & Trading Ltd.Factory Automation Division15F., No.100, Songren Rd., Sinyi Dist., Taipei City, 11073Taiwan, ROCTEL : +886-(0)-2-8786-6688FAX : +886-(0)-2-8786-6600iv Safety and Installation (RC700 / EPSON RC+ 7.0) Rev.17Korea Epson Korea Co., Ltd.Marketing Team (Robot Business)10F Posco P&S Tower, Teheranro 134(Yeoksam-dong)Gangnam-gu, Seoul, 06235KoreaTEL : +82-(0)-2-3420-6692FAX : +82-(0)-2-558-4271Southeast Asia Epson Singapore Pte. Ltd.Factory Automation System1 HarbourFront Place, #03-02,HarbourFront Tower One,Singapore 098633TEL : +65-(0)-6586-5696FAX : +65-(0)-6271-3182India Epson India Pvt. Ltd.Sales & Marketing (Factory Automation)12th Floor, The Millenia, Tower A, No. 1,Murphy Road, Ulsoor, Bangalore,India 560008TEL : +91-80-3051-5000FAX : +91-80-3051-5005Japan Epson Sales Japan CorporationFactory Automation Systems DepartmentNishi-Shinjuku Mitsui Bldg.6-24-1Nishishinjuku, Shinjuku-ku, Tokyo 160-8324JapanTEL :+81-(0)3-5321-4161Safety and Installation (RC700 / EPSON RC+ 7.0) Rev.17 vRegarding battery disposalThe crossed out wheeled bin label that can be found on your product indicates that this product and incorporated batteries should not be disposed of via the normal household waste stream. To prevent possible harm to the environment or human health please separate this product and its batteries from other waste streams to ensure that it can be recycled in an environmentally sound manner. For more details on available collection facilities please contact your local government office or the retailer where you purchased this product. Use of the chemical symbols Pb, Cd or Hg indicates if these metals are used in the battery.This information only applies to customers in the European Union, according to DIRECTIVE 2006/66/EC OF THE EUROPEAN PARLIAMENT AND OF THE COUNCIL OF 6 September 2006 on batteries and accumulators and waste batteries and accumulators and repealing Directive 91/157/EEC and legislation transposing and implementing it into the various national legal systems.For other countries, please contact your local government to investigate the possibility of recycling your product.The battery removal/replacement procedure is described in the following manuals:Controller manual / Manipulator manual(Maintenance section)For California customers onlyThe lithium batteries in this product containPerchlorate Material - special handling may apply,See /hazardouswaste/perchlorate.vi Safety and Installation (RC700 / EPSON RC+ 7.0) Rev.17Safety and Installation (RC700 / EPSON RC+ 7.0) Rev.17 viiBefore Reading This ManualConcerning the security support for the network connection:The network connecting function (Ethernet) on our products assumes the use in the local network such as the factory LAN network. Do not connect to the external network such as Internet.In addition, please take security measure such as for the virus from the network connection by installing the antivirus software.Security support for the USB memory:Make sure the USB memory is not infected with virus when connecting to the Controller.Control System ConfigurationRobot Controller Drive Unit RC700DU is available for the following version.EPSON RC+ 7.0 Ver.7.1.0 or laterRobot Controller RC700-ARobot Controller Drive Unit RC700DU-A is available for the following version.EPSON RC+ 7.0 Ver.7.1.2 or laterManipulators can be connected with the following versions. C4 series : EPSON RC+ 7.0 Ver.7.0.0 C8 series (C8XL) : EPSON RC+ 7.0 Ver.7.1.3 C8 series (C8, C8L) : EPSON RC+ 7.0 Ver.7.1.4 C8 series (wall mounting) : EPSON RC+ 7.0 Ver.7.2.0 N2 series: EPSON RC+ 7.0 Ver.7.2.0 N6 series (N6-A1000**) : EPSON RC+ 7.0 Ver.7.3.4 N6 series (N6-A850**R) : EPSON RC+ 7.0 Ver.7.4.1G1, G3, G6, G10, G20, RS series : EPSON RC+ 7.0 Ver.7.1.2 X5 series: EPSON RC+ 7.0 Ver.7.3.0☞NOTE☞NOTEChina RoHSThis sheet and environmental protection use period label are based on theregulation in China. These are not necessary to be concerned in othercountries.viii Safety and Installation (RC700 / EPSON RC+ 7.0) Rev.17产品环保使用期限的使用条件关于适用于在中华人民共和国境内销售的电器电子产品的环保使用期限,在遵守该产品的安全及使用注意事项的条件下,从生产日期开始计算,在标志的年限内,本产品中含有的有害物质不会对环境造成严重污染或对人身、财产造成严重损害。
EPSON软件安装及应用简介
4. 运行程序。 (1)按下F5键,显示Run窗口。(F5是用于选择EPSON
RC+ 7.0菜单 - [运行] - [Run窗口]的快捷键。)表示创 建操作状态的状态窗口显示在主窗口的下方。 (2)项目创建期间,程序被读入存储器中进行编译。程序与 项目文件被发送到控制器。如果创建期间未发生错误,则 显示Run窗口。
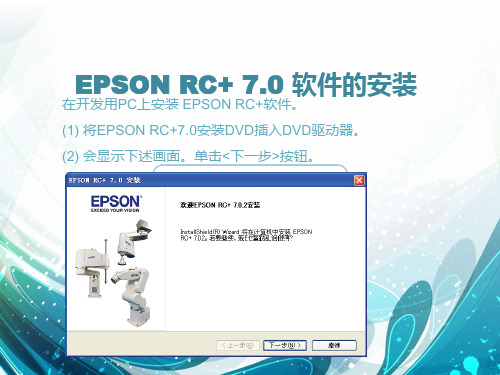
EPSON RCPSON RC+软件。 (1) 将EPSON RC+7.0安装DVD插入DVD驱动器。 (2) 会显示下述画面。单击<下一步>按钮。
(3) 根据画面中显示的指示,输入用户名与公司名,然后单 击 <下一步> 按钮。
(4) 选择安装 EPSON RC+ 7.0 的驱动器,然后单击 <下一步 > 按钮。
(1)选择 EPSON RC+ 7.0 菜单 - [项目] - [新建]。显示 [新建]对话框
(2)在[新建名称]输入项目名称。(例:FirstApp) (3)单击 <OK> 按钮,创建新项目。 在创建新项目的同时,生成名为 Main.prg 的程序。 在光
标闪烁于左上角的状态下,显示 Main.prg 画面。输入最 初程序的准备至此结束。 3. 编辑程序。 在Main.prg 编辑画面中输入下述程序。 Function main
(3)单击Run窗口中的<开始>按钮,运行程序。 (4)状态窗口中会显示下述任务。 19:32:45 开始任务main 19:32:45 所有任务停止 Run窗口中显示语句的输出。
注意: 1)需要使用 Adobe Reader 来显示 EPSON RC+ 7.0 手
2024版爱普生机器人软件编程操作培训[1]
![2024版爱普生机器人软件编程操作培训[1]](https://img.taocdn.com/s3/m/fa676ba26394dd88d0d233d4b14e852458fb39af.png)
通过实际案例演示手动操作步骤,包括机器人的 移动、抓取、放置等。
自动运行模式下任务执行流程
1 2
自动运行模式启动 讲解如何启动机器人的自动运行模式,并介绍相 关注意事项。
任务执行流程讲解 详细阐述在自动运行模式下,机器人如何接收任 务、规划路径、执行任务等流程。
3
任务执行过程中的监控与调整 介绍在任务执行过程中,如何对机器人的运行状 态进行实时监控,并根据实际情况进行调整。
运算符
算术运算符(+、-、*、/ 等)、关系运算符(>、<、 ==等)、逻辑运算符 (&&、||等)。
表达式
由运算符和操作数组成的 计算式,如`(speed + 5) * 2`。
优先级规则
先乘除后加减,括号内优 先计算等。
流程控制语句使用方法
条件语句
if-else语句,根据条件 选择执行不同代码块。
人工智能、机器学习 等技术的融合,推动 机器人智能化发展。
爱普生机器人市场应用
爱普生机器人在工业自动化领 域有广泛应用,如焊接、装配、 检测等。
在医疗、教育、服务等领域也 有爱普生机器人的身影。
随着技术的不断发展,爱普生 机器人市场应用前景广阔。
软件编程在机器人领域重要性
软件编程是实现机器人智能化的 关键。
问题定位与解决
根据调试结果和问题现象,定位 问题所在,并采取相应的措施进 行解决,包括修改代码、调整参 数等。
经验总结与分享
在解决问题后,总结经验教训, 并与其他人分享,避免类似问题
的再次发生。
05
机器人操作培训
机器人安全操作规范讲解
安全防护装置使用
确保在操作前正确安装和使用各 种安全防护装置,如安全光栅、
爱普生机器人PROFINET设置
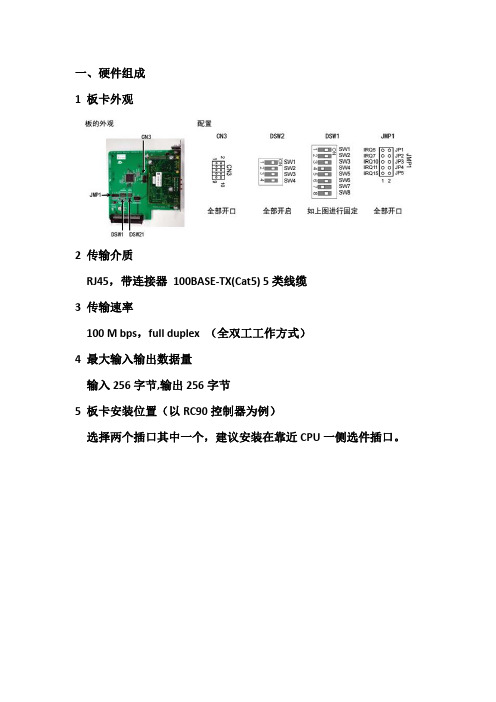
一、硬件组成
1板卡外观
2传输介质
RJ45,带连接器100BASE-TX(Cat5)5类线缆
3传输速率
100M bps,full duplex(全双工工作方式)
4最大输入输出数据量
输入256字节,输出256字节
5板卡安装位置(以RC90控制器为例)
选择两个插口其中一个,建议安装在靠近CPU一侧选件插口。
二、软件设置部分
1输入输出字节数
板卡如果安装完成,控制器正常自动识别板卡,如果不能自动识别请检查板卡安装。
根据点位要求设置1-256字节(和PLC或者其他主站控制器保持一致,DAP模式对于新版本控制器一般默认选择Ver.2
2PLC软件设置
首先把RC软件中得GSD文件找到提供给PLC或者其他主站控制器,机械手控制器是RC90就选择RC90的GSD文件
以西门子S7-1200为例,在设备概览中Interface表示设备已经建立连接,在组合输入输出状态时,请先分配输出状态,地址范围和机械手设置的字节数相同
三、板卡LED灯状态说明
1正常状态下LNK/ACTLED绿灯闪烁说明PLC或者其他主站已经和控制器建立通讯连接。
2正常状态下MS和CS LED绿色灯亮,如果MS红灯亮请检查PLC 分配地址是否正确或者IP地址设置等。
爱普生培训资料:EPSON机械手软件操作指南
四、RC+5.4.3软件操作 (5)在“点数据”页面单击“保存”按钮,完成示教点。
四、RC+5.4.3软件操作
五、 马达重置及伺服OFF
工具 →机器人管理器→控制面板或单击工轴刹车释放后要按住 伺服指示灯旁边白色按
钮才能手动移动Z轴
运行功率设置
四、RC+5.4.3软件操作
1、 示教点步骤
(1)在“点数据”页面中“点文件”下拉菜单中选择需要教点的点文件
单击选择点文件
四、RC+5.4.3软件操作
(3)微动将机械手移动的需要示教点的位置。如果是SCARA机械手,Motor On情况下,可以在 Control Panel 页面Free All释放所有轴后,手动将机械手移动需要示教点的位置后,Lock ALL锁定所有轴。
EPSON机械手软件操作指南
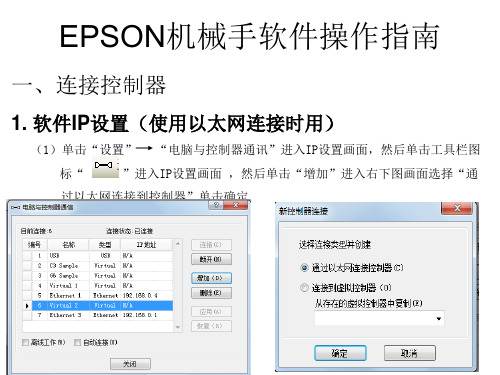
一、连接控制器
1. 软件IP设置(使用以太网连接时用)
(1)单击“设置” “电脑与控制器通讯”进入IP设置画面,然后单击工具栏图
标“
”进入IP设置画面 ,然后单击“增加”进入右下图画面选择“通
过以太网连接到控制器”单击确定
四、RC+5.4.3软件操作
(2)设置新增以太网连接名称及IP地址 ,控制器出厂默认控制器IP设置如右下图所示 设置好IP后单击应用,如果控制器IP忘记了,可以先用USB线连接控制器然后在 “设置”|控制器|configuration里可以查看控制器IP,电脑IP的前三位要与控制 器的前三位相同,例如“192.168.0.10”
四、RC+5.4.3软件操作 2、选择“控制器”单击“下一个”进入如下画面
四、RC+5.4.3软件操作
3、修改程序名称(可不修改)设定存储磁盘后,单击“下一个” 进入如下画面,然后单击“导入”即可将控制器内的程序读取出 来。
Epson Synthis T3 T6 机器人安装与软件安装指南说明书
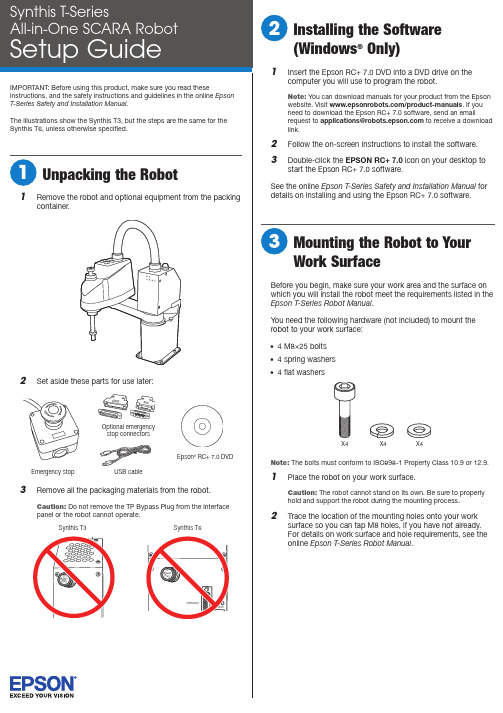
2 C onnect the emergency stop connector to theEMERGENCY port on the robot’s interface panel.3 CA ttaching a Power Adapterand Turning on the RobotThe power cable is already attached to the robot’s power supply. You must attach a power adapter plug to the other end of the power cable. See the example power adapter plugs below:220 V110 V2 orWarning: Improperly connecting the ground wire may cause a fireor electric shock.2 O n your computer, double-click the EPSON RC+ 7.0 iconon your Windows desktop to start the Epson RC+ 7.0software.3 In the Connection list, select USB.The robot’s PROGRAM light starts flashing.4 O pen the Project menu and select New to create a testproject.5 Enter a test project name and click OK .6 Open the Tools menu and select Robot Manager.7 W hen the control panel appears, click Reset to clear theemergency stop condition.2 Plug the robot’s power cable into a power outlet.The lights on the front of the robot flash for about 30PROGRAMlights flash alternately in a steady pattern.Now you can create a test project and test the robot using the Epson RC+ 7.0 software.Note: See the online Epson T-Series Safety and Installation Manual for details on using the Epson RC+ 7.0 software.1 B efore testing the robot, position it as follows:• Rotate the J1 and J2 joints counterclockwise to themiddle-of-reach position as shown here.Front viewTop view• Press and hold the Brake Release Switch button and push the J3 (Z axis) down about 1 inch (2.54 cm) asshown here.8 M ake sure no one is standing near the robot, then selectMOTOR ON and select Yesto continue.Warning:on the motor and whenever the large orange light is on.9 S elect the Jog & Teach tab (1) and click the Continuousradio button (2).10 C lick one of the directional arrows to move the robot in theindicated direction.11 W hen you finish testing, close the control panel window andselect File > Exit to exit the Epson RC+ 7.0 software.The robot is now ready to program and use. See the online Epson RC + 7.0 User’s Guide to get started with programming.Where to Get HelpFor technical support, do one of the following:• Visit /customer-service anytime.• Call 1-866-ROBOTS1 (U.S. only, toll free) or 1-562-290-5900(U.S. and elsewhere, toll or long distance charges may apply), 6 am to 4:30 pm , Pacific Time, Monday through Friday.EPSON is a registered trademark and EPSON Exceed Your Vision is a registered logomark of Seiko Epson Corporation.Windows is a registered trademark of Microsoft Corporation in the United States and/or other countries.General Notice: Other product names used herein are for identification purposes only and may be trademarks of their respective owners. Epson disclaims any and all rights in those marks.This information is subject to change without notice.© 2018 Epson America, Inc., 6/18Printed in U.S.A.CPD-54750R1。
HAPSITE Smart 第三章 Smart IQ软件的安装、联机与使用
13
March 12
file_name
Smart IQ软件的使用 软件的使用——数据分析 软件的使用 数据分析
3.1 定性(续)。勾选“Switch to NIST”,点击ok,进 入NIST库进行检索,得到物质的分子式,结构式,分子 量,碎片离子等信息。
14
March 12
file_name
15
23
March 12
file_name
Smart IQ软件的使用 软件的使用——查看状态 软件的使用 查看状态
11.双击Frontpanel Display,可以通过 电脑查看主机前面板 显示内容,他们是同 步的。
24
March 12
file_name
联系我们
如有任何问题,请联系英福康有限公司 电话:021-6209 3094
Smart IQ软件的使用 软件的使用——编辑方法 软件的使用 编辑方法
6.双击Method Editor可以对方法进行编辑;
选择方法类型 选择扫描模式 方法的描述性文字
19
March 12
file_name
Smart IQ软件的使用 软件的使用——编辑方法 软件的使用 编辑方法
7.单击Next;
6
March 12
file_name
Smart IQ软件的联机 软件的联机
1.双击桌面上Smart IQ软件的快捷方式;
2.双击软件界面中的System;
3.单击HAPSITE List;
7
March 12
file_name
Smart IQ软件的联机 软件的联机
4.通过面板上显示的仪器序号,将第一位数字“0”改成字母“H”后, 填入到如左图的位置上。点击Add,会在上方的列表中显示出添加后的仪 器型号,点击“ok”,即可添加当前仪器。
爱普生机器人软件安装及使用教程
出现上面显示的界面后,按按钮。
出现上面显示的界面后,再接着按按钮。
目标驱动器不必选择,直接按按钮。
接按
按
安装完成后,将弹出下面的窗口。
按按钮完成软
此时,在用户的桌面上会出现下面两个图标
前一个图标用于软件的开发和调试,后面的图标用于对工作
流程的监视。
双击项,将打开Internet 协议(TCP/IP)属性页面,修改IP地址等项为下图的值。
按
键。
完成IP的设定。
图标,启动
在EPSON RC+ 5.0软件菜单中点击“设置”菜单项,单击选择项目。
将弹出下面“电脑与控制器通
信”页面。
点击
选择选项,按键,完成添加
网络通讯功能。
检查网线连接是否正常,正常则单击新添加的Ethernet项,按按钮,弹出下面页面。
选项表示电脑只作为监视
选项将首先中断目前和控
项目并按键切换到程
序模式。
此后EPSON RC+ 5.0软件将开始尝试连接RC170机器人控制器,连接成功后页面为下图状态。
按
修改“控制设备(O)”项目。
如果需要本机调试,可修改为PC,如需要使用按钮盒,则需要修改为“远程I/O”状态。
修改
完成后,按键关闭设置页面。
完成上面设置后,机器人已经处于可操作状态。
3. 机器人的示教
在菜单项里单击“设置”项,再单击“机器人管理器”选项。
单击控制面板,弹出下面页面
按钮:关闭机器人
按钮:启动机器人
按钮:在按下“急停”后,机器人进入锁定,必须按下
⑵.步进示教。
iprojection 操作指南
iprojection 操作指南iProjection是一个用于投影仪的应用程序,它可以让用户通过无线网络将其移动设备上的内容投射到投影仪上。
该应用程序适用于iOS和Android设备,并且可以与支持网络投影功能的Epson投影仪配对使用。
以下是iProjection的操作指南:1. 下载和安装,首先,您需要在您的移动设备上下载并安装iProjection应用程序。
您可以在App Store(iOS设备)或Google Play商店(Android设备)中找到该应用程序,并进行免费下载安装。
2. 连接投影仪,确保您的移动设备和Epson投影仪连接到同一个无线网络。
启动iProjection应用程序后,它将自动搜索并显示可用的Epson投影仪列表。
选择您要连接的投影仪,并进行连接。
3. 投影内容,一旦连接成功,您可以选择要在投影仪上显示的内容。
这可以是您设备上的照片、文档、网页、视频等。
通过iProjection应用程序,您可以轻松地控制投影内容的放映和播放。
4. 设置和调整,iProjection还提供了一些设置选项,您可以根据需要调整投影画面的亮度、对比度、色彩等参数。
此外,您还可以在应用程序中找到一些实用的投影工具,如倒计时器、画笔工具等。
5. 结束投影,当您完成投影时,可以通过iProjection应用程序断开与投影仪的连接,或者直接关闭应用程序。
在断开连接之前,建议您先停止投影内容的播放,以免造成不必要的干扰。
总的来说,iProjection是一个非常实用的应用程序,它为用户提供了便捷的无线投影解决方案,使移动设备和投影仪之间的连接和操作变得更加简单和高效。
希望以上操作指南能够帮助您更好地使用iProjection应用程序。
爱普生 机器人
3. 机器人1. 用USB电缆连接机器人控制器。
2. 启动机器人编程软件。
出现如下对话框时,按图示选择。
3. 打开机器人程序项目工程。
4. 选择“设置” “电脑与控制器通信”,弹出如下对话框,选择USB连接方式,点击“连接”按钮。
5.如果出现如下对话框,按图示选择。
6.选择“设置” “控制器”,按下述图示设置参数。
“配置”菜单:“IP地址”设定为192.168.1.169;“控制设备”设定为远程I/O;“参数”菜单:勾选第一条“重置命令时关闭输出”“远程控制”菜单:“输入”:Start设为0、Stop设为1、Reset设为2,其余设为空闲;“输出”:全部设为空闲;“RS232”菜单:“端口1”:“波特率”:57600;“终端”:CR;“TCP/IP”菜单:“端口201”:“IP地址”:192.168.1.169;“终端”:“CR”“端口202”:“IP地址”:192.168.1.169;“终端”:“CR”7. 选择“工具” “机器人管理器”,出现如下提示下载程序的对话框。
8.点击“是”按钮,程序即被下载到机器人控制器中。
随后出现机器人管理器对话框,按如下图示设置机器人的夹爪重量和惯性参数。
“重量”:“重量”:0.500;“长度”:255.0009. 选择“工具” “控制器”,在弹出的对话框中选择“恢复控制器”,按如下图示恢复控制器数据。
该步骤主要是为了将各加工程序对应的点表文件恢复到机器人控制器中,如不需要恢复点表文件,则不必执行该步骤。
10.在CCD标定之前,可选择“运行” “显示变量”,在变量设定对话框中,手动设置CCD 已标定的标志。
(修改变量前,必须勾选变量设置对话框中的“编辑”选项。
修改变量后,按“写入”按钮)。
其他变量也可以按下表预先设定。
3 机器人DO:DO0 机器人真空产生V161DO1 CCD拍照触发ZOC11KA2DO2 CCD平台真空产生V141DO3 CCD平台真空破坏V142DO4 助焊剂泄压阀打开ZOC11KA5DO5 助焊剂上喷启动ZOC11KA6DO6 助焊剂下喷启动ZOC11KA7DO7 助焊剂水阀ZOC12KA1DO8 助焊剂气阀ZOC12KA2。
- 1、下载文档前请自行甄别文档内容的完整性,平台不提供额外的编辑、内容补充、找答案等附加服务。
- 2、"仅部分预览"的文档,不可在线预览部分如存在完整性等问题,可反馈申请退款(可完整预览的文档不适用该条件!)。
- 3、如文档侵犯您的权益,请联系客服反馈,我们会尽快为您处理(人工客服工作时间:9:00-18:30)。
爱普生机器人软件安装
及使用教程
Company Document number:WUUT-WUUY-WBBGB-BWYTT-1982GT
爱普生机器人软件安装及使用教程一、EPSONRC+开发软件的安装
打开EpsonRC50文件夹,双击开始安装。
出现上面显示的界面后,按按钮。
出现上面显示的界面后,再接着按按钮。
目标驱动器不必选择,直接按按钮。
上面可勾选部分为手册和模拟器实例,可以按默认安装,直接按按钮进行到安装的下一步。
按按钮选择继续安装。
会出现下面的安装进度界面,大约需要等待几分钟,整个EpsonRC50软件安装完成。
安装完成后,将弹出下面的窗口。
按按钮完成软件的安装。
此时,在用户的桌面上会出现下面两个图标
前一个图标用于软件的开发和调试,后面的图标用于对工作流程的监视。
二、IP地址的设置
用普通网线连接机器人和开发用电脑。
打开本地连接,弹出“本地连接属性”页面。
双击项,将打开Internet协议(TCP/IP)属性页面,修改IP地址等项为下图的值。
按键。
完成IP的设定。
三、EPSONRC+软件使用
双击图标,启动EPSONRC+软件。
1.网络通讯的设置
在EPSONRC+软件菜单中点击“设置”菜单项,单击选择
项目。
将弹出下面“电脑与控制器通信”页面。
点击按钮。
选择选项,按键,完成添加网络通讯功能。
按钮,完成软件中连接IP的设置。
设置完成后页面显示为下图。
检查网线连接是否正常,正常则单击新添加的Ethernet项,按按钮,弹出下面页面。
选项表示电脑只作为监视器使用,不能进行程序的编制、修改等操作,不能对机器人控制点进行示教,也不能对外部I/O进行控制。
不影响已经存在的网络连接。
选项将首先中断目前和控制器的网络连接,将软件切换到程序模式,在此模式下可以进行控制程序的编制、修改工作,机器人控制点的示教和对外部I/O进行实时控制。
为了进行控制程序的编写、修改和调试,我们需要选择
项目并按键切换到程序模式。
此后EPSONRC+软件将开始尝试连接RC170机器人控制器,连接成功后页面为下图状态。
按按钮离开设置界面。
2.控制器的设置
在菜单项里单击“设置”项,再单击“控制器”选项。
将弹出下面界面。
单击“配置”项,弹出下面界面
修改“控制设备(O)”项目。
如果需要本机调试,可修改为PC,如需要使用按钮盒,则需要修改为“远程I/O”状态。
修改完成后,按键关闭设置页面。
完成上面设置后,机器人已经处于可操作状态。
3.机器人的示教
在菜单项里单击“设置”项,再单击“机器人管理器”选项。
将进入机器人管理器页面。
其中可进行多种操作,目前我们可使用控制面板、步进示教和点数据三个项目。
⑴.控制面板
单击控制面板,弹出下面页面
在此页面可以关闭或者开启机器人,在急停后可以按“重置”按钮恢复机器人的可运行状态。
按钮:关闭机器人
按钮:启动机器人
按钮:在按下“急停”后,机器人进入锁定,必须按下
按钮来解除机器人的锁定,重新进入运
行状态。
⑵.步进示教。