microglia preparation protocol
无菌工艺模拟试验指南 英语
无菌工艺模拟试验指南英语英文回答:Guideline for Aseptic Process Simulation Trials.Introduction.Aseptic process simulation (APS) trials are criticalfor ensuring the sterility and safety of aseptic pharmaceutical products. These trials are designed to evaluate the effectiveness of the aseptic processing system and identify any potential contamination risks. This guideline provides a comprehensive overview of the planning, execution, and evaluation of APS trials.Planning.Define Objectives: Clearly define the objectives ofthe trial, such as verifying sterility assurance level (SAL) or assessing the effectiveness of specific interventions.Select Simulants: Choose simulants that mimic the characteristics of the actual product, including microbial load, viscosity, and particle size.Design Trial Protocol: Develop a detailed protocolthat outlines the steps of the trial, including equipment setup, simulant preparation, inoculation, and sampling.Obtain Regulatory Approval: Submit the trial protocolto the appropriate regulatory agencies for review and approval.Execution.Equipment Setup: Install and calibrate all equipment used in the trial, including filling machines,sterilization systems, and environmental monitoring devices.Simulant Preparation: Prepare the simulant accordingto the protocol and inoculate it with the appropriate microorganisms.Inoculation: Inoculate the simulant into the aseptic processing system at predetermined intervals to simulate product contamination.Sampling: Collect samples from critical points in the process, such as the filling area, product containers, and environmental surfaces.Monitoring: Monitor environmental conditions,including temperature, humidity, and differential pressure, throughout the trial.Evaluation.Microbial Analysis: Test the samples for microbial growth to determine the efficacy of the aseptic processing system.Environmental Monitoring Data Analysis: Evaluate environmental monitoring data to identify any potential sources of contamination.Process Observations: Record any deviations from the protocol or unexpected events that occur during the trial.Data Interpretation: Interpret the results in the context of the trial objectives and identify areas for improvement or corrective action.Reporting.Trial Report: Prepare a comprehensive report that summarizes the trial design, execution, and evaluation.Regulatory Submission: Submit the trial report to the appropriate regulatory agencies to demonstrate the effectiveness of the aseptic processing system.中文回答:无菌工艺模拟试验指南。
Microglia cell culture,a primer for the novice
49Lucio G. Costa et al. (eds.), In Vitro Neurotoxicology: Methods and Protocols , Methods in Molecular Biology, vol. 758,DOI 10.1007/978-1-61779-170-3_4, © Springer Science+Business Media, LLC 2011Chapter 4Microglia Cell Culture: A Primer for the NoviceAnke Witting and Thomas MöllerAbstractMicroglial cells are the resident immune cells of the central nervous system. Progress in the recent decade has clearly established that microglial cells participate or even actively drive neurological disease. Much of our current knowledge has been generated by investigating microglial cells in cell culture. The aim of this chapter is to give the uninitiated a basic and adaptable protocol for the culturing of microglial cells. We discuss the challenges of microglial cell culture and provide a collection of tips which reflect our 25+ years of collective experience.Key words: Microglia, Cell culture, Medium, Serum, Growth factor, M-CSF, GM-CSF, Transfection, Endotoxin, Cell yieldThis chapter only provides a brief introduction into microglial cells as a point of reference. For more detailed information on the topic, the reader is respectfully referred to a number of excellent and comprehensive reviews on microglial biology (1–7). Microglia are the resident immune cells of the CNS. They resemble periph-eral tissue macrophages and are the primary mediators of neuroin-flammation (1, 8). Studies in the last two decades have demonstrated the involvement of microglia in many acute and chronic neuro-logical diseases (2, 9). In the healthy adult brain, microglia exist as so-called “resting” or “surveilling” microglia, characterized by a small cell body with fine, ramified processes and minimal expres-sion of surface antigens. Upon CNS injury, these cells are rapidly activated and participate in the pathogenesis of n eurological disor-ders. They secrete various inflammatory molecules, including TNF-a , IL-6, and nitric oxide (8). When CNS cells die, microglia 1. Introduction1.1. Microglia50 A. Witting and T. Möllerare further activated and become phagocytes. It is widely believed that substances released from damaged cells within the brain trig-ger microglial activation, consequently leading to the long-term changes of gene expression and reorganization of the cell pheno-type (2, 8).Activated microglia exert their effects on neurons and macroglia (astrocytes and oligodendrocytes) through the release of cytotoxic substances such as oxygen radicals, nitric oxide, glutamate, proteases, and neurotoxic cytokines, as well as cytoprotective agents such as growth factors, plasminogen, and neuroprotective cytokine (8). The effects of microglia are themselves modulated by astrocytes and neurons through cytokines and neurotransmitters, thus giving rise to complex interactions between microglia, neurons, and astrocytes. Evidence suggests that microglial cells play a central role in HIV encephalopathy and multiple sclerosis (10, 11). In addi-tion to infectious or inflammatory diseases, there is accumulat-ing evidence that microglia play a significant role in the pathogenesis of neurodegenerative diseases such as Alzheimer’s disease (AD), Parkinson’s disease (PD), and amyotrophic lat-eral sclerosis (ALS) (12–15).EARLY evidence that microglial cells play a role in neurological diseases emerged from histological studies. With the advent of cell culture and its successful application to neurons and astro-cytes, it was only a question of time until ingenious “glioscien-tists” developed protocols to isolate microglia. A seminal paper by Giulian and Baker in the mid-1980s describing the culture of microglial cells from neonatal mice jump started the field and with roughly 800 citations it might be the most cited primary research paper on microglial cells (16). Much has been learnedfrom these cells in a culture dish; from their complement of receptors and ion channels, to their ability to proliferate and migrate, as well as their annotated genomic profile. However, one lingeringconcern has always been this: what happens to immune cells, which are supposed to monitor CNS integrity after you put a brain through a wire mash and bath the cells in 10% serum? The answer seems blatantly clear, the cells get acti-vated. This has been ignored at the peril of the field for some-time, until it became clear that microglial cells in vitro not always (and this might be an understatement) resemble microglial cells in vivo. This controversial topic has been covered in recent years by several reviews and primary papers and is far outside the scope of this chapter (1, 17, 18). Advances in imaging technology and smart genetic approaches however have considerably improved our understanding of microglia in vitro (19–22) and the field isnow embarking on reconciling the in vitro and in vitro findings. 1.2. Microglia in CellCulture: A Catch 22514 Microglia Cell Culture: A Primer for the Novice It is clear that mechanistic s tudies will necessitate the in vitro approach for the time being. However, no self-respecting micro-gliologist will attempt to explain a complex neurological disease from data solely derived from a Petri dish.While there might be as many specific microglial cell culture p rotocols as there are laboratories working with microglia, most protocols in use are based on the above-mentioned publication of Giulian and Baker (16). The overriding principle is to first gener-ate mixed CNS cultures from late embryonic to postnatal day 5 brains and then repeatedly isolate microglial cells from these mixed cultures. However, other approaches exist, for example the isolation and (long-term) culture of adult microglia (23); the generation of larger amounts of microglia from the subventricular zone (24); or the derivation of microglia precursors from embry-onic stem cells (25). Microglial cells have not only been isolated from mouse and rat, but also from fetal human tissue (26); adult human surgically resected tissue (27); human postmortem tissue (28), human retinal tissue (29); and porcine CNS (30) and even gold fish (31).In this chapter, we provide a basic protocol for the initial mixed CNS cultures similar to what can be found in many CNS cell culture books (32). The described protocol for microglia iso-lation has several advantages. It will generate reasonable amounts of microglia; microglia can be kept for an extended time in cul-ture to do stimulation experiments and lastly, in all its variations, it is time proven. While the overall properties of microglia gener-ated this way seem to be the same, it is difficult to judge whether reported differences are species-dependent or cell culture protocol-dependent.For many procedures, written instructions are similar to instruction on how to tie shoe laces. In such a case, a picture is worth a thousand words, and a video of the procedures is invalu-able. The reader is referred to the Journal of Visualized Experiments at , which has several instruc-tional videos on the general procedures on how to obtain CNS cell cultures. The added value in our protocol are the notes, which highlight some of the common challenges and are usually not spelled out in detail. We are almost certain that most of our esteemed colleagues will have a divergent opinion on one issue or the other. However, we would like to point out that for the most part there is no single right or single wrong in how to pre-pare microglial cultures. There are actually many right and unfortunately many wrong ways. We intend to provide one pos-sible way which has successfully worked for us and warn of many wrong turns one can take along the arduous road to microglial cultures.1.3. Microglia CellCulture: A GenericProtocol52 A. Witting and T. Möller1. Dissecting microscope.2. Sterile dissection tools (scalpels, scissors, forceps, etc.).3. Hanks’ Balanced Salt Solutions (HBSS) (see Note 1).4. 0.25% Trypsin in HBSS (cell culture grade, not trypsin/EDTA).5. Petri dishes, 15-ml tubes, 50-ml tubes, cell strainer (100 m m; BD Falcon).6. DNase I (not the expensive molecular grade). A stock solution at 10 mg/ml in HBSS should be aliquoted and frozen.7. Dulbecco’s Modified Eagle’s Medium (DMEM, high glu-cose, with glutamine) supplemented with 100 U/ml of peni-cillin and 100 m g/ml streptomycin (see Note 2).8. DMEM/10% FBS: DMEM supplemented with 10% heat inactivated fetal bovine serum (FBS) and 100 U/ml of peni-cillin and 100 m g/ml streptomycin (P/S) (see Note 3). Of note, one should avoid HEPES containing medium. HEPES is used to increase the pH buffer capacity of the medium once removed from the CO 2 atmosphere of the incubator. However, it as a negative influence on microglia yield in primary mixed CNS culture (see Note 1).9. Poly-l -ornithine-coated flasks for primary mixed cultures: flasks are coated with 1 mg/ml poly-l -ornithine dissolved in tissue-culture water for at least 30 min at 37°C or over night at 4°C. The coating solution should cover the whole surface of the flasks. After the coating, flasks are washed two times with tissue culture grade water and one time with HBSS (see Note 4). For three brains, one 75 cm 2-coated cell culture flask will be needed, or for one brain, one 25 cm 2-coated cell culture flask. For higher throughput cultures, ratios can be scaled to 175-cm 2 culture flasks. The actual number of brains is flexible and can be empirically determined. However, it is imperative that for cultures which will be compared, the same number of brains is used. Otherwise differences in the growth phase will lead to nonlinear differences with might distort results.10. Culture dishes or well plates for microglia cells are either coated with poly-l -lysine or poly-l -ornithine or specialized cell culture ware can be used (e.g., PRIMARIA from BD Falcon).2. Materials534 Microglia Cell Culture: A Primer for the Novice The extraction of the brains from the animals (P1–P5 mouse or rat) and the removal of the meninges should be preferably done in a sterile work bench. The “cleaner” the work at this step, the less likely is a (low-level) contamination in the later steps, which most likely will be cleared by the antibiotics in the medium (see Note 2). However, the presence of microbial products will lead to an undefined activation state of the cultures (see Note 5). Please note that the sterile work bench for animal preparation should be different from the actual cell culture hood. Avoid bringing ani-mals into your cell culture facility. If there is not a sterile work bench for animal preparation, the preparation can be done on a laboratory bench, which gets sanitized beforehand and is prefer-ably located in a low-traffic area.1. Sterilize the surface of the bench and the dissection- m icroscope with 70% ethanol. Lay out the sterile dissection tools on a sterile surface (e.g., sterile Petri dish). To sterilize the prepa-ration tools directly after each usage, a bead sterilizer is opti-mal; however, a beaker filled with 70% ethanol can work as well.2. For the collection of brains, put Petri dishes and 15-ml cen-trifugation tubes filled with 10 ml HBSS on ice to prechill the solution. To keep the Petri dishes cold, while under the dis-ecting microscope a rectangular cold pack as frequently used for shipping has been proven useful. To increase contrast in the dissection microscope, a black sheet might be put between the cold pack and the Petri dish.3. Decapitate animals, spray the head with 70% ethanol, and then place it in a sterile Petri dish. Please check institutional animal care and use rule for decapitation of animals. CO 2 nar-cosis prior to decapitation is not desirable, and usually omis-sion can be justified.4. Remove the skin from the skull and cut the skull on the right and left side from the entry of the spinal cord toward the eyes. For an easy removal of the brain, it is recommended to also cut the skull along the midline of the brain, which is eas-ily visible as a meandering line in the skull. To cut only the skull and avoid cutting into the brain tissue, a scissor with one blunt blade is helpful. Once the incision is done along-side the base of the brain and along the midline the skull bone can be removed by gripping them with forceps and lifting up and outward. An alternative approach is to half the skull along the midline and carefully scoop out the hemisphere. However, this approach is only advisable for very young animals.3. Methods54 A. Witting and T. MöllerExtreme care has to be taken not to squish the brain with adull blade. Nevertheless, if executed with care, this procedurecan be very efficient and safe valuable time.5. Remove the brain as a whole after cutting the olfactory nerves.Place the brain into a Petri dish filled with ice-cold HBSS.Once the brains are on ice (HBSS in a 50-ml Falcon tube),they can be stored for up to 4 h with little effect on glial cellviability. Nevertheless, for consistent results, it is advisable toperform the preparation as fast as possible.6. Remove the olfactory bulb, cerebellum, and midbrain bytweezing them off with forceps. Remove the meninges underthe dissection microscope: first cut the brain along the hemi-spheres, detach the meninges along the inner side of thehemispheres, and carefully pull off the meninges. They mightcome off in one piece; however, they may also rip and onlycome off in little pieces. It is very important to check for leftover meninges and remove them carefully, as they might con-taminate the culture with fibroblasts. This might not seem abig issue if one plans to isolate microglia from the mixed cul-tures. However, one needs to keep in mind that the fibroblastwill release a different set of growth factors and cytokines intothe mixed culture and therefore might lead to a different dif-ferentiation pattern of microglia than in cultures withoutfibroblasts. In general, the meninges are easily removed froma carefully disected brain. A brain bruised while extracted willhave sticky meninges.7. Transfer the meninges-free brain to a 15-ml centrifugationtube filled with 10 ml HBSS and store on ice. Up to six brainsper tube can be pooled together.The next steps are performed in the cell culture hood.8. Wash the brain tissue at least three times with 7 ml of HBSS.This step will remove contaminations such as blood, pieces ofmeninges, etc., and reduce microbial load by dilution. If thepreparation took longer and was performed in an unsterileenvironment, more washes are recommended. To wash,remove the supernatant and add 7 ml of HBSS. Close thecentrifugation tube and reverse it twice. When the brains havesettled down, remove the supernatant, and repeat the nextwashing step as desired. After the last wash, leave 1–2 mlsupernatant to cover the brains.9. Trypsinize the brain tissue by adding 1 ml of 0.25% trypsin inHBSS and 50 m l of the DNase solution. Incubate the brainswith trypsin and DNase for 5–10 min at room temperature.During the incubation agitate, the centrifugation tubes a fewtimes to ensure good trypsinization. Several other enzymepreparations have been used such as collagenase or dispase.554 Microglia Cell Culture: A Primer for the NoviceSome protocols actually perform the dissociation step enzyme-free, and some combine a mincing step with enzymatic diges-tions. There are pros and cons for each approach. However, we have found that the procedure we describe is a good compro-mise between speed and consistent results.10. Stop the trypsinization by adding 10 ml of DMEM/10%FBS. At this point, a jelly-like band might enwrap some of the tissue. This is DNA from broken up cells. This is more fre-quently the case, if a strong mechanical force is used, and can be countered by adding more DNAse. However, generally this should not be necessary, and it is usually a sign that either the trypsinization was too long or the DNase had expired. 11. Wash the tissue twice with HBSS as stated in step 9. After thelast wash, keep 5 ml of supernatant. This amount of volume can be adjusted to match the number of brains used.12. Homogenize the brains by pipetting with either serologicalor fire-polished Pasteur pipettes of decreasing opening dia-meters. Care has to be taken to avoid bubbles, as this will reduce cell viability and yield. A fine line has to been walked between pipetting often enough to break up the tissue and pipetting too often, thus killing cells because of the shear forces in the pipette tip. This is the most critical part of the preparation and is indeed more an art than a science. We rec-ommend limiting the homogenization to only two fire-pol-ished Pasteur pipettes for a maximum of five pipetting steps each time. It is better to err on the side of still having some undissociated tissue, than to homogenize too much and kill liberated cells. Again, if in this step jelly-like bands or clumps are observed, more DNase can be added.13. Filter the cell suspension is through a 100-m m cell strainer.This step will remove larger undigested clumps. After trans-ferring the cell suspension, the cell strainer can be washed with additional DMEM + 10% FBS to increase cell recovery from the cell strainer.14. Centrifuge the cell suspension for 10 min at 200 × g. Discardthe supernatant and resuspend the cell pellet in 10 ml of DMEM + 10% FBS + P/S. Add the cell homogenate to the flasks in an amount that correspond to three whole brains for one 75-cm2 flask.15. Incubate the cell culture flasks at 5% CO2and 37°C. Thecultures will look rather cloudy because of a lot of debris in the supernatant.16. Live cells will attach within hours. One considerable differ-ence among different protocols is what happens next. One school of thought suggests removing debris after overnight incubation, arguing that the myelin in the debris is toxic to56 A. Witting and T. Möllerthe cells and should be removed as soon as all cells have safelyattached. Others argue that leaving debris around will stimu-late microglial proliferation. Both arguments are most likelycorrect. The important point, as actually in everything relatedto microglia culture, is consistency. If you decide to removedebris at, let us say DIV 2, then always remove it on DIV 2.Changing these seemingly unimportant, early parameters canlead to variable result later on.17. After 24 h, wash the attached cells three times with PBS, thenadd 12 ml of DMEM + 10% FBS + P/S. After about 7 days inculture, an astrocyte monolayer with a few microglia on topwill form. Frequency of medium change is also at varianceamong different protocols. We found that keeping the initial12 ml of medium until DIV 7 yields good results. However,other laboratories immediately start with a 3–4 day mediumchange cycle. In general, the longer you maintain the cells inthe same medium (without depletion of nutrients!), the morethe cultures get conditioned by factors secreted from the astro-cytic monolayer. This seems to have beneficial effects on micro-glial cell yield. One frequently employed alternative is the useof growth factors to increase microglia yield (see Note 6).18. Depending on the details of the preparation (number of brainsper flask, medium change frequency) 10–20 days after thepreparation, a larger number of microglia appear on top ofthe astrocytic monolayer. In mouse-derived cultures, micro-glia usually remain attached to the astrocytes, in rat-derivedcultures the microglia tend to float in the supernatant.19. To collect the microglia cells from a primary culture flask, col-lect the loosely attached microglial cells by gently shaking theflasks for 30 min on an orbital shaker at 37°C. Alternatively,the flask can be tapped on the side with the flat hand withmedium intensity for 5–10 times in a way that does not inducefoaming of the medium. A quick inspection with a micro-scope will indicate whether microglial cells are successfullydislodged and can be collected from the supernatant. Similarto the trituration of the CNS, this process is more art thanscience and needs to be perfected by iteration. Too lights haking will cause microglial cells to stay attached, while toovigorous shaking will also dislodge oligodendrocytes. A fur-ther consideration is the need to strike a balance for currentmicroglial yield and leaving enough cells remaining in theflask to repopulate the primary culture. While there is ongo-ing discussion whether the actual microglial cells proliferateor if the cell culture contains an actively proliferating micro-glial precursor, it is clear that removing too many cells willreduce the repopulation rate (see Notes 6 and 7).574 Microglia Cell Culture: A Primer for the Novice20. Collect the supernatant in a centrifugation tube, and c entrifugefor 10 min at 200 × g. Because microglial cells reattach veryquickly, it is important to collect the supernantant immedi-ately after shaking the flasks. Primary mixed CNS cultures arerefed with 12 ml DMEM + 10% FBS and the flasks are placedback in the incubator. Microglial cells will continue to prolif-erate and the flasks can be shaken off again after 5–7 days.The yield of microglia will decrease significantly with everyshake off and after the forth shake off the microglia yield willbe usually very low.21. After the centrifugation, carefully remove the supernatant.Resuspend the microglial cells in the pellet with a fire-polishedPasteur pipette in DMEM/10% FBS, and plate them into theappropriate cell culture dish or multi-well plate by addingthe appropriate amount of cells (see Note 8) and the mediumof choice (see Note 3). Cells can be used for stimulationexperiments (see Notes 9 and 10) or can be transfected foroverexpression or knock-down studies (see Note 11).4. Notes1. Many protocols use phosphate-buffered saline (PBS) orDulbecco’s Phosphate-Buffered Saline (DPBS) as basis forthe digestion solutions. We prefer Hank’s buffered salt solu-tion (HBSS). While different in salts, the main difference isthe presence of glucose in HBSS, therefore providing anenergy source for the cells. Trypsinization is affected by thepresence of divalent cations and the use of buffers withoutcalcium and magnesium might increase trypsinization. Onthe other hand, optimal DNase activity requires buffers withcalcium and magnesium. Again there is no right and wrong.However, being cognizant of these underlying mechanismswill allow for efficient troubleshooting.2. The use of penicillin and streptomycin in cell cultures is stan-dard operating procedure (SOP). It prevents the hostile take-over of the cultures by microbes carried in from the preparationor due to unsterile work practices. This SOP indeed seems likea good thing. However, even low levels of bacterial contami-nation will activate the microglial cells in culture. So, a con-tamination kept in check by antibiotics might give theimpression of a healthy culture, while the cells are actuallyactivated by bacterial products. This would indeed confoundresults. Therefore some laboratories, prefer to work withoutantibiotics. However, this is not without risk either. Low-levelcontamination could be cleared by the cells themselves (after58 A. Witting and T. Möllerall, they are phagocytes) appear healthy but are activated by bacterial products as well. Additionally, cultures where a con-tamination could have been easily eliminated by antibiotics could be lost due to unchecked bacterial growth. Our approach is to work in the cleanest possible conditions, thus reducing the risk of contamination from the preparation, and the need to “clean” the cultures with antibiotics. If a given primary culture leads to experimental outcomes, which substantially differ from the data usually produced in the laboratory, a low-level contamination might be a potential explanation.3. One important difference between microglia culture proto-cols, and most likely the one which might be at the root of the large body of divergent data on microglia responses to a given stimulus, is the medium microglial cultures are main-tained in-culture medium with or without serum. Serum was the decisive factor which actually enabled the successful cul-turing of cells. It is the major source of nutrients. However, based on its biological nature, it is also the most variable com-ponent in a cell culture medium. The virtues of testing and banking serum lots are discussed at length in any basic cell culture hand book and will not be repeated here. And while the actual source, lot and repeated freeze/thaw cycles of a given FBS bottle will certainly influence the culture condi-tions, it is self-evident that the absence or presence of serum will have a much more profound effect on cells. The most commonly acknowledged reason to culture cells serum free is to synchronize cells and arrest them in G 0/G 1 phase (33). This is virtually true for all cells. However, there are other issues worth contemplating when culturing micro-glia. Microglia reside behind the blood brain barrier. The only time these cells are exposed to serum components is dur-ing break down of the blood brain barrier, for example, dur-ing stroke, trauma, or in active multiple sclerosis regions. Indeed several serum components have been identified as microglia-activating signals (1, 34–36). This could lead to an increased baseline activation of the cells. Proponents of serum in the medium would argue that cell culture is artificial in the first place and that there are no resting microglia in a culture dish anyway (see below for more detailed discussion on the microglial “activation state” in vitro). To our mind, there is no right or wrong in this discussion. As with everything we stressed before, consistency is the most important message. However, when interpreting own results in context of the literature it is very important to pay attention to this detail. For example, there are broadly diverging data on the sensitiv-ity of microglial cells to lipopolysaccharide (LPS), the arche-typical activator of toll-like receptor (TLR4). While it is now appreciated that not all LPS is created equally potent (seeNotes 5 and 9), it is now also well understood that serum contains LPS binding protein (LBP). LBP, together with CD14 on the cell surface, leads to optimal presentation of LPS to TLR4 and increases cell sensitivity to LPS by 2–3 orders of magnitude (37). Similarly, serum might contain cofactors for other agonists and/or receptor systems or rather unselectively serve as a priming signal for an unrelated trigger.Because of the many potential pitfalls with serum-contain-ing medium, many laboratories and commercial sources have developed serum-free alternatives. For microglia, approaches developed for peripheral macrophages have been successful adapted. While it is certainly possible to culture microglia in unsupplemented DMEM, cells do not survive long. Serum withdrawal is also a common way to induce autophagy (38) and the induction of autophagocitic pathways in serum starved microglial is a concern. Most laboratory-derived serum-free media start with DMEM, supplemented with serum albumin (bovine or human, usually 1 mg/ml), insulin, transferrin, and selenite. The latter three are readily available as an ITS supplement, making this a convenient and inexpen-sive alternative to commercial media.Of the many commercial serum-free media, the Macrophage Serum-free Medium from Invitrogen and Mediatech’s Cellgro COMPLETE TM Serum-Free/Low-Protein Medium are of note. While the former is specially formulated for mac-rophages both allow for ready growth of microglial cells without further supplementation. The compositions are pro-prietary, however, one can enter in an agreement with the respective supplier to get information on the ingredients (not concentration) of the media, (e.g., if one needs to determine the presence of a specific factor). We have had excellent expe-rience with Invitrogen’s Macrophage Serum-free Medium and it is our (pricey) medium of choice.4. Polystyrol culture flasks or plates should be coated with sub-strates that facilitate the attachment of cells. Usually poly-d-lysine (MW 30,000–70,000; 70,000–150,000; >300,000) or poly-l-lysine (MW 70,000–150,000; 150,000–300,000) are used for the attachment of the primary mixed CNS cultures. When it is required that poly-lysine is not metabolized by the cells, poly-d-lysine is preferred. Instead of poly-d/l-lysin, poly-l-ornithine (MW 30,000–70,000) can be used. Our observation is that with a poly-ornithin more microglial cells float in the supernantant of the primary mixed cultures. Pure microglia cultures can be plated without coating on pre-treated polystyrol flasks or specialty cell culture ware such as PRIMARIA TM, (Becton Dickinson) or Cell+(Sarstedt).。
微管实验protocol中文版
五、注意事项
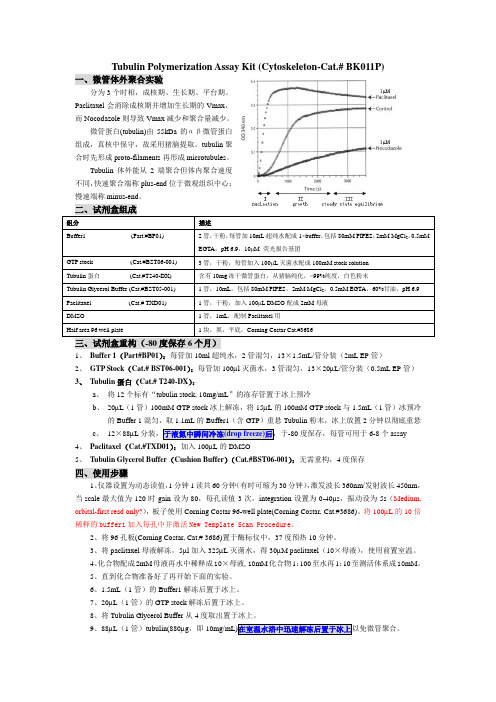
注 1:10×inhibitor 阳性对照:5L 的 5mM 氯化钙溶液或 30M Nocodazole/vinblastine(长春碱) /colchicine(秋水仙素) ;10×enhancer 阳性对照:30M Paclitaxel,kit 中初始浓度为 2mM。 注 2:8 个孔内可单道加,1 分钟加完;超过 8 个孔需排枪加;适中快速且贴着孔壁较低的位置排液, 避免产生气泡,可用 2mg/mL 的 BSA 蛋白溶液练习。 注 3:标准的反应体系包括 2mg/mL 微管,80mM PIPES pH6.9,2.0 mM MgCl2,0.5mM EGTA,1.0mM GTP 和 15%甘油。要优化对 inhibitor 的检测采用 20%甘油,检测 enhancer 则采用 15%甘油。 注 4:微管必须放冰上直到加入 96 孔板 assay ,在加入微管前预热 96 孔板。 注 5: 微管要在分装前在液氮中速冻后再置于-80 度干燥保存; 且冻存前微管蛋白浓度要大于 6mg/mL 。 注 6: 测活标准条件是 2mg/mL 微管+1mM GTP+15%甘油的 Buffer 1 。促进解聚采用更高浓度微管蛋 白产生高信号;促进聚合不用/用低浓度甘油有助于检测,如不加甘油微管不会聚合而 paclitaxel 则会促进 聚合。如果要找通过结合微管疏水口袋而促进微管解聚化合物则可不加甘油并增加微管含量或者使用 MAPs(不是通过与微管疏水口袋结合而是通过离子性结合) 。 注 7:1 个单位的微管(100g,55L)加入 1 个孔,于 30 分钟后达最大荧光值(强度增 3~4 倍)。
干粉受潮所致2聚合时严格控制在37度测活前96孔板预热至37度若室温则微管成核时间加长3甘油浓度对聚合影响很大确保反应中含有甘油4微管蛋白浓度对聚合影响很大差的聚合反应可能是由于浓度低于2mgml对照聚合存在稳定的差异由于加蛋白慢导致先加的孔在最后的孔加完之前已开始聚合这常常是超过8个样品而使用单通道移液枪所致1加快加样2多通道排枪加样聚合曲线波动气泡导致小心加样避免气泡
美国药典微生物限度检测

61微生物限度检测(MICROBIAL LIMIT TESTS)此章提供方法来检测可能存在的好氧微生物其他制药过程中可能出现的微生物的数量,包括原材料和成品中的。
如果经过验证确认可以得到相同或更好的检测结论,也允许采用自动化的检测方法。
在样品检测过程中须进行无菌操作。
若无特别说明,则“培养(incubate)”一词指在30—35℃的培养箱内培养24至48小时;“生长(growth)”一词用于专门的判定,说明“存在和可能存在活的微生物”。
准备实验 (Preparatory Testing)本章涉及实验结果的有效性取决于:提供的被检测样品本身在实验条件下,被充分证明不会抑制可能存在的微生物的生长。
因此,在准备样品时,需要正规的实验操作和符合要求的实验条件,接种稀释样品到含有以下(微生物)培养物的培养基:金黄色(奥里斯)葡萄球菌(Staphylococcus aureus),大肠埃希氏菌(Escherichia coli), 铜绿假单胞菌(Pseudomonas aeruginosa), 和沙门氏菌(Salmonella)。
方法如下:将用肉汤培养基培养24小时后的(微生物)不小于10-3稀释的微生物培养物,加1 ml(微生物)培养液到磷酸(盐)缓冲液(pH 7.2),液体大豆酪蛋白消化物培养基(Fluid Soybean-Casein Digest Medium),或者液体乳糖培养基(Fluid Lactose Medium)。
相应培养基培养失败则需要采取以下方法更改检测程序:(1)增加稀释液体积,检测样品加入量仍维持不变;或者(2)中和一定数量的干扰因子;或者(3)结合(1)、(2)得出适当条件,使接种物得以生长。
以下是一些物质的成分和浓度,该物质及浓度可用于加入培养基、阻止物质发挥抑菌作用:大豆卵磷脂(soy lecithin, 0.5%)或者聚山梨醇酯20(polysorbate 20, 4.0%)。
微生物检查采样流程

微生物检查采样流程英文回答:Microbial examination sampling process:Microbial examination is an important procedure in various fields such as medicine, food safety, and environmental monitoring. It involves the collection and analysis of samples to determine the presence and abundance of microorganisms.1. Sample collection:The first step in the microbial examination process is the collection of samples. This can be done using different methods depending on the type of sample and the purpose of the examination. For example, in medical settings, swabs or tissue samples are commonly collected from patients. In food safety, samples of raw materials, finished products, or environmental surfaces may be collected. Environmentalmonitoring may involve the collection of air, water, orsoil samples.2. Sample preparation:Once the samples are collected, they need to beproperly prepared for analysis. This may involve various steps such as homogenization, dilution, filtration, or centrifugation. The goal is to obtain a representative portion of the sample that can be easily analyzed for microbial content.3. Microbial analysis:After sample preparation, the next step is to analyzethe sample for microbial content. There are several methods available for this purpose, including culture-based methods, molecular techniques, and microscopy. Culture-based methods involve the growth of microorganisms on selective media, followed by identification and enumeration. Molecular techniques, such as polymerase chain reaction (PCR), allow for the detection and identification of specific microbialDNA or RNA sequences. Microscopy involves the direct visualization of microorganisms using specialized equipment.4. Data interpretation:Once the microbial analysis is complete, the obtained data needs to be interpreted. This involves comparing the results to established standards or reference values. For example, in food safety, the presence of certain pathogens may indicate contamination and potential health risks. In environmental monitoring, the abundance of certain microorganisms may indicate pollution or ecological changes.5. Reporting and action:Finally, the results of the microbial examination are reported to the relevant authorities or stakeholders. Depending on the findings, appropriate actions may be taken. For example, in medical settings, the identification of a pathogenic microorganism may lead to the implementation of infection control measures. In food safety, theidentification of contaminants may result in productrecalls or improved sanitation practices.中文回答:微生物检查采样流程:微生物检查是医学、食品安全和环境监测等领域中的重要程序。
微生物检测美国药典
微生物检测非无菌供试品的微生物检测:微生物计数检测修改:生长促进实验,计数方法的适应性以及阴性对照概论在供试品存在的情况下发现微生物检验能力必须被确定。
如果检验过程中发生变更或者供试品变更,且这些变更可能影响检验结果,适应性必须被确认。
检验菌株的准备使用稳定的标准菌悬液或者按照下面所述备制。
使用菌种保存技术(种子批系统),以便用于接种的可萌发微生物从最初的主种子批开始不超过5代。
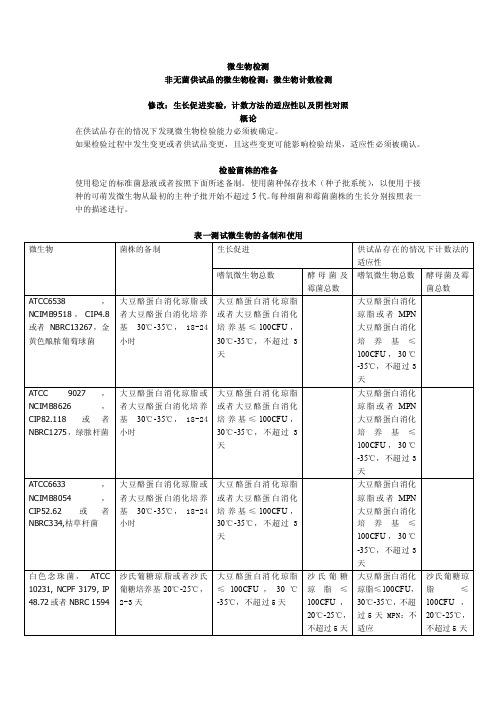
每种细菌和霉菌菌株的生长分别按照表一中的描述进行。
表一测试微生物的备制和使用使用pH7.0的缓冲氯化钠蛋白胨溶液或者pH7.2的磷酸盐缓冲溶液备制测试菌悬液;备制黑曲霉孢子悬浮液时,0.05%的聚山梨脂80可以被添加到缓冲液中。
测试菌悬液应在两小时内使用,或者在2-8℃的条件下24小时内使用。
也可以通过制备并稀释枯草芽胞杆菌营养细胞的新鲜悬液进行替代,制备稳定的胞子悬液,在接种测试中使用适当体积的胞子菌悬液,稳定的胞子悬液在2-8℃保存,保存期是经过验证的。
阴性对照为了确定检测条件,用选择好的稀释液代替测试备制来进行阴性对照。
必须没有微生物的生长。
当按照供试品检测中的描述进行检验时,也需要进行阴性对照。
如果阴性对照不合格需要进行调查。
培养基的生长促进检测每个批次的已经备制好的培养基以及通过脱水培养基或者描述的配料备制的每个批次的培养基。
在部分/盘大豆酪蛋白消化肉汤培养基以及大豆酪蛋白消化琼脂上接种少量(不超过100CFU)微生物,按表一中所示,每一种微生物应使用单独一部分/一盘培养基。
在沙氏葡萄糖琼脂上接种少量(不超过100CFU)微生物,按表一中所示,每一种微生物应使用单独的一盘培养基。
按照表一中所述的条件进行接种。
固体培养基的生长通过一个不大于2的系数的调节必须不能与标准接种体计算得到的数值有区别。
新鲜备制的接种体微生物的生长应与上一批通过检测的培养基的生长情形相同。
如果肉眼能清晰看到的微生物的生长与上一批通过检测的培养基的生长情形相同的话,液体培养基是适合的。
微生物培养基配制流程
微生物培养基配制流程英文回答:Microbial culture media preparation is an essential step in microbiology research and laboratory work. It involves the formulation and sterilization of a medium that provides the necessary nutrients for the growth and proliferation of microorganisms. The process can vary depending on the type of microorganism being cultured and the specific requirements of the experiment or study.The first step in preparing a microbial culture medium is to gather all the necessary ingredients. These typically include a carbon source (such as glucose or sucrose), a nitrogen source (such as peptone or ammonium salts), inorganic salts (such as magnesium sulfate or potassium phosphate), and any additional supplements or selective agents required for the specific microorganism being cultured.Once all the ingredients are gathered, they need to be accurately measured and weighed according to the recipe or formulation being used. It is crucial to follow the recipe precisely to ensure the proper growth of the microorganisms. Any deviation in the ingredient quantities can result inthe failure of the culture.After measuring the ingredients, they are mixedtogether in a suitable container, such as a beaker or flask. The mixture is then dissolved in distilled water or a suitable solvent to create a homogeneous solution. It is important to ensure that all the ingredients are completely dissolved to avoid any potential clumping or precipitation.Once the medium is prepared, it needs to be sterilizedto eliminate any potential contaminants. This is typically done by autoclaving, which involves subjecting the mediumto high pressure and temperature for a specific period of time. Autoclaving effectively kills any microorganisms present in the medium, ensuring a sterile environment for the growth of the desired microorganisms.After sterilization, the medium is allowed to cool down to room temperature before it can be used. It is important to cool the medium slowly to avoid any thermal shock that could affect the viability of the microorganisms.Once the medium is cooled, it can be dispensed into sterile containers, such as petri dishes or test tubes, depending on the intended use. The containers are sealed to maintain sterility and can be stored in a refrigerator or incubator until needed.In summary, the process of microbial culture media preparation involves gathering and measuring the necessary ingredients, mixing them together to create a homogeneous solution, sterilizing the medium to eliminate contaminants, and finally dispensing it into sterile containers. Following proper protocols and accurately measuring the ingredients are crucial for successful microbial culture.中文回答:微生物培养基的配制是微生物学研究和实验室工作中的一个重要步骤。
微生物发酵制药工艺流程
微生物发酵制药工艺流程英文回答:Microbial Fermentation for Pharmaceutical Manufacturing: Process Flow.Microbial fermentation is a metabolic process in which microorganisms, such as bacteria, fungi, or yeasts, areused to convert substrates into desired products. This process is widely employed in the pharmaceutical industryfor the production of various drugs, antibiotics, vitamins, and other bioactive compounds. The typical microbial fermentation process flow involves the following stages:1. Strain Selection and Optimization: The first step is to select the strain of microorganism that is most suitable for the desired product. This involves screening and evaluating different strains based on their productivity, efficiency, and stability. The strain may also begenetically engineered to enhance its performance.2. Media Preparation: The next step is to prepare the culture medium, which provides the necessary nutrients and growth factors for the microorganisms. The medium composition is optimized to support the specific metabolic pathways involved in the production of the target molecule.3. Fermentation: The fermentation process is conductedin bioreactors or fermenters under controlled conditions, such as temperature, pH, and oxygenation. The microorganisms are grown and allowed to carry out the biotransformation of the substrate into the desired product. The duration of fermentation can vary depending on the microorganism and the product being produced.4. Downstream Processing: After fermentation, the product is recovered from the broth through a series of downstream processing steps. This involves cell separation (e.g., centrifugation or filtration), product extraction (e.g., solvent extraction or chromatography), purification (e.g., crystallization or recrystallization), and drying.5. Quality Control and Assurance: Throughout the process, rigorous quality control measures are implementedto ensure the safety, efficacy, and purity of the final product. This includes testing for contaminants, impurities, and potency.Microbial fermentation is a versatile and cost-effective method for the production of a wide range of pharmaceutical products. By harnessing the metabolic capabilities of microorganisms, scientists can efficiently synthesize complex molecules with high specificity and yield.中文回答:微生物发酵制药工艺流程。
美国药典微生物试验说明
更為的是防止微生物生長
17/9
USP微生物相關
務必遵守章節
<51> 防腐效力/Antimicrobial Preservatives – Effectiveness <55> 生物指示劑–耐受力測試
Biological Indicators – Resistance Performance Tests <61> 非無菌產品的微生物檢驗:微生物計數試驗
而是通過適當滅菌工程或無菌充填過程確效, 並嚴格執行製程規定(cGMP)才可得到的。
–環境的微生物控制 –原料和組成分的微生物控制 –所有微生物控制的整合 –人員的微生物控制 –製程的微生物控制 –最終成品的微生物控制
33/9
無菌的概率possibility
每批產品的無菌性是根據概率推定的,即有產 品被污染的可能性也是微乎其微的
通常被接受的無菌保證度(SAL)是 10-6 的 微生物存活率或更低,即保證經滅菌的物品或 劑型中有活的微生物的可能性不超過百萬分之 一。
我們能做到比 10-6 更好嗎?
34/9
滅菌前的生物負荷
對熱不安定的物品,透過了解滅菌前物品的生物負 荷,經過 適當的時間週期,及足夠的滅菌前產品批 數,才足以建立滅 菌製程。
<2023> 非無菌營養和膳食補充劑 的微生物評估
19/9
EP & USP & JP 藥典方法的國際協合
International Harmonization of Pharmacopoeia
United States Pharmacopeia
European Pharmacopoeia
微生物培养基配制流程
微生物培养基配制流程英文回答:## Microbial Culture Media Preparation Process.Materials:Sterile glassware (e.g., flasks, beakers, graduated cylinders)。
Deionized water.Nutrient broth (powder or liquid)。
Autoclave.Magnetic stirrer.Hot plate.Dispensing bottles or tubes.Labels.Procedure:1. Calculate the required amount of broth powder: Determine the desired concentration of the broth (e.g., 1x, 2x, etc.) and calculate the corresponding amount of broth powder based on the manufacturer's instructions.2. Prepare deionized water: Measure the required volume of deionized water into a sterile flask or beaker.3. Dissolve the broth powder: Add the calculated amount of broth powder to the water and stir thoroughly using a magnetic stirrer until completely dissolved.4. Adjust the pH: If necessary, adjust the pH of the broth to the optimal range for the target microorganism using a pH meter and pH adjustment solutions.5. Autoclave the broth: Transfer the broth to an autoclavable flask or bottle and seal tightly. Autoclavethe broth at the appropriate temperature and pressure (e.g., 121°C, 15 psi) for the specified time (e.g., 15-20 minutes).6. Cool the broth: After autoclaving, allow the brothto cool to room temperature.7. Dispense the broth: Aseptically dispense thesterilized broth into sterile dispensing bottles or tubes.8. Label the bottles or tubes: Clearly label thebottles or tubes with the contents, concentration, date,and any other relevant information.Tips:Use high-quality ingredients and equipment for optimal results.Ensure that all glassware and equipment are sterilebefore use.Follow manufacturer's instructions carefully.Store the prepared broth at the appropriate temperature until use.中文回答:## 微生物培养基配制流程。
- 1、下载文档前请自行甄别文档内容的完整性,平台不提供额外的编辑、内容补充、找答案等附加服务。
- 2、"仅部分预览"的文档,不可在线预览部分如存在完整性等问题,可反馈申请退款(可完整预览的文档不适用该条件!)。
- 3、如文档侵犯您的权益,请联系客服反馈,我们会尽快为您处理(人工客服工作时间:9:00-18:30)。
1.解剖工具,移液器
2. 超净台中,HBSS 放冰上,通过倾倒,取50ml 在50ml 的tube 和 3个培养皿
中,同样放冰上。
3. 1ml 2.5% 的trypsin; 100ul 1mg/ml 的DNAse ; MSCF-median;1ml FBS (终止消化)
4. 2个100um的滤器,2个40um的滤器,75平方厘米的culture flask.
5. tryblue ,细胞计数板
解剖阶段:
新生老鼠(通常8-14只),断头,放入冰上的1号含HBSS的培养皿中,取大脑放入冰上的2号含HBSS的培养皿中,在2号培养皿中取皮质,皮质转移到冰上的3号含HBSS的培养皿中,3号培养皿(放小冰盒上)在解剖镜下,去血管膜。
得到的干净皮质放入50ml HBSS的tube.
消化阶段:
1. 在超净台中,倒掉tube中的上层液体(小心不要倒掉皮质),然后加HBSS
40ml, 拧紧盖子,上下颠倒摇晃,然后等皮质下沉后,再次倒掉上层液体,用来洗掉血液成分。
2 .加HBSS 至18ml, 用5ml的pipet吹打皮质成碎絮状
3 .另取两个培养皿,分别放1ml 2.5% 的trypsin和100ul 1mg/ml 的DNAse (先加入trypsin,然后往trypsin里加DNAse)。
4. 将18ml皮质悬液各取9ml于两个培养皿中,混匀,让组织与消化液充分接触,然后将两个培养皿放入培养箱37摄氏度30分钟。
离心+过滤阶段:
1.消化结束后,两个培养皿分别加入1ml FBS, 稍做吹打进行混匀,终止消化,将
2.个培养皿中的混合液分别转移到2个tube中,用HBSS冲洗培养皿,冲洗液也分
别转移到对应的tube 中(保证所有的组织和细胞都被转移),然后对tube 中的液体进行充分吹打(多吹25-50下)。
2 .1500 rpm+4摄氏度条件下离心10分钟
3 .离心后,倒掉上清液,加HBSS 10ml,用5ml的pipe吹打25次,通过100um的滤器过滤(原来两个tube的液体都过滤到一个新的tube中),得到的滤液通过40um的滤器再次过滤到一个新的tube中,得到滤液再次1500 rpm+4摄氏度条件下离心10分钟。
1.离心后,倒掉上清液,加MCSF-median 10 ml, 吹匀.
2. 取90ul tryblue于一个子弹头中,然后吸取10ul的细胞吹打液,于tryblue中混合均匀,取混合液10ul, 加入计数板。
3. 计数
(4个大方格总细胞数目/4)*10(稀释倍数,10ul细胞液稀释成100ul)*104(系统系数)*10(10ml细胞液)=10ml细胞液中的总细胞数目(通常每次得到20-80 million)。
种植+culture阶段:
每个75平方厘米的flask 种植20-30 million细胞(20ml MCSF),培养箱中培养10天,分离细胞当天4天后,开始换液体, 每次换液从flask中取出10ml,然后加入新的10ml (5ml不含MCSF+5ml含MCSF的median)液体. 培养期间自第四天换液体开始每天换液体(若细胞液体没有变黄色,可以不换),第10天harvest 细胞。
harvest 阶段:
1. 第10天,flask shake, 右手握住上壁,向下拍击左手掌,每20-30下后,显微镜下观察拍打情况,直到达flask底面上的光亮有立体感的细胞基本敲下,悬浮在液体中。
2 .吸取flask中的全部液体,转移到50ml tube 中,1200rpm+4摄氏度条件下离心10分钟; flask 中加10ml MCSF-median+10ml without-MCSF-median. 放入培养箱继续培养,10天后,2nd harvest, 然后扔掉不再用(每批细胞用2次)。
3. 离心后,到上清液, 每个tube加入without-MCSF-median 10ml, 吹打,把各个tube中的液体吹打均匀后合在一个tube中,后离心(用without-MCSF-median为了去除MCSF,因为得到的细胞将用于正式实验,不需要继续增殖分化)。
4. 离心后,去上清液,加without-MCSF-median 10ml, 吹打(多吹,争取得到多一些单个细胞,而不是成团的),计数(方法同上)。
5.根据不同实验需求密度,种细胞。
种好的细胞,放在培养箱里静置,半小时后,吸取液体,换上新的without-MCSF-median(去未贴壁细胞)
6. 正式实验,一般2-3天后开始用于实验。
所需药品:
1.HBSS, 1X , without calcium and magnesium , volume 500ml , Mediatech, Inc
2.DMEM, 1X, with 4.5g/L glucose, L-glutamine and sodium pyruvate, volume
500mL, Mediatech, Inc
3.trypsin, 2.5%, 10X, without calcium, magnesium, EDTA, phenol red; volume
100ml, HyClone Laboratories, Inc. Thermo Scientific.
4.Deoxyribonuclease I, from bovine pancreas, Sigma.(D4263-1 VL)
5.W/0 microglia median (MCSF-without-median):
50ml灭活FBS, 5ml Pen Strep (Gibco, 10,000 units/ml Penicillin, 10,000 ug/ml streptomycin), 1.25ml 200mM的L-glutamin (使用前,分装成1.25ml 在EP管中,因为它常温不溶与水中,所以配stock液体,和配W/0时都要在37摄
氏度水浴中几分钟,摇晃几下即可溶解。
), 全部放入500ml的DMEM中,终浓度分别为 FBS10%, 1% pen/1% strep, L-glutamin 0.5mM.
6.W/ microglia median (MCSF-median):
MCSF stock (浓度为 1mg/ml), 用W/0 microglia median进行1:1000的稀释. 通常配500ml的W/0 microglia median,取出200放在一个干净的flask里,然后加入20ul的MCSF stock液体,用完可以临时配。