西瓦产品培训手册
Elektra Micro Casa a Leva 培训手册说明书

Micro Casa a LevaTraining ManualContentsOverview 1Models 1Specifications 1Features 1Available accessories 1Package contents 2Leva parts 3Assembly 4Operating instructions 4Making coffee 5Procedure 5Frothing or heating milk 7Refilling the boiler 7Maintenance and cleaning 8Daily 8Weekly 8Background information 9Operating principles 9The group head 9Precautions 10Elektra srlVia a.Volta 18, 31030 Dosson di Casier (Treviso) Italy Fax. (39) 0422-490620 Tel. (39) 0422-490405–*******************Training manual – Micro casa a leva1ModelsAvailable in four versions: ▪ S1 Brass/copper ▪ S1CChrome▪ S1CO Chrome with Brass▪S1CB Chrome only machine with carry case. Includes an additional chrome boiler cover with Morano blue glass ball.SpecificationsWeight10 kg Boiler capacity 1.8 litres Height50 cm Base Diameter26 cmFeatures▪ Traditional lever extraction method ▪ Durable and hard wearing construction ▪ Easy to clean and operate ▪ Silent coffee extraction▪Powerful steam wand for creamy cappuccinos and smooth lattesAvailable accessories▪Dumping boxes, two types:▪ Coffee grinders, two models ▪ Cups, two types:TC (Cappuccino – Ivory)TE (Espresso – Ivory)▪Cleaning brush (SPA)Copper and brass finish (model MS)Chrome finish(model MSC)Brown wood base brass ball grip (SB) Black wood base, chrome ball grip (SBN)Training manual – Micro casa a leva2Micro casa a leva Instruction manual espresso coffee machinewith guarantee cardBoiler cover, handle (eagle or Morano blue ball) and brass bolt Boiler plug/ Pump leversafety release valvePlastic drip tray Brass or chrome drip tray coverCoffee handleSingle and double filter basketsDosing spoonTamperTraining manual – Micro casa a leva3decorative boiler cover handleboiler covermetal drip tray coverplastic drip trayswitch bolt to attach handle to coverboiler plug/safety release valveleversteam wandsteam wand tapfilter basketcoffee handleboiler pressure gaugeboiler water level gaugeelementindicator lightgroup head boilerTraining manual – Micro casa a leva41. Place plastic drip tray into position.2. Place chrome / brass drip tray cover into plastic drip tray.3. Attach lever handle securely.4. Place filter basket into coffee handle.5.Attach coffee handle to group head. 6. Attach eagle to boiler cover with metal bolt.1. Fill boiler with fresh, cold water until boiler level sight glass isnearly full. (For best results use filtered or bottled water.) 2. Screw the boiler plug/safety valve on securely (turn clockwise). 3. Place boiler cover into position.4. Ensure the steam wand tap is in the off position.5. Connect the electrical plug to a suitable 240V power outlet.6. Switch on power outlet, then switchon the machine at its on/off switch. A red lamp in the switch should glow, indicating power to the machine is on.The heating element indicator light will turn on and a soft boiling sound will be heard as the water heats. The element indicator light will go out when the boiler pressure reaches thegreen band of the pressure gauge (1–1.25 bars of pressure). This takes around 12 minutes. The machine isnow ready to make coffee.Screw pump lever clockwise into pumpand hand tighten.Steam tap in the OFF positionTraining manual – Micro casa a leva5Hot surfaces – some parts of this machine will become hot enough to cause burns, in particular the boiler and group head casings. The steam wand and boiler lid can also become too hot to touch. As well, if the machine is left on for extended periods (not recommended), the base can become uncomfortably hot.Boiler water level – it’s essential to ensure the boiler is never ▪ coffee beans freshly ground to the correct densityallowed to run dry, as the heating element will burn out.The main requirements for making good coffee are: ▪ filter basket filled with grounds to correct level, and evenly tamped ▪ correct temperature of the water passing through the grounds ▪cups, coffee handle and machine correctly heated.Procedure1. Ensure machine is warmed up , in particular the group head,coffee handle and filter basket. This can be done by placing the handle (fitted with a filter basket) into the group head, and pulling the pump lever down so water flows for about five seconds. Note: If there is no coffee in the handle, releasing the pump lever after pulling it down can cause the lever to return forcefully to the upright position, possibly causing injury. Hold the lever so it rises slowly . 2. Remove the heated handle/basket from the machine and: ▪To make a single cup — with the single cup filter basket fitted to the handle, add one level espresso dosing spoon of coffee grounds to the basket, and tamp down firmly. The tamped grounds should be approximately 4mm from the top of the basket. ▪To make a double cup — with the double cup filter basket fitted to the handle, add a level espresso dosing spoon of coffee grounds to the filter basket and tamp down firmly. Add another level dosing spoon of coffee grounds and tamp firmly. The tamped grounds should be around 4mm from the top of the basket, as below.The tamped coffee grounds should be around 4mm from the top of the filter basket.If too high, the handle won’t fit into the group head.hot4mmTraining manual – Micro casa a leva6Hold machine base and always keep elbow abovepump leverLever in fully loweredposition. Hold untilcoffee starts dripping. 3. Wipe off excess coffee grounds from the rim of the filter basket. 4. Fit the coffee handle securely intogroup head – to ensure it does not release during coffee extraction. Make sure the coffee handle is properly locked into position by moving it to the right to give a tight fit. Otherwise the handle can twist and release during coffee extraction. 5. Place coffee cup(s) onto drip tray. 6. Place one hand on the base of themachine to secure it. 7. Hold the lever with the other hand,keeping your elbow above the lever. 8. Push the lever down in a singlemotion while standing over the machine and keeping your elbow above the lever at all times. You’ll hear and feel water entering the group head chamber. 9. Hold the lever in this position untilcoffee begins to drip through. 10. Release the lever which will slowlyreturn to the upright position. 11. For more coffee, pull the lever downonce more. Wait for coffee to drip and release lever. The second extraction of coffee will flow more quickly.12. When the lever is fully raised, removethe coffee handle by slowly andcarefully pulling it horizontally to the left until a pressure releasing hiss is heard. Allow the pressure to slowly release to avoid splattering the coffee grounds. 13. Dump the used coffee cake into dumping box or by tapping thecoffee handle on a non-metal surface. 14. Rinse the handle/basket and return to the group head.Notes:▪ It normally takes 25–30 seconds to extract a shot of coffee. ▪Around 30ml of coffee is extracted per cycle of the pump lever.Make sure the coffee handle is securely fittedTraining manual – Micro casa a leva7You can froth or heat milk while coffee is being extracted. To do this: 1. Purge the steam wand of condensation by releasing steam into acontainer. 2. Fill a stainless steel jug with the required amount of milk. Avoidfilling jug much more than half way. 3. Immerse the tip of the steam wand into the centre of the jug, justbelow the surface of the milk. 4. Turn on the steam tap until you hear a soft “psst-psst” sound,which indicates the milk is being frothed. As the milk level rises, lower the jug to ensure the wand stays just under the surface of the milk to maintain the “psst-psst” sound. 5. When the milk is sufficiently frothed, lower the steam wand intothe milk to heat it. Move the wand around the milk to ensure even heating. Do not boil the milk!Correct temperature can be judged by holding your hand against the jug. When the temperature is too hot to the touch, wait four seconds or so, then turn off the steam.6. Remove the jug and immediately release a small amount ofsteam into a container to flush any milk deposits from the tip of the wand. Otherwise, the milk will dry, possibly blocking the wand and causing a health hazard. Also wipe the steam wand with a clean damp cloth to remove any milk before it dries.Refilling the boiler1. When the boiler level is less than a quarter full, turn off themachine. Then open the steam tap and allow all the boiler steam to release into a jug or suitable container.2. Remove the boiler cover. Use a cloth, as the cover will be hot.3. Carefully undo the boiler plug (it could be hot!), and refill theboiler. Replace the boiler plug and boiler cover and turn on the machine. It should be ready to make coffee in around five minutes.Turn steam tap on (as shown) and release boiler pressure untilgauge shows 0Training manual – Micro casa a leva8Daily1. Use a clean sponge, cloth or brush to clean the shower head andup inside the group head.Looking into the group head.Clean all parts, including the rubber sealing ringand the surface of the shower head.2. Place a cup onto drip tray and push the pump lever down to flusha small amount of water through the group head.3. Place a small jug of cold water under the steam wand and releasesteam to remove any milk deposits from the wand. 4. Wipe the surface of the wand with a soft damp cloth, including allgrooves or places where milk could build up. 5. Remove filter baskets from coffee handle and wash in warmsoapy water. Rinse them thoroughly under hot running water. 6. Remove the metal drip tray cover and plastic drip tray and washthem in warm soapy water. 7. Use a clean, wet paper towel or soft cloth to remove marks fromthe surface of the machine (while warm) and polish with a clean, dry soft paper towel or soft cloth. Do not use any alcohol, solvents or abrasive creams or cloths on the surface of the machine.WeeklyWith commercial espresso machine cleaning chemical1. Put three teaspoons of cleaning chemical into half a litre of veryhot water. 2. Place coffee baskets and handle into the solution to soak for 20 to30 minutes. Ensure that the bakelite part of the handle is not immersed in the solution.3. Rinse and wash all parts with warm soapy water.4. Rinse thoroughly in hot water.group headTraining manual – Micro casa a leva9 Operating principlesThe beauty of the Elektra Micro casa a leva is that it uses a traditional spring-loaded piston to produce the eight bars of pressure needed to pump hot water through the coffee grounds. The water in the boiler is heated to give a boiler pressure of around one bar of pressure. The boiler pressure is governed by a pressure release valve (called a pressure-stat ) that allows maximum pressure to be reached regardless of the boiler water level.The spring-loaded piston is compressed by pulling a lever down. This allows the pressurised boiler water to enter the group head chamber. When the lever is released, the spring causes the piston to return to the upright position, forcing water through the coffee grounds to extract a true flavoursome espresso.This machine allows the user to extract coffee and froth/heat milk at the same time.The group headThe coffee handle fits into the group head, with water flowing through a “shower screen”, as below. If the basket is too full, the grounds will press against the shower screen, stopping the handle from being fitted to the group head.Coffee handle and group head.Water passes through the shower screen to give aneven flow of water through the coffee grounds.The coffee handle has two lugs either side that locate into two slots in the group head. The handle is fitted by aligning the lugs and slots, then pushing the handle up so it can be twisted to the right.When the coffee handle is fitted into the group head, a rubber ringinside the group head seals against the top of the filter basket. It’stherefore important to make sure the top of the filter basket isclean and free of coffee grounds . Otherwise leakage can occur, and in some cases the rubber seal can become dislodged due to a build-upof coffee grounds behind the seal.Training manual – Micro casa a leva10▪Place machine on a suitable surface – which should be firm and low enough to allow easy operation of the pump lever. When you are pulling it down, your elbow should be above the lever at all times to give best control.▪The boiler plug/safety release valve– which should be firmly screwed into the top of the boiler before the machine is switched on. This device incorporates a pressure release valve (pressure stat) to regulate the boiler pressure. It should only be tightened by hand, as over-tightening can damage the valve. Turn the plug clockwise to tighten.▪When refilling the boiler, make sure all pressure has been released before removing the boiler plug.▪Other precautions are shown elsewhere, indicated with an exclamation symbol.Precaution symbolThe boiler plug, safety release valve.Turn clockwise to tighten.。
屋面瓦知识培训

3、结构效果 从结构划分:瓦分为主瓦和配瓦,配瓦有脊瓦、排水
瓦、收边瓦等等。
的恒 十大 种专 色用
3、结构效果 从效果划分:烧结瓦分有光亮、亚光、无光和复合混色等。
3、结构效果 从效果划分:烧结瓦分有光亮、亚光、无光和复合混铺等。
烧结瓦 西瓦
烧结瓦是由粘土或其他无机非金属原料,经成型、烧结等工艺处理,用于建 筑物屋面覆盖及装饰用的板状或块状烧结制品。通常根据形状、表面状态及吸水 率不同来进行分类和具体产品命名。
过磅称重
配料
原料输送
球磨:配料好后进行球磨, 经过球磨,配料能完全均 匀混合,细度降低,使西 瓦具有更高地强度和更低 的吸水率,提高产品的抗 冻性。
脱水滤干:球磨好的浆料 进行脱水、滤干,以使泥 料更快风化。
风化:为了使泥料成分更 加均匀,包括水分达到成 型所需的最佳含量,一般 含水量在15%-20%是最佳 的风化效果。
搅拌挤出:这一工序是 为了细化泥料,使泥料 成分更均匀,特别是大 的颗粒及水分不均匀的 部位,在这里得到均化 处理。
压机成型:挤出的坯体 输送到压机成型,一般 使用模压成型,磨具使 用钢模。压机压力一般 在80吨左右。
干燥施釉:成型后的瓦 坯通过机械手吸到架子 上,输入干燥窑进行干 燥,干燥时间12小时左 右,这个工序为了使瓦 坯干燥,便于施釉,施 釉采用淋釉。
干燥烧成:施釉之后再进行一次干 燥,干燥时间12小时左右,目的是 为了排除过多的水分,为下步的烧 成做准备。 烧成采用隧道窑烧成,温度1100摄 氏度左右,时间10小时左右。
成品验收:出窑炉产品按品质要求 进行表面效果、色差、承载力、吸 水率等的检测。合格产品入库。
水泥瓦
水泥瓦也叫混凝土瓦,是用水泥、石英砂、粉煤灰、凝固剂按配比混合后压 制而成。按不同要求表面可喷涂不同颜色的涂料,得到丰富多彩的装饰效果。
ATLASROCD7液压露天钻机培训课程(24页)
3、D7基本特点介绍
D7钻机的基本特点
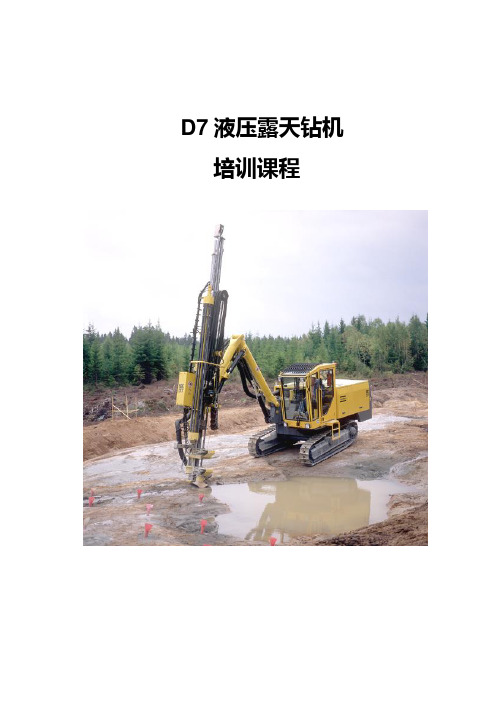
D7是目前世界上较为先进的一种全液压顶锤式露天钻机,适用于露天矿山生产、建筑工程中的土石方开挖、采石场取料及边坡处理等各项工作,其钻孔孔径范围φ64-φ115。该设备已在国内广泛应用,深受用户欢迎。
一、基本工作叁数
D7是单人操作、柴油发动机驱动的全液压顶锤式履带行走露天钻机,有带驾驶室式和不带驾驶室式可选。钻孔直径范围从φ64-φ115,这表明D7的适应工作范围很广,该钻机钻孔深度最大可达29m,一次定位工作覆盖面最大可达17㎡,能够钻自0.3-7.6m范围的水平孔及各种角度的孔,其能力是同类产品中较大的。除上述优越的钻孔能力,该机还配置了一系列钻进保护装置和功能,因此在钻同样深度的炮孔时,D7的钻孔速度、精度及偏斜度要更优越。D7钻机宽度不足2.4米,底盘离地间隙455,驱动力达110,意味着其更能适应狭小恶劣地段的工作,其配有自动接换杆装置,使得操作者得以从繁重的劳动中解脱出来,从而大大节省人工,提高生产率。
二、D7钻机的基本结构和性能特点介绍
1、D7-11基本机构
1、空压机2、柴油发动机()3、电器柜
4、驾驶室5、打钻控制盘6、钻臂
7、推进梁8、钻杆夹持器9、履带行走架
10、液压泵11、集尘器12、卷扬机
13、发动机水箱散热器14、空压机油、液压油冷却器
15、机械化换杆装置
备注:D7-11中“-11”是指折叠臂带驾驶室型,是我们实际使用的的特点以及反映在操作中的顺序控制
五、维护、保养和操作
六、实际使用注意要点
一、钻机的工作方式、打钻的基本原理
1、钻机的工作方式及分类
按照工作机构动力,可分为液压式、风动式、电动式、和内燃式。液压凿岩机由于钻孔效率高、消耗能量少、噪音低等优点而得到广泛应用。
种产品培训资料(东西贸易)
• 把引流管固定在胰管时,要确实进行且不压迫引流管,引 流管内腔因受压迫而不通畅时,会有无法引流胰液而导致 缝合不全。
•1 外径的尺寸齐 全,可以满足 不同手术的需 要。
SB排液包的特点:
• 6.专门设计的便携包
•附有背带,无论是悬于 床边或患者步行携带均 可使用。
•便携包的三面均不透明, 看不到里面的内容,保 护患者隐私。
超光滑型引流管
•顺畅的插入性 因采用了柔软的硅橡胶 而对组织的刺激减少。
•顺畅的排液性 在折翼结构上、采用了 两个流道,更设有傍通 孔、可以着实地引流。
RTBD管的构造图
RTBD引流管的特点1
• 为便于插入 肝内胆管, 配有可弯曲 成适当角度 的特殊铝制 导引针。
RTBD引流管的特点2
• 导引针的尖端 为塑料或铝制 无锐角,已制 成不易损伤胆 管或肝内血管 的圆头。
RTBD引流管的特点3
• 导引针与 引流管的 接缝平坦 光滑,便 于引出。
RTBD引流管的特点4
胰管引流管的使用方法5
• 在针的联结部 附近剪断引流 管,将附带的 金属联结器插 入引流管。
• 将金属联结器 与排液包联结。
• 约经过4周后, 慢慢拔出引流
管。
重要注意事项1
• 用钳子夹引流管时,注意不要损伤引流管。一旦损伤引流 管,拔管时引流管有破裂折断的可能。
• 请不在引流管的凸出部分尚未插入胰尾侧深部时就进行缝 合固定。否侧会引起缝合不全的危险。
※请将引流管深插入Y型联结管,防止脱落。
双管引流使用说明图
1.从体表向体内穿刺。 2.向体内引导创伤引流管。 3.剪断创伤引流管吸引部分。 4.从体内向体表穿刺,引导创伤引流管。
【VIP专享】西瓦产品培训手册

西式瓦产品培训手册编制单位:四川省新兴瓷业有限公司目录<一>西瓦产品简介......................................- 1 -1、什么是西瓦......................................- 1 -2、西瓦的优点......................................- 1 -3、西瓦的来历以及国内外发展情况....................- 2 -4、西瓦的发展前景..................................- 2 -<二>产品知识..........................................- 3 -1、生产状况........................................- 3 -2、西瓦产品分类、标识和规格........................- 4 -3、西瓦的施工方法..................................- 6 -<三>西瓦销售的计件算法................................- 7 -<四>西瓦销售特点及注意事项............................- 8 -<一>西瓦产品简介1、什么是西瓦西瓦,是西班牙瓦的简称(英文名 Spanish Roofing tile),因其外型象英文字母“S”,所以俗称又叫S瓦(市面上还有其他俗称,如川渝等地叫大波瓦,江浙等地叫曲瓦)。
西瓦是一种以红坭、黄坭、岗砂按比例来配备原料(或按客户的要求成色来配比),经过陈腐加工、挤出冲压成型、干燥施釉(有釉产品) 、二次干燥后,进窑炉煅烧而成的烧结彩瓦。
它是一种现代流行的具有欧洲风格的健康环保的屋面装饰瓦。
※什么是烧结瓦?烧结瓦是由粘土或其他无机非金属原料,经成型、烧结等工艺处理,用于建筑物屋面覆盖及装饰用的板状或块状烧结制品。
SUNGROW下一代产品培训说明书
SUNGROW NextGen Product Training Lecturer: Graham SmithDate: June 2018DisclaimerThe following presentation is intended as a guide to the benefits, and the install and commission of the New Generation Sungrow Crystal and PowCube 4.8 systems.It is not a statement or advice on any of the Electrical or Solar Industry standards or guidelines.Please observe all OH&S regulations when working on Sungrow equipment.Contents010203 NextGen Crystal Series NextGen ESSService & Warranty01Crystal SeriesNextGen Crystal Series Overview - Improvements- Built-in LCD- Easy set-upWi-Fi monitoringOptional Export Controlwith single and 3 phaseEnergy Meters- 98.2% Max efficiencyfor single tracking- 98.4% Max efficiencyPlug & Play connectionWhy NextGen Crystal Series?Easy to install and commission Flexible configuration with single phase or three phase meter solutions Optional ‘Export Control’Easy troubleshooting for installers, with smart monitoring solutionsElectrical ConnectionSimply plug in the DC and AC connectors and switch on:Easy Connection of the Energy Meter (single phase shown) Connection in the switchboard side Connection on the inverter sideCommissioning Overview• Commissioning is simple• Switch the inverter on and allow to go through start-up• Enter into the menu and make any changes as necessaryCommissioning – a few simple stepsStep 1: Set the date and time (important if loggingvia Solarinfo Bank)Step 2: Check/Set the country (AU Default) – AS4777Step 3 (optional): Set the network parametersExport Setting (Only if Sungrow energy meter installed)• Enter the settings• Password 111• Select Zero Export function:– Off: All power will be exported to the grid– On: No power will be exported to the grid.– Partial: Select percentage of total power tobe exported to the grid.• Press ‘Enter’ to save.Monitoring Solutionsª App and web portal solutions for end users and installers (free) ª Local access and online monitoring via App (SolarInfo Home)ª Easy set up of account on ‘SolarInfo Bank’Router CloudWebInverter Wi-FiModule RS485Wi-Fi Net/4G/Wi-FiSmartphoneAPPMonitoring for CustomersMonitoring for Troubleshooting (Installers)NextGen ESS02Why NextGen ESS? Outstanding featuresEasy to install and commissionFlexible configuration for different installation applicationsEasy troubleshooting for installers, with smart monitoring solutions• New look SH5K-20 Hybrid Inverter plusan Energy Meter (single phase or threephase (optional))• The STB5K - 20 EPS Box• Up to 3 SBP4K8 Batteries (3*4.8=14.4kWh)• Modular - Allows flexible install optionsThe PowCube System – ComponentsThe PowCube System – Features• Suitable for retrofit with existing systems • Can run in EPS (off-grid) mode• True Hybrid – AC and DC charging• Single or 3 phase installation• Flexible installation options• Up to 14.4 kWh storageFlexible ConfigurationStandard Energy Storage System AC Charger System Retrofit Solar System 1 (without solar) Retrofit Solar System 2 (with solar)PowCube 4.8 SystemThe PowCube 4.8 is not just a battery storage system, it can also run in ‘EPS’ mode.PowCube 4.8 SpecificationsHybrid inverterMax. PV input power 6500 W Nominal AC output power 5000 W EPS output5000 W EPS output (with battery only) 3000 W Max. efficiency > 97.7 % Weight22 kg Ingress protection ratingIP65 BatteryBattery type Li-ion (NMC) Energy capacity 4.8 kWh ScalabilityUp to 14.4 kWhDepth of discharge (DOD) > 95% Weight48 kg Key ComponentsSH5K-20Batteries Compatible with the SH5K-20v Sungrow / Samsung SBP4K8 Li-ion v LG Chem Li-ion (LV) v BYD Li-ion (LV) v Pylon Li-ion v GCL Li-ion v Lead Acid 48VPylon/GCLLG ChemSungrow SamsungBYDLead Acid• 5 kW from PV + Battery • 3 kW from Battery only • ‘Reserve Capacity’ function available EPS in Off-Grid modeAt zero grid, EPS box decouples from grid.EPS box sends a signal over control wires and invertergoes into 'Off-Grid' mode.Grid presence signals also come from the Energy Meter.When grid re-establishes, EPS box couples with grid andinverter resumes grid-connected modeDCAutomatic changeoverswitchACNo Grid!ACDCHouse loads i.e. Power, StoveEmergency Loads i.e. Fridge, LightsFeatures - Emergency Power Supply (EPS)A “Reserve Capacity” can be setfor EPS use.Reserve capacity set at for eaxmple 10%+-*Reserve capacity only available in 'Off-Grid' mode and w ill not be used for day-to-day battery cycling.Total capacity 4.8 kWh Reserve Capacity @ 10%Daily cycle availableUsable Capacity 4.56 kWh95% DODFeatures - Easy to Connect Battery• Power and data connections at both sides Array allow flexible install options• Also allows daisy chain connection• No DIP switches• 48 kg• Free standing or wall mount with optionalshelf• SH5K-20 will automatically detect battery type (Li-ion)Features - Retrofitting System• No need to upgrade the existing system • Can be installed with or without new solar PV• Will allow AC charging from existing systemFeatures - Three-phase meter (optional)ª Increase Self-consumption of a three-phase property with a three-phase meter for net meterThe new SH5K+ Inverter is simple to connect with new spring-clip connectors for the Data cables.Spring-clipRemovable coverInstallation - BatteryC A N L* Communication cableincluded in the packageInstall the communication cableInstall electrical cablesConnection with Sungrow Samsung Battery• Modular design of the inverter and battery• Suitable for both free-standing and wall-mountable installations • Simple setup for multiple battery packsConnection with LG Chem Batteryv LG Chem RESU Gen II (range from 3.3 kWh to 19.6 kWh )v LG Chem RESU Gen I (range from 6.4 kWh to 12.8 kWh )Connection with BYD Batteryv Compatible with 8 BYD batteries(2.5 kWh U3A1-50P-A) up to 20kWh• Automatically senses Li-ion battery type during setup• Inverter automatically ‘wakes up’ battery Easy Battery Setup• Lead Acid 48 Volts – Manual parameter setup by accredited installerCase StudiesMonitoring featuresInformationSystemPVBatteryGridHouseSolarInfo MoniAccess to Data and AlarmsMonitor Import Power to assist battery up-sellService &Warranty03Service NetworkCall centerremotely assist customers throughout Australia Service c ontractors located in major capital cities for field service supportRepair workshoptest and repair faultyinvertersSpare parts warehouse manage backup inverters, spare parts and outbound & inbound logistics 43Warranty Process – On Line44• Technical support hotline• • Sydney based training centre • capitals• and training centreHotline+61 1800 786 476 Email************************.au*********************.au Sungrow has an extensive knowledge base available on the web page.Visit .au© 2018SUNGROW Confidential。
ROEDERS 公司内部培训手册
维修部内部培训手册此次培训为期两周,安排如下:第一天培训内容:a). ROEDERS机床功能概述。
1.罗德斯公司创于1789年,一直从事锡蜡模具生产,于80年代未开始自行开发新机床,以应付模具生产需求,有超过200年模具生产经验,于1994年生产出世界上第一台高速加工中心.2.罗德斯公司并于1999年在奥地利以RFM760首次夺得国际高速加工大赛冠军,及以后2000-2001年再次夺此殊荣.3.高速加工是模具加工行业一个趋势,那么要求是社会发展动力.4.高速加工概念是尽可能在机床加工一次成型,减少后续(如电火花)加工时间.包括高转速,大扭力主轴,快速进给和稳定机床性能和高速数据处理控制系统等.5.Roeders机床几大优点:A.主轴转速高达36000-42000转,从而很好充分利用细小刀具来加工工件(R0.2),这是一般机床所不能及.B.进给速度达60M每分钟,不管是在开粗或是在光刀领域,都大大地缩短了加工时间,从而提高了生产效率,缩短生产周期.C.机床控制平台为一般PC平台,由两台PC(RT-PC.NT-PC)所组成,即是NT-PC能提供机器在工作中做任何编辑和准备有关下一个要加工程序,为下一步工作做准备.减少机器在工作中所浪费时间.RT-PC主要是供给机器工作时数据处理以及传输.RT-PC与机器各轴驱动板连接是由光纤电缆组成,比传统电缆速度大大提高,从而达到高速加工时数据传输高速要求,避免如传统加工中心数据停留现象.D.整个机床由机器附带风冷系统来控制恒温,避免出现由于环境温差出现机床精度变化问题,提高机器加工精度.E.机器装有自动激光对刀系统,能减少在生产中人工对刀次数和降低对刀出现误差,提高实际加工接面时精度.6.Roeders高速加工中心目标:A.高精度.B.高光洁度.C.最短加工时间.7.机器采用(HSK)热胀冷缩式刀头,优点如:A.高精度,无任何磨损,同心度少于0.003MMB.简单牢固可靠,特别适合高转速运行.C.硬质合金涂层刀,CBN及金属,陶瓷刀均适合使用.8.Roeders机器有多种型号(RFM600.RFM760.RP800.RFM1000).各种型号有它独特加工优点.适合客户不同产品加工需求.机床重量从5500KG到13000KG不等.而且有着非常重要重心向下设计.减少加工运动时产生震动.保持机床稳定性.b). 机床操作注意事项。
西屋生产工具设备使用手册
WPSD生产手动工具使用手册工西屋生产工具设备使用手册目录目录 (2)简介 (3)1工具与设备的管理 (3)1.1工具的申请领用与保管 (3)1.2工具的借用及归还 (4)1.3工具设备的日常检查及维护 (4)1.4工具的检测与校验 (4)2工具的分类与使用 (5)1.1手动工具 (5)1.1.1 手动工具的分类及用途 (5)1.1.2 常用手动工具使用常识 (13)1.2测量工具 (17)1.3电动工具 (17)1.3.1 电动工具的分类与使用 (17)1.4气动工具 (25)1.4.1 气动工具的分类 (25)1.4.2气动工具安全使用规则 (26)1.4.3气动工具常见故障现象及排除方法 (27)1.4.4 气动工具连接注意事项 (28)1.4.5 气动工具的常规保养 (29)3WPSDGZ固定设备的种类与使用 (33)3.1液压机 (33)3.2特种设备 (38)3.2.1特种设备简介 (38)3.2.2特种设备安全管理制度 (38)简介本手册主要适用于西屋月台屏蔽门(广州)有限公司生产运营车间的生产工具与设备的使用、管理、维护保养。
.1工具与设备的管理可参照WI文件工装和工具管理规范WI SP8-GZ-011.1 工具的申请领用与保管1.1.1 工具首次申领使用时首先填写工具申领单,经生产主管同意报部门负责人签准,经理审核批准后,交计划下达采购计划单采购。
1.1.2 工具入库后,生产凭经生产主管同意报部门负责人签准的领取使用申领单从仓库领取所需工具。
1.1.3 工具首次申领使用时,应在“生产工具台账”注明用途和保管责任人,经生产主管同意报部门负责人签准领取使用,由生产科建立生产工具台帐备查台帐应注明:领用日期、名称、规格、责任人等。
1.1.4 生产工具使用应爱护使用,在使用过程中,发现工具不良或损坏,以旧(坏)换新形式换取新工具,并及时填写工具返修单或工具报废单,以旧(坏)换新领用前,由生产负责人鉴定工具的好坏并说明原因。
- 1、下载文档前请自行甄别文档内容的完整性,平台不提供额外的编辑、内容补充、找答案等附加服务。
- 2、"仅部分预览"的文档,不可在线预览部分如存在完整性等问题,可反馈申请退款(可完整预览的文档不适用该条件!)。
- 3、如文档侵犯您的权益,请联系客服反馈,我们会尽快为您处理(人工客服工作时间:9:00-18:30)。
西瓦产品培训手册
西
瓦
产
品
培
训
手
册
编制单位:佛山市荣冠玻璃建材有限公司市场部
目录
<一>西瓦产品简介.............................................. 错误!未定义书签。
1、什么是西瓦 .............................................. 错误!未定义书签。
2、西瓦的优点 .............................................. 错误!未定义书签。
3、西瓦的来历以及国内外发展情况 ........... 错误!未定义书签。
4、西瓦的发展前景....................................... 错误!未定义书签。
<二>产品知识 ..................................................... 错误!未定义书签。
1、生产状况 .................................................. 错误!未定义书签。
2、西瓦产品分类、标识和规格 ................... 错误!未定义书签。
3、西瓦的施工方法....................................... 错误!未定义书签。
<三>西瓦销售的计件算法 .................................. 错误!未定义书签。
<四>西瓦销售特点及注意事项........................... 错误!未定义书签。
<一>西瓦产品简介
1、什么是西瓦
西瓦,是西班牙瓦的简称(英文名 Spanish Roofing tile),因其外型象英文字母“S”,因此俗称又叫S瓦(市面上还有其它俗称,如川渝等地叫大波瓦,江浙等地叫曲瓦)。
西瓦是一种以红坭、黄坭、岗砂按比例来配备原料(或按客户的要求成色来
配比),经过陈腐加工、挤出冲压成型、干燥施釉(有釉产品) 、二次干燥后,进窑炉煅烧而成的烧结彩瓦。
它是一种现代流行的具有欧洲风格的健康环保的屋面装饰瓦。
※什么是烧结瓦?烧结瓦是由粘土或其它无机非金属原料,经成型、烧结等工艺处理,用于建筑物屋面覆盖及装饰用的板状或块状烧结制品。
一般根据形状、表面状态及吸水率不同来进行分类和具体产品命名。
注:根据吸水率不同分为Ⅰ类瓦(≦6%)、Ⅱ类瓦(6%~10%)、Ⅲ类瓦(10%~18%)、青瓦(≦21%)。
西瓦属于Ⅱ类瓦。
2、西瓦的优点
西瓦与其它烧结彩瓦对比,有以下优点:
A.起源早,流行广泛。
多年前起源于欧洲,广泛流行于世界各地。
B.色彩丰富,自然。
可根据个性需要调色,达到人性化与自然化的结合。
C.设计简单,安装便利。
设计上达到简单实用,安装比琉璃瓦方便高效。
3、西瓦的来历以及国内外发展情况
西瓦最早是在西班牙等西欧国家出现并流行而得名,是一种用于屋顶装饰效果并具有朴素典雅、风韵别致的西欧风格的屋面装饰建材。
古典西瓦是最传统的瓦型,是传统陶瓦中轮廓特别丰润的瓦型。
多年以来古典西瓦伴随着人类的发展。
而现代科技赋予这一传统瓦全新的内涵。
在地中海周边特别受欢迎,古典西瓦追求将其传统坚持到底,紧凑的线条颇具时尚品位,丰富的色彩满足不同国度和地区的需求。
全新的别墅,古宅的翻新都有上佳表现。
同时,西瓦的屋面装饰效果慢慢得到世界各国建筑设计师的追捧和广大人们的认可,并于上世纪80年代末逐渐传入到亚洲的韩国,日本和中国。
它与国内的琉璃瓦相似,并别具一格,因此在国内得以认可和流行起来,成为一种具有欧洲风格的装饰瓦。
西瓦是属于瓦类中的烧结彩瓦,它从普通瓦类的遮风挡雨的功能转变为主要以装饰功能为主,装饰效果古朴自然、经典怀旧、风韵雅致。
它是各种中高档酒店别墅、楼宇亭台、大型商业中心、市政工程等建筑的首选屋面装饰材料。
当前中国瓦产品主要有三大品种,一是烧结黏土瓦,二是水泥彩瓦,三是烧结彩瓦(琉璃瓦、亚光瓦)。
其中:烧结黏土瓦色调单一不均匀,直接影响建筑工程的外观质量,吸水率较高,。