android 带文字的图片 按钮,其实就是这么简单
手机最简单的截屏方法

手机最简单的截屏方法
1、以iPhone 6S为例,首先确保你的手机处于解锁状态,然后在屏幕上将要截取的内容准备好,比如一张图片或一段文字。
2、接着,同时按住手机上的“Home”键和“电源”键,直到
屏幕发出一声“咔嚓”的声音为止。
3、按键后,你会发现屏幕变暗,说明截屏成功。
可以在“照片”应用中找到刚才截取的屏幕图片。
4、如果你使用的是Android系统的手机,也可以按照上
述步骤来完成截屏,但是Android系统的手机对应键为“电源”
键和“音量减”键,而且在截屏后,一般会有一个提示框,点击框内的“保存”按钮即可保存到相册。
imagebutton控件的用法

imagebutton控件的用法============一、概述----ImageButton控件是Android开发中常用的控件之一,它结合了Button控件和ImageButton控件的特点,可以在图片上实现点击事件。
本文将详细介绍ImageButton控件的用法,包括基本属性、事件处理和自定义样式等。
二、基本属性------* `id`:控件的唯一标识符,用于在XML布局文件或代码中引用该控件。
* `background`:设置控件的背景图片或Drawable对象。
* `src`:设置按钮的选中图片,即点击后的显示图片。
* `backgroundRes`和`backgroundState`:用于自定义背景样式,支持点击事件和长按事件。
三、事件处理------ImageButton控件支持点击事件、长按事件和滑动事件等。
可以通过为ImageButton控件绑定相应的事件监听器来实现。
以下是几个常用的监听器:* `OnClickListener`:点击事件监听器,用于处理点击事件。
* `OnLongClickListener`:长按事件监听器,用于处理长按事件。
* `OnScrollListener`:滑动事件监听器,用于处理滑动事件。
四、自定义样式-------ImageButton控件支持通过XML布局文件或代码自定义样式,包括背景图片、边框样式、圆角大小等。
可以通过设置`background`属性或使用`StateListAnimator`来实现自定义样式。
五、使用示例------以下是一个使用ImageButton控件的示例代码:```java// 创建一个ImageButton控件,设置背景图片和选中图片ImageButton imageButton = new ImageButton(this);imageButton.setBackgroundResource(R.drawable.button_background);imageButton.setImageResource(R.drawable.button_selected);// 绑定点击事件监听器,处理点击事件imageButton.setOnClickListener(new View.OnClickListener() {@Overridepublic void onClick(View v) {// 点击事件的处理逻辑}});```六、总结----ImageButton控件是Android开发中常用的控件之一,通过设置基本属性和绑定相应的事件监听器,可以实现图片上的点击事件。
Android基本控件学习(代码为贴图方式)
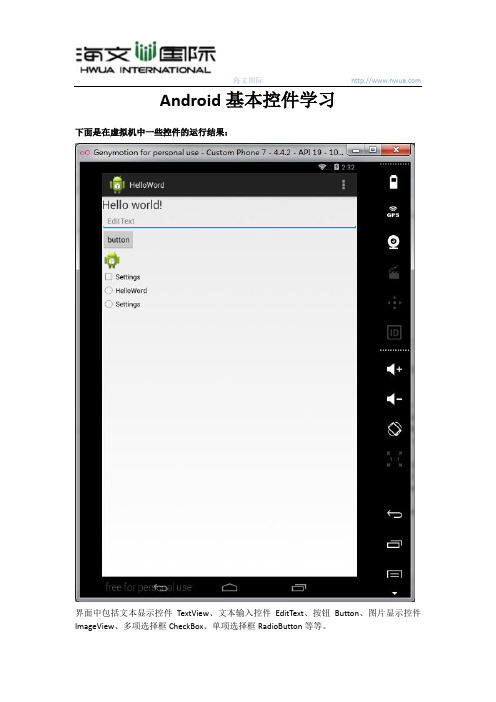
海文国际 Android基本控件学习下面是在虚拟机中一些控件的运行结果:界面中包括文本显示控件TextView、文本输入控件EditText、按钮Button、图片显示控件ImageView、多项选择框CheckBox、单项选择框RadioButton等等。
海文国际界面设计和代码编写:进入到开发环境中,首先进入布局文件中将几个控件添加上去添加有几种方式,先介绍一下简单的用鼠标直接拖拽,从右边找到我们的需要的控件点住拖拽至我们需要的位置,但是这样很多属性我们是不能修改的。
所以我们还是要进到xml文件里的,这里要说一下,Android里所有的布局文件都是xml文的形式写的。
点击上图中下面的两个选项页,可以分别进入xml界面和可视化界面,接下来就是xml文件的代码了海文国际进入到工程目录下的res文件夹下的layout文件夹中是我们的布局文件,双击fragment_main.xml文件,上图是我们的控件代码,每个控件都有两个必不可少的参数:android:layout_width和android:layout_height,分别定义控件的宽和高。
其它常用的属性:android:id设置控件的ID,对我们代码中需要动态用到的控件必须加ID属性,其他可以不加这里的布局文件的写法,下面看看在代码中如何动态的使用这些控件。
海文国际海文国际海文国际根据ID找到对应的控件海文国际海文国际上面是我们的JAVA代码了,程序的主入口为mainactivity的oncreate方法,在方法里填充显示了一个fragment,而我们的所有控件之前是放在了fragment中,所以我们对应的代码应该是写在fragment类中,这里Eclipse自动帮我们创建了一个fragment的内部类,所以就可以直接在这个内部类中写我们的对应的代码。
Android开发之EditText属性详解
Android开发之EditText属性详解1、EditText输⼊的⽂字为密码形式的设置(1)通过.xml⾥设置:把该EditText设为:android:password="true" // 以”.”形式显⽰⽂本(2)在代码⾥设置:通过设置EditText的setTransformationMethod()⽅法来实现隐藏密码或这显⽰密码。
editText.setTransformationMethod(PasswordTransformationMethod.getInstance());//设置密码为不可见。
2、(1)EditText输⼊的⽂字为电话号码Android:phoneNumber=”true” //输⼊电话号码3、EditText字数限制的设置(1)在.xml中设置:android:maxLength=“50”(2)代码中设置:editText.setFilters(new InputFilter[]{newInputFilter.LengthFilter(100)});4、EditText设置字体android:typeface="monospace" //设置字型。
字形有:normal, sans, serif,monospace5、EditText是否可编辑Android:editable // 是否可编辑6、在EditText中软键盘的调起、关闭(1)EditText有焦点(focusable为true)阻⽌输⼊法弹出editText=(EditText)findViewById(R.id.txtBody);editText.setOnTouchListener(new OnTouchListener(){public boolean onTouch(View v, MotionEvent event){editText.setInputType(InputType.TYPE_NULL); //关闭软键盘return false;}});(2)当EidtText⽆焦点(focusable=false)时阻⽌输⼊法弹出InputMethodManager imm =(InputMethodManager)getSystemService(INPUT_METHOD_SERVICE);imm.hideSoftInputFromWindow(editText.getWindowToken(),0);(3)调⽤数字键盘并设置输⼊类型和键盘为英⽂etNumber.setInputType(InputType.TYPE_CLASS_NUMBER); //调⽤数字键盘rlEditText.setInputType(InputType.TYPE_TEXT_FLAG_MULTI_LINE);//设置输⼊类型和键盘为英⽂或者:android:inputType="textUri|textMultiLine"(4)android:focusable="false"//键盘永远不会弹出<activity android:name=".AddLinkman"android:windowSoftInputMode="adjustUnspecified|stateHidden"/>//不⾃动弹出键盘//关闭键盘(⽐如输⼊结束后执⾏) InputMethodManager imm =(InputMethodManager)getSystemService(Context.INPUT_METHOD_SERVICE); imm.hideSoftInputFromWindow(etEditText.getWindowToken(), 0);//⾃动弹出键盘((InputMethodManager)getSystemService(INPUT_METHOD_SERVICE)).toggleSoftInput(0,InputMethodManager.HIDE_NOT_ALWAYS); etEditText.requestFocus();//让EditText获得焦点,但是获得焦点并不会⾃动弹出键盘7、android:layout_gravity和android:gravity的区别(1)android:layout_gravity是本元素对⽗元素的重⼒⽅向。
Android实现圆角Button按钮

Android实现圆⾓Button按钮本⽂实例讲述了Android开发圆⾓Button按钮实现过程,分享给⼤家供⼤家参考,具体内容如下需求及效果图:实现思路:1、shape实现圆⾓在drawable新建两个xml ⽂件, 这两个 xml⽂件⽤shape 实现了圆⾓效果。
Note:因为要让⽤户有按下去的效果体验, 所有要有两套圆⾓图, 在按下去时候切换<!-- res/drawable/button_shape_normal.xml --><shape xmlns:android="/apk/res/android"android:shape="rectangle" ><!-- rounded corner --><corners android:radius="5dp" /><solid android:color="@color/orange_normal" /></shape><!-- res/drawable/button_shape_pressed.xml --><shape xmlns:android="/apk/res/android"android:shape="rectangle" ><!-- rounded corner --><corners android:radius="5dp" /><!-- fill with two colors, and the two colors change softly --><!--<gradientandroid:angle="270"android:startColor="@color/orange_light"android:endColor="@color/orange_normal"android:useLevel="true" />--><solid android:color="@color/orange_light" /></shape>2、selector实现按下效果在 drawable 新建⼀个 xml ⽂件, ⽤ selector 把刚才建⽴的两个 xml ⽂件组织起来<!-- res/drawable/button_shape.xml --><selector xmlns:android="/apk/res/android"><item android:drawable="@drawable/button_shape_normal" android:state_pressed="false"/><item android:drawable="@drawable/button_shape_pressed" android:state_pressed="true"/></selector>3、style实现多个按钮复⽤在res/values/styles.xml ⾥⾯输⼊下⾯代码<style name="SmsButton"><item name="android:layout_width">0dp</item><item name="android:layout_weight">1</item><item name="android:layout_height">wrap_content</item><item name="android:textSize">20sp</item><item name="android:background">@drawable/button_shape</item><item name="android:textColor">@color/white</item></style>4、引⽤圆⾓按钮在 layout/fragment_bomb.xml ⾥⾯⽤ style 引⽤<Buttonandroid:id="@+id/fireup"style="@style/SmsButton"android:layout_marginEnd="20dp"android:layout_marginStart="20dp"android:text="@string/fireup" />可以省去建⽴style的步骤, 直接在layout⾥⾯引⽤即可。
AndroidEditText详解及示例代码

AndroidEditText详解及⽰例代码 EditText在API中的结构 ng.Object android.view.View android.widget.TextView android.widget.EditText 已知直接⼦类: AutoCompleteTextView, ExtractEditText 已知间接⼦类: MultiAutoCompleteTextView EditText是TextView的直接⼦类所以EditText会继承⽗类TextView的⼀些⽅法。
下⾯我⽤⾃⼰写的⼀个Demo 和⼤家详细的说明⼀下EditView的使⽤⽅法。
1.简单的EditText输⼊框 ⾮常简单,在layout布局中配置⼀下EditText 在配置⼀个Button 在代码中监听Button 的事件获取当前EditView中输⼊的内容并且显⽰出来。
XML/HTML代码<?xml version="1.0" encoding="utf-8"?><LinearLayout xmlns:android="/apk/res/android"android:id="@+id/textviewll"android:orientation="vertical" android:layout_width="fill_parent"android:layout_height="fill_parent"><EditTextandroid:id="@+id/sample_edit_text0"android:layout_width="fill_parent"android:layout_height="wrap_content"android:text="简单的EditText输⼊框"/><Buttonandroid:id="@+id/sample_button0"android:layout_width="fill_parent" android:layout_height="wrap_content"android:text="确定"/></LinearLayout>Java代码public class SampleActivity extends Activity {@Overrideprotected void onCreate(Bundle savedInstanceState) {setContentView(yout.sample);final EditText editText0 = (EditText)findViewById(R.id.sample_edit_text0);Button button0 = (Button)findViewById(R.id.sample_button0);button0.setOnClickListener(new OnClickListener() {@Overridepublic void onClick(View arg0) {String str = editText0.getText().toString();Toast.makeText(SampleActivity.this,str, Toast.LENGTH_LONG).show();}});super.onCreate(savedInstanceState);}} 2.限制EditText输⼊框的内容 在layout中配置信息 android:digits=”1234567890.+-*/%\n()” 限制输⼊框中只能输⼊⾃⼰定义的这些字符串如果输⼊其它将不予以显⽰ android:phoneNumber=”true” 限制输⼊框中只能输⼊⼿机号码 android:password=”true” 限制输⼊框中输⼊的任何内容将以”*”符号来显⽰ android:hint=”默认⽂字” 输⼊内容前默认显⽰在输⼊框中的⽂字 android:textColorHint=”#FF0000″ 设置⽂字内容颜⾊ android:enabled=”false” 设置输⼊框不能被编辑 3.编辑框中显⽰图⽚ 上⼀篇讲TextView中就讲过在TextView中添加图⽚的⽅法,因为EditText是TextView的⼦类,所以当然也可以添加图⽚了,只是⼀旦在EditText中添加图⽚以后是不能删除的,如图所⽰我可以编辑图⽚旁边的内容,写⼊⽂字。
android 带箭头提示框,三种带箭头提示框总结实例
android 带箭头提示框,三种带箭头提示框总结实例Android带箭头提示框,也被称为气泡提示框,是一种常见的用户界面元素,常用于引导用户操作、显示提示信息等场景。
在本文中,我们将总结三种常见的带箭头提示框,并提供相应的实例,帮助读者快速上手制作自己的提示框。
一、简单带箭头提示框简单带箭头提示框是最基本的一种形式,它由一个矩形框和一个带箭头的尖角组成。
在Android中,我们可以利用PopupWindow类来创建这种提示框。
下面是一个简单的示例代码:kotlinval popupView = layoutInflater.inflate(yout.popup_layout, null) val popupWindow = PopupWindow(popupView, youtParams.WRAP_CONTENT,youtParams.WRAP_CONTENT)设置背景popupWindow.setBackgroundDrawable(ColorDrawable(Color.TRA NSPARENT))设置箭头的位置和大小popupWindow.showAsDropDown(anchorView)其中,`popup_layout`是一个自定义的布局文件,用于定义提示框的样式和内容。
通过调用`PopupWindow`的构造方法,我们可以传入布局文件的引用来创建一个带有指定宽度和高度的提示框。
在示例代码中,我们还设置了提示框的背景为透明,通过`ColorDrawable`类来实现。
这样可以让提示框的样式更加灵活,适应不同的背景色。
同时,我们通过`showAsDropDown()`方法设置了箭头的位置,使得提示框能够正确地显示在指定的锚点View下方。
二、可自定义样式的带箭头提示框除了简单的带箭头提示框外,我们还可以根据需求自定义提示框的样式。
在Android中,可以通过自定义Drawable来实现。
Android开发之EditText属性详解
Android开发之EditText属性详解1、EditText输入的文字为密码形式的设置(1)通过.xml里设置:把该EditText设为:android:password="true" // 以”.”形式显示文本(2)在代码里设置:通过设置EditText的setTransformationMethod()方法来实现隐藏密码或这显示密码。
editText.setTransformationMethod(PasswordTransformationMethod.getInstance());//设置密码为不可见。
2、(1)EditText输入的文字为电话号码Android:phoneNumber=”true” //输入电话号码3、EditText字数限制的设置(1)在.xml中设置:android:maxLength=“50”(2)代码中设置:editText.setFilters(new InputFilter[]{newInputFilter.LengthFilter(100)});4、EditText设置字体android:typeface="monospace" //设置字型。
字形有:normal, sans, serif,monospace5、EditText是否可编辑Android:editable // 是否可编辑6、在EditText中软键盘的调起、关闭(1)EditText有焦点(focusable为true)阻止输入法弹出editText=(EditText)findViewById(R.id.txtBody);editText.setOnTouchListener(new OnTouchListener(){public boolean onTouch(View v, MotionEvent event){editText.setInputType(InputType.TYPE_NULL); //关闭软键盘return false;}});(2)当EidtText无焦点(focusable=false)时阻止输入法弹出InputMethodManager imm =(InputMethodManager)getSystemService(INPUT_METHOD_SERVICE);imm.hideSoftInputFromWindow(editText.getWindowToken(),0);(3)调用数字键盘并设置输入类型和键盘为英文etNumber.setInputType(InputType.TYPE_CLASS_NUMBER); //调用数字键盘rlEditText.setInputType(InputType.TYPE_TEXT_FLAG_MULTI_LINE);//设置输入类型和键盘为英文或者:android:inputType="textUri|textMultiLine"(4)android:focusable="false"//键盘永远不会弹出<activity android:name=".AddLinkman"android:windowSoftInputMode="adjustUnspecified|stateHidden"/>//不自动弹出键盘//关闭键盘(比如输入结束后执行)InputMethodManager imm =(InputMethodManager)getSystemService(Context.INPUT_METHOD_SERVICE); imm.hideSoftInputFromWindow(etEditText.getWindowToken(), 0);//自动弹出键盘((InputMethodManager)getSystemService(INPUT_METHOD_SERVICE)).toggleSoftInput(0,InputMethodManager.HIDE_NOT_ALWAYS);etEditText.requestFocus();//让EditText获得焦点,但是获得焦点并不会自动弹出键盘7、android:layout_gravity和android:gravity的区别(1)android:layout_gravity是本元素对父元素的重力方向。
Android 基础知识4
Android 基础知识41.1、简介ToggleButton 类似开关有开和关两种状态,不同的状态下可以有不同的文本。
public class ToggleButton extends CompoundButtonDisplays checked/unchecked states as a button with a "light" indicator and by default acpanied with the text "ON" or "OFF"。
这是一种特殊的有两种状态的继承至CompoundButton的控件,在不同的状态会有高亮显示效果,既然是继承至CompoundButton,那我们也随便看一下CompoundButton的介绍:A button with two states, checked and unchecked. When the button is pressedor clicked, the state changes automatically.1.2、属性android:checked = “true”默认为选中状态,反之false即是默认为非选中状态。
android:textOff = “张起灵” 未选中状态下的文本是张起灵android:textOn = “张无忌” 选中状态下的文本是张无忌1.3.1、示例1效果图:XML:<ToggleButtonandroid:layout_width="match_parent"android:layout_height="wrap_content"android:text="ToggleButton"android:textAllCaps="false"android:textOff="张起灵"android:textOn="张无忌" />1.3.2、示例2同样的,我们可以监听不同的状态来设置不同的背景,来适配不同的使用场景,这个背景设置和Button 中的一模一样。
android手把手开发一个图片浏览器
android手把手开发一个图片浏览器这次我给大家讲解一个Android图片浏览器的应用。
AndroidAndroid是基于Linux内核的软件平台和操作系统,早期由Google开发,后由开放手机联盟Open Handset Alliance)开发。
它采用了软件堆层(software stack,又名以软件叠层)的架构,主要分为三部分。
低层以Linux内核工作为基础,只提供基本功能;其他的应用软件则由各公司自行开发,以Java作为编写程序的一部分。
另外,为了推广此技术,Google和其它几十个手机公司建立了开放手机联盟。
Android在未公开之前常被传闻为Google电话或gPhone。
大多传闻认为Google开发的是自己的手机电话产品,而不是一套软件平台。
到了2010年1月,Google开始发表自家品牌手机电话的Nexus One。
目前最新版本为Android2.1。
下图是它的结构:简单来讲,Android就是一个开源的手机软件开发工具。
我主要给大家讲应用方面,大家如果有兴趣,可以了解相关基本知识。
要开发一个Android应用,首先得搭建Android开发环境:下载并安装Android sdk(Software Development Kit, 即软件开发工具包)。
由于Android 开发是集成在Eclipse中,需下载并安装ADT (Eclipse集成Android sdk插件)。
搭建环境会用一个专门的章节为大家详细讲解,这里我就不再赘述。
Android开发环境搭好后,我们先启动Eclipse创建一个Android的应用程序,然后在左上角单击File,New,Android Project,如下图所示:如果在图中Java Project找不到Android Project:在左上角单击File,New,Other:在弹出框中Android文件件中选中Android Project,然后单击Next进入下一步:弹出一个列表框:下面对这个列表的一些重要属性进行讲解:1.应用程序名称以及内容栏:2.工具栏:采用的编译工具即Android模拟器:3.属性栏:即应用程序中的相关属性:Android 这就是我们刚才创建的一个Android应用程序如下图:在这里面,我们最关心的是界面(main.xml)与后台(Test1.java):单击main.xml:我们先看看中间视图:这是一个页面编辑器模式:在左下角点击main.xml切换到界面编码模式:这就是刚才页面视图的源码:下面让我们看看后台(Test1.java)源码:单击Test1.java:以下将此类程序称之为activity(活动),该activity运行时会自动调用onCreate方法:而上图中onCreate方法是启动res文件夹下的layout下的main.xml界面。
- 1、下载文档前请自行甄别文档内容的完整性,平台不提供额外的编辑、内容补充、找答案等附加服务。
- 2、"仅部分预览"的文档,不可在线预览部分如存在完整性等问题,可反馈申请退款(可完整预览的文档不适用该条件!)。
- 3、如文档侵犯您的权益,请联系客服反馈,我们会尽快为您处理(人工客服工作时间:9:00-18:30)。
<RelativeLayoutxmlns:android="/apk/res/android" xmlns:tools="/tools"android:layout_width="match_parent"android:layout_height="match_parent"android:background="@drawable/main_bg"android:orientation="horizontal" ><RelativeLayoutandroid:id="@+id/bt_personal_control"android:layout_width="wrap_content"android:layout_height="wrap_content"android:layout_marginLeft="250dp"android:layout_marginTop="200dp" ><ImageButtonandroid:id="@+id/personal_control_image"android:layout_width="wrap_content"android:layout_height="wrap_content"android:layout_centerHorizontal="true"android:background="@drawable/personal_control" /><TextViewandroid:layout_width="wrap_content"android:layout_height="wrap_content"android:layout_below="@id/personal_control_image"android:layout_marginTop="5dp"android:text="@string/personal_control"android:textSize="18dp" /></RelativeLayout><RelativeLayoutandroid:id="@+id/bt_car_manager"android:layout_width="wrap_content"android:layout_height="wrap_content"android:layout_alignTop="@id/bt_personal_control"android:layout_marginLeft="150dp"android:layout_toRightOf="@id/bt_personal_control" ><ImageButtonandroid:id="@+id/car_manager_image"android:layout_width="wrap_content"android:layout_height="wrap_content"android:layout_centerHorizontal="true"android:background="@drawable/car_manager" /><TextViewandroid:layout_width="wrap_content"android:layout_height="wrap_content"android:layout_below="@id/car_manager_image"android:layout_marginTop="5dp"android:text="@string/car_manager"android:textSize="18dp" /></RelativeLayout><RelativeLayoutandroid:id="@+id/bt_environmental_protection_sign_manager"android:layout_width="wrap_content"android:layout_height="wrap_content"android:layout_alignTop="@id/bt_personal_control"android:layout_marginLeft="150dp"android:layout_toRightOf="@id/bt_car_manager"android:gravity="center_vertical" ><ImageButtonandroid:id="@+id/environmental_protection_sign_manager_image"android:layout_width="wrap_content"android:layout_height="wrap_content"android:layout_centerHorizontal="true"android:layout_marginLeft="12dp"android:background="@drawable/environmental_protection_sign_manager" /><TextViewandroid:layout_width="wrap_content"android:layout_height="wrap_content"android:layout_below="@id/environmental_protection_sign_manager_image" android:layout_marginTop="5dp"android:text="@string/environmental_protection_sign_manager"android:textSize="18dp" /></RelativeLayout><RelativeLayoutandroid:id="@+id/bt_check_manager"android:layout_width="wrap_content"android:layout_height="wrap_content"android:layout_alignTop="@id/bt_personal_control"android:layout_marginLeft="150dp"android:layout_toRightOf="@id/bt_environmental_protection_sign_manager"android:gravity="center_vertical" ><ImageButtonandroid:id="@+id/check_manager_image"android:layout_width="wrap_content"android:layout_height="wrap_content"android:layout_centerHorizontal="true"android:layout_marginLeft="12dp"android:background="@drawable/check_manager" /><TextViewandroid:layout_width="wrap_content"android:layout_height="wrap_content"android:layout_below="@id/check_manager_image" android:layout_marginTop="5dp"android:text="@string/check_manager"android:textSize="18dp" /></RelativeLayout><RelativeLayoutandroid:id="@+id/bt_statistical_analysis"android:layout_width="wrap_content"android:layout_height="wrap_content"android:layout_below="@id/bt_personal_control" android:layout_marginLeft="250dp"android:layout_marginTop="100dp"android:gravity="center_vertical" ><ImageButtonandroid:id="@+id/statistical_analysis_image"android:layout_width="wrap_content"android:layout_height="wrap_content"android:layout_centerHorizontal="true"android:layout_marginLeft="12dp"android:background="@drawable/statistical_analysis" /><TextViewandroid:layout_width="wrap_content"android:layout_height="wrap_content"android:layout_below="@id/statistical_analysis_image" android:layout_marginTop="5dp"android:text="@string/statistical_analysis"android:textSize="18dp" /></RelativeLayout><RelativeLayoutandroid:id="@+id/bt_system_setup"android:layout_width="wrap_content"android:layout_height="wrap_content"android:layout_below="@id/bt_car_manager"android:layout_toRightOf="@id/bt_statistical_analysis"android:layout_marginLeft="150dp"android:layout_marginTop="100dp"android:gravity="center_vertical" ><ImageButtonandroid:id="@+id/system_setup_image"android:layout_width="wrap_content"android:layout_height="wrap_content"android:layout_alignParentLeft="true"android:background="@drawable/system_setup" /><TextViewandroid:layout_width="wrap_content"android:layout_height="wrap_content"android:layout_below="@id/system_setup_image" android:layout_marginTop="5dp"android:text="@string/system_setup"android:textSize="18dp" /></RelativeLayout><TextViewandroid:id="@+id/welcomeMessage"android:layout_width="wrap_content"android:layout_height="wrap_content"android:layout_alignParentRight="true"android:layout_alignParentTop="true"android:layout_marginRight="100dp"android:layout_marginTop="45dp"android:textSize="20dp" /></RelativeLayout>杭州android 开发讨论群216045581,欢迎加入学习探讨。