德生DR-920收音机使用说明
Wouxun KG-UV920P-A 双频双段车载机使用说明书

The included 14 foot extension cable allows you to install it just about anywhere in your vehicle so you can have it right where you need it. The KG-UV920P-A can also be powered by the optional Wouxun SPS30WIN Power Supply to turn your twin band mobile receiver into a fully operational base station! The Wouxun KG-UV920P-A comes with hand microphone with speaker, inclined switchboard panel, flat switchboard panel, mobile mounting bracket, remote front panel bracket, mobile power cord, 14 foot extension cable, hand microphone hoo
德生pl00说明书
改变频率
频率变化
------------------------------------------------------------------------------------------------------------------------ ----------- 方法二、用调谐钮搜台 旋转 [TUNING]钮改变频率,找到您想收听的电台。
六、自动搜台存储(ATS) 作用:自动搜索调频、中波的强信号电台,并存储到P0页面,可存储100个电台。
开机,长按 [FM-MW-LW键],直到显示屏上的频率在 变化、地址在闪烁时松手,即启动了自动搜台存储(ATS)功能。
步 骤 1
搜存完电台后,本机自动进入地址状态,并收听自动搜存 的第一个电台。 可旋转 [TUNING]钮,或短按 [UP]键、 [DOWN]键收听已搜存的其它电台。
四. FM/MW波段自动搜索存台(ATS) 开机后,拉出 [拉杆天线],长按 [FM-MW-LW]键启动自动搜索存台(ATS)功能,本机会自动搜索调频和中波波段的电台,并自动存储起来。 完成了ATS操作后,您可以旋转 [TUNING]钮收听已存储好的电台。
五. 存储电台 1.开收音机,选择波段,旋转 [TUNING]钮搜到您喜欢的电台; 2.短按 [MEMORY]键,显示屏右上角显示闪烁的存储地址; 3.再短按 [MEMORY]键确认存储。
步
骤 2 2.按数字键依次输入7、5、6。
搜 寻 电 台
提示:若输入的电台频率不在本波段范围,显示屏显示“ ” (错误)符号。
------------------------------------------------------------------------------------------------------------------------ ---------- 方法四、用自动搜索存台(ATS)功能 长按 [FM-MW-LW]键,直到显示屏上的频率在变化、 地址在闪烁时松手,即启动了自动搜索存台(ATS)功能。 搜存完电台后,本机自动进入地址状态,并收听自动搜存的第一个电台。可旋转 [TUNING]钮,或短按 [UP]键或 [DOWN]键收听已 搜存的其它电台。
德生PL757A 调频 中波 短波立体声钟控收音机 使用手册说明书
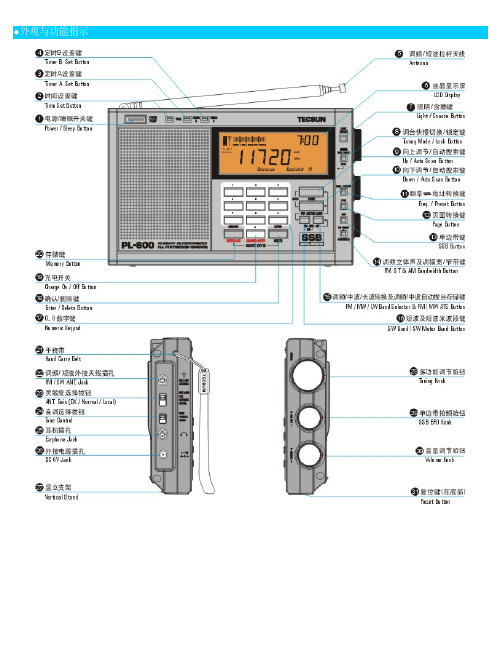
2004年4月第三版德生牌收音机东莞市德生通用电器制造有限公司中国 广东网址:e-mail:*****************.cn调频立体声/中波/短波(2.30-26.10MHz)采用进口优秀数字调谐(PLL)处理器应用先进的表面贴片(SMT)制造工艺,优质可靠四种方式选择搜索电台: 直接输入电台频率 手动搜索电台 自动搜索电台电脑预选记忆24个电台频率轻触式电子波段开关、短波米波段开关设按键锁定开关,防止误操作数字时钟,可控制定时开机及睡眠自动关机设9k/10k 中波步进频率选择开关,适合世界各国制式电池耗尽前自动关机,防止漏液损坏收音机设本地/远程灵敏度开关,方便在不同环境下接收强弱广播信号特设夜间照明指示灯,方便使用使用3节R6(5号)电池供电,可使用外接电源设外接天线插孔,附送室外短波天线,提高接收能力附送精美皮套、高级立体声耳机与外接电源供电器使用手册Operating Manual直接输入电台频率PL757A存储设置指示功能定时自动开机指示存储电台频率地址号码按键锁定开关功能指示调频立体声状态指示频率或时间指示波段指示:(),(),短波1或2(SW 1/2)调频FM 中波MW 液晶显示屏显示说明调频/短波频率单位(兆赫兹)中波频率单位(千赫兹)睡眠定时自动关机指示更换电池提示符号短波频率范围按电池正负极性正确方向装入3节R6(5号)新电池。
本机特设电源电压不足自动关机保护功能。
当电源电量即将耗尽时,会自动关闭收音机。
在您收听时,如果声音不稳定,可能是电池供电不足,请将收音机音量调小。
当收音机自动关机时,为防止已记忆的信息丢失,请及时更换新电池。
新旧电池不要混在一起使用。
当您长时间不用收音机时,请将电池取出,以免电池漏液,腐蚀机内元件。
务必关机后,才更换新电池!使用外接电源时,机内电池将被自动切断;请按照以上方式操作,以防机内记忆信息丢失!收音机左侧面220V 交流电插座外接电源连接和断开操作步骤:连接:断开:注意1.将DC05型交直流电源供电器插入220V 交流电 电源插座;2.打开DC05型供电器上的电源开关;3.将DC05型供电器与PL757A4.开收音机。
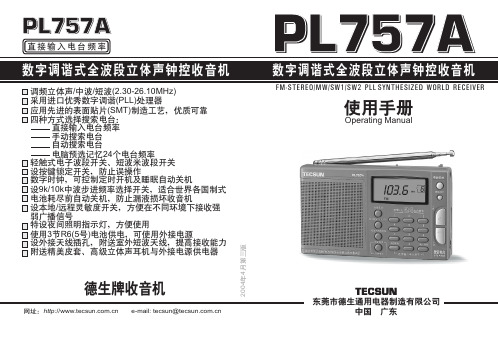
德生PL-200说明书
外观图与功能指示(1)安装电池打开电池仓按电池正负极性方向,正确装入随机的充电电池或2节新的五号电池( AA或UM-3 )。
提示:1.本机有电池容量显示,装入新电池后液晶显示屏上会出现电池容量符号。
2.本机出厂默认使用充电电池,如果您使用普通五号电池时,需要通过更改系统设置码将电池设置为普通电池(详见系统设置),以保证显示屏上的电池容量指示准确。
3.本机若长时间不安装电池,其时钟功能将中断运行,但不会丢失您已存储记忆的电台频率,也不影响您已设置好的系统状态。
(重新安装电池后只需要重新调整电子钟的时间即可。
)4.当您从本机取出旧电池后,电子时钟仍可继续运行30分钟左右,保证您有充足的时间更换新电池。
注意:1.本机设有电源电压不足自动关机保护功能。
当电池电量即将耗尽时,会自动关闭收音机,进入时钟显示状态,指向电池符号的三角符号一直在闪动,提醒您及时充电或更换新电池!2.把新旧电池混在一起使用,将造成收音机不能正常工作,也严重影响电池显示和电池耗尽自动关机功能的准确性。
3.若长时间不用收音机,请取出电池,防止电池漏液,腐蚀机内元件。
4.请按要求对电池充电,可防止充电电池老化,延长其使用寿命。
(2) 使用随机全自动充电器(务必阅读)本机设有电池充电功能,充电过程如下:1.按电池正负极性的正确方向,装入随机附送的2节5号镍氢可充电电池;2.将DC-03型全自动充电器插入220V交流电电源插座,这时DC-03上的充电指示灯是不亮的;3.将DC-03型全自动充电器插入PL-200的充电插孔(CHARGE),几秒钟后DC-03上的充电指示灯点亮,表示进入了恒流充电状态(约200毫安);4.充电约3-4小时后,DC-03的充电指示灯开始闪烁,表示进入了脉冲充电状态;(注意:充电指示灯的闪烁速度随时间变化会逐渐加快。
)5.脉冲充电约3-4小时后,DC-03的充电指示灯熄灭,表示电池已基本上充满了,充电器自动进入涓流安全充电状态,这时您可以停止充电了。
德胜收音机产品展示
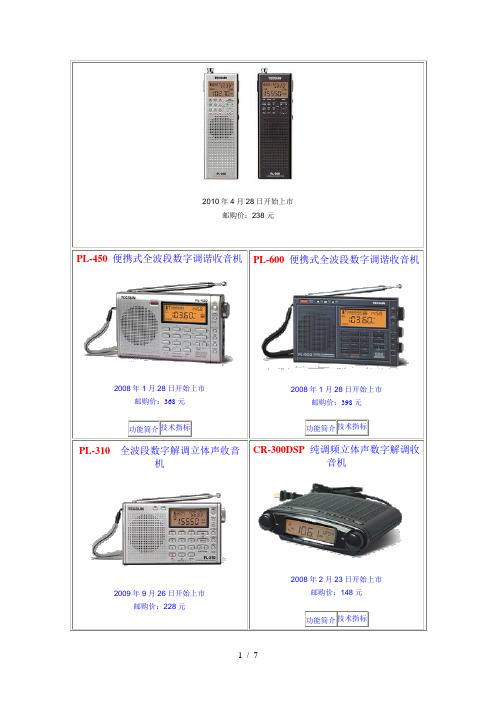
2010年4月28日开始上市邮购价:238元PL-450 便携式全波段数字调谐收音机2008年1月28日开始上市邮购价:368元功能简介技术指标PL-600 便携式全波段数字调谐收音机2008年1月28日开始上市邮购价:398元功能简介技术指标PL-310全波段数字解调立体声收音机2009年9月26日开始上市邮购价:228元CR-300DSP 纯调频立体声数字解调收音机2008年2月23日开始上市邮购价:148元功能简介技术指标功能简介技术指标PL-300wt世界钟全波段数字解调收音机2009年5月28日开始上市邮购价:198元(赠送AN-05外接天线一个)功能简介技术指标PL-380全波段数字解调立体声收音机2009年12月8日开始上市邮购价:238元功能简介技术指标1994 调频/调幅高保真收音机(纪念版)2007年8月18日开始上市邮购价:930元功能简介技术指标S-2000数字调谐全波段无线电接收机2008年8月8日开始上市邮购价:1500元(含邮资20元)功能简介技术指标致用户:了解方法:德生牌收音机产品及附件在全国各大中城市商场均有销售。
如您所在的地区没有德生产品销售,您可以与我公司用户服务部了解邮购。
邮购方法:通过邮局汇款邮购位置:广东省东莞市东城区莞长路189号德生大楼收款人:德生通用电器制造XXX邮政编码:523128说明:本产品橱窗内所标注的邮购价已经包含邮费,您只要按所标金额通过邮局汇款给我们即可,不需要另外再加邮寄费。
各位关心德生公司的朋友和德生电器公司的用户们,如果你们有什么意见和建议,请与我们了解,了解方法如下:Email:tecsun@21cnaaa来信:广东省东莞市东城区莞长路189号德生大楼德生电器公司收邮编:523128咨询热线电话:0769-2316 71180769-2245 5117[文档可能无法思考全面,请浏览后下载,另外祝您生活愉快,工作顺利,万事如意!]。
阿尔伯特DR301 FM-DAB收音机_用户手册说明书

Öffnen Sie das Batteriefach. Ziehen Sie an dem Bändchen, um die alten Batterien zu entfernen und setzen Sie drei (3) AA Alkaline Batterien gemäßSetzen Sie die Batteriefachabdeckung ein und schieben sie nach links, bis zum hörbaren Einrasten.1221Drücken Sie die MENU Taste."MODE" erscheint auf dem Display. Platzieren Sie den Cursor anhand der Pfeiltasten auf "FM Radio" und bestätigen Sie mit der SELECT Taste.Drücken Sie die MENU Taste."MODE" erscheint auf dem Display. Platzieren Sie den Cursor anhand der Pfeiltasten auf "Music Player" und bestätigen Sie mit der SELECT Taste.Einzelauswahl:Der Nachrichtenservice hat jederzeit Vorrang gegenüber dem laufenden TIP- Themenauswahl TIP- Nachrichtenservice1.1.Andere Services: Wenn Sie andere Services vom aktuellen Ensemble wünschen, drücken Sie < (Rückwärtstaste) oder > (Vorwärtstaste), so dass Services wird der letzte Service des vorherigen Ensembles wiedergegeben. Daten Services: Die meisten Ensembles geben mehr als einen Datenservice wieder (das Symbol erscheint auf dem Display). Datenservices haben keine Audiowiedergabe.Andere Ensembles: Um einen anderen Service von einem anderen Ensemble zu wählen, halten Sie die Rückwärts- bzw. Vorwärtstaste länger als 1 Sek. DR301 gibt den ersten Service des Ensembles wieder.No Signal: Wenn eins der Ensembles keinen Service enthält, erscheint "No Signal" auf dem Display. "No Signal" bedeutet, dass entweder kein Empfang"Searching" bis das nächste DAB Ensemble gefunden wurde. Dann lädt das DR301 den ersten Service des Ensembles und das Autotune schaltet sich ab. Das Display zeigt :TIP-Bedienung während des FULL SCANUm den laufenden Full Scan zu stoppen, drücken Sie die SELECT(Play/Pause/Stop) Taste. Der Full Scan bricht ab und die bis dahin gefundenenDrücken Sie die REW (Rücklauf) Taste,und das DR301 gibt wieder, was vor einerDas Symbol erscheint oben im Display und das Service Logo blinkt. Um den Rücklauf zu stoppen und zurückzukehren zur aktuellen Sendung, drücken Sie die REW Taste erneut, oder wählen andereHalten Sie die Vorwärts- oderRückwärtstaste gedrückt bis das AUTOWenn ein Signal empfangen wird, erlischt dasAUTO Symbol und MAN erscheint. Der automatische Suchlauf ist beendet. Um den automatischen Suchlauf zu stoppen, drücken Sie die Vorwärts-oder Rückwärtstaste während des Suchlaufs.Während des Empfangs einer Frequenzdrücken Sie SELECT länger als 1 Sek.Daraufhin erscheint auf dem Display "Add toPreset?" (=zur Preset Liste hinzufügen?).Bestätigen Sie, indem Sie den Cursor auf OKplatzieren und drücken Sie SELECT. Damit ist diese Frequenz in der Preset Wechseln Sie den Suchlauf in den PresetTune Modus. (siehe Seite 25).Drücken Sie SELECT länger als 1 Sek.Die Preset Liste erscheint.Scrollen Sie anhand der Pfeiltasten rauf bzw.runter, bis zur gewünschten Frequenz, dieAuf dem Display erscheint "Delete preset?" (=Preset löschen?).Bestätigen Sie, indem Sie den Cursor auf OK platzieren und drücken Sie Damit ist diese Frequenz aus der Preset Liste gelöscht. Die Preset Liste erscheint erneut auf dem Display. (Die gelöschte Frequenz wird gesendet, obwohl sie aus der Liste gelöscht wurde.) Mit der MENU Taste kehren Sie in den Preset Tune Modus zurück.Drücken Sie SELECT länger als 1 Sek. Die Preset Liste erscheint auf dem Display. Scrollen Sie in der Liste rauf bzw.runter und drücken Sie SELECT, wenn Sie auf der gewünschten Frequenz sind.Drücken Sie die MODE Taste.Auf dem Display erscheint das MODE Symbol, platzieren Sie den Cursor anhand der Pfeiltasten auf "DAB Receiver" und bestätigen Sie mit ELECT.Drücken Sie die MODE Taste.Auf dem Display erscheint das MODE Symbol, platzieren Sie den Cursor anhand der Pfeiltasten auf "FM Mode" und bestätigen Sie mit SELECT.Drücken Sie die MENU Taste und bewegen Sie den Cursor anhand der Pfeiltasten auf "SET" (Setting).Anschließend platzieren Sie den Cursor auf "Contrast" und bestätigen mit SELECT. Einstellung des Kontrastes erfolgt von 0 (dunkel) bis 10 (hell).Stellen Sie den Kontrast anhand der Pfeiltasten ein und bestätigen Sie mit SELECT.b) Hintergrundbeleuchtung (Backlight)Drücken Sie die MENU Taste und bewegen Sie den Cursor anhand der Pfeiltasten auf "SET" (Setting).Anschließend platzieren Sie den Cursor auf "Backlight" und bestätigen mit SELECT. Einstellung der Hintergrundbeleuchtung erfolgt von 0 bis 5 Sek.Stellen Sie Beleuchtungsdauer anhand der Pfeiltasten ein und bestätigen Sie mit SELECT.Drücken Sie die MENU Taste und bewegen Sie den Cursor anhand der Pfeiltasten auf "SET" (Setting). Anschließend platzieren Sie den Cursor auf "Scroll Speed" und bestätigen mit SELECT.Einstellung der Geschwindigkeit erfolgt von 1 bis 11.Stellen Sie sie anhand der Pfeiltasten ein und bestätigen Sie mit SELECT.d) Klang BalanceDrücken Sie die MENU Taste und bewegen Sie den Cursor anhand der Pfeiltasten auf "SET" (Setting).Anschließend platzieren Sie den Cursor auf "Sound Balance" und bestätigen mit SELECT.Einstellung der Geschwindigkeit erfolgt von - 5 (links) bis +5 (rechts).Stellen Sie sie anhand der Pfeiltasten ein und bestätigen Sie mit SELECT.f) Software UpdateSiehe Software Update im Abschnitt DAB Modus.Drücken Sie die MENU Taste und bewegen Sie den Cursor anhand der Pfeiltasten auf "Equalizer".Scrollen Sie rauf bzw. runter und wählen einen der 6 Equalizer ( Normal,Classic, Jazz, Rock, Pop und User), bestätigen Sie mit er Equalizer: Hier können Sie Bässe und Höhen selbst einstellen.3) EqualizerNormal: Wiedergabe vom ersten Lied bis zum letzten, ohne Wiederholung.Repeat One: Wiederholt das laufende Lied immer wieder.Repeat All: Wiederholt alle Lieder in gleicher Reihenfolge.Shuffle: Wiederholt alle Lieder in zufälliger Reihenfolge.Intro: Wiedergabe von den ersten 10 Sek. eines jeden Liedes.4) Play ModeDrücken Sie die MENU Taste und bewegen Sie den Cursor anhand der Pfeiltasten auf "Delete".Bestätigen Sie mit SELECT, wenn "Delete One" ausgewählt wurde. Das betreffende Lied wird endgültig gelöscht.6) ExitDrücken sie die MENU Taste und bewesen Sie den Cursor anhand der Pfeiltasten auf das "SET"(Setting) Menü.Gehen Sie mit dem Cursor auf "Sleep" und drücken Sie die SELECT Taste um den Timer einzustellen.Die Einstellung erfolgt von 0 (aus) bis 60 Minuten in 1-Minuten-Schritten. Regeln Sie den Timer anhand der Pfeiltasten und bestätigen Sie mit SELECT.Um Batterie zu sparen, schaltet das DR301 sich nach 10 Sek. aus, nachdem gestoppt wurde.Liedersuche (Track Search)Während der Wiedergabe oder im Stop Modus drücken Sie die Vorwärts-oder Rückwärtstaste, um das nächste bzw. vorherige Lied zu wählen.Um eine bestimmte Stelle im Lied zu finden, halten Sie die Vorwärts- bzw.Rückwärtstaste gedrückt.Wenn Sie die Stelle erreicht haben und hören möchten, lassen Sie die Taste los.. ..Schalten Sie das DR301 ein und wechseln in den MP3-Player Modus.Verbinden Sie das DR301 mit dem PC anhand des mitgelieferten USB-Kabels. Windows 98 erkennt das Gerät als "Neue Hardware".Sie werden aufgefordert, die neue Hardware hinzuzufügen.Wenn gefragt wird, wo sich der Treiber befindet, legen Sie die CD in das CD-ROM Laufwerk ein.Geben Sie den Pfad des Laufwerks ein, z.B. [DR301_WIN98_usbdrv] und klicken Sie auf [OK]. Danach klicken Sie auf [Next].Die Treiber Installation startet automatisch.Nach Beendung klicken Sie auf [Fertigstellen] um die Installationabzuschließen.Wenn die Installation beendet ist, können Sie prüfen ob das DR301 richtig erkannt wird und ob der Treiber korrekt installiert wurde, indem Sie den Der Up- oder Download kann ganz einfach durch Kopieren und Einfügen der Dateien auf das "Externe Laufwerk" ausgeführt werden.Um dies zu vermeiden verfahren Sie folgendermaßen: Doppelklick auf das CD-Symbol in der Taskleiste.Dann klicken Sie auf [USB DISK] und dann auf [Stop]. Ein Bestätigungs-fenster öffnet sich.Klicken Sie auf die USB DISK in diesem Fenster und dann auf [OK]. Das System bestätigt mit "USB Disk can now be safely removed from the system".Achten Sie darauf, das USB Kabel am DR 301 abzuziehen, um Hard-oder Software-Probleme bei DR 301 und PC zu vermeiden.wird aufgrund eines fehlerhaften Downloads, kann es unter Umständen Hierfür klicken Sie mit der rechten Maustaste auf das externe Laufwerk.Wählen Sie "FORMAT" und bestätigen Sie durch anklicken.Frequency FrequencyFrequencyDas Gerät lässt sich nicht einschalten.Es wird kein DAB Signal empfangen.Der Ton setzt aus, oder Sie hören überhaupt nichts mehr.Es wird ein DAB Signal empfangen, aber Sie hören nichts.1086127.3 (mm) 4.25 2.44 1. 07(Inch) -5C ~ +35C-40C ~ +80CMP2 / MP3 / WMAKeine Tasteneingabe möglichBildschirm ist zu schwach zu erkennen.Das Display schaltet nicht ein.Überprüfen Sie die Display-Einstellungen. Wechseln Sie die Batterien (Das DR301 schaltet。
PIONEER 双区域双色调灯 CD 收音机说明书
Hit the road with your favorite tracks. With AOA 2.0 compatibility, get seamless control of your music from your Android device.•55 watt x 4 Dynamic Reality Amp 1•Enhanced smartphone connectivity with AOA 2.0•Advanced sound with EQ10, EXTRA Bass, and HPF/LPFcrossovers•2-Zone Dynamic Color Illuminator ® with SoundSynchronization•Front AUX and USB for iOs & MSC/MTP USB devices 2•SiriusXM™ Satellite radio ready 4•Works with Pandora ® for iOS•MP3/WMA/FLAC music file playback support for USB 3•Intuitive Quick-BrowZer® and Jump Mode search features •Digital Clarity Tuner with RDS•2-Volt rear and sub RCA preamp outputs •Detachable faceplate with LCD display •Steering wheel remote control input ready 5•Convenient wireless remote (RM-X211)Powerful in-dash amplification 1The redesigned, internal Dynamic Reality Amp circuitry boasts 47% lower internal resistance compared to conventional receivers, delivering 55 watts x 4 to your interior speakers.1 This allows you to crank up the volume while maintaining low distortion, low noise levels and smooth frequency response. Your music isn’t just louder, its clearer too.Enhanced smartphone connectivity with AOA 2.0AOA (Android Open Accessory) allows many Android phones with OS 4.1 and up transfer audio to a car stereo via USB. While connected, use the receiver’s controls to play, pause, and skip tracks and charge your device at the same time.Advanced sound with EQ10, EXTRA Bass, and HPF/LPF crossoversThe new Advanced Sound Engine includes adjustable 10 band equalizer, digital LPF/HPF crossovers and EXTRA Bass that enhances low frequency playback.2-Zone Dynamic Color Illuminator ® with Sound SynchronizationExperience up to 35,000 different color variations as they pulse in time to the beat, with the new two-zone Dynamic Color Illuminator. You can also customize your own double line LED display to create the right atmosphere for your drive.Front AUX and USB for iOs & MSC/MTP USB devices 2Connect control & charge your Walkman ®, iPod ®, iPhone ®, Android™, Blackberry ®, or other compatible USB device while accessing your digital music files via the front USB input.2 You can also view metadata like song title and artist on the front display. The front USB port provides up to 1 amp maximum output for charging your portable devices.SiriusXM™ Satellite radio ready 4The on-board SiriusXM™ connector simplifies satellite radio installation by eliminating compatibility issues and providing direct connection to the latest platform of tuners.4Works with Pandora ® for iOSPandora ® is the leading internet radio service, giving people music they love anytime, anywhere, through personalized radio stations. The receiver provides complete access to your Pandora account using your iPhone ®.MP3/WMA/FLAC music file playback support for USB 3Multi-format playback lets you play your MP3, WMA or FLAC files from a MSC/MTP compatible USB device.3Intuitive Quick-BrowZer ® and Jump Mode search featuresUse Quick-BrowZer ® to find music by artist, album, genre, song or playlist. Use Jump Mode to fast forward through a category in 10% increments to help you find a specific song.Digital Clarity Tuner with RDSSiriusXM ready CD ReceiverCDX-G3206UVThe Digital Clarity Tuner delivers industry leading signal to noise ratios, lower interference, better multipath rejection and better stereo separation. The RDS feature displays broadcast information when listening to compatible AM/FM stations.2-Volt rear and sub RCA preamp outputsWhen you’re ready to expand your system, the receiver delivers 2 volt RCA pre-amp outputs for external front, rear and subwoofer amplifiers. The adjustable subwoofer level control also lets you dial in the bass when you’re ready to pump it up.Detachable faceplate with LCD displayThe easy-to-read LCD display shows source and call information, clock, station ID and track data when playing back digital files from CD, streaming audio or external USB devices. Front auxiliary input lets you connect almost any portable audio device to your car's sound systemSteering wheel control ready input5This receiver is compatible with aftermarket remote control adapters designed to utilize the vehicles existing, primary radio controls directly from the steering wheel.5 The 1/8” rear panel mounted remote input jack allows for simple connectivity. Configurable steering wheel remote control input readyRetain factory steering wheel controls without an adapter. (RC-SR1 required).Convenient wireless remote includedControl your receiver with the included wireless card remote (RM-X211).Specifications1. Rated Power: CEA2006 Standard Power Output: 20 Watts RMS × 4 at 4 Ohms 1% THD+N SN Ratio: 80 dBA(reference: 1 Watt into 4 Ohms).2. Not all USB devices are compatible. Consult for complete details.3. Not all files may playback due to file variations. Copyright protected ACC-LC files not supported.4. Requires tuner and subscription, sold separately5. Compatibility varies as not all vehicles are compatible; please consult with each interface manufacturer fordetails.Made in China。
TECSUN收音机说明书
一、选择波段收音机开机后,您可以按调频/中波转换按键(15),选择调频或中波波段,按短波·米波段转换键(16)可选择短波波段,屏幕上会显示您按键后选择的波段。
在选择短波波段后,可用短波·米波段转换键 (16)选择不同的短波米波段,每按一下此键,则从当前米波段跳到下一个米波段的最低频率。
当利用短波·米波段转换键切换到短波米波段后,并在 3 秒钟内按上、下(9、10)调节键,可向上或向下选择短波米波段。
利用短波·米波段选择按键(16)切换到短波米波段时,显示屏右上方同时显示米波段数字,停止米波段切换操作 3 秒钟后,自动返回到时间显示状态。
这时,上、下键也从短波米波段选择切换状态返回到调整频率状态。
本机短波米波段频率扫描范围,比国际标准短波米波段范围稍宽。
二、搜索电台pl-550 有七种搜索电台的方法: 1.手动搜索电台;2.自动搜索电台;3.直接输入电台频率;4.调频/中波的自动存台(ats)功能; 5.直接输入2位存储地址数字,调出当前页面下的地址频率;6.进入搜索存储器状态,手动或自动搜索已存储的电台频率;7.用旋转式调谐钮调出已存储的电台。
(1)手动搜索【方法一】手动搜索电台:利用向上或向下调节键(9或10)或用旋转式调谐旋钮(28)搜索电台,搜索过程中,可按调台快慢键(8)选择快速或慢速调谐步进,各波段频率按下表规定的步长标准变化,直到找到电台为止。
手动调谐适合于:——搜索那些比较弱的电台信号;——搜索密集拥挤的强电台信号;——搜索那些频率不在米波段范围内的短波电台信号,而且可以从1711到 29999 khz 频率范围内逐点搜索电台信号。
旋转式频率微调旋钮的其它重要用途:当相邻的频率有很强电台,其声音隐隐约约地串入您正在收听的电台频率时,您可以利用旋转式调谐旋钮,把频率故意微调偏离正常收听的频率,以避开干扰,fm微调,mw和sw微调1-2khz。
【方法二】自动搜索电台:按住向上或向下调节键(9或10),直到显示频率自动变化即松手,当收到电台时会自动停止搜索。
TOA DT-920 电子调制收音机用户手册说明书
OPERATING INSTRUCTIONS AM/FM SYNTHESIZERDT-920 TUNERPlease follow the instructions in this manual to obtain the optimum results from this unit.We also recommend that you keep this manual handy for future reference.TOA CorporationCONTENTSTO USE YOUR UNIT PROPERLY AND SAFELY ACCESSORIESCONNECTIONSCONTROLSLISTENING TO THE RADIOFREQUENCY UP/DOWN TUNINGDIRECT TUNINGAUTOMATIC OR MANUAL PRESET TUNING LISTENING TO PRESET STATIONS MAINTENANCETROUBLESHOOTING GUIDE SPECIFICATIONS 1 1 2 3 3 3 4 4 5 6 6 6TO USE YOUR UNIT PROPERLY AND SAFELY- Do not damage the power cord.- When not in use, disconnect the power cord from the outlet. Grasp the plug, not the cord, when disconnecting the unit.- If water should enter the unit, electrical shock or a malfunction may result. Use in an area where there is low humidity and little dust.- Do not disassemble or alter the unit in any way.CAUTIONTHIS UNIT SHOULD NOT BE ADJUSTED OR REPAIRED BY ANYONE EXCEPT PROPERLY QUALIFIED SERVICE PERSONNEL.WARNING!TO AVOID THE HAZARDS OF FIRE OR ELECTRICAL SHOCK, DO NOT EXPOSE THIS APPLIANCE TO RAIN OR OTHER MOISTURE.ACCESSORIESAM loop antenna Part No. 614 240 0845FM indoor antennaPart No. 614 023 7481RCA plug audio cablePart No. 645 005 0534 ATTENTIONFor your protection in the event of theft or loss of this product, please fill in the information below for your own personal records.DT-920 Model No.Date of PurchaseWhere Purchased Serial No.(Located on the back of the unit) Purchase PriceWARNING: TO PREVENT FIRE OR SHOCK HAZARD, DO NOT EXPOSETHIS APPLIANCE TO RAIN OR MOISTURE.RISK OF ELECTRIC SHOCKDO NOT OPENThese markings are located on the bottom, side or back of the unit.CAUTION: TO PREVENT THE RISK OF ELECTRIC SHOCK, DO NOT REMOVE COVER (OR BACK). NO USER-SERVICEABLE PARTS INSIDE. REFER SERVICING TO QUALIFIED SERVICE PERSONNEL.This symbol indicates that dangerousvoltage constituting a risk of electric shock is present within this unit.This symbol indicates that there are important operating and maintenance instructions in the literature accompany-ing this unit.CONNECTIONS1. Connect the FM and AM antennas as shown below.FM antennaThe T-shaped indoor FM antenna (300-ohm) is sufficient to receive most local FM broadcasts and should be connected to the rear FM terminals on the DT-920.Infringe areas, or w here reception is distorted or noisy,an FM outdoor antenna (not supplied) should be connected instead of t he indoor a ntenna. The t erminals will accept 300-ohm twin lead cable.AM antennaThe AM loop antenna issufficient to receive most local AM broadcasts.Assemble the loop antenna Unwind the antenna wires (about 3 turns), then connect them to the AM LOOP terminals. Place the loop antenna in a position which yields the best AM reception, or attach it to a wall or other surface as shown.NOTE:To minimize noise...- Keep the speaker wires, power cord and all other cables away from the antennas.- Do not place the antenna close to a TV or speaker.2. Connect one end of a supplied audio cable to the OUTPUT (1 or 2) jack on the TUNER and the other end to the AUX input jack (-20 to 0dBV, 10k ) of the 900series II amplifier.3. After making all the connections, connect t he AC power cord to 120V AC 60Hz outlet.This unit is equipped with a polarized plug. If you have difficulty inserting the plug, turn it over and reinsert it. If the unit will not be used for a long time, disconnect the AC plug from the AC outlet.CAUTION: TO PREVENT ELECTRIC SHOCK, MATCH WIDE BLADE OF PLUG TO WIDE SLOT, FULLY INSERT.ATTENTION:POUR ÉVITER LES CHOCS ÉLECTRIQUES, INTRODUIRELA LAME LA PLUS LARGE DE LA FICHE DANS LA BORNE CORRESPONDANTE DE LA PRISE ET POUSSER JUSQU'AU FOND.CAUTION:Loose or incorrect connections will result in poor sound or improper operation.900 SERIES II AMPLIFIERDT-920CONTROLS1. Power button (POWER)2. Channel/Frequency select button (CH/FREQ)3. Display (MULTI-FUNCTION DISPLAY)4. Band select button (BAND)5. Tuning button (DOWN TUNING UP)6. Preset tuning buttons (PRESET)7. Direct-in button (DIRECT IN)8. Memory button (MEMORY)9. Scan level button (SCAN LEVEL)10. Automatic/Manual tuning select button(AUTO/MANUAL)LISTENING TO THE RADIOPreparation 1. Press the POWER button on the tuner.FREQUENCY UP/DOWN TUNINGAutomatic tuningManual tuning1. Press the BAND button to select AM or FM.2. Press the CH/FREQ button to select the frequency mode. "FREQ" appears.3. Press the AUTO/MANUAL button to select the automatic tuning mode. "AUTO" appears.4. Press the SCAN LEVEL button to select the desired scanning level, "SCAN 1" or "SCAN 2."SCAN 1: To receive stations with weak signals SCAN 2: To receive stations with strong signals 5. Press the TUNING "UP" or "DOWN" button.The unit will scan up or down the band and receive the next station with a signal that is at least as strong as the scanning level selected in step 4.6. Adjust f or t he d esired s ound quality w ith t he a ppropriate controls of the connected amplifier.1. Press the BAND button to select AM or FM.2. Press the CH/FREQ button to select the frequency mode. "FREQ" appears.3. Press the AUTO/MANUAL button to select the manual tuning mode. ("AUTO" disappears and "MONO" appears when FM band is selected.)4. Press and hold the TUNING "UP" or "DOWN" button until the desired station frequency appears on the display.- Press and release the TUNING "UP" or "DOWN"repeatedly change the selected frequency one step at a time.DIRECT TUNING1. Press the BAND button to select AM or FM.2. Press the DIRECT IN button."FM ---. -- MHz" or "AM - - - - kHz" appears and blinks.3. Press the PRESET buttons (1 - 0) to enter the frequency of a broadcast station.Example:FM 98.1 MHz... Press 9, 8 and 1.FM 103.5 MHz... Press 1, 0, 3 and 5.AM 560 kHz... Press 5 and 6.AM 1680 kHz... Press 1, 6 and 8.NOTE:If you try to enter an incorrect station frequency (86.0MHzor 500kHz, for example), the display will continue to blink until the correct number is entered.AUTOMATIC OR MANUAL PRESET TUNINGAutomatic preset tuning (APT)Manual preset tuning1. Press the BAND button to select AM or FM.2. Press the SCAN LEVEL button to select the desired scan level, "SCAN 1" or "SCAN 2."3. Press and hold down the MEMORY button for at least 3seconds, until "APT" and "CH" blink, then release the button.The unit w ill s tart at t he low end of t he s elected band and scan upward (higher frequency numbers). Up to 20stations will be memorized automatically.After the last station is programmed, the lowest preset station number will be selected. "APT" disappears.4. To automatically preset stations on the other band,press the BAND button, then follow steps 1 - 3 above.IMPORTANT NOTE- If APT is activated, all previously programmed stations will be cleared and new stations will be programmed.- FM stations will be automatically programmed into CH01- CH20.AM stations will be automatically programmed into CH21 - CH40.1. Press the BAND button to select AM or FM.2. Tune in a station as described in "FREQUENCY UP/DOWN TUNING" or "DIRECT TUNING."3. Press the MEMORY button. "MEMO" appears and "CH - -" blinks.4. Press two PRESET buttons (1 - 0) while "CH - -" is blinking.When presetting stations, two buttons must be pressed (except when presetting CH40).Example:CH01 ....... Press "0" and "1".CH05 ....... Press "0" and "5".CH12 ....... Press "1" and "2".CH39 ....... Press "3" and "9".CH40 ....... Press "4" only.The selected station is now programmed. The preset channel number and the frequency of the programmed station appear on the display.NOTES:- You cannot enter preset numbers above CH40.- If a new station is programmed into a band and preset number already containing a programmed station, the previously programmed station will be cleared.5. To manually preset stations on the other band, press the BAND button, then follow steps 1 - 4 above.LISTENING TO PRESET STATIONSProgram stations as described in "AUTOMATIC OR MANUAL TUNING."Using the TUNING "UP" or "DOWN" buttonUsing the PRESET button1. Press the CH/FREQ button to select the channel mode.("FREQ" disappears.)2. Press the TUNING "UP" or "DOWN" button until the desired channel number appears on the display.- The preset station for the selected channel number can be heard.1. Press two PRESET buttons (1 - 0) to select the desired channel number.Example:CH01 ... Press "0" and "1".CH05 ... Press "0" and "5".CH12 ... Press "1" and "2".CH39 ... Press "3" and "9".CH40 ... Press "4" only.You cannot enter preset numbers above CH40.- The preset station for the selected channel number can be heard.- If a channel number which has not been preset is entered,"----" appears f or 2 seconds and t he previous station is selected.Changing the reception frequenciesIt is not necessary to perform this procedure in U.S.A and CANADA.1. Select the band to be changed.2. Turn the power off.3. While pressing the BAND button, press the POWER button.AM: 520 - 1710 kHz (10 kHz steps)522 - 1710 kHz (9 kHz steps)FM: 87.9 - 107.9 MHz (200 kHz steps)87.5-108.0 MHz (50 kHz steps)- The preset stations will be retained in the memory even if the unit is turned off.If the memory contents are lost due to a power failure or other condition, preset the stations again.WHAT TO DO IF ...If t he operation of the unit or display is not normal, or you wish to clear the contents of the memory, disconnect the power cord from the AC outlet, then press the RESET button (rear of the unit) for at least 20 seconds.MAINTENANCECleaning the cabinetUse a clean soft cloth moistened with plain lukewarm water and wrung dry. Never use benzol, benzene or other strong chemical cleaners since these could damage the finish of your unit. It is important that no liquid reaches the inside of the unit.WARNING:FOR YOUR PERSONAL SAFETY, BE SURE TO DISCONNECT THE AC POWER CORD BEFORE PROCEEDING WITH ANY MAINTENANCE OR CLEANING.TROUBLESHOOTING GUIDEIf you have followed the instruction and are having difficulty operating the unit, locate the SYMPTOM in the left column below. Check the corresponding POSSIBLE CAUSE and CORRECTIVE ACTION columns to locate and remedy the problem.Servicing:Should this product require service, refer to the TOA Electronics, Inc., TOA Canada Corporation warranty.SPECIFICATIONS DT-920Tuning range AM:FM:520kHz - 1710kHz (10kHz steps)/522kHz - 1710kHz (9kHz steps)87.9MHz - 107.9MHz (200kHz steps)/87.5MHz - 108.0MHz (50kHz steps)FM usable sensitivity AM usable sensitivity Power requirements Power consumption Dimensions (W x H x D)Weight 14.7dBf 700µV/m 120V AC ±10%, 60Hz 6 Watts Approx. 420 x 82 x 270 mm Approx. 2.8 kgIMPORTANT INFORMATIONAll specifications are subject to change without notice.SYMPTOMNo power when the POWER button is set to ON.Poor FM reception.Continuous or intermittent hissing noise during AM reception, especially at night.A humming noise can be heard during AM broadcast reception.The tuner operation or display is not normal.POSSIBLE CAUSENo power plug connection at the AC outlet.No antenna is connected.Shorted or faulty connection(s) between the FM antenna and the tuner.The antenna is not positioned for the best reception.Noise caused by motors, fluorescent lamps,lightning, television. etc.The power cord may be too close to the AM loop antenna or the antenna wire.The memory must be reset.CORRECTIVE ACTIONInsert power plug into the AC outletConnect the supplied FM antenna to the FM antenna terminals on the rear panel of the unit.Refer to the "CONNECTIONS" section.Check the connections to the FM antenna terminals on the rear panel of the unit.Change the position of the antenna. Refer to the "CONNECTIONS" section.Keep the unit away from noise sources.Install an outdoor AM antenna (Noise may bereduced, but not completely eliminated.)Position the power cord away from the antennaline and the AM loop antenna.Adjust the position of the AM loop antenna.Disconnect the power cord, then press theRESET button (rear of the tuner) at least 20seconds. See page 5.FCC INFORMATIONThis device complies with Part 15 of the FCC Rules.Operation is subject to the condition that this device does notcause harmful interference.CAUTION:Changes or modifications not expressly approved by TOA mayvoid the user's authority to operate this equipment.Printed in Hong KongTOA Corporation1AD6P1P0022--A。
基于Goldwave的DVOR莫尔斯识别码的提取
• 9•1 引言甚高频全向信标(VOR)是民航中广泛使用的陆基无线电导航设备,地面天线向天空中辐射电磁场,飞机机载设备接收到地面设备的信号后即可判断和VOR的相对方位。
配合测距机(DME)使用,即可利用距离-方位角确定飞机的位置。
VOR分为CVOR 和DVOR(多普勒VOR)两种,目前我国民航使用的VOR主要为DVOR。
D V O R设备主载波频率范围为108M H z-118M H z(或117.975MHz,不同的文件规定的范围不同),发射调制后的基准相位信号、可变相位信号和识别信号。
识别信号通常是三个英文字母,用1020Hz正弦单音的莫尔斯电码表示,即莫尔斯识别码。
飞行员通过识别码即可判断飞机接收到的信号是否来自预选的导航台。
由于莫尔斯电码国际上采用统一的编码,故本文不再赘述具体编码。
Goldwave是一款音频文件处理软件,可对wav、mp3等格式的音频文件进行处理。
笔者在DVOR台前用收音机接收到DVOR台的信号,并进行录音,然后用Goldwave读取音频文件,经过处理,成功提取到1020Hz莫尔斯识别码。
本文对莫尔斯识别码的提取过程进行了介绍。
2 准备工作由于DVOR设备的主载波频率范围超出普通收音机接收的频率范围,故选用德生DR-920型收音机,经拆卸后修改四联,成功将接收频率范围覆盖到DVOR主载波频率范围。
兰州DVOR和忠和DVOR是兰州中川机场的进离场程序中使用的两个DVOR台。
兰州DVOR是Indra公司生产的VRB-53D型设备,识别码为DNC;忠和DVOR是SELEX公司生产的1150A型设备,识别码为DZH。
笔者实地来到两个DVOR台前,用改装过的DR-920型收音机接收DVOR台信号,并用音频线录制音频文件,最后用Goldwave软件读取录制好的音频文件,并进行处理。
3 均衡器处理均衡器是Goldwave软件中自带的信号处理工具,可以对不同频率的信号的增益进行调整。
由于莫尔斯识别码是1020Hz正弦单音信号,故在均衡器中提升1kHz频率增益,降低其他频率增益,用均衡器处理两遍。
- 1、下载文档前请自行甄别文档内容的完整性,平台不提供额外的编辑、内容补充、找答案等附加服务。
- 2、"仅部分预览"的文档,不可在线预览部分如存在完整性等问题,可反馈申请退款(可完整预览的文档不适用该条件!)。
- 3、如文档侵犯您的权益,请联系客服反馈,我们会尽快为您处理(人工客服工作时间:9:00-18:30)。
矿产资源开发利用方案编写内容要求及审查大纲
矿产资源开发利用方案编写内容要求及《矿产资源开发利用方案》审查大纲一、概述
㈠矿区位置、隶属关系和企业性质。
如为改扩建矿山, 应说明矿山现状、
特点及存在的主要问题。
㈡编制依据
(1简述项目前期工作进展情况及与有关方面对项目的意向性协议情况。
(2 列出开发利用方案编制所依据的主要基础性资料的名称。
如经储量管理部门认定的矿区地质勘探报告、选矿试验报告、加工利用试验报告、工程地质初评资料、矿区水文资料和供水资料等。
对改、扩建矿山应有生产实际资料, 如矿山总平面现状图、矿床开拓系统图、采场现状图和主要采选设备清单等。
二、矿产品需求现状和预测
㈠该矿产在国内需求情况和市场供应情况
1、矿产品现状及加工利用趋向。
2、国内近、远期的需求量及主要销向预测。
㈡产品价格分析
1、国内矿产品价格现状。
2、矿产品价格稳定性及变化趋势。
三、矿产资源概况
㈠矿区总体概况
1、矿区总体规划情况。
2、矿区矿产资源概况。
3、该设计与矿区总体开发的关系。
㈡该设计项目的资源概况
1、矿床地质及构造特征。
2、矿床开采技术条件及水文地质条件。