Hunter L, a, b Color Scale
L A B详解
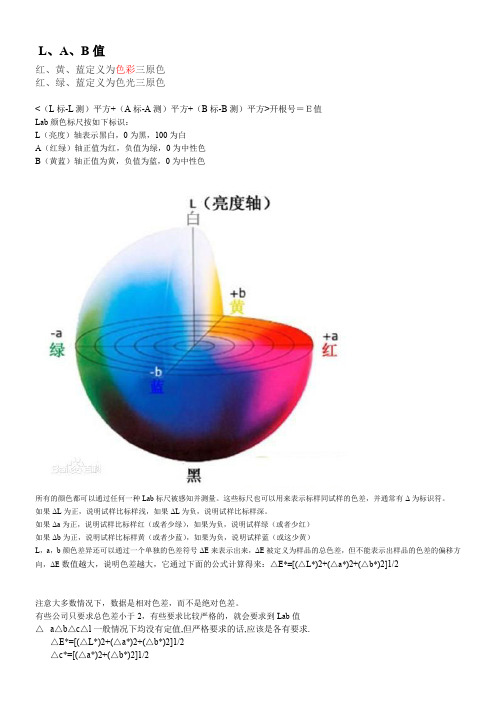
L、A、B值红、黄、蓝定义为色彩三原色红、绿、蓝定义为色光三原色<(L标-L测)平方+(A标-A测)平方+(B标-B测)平方>开根号=E值Lab颜色标尺按如下标识:L(亮度)轴表示黑白,0为黑,100为白A(红绿)轴正值为红,负值为绿,0为中性色B(黄蓝)轴正值为黄,负值为蓝,0为中性色所有的颜色都可以通过任何一种Lab标尺被感知并测量。
这些标尺也可以用来表示标样同试样的色差,并通常有Δ为标识符。
如果ΔL为正,说明试样比标样浅,如果ΔL为负,说明试样比标样深。
如果Δa为正,说明试样比标样红(或者少绿),如果为负,说明试样绿(或者少红)如果Δb为正,说明试样比标样黄(或者少蓝),如果为负,说明试样蓝(或这少黄)L,a,b颜色差异还可以通过一个单独的色差符号ΔE来表示出来,ΔE被定义为样品的总色差,但不能表示出样品的色差的偏移方向,ΔE数值越大,说明色差越大,它通过下面的公式计算得来:△E*=[(△L*)2+(△a*)2+(△b*)2]1/2注意大多数情况下,数据是相对色差,而不是绝对色差。
有些公司只要求总色差小于2,有些要求比较严格的,就会要求到Lab值△a△b△c△l一般情况下均没有定值,但严格要求的话,应该是各有要求.△E*=[(△L*)2+(△a*)2+(△b*)2]1/2△c*=[(△a*)2+(△b*)2]1/2如果△E小于等于2.0,建议△a△b△l均小于等于1.5一般的,△E在1.5时目视可以分辨.CIELab和Lch的色彩空间图?CIE色空间坐标图∙CIELAB∙LAB色空间是基于一种颜色不能同时既是蓝又是黄这个理论而建立。
所以,单一数值可用于描述红/绿色及黄/蓝色特徽。
当一种颜色用CIEL*a*b*时,L*表示明度值;a*表示红/绿及b*表示黄/蓝值。
∙CIELCH∙CIELCH颜色模型采用了同L*a*b*一样的颜色空间,但它采用L表示明度值;C表示饱和度值及H表示色调角度值得柱形坐标。
hunter标准

hunter标准
HUNTER标准,也称为HUNTER色盲标准,是一种用于检测色盲和色弱的标准测试。
它是基于对颜色差异的感知和识别能力来评估个体是否存在色觉障碍。
HUNTER标准通常包括一系列不同颜色和形状的图案,要求个体识别或匹配特定的颜色或图案。
通过比较个体在不同测试中的表现,可以判断其是否存在色盲或色弱,以及其色觉障碍的类型和程度。
需要注意的是,HUNTER标准并不是绝对准确的,因为个体的色觉感知能力可能会受到多种因素的影响,如年龄、视觉疲劳、疾病等。
此外,不同人之间的色觉感知能力也存在差异,因此对于某些个体来说,即使通过了HUNTER标准,也可能存在色觉障碍。
因此,在使用HUNTER标准进行色觉检测时,需要综合考虑个体的背景和具体情况,并结合其他测试方法来确定其是否存在色觉障碍。
如果您对自己的色觉状况有疑问,建议咨询专业的眼科医生进行评估和诊断。
IEC ColorMaster收源云云色云颜色处理系统产品说明书

Streamlined Workflows•Quickly switch between jobs and save time by applying dynamic Formulation Rules that include process, colorant and customer specifications.•Significantly reduce waste, costs, and environmental impact using new Batch Recycle and Waste Work-Off capabilities that allows you to formulate using leftover materials.•Visually evaluate achievability using the Gamut Viewer, which offers a unique target overlay to help make educated formulation decisions.• Directionally adjust formulations to reduce process and material variations that occur between laboratory and production.• Improve operator confidence and reduce training time with a modern, user-friendly interface.•Simplify customer specification of Pantone standards by enabling PantoneLIVE, which provides spectral values for Pantone standards.Unrivaled Match Performance•Increase match rate up to 50% and cut correction steps in half with the new match engine and Search and Correct algorithm that more accurately identifies candidate formulas.•Maximize productivity and formulation efficiency with the updated, fully-integrated Colorant Assortment Editor, which provides specific guidance to better characterize your colorants, and guarantees match prediction confidence.Optimized Legacy Data• Leverage new matching technology to gain insights from historical data and accelerate the formulation process.•Improve database performance by identifying opportunities to enhance the value of your color data using the built-in Color Assortment Editor.•Easily transition your customer data from legacy systems for use in Color iMatch with support from our dedicated, industry-specific applications team.Color Matching and Formulation SoftwareExcellence in Color FormulationFewer steps, fewer corrections, better matches. Color iMatch is the industry’s smartest formulation engine. Using multi-flux technology, it intelligently processes color data to provide optimal initial color matches and reduce wasteful formulation attempts. Color iMatch has the power to streamline complicated workflows, improve formulation efficiency, and reduce wasted time and materials to return your investment quickly.At each step in the process, Color iMatch delivers initial matches with an average delta E that is halfthat of our competitors.For more information regarding this product, visit /color-imatchColor iMatche n t ai l a b l eX-Rite is either a registered trademark or trademark of X-Rite, Incorporated in the United States and/or other countries. PANTONE©, PantoneLIVE and other Pantone trademarks are the property of Pantone LLC. All other trademarks or registered trademarks are the property of their respective owners. © X-Rite, Inc. 2020. All rights reserved. L10-668-EN (10/20)Service Support and WarrantyX-Rite’s color analysis and measurement solutions are engineered and manufactured to the most rigorous quality standards. These standards are backed by comprehensive global service, superior phone and web support, and preventative maintenance options to optimize your long-term investment. We have developed service support and warranty plans that are unique to your organization’s specific products and needs. Learn more by reviewing our service offerings on our website at: /page/service-warranty . Still unsure of what you need? Contact us directly at:************************Management access is available through a unique Management configuration. Server-based configurations are also available. Ask your sales rep for more details.Measurement Conditions Reflectance, Transmission, Reflectance / Transmission, Over Light / Over Dark, SCI / SCEColor Differences FMCII, CIE DL*, Da*, Db*, CIE DL*, DC*, DH*, Hunter DL, Da, Db, All Attributes of CIELab, CIELch or HunterLab, CMC (l:c), CIE2000 (l:c:h), and more. Ask your sales rep for your specific needs.Color Spaces CIE L*a*b*, CIE L*C*h*, Hunter Lab, CIE (XYZxy)Illuminants D50, D55, D65, D75, F2, F7, F11, C, A, Horizon, TL84, Ultralume 3000, CIE LED, and more. Ask your sales rep for your specific needs.Observers 2 degree,10 degreeStandard IndicesWhiteness [ASTM E313, CIE, GANZ, Berger, Stensby, Taube, Tappi], Yellowness [ASTM E313, D1925], Opacity [Contrast Ratio, Tappi], Strength [SWL, Summed, Weighted Sum], Haze, Munsell Notation, Orange Juice, Gloss [ASTM E429, Gloss60], Grey Scale [ISO 105, Staining, Color Change], Metamerism, Color Constancy Index, APHA, Gardner Color Index, ASTM Color Index, Saybolt Color Index, AATCC TM203 Light Blocking Index, DIN55979 Blackness Index, G7 Substrate Compensation Configuration Options Basic, Professional, Management, Satellite, Online Editions Databases MS Access, MS SQL Server Experience Level Beginner to Advanced Import/Export Format CxF, JB5, MIF, QTXLanguages Supported English, French, German, Spanish, Italian, Portuguese, Japanese, ChineseSupported DevicesCi7860, Ci7800, Ci7600, Ci7500, Ci64, Ci62, Ci4200, Ci52, VS3200, 964, 962, CE-7000A, Color i5, Color i7, eXact, eXact XP , SP62, SP64 and most other industry instrumentsSpecificationsFor more information regarding this product, visit /color-imatch。
EU-ME2、EU-ME2 Premier Plus流式模式快速参考指南说明书

CAUTION: This quick reference guide is only a summary of the EU-ME2, EU-ME2 Premier Plus Instructions for Use. For detailed operating instructions, be sure to followthe EU-ME2, EU-ME2 Premier Plus Instruction Manual included with your EU-ME2 or EU-ME2 Premier Plus purchase.EU-ME2, EU-ME2 Premier PlusQuick Reference Guide - FLOW Mode1 P ress the FLOW key on the keyboard.* The LCD touch panel automatically switches from MAIN MENU to FLOW MAIN .2S imultaneously, the ultrasound image on the monitor switches to the FLOW mode. Ensure that the ROI with colorappears on the image.3S elect a FLOW mode: COLOR , POWER , or H-FLOW .COLOR FLOWPOWER FLOWH-FLOWFLOW MAINT ouch Panel: MAIN MENUGray scale Color scale(Value: velocity range)CAUTION: This quick reference guide is only a summary of the EU-ME2, EU-ME2 Premier Plus Instructions for Use. For detailed operating instructions, be sure to followthe EU-ME2, EU-ME2 Premier Plus Instruction Manual included with your EU-ME2 or EU-ME2 Premier Plus purchase.4 S elect the LOCATION button and adjust the ROI position. The ROI can be moved by using the ROI buttons or the trackball .5S elect the SIZE button and adjust the ROI size. The ROI size can be adjusted by using the ROI buttons or the trackball .6U se the FLOWkey to exit the FLOW mode.ROIROITrackballTrackballROI ButtonsCAUTION: This quick reference guide is only a summary of the EU-ME2, EU-ME2 Premier Plus Instructions for Use. For detailed operating instructions, be sure to followthe EU-ME2, EU-ME2 Premier Plus Instruction Manual included with your EU-ME2 or EU-ME2 Premier Plus purchase.Display (Single/Dual)1P ress the DISPLAY button to switch between single-screen display and dual-screen display.1Detect blood flow in B mode or FLOW mode.SINGLEDUALFLOW ModeSwitchB Mode and FLOW Mode1P ress the FLOW GAIN buttons to adjust the sensitivity of the flow signal in the FLOW mode.* Flow gain can be adjusted in 32 steps.FLOW GAIN buttonsCAUTION: This quick reference guide is only a summary of the EU-ME2, EU-ME2 Premier Plus Instructions for Use. For detailed operating instructions, be sure to followthe EU-ME2, EU-ME2 Premier Plus Instruction Manual included with your EU-ME2 or EU-ME2 Premier Plus purchase.3T he PW CURSOR (two short lines) is shown at the center of the left image. Move the PW CURSOR to the blood flowusing the trackball .4P ress the PW STARTbutton and the Pulse Wave Doppler Waveform starts.PW CURSORPW START ButtonPulse WaveDoppler Waveform2P ress the PW key on the keyboard. Simultaneously, the image switches to the PW mode.* The LCD touch panel automatically switches from MAIN MENU to PW MAIN .CAUTION: This quick reference guide is only a summary of the EU-ME2, EU-ME2 Premier Plus Instructions for Use. For detailed operating instructions, be sure to followthe EU-ME2, EU-ME2 Premier Plus Instruction Manual included with your EU-ME2 or EU-ME2 Premier Plus purchase.Sample Volume1T he SAMPLE VOLUME button designates the width of the blood flow from which Pulse Wave Doppler is acquired. Makesure the cross-sectional surface is positioned between the two lines. Press the SAMPLE VOLUME button to adjust the width of the two lines. The width can be adjusted with the trackball or ARROWkeys.1T he volume of Pulse Wave Doppler Waveforms can be adjusted. Select the PW ADJUST tab and adjust the volume usingthe VOLUME buttons. Pulse Wave Doppler sound can be output from the bottom of the EU-ME2. The adjusted volume setting is saved and recalled the next time the EU-ME2 is used.CAUTION: This quick reference guide is only a summary of the EU-ME2, EU-ME2 Premier Plus Instructions for Use. For detailed operating instructions, be sure to followthe EU-ME2, EU-ME2 Premier Plus Instruction Manual included with your EU-ME2 or EU-ME2 Premier Plus purchase.1A djusting the Base Line position up or down using the BASELINE button corrects the views of Pulse Wave DopplerWaveforms by avoiding imbalanced views. The BASELINE button, on the LCD touch panel, is highlighted during Base Lineadjustment. Touching the button again returns to the original display.Olympus is a registered trademark of Olympus Corporation, Olympus America Inc., and/or their affiliates.。
猎人Avia II 59601 59593 吊扇安装说明书

Installation Manual©2018 Hunter Fan Co.Model: 59601 Brushed Nickel 59593 Matte Black Fan weight ±2 lbs: 8.9 kg / 19.6 lbCheck out the installation video at:http://bit.ly/HunterAvia2We’re here to help!c.1 - All wiring must be in accordance with national and local electrical codes ANSI/NFPA 70. If you are unfamiliar with wiring, use a qualified electrician.c.2 - Use only Hunter replacement parts.This equipment has been tested and found to comply with the limits for a Class B digital device, pursuant to part 15 of the FCC Rules. These limits are designed to provide reasonable protection against harmful interference in a residential installation. This equipment generates, uses and can radiate radio frequency energy and if not installed and used in accordance with the instructions may cause harmful interference to radio communications.However, there is no guarantee that interference will not occur in a particular installation. If this equipment does cause harmful interference to radio or television reception, which can be determined by turning the equipment off and on, the user is encouraged to try to correct the interference by one or more of the following measures:• Reorient or relocate the receiving antenna.• Increase the separation between the equipment and receiver.• Connect the equipment into an outlet on a circuit different from that to which the receiver is connected.• Consult the dealer or an experienced radio/TV technician for help.Caution: modifications not approved by the party responsible for compliance could void user’s authority to operate the equipment.This device complies with Part 15 of the FCC Rules. Operation is subject to the following two conditions: (1) This device may not cause harmful interference, and (2) this device must accept any interference received, including interference that may cause undesired operation.This product conforms to UL Standard 507.Certified to CSA Standard C22.2 No. 113We recommend that you pull everything out of the box and lay it out. We have grouped the drawn components below with the hardware you’ll need for those parts. The screws below are drawn to scale to make it easier to identify what piece of hardware is needed to install each component.If you have an angled or vaulted ceiling:1. You will need a longer downrod. (Sold separately at )2. If your ceiling angle is greater than 34°, you will also need anAngled Mounting Kit. (Sold separately at )If you have a flat ceiling:Hang your fan by a standard downrod. Some fans comewith a shorter downrod for a Low Profile installation.Standard Mountingbracket with hardware found in the hardware bag.Hunter Pro Tip:You have two options for installation. Pick which one works best for your location. Remove any existingPass all wires to one side of horizontal bar in downrod assembly. Hand tightenHanging the Fan S l i d e c a n o p y o v e r d ow nr o d a n d w ir e s .Place the downrod ball into the slot in the ceiling bracket.NOTICETo prevent damage to fan,ALWAYS lift holding either the fan housing or the downrod.Wiring the FanWe know wiring is hard. Let’s make it easier.Follow these steps to get your fan wired quickly and safely. Follow the route below that best matches your wall switchsetup. If you are unfamiliar with wiring or uncomfortable doing it yourself, please contact a qualified electrician.Hunter Pro Tip:Here is how to connect the wires:Push the bare metal ends of the wires together and slide a wirenut over them. Then, twist the wire nut clockwise until tight.Give it a gentle pull to make sure none of the wires are loose.Insert the two canopy screwsfound in the hardware bag. screws, found in the1886Installing the Glass NOTE: Check to ensure proper engagement.Attach the globe by lifting and turning clockwise one third of a full turn of the glass until it stops.WARNINGGLASS FALL HAZARDTo prevent SERIOUS INJURY or DEATH , make sure that glass is properly secured.Install the included bulbs into the sockets. When necessary, replace with bulbs of same wattage.Lift the globe and align the notches in the globe with the tabs in the light kit.NotchTabAssembling the Light KitAfter rotating the trim ring into place, tighten all three screws securely.After rotating the light kit into place, tighten all three screws securely.Loosen the two pre-installed screwsLoosen the three pre-installed screwsFeed the wire plug throughthe center hole of the trim ring, then wrap keyhole slots around the screws and twist counterclockwise. Ensure screws are engaged in the keyhole slots.Connect the plugs from the motor to the light kit. Make sure to line up the colored markings on the connectors. Fit light kit keyhole screws onto the three trim ring screws and twist counterclockwise to secure light kit into place.WARNINGFAN FALL HAZARDMake sure all screws are tight to secure the light fixture.You have two options for installing the remote cradle.TroubleshootingReverseSwitchCeiling fans work in two directions: downdraft (counterclockwise rotation) and updraft (clockwise rotation). To change the direction of air flow, turn the fan off and let it come to a complete stop. The reversing switch is located inside the light fixture. It can only be accessed when the glass is removed. Slide the reversing switch to the opposite position. Restart the fan.Updraft (clockwise rotation) creates a more indirect airflow. Updraft airflow is great for moving warm air downward.Downdraft (counterclockwise rotation) creates a direct breeze and maximum cooling effect.Controlling Your Fan Fan Doesn’t Work Excessive Wobbling Noisy OperationRemote Control of Fan is Erratic Remote Only Works Close to Fan Remote Pairing Issues Multiple Remote IssuesFollow steps 6-10 to reassemble with new downrod。
hunt lab介绍
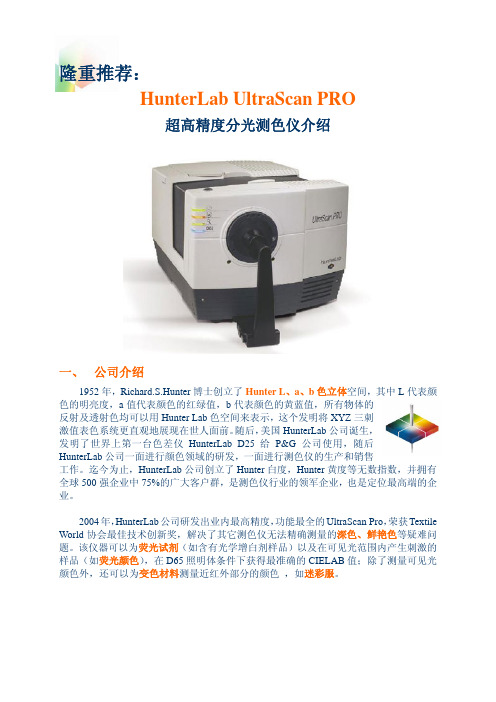
隆重推荐:HunterLab UltraScan PRO超高精度分光测色仪介绍一、 公司介绍1952年,Richard.S.Hunter博士创立了Hunter L、a、b色立体空间,其中L代表颜色的明亮度,a值代表颜色的红绿值,b代表颜色的黄蓝值,所有物体的反射及透射色均可以用Hunter Lab色空间来表示,这个发明将XYZ三刺激值表色系统更直观地展现在世人面前。
随后,美国HunterLab公司诞生,发明了世界上第一台色差仪HunterLab D25给P&G公司使用,随后HunterLab公司一面进行颜色领域的研发,一面进行测色仪的生产和销售工作。
迄今为止,HunterLab公司创立了Hunter白度,Hunter黄度等无数指数,并拥有全球500强企业中75%的广大客户群,是测色仪行业的领军企业,也是定位最高端的企业。
2004年,HunterLab公司研发出业内最高精度,功能最全的UltraScan Pro,荣获Textile World协会最佳技术创新奖,解决了其它测色仪无法精确测量的深色、鲜艳色等疑难问题。
该仪器可以为荧光试剂(如含有光学增白剂样品)以及在可见光范围内产生刺激的样品(如荧光颜色),在D65照明体条件下获得最准确的CIELAB值;除了测量可见光颜色外,还可以为变色材料测量近红外部分的颜色,如迷彩服。
UltraScan Pro是一高性能的分光测色仪,能在生产中及实验室里,测量不透明、半透明和透明固体及液体的性能,如反射色、不透光度、明度、强度、透射色、APHA和浊度。
适用范围广泛,可应用于包括纺织、塑料、化学、涂料、食品、建筑材料和造纸等多种行业。
系统描述如下:二、 硬件超高精度专业分光测色仪UltraScan Pro, 代表当今最高水平的测色仪,。
相比市场上各类其它测色仪,UltraScan Pro有如下特点:1.波谱范围:相比于一般的测色仪,UltraScan PRO波谱范围更宽350-1050nm, 除了常用的可见光之外还包含近红外和近紫外部分,所以能够测量伪装材料及抗紫外产品,该产品入围军工产品的采购目录。
检测仪器中英文对照表
Electric/digital Balance
测头的测量范围
transmission function for the sine waves
仪器的测量范围
measuring range of the instrument
工作量规
Working gauge
模数转换器的量化步距
quantification step of the ADC
控制计划
Control plan
百分表
Dial indicator
失效模式与影响分析
Failure mode&effect analysis (FMEA)
拉力计
Tension gauge
进料检验
Incoming material quality control(IQer
铸铁平尺
cast iron straigjht edge
数字温度计
Digital thermometer
钢平尺和岩石平尺
steel and granite straigjht edge
辐射温度计
Radiation thermometer
圆度仪
roundness measuring instrument
抛光粉
polishing powder
套筒
nut driver
护镜液
lens coating liquid
量具
calipers
切削液
grinding ccoolant
粘片
adhesive tape
平形砂轮
diamod plain wheels
厚度表
thickness apparatus
光学测量相关术语词汇表
颜色感知 通过光谱的可见光区,不同波长的光所产生的颜色视觉感知。通过这样的颜色感知,观测仪 可能够区别大小、形状和结构相同的两个不同物体的不同之处。
色别标志 在特定的颜色系统中用数值来标明颜色的三刺激值、色度座标、亮度值或其他色度值。
色度计 色度计用于测量三刺激值,并将其转化成色度。
标准(Standard) 进行仪器测量的参考。
标准化(Standardization) 为达到符合规定的条件,使用给定的方法、程序或协议的过程。标准化仅在标度中使用。
T
公差(Tolerance) 样品实际参数值的允许变动量。任何色度或指标参数都可设置公差。
全反射(Total Reflection) 漫射及镜面反射。
属性 感觉、知觉或外观模式的显著特征。色彩和几何外观属性不同。
B
亮度 观测仪对发光体表面发光强弱的视觉感受。
C
校准 仪器输出与某属性的图示或数学关系式。
色彩 有色调的视觉感受——非白色、灰色或黑色。
色彩属性 那些与光的光谱分布、色调和饱和度相关的属性。
色度 色度指不包括亮度在内的色别标志。
CIE 1976 L*a*b*色域 1976 年,为测量小色差,国际照明协会(CIE)建议采用统一色域,这一数值采用亚当斯•尼
L
光(Light) 在光谱范围(大约 380 到 780 纳米之间)内正常人的眼睛能感知到的电磁辐射。
光源(Light Source) 仪器或视觉观察条件下,以光的形式提供辐射能量的因素。
亮度(Lightness) 白色物体区别于灰色、亮色区别于暗色物体的人类视觉感受。
M
同色异谱(Metamerism) 由于样品的光谱反射率不同,物质在一种光谱组成的光下匹配,而在另一种光谱组成的光下 却可能呈现不匹配的现象。
美国HunterLab LabScan XE-黄色指数仪 测量样品的颜色
隆重推荐美国HunterLab LabScan®XE色度仪-黄色指数仪LabScan®XE以一全新的观点测量颜色,其功能更多、性能更优、并且操作简便,自动化程度高。
测试所有形状、大小和结构的颜色——正如您的眼睛“看”颜色全新规格的色度仪LabScan®XE以您看颜色的方式测量样品的颜色。
LabScan®XE把颜色测量带进了一个新的和完全不同的先进技术水平,与当今市场上的其它任一产品相比,其操作更简便、自动化程度更高、功能更多。
从粉末、固体和液体到颗粒、薄片、纱线或纸,LabScan®XE均能给您最佳的颜色测量,它广泛应用在PP行业的黄色指数测定。
i0°/45°光学几何结构为“看”颜色提供了较好的角度如相同颜色的样品其表面光泽或纹理不同,人眼看的结果则是不同的颜色。
LabScan®XE的0°/45°圆环几何结构利用含15点光纤环接受并平均从所有点来的反射光,这样,既得到快速、简便的测试结果,还自动考虑了结构、光洁或颗粒方面等变量的影响。
新的测试通用性——从引进的原材料到成品现在LabScan®XE凭借其空前的多功能性、简便性和精度,可以测量所有大小、形态和形状各异的样品。
例如:最大的照明面积可达44mm——在测量纹理和非均匀样品时,提供最优的精度。
另外, LabScan®XE还提供多台仪器之间优良的读数一致性。
ii配色或QC——不管您在实验室还是在工厂现场LabScan®XE适合于质量控制和配色应用。
您可以在实验室或生产上与PC机连接使用,运行我们的Universal®软件进行质量控制或结合我们的EasyMatch®软件进行配色或QC亦或两者均用。
或者,您也可用它与我们牢固的、可靠的DP-9000®处理器连接从而可以在恶劣的工厂环境使用。
建立新标准的标准特性0°/45°检测——测试和考虑在纹理和光洁度上的变化;“看”颜色的方法同人眼一致。
色差公式(4)—— Hunter色差公式
色差公式(4)—— Hunter色差公式
亨特色差公式是由亨特(Hunter)为使光电色度计读数方便而于1948年提出的Lab对抗色系统中计算色差的公式,较多用于陶瓷,塑料和纺织品等,一般可满足工业生产管理的需要。
在该系统中,L表示无反射光的明度,a表示反射光中红色与绿色的成分,b表示反射光中黄色与蓝色的成分。
因此Lab系统的色差公式表示为
式中分别为两个物体表面色的明度差和色品坐标差,并且可由下式决定亨特颜色空间的明度指数联合色品指数a,b之值:
式中X,Y,Z为颜色样品的三刺激值,为由所选用的CIE标准色度观察者和标准照明体决定的常数。
- 1、下载文档前请自行甄别文档内容的完整性,平台不提供额外的编辑、内容补充、找答案等附加服务。
- 2、"仅部分预览"的文档,不可在线预览部分如存在完整性等问题,可反馈申请退款(可完整预览的文档不适用该条件!)。
- 3、如文档侵犯您的权益,请联系客服反馈,我们会尽快为您处理(人工客服工作时间:9:00-18:30)。
180.10
UL 3000
111.12
35.21
186.30
D50
96.72
81.45
173.82
D60
95.21
99.60
172.45
D75
94.45
120.70
171.76
Kb 38.20 69.40 66.70 53.60 52.70 38.20 58.13 64.28 70.76
∆L = Lsample - Lstandard
175.00
95.02
108.82
172.30
98.09
67.53
175.00
101.40
65.90
178.00
107.99
33.91
183.70
96.38
82.45
173.51
95.23
100.86
172.47
94.96
122.53
172.22
Kb 38.40 70.00 67.20 52.90 52.30 37.50 58.48 64.72 71.30
The Hunter L, a, b color scale may be used on any object whose color may be measured. It is not used as frequently today as it was in the past because the CIE L*a*b* scale, which was released in 1976, has gained popularity.
The total color difference, ∆E, may also be calculated. ∆E is a single value that takes into account the differences between the L, a, and b of the sample and standard. It does not indicate which parameter is out of tolerance if ∆E is out of tolerance. It may also be misleading in some cases where ∆L, ∆a, or ∆b is out of tolerance, but ∆E is still within the tolerance.
This color scale may be used for measurement of the color of any object whose color can be measured.
Page 3
©Copyright 2008
Applications Note
For Additional Information Contact:
Technical Services Department Hunter Associates Laboratory, Inc. 11491 Sunset Hills Road Reston, Virginia 20190 Telephone: 703-471-6870 FAX: 703-471-4237
Vol. 8, No. 9
Page 4
06/08
©Copyright 2008
Conditions for Measurement
Instrumental: Any HunterLab color measurement instrument
Illuminant: Any
Standard Observer Function: Either 2 or 10 degree
Transmission and/or Reflectance: Either
∆b = bsample - bstandard
+ ∆b means sample is yellower than standard - ∆b means sample is bluer than standard.
∆E = ∆L2 + ∆a2 + ∆b2 .
Typical Applications
Insight on Color
Vol. 8, No. 9
Hunter L, a, b Color Scale
Background
The Hunter L, a, b color scale evolved during the 1950s and 1960s. At that time, many of the scientists involved with color measurement were working on uniform color scales. The XYZ system was being used, but it did not give a good indication of sample color based solely on the numbers. The uniform color scales being investigated gave better indications of the color of a sample based solely on the numbers. There were several permutations of the Hunter L, a, b color scale before the current formulas were released in 1966.
+ ∆L means sample is lighter than standard - ∆L means sample is darker than standard
∆a = asample - astandard
+ ∆a means sample is redder than standard - ∆a means sample is greener than standard
Page 2
©Copyright 2008
Applications Note
Illuminant A C D65 F2 TL 4 UL 3000 D50 D60 D75
CIE 2 Degree Standard Observer
Xn 109.83
Zn 35.55
Ka 185.20
98.04
118.11
The Hunter L, a, b color scale is more visually uniform than the XYZ color scale. In a uniform color scale, the differences between points plotted in the color space correspond to visual differences between the colors plotted. The Hunter L, a, b color space is organized in a cube form. The L axis runs from top to bottom. The maximum for L is 100, which would be a perfect reflecting diffuser. The minimum for L would be zero, which would be black. The a and b axes have no specific numerical limits. Positive a is red. Negative a is green. Positive b is yellow. Negative b is blue. Below is a diagram of the Hunter L, a, b color space.
Formulas
Y L = 100
Yn
a
=
Ka
⎛ ⎝⎜⎜
X
/
Xn Y
/
Y Yn
/
Yn
⎞ ⎠⎟⎟
b
=
Kb
⎛ ⎝⎜⎜
Y
/
Yn Y/
Z/ Yn
Zn
⎞ ⎠⎟⎟
where X, Y, and Z are the CIE tristimulus values. Xn, Yn, and Zn are the tristimulus values for the illuminant. Yn is 100.00. Xn and Zn are listed in the tables below. Ka and Kb are chromaticity coefficients for the illuminant and are listed in the tables below.
Page 1
ቤተ መጻሕፍቲ ባይዱ
©Copyright 2008
Applications Note
Vol. 8, No. 9
There are delta values (∆L, ∆a, and ∆b) associated with this color scale. These values indicate how much a standard and sample differ from one another in L, a, and b. The ∆L, ∆a, and ∆b values are often used for quality control or formula adjustment. Tolerances may be set for the delta values. Delta values that are out of tolerance indicate that there is too much difference between the standard and the sample. The type of correction needed may be determined by which delta value is out of tolerance. For example, if ∆a is out of tolerance, the redness/greenness needs to be adjusted. Whether the sample is redder or greener than the standard is indicated by the sign of the delta value. For example, if ∆a is positive, the sample is redder than the standard.