flash启动说明
FlashPRO使用手册
FlashPRO使⽤⼿册1、FlashPRO编程器概述FlashPRO编程器是⼀种可靠性⾼、速度快、具有⾼性能价格⽐的通⽤编程器。
⽀持数⼗个⼚家⽣产的PLD、E(E)PROM、FLASH、MCU等数千种可编程器件。
领先的管脚检测、插⽚⾃动启动功能使操作变得快捷⽅便,真正实现了编程智能化。
⼯作时直接与计算机USB端⼝通讯,其驱动接⼝软件使操作极其⽅便。
1.1 功能特点★新颖的造型设计:吸取了众多编程器产品外壳开模的经验,倾注了全新的⼯业设计思想与理念,从⼈机⼯程学的⾓度出发,更加注重⼈性化,造型更加流畅美观。
★可靠的技术保障:吸取先进编程器优点,经过不断改进和测试,从研究器件特性和电路可靠性⼊⼿,把电路⾃⾝产⽣噪声影响降到最低,保证每个控制电路⼯作点的波形准确⽆误,同时采⽤硬件⾃动校验数据,达到可靠烧写芯⽚的⽬标。
★过流保护电路:系统内部完善的过流保护电路,有效保护芯⽚和编程器。
★充分利⽤USB接⼝:USB通讯接⼝快速可靠,同时增加USB供电功能,⼀般不接外部电源即可⼯作,极⼤的节省了系统资源。
★管脚检测功能:可靠检测芯⽚的反插,错插及坏⽚,全⾯提升OTP芯⽚烧录的良品率。
★⼈性化的软件界⾯:操作简单、⽅便、流畅,⼯作效率⾼,提供编程⽂件管理程序,⽤户以项⽬⽅式管理编程⽂件。
★⽀持的操作系统:⽀持Windows NT/2000/XP、Windows7以及Vista。
★⽂件格式⾃动识别:⽀持Binary、Intel(普通型或扩展型)Hex、Jed等多种⽂件格式。
★集成化缓冲区编辑环境:附有填充、定位、查找、交换等功能。
★完善的电⼦序列号功能:⽀持⾃动⽣成电⼦序列号。
★智能化的量产模式:插⽚⾃动启动功能,⽀持⾃动烧写,⼤幅提⾼⽣产效率,有效降低⽣产成本。
1.2 系统需求★IBM-PC 586或奔腾兼容机,台式或笔记本电脑,⾄少有⼀个USB通⽤串⾏总线接⼝。
★Windows NT/2000/XP、Windows7或Vista操作系统。
Tailgater Flash 快速启动指南说明书
Tailgater® Flash™Quickstart GuideAppendix1.Make sure all items listed in the Box Contents are included in the box.2.READ THE SAFETY & WARRANTY MANUAL BEFORE USING THE PRODUCT.3.MAKE SURE THE BATTERY IS COMPLETELY CHARGED PRIOR TO FIRST USE FOR MAXIMUMBATTERY LIFE.4.Study the connection diagram.5.Ensure the Master Volume on Tailgater Flash is at zero.6.Connect your devices.7.Raise the volume to a comfortable level.8.Return the Master Volume to zero when you are finished using Tailgater Flash.Box ContentsTailgater FlashMicrophone with mic cable3.5mm (1/8”) to 3.5mm (1/8”) cablePower Cable (standard IEC)Quickstart GuideSafety & Warranty ManualSupportFor the latest information about this product (system requirements, compatibility information, etc.) and product registration, visit .Rechargeable BatteriesRechargeable lead-acid batteries are the same type used in automobiles. As with your car battery, how you use this battery has a significant impact on its lifespan. With proper use and treatment, a lead-acid battery can last for years. Here are some recommendations for getting the longest life from the internal battery. General Usage Fully charge the battery before using it.Charge the battery completely after each use.Storage For best product longevity, do not store at exceedingly hot (greater than 90°F / 32°C) or exceedingly cold (less than 32°F / 0°C) temperatures.It is acceptable to leave your sound system plugged in. This will not overcharge thebattery.If you leave the battery level low and do not charge it for 6 months, it may permanentlylose capacity.Repair If the battery fails to charge, check your fuse near the power cable input. If your fuse is intact and it still will not charge, contact ION Audio at .Disposal Bring the unit to a recycling center or dispose of in accordance with local ordinances.34•Keep a minimum of 5 cm of distance around the product for sufficient ventilation. The ventilation should not be impeded by covering them with items such as newspaper, tablecloths, curtains, etc.• Attention should be drawn to the environmental aspects of battery disposal. • Do not place naked flame sources, such as lighted candles, on the product. • This product is intended for use in moderate climates only.• Caution: To reduce the risk of electric shock, do not connect the product to a power outlet while the grille is removed.• Class II apparatus with functional earth.Connection DiagramItems not listed under Introduction > Box Contents are sold separately.REAR PANEL TOP PANEL TABLETTop Panel1.Microphone Input with Volume Control (1/4"): This mono input accepts a 1/4" (6.35mm) input such as a microphone,guitar, or other musical instrument.2.Auxiliary Input: This stereo3.5mm (1/8”) input can be used to connect a CD player, MP3 player, or other audio source.3.Lights: Press this button to cycle through these different light effects:•Shimmering Lights (non-reactive to music)•EQ Bars (reactive to music)•Wavy Line: (non-reactive to music)•Moving Block (reactive to music)•Pulsating Block (reactive to music)•Pulsating Bar (reactive to music)•Vertical Lights Wipe (non-reactive to music)•Diagonal Lights Wipe (non-reactive to music)•Vertical Lights Scrolling (non-reactive to music)•Snowflake/Square Lights (non-reactive to music)•Circular Spinning Lights (non-reactive to music)•Off (no lights)4.Bluetooth Icon:The Bluetooth icon will be lit solid when a device is paired to Tailgater Flash. The Bluetooth icon willbe off when in pairing mode.5.Master Volume Control: This adjusts the speaker’s main mix volume, which includes the Microphone Input, AuxiliaryInput, Radio, and the audio of a paired Bluetooth device.6.Radio Selector: This button sets the radio to AM or FM or turns the radio off.7.Display: Displays the current radio station, battery status, and Bluetooth status.8.Charging Indicator: With the battery charging indicator, when the power cable is connected, movement of the topbattery segment shows the battery is charging. When fully charged, all battery segments will be lit without blinking.When the power cable is disconnected, the battery segment shows the level of the battery.9.Lightning Bolt Icon: The lightning bolt icon will illuminate when the IEC power cable is connected to wall power.10.Decimal Icon: The decimal icon will be lit when Tailgater Flash is powered on.The decimal icon will not be lit whenTailgater Flash is powered off.11.Tune/Track Buttons: Tap these buttons to tune in a radio station or go to the previous/next track on a Bluetooth-connected device. To "seek" (jump to the next available station), hold either button down for a few seconds until it starts to seek a station. The unit will remember the last station it was on and start at that station when powered off and on again.Note: When listening to Bluetooth sources, pressing the Tune/Track buttons in some apps may go to another playlist or music genre.12.Bluetooth/Play/Pause: Press and hold this button for 2 seconds to disconnect a paired Bluetooth device. Whenconnected to a Bluetooth device, press this button to play or pause a track. B Charging Port: Connect your device’s charge cable here to charge it. USB charging only functions when theunit’s power is turned on.Note: To charge smartphones and tablets faster, put the device’s screen to sleep.14.Antenna: Adjust this FM antenna to get the best radio reception.Note:To prevent accidental damage, we recommend rotating the antenna only when it is extended horizontally. Also, retract the antenna when the radio is not in use.15.NFC (near-field communication): Touch and briefly hold your supported and enabled device to the NFC logo to pair thedevice.5Rear Panelhere to charge the unit. Note that the Tailgater Flash can beused with the power cable while it simultaneously chargesthe battery. The lightning bolt charge indicator illuminateswhen the power cable is connected.2.Fuse Cover: If the unit’s fuse is broken, use a screwdriveror other tool to lift this tab to replace the fuse. Replace itwith a fuse with the same rating. Using a fuse with anincorrect rating can damage the unit and/or fuse.3.Power ON/OFF S witch: Turns Tailgater Flash on or off.Please note that while Tailgater Flash is connected to apower source, it does not need to be powered on to chargethe battery.When the power is on, the display will show thedecimal icon or your current radio station.1.Turn on your Bluetooth device.2.Power on Tailgater Flash and it will automatically go into pairing mode to search for Bluetooth devices. You will knowyou are in pairing mode when the Bluetooth icon is off.3.Navigate to your Bluetooth device’s setup screen, find “Tailgater Flash” and connect.Note: If your Bluetooth device prompts for a pairing code, enter “0000”.4.The Bluetooth icon will be lit solid when a device is “paired” to Tailgater Flash.5.Press and hold the Bluetooth button for 2 seconds to disconnect a paired Bluetooth device.6.To connect to another Bluetooth device, repeat steps 3-4.Note: Maximum range will be achieved when using devices with Bluetooth 4.0.NFC (near-field communication) allows data exchange from devices, such as pairing, by gently bumping them together. Checkin your device’s manual to see if this feature is supported.To use NFC to pair with Tailgater Flash:1.In order to use NFC, your device must be turned on and unlocked.2.Enter your device’s Settings menu and check that NFC is turned On (one time step).3.Power on Tailgater Flash.4.Touch and briefly hold your device to the NFC logo.5.Follow the pairing instructions that appear on your phone. If a passcode is required, enter “0000”.6.To unpair, gently bump your device against the NFC logo located on Tailgater Flash’s top panel.To use the free Block Rocker app, navigate Google Play on your Android device or the App Store on your iOS device, and search for ION Block Rocker. This app provides EQ, sound effects, and more!If the sound is distorted: Try lowering the volume control of your sound source, musical instrument, or microphone. Also, try to reduce the overall volume of Tailgater Flash using the Master Volume knob.If there is too much bass: Try adjusting the tone or EQ control on your sound source to lower the bass level. This will allow you to play the music louder before clipping (distortion) occurs. You can also control EQ using the free ION Block Rocker app for iOS and Android.If there is a high-pitched whistling noise when using microphones: This is probably feedback. Point the microphone away from the speaker.If there is poor AM reception: Disconnect AC power for optimal AM radio reception. To further adjust AM reception, move entire unit.If you can’t hear the microphone over the music volume: Turn down the music volume from your source.If you can’t play music from a flash drive: The USB port is only for charging USB devices.67Specifications are subject to change without notice.* Bluetooth range is affected by walls, obstructions, and movement. For optimal performance, place the product in your room at line of sight, so it is unaffected by walls, furniture, etc.** Battery life may vary based on temperature, age, and volume usage of product.RS S S tatement for Canadian models: This device complies with Industry Canada licence-exempt RSS standard(s). Operation is subject to the following two conditions: (1) this device may not cause interference, and (2) this device must accept any interference, including interference that may cause undesired operation of the device.ION Audio is a trademark of ION Audio, LLC, registered in the U.S. and other countries.The Bluetooth word mark and logos are owned by the Bluetooth SIG, Inc. and any use of such marks by ION Audio is under license.iOS is a registered trademark of Cisco in the U.S. and other countries and is used under license.The N Mark is a trademark or registered trademark of NFC Forum, Inc. in the United States and in other countries.App Store is a service mark of Apple Inc., registered in the U.S. and other countries.Android and Google Play are registered trademarks of Google Inc.All other product or company names are trademarks or registered trademarks of their respective owners.Dimensions(Depth x Width x Height) 12.5” x 9.4” x 12.8”318 mm x 239 mm x 325 mm Weight18.5lbs. 8.4 kg Supported Bluetooth Profile A2DP, AVRCP Bluetooth Range Up to 100' / 30.5 m *Microphone Type Dynamic microphone Aux Input 3.5 mm (1/8”) line-level Output Power50W (peak)Frequency Response (+/- 3dB) 77 Hz –20 kHz Battery Type 12V 5.0Ah SLA Battery LifeUp to 50 hours **Battery Measurements (Depth x Width x Height) 2.8” x 3.5” x 4”70 mm x 90 mm x 101 mm Fuse Type T800mAL 250VPower Input voltage: 100-240V~ 50/60Hz, 50W Charge PortUSB; +5V, 1ARadio Frequency RangeUS: AM 520 – 1710 kHz FM 87.5 – 107.9 MHz Manual Version 1.1。
Nandflash原理与启动详解
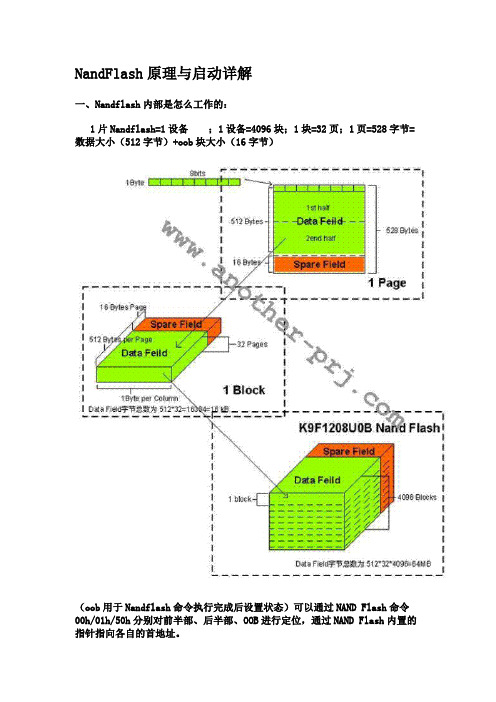
NandFlash原理与启动详解一、Nandflash内部是怎么工作的:1片Nandflash=1设备;1设备=4096块;1块=32页;1页=528字节=数据大小(512字节)+oob块大小(16字节)(oob用于Nandflash命令执行完成后设置状态)可以通过NAND Flash命令00h/01h/50h分别对前半部、后半部、OOB进行定位,通过NAND Flash内置的指针指向各自的首地址。
存储操作特点有:擦除操作的最小单位是块;NAND Flash芯片每一位只能从1变为0,而不能从0变为1,所以在对其进行写入操作之前一定要将相应块擦除(擦除即是将相应块的位全部变为1);OOB部分的第6字节(即517字节)标志是否是坏块,值为FF时不是坏块,否则为坏块。
除OOB第6字节外,通常至少把OOB的前3字节用来存放NAND Flash硬件ECC码。
(ECC:"Error Correcting Code" "错误检查纠正",带有奇偶校验的内存的主要功能。
)1.Nand flash以page为单位进行读写,以block为单位进行擦除,没页分为main区和spare区,main区用于存放正常的数据,spare区用于存放一些附加信息2.S3c2440 支持从Nand 启动是因为内部有一个叫做Steppingstone的SRAM buffer,当启动的时候,nand 的前4k的将会代码将被拷贝到steppingstone中执行,注意前4k代码是不会经过ECC校验的,所以必须确保这些代码的准确3.对nand的操作都是通过使用命令来实现,有的操作只要一个命令就可以完成,而有的需要两个命令才能完成,下面是K9F1G08U0B的命令表:4 Flash烧写程序原理及结构基本原理:将在SDRAM中的一段存储区域中的数据写到NAND Flash存储空间中。
烧写程序在纵向上分三层完成。
人教版八年级上册信息技术1.1启动Flash课件

4.给动画添加背景
【步骤1】 新建图层并改变图层顺序 【步骤2】 导入背景图片(选中新图层的第一帧,导入到舞台)
5. 测试、保存和导出动画
帧
◦ 组成动画的每一个画面就是一个帧,也可以把帧看作是Flash动 画中在最短时间单位里出现的画面。
帧频不变的情况下,帧越多,动画需要播放的画面也越多,播放时 间就越长。
◦ 帧频:将每一秒钟播放的帧数,默认情况下是12帧/秒
每一秒钟要显示动画中的12帧画面,如果动画有48帧,那么动画播 放的时间就是4秒。
“打开”对话框
9、播放及测试影片
• 测试简单动画、基本控件 —— 【控制】|【播放】 • 测试全部的动画和交互式控件 —— 【控制】|【测试 影片】 • 浏览时测试电影文件 —— 【文件】|【发布预览】| 【HTML】
1.新建文档设置文档属性
【步骤1】 新建文档 【步骤2】 打开属性检查器 【步骤3】 设置文档属性(改:宽400px,12fps)
文本工具 矩形工具 刷子工具
“工具”区 提供选择、创建、编辑图形的工具。
“查看”区
颜料桶工具 橡皮擦工具 缩放工具(M,Z) 无颜色
反色 缩小
改变舞台画面以便更好地视察。
“颜色”区
选择绘制、编辑图形的笔触颜色和填充色。 “选项”区
当前工具的功能键不同工具有不同的选项, 通过“选项”区为当前选择的工具进 行属性选择。
主工具栏
时间轴用于组织 和控制影片内容 在一定时间内播 放的层数和帧数。 与电影胶片一样, Flash影片也将时 间长度划分为帧。 图层相当于层叠 在一起的幻灯片, 每个图层都包含 一个显示在舞台 中的不同图像。 时间轴的主要组 件是图层、帧和 播放头 。
微星M-Flash图解和教学
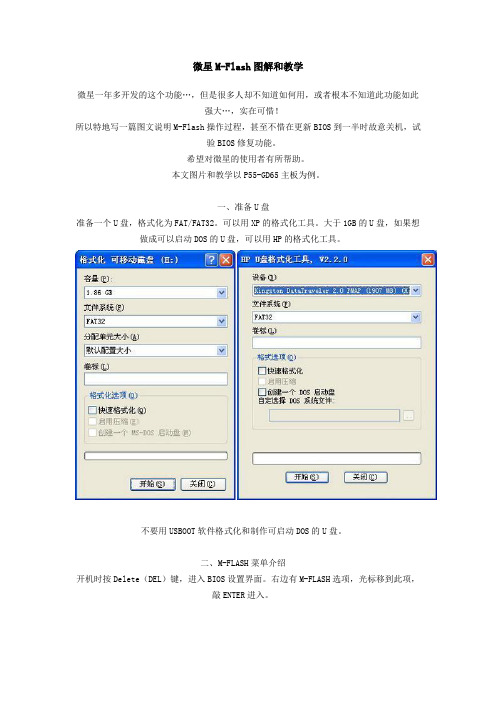
微星M-Flash图解和教学微星一年多开发的这个功能…,但是很多人却不知道如何用,或者根本不知道此功能如此强大…,实在可惜!所以特地写一篇图文说明M-Flash操作过程,甚至不惜在更新BIOS到一半时故意关机,试验BIOS修复功能。
希望对微星的使用者有所帮助。
本文图片和教学以P55-GD65主板为例。
一、准备U盘准备一个U盘,格式化为FAT/FAT32。
可以用XP的格式化工具。
大于1GB的U盘,如果想做成可以启动DOS的U盘,可以用HP的格式化工具。
不要用USBOOT软件格式化和制作可启动DOS的U盘。
二、M-FLASH菜单介绍开机时按Delete(DEL)键,进入BIOS设置界面。
右边有M-FLASH选项,光标移到此项,敲ENTER进入。
进入M-FLASH菜单后,可以看到菜单分为2大部分。
第一部分是:BIOS Update or Boot 2nd BIOS From USB Drive。
这里包括2项功能:更新BIOS和从U盘的BIOS启动。
第二部分是:Backup BIOS to USB Drive。
这是备份BIOS到U盘。
第一部分的右侧帮助栏提示:[BIOS Update]是从选定的文件更新BIOS ROM芯片数据。
[Boot]是指定BIOS文件后,系统将从存储在U盘的BIOS启动。
特别要注意的是红色文字提示:仅支持文件名为[A7583IMS]的BIOS文件和FAT/FAT32格式。
这里说明U盘必须是FAT/FAT32格式的,而且必须是该主板的BIOS。
在右侧下部可以看到主板的当前BIOS版本。
此例是[A7583IMS.141]。
三、更新BIOS我们先看看“更新BIOS”的操作。
先把下载的BIOS拷贝到U盘,插入U盘开机。
光标移动到M-Flash Function as(M-Flash功能为),敲ENTER看到下拉菜单,除默认的Disabled外,还有2项:BIOS Update和Boot。
C6000DSP_的flash自启动

name
origin length
used attr fill
---------------------- -------- --------- -------- ---- --------
BOOT
00000000 00000400 000000c0 RWIX
L2
00000400 0000fc00 0000d76d RWIX
今天完成了 C6713 的 flash 自加载,现将个人理解记录如下: 1:原理:C6000DSP 的二级启动分如下步骤: 1.1:在上电复位之后,DSP 自动去搬移 flash 开始的 1K 字节程序,这 1K 字节程序搬移近 来之后,DSP 就按照这 1K字节的程序来运行,而通常这1K 字节程序的作用是将存储在 flash 中的要自启动的目标程序搬移到片内来,然后运行已经搬移进来的目标程序,也就达到了自 启动的目的。 那么现在要解决的问题有如下两个: (1) 怎么把目标程序写进 flash 中去? (2) 怎么在 1K字节的程序中实现把 flash 中的程序搬移进来,并且运行搬移进来的程序 下面分别介绍:
从这里看到目标文件中,BOOT用了 0xc0 字节(这里的单位是字节),而其他代码用
了 0xd76d字节。
为了保险,把 flash_burn 的代码放置在离前面目标文件很远的地方(注意:还在片内 RAM 中),比如:6713 的片内地址从 0x00000000 到 0x2fffffff,前面目标文件已经占用 了从 0x00000000 到 0x00010000 这段空间,那么我把 flash_burn 这个工程的代码放置
NandFlash启动过程详解
NandFlash启动过程详解NAND Flash是一种流行的非易失性存储技术,它可以用于嵌入式系统的启动过程中。
以下是NAND Flash启动过程的详细解释。
1. 电源投入:启动过程始于将电源连接到系统上。
一旦电源被投入,NAND Flash芯片便开始工作。
芯片内部会进行一系列初始化操作,以确保其正常运行。
2. 主控器初始化:NAND Flash芯片的主控器是其核心部分,它控制着所有数据的读取和写入操作。
在启动过程中,主控器需要进行初始化,以确保它可以正确地与系统中的其他组件进行通信。
3. 片选操作:由于可能存在多个NAND Flash芯片连接到同一个总线上,因此需要使用片选操作来选择要进行读取和写入操作的特定芯片。
在启动过程中,首先需要选择正确的芯片。
4. 地址传输:NAND Flash芯片存储数据的方式是按块存储,而不是按字节存储。
因此,在进行读取和写入操作之前,需要先传输正确的地址以指示要操作的块和页。
5. 读取操作:在启动过程中,通常需要从NAND Flash芯片中读取引导程序代码。
读取操作涉及到将芯片中的数据按照正确的地址传输到系统的内存中。
6. 缓冲区操作:由于NAND Flash芯片的读取速度相较于内存较慢,因此在读取操作中通常会使用缓冲区来提高读取速度。
在读取操作期间,数据会首先存储在缓冲区中,然后再传输至系统的内存中。
7. 写入操作:除了读取操作外,启动过程中还可能需要将数据写入到NAND Flash芯片中。
写入操作涉及将数据从系统的内存中传输到合适的块和页。
8. 擦除操作:NAND Flash芯片的数据存储是按块而不是按页进行的。
因此,在进行写入操作之前,可能需要先擦除芯片中的一些块。
擦除操作会将一些块中的所有数据都清除,以便进行写入操作。
9. 引导加载:启动过程的最后阶段是引导加载,它涉及将引导程序代码从NAND Flash芯片中加载至系统的内存中。
一旦引导程序代码被加载,系统便可以开始执行并启动其他组件。
第2讲 Flash CS5基础知识(2)
此外,还可以根据需要将影片发布为.mov、.avi等格式的视频 格式,具体参见第7章 “动画发布”中的相关内容。
课堂小结
熟悉Flash cs5软件的界面 熟悉简单Flash文档的制作
第1章 Flash CS5基础知识(1.1-1.3)
本讲重点: 本讲重点:
Flash CS5是一款优秀的二维动画制作软件,在学习之前, 应掌 是一款优秀的二维动画制作软件, 是一款优秀的二维动画制作软件 在学习之前, 握其界面的基本布局和基本文档操作。而矢量图形是Flash动画的基 握其界面的基本布局和基本文档操作。而矢量图形是 动画的基 本元素之一, 本元素之一 ,Flash提供了多种工具来绘制和编辑矢量图形作为动画 提供了多种工具来绘制和编辑矢量图形作为动画 中的元素。通过本章学习应掌握以下内容: 中的元素。通过本章学习应掌握以下内容: 位图与矢量图的关系 Flash CS5的界面构成 的界面构成 基本文档操作
2.矢量图 矢量图
矢量图是由数学公式所定义的直线和曲线组成的,内容以色块和 线条为主,如一条直线的数据只需要记录两个端点的位置、直线的粗细 和颜色等,因此矢量图所占的数据容量比较小,他的清晰度与分辨率无 关。对矢量图进行放大、缩小和旋转等操作时,图形对象的清晰度和光 滑度不会发生任何偏差,如图1-2所示。
1.1 位图与矢量图
根据生成原理的不同,计算机中的图形可以分为位图和矢量图 两种。
1.位图 位图
位图是由像素构成的,单位面积内的像素数量将决定位图的最终 质量和文件大小。位图放大时,放大的只是像素点,位图图像的四周 会出现马赛克,如图1-1所示。位图与矢量图相比,具有色彩丰富的特 点。位图中单位面积内的像素越多,图像的分辨率越高,图像也就表 现得越细腻,但文件所占的空间越大,计算机处理速度越慢。因此, 要根据实际需要来制作位图。
TI DSP flash烧写及自启动
问题描述:TI DSP flash烧写及自启动DSP型号:DM642所有的系统在结束了仿真器开发后,都需要解决一个问题,就是将程序烧写到外部存储芯片中,完成系统上点后的自启动和引导,大多数,就是flash的烧写和自启动。
一,系统初期,没有估计到这部分的工作量,直到与苏工结帐时仍然以为这是一个手到擒来的过程。
也许是以前在实验室,单片机和FPGA的开发过程中,没有遇到过类似的问题,所以我相当然地以为对于DSP也是同样的过程。
现在想想,单片机是用单独的编程器烧写,而FPGA因为开发板提供厂商已经把大量的底层都完善了,我们所需要做得仅仅是编译产生下载文件,下载,OK!按理说,如果我们也是采取购买开发板的途径进行开发,开发板提供厂商也应该把这部分工作做完了。
但是,我们找的是单独的小公司设计一块系统板,这部分工作,尤其是如果系统板和开发板有所不同的这部分工作,就应改在设计初期,签合同时,明确提出来是谁做,做到权责明析,很遗憾我们没有。
而且,在项目进行中和那个帮我们做板子的人有点不愉快,最要命的是我已经把项目款付给了人家,接下来的工作量,就不能不说是我们自找的了。
二,我意识到,我不得不自己去做这部分工作了,于是开始想要借力合众达。
合众达是TI的官方合作伙伴,中国TI DSP的技术支持。
一开始,合众达觉得我是它们开发板的潜在买家。
于是开始费力地给我介绍它们的VPM642。
于是我告诉它们,我的系统是自己设计的,希望能够得到它们的支持。
他们于是好奇地研究了研究我的板子,然后告诉我,它们这边只是支持合众达的VPM642开发板,而且我的板子和它们的不同,它们也不保证提供的在VPM642上work的东西在我的板子上也能正常工作。
anyway,我说给我吧,我可以作为参考。
于是我搞到两块板子的图纸,开始详细比较二者的不同。
三,根据我比较的结果,我认为,二者没有本质的不同,都是AMD的芯片,型号有差异,一个33,一个320,它们能用的我应该也能用。
GYSFLASH 8.12 12.12 使用手册说明书
GYSFLASH 8.122-62安全条例这份使用手册包含机器性能介绍以及需注意的安全事项。
首次操作机器前请仔细阅读该说明并妥善保管以备后期查阅。
任何一项操作前需认真阅读和掌握这些条例。
不可对机器做任何该说明上未提及的改装和维护操作。
因违反操作条例导致的任何损害不由生产商负责。
对机器的操作有疑问,请咨询专业人员以保证机器的准确操作。
机器的充电、启动和电源供应应严格遵照此手册和机器上提示的进行。
需遵循安全条例进行操作,任何不当或危险操作造成的问题,生产商将不予负责。
8岁以下儿童不可进行操作。
有自主活动能力、感知力和精神能力的但缺乏操作经验的人员在接受了相应的操作指导,掌握了安全操作条例后,在严格监管下可以操作机器。
机器不可给儿童玩耍。
机器的清理维护不可在无人监管的情况下由儿童进行。
不可用于给非可充电电池进行充电。
自动模式和应用限制在后面的使用模式内容中有详细解释。
易燃易爆!正在充电的电池可能释放易爆气体。
• 充电过程中,电池应放于通风良好处。
• 机器使用范围内避免火花,电弧。
禁止抽烟。
电源连接/断开• 连接机器前请先断开电源连接,或者断开电池上的连接。
• 应先将电池上不和车架相连的接线柱接入电源。
其他接线柱和车架连接时应远离电池和燃油管。
电池充电器• 充电完成后,按照先断开电池充电器再断开和车架的连接最后是电池电源的顺序依次切断连接。
连接:• 第二类设备机器• 接入电源的操作应确保符合国家安装条例。
维修:• 电源线的更换应由生产商、其售后部门或专业人员进行以避免危险。
规章条例:• 机器符合欧洲各指令。
• 产品安全标准申明在可在我们的网站上下载.• 符合EAC(欧洲经济共同体)规定的标志3废弃机器的处理:• 需特殊分拣处理,不能直接扔到家用的垃圾箱。
基本描述Gysflash专为大多数维护或免维护的铅酸电池充电而设计,这些电池通常用于汽车和许多其他车辆上。
这些电池有几种不同的类型,比如GEL(凝胶电解质),AGM(浸渍电解质),WET,MF(免维护),CA(钙)......Gysflash 8.12适用于为15Ah-160Ah的12V电池(6个2V单元)充电,以及高达240Ah的负载维持。
- 1、下载文档前请自行甄别文档内容的完整性,平台不提供额外的编辑、内容补充、找答案等附加服务。
- 2、"仅部分预览"的文档,不可在线预览部分如存在完整性等问题,可反馈申请退款(可完整预览的文档不适用该条件!)。
- 3、如文档侵犯您的权益,请联系客服反馈,我们会尽快为您处理(人工客服工作时间:9:00-18:30)。
背景说明:
通过SD卡启动后,在“Miz702 ZYNQ开发教程(裸机部分20160508).pdf”中有提到flash启动,然后此资料中的flash启动说明很简单,只提到demo板上的拨码开关如何处理,以及如何down程序到板子上,可操作性不强;
后查询了些资料,在“flash启动资料”中,有说明flash启动的相关资料;
这里再对具体操作过程进行说明和总结。
硬件拨码:
有6个拨码(1~6),分别对应的是SPI-DQ0、SPI-DQ1、SPI-DQ2、SPI-DQ3、SPI-CLK、LD-MIO(“Zynq-7000 MiZ702 SOC硬件使用手册.pdf”),而这几个脚又分别对应的是MIO2、MIO3、MIO4、MIO5、MIO6、MIO7,再根据“Zynq-7000 MiZ702 SOC硬件使用手册.pdf”,即可看出QSPI启动,需要将MIO5置OFF状态,其他都是ON状态,即拨码4处于OFF 状态;
Flash启动的uboot程序生成:
在flash启动的时候,BOOT程序也是需要FSBL.elf、system.bit、uboot.elf生成,最终生成的文件名称为BOOT.mcs,同样是使用Xilinx Tool来生成的;然后通过Xilinx Tool->Program flash烧写到板子中,烧写完成后,重新上电,在串口中能看到uboot启动的信息,走到内核处停掉,因为内核程序没有烧写;(可查看“ZYNQ-7000 QSPI Flash和SD 卡启动Linux的方式_零阶简正波”网页资料)
Flash启动内核、文件系统:
1、首先需要确定内核启动在flash中的基地址,这个通过“linux-digilent-3.6-digilent-13.01\arch\arm\boot\dts\digilent-zed.dts”,查找ps7_qspi_linear_0,查看“reg = < 0xfc000000 0x1000000 >;”,说明flash基地址为0xFC000000;(可查看“设备树历史最详解- Klaus_Wei的专栏- 博客频道- ”网页资料)
2、此时,在uboot的“u-boot-digilent-2012.04-digilent-13.01\include\configs”下的zynq_zed.h,“qspiboot”下配置启动地址
"qspiboot=echo Copying Linux from QSPI to RAM...;" \
"sf probe 0 0 0;" \
"sf read 0x8000 0xFC700000 0x270000;" \
"sf read 0x1000000 0xFCC00000 0x8000;" \
"sf read 0x800000 0xFCC20000 0x400000;" \
"go 0x8000\0" \
这里的“sf probe 0 0 0”是初始化flash;
0x8000地址对应内核的DDR地址;
0x1000000地址对应设备树的DDR地址;
0x800000地址对应文件系统的DDR地址;
0xFC700000地址对应内核在flash地址;
0xFCC00000地址对应设备树在flash地址;
0xFCC20000地址对应文件系统在flash地址;
0x270000是内核文件的大小;
sf read 0x8000 0xFC700000 0x270000表示从0xFC700000地址读取0x270000长度
的数据到0x8000,即完成从flash导入ddr的操作;
重新编译uboot;
然后再是生成全包程序,通过Xilinx Tool来生成,需要按顺序加载FSBL.elf、system.bit、uboot.elf、zImage、devicetree.dtb、ramdisk8M.image.gz,其中zImage、devicetree.dtb、ramdisk8M.image.gz在添加的时候,需要加上偏移地址,分别为0x700000、0xC00000、0xC20000;然后生成qspi_image.bin,再通过Xilinx Tool->Program flash烧写到板子中,烧写完成后,重新上电,即可看到系统正常启动;(可查看“zedboard spi flash启动配置流程-guo443193911-ChinaUnix博客”网页资料)
这里,为什么偏移地址是0x700000、0xC00000、0xC20000,尚还不清楚,需要将此值改为其他的值再查看下,才知道是否只是按照需要的空间进行修改即可,还是是固定写死的,如果是固定写死的,是在哪里写的;
uboot烧写程序:
在进入uboot倒数的地方,敲入回车,进入uboot下,通过手动的sf read、sf erase、sf write 来烧写flash,然后再启动,这里我是用tftp命令来下载文件的;(可查看“ZYNQ 7000 MicroZED通过QSPI启动linux内核(不需要SD卡)- 网布的世界- 博客频道- CSDN”网页资料),但是这里通过uboot下下载没有成功,可能和tftp下载文件的存放的地址有关,这个后期再研究;
sf probe 0 0 0
tftp 0x30100000 BOOT.bin
sf erase 0xFC000000 0x500000
sf write 0x30100000 0xFC000000 0x500000
tftp 0x30100000 zImage
sf erase 0xFC500000 0x300000
sf write 0x30100000 0xFC500000 0x300000
tftp 0x30100000 devicetree.dtb
sf erase 0xFC800000 0x40000
sf write 0x30100000 0xFC800000 0x40000
tftp 0x30100000 filesys.jffs2
sf erase 0xFC840000 0x500000
sf write 0x30100000 0xFC840000 0x500000
这里的烧写偏移量要和uboot中的配置参数以及flash的分区配置一致;。