座椅说明书
CARROT 3 BOOSTER SEAT - 特殊需求儿童座椅说明书

Instruction Manual!CARROT 3 BOOSTER SEAT - CHILD RESTRAINT SYSTEMFor Children with Special NeedsRead all instructionsbefore using thisrestraint system.WARNINGCARROT 3 CHILD RESTRAINT SYSTEMThe Carrot 3 Booster Seat is an extended version of the standard Carrot 3 child restraint system. The Carrot 3 Booster Seat offers a larger coniguration to meet the needs of children that require additional seat growth that is not available on the standard Carrot 3. Always consult your doctor to make sure that this restraint system is suitable for your child.Your child’s safety is very important to us. To ensure that your restraint system is installed correctly, please read all the instructions in this manual before using.Table of ContentsWarnings (3)Safety Information (5)Important Notes (5)Certiication (6)Features (7)Installation (8)Standard Installation (8)Functions (9)Head Support Adjustment (9)Depth Adjustment (9)Forward / Backward Positioning (9)Head-Pillow Adjustment (9)Shoulder Support (10)Shoulder Width Adjustment (10)Shoulder Straps Comfort Pads (10)2Table of ContentsBackrest (11)Backrest Height Adjustment (11)Backrest Extensions 4” (100mm) (11)3D Body Balance Pads (11)4-Point H-Harness (12)Harness Buckle (12)Accessories (14)Support Tray (14)Seat Wedge (14)Securing Your Child (15)Warning (17)Warning (17)Care and Maintenance (19)Cover Removal (19)Upholstery, Cushions, Pillow & Pads (19)Harness Buckle (19)Harness Strap (19)Product Dimensions (20)Warranty (20)Limited Five Year Warranty (21)Warranty Limitations (22)Limitations of Damages (22)Limited Warranty (22)3WARNING !DEATH or SERIOUS INJURY can occur• Recommended for use with children who have outgrown the Carrot 3 car seat. Suggested guidelines are children who weigh more than79lbs (36kg) and less than 165lbs (75kg) with height between4.5ft (140cm) and5.7ft (175cm). It has been successfully crash tested.• Use in forward-facing only.• Never alter construction of the Carrot 3 Booster Seat child, unless specially authorized in the instruction manual.• Adjust the belts provided with this child seat so they it snugly around your child. A snug strap should not allow any slack or twist. It does not press onthe child’s skin or push the child’s body into an unnatural position.• Secure child restraint system with the upper and lower ixing straps to the vehicle’s seat, and always use vehicle’s lap shoulder 3-point safetybelts as well.• Fasten the harness 4-point of the child restraint system as well as the vehicle’s lap shoulder 3-point safety belt to secure your child ina irm position.• Follow all the instructions on this child restraint system and in this instruction manual.• Use this child restraint system only with vehicles provided with lap shoulder 3-point safety belts approved by ECE regulation No.16 or otherequivalent standards.• The rigid items and plastic parts of the child restraint system must be located and installed in away so they don’t become trapped by a movableseat or in a door of the vehicle.• To prevent injury due to hidden damage, discontinue use of a child restraint system that has been in any type of car crash.• This child restraint system must be used with the cover.4WARNING !DEATH or SERIOUS INJURY can occur• The child restraint system cover should only be replaced with the one recommended by the manufacturer.• This instruction manual should be stored in the pocket on the back of the child restraint system.• This child restraint system is not for use in the home, in boats, or other non-certiied applications.• The back seat of vehicle is the safest location for a properly installed child restraint system. Please comply with safety standards set in your vehicleowner’s manual, to ensure your child’s safety.• Secure this child restraint system seat even when it is not occupied. In a crash, an unsecured child seat may injure vehicle occupants.• When using in a vehicle with airbags, refer to your vehicle’s owner’s manual for child restraint system installation instructions and precautions.• Never use the adjuster strap to lift or carry this child restraint system. Doing so will cause damage to the harness adjuster and webbing. Always carrythis child restraint system by its shell.• Do not take the child restraint system apart or attempt to take apart the harness and the straps from the child seat. Do not remove the bucklesand / or the buckle tongues from the harness or the straps. They cannotbe reattached after removal. If reassembled incorrectly, the child restraintsystem may not perform optimally.• The primary protection for occupants of a vehicle in a collision is the body of the vehicle itself; a child restraint system will not protect a child when avehicle is seriously impacted. However, correctly installed, a child restraint system will substantially improve chances for survival in most crashes.Make sure all users fully understand proper use of this child restraintsystem in a vehicle.5Safety InformationImportant Notes• Make sure that the child restraint system is properly secured with the provided upper and lower ixing straps, and harness is properly adjusted around thechild each time the child restraint system is used.• Adjust the harness to accommodate and it the occupant’s clothing.• Cover the child restraint system when vehicle is parked in direct sunlight.Parts could become very hot and could burn the occupant.• Store child restraint system in a safe place when not in use. Avoid placing heavy objects on top of it.• Never leave occupant unattended in a vehicle, even for a short period of time.• Do not, except as described in this manual, attempt to disassemble any part of the child restraint system or change the way its harness or vehicle’s seatbelts are used.• Do not leave loose objects (e.g. books, bags, etc.) in the back of a vehicle; in the event of a sudden stop, loose objects could potentially causingserious injuries.• Do not leave folded vehicle seats unlatched. In the event of a sudden stop, a loose seat back could prevent the child restraint system from protecting theoccupant as it should.• Do not use anything to raise the child restraint system off the vehicle seat except as described in this manual. In a crash, the child restraint systemcould slide and may not protect the occupant.• Do not allow children to play with this child restraint system.• It is recommended that the child restraint system is used in an upright positioning only.6Safety Information Certiication• This child restraint system is designed for occupants who weigh more than 79lbs (36kg) and less than 165lbs (75kg).LoosenRe-tighten78Features Head Pillow Comfort Pads4-Point Table Feet ReceiverBackrest ShoulderProtector WingHead-SupportHead-Support Fixing StrapVehicle’s Belt PathMetal YokeBackrest Release (D-shape) RingInstruction Manual(in pocket)InstallationInstructionsFixing Straps1. Install the ixing straps at the upper and lowerparts of the child restraint system.2. Secure the child restraint system’s headsupport using the head support ixing strap,and use the lower ixing strap to secure thechild restraint system to vehicle’s seat.3. Attach the buckles, and snugly it the childrestraint system seat into the vehicle seat whilepulling both adjuster straps tightly to removeall slack. Ensure the child restraint system istightly secured (Fig. A and B).4. Verify all connectors are secure and that thechild restraint system is secure.5. When installing the child restraint system ontothe passenger seat, avoid potential airbagimpact by moving the passenger seat as farback as possible.6. When you install the child restraint system toa bench-seat you may ind that the ixing strapis too short, in this instance, you may ix childseat by using the strap vertically (Fig. C).7. If you have dificulty securing the child restraintsystem, please contact the distributor orthe retailer where you purchased this childrestraint system for consulting.FIG.A FIG.B FIG.C910Installation IMPORTANT:Adjustment of the Head-Support position (forward / backward) requires ixing tools. Contact and ask your dealer for adjustment assistance.FunctionsHead SupportHead Support AdjustmentThe Head-Support Depth can be adjusted forward or backward by 0.6” (15 mm) increments to provide a better it and added protection for the occupant.To Adjust: Pull out the Head-Support from the main body, and remove screws on each side at the bottom(Fig. A). Move the Head-Support to selected position, andreinsert the screws (Fig. B).Note: Standard setting is at center position.Head Pillow Adjustment The Head Pillow can easily be adjusted to the most favorable position to the user.FIG.A FIG.B11IMPORTANT:When your child becomes big enough touse the Shoulder Protector Wings, you can purchase the Shoulder Protector Wings for a larger child.You must contact and ask your dealer for the installation and adjustment of the set.NOTE: Do not pull the Padded Covers on theharness strap as it is ixed on the back. Pull and loosen the harness strap only. FunctionsPadded Covers You can adjust the Padded Covers to the favorable position by moving the Velcro ®tape attached to the back of the Head-Support. Shoulder SupportShoulder Width AdjustmentThe Shoulder Protector wing can be extended by 4” (100mm), by extending the right and left sides by 2” (50 mm) each.To extend the Shoulder Protector wing by4” (100 mm) you must move the wing to the ifth position. This is achieved by pressing on the yellow button on the back of the unit, while simultaneously pulling the wing outward toward you until it is in the desired position. Each position “stop” allows the wing to increase byapproximately 0.5” (10 mm).FunctionsIMPORTANT:• The height of the Shoulder Harness Strap moves with the height of the Backrest.• The level of the Shoulder Harness Strap must be at or above the occupant’sshoulders, parallel to level ground.Adjusting Backrest HeightRelease the locking by pulling the BackrestRelease (D-shape) ring on the back of theoccupant child seat. While pulling the strap,adjust the height of the Backrest.Backrest Extension 4” (100 mm) Backrest Extensions ill the space exposedbetween the Backrest and the seat whenyou extend to the Backrest.3D Body Balance PadsErgonomic three dimensional shaped padsfor better positioning of the child’s body.Backrest Support12Fastening / ReleasingHarness Buckle1. Hold the harness buckle with one hand.Use the other hand to insert the buckletongue into the harness buckle (Fig. A).2. Hold the harness buckle with one hand.Push and release the buckle tonguesand slide out to remove from the buckle(Fig. B ).Functions4-point H-Harness13Functions AccessoriesSupport TrayThe X-Large support tray is designed speciically for the booster seat and may be used to secure the child’s upper limbs.Seat WedgeUse to increase and adjust the height and angle of the front area of the seat for better secure andstability of seating.14Secure OccupantOnce The Carrot 3 Booster Seat has been installed in thevehicle’s seat and adjustments have been made, followthese instructions to secure the child.• Loosen the harness and unfasten the harness buckles(upper and lower). Move the harness straps to theside of the seat (Fig. A).• Place the child in the seat (Fig. B).• Position the harness strap around the child and verify the harness is not twisted or tangled (Fig. C).• Fasten the lower harness buckle irst. Proper connection is conirmed with a positive click afterinserting the buckle tongue (Fig. D).• Gently pull the harness strap to the side to tighten the lap section (Fig. E).Note: The child’s hip should be positioned as deep as possible in the seat to irmly secure the child.• Next, fasten the upper harness buckle on the chest.Proper connection is conirmed with a click afterinserting the buckle tongue (Fig. F).• Gently pull down the harness straps to tighten the shoulder section.WARNINGIn order to avoid injury or choking the child, always manually test the straps to ensure child’s safety and comfort (Fig. H).Reconirm that the 4-point harness is not twisted and thechild is properly secured.1516Secure Occupant• After you secured the child with the 4-pointharness, fasten the vehicle’s lap shoulder 3-pointsafety belt over the Carrot seat routing through theRED belt guides on the child seat’s shoulder(Fig. I and J).• Proper connection is conirmed with a click soundafter inserting the buckle tongue of the vehicle’slap shoulder 3-point safety belt into the buckle ofthe vehicle’s seat.• Verify that vehicle’s lap shoulder 3-point safetybelt is not twisted or sagging, and is properlyrouted through the RED belt guide(Fig. I and J).• Ensure that the vehicle’s lap shoulder 3-pointsafety belt is positioned not to harm the face andthe neck of the child.• It is required by law to use the vehicle’s lapshoulder 3-point safety belt to concurrently securea child restraint system and child.• Before every trip, make sure that the vehicle’s lapshoulder 3-point safety belt is irmly fastened overthe child seat, and the child is secure.• Verify that H-shaped harness of the Booster Seatis at the position that guarantees the lap beltstays appropriately to hold the hip of the child assnuggly as possible.• If you are unsure about the appropriate positioningof your child in the child restraint system, consultyour dealer for immediate support.• Reconirm that the 4-point harness is not twistedand that the child is properly secured.FIG.J FIG.G FIG.HSecuring Your Child17Secure Occupant• Always pull on the harness after securing the occupant to ensure the buckle tongues are secure in the harness buckle.• Always park your car in a safe place when you make any adjustments to the child restraint system, including reclining the car seat. Adjusting and / or handling the child restraint system during driving could cause SERIOUS INJURY to you and your child.• During driving, the child restraint system must be used in an upright position. Reclined position could cause the child restraint system not to perform as intended in a collision.18Care and MaintenanceDo not try to remove or replace the cover by yourself as it needs special equipment. Consult your dealer for removal or replacement of the cover.Cleaning the Cover, Pillow and PadsFor the Cover, SPONGE CLEAN using cold water and mild soap. TOWELDRY. For the Pillow and Pads and Cushions, HAND WASH using cold waterand mild soap. LINE or LIE FLAT DRY to prevent from shrinking. Do notBleach, machine wash, machine dry or iron. Washing may damage fabric. It is important to keep upholstery clean. Periodic replacement is recommended.When fabric is damaged, it must be replaced. The harness buckle needs tobe periodically checked for performance. If a click is not heard, it is time toreplace the harness buckle. Ask the dealer for replacement of the harnessbuckle, which must be done by your dealer.Harness & StrapsDo not take apart, or attempt to take apart, the harness and the strapsfrom the child seat. Never remove the buckles and / or the buckle tonguesfrom the harness or the straps. They cannot be reattached after removal. If reassembled incorrectly, the child seat may not perform as intended.19WarrantyLIMITED FIVE YEAR WARRANTYThis product is warranted against defective materials and workmanship forive years from the date of original purchase. Proof of purchase is required.To make a claim under this warranty, contact the authorized dealer or theretailer whom you purchased this product from.WARRANTY LIMITATIONSThis warranty does not include damages which arise from negligence and/ormisuse not in accordance with the product instruction.The use of other (non-Carrot 3 Booster Seat) covers, inserts, toys,accessories, or tightening devices is not approved. Their use could cause thischild seat to fail Safety Standard FMVSS 213, or not perform as intended in acrash. Their use automatically voids this warranty.LIMITATION OF DAMAGESThe warranty set forth above is exclusive and in lieu of all others, oral orwritten, express or implied. In no event will the manufacturer, the distributors,or the retailers selling this product, be liable for any damages, includingincidental or consequential damages, arising out of the use or inability to usethis product.Now Youre Going Plac esUG0021-ENG-02022016。
多功能座椅产品说明书

多功能座椅产品说明书一、产品名称多功能座椅二、产品功能简介本产品在保留原有座椅优点的基础上,通过结合理论力学,利用系统搭配实现座椅的功能多样化,并对其进行功能整合,具有方便使用、易移动、功能多样、设计人性化等优点。
本产品集座椅、梯子和摇椅三种功能于一体,功能包括:1、座椅功能:本座椅靠背打破了以往靠背形如直线的形式,其设计采用了人机工程学原理对靠背样式进行了弧形设计,让使用者在使用时更加的舒适。
靠背的背面安装有可向上滑动的上滑板及向下滑动的下滑板,两滑板与靠背的弧形一致,通过滑道装置与靠背进行连接。
向上滑动上滑板,将其嵌入到靠背内部的阶梯式凹槽中而固定,以此来调节靠背的高度满足使用者的需求。
2、梯子功能:本座椅含有一个前脚架、一个后脚架。
前脚架由两个前侧板组成,两板间固定连接一横板作为梯子的下踏板。
下踏板通过铰链装置连接有一横板,后脚架由两后侧板组成,两板间固定连接一横板作为梯子的上踏板。
两脚架分别与两块椅面固定连接,两块椅面由可滑动式铰链连接,保证座椅椅面及摇椅的弧形触地面结构的平整度。
后脚架翻转180度后两块椅面相重叠形成梯子的中间踏板。
梯子的整体框架由紧固装置进行固定。
椅面与前脚架的整体高度是靠背高度的二分之一,以保证梯子的两触地面在同一平面上且与地面保持平行。
前脚架两侧板内侧安装有可旋转折叠的支架,在需要时旋转折出并与受力装置相接合保证梯子的稳定性。
收回后与前脚架两侧板上的磁性物质相吸合而固定,从而达到美观的效果。
3、摇椅功能:梯子放倒后,弧形触地面结构与地面相接触形成摇椅。
座椅靠背的背面作为摇椅的椅面,上滑板与下滑板滑出并嵌入到靠背的凹槽中而固定。
弧形椅面将使人们在感到更加的舒适,以起到减缓疲劳的作用。
摇椅的弧形触地面结构的弧形较小,将摇椅的摆角限制在一定范围内,有益于摇椅在摇晃时的平衡性。
三、产品特点1、设计采用了人体工程学原理,将靠背设计成弧形结构,使人们在使用时更加的舒适。
2、前脚架两侧板内侧安装有可旋转折叠的梯子支杆,梯子支架旋转折出与受力装置相接合以保证梯子的稳定性。
飞多儿安全座椅c4说明书

飞多儿安全座椅c4说明书一、产品特点:1.安全舒适:采用优质环保材料制作,座椅套布柔软舒适,能够给儿童提供良好的乘坐体验。
2.多功能设计:座椅可调节多个角度,可根据孩子的身高和体重进行灵活调整,保证最佳的乘坐姿势。
3.安全防护:配备多重安全保护装置,如5点式安全带、头枕和侧翼等,有效保护儿童在行车过程中的安全。
4.便捷易用:座椅采用快速安装设计,方便快捷地将座椅安装在车辆上,并可以轻松拆卸和清洁。
二、使用方法:1.调整座椅:根据儿童的身高和体重,通过调节座椅角度和高度,使得儿童能够坐得更加舒适。
2.系好安全带:用5点式安全带将儿童系好,确保安全带的位置正确且收紧,以保护儿童在碰撞时的安全。
3.调节头枕:根据儿童的身高和体重,通过调节头枕的高度和角度,保证儿童的头部得到良好的支撑。
4.固定座椅:根据车辆的类型和座椅的安装方式,将座椅稳固地安装在车辆上,并确保座椅与车辆的接触部位紧密贴合。
三、安装步骤:1.打开座椅:将座椅的包装打开,取出座椅和配件。
2.安装支架:根据座椅的使用方式,将支架固定在座椅上,并确保支架稳固可靠。
3.调节座椅角度:根据孩子的年龄和身高,调节座椅的角度,使儿童坐得更加舒适。
4.安装安全带:将5点式安全带穿过座椅上的安全带孔,并调节安全带的长度和收紧度。
5.调节头枕:根据儿童的身高,调节头枕的高度,确保头部得到良好的支撑。
6.固定座椅:根据车辆的类型和座椅的安装方式,将座椅稳固地安装在车辆上并进行固定。
四、注意事项:1.使用前请仔细阅读说明书,并按照说明操作,以确保儿童的安全。
2.安装过程中,请确保支架和座椅的固定牢固,避免座椅松动或脱落。
3.请按照儿童的实际身高和体重调节座椅的角度、高度和安全带的长度,以保证最佳的乘坐姿势和安全性。
4.定期检查座椅的各个部件,如安全带、支架、头枕等,以确保其正常使用。
5.不要在座椅上放置过重或不稳固的物品,以免在碰撞时对儿童造成伤害。
6.座椅接触部位的污渍可使用中性洗涤剂轻柔擦拭,不可使用酒精、热水等溶剂。
汽车座椅调节说明书.pdf_1702091176.558019

Adjusting the Rear Seatsn Adjusting the Second Row Passenger's Seats1.Horizontal Position2.Seat Back Angle AdjustmentAdjustmentAn unsecured seat or seat-back can move out of position or collapse without warning if there is sudden acceleration or stop or in a crash.A seat or seat-back that suddenly moves or collapses can result in severen Adjusting the Third Row Passenger's SeatsPull up the right strap to change the angle of the right seat back or the left strap for the left and center seat backs.n Third Row Seat AccessModels with button typePressing the button on the seat-back orseat cushion tilts the second row outerseat's seat-back forward. The wholeseat slides forward.Models with lever typePulling the lever on the seat side, andthe second row outer seat's seat back forward. The whole seat slides forward.All modelsPulling up on the strap also tilts theseat-back forward.n Folding Down the Rear SeatsSecond Row Seat - Models with Bench Seat1.Store the center seat belt.2.Insert the latch plate into the slot onthe side of the anchor buckle.3.Retract the seat belt into the holderon the ceiling.4.Lower the center head restraint toits lowest position. Put the armrestback into the seat back.5.Pull up the release lever and fold down the seat-back.To return the seat to the original position, pull up the seat-back in the upright position until it locks.Folding Down the Third Row Seat1.Pull the strap on the seat back fully.The head restraint tilts downward.2.Push the seat back forward whilepulling the strap.To return the seat to the originalposition, pull the seat back up with thestrap pulled, then push the headrestraint up to its original position.Make sure all items in the cargo area oritems extending to the third row seatsare properly secured. Loose items canfly forward if you have to brake hard.。
舒适出行利器XXX汽车座椅使用说明

舒适出行利器XXX汽车座椅使用说明一、简介XXX汽车座椅是一款为用户打造舒适出行体验的创新产品。
本使用说明将为您提供有关XXX汽车座椅的详细信息,包括安装指导、功能介绍和使用注意事项。
二、安装指导1. 准备工作在开始安装XXX汽车座椅之前,请确保您已经阅读并理解了本使用说明。
同时,准备以下工具:扳手、螺丝刀和说明书。
2. 安装步骤请根据以下步骤正确安装XXX汽车座椅:(1)将车辆座椅调至最佳行驶位置。
(2)根据说明书上的图示,使用扳手和螺丝刀拆卸车辆原有座椅。
(3)将XXX汽车座椅放置在座椅安装区域,并确保与固定孔对齐。
(4)使用螺丝刀紧固螺丝,确保座椅稳固。
(5)按照说明书的示意图,连接座椅的电源线到车辆电源系统。
三、功能介绍1. 舒适调节功能XXX汽车座椅配备多项舒适调节功能,以满足不同用户的需求。
通过操作座椅上的控制按钮,您可以实现以下功能:(1)座椅加热:在寒冷的天气里,座椅加热功能能够提供温暖的座椅表面,增加乘坐舒适度。
(2)座椅按摩:座椅按摩功能能够提供舒缓的按摩,缓解长时间驾驶带来的疲劳感。
(3)座椅通风:座椅通风功能能够通过送风系统,提供清凉的乘坐体验。
2. 安全保护功能XXX汽车座椅还配备了多项安全保护功能,以确保乘坐安全。
以下是一些主要的安全保护功能:(1)安全带警示:当车辆行驶中,安全带未系好时,座椅上的警示灯将闪烁,提醒乘坐者系好安全带。
(2)防撞保护:座椅背部和靠背位置配备了防撞装置,能够在车辆发生碰撞时提供额外的保护。
四、使用注意事项1. 操作指南(1)在使用XXX汽车座椅之前,请仔细阅读并理解本使用说明。
(2)在调节座椅功能时,请按照说明书上的操作指南进行,避免误操作引起意外。
(3)请勿在驾驶过程中操作座椅功能,以免分散注意力,造成危险。
2. 日常保养(1)定期清洁:使用柔软的布和温和的清洁剂,定期清洁座椅表面。
(2)防止霉菌生长:保持车内干燥,避免座椅受潮,以防止霉菌滋生。
Kanga Wheelchair 座椅包装说明书

Traystep one - seat/back assemblykanga seating packageWarning! Do not install this equipment without first reading and understanding the instructions and parts included with this package. Innovative concepts will not be responsible for damage or injury as a result of misuse or improper installation. We recommend an experienced professional be consulted in the selection and application process of this product.Warning! Until all mounting clamps, brackets and parts are properly tightened and securely attached, make sure client is safely supported while positioning adjustments are made to prevent the client from falling out of the wheelchair.NOTE - Seat/back assembly; “holes through upholstery” have already been made for ease of assembly. Do not ini-tially over tighten mounting hardware as final adjustments will be necessary prior to fitting client into seating.1.1 For shipping purposes only; the seat-to-back hinge is attached to the back with only one bolt, loosen bolt and adjust so that second bolt/washer can be installed to securely fasten in place.1.2 Align the seat and seat-to-back hinge to attach the remaining two bolts/washers to bottom of seat.1.3 Align the seat and seat-to-back hinge to attach the remaining two bolts/washers to bottom of seat.1.4 Align the seat and seat-to-back hinge to attach the remaining two bolts/washers to bottom of seat.Item Number1300-921110Kanga Seating Package 10” w/mounting hardware 1300-921112Kanga Seating Package 12” w/mounting hardware 1300-921114Kanga Seating Package 14” w/mounting hardware T ools Needed: 5/32 allen wrench, 7/16 wrench or socket, tape measure, pencil(1) Contoured seat.Contents in package (qty)(1) Contoured back(1) #1300-7093Left-side back hardware (hardware packet included)(1) #1300-7095Right-side back hardware (hardware packet included)(1) #1300-7097Seat knob clamp hardware (1) #1300-7099Seat-to-back hinge bolt packetstep two - Installing hardware to wheelchair frame step three - attaching seat/back to wheelchair frame2.1 Open the package labeled “seat knob clamp hard-ware” loosen the large plastic hand knobs and attach the seat knob clamps onto the seat mount brackets.2.2 Locate the desired position for the seat/back within the wheelchair frame. Using a pencil or a non-permanent marking tool, mark the desired position for the seat/back knob clamps on the wheelchair seat rails and back canes. Remove the seat knob clamps from the seat mount brackets.2.3 Attach the seat knob clamps on the marked position on the wheelchair seat rails.2.4 Remove the right/left back knob clamps by loosening the large plastic hand knobs.2.5 Attach the right/left back knob clamp on the marked positions on the wheelchair back canes.2.6 Use tape measure and verify that both seat knob clamps measure the same distance from a specific refer-ence point on the wheelchair seat rails.2.7 Repeat step 2.6 for the back knob clamps mounted tothe wheelchair back canes.Attach the seat by aligning the seat mount brackets onto the seat knob clamps attached to the wheelchair seat rails.Align the back knob brackets onto the back knob clamps on the back canes.Tighten all four of the large plastic hand knobs to secure the seat/back in place.Final adjustments for installing/removing seat/back, make all necessary fine-tuning adjustments so that seat/back assembly installs/removes properly. Do a final check and tighten all hardware and plastic hand knobs prior to posi-tioning client into wheelchair.1.1 Locate the mounting base and mounting base hard-ware packet.1.2 Locate the (2) t-nut holes (through upholstery) on the contoured back to attach the mounting base, carefully cut upholstery to access t-nuts.1.3 Using the mounting base hardware packet, attach (2) screws/washers through the middle holes of the mount-ing base to securely mount to the contoured back.1.4 Locate the horizontal headrest bar and headrestmounting ring and attach to headrest pad using the head-rest pad mounting packet.1.5 Complete the assembly by attaching the vertical Item.assemblykanga comfort max headrest,offset hardwareItem Number4008-401010Kanga Comfort Max Headrest, Offset Hardware, 10”4008-401012Kanga Comfort Max Headrest, Offset Hardware, 12”4008-401014Kanga Comfort Max Headrest, Offset Hardware, 14”T ools Needed: 5/32 allen wrench, 3/16 allen wrench.contents in package (qty)(1) Offset multi-axis headrest bracket assembly (1) Small 9 inch comfort max headrest pad (1) Mounting base hardware packet (1) Headrest pad mounting packetkanga lateral trunk supports, qr-removableItem Number3040-021010Kanga Lateral Trunk Supports, Removable, 10” (pair)3040-021012Kanga Lateral Trunk Supports, Removable, 12” (pair)3040-021014Kanga Lateral Trunk Supports, Removable, 14” (pair)T ools Needed: 5/32 allen wrench Contents in package (qty):(2) Track mount bracket (1) QR lateral mounting packet (2) QR mounting base(2) lateral bracket, flush mount with pads (attached)(2) lateral bracket, 1inch Offset (optional use)NOTE - It is best to dry-fit hardware in-place prior to cutting holes in upholstery. This installation is easiest with the contoured back removed from the wheelchair, lyingrear side up flat on a solid surface.1.1 On the rear side of contoured back ( I cut-out area) choose either left or right side, locate the (2) t-nut holes through upholstery, carefully cut upholstery to access t-nuts.1.2 Open the lateral mounting packet and remove (2) screws, use screws to attach track mount bracket with lateral assembly to the contoured back.1.3 Repeat above steps for opposite side.1.4 Locate the silver pull knob attached to the QR mount-ing base, lift and rotate the knob to “unlocked” position.1.5 Adjust the lateral bracket on the QR mounting base to the desired width location, rotate and release the pull knob to allow it to “lock” into desired hole on the lateral bracket to hold desired lateral width position.1.6 Lateral height adjustment; loosen the QR mounting base and slide up or down track mount to desired height position. Fully tighten all bolts to secure pads, brackets to the track.assemblyItem Number1072-34410Kanga Thigh Supports, Removable, 10” (pair)11072-34412Kanga Thigh Supports, Removable, 12” (pair)11072-34414Kanga Thigh Supports, Removable, 14” (pair)T ools Needed: 5/32 allen wrench Contents in package (qty):(1) Mounting base hardware packet(2) Thigh support assembly, flush mount with pads (attached)(2) Upper mounting brackets, 1inch Offset (optional use)kanga thigh supports,removableNOTE - The 12inch and 14inch contoured seats come with multiple thigh support mounting base t-nut locations, it is best to dry-fit hardware in-place prior to cutting upholstery. This installation is easiest with the contoured seat removed from the wheelchair, lying bottom side up flat on a solid surface.1.1 Locate the spring loaded pull knob on bracket(s), to remove simply pull knob and lift up on contoured pad. T o re-attach simply align upper bracket into seat mount base receiver and push-click into place.1.2 Locate the desired (2) t-nut holes (through upholstery) on the bottom of contoured seat to attach the mounting base (see note above), carefully cut upholstery to access t-nuts.1.3 Using the mounting base hardware packet, attach (2) screws/washers through the mounting base slots and secure to the contoured seat. Repeat steps for opposite side.assemblyItem Number11060-10110Kanga Abductor Pommel, Flip Down, 10” 11060-10112Kanga Abductor Pommel, Flip Down, 12”11060-10114Kanga Abductor Pommel, Flip Down, 14”T ools Needed: 1/8 allen wrench, 5/32 allen wrench.Contents in package (qty):(1) Flip down-removable abductor assembly with small pad.(1) Mounting base with T-knob.(1) Mounting base hardware packet.kanga abductor pommel,flip downassembly1.1 Locate the mounting base and mounting base hardware packet.1.2 Locate the (2) t-nut holes (through upholstery) on the bottom of contoured seat to attach the mounting base, carefully cut upholstery to access t-nuts.1.3 Using the mounting base hardware packet, attach (2) screws/washers through the middle holes of the mounting base to securely mount to the contoured seat.1.4 Complete the installation by attaching the flip down assembly to the mounting base and tightening the T -knob. Adjust the pad height by loosening the 1/8 allen bolt on the vertical bar.kanga polycarbonate trayItem Number11060-10110Kanga Abductor Pommel, Flip Down, 10”11060-10112Kanga Abductor Pommel, Flip Down, 12”11060-10114Kanga Abductor Pommel, Flip Down, 14”T ools Needed: 3/8 open end wrench.Contents in package (qty):(1) Poly tray with toggle plates and toggle clamps (attached)1.1 T oggle clamp adjustment; if necessary to adjust toggle clamps, slightly loosen the (2) 10-24 pressure nuts holding the toggle clamp to the underside of the toggle plate. Slide the toggle clamp into new position and re-tighten both 10-24 pressure nuts firmly to hold in place.1.2 Repeat above step for opposite side Y our Inspired by Drive branded product is warrantied to be free of defects in materials and workmanship for the lifetime of the product for the original consumer purchaser.This device was built to exacting standards and carefully inspected prior to shipment. This Lifetime Limited Warranty is an expression of our confidence in the materials and workmanship of our products and our assurance to the consumer of years of dependable service.This warranty does not cover device failure due to owner misuse or negligence or normal wear and tear. The warranty does not extend to non- d urable components, such as rubber accessories, casters, and grips, which are subject to normal wear and need periodic replacement.If you have a question about your Inspired by Drive device or this warranty, please contact an authorized Inspired by Drive dealer.Limited Lifetime Warranty。
GF Health Products, Inc. 卧座椅用户手册说明书
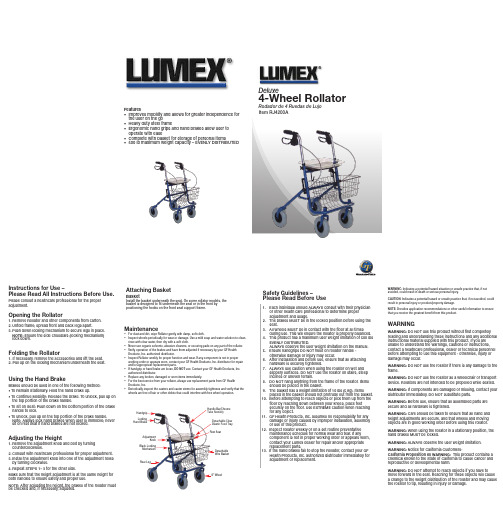
Maintenance• For dust and dirt, wipe Rollator gently with damp, soft cloth.• Inspect wheels periodically for wear or damage. Use a mild soap and water solution to clean, rinse with clear water, then dry with a soft cloth.• Never use organic solvents, abrasive cleaners, or scouring pads on any part of the rollator. • Verify operation of the brakes and have them adjusted if necessary by your GF Health Products, Inc. authorized distributor.• Inspect Rollator weekly for proper function and wear. If any component is not in proper working order or appears worn, contact your GF Health Products, Inc. distributor for repair and/or appropriate replacement parts.• If handgrip or hand brake are loose, DO NOT use. Contact your GF Health Products, Inc.authorized distributor.• Replace any broken, damaged or worn items immediately.• For the best service from your rollator, always use replacement parts from GF Health Products, Inc.• Periodically inspect the casters and caster stems for assembly tightness and verify that the wheels are free of hair or other debris that could interfere with free wheel operation. 1. Each individual should ALWAYS consult with their physicianor other health care professional to determine properadjustment and usage.2. The brakes MUST be in the locked position before using theseat.3. All wheels MUST be in contact with the floor at all timesduring use. This will ensure the rollator is properly balanced.4. This product has a maximum user weight limitation of 500 lbsEVENLY DISTRIBUTED.ALWAYS observe the user weight limitation on the manual.5. Ensure handgrips DO NOT twist on rollator handle -otherwise damage or injury may occur.6. After installation and before use, ensure that all attachinghardware is securely tightened.7. ALWAYS use caution when using the rollator on wet andslippery surfaces. DO NOT use the rollator on stairs, steepinclines or uneven terrain.8. DO NOT hang anything from the frame of the rollator. Itemsshould be placed in the basket.9. The basket has a weight limitation of 10 lbs (5 kg). Itemsplaced in the basket should not protrude out from the basket.10. Before attempting to reach objects or pick them up from thefloor by reaching down between your knees, place feetsecurely on the floor. Use EXTREME caution when reaching for any object.11. GF Health Products, Inc. assumes no responsibility for anydamage or injury caused by improper installation, assembly or use of this product.12. Inspect rollator weekly or on a set routine preventativemaintenance schedule for normal wear and tear. If anycomponent is not in proper working order or appears worn, contact your Lumex dealer for repair and/or appropriatereplacement parts.13. If the hand brakes fail to stop the Rollator, contact your GFHealth Products, Inc. authorized distributor immediately for adjustment or replacement.Safety Guidelines –Please Read Before UseInstructions for Use –Please Read All Instructions Before Use. Please consult a healthcare professional for the proper adjustment.Opening the Rollator1. Remove Rollator and other components from carton.2. Unfold frame; spread front and back legs apart.3. Push down locking mechanism to secure legs in place.NOTE: Ensure the side crossbars (locking mechanism)lock down.Folding the Rollator1. If necessary, remove the accessories and lift the seat.2. Pull up on the locking mechanism underneath the seat.Using the Hand BrakeBrakes should be used in one of the following method:• To Remain Stationary: Hold the hand brake up.• To Continue Mobility: Release the brake. To unlock, pull up on the top portion of the brake handle.• To Sit on Seat: Push down on the bottom portion of the brake handle to lock.• To unlock, pull up on the top portion of the brake handle. Note: Always lock hand brakes when user is immobile; never sit on rest seat if hand brakes are not locked.Adjusting the Height1. Remove the adjustment knob and bolt by turning counterclockwise.2. Consult with healthcare professional for proper adjustment.3. Install the adjustment knob into one of the adjustment holes by turning clockwise.4. Repeat STEPS 1– 3 for the other side.Make sure that the height adjustment is at the same height for both handles to ensure safety and proper use.NOTE: After adjusting the height, the brakes of the rollator must be checked and, if necessary, adjusted.Attaching BasketBasketInstall the basket underneath the seat. On some rollator models, thebasket is designed to fit underneath the seat or in the front bypositioning the hooks on the front seat support frame.Rodador de 4 Ruedas de LujoItem RJ4200ADeluxe4-Wheel RollatorWARNING: Indicates a potential hazard situation or unsafe practice that, if notavoided, could result in death or serious personal injury.CAUTION: Indicates a potential hazard or unsafe practice that, if not avoided, couldresult in personal injury or product/property damage.NOTE: Provides application recommendations or other useful information to ensurethat you receive the greatest benefit from this product.Features• Improves mobility and allows for greater independence forthe user on the go• Heavy duty steel frame• Ergonomic hand grips and hand brakes allow user tooperate with ease• Complete with basket for storage of personal items• 500 lb maximum weight capacity – EVENLY DISTRIBUTEDWARNINGWARNING: DO NOT use this product without first completelyreading and understanding these instructions and any additionalinstructional material supplied with this product. If you areunable to understand the warnings, cautions or instructions,contact a healthcare professional, dealer or technical personnelbefore attempting to use this equipment - otherwise, injury ordamage may occur.WARNING: DO NOT use the rollator if there is any damage to theframe.WARNING: DO NOT use the rollator as a wheelchair or transportdevice. Rollators are not intended to be propelled while seated.WARNING: If components are damaged or missing, contact yourdistributor immediately. DO NOT substitute parts.WARNING: Before use, ensure that all assembled parts aresecure and all hardware is tightened.WARNING: Care should be taken to ensure that all hand andheight adjustments are secure, and that wheels and movingobjects are in good working order before using this rollator.WARNING: When using the rollator in a stationary position, thehand brakes MUST be locked.WARNING: ALWAYS observe the user weight limitation.WARNING: Notice for California Customers-California Proposition 65 WARNING: This product contains achemical known to the State of California to cause cancer andreproductive or developmental harm.WARNING: DO NOT attempt to reach objects if you have tomove forward in the seat. Reaching for these objects will causea change to the weight distribution of the rollator and may causethe rollator to tip, resulting in injury or damage.DetachableWire BasketHandgripLockingHand Brake8" WheelRest SeatDetachable ClearPlastic Food TrayHandle Bar(ChromeTube Section)AdjustmentKnobRear LegBlack LockingMechanism。
neosuny儿童成长书桌椅子说明书

neosuny儿童成长书桌椅子说明书使用说明:第一、避免拖拽neosuny儿童成长书桌为了孩子的安全,一般neosuny儿童成长书桌的用料都很足,因此桌子往往比较重,如果直接用力拖拽,可能会影响桌子使用寿命。
移动时,应抬在钢架位置,在抬离地面后再移至新的位置。
第二、注意摆放位置儿童neosuny儿童成长书桌椅的保养忌过干或过湿。
若使用加湿器,湿度宜保持在60%,出风口避免直接对着neosuny儿童成长书桌。
使用暖气、空调等取暖设备,尽量让neosuny儿童成长书桌远离空调口和暖气片。
同时,应避免neosuny儿童成长书桌长时间曝晒在阳光下,以防变形。
第三、避免拉扯椅面的线头儿童neosuny儿童成长书桌的座垫和靠背有的采用的是纺织面料,如出现被钩伤、刮伤或线头松脱,不可用手扯断,应用剪刀将其修剪平整。
日常使用过程中,我们可以套上椅套以防止椅面脏污或刮伤。
第四、及时清洁,软布擦拭儿童neosuny儿童成长书桌的桌面板可以直接当作画板,使用后清洁起来也很方便!清洁neosuny儿童成长书桌时,应该用软布擦拭。
如果污渍较为严重,可以适当在软布上沾一点清洁剂,但不宜用碱水或开水冲洗,否则容易损伤桌面抗菌保护层。
neosuny儿童成长座椅调整说明:首先调整neosuny儿童成长座椅高度,以孩子的膝盖弯为参考,座垫与之齐平,让孩子坐下来脚踏实地,保持大腿与地面平行,小腿与地面垂直。
孩子坐下来后,调节椅背,椅背与座垫距离一拳头左右,让孩子感受到腰有托即可;再调节座垫深度,让孩子的后背紧靠椅背。
neosuny儿童成长座椅调节方法neosuny儿童成长座椅高度调节:松开凸轮扳手,将旋钮旋至“ON”位置,调节座高至合适位置,松开旋钮,旋钮自动卡入椅杆孔,锁紧凸轮扳手,调节完成。
椅背调节:将旋钮旋至“ON”位置,调节背高至合适位置,松开旋钮,旋钮自动卡入椅杆孔,调节完成。
座垫深度调节:向上拨动手柄,用手拉动座垫调节至合适位置,松开手柄,座垫卡入档位,调节完成。
- 1、下载文档前请自行甄别文档内容的完整性,平台不提供额外的编辑、内容补充、找答案等附加服务。
- 2、"仅部分预览"的文档,不可在线预览部分如存在完整性等问题,可反馈申请退款(可完整预览的文档不适用该条件!)。
- 3、如文档侵犯您的权益,请联系客服反馈,我们会尽快为您处理(人工客服工作时间:9:00-18:30)。
座椅设计说明系别:艺术与设计系专业:工业设计班级:B090801学生:曹富淞学号:B********指导教师:***2012年11月家居设计----生活空间中的时尚目录第一节座椅的调查 (2)第二节座椅的人机工程分析 (2)一、当前座椅存在的问题 (3)二、座椅的好处 (3)三、座椅的要求 (3)四、座椅的数据要求 (4)第三节座椅的设计分析 (5)一设计流程 (5)二设计要素 (6)第四节座椅的设计定位 (8)第五节草图 (9)第六节三视图 (12)第七节效果图 (13)第八节展板设计 (14)第一节座椅的调查坐椅是坐的机器。
人类最早使用坐椅完全是权利地位的象征,坐的功能是次要的。
在文明史上,坐椅作为地位象征发展的极点是皇帝御座。
直到本世纪初,人们才开始认识到坐着工作可以提高工作效率,减轻劳动强度。
站立的人,从足踝、膝部、臀部和腰椎等关节部位都受到静肌力的作用,而坐下,则消除了这部分肌肉的负荷。
今天,在工业国家内几乎2/3的工作是坐姿作业的,坐姿的正确与舒适与否直接影响到工作效率。
因此,坐椅的研究受到了广泛的重视。
座椅是一种有靠背、有的还有扶手的坐具。
按照使用的分类:机场座椅,汽车座椅,公交座椅,家庭座椅,餐厅座椅,休闲座椅等。
第二节座椅的人机工程分析一、当前座椅存在的问题1、座椅的高度宽度及背部扶手尺寸不合理。
2、座面太硬。
3、不够平稳倾角不合理。
4、不够美观。
二、座椅的好处1、可免除站立时人体的足踝、膝部、臀部和脊椎等关节部位受到静肌力,减少人体能耗,消除疲劳2、坐姿比站立更有利于血液循3、有利于保持身体的稳定,这对精细作业更适4、在脚操作场合,坐姿保持身体处在稳定的姿势,有利于作业。
三、座椅的要求1、正常的姿势下,脊柱的腰椎部分前凸,而至骶骨时则后凹。
在良好的坐姿状态下,压力适当地分布于各椎间盘上,肌肉组织上承受均匀的静负荷。
2、当处于非自然姿时,椎间盘内压力分布不正常,形成的压力梯度,严重的会将椎间盘从腰椎之间挤出来,压迫中枢神,产生腰部酸痛、疲劳等不适感。
3、工作座椅可调节部分的结构构造,必须易于调节,必须保证在椅子使用过程中不会改变已调节好的位置并不得松动。
4、工作座椅各零部件的外露部分不得有易伤人的尖角锐边,各部结构不得存在可能造成挤压、剪钳伤人的部位。
5、无论操作者坐在座椅前部、中部还是往后靠,工作座椅坐面和腰靠结构均应使其感到安全、舒适。
6、工作座椅腰靠结构应具有一定的弹性和足够的刚性。
在座椅固定不动的情况下,腰靠承受250N的水平方向作用力时,腰靠倾角β不得超过115°。
7、工作座椅一般不设扶手。
需设扶手的座椅必须保证操作人员作业活动的安全性。
8、工作座椅的结构材料和装饰材料应耐用、阻燃、无毒。
座垫、腰靠、扶手的覆盖层应使用柔软、防滑、透气性好、吸汗的不导电材料制造。
9、工作座椅坐面,在水平面内可以是能够绕座椅转动轴回转的,也可以是不能回转的四、座椅的数据要求1、座椅高度座面高度指地面至就坐骨支承处的高度。
合适的座高应使大腿保持水平,小腿垂直,双脚平放在地面上。
若座面过高或过低都会产生不适,坐面前缘应比膝窝低,并做成圆弧形。
座面高度按我国人体尺寸中的小腿加足高值,女性的5%(342mm)t 男性的95%(448mm),可取为380~450mm之间。
休闲用椅座面高度可降低。
2、座宽座宽能满足臀部就坐所需的尺度,使人能自如地调整坐姿。
通常应以女性大身材第95百分位数值(346mm)的臀宽尺寸进行设计,以满足最宽人体的需要。
一般可取400~500mm。
座宽尺寸不能太大,特别是对长时间坐姿作业,双臂应得到应有的支撑,如座宽太大,肘部必须向两侧寻求支撑,反倒引起疲劳。
成排相邻放置的座椅,座宽应比人的肘间距稍大些,以免拥挤感。
3、座深座深指座面前后距离。
正确的设计应使臀部得到全面的支撑,腰部得到靠背的支持,座面前缘与小腿间留有适当距离,保证小腿可自由活动。
就工作座椅来讲,座深应按较小百分位数(5%女性401mm)的群体设计,即满足小身材者。
通常工作椅可取350~400mm,休息用椅可取400~430mm。
一般不超过430mm。
4、座面倾角座面与水平面夹角称为座面倾角。
当人坐姿处于腿、背之间夹角为135°时人体骨盆受力最为有利,因此坐面一般设计为前倾。
对办工用椅,一般前倾角为0°~70°。
为克服身体前滑,也可将坐面设计成后倾形状,可使体重合理分布在臀部和背部,但后倾角不易过大,一般为 3 °~ 5°。
还可设计成倾角可调式。
而休息椅后倾角可大一些,一般取14°~ 24 °,有利于肌肉放松。
5、靠背的高和宽靠背的作用是保持脊椎处于自然形态的轻松姿势。
设计靠背重点在腰部,即距离座面230~260mm处。
最好做成可调节式的。
靠背可分为肩靠和腰靠,作业场所的工作椅大部分属于腰靠。
靠背的最大高度可达480~630mm,最大宽度350~480mm。
支撑腰部以下的骶骨部分能增加舒适感,靠背下沿与座面之间最好保留有一定的空间(70~80mm),以容纳向后挤出的臀部肌肉。
靠背的横截面可以是一个半径小于1000mm的圆弧。
6、靠背与座面夹角靠背与座面夹角若小于900,则腹部受压迫;夹角太大会降低人的警觉状态。
从保持脊椎的正常自然形态和增加舒适感考虑,该角为115°较为合适。
实际应用中视座椅用途不同采用不同值,如工作椅可取95°~105°;学生读书用椅可取95°~100°;休息椅可取105°~110°。
7、座面硬度与座面接触最紧密的是坐骨结节两个点,在这两个点周围约250mm2范围承受人体约70%的重量。
所以,人们久坐以后,感觉臀部酸痛。
若在座面上加上软硬适度的座垫,可增加接触面积,从而减少压力分布的不均匀性。
一般座垫的高度是25mm。
太软太高的座垫,易造成身体不稳,反而会产生疲劳。
在选则座垫材料时,还应考虑其散热和吸潮的能力,以及防止滑动的能力等。
8、扶手高度在不妨碍执行某些特定作业的情况下,一般座椅可设置扶手。
扶手的主要作用在于支持手臂重量,以减轻手臂下垂重力对肩部的负担,增加舒适感;在就坐和起身站立或变换坐姿进,可利扶手支撑身体。
扶手高度一般取200~250mm。
两扶手的内间距最大不超过500mm。
扶手长度为200~280mm。
此外,为了防止倾斜和滑动,座椅应设有5个脚,每个脚上均应安有方向轮,其所成的圆至少要和椅面尺寸一样大。
椅面前缘不带棱角,做成弧曲面。
第三节座椅的设计分析一设计流程椅子是对人们活动起辅助作用的工具,首先必须能够承受人们活动带来的各种力量和冲击。
设计师在设计初期就应该考虑到椅子对外部冲击的承受力,否则就不能充分体现椅子的实用功能。
因此设计师应在充分了解椅子构造的基础上进行设计,以达到既美观又实用的目的。
为实现这个目的构筑了如下的设计流程。
1概念化阶段概念化阶段是整体设计的理念和宗旨,是保证今后具体设计得以顺利进行的前提条件。
对椅子设计概念化进行设定的过程,涉及椅子相关的功能性、构造和材料以及形状等问题。
对于“某种设计为什么应该采取那样的形状或构造?”“为什么应该用那样的材料生产?”等问题,概念化阶段都要做出总体的说明。
设计的概念化要充分反映设计师的理念和价值,发挥他们的创造性,所以它不应是其他人的意见,而应该是设计师自己的想法。
2体化阶段具体化阶段是按照在概念化阶段设定的设计方案,解决家具的构造、功能和美观问题并创造出其基本形状。
在这个阶段要画很多草图、图样,做出模型,还要选择材料,讨论椅子的构造以及其他一些细节问题等。
椅子设计的具体化阶段就是创造出产品形状的过程,简单地讲就是做出椅子造型的外观图样,并对其进行论证。
3计家具阶段椅子设计的关键是将重点放在符合整体的外观和核心架构的设计上。
产品的外观、椅子的造型以及稳定的构造应该既反映设计师的精湛设计,又能实现人们对舒适的要求,这就是设计家具的重点。
为实现这一目标,我们以在具体化阶段提出的产品外观为基准做出了如下的骨架模型。
可以说这是为实现自顶向下的设计方式而做出的基本模型。
从这个骨架模型中,我们不仅可以看到体现着产品概念的外观,还可以获得产品各种配件位置和连接的信息,如核心架构(Core),倾斜度(Tilt),底座(Base),扶手(ArmRest)等。
这可以由设计师在设计产品并做出草图的同时,从3个角度,即曲面(Surface),曲线(Curve),基准面(DatumPlane)来表现。
这种骨架模型是与上面提到的三个阶段中对家具设计的内容相联系的,用于设计师很少接触的筋(Rib),凸台(Boss),体格构造等的设计中。
当然这对于没有相关基本知识的设计师来说几乎是不可能的事情,但只要是在内部开发过2个以上模型产品的设计师,都可以亲自完成模型各部分器具设计。
4计检验阶段通过以上各阶段步骤完成的产品设计并不是完美的。
尤其是椅子与人体结构有着密切的关系,可以说人们对产品设椅子设计计的合理性和适用性的评判是很重要的。
因此应该对设计进行检验。
对于椅子的设计来说,椅子的大腿——底座(Base)部分能否稳定地支撑人体体重是很重要的。
当然除此之外对Back,即支撑人体背部的椅背部分和ArmRest,即扶手部分的检验也是很必要的。
对椅子底座(Base)的说明通过以上一系列说明,我们可以了解设计师对产品零部件进行亲自设计的整个过程。
当然比起专门的零部件设计者来说,他们的设计可能还存在着不足,但是这拓展了设计师的工作领域,重要的是创造产品的设计师通过参与产品的整个开发过程,可以开发出更具亲和力,符合人体工程学的产品。
二设计要素1实用性实用性就是泛指满足人们生活需求开始与发展的。
现代家具不但要可靠、适用、安全,更重要的是满足它的使用功能与舒适度。
无论是静负荷类家具或动负荷类家具,都应根据人体工效学的基本法则,结合人体的生理和心理的需求,设计出合理的家具尺度的和空间分割距离,给消费者创造一种最大限度的舒适和方便以及安全感、视觉美感等,最终回归到最佳实用效果的目的上来。
现代家具赋予人们的美感是,通过人们的视觉、触觉感官来体会与感应的。
而家具的实用性程度,则是通过人们的反复使用、接触与鉴别验证的。
现代家具设计师水平的高低,只有通过努力探索、长期实践与不断总结,才能使自己的设计作品逐步达到日臻完善的设计追求目的。
2 艺术性现代家具已不单纯是简单的日用消费品,家具产品作为一种文化现象发展到今天,它已经是现代人类生活中调剂居室环境的艺术品、装饰品、是融艺术与实用于一体的一代全新消费品。
同时也是直接影响到室内陈设艺术效果和现代居室文化品味的重要乐章和主旋律。
为此,现代家具设计师就必须从这一高度来认真研究与分析家具设计的要素中的艺术性问题。