罗技m210鼠标说明书
罗技M510鼠标怎么设置?罗技鼠标的设置方法
罗技M510⿏标怎么设置?罗技⿏标的设置⽅法
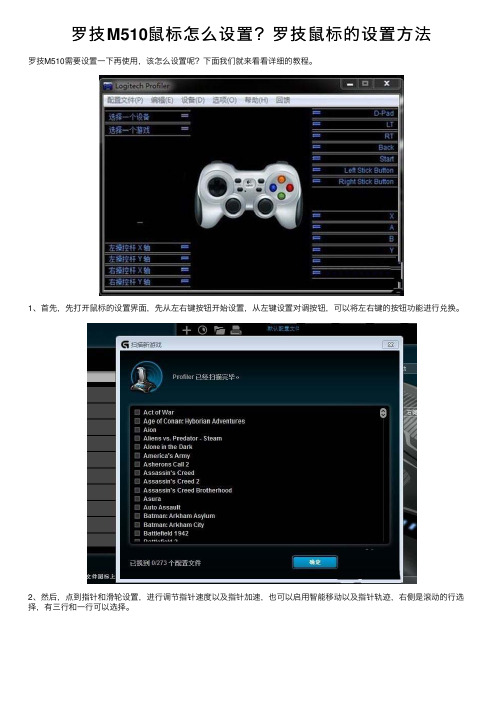
罗技M510需要设置⼀下再使⽤,该怎么设置呢?下⾯我们就来看看详细的教程。
1、⾸先,先打开⿏标的设置界⾯,先从左右键按钮开始设置,从左键设置对调按钮,可以将左右键的按钮功能进⾏兑换。
2、然后,点到指针和滑轮设置,进⾏调节指针速度以及指针加速,也可以启⽤智能移动以及指针轨迹,右侧是滚动的⾏选择,有三⾏和⼀⾏可以选择。
3、然后,如果是游戏玩家,想⽤这个⽆线⿏标玩游戏,可以进⾏游戏⽅⾯的设置,先启⽤最上⽅的启⽤游戏检测,当进⼊游戏时,会⾃动启⽤游戏设置,下⽅的游戏模式设置都是默认。
4、然后,是怎么看电量,在左上⾓的型号旁边,就会有电量显⽰,也可以点左侧图标的最后⼀个,打开后会看到,系统对电池的评价,当电量不⾜时,会⾃动提醒。
5、然后,在界⾯中的⼯具栏下,找到信息资源⾥,可以不⽤进⾏设置,再只需了解即可。
6、最后,在界⾯中的⼯具栏下的状态指⽰器,需要注意⼀下,将该勾选的都勾选上。
以上就是罗技⿏标的设置⽅法,希望⼤家喜欢,请继续关注。
无线鼠标说明书

无线鼠标使用说明书
第一步:先找到接收器
接收器在泡沫袋子里面或者电池下面
第二步:将接收器插入电脑USB接口
第三步:打开鼠标开关(ON 是开off 是关)
第四步:多次点击左右按键就可以啦
注意:
1.鼠标DPI按键是微调速度(灵敏度)
2.充电需要3小时左右,充电时鼠标亮蓝色灯,充满了就不亮了。
3.放接收器的凹槽在电池下面,扣下电池即可看到,方便携带。
(不建议用完拔下接收器,容易丢失,可以插在电脑上,不取下来。
)
4.鼠标2分钟不用就会自动休眠,需要多次点击左右按键,或者重新打开开关即可唤醒鼠标,正常使用。
罗技MX Master 2S使用说明书

Step OneDownload Logitech Options to use all the possibilities this mouse has to offer. Todownload and learn more about the possibilities go to /options.Step TwoTurn your mouse on.Step ThreeThis mouse allows you to use it with up to three different computers. Just use the Easy-Switch™ button to change the channel. Select the channel you want and go to the next step.Step FourTo connect your mouse to your computer press the Easy-Switch™ button for 3 seconds.When it blinks fast it means it's in discoverable mode.Step FiveChoose if you want to pair with Bluetooth or with the provided Unifying receiver.Product OverviewMX MASTER 2S AT A GLANCE1 – Speed-adaptive scroll wheel 6 – Darkfield high precision sensor2 – Manual shift button 7 – Easy-Switch & connect button3 – Gesture button 8 – Battery status LED4 – Micro USB port 9 – Thumb wheel5 – On/Off button 10 – Back/forward buttonsFeatures:Speed adaptive scroll-wheelIf SmartShift™ is enabled, the speed-adaptive scroll wheel shifts between two scrolling modes automatically, in response to your touch.∙Click-to-click (ratchet) mode — ideal for precise navigation of items and lists.∙Hyper-fast (freespin) mode — near-frictionless spinning, letting you fly through long documents and web pages.Enable SmartShiftSelect Enable from the SmartShift pull-down menu on the Point and scroll tab.Turn off SmartShift by selecting Disable from the SmartShift pull-down menu.When SmartShift is disabled, spinning or braking the scroll wheel has no effect on the current scrolling mode.Switch modes manuallyWhether SmartShift is enabled or disabled, you can manually switch between modes by pressing the mode shift button.By default, mode shift is assigned to the button on top of the mouse. (Check current button assignments on the Mouse tab.)Set a fixed scroll wheel modeIf you prefer to use just one mode, you can fix the scroll wheel to either click-to-click (ratchet) or hyper-fast (freespin) mode.On the Point and scroll tab, select Ratchet or Freespin from the Fixed scroll wheel mode pull-down menu.IMPORTANT!You can fix the scroll wheel mode only if SmartShift is disabled and mode shift is not assigned to any MX Master button.To activate fixed scroll wheel mode:∙Select Disable from the SmartShift pull-down menu.∙On the Mouse tab, click the highlighted mode shift button and select an action other than mode shift.For more help, see the MX Master 2S FAQ pageThumb wheelScroll side to side effortlessly with a stroke of your thumb.To scroll horizontally:∙Spin the thumb wheel up (to scroll right) or down (to scroll left)Install Logitech Options software to extend thumb wheel capabilities:∙Invert scrolling direction∙Reproduce touch-based gestures∙Adjust scrolling speed and resolution∙Navigate tabbed content∙Switch apps∙Swipe between full-screen apps (Mac only)∙Switch between full-screen apps (Windows 8 only)∙Zoom in and out∙Adjust volume∙Control screen brightness∙Display notifications (Mac only)Gesture buttonGESTURES STREAMLINE NAVIGATION AND DESKTOP MANAGEMENTInstall Logitech Options software to enable gestures for managing media, panning, zoom, and rotation, plus custom tasks.Assign up to five different actions to the Gesture button. Or map gestures to other MX Master buttons, including the middle button or manual shift button.To perform a gesture:Hold down the Gesture button while moving the mouse left, right, up, or down.The figure below shows the gestures for managing windows in Windows 8 and in Mac OS X.Back/Forward buttonsConveniently located at your thumb, the back and forward buttons enhance navigation and simplify tasks.To move back and forward:Press the back or forward button to navigate web or document pages, depending on the location of the mouse pointer.NOTE: On the Mac, enabling of the back/forward buttons requires installation of Logitech Options software.Install Logitech Options software to unlock new capabilities for the back/forward buttonsIn addition to enabling the buttons for use with Macs, Logitech Options software lets you map other useful functions to the buttons, including OS navigation, zoom, dictionary lookup, and more.Battery1 – Charging cableRECHARGE MX MASTER 2SConnect one end of the provided charging cable to the Micro-USB port on the mouse and the other end to a USB power source.A minimum of 3 minutes charging gives you enough power for a full day of use. Depending on how you use the mouse, a full charge can last up to 70 days*.* Based on eight hours of daily use. Battery life may vary depending on user and operating conditions.CHECK BATTERY STATUSThree LED lights on the side of the mouse indicate battery status.Install Logitech Options software to receive battery status notifications, including low-charge warnings.。
Logitech MX Anywhere 2S 使用指南说明书

Downloadpossibilities go toStep TwoTurn your mouse on.Thischannel. Select the channel you want and go to the next step.Step FourTo connect your mouse to your computer press the Easy-Switch™ button for 3 seconds. When it blinks fast it means it's in discoverable mode.Step FiveChoose if you want to pair with1 – Scroll wheel 5 – On/O button2 – Middle button 6 – Dark eld high precision sensor3 – Battery status LED7 – Connect and Easy-Switch button4 – Micro USB port8 – Back/forward buttonsFeatures:Hyperfast scrollingPress down on the wheel to switch between two scrolling modes: hyperfast and click-to-click.In hyperfast mode you’ll y through documents and web pages with a single spin. Click-to-click scrolling ratchets the wheel, giving you the precision you need for navigating lists, slides, and images.Logitech OptionsInstall Logitech Options to optimize the scrolling experience.Enable smooth scrollingSwitch scrolling directionAdjust scrolling speed (Mac only)Horizontal scrollingScroll wide documents and web pages by tilting the wheel right or left.Use Logitech Options software to:Adjust scrolling speedInvert horizontal scrolling directionAssign another action to the tilt wheelBack/forward buttonConveniently located back and forward buttons enhance navigation and simplify tasks.Use Logitech Options software to activate the back/forward buttons (on a Mac) and assign other actions to the buttons.NOTE: On a Windows computer, this feature is available right out of the box.GesturesInstallation of Logitech Options transforms the middle button into a gesture button you can use to trigger gestures that simplify desktop and application management, media control, document viewing, and personalization of common tasks.Perform a gesture:Hold down the middle button while moving the mouse left, right, up, or down.The gure below shows gesture sets available for managing windows in Windows (7, 8, or later) and Mac OS X (10.8 or later).TIP: Use Logitech Options to view available gesture sets and assign gestures to the middle button or to other mouse controls.BatterySupport Check battery level:。
罗技 Zone Touch Mouse T400 设置指南说明书

Logitech Zone Touch Mouse T400
Your Zone Touch Mouse T400
Touch strip Soft grip
4 English
Logitech Zone Touch Mouse T400
Your Zone Touch Mouse T400
Power switch
10 English
您的多点触控无线鼠标 T400
Logitech Zone Touch Mouse T400
触控条
柔软握槽
简体中文 11
Logitech Zone Touch Mouse T400
您的多点触控无线鼠标 T400
电源开关
电池 状态指示灯
电池 存放槽 和接收器 存放
Unifying 接收器
Replace batteries
Remove the battery cover and insert new batteries into the compartment.
Logitech Zone Touch Mouse T400
Unifying
Logitech® Unifying technology connects up to six compatible Logitech mice and keyboards to the same receiver, using only one USB port for multiple devices. To learn more, visit:
off and then back on. • Check if your Unifying receiver
is properly connected to a USB Port. • Move the Unifying receiver to another USB port on your computer. (Try connecting directly to your computer instead of using a USB hub.) • Remove any metallic objects near the mouse. • If the status light blinks red, replace the battery.
洛奇(Logitech)G502 HERO游戏鼠标安装指南说明书

G502 HERO Setup GuideGuide d’installationEnglish 31If you would like to customize your G502, refer to the next section3You can customize the three onboardprofiles of the G502— button programming, lighting color, lighting effects, and tracking behavior—using the Logitech Gaming Software Download this free software and learn how to customize the G502at/support/g502-heroTo adjust the weight and balance of your G502, Array first open the weight door by graspingthe mouse firmly in your right hand and pullingthe tab down with your left thumbEnglish 55You can place up to five 3 6 gram weights in a number of different orientations Experiment with different positionsfor the weights to find an overall weightand balance that feels right for you6 English11 fully programmable buttons1. Left (Button 1)2. Right (Button 2)3. Wheel click (Button 3)4. Back (Button 4)5. Forward (Button 5)6. DPI Shift (Button G6)7. DPI Down (Button G7)8. DPI Up (Button G8)9. Scroll left (wheel tilt left)10. Scroll right (wheel tilt right)11. Profile select (Button G9)12. Wheel mode shift (not programmable)English 7(High-DPI gaming)(Low-DPI gaming)(Standard:unshifted)(Standard:G-shifted)DPI values1200, 2400, 3200,6400400, 800, 1600,240024002400Default DPIvalue2400160024002400 DPI Shift value1200400N/A N/A Reports/sec100010005005001Button 1(left click)Button 1(left click)Button 1(left click)Button 1(left click)2Button 2(right click)Button 2(right click)Button 2(right click)Button 2(right click)3Button 3(middle click)Button 3(middle click)Button 3(middle click)Ctrl-T8 English(High-DPI gaming)(Low-DPI gaming)(Standard:unshifted)(Standard:G-shifted)4Button 4 (back)Button 4 (back)Button 4 (back)Ctrl-Shift-Tab5Button 5(forward)Button 5(forward)Button 5(forward)Ctrl-Tab6DPI Shift (sniper)DPI Shift (sniper)G-Shift (doublefunctions)N/A7DPI Down DPI Down Ctrl-C Ctrl-X8DPI Up DPI Up Ctrl-V Ctrl-Z9Scroll left Scroll left Scroll left Ctrl-F410Scroll right Scroll right Scroll right Ctrl-Shift-T11Next profile Next profile Next profile Ctrl-0English 9Onboard profilesThe G502 has three preconfigured profiles, one each for high sensitivity gaming, low sensitivity gaming, and standard mouse usage Use Button 9 (see mouse drawing) to rotate through these default profiles When you change profiles, the DPI indicator lights will change color to blue for three seconds and will indicate the new mode as shown here:DPI indicatorsDPI values are shown using the three LEDs indicated in the mouse drawing The image below shows which DPI value is being indicatedby the LED panel10 EnglishHyperfast Scroll WheelThe G502 features Logitech’s exclusive dual-mode hyperfast scroll wheel Click the button right below the wheel (Button G12) to switch between the two modesTipsWeight and balance tuning is very muchan exercise in personal preference Generally speaking, more weight makes it easier to control high DPI settings, while less weight makes low-DPI gaming less fatiguing Centering weights along an imaginaryline between your thumb and right-sidegrip finger(s) will help maintain optimal front-to-back balance The effects of changing weights may not be immediately apparent After changing the position or number of weights, give yourself some time to experience the difference before changing them againTry the default profile settings in practice games before changing these settingsAdvanced gamers can customize each game according to their specific button configuration and sensitivity switching needs The Logitech Gaming Software stores this informationand applies it automatically when the gameis detectedEnglish 11If the mouse doesn’t work• Unplug and re-plug the USB cable to ensure a good connection• Try the mouse USB cable in another USB port on the computer• Use only a powered USB port• Try rebooting the computer• If possible, test the mouse on another computer• Visit www logitechG com/support/g502-hero for more suggestions and assistance12 English。
无线鼠标说明书
无线鼠标说明书一、产品概述无线鼠标是一款便携式、无线连接的外设设备,主要用于计算机操作,提供更方便、灵敏的控制方式。
本说明书将详细介绍无线鼠标的使用方法、技术参数、注意事项等内容,让用户更好地了解和使用该产品。
二、产品外观及配件1. 外观结构无线鼠标采用人体工学设计,握感舒适,手感优良。
其外观结构包括鼠标左键、右键、中键、滚轮、无线接收器等部分。
具体外观细节请参考产品实物。
2. 配件清单无线鼠标无线接收器电池三、使用方法1. 无线接收器连接将无线接收器插入计算机的USB接口,等待计算机自动安装驱动程序。
2. 电池安装打开无线鼠标底部的电池仓盖,将电池正确安装,注意正负极方向。
3. 开机与连接按下无线鼠标底部的电源开关,即可启动设备。
无线鼠标会自动搜索并连接接收器。
4. 使用与操作通过左键、右键、滚轮等按键和操作方式,实现对计算机的各种操作,例如点击、双击、滚动等。
四、技术参数1. 无线连接方式:2.4GHz无线技术2. 工作距离: 最远10米3. 分辨率: 800-1600DPI可调4. 电池类型: AAA干电池/可充电电池5. 兼容系统: Windows 7/8/10、Mac OS X以上版本五、注意事项1. 电池安装:请正确安装电池,避免电极接触不良导致设备无法正常工作。
2. 使用环境:请避免在潮湿、高温或尘埃较多的环境下使用鼠标,以免影响设备寿命。
3. 关闭节电:长时间不使用时,建议关闭无线鼠标的电源开关以节省电池电量。
4. 不可拆解:除电池更换外,请勿拆解无线鼠标,以免损坏设备。
5. 安全储存:无线鼠标长时间不使用时,请将电源开关置于关闭状态,并妥善保管。
六、保修条款无线鼠标享受一年保修服务,自购买之日起算。
在保修期内,若出现非人为损坏的故障,请将产品及购买凭证带至售后服务点进行维修。
七、常见问题解答1. 无线鼠标无法正常连接怎么办?答:请检查无线接收器是否已正确插入计算机的USB接口,并确保鼠标处于开机状态。
罗技 无线键鼠套装 MK270 快速入门
2
© 2011 Logitech. All rights reserved. Logitech, the Logitech logo, and other Logitech marks are owned by Logitech and may be registered. All other trademarks are the property of their respective owners. Logitech assumes no responsibility for any errors that may appear in this manual. Information contained herein is subject to change without notice.
© 2011 Logitech。
著作权及其他知识产权声明:本产品及其包装与相关手册文件上所印载的「罗技」、「Logitech」,以及其他由罗技公司创作或发明之图案、文字、软件,其上所存之知识产权或其他权利(包含但不限于商标权、著作权、专利权),皆属罗技公司所有并保留一切权利。
凡未经合法授权而使用或复制上述罗技
权利,将依法追究。
其他非罗技商标,仍由各该商标所有人拥有其权利。
罗技对于本手册中可能出现的任何错误不承担任何责任。
本文中包含的信息如有更改,恕不事先通知。
620-003456.002。
电子产品无线鼠标使用手册
电子产品无线鼠标使用手册鼠标作为一种重要的电子配件,广泛应用于各种电子设备上方便用户的操作。
无线鼠标作为其中的一种,摆脱了传统鼠标的线缠绕的困扰,给用户带来更加自由和便利的使用体验。
本手册将详细介绍电子产品无线鼠标的使用方法,帮助用户快速上手。
1. 硬件配置在使用无线鼠标之前,确保你已经正确地进行了硬件配置。
通常情况下,无线鼠标会包括一个主机和一个USB接收器。
插入USB接收器到电脑的USB插槽中,确保接收器与鼠标处于相同的信号频道。
一些无线鼠标也可能需要安装电池或者充电,根据鼠标的具体型号和要求进行操作。
2. 连接与配对一般情况下,鼠标会在插入USB接收器后自动连接。
如果没有自动连接,可以按下鼠标上的连接按钮或者开关,让鼠标与接收器建立连接。
有些无线鼠标也可能需要进行配对操作,通常会在鼠标上有一个配对按钮,按下该按钮即可与接收器进行配对。
3. 使用方法使用无线鼠标与传统有线鼠标的操作方法基本相同,只是不需要通过线缠绕地连接到电脑。
无线鼠标通常包括左键、右键和滚轮。
左键用于选择、打开或者执行操作,右键用于弹出菜单或者执行特定功能,滚轮用于在页面或者文档中滚动。
4. 高级功能除了基本的操作外,一些无线鼠标还具备一些高级功能,可以更加方便和快捷地操作。
例如,一些无线鼠标具备多键功能,可以通过按下特定的快捷键实现复杂操作或者自定义快捷键。
另外,一些鼠标还支持手势操作,通过手指在鼠标表面滑动或者轻触,可以实现快速切换页面、放大缩小等功能。
5. 注意事项在使用无线鼠标的过程中,有一些注意事项需要牢记:a. 电池或充电:一些无线鼠标需要使用电池或进行充电,及时充电或更换电池以保持正常使用。
b. 信号干扰:无线鼠标使用无线信号传输,避免与其他无线设备或者信号源过近,以免造成干扰。
c. 距离限制:无线鼠标的使用距离受限,通常在10米左右,距离过远可能会导致连接不稳定。
d. 清洁保养:定期清洁无线鼠标表面,避免灰尘或脏物影响操作和使用寿命。
罗技无线键盘使用说明书
罗技无线键盘使用说明书一、产品简介罗技无线键盘是一款功能齐全、易于操作的电脑外设,适用于个人、商务和办公场所使用。
该产品采用最新的无线连接技术,使用户可以更加自由地进行工作和娱乐。
本文将详细介绍罗技无线键盘的使用方法和注意事项。
二、产品功能1. 无线连接:罗技无线键盘采用先进的无线连接技术,通过与配套的接收器进行连接,使键盘与电脑之间实现稳定的无线通信。
2. 多媒体控制:该键盘配备了多媒体控制键,可方便用户进行音量调节、播放/暂停、上一曲/下一曲等操作,提供更便捷的多媒体体验。
3. 快捷功能键:罗技无线键盘还提供了一系列的快捷功能键,包括亮度调节、屏幕锁定、电源管理等,帮助用户高效地完成各种操作。
4. 高品质按键:该键盘配备了舒适的按键,具有良好的手感和耐用性,可以满足用户长时间使用的需求。
三、使用方法1. 连接键盘:a. 将接收器插入电脑的USB接口。
b. 打开键盘背部的电源开关。
c. 等待电脑自动安装驱动程序。
2. 功能操作:a. 多媒体控制:使用键盘上的音量加/减键来调节音量大小,使用播放/暂停键来控制音乐和视频的播放。
b. 快捷功能键:根据实际需求,按下相应的快捷键来执行特定功能,如亮度调节或屏幕锁定。
c. 其他常用操作:使用键盘上的常规按键来输入字符和执行常见的操作,如复制、粘贴和撤销等。
四、注意事项1. 避免与其他无线设备干扰:为了保持稳定的无线连接,使用过程中应尽量避免与其他无线设备的频率干扰,如无线路由器、蓝牙设备等。
2. 定期更换电池:键盘使用的是电池供电,为了保持良好的使用体验,建议定期更换电池,以免电量不足影响键盘的正常使用。
3. 避免水和湿度:请勿将键盘浸入水中或放置在高湿度的环境中,以免损坏键盘电路和按键。
4. 长时间不使用:如果键盘长时间不使用,建议关闭电源开关以节省电池电量和延长电池寿命。
五、售后服务如果您在使用过程中遇到任何问题或需要获取更多的帮助和支持,请联系罗技客户服务中心或访问官方网站。